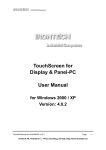
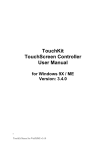
1
Figure 3-1
Figure 3-2
Controller Mounting Steps
1. Secure the touch controller onto the back side of the LCD chassis by using proper
size screws.
2. Reconfirm controller interface selection (RS232 or USB), please see Figure 3.
3. Connect the tail of touch panel to the locking AMP connector on the controller,
and affix the tail to the chassis of LCD panel by tape. Be aware not to bend the
tail more than once as mentioned earlier.
4. Connect your Serial or USB cable to the controller and route the other side of
cable out of the rear case. Secure the cable to the case as well.
5. Test your touch controller by connecting the interface cable to your computer.
For serial type controller, connect both PS/2 and RS232 cables to the PS/2 port
and RS232 port on your computer respectively. For USB type controller, use a USB
cable to connect the controller with your computer. After the connection, the LED
light should keep blinking.
6. Reassemble the LCD panel and rear cover.
Turning On Your System
Make sure all cables and screws are connected properly and fixed. Then open your
monitor and computer.
DanoTech Installation Guide
11