1
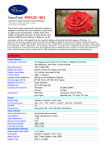
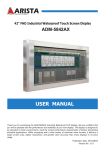
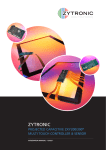
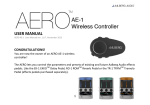
DanoTech
Capacitive Touch Panel
Installation Guide
Version: A1.0706
Index
Chapter 1
Preparation for Installation
Opening your container…………………………………...3
Preparing the Monitor……………………………………..3
Preparing your tools and material…..……………………3
Chapter 2
Mounting DanoTech Capacitive Touch Panel
Basic Mounting procedure…………………………. .……5
Sealing Tape……………………………………… ………..6
Tail Considerations……………………………… ………...6
Double-Side Sponge Tape..…………………… ………....6
The back shield………………………………………….….6
Touch Panel Mounting Steps..………………………….…7
Chapter 3
Set-up for Touch Panel Controller
Positioning Your Controller…………………………………8
Interface selection…………………………………………..8
Dimension of Touch Panel Controller………………….….9
Controller Mounting Steps……………………………….…9
Installing software………………………….…….………...10
DanoTech Installation Guide
2
CHAPTER 1
Preparation for Installation
Open your container
Before perform your installation, please open the shipping container and check
following necessary components for a complete installation.
¾
¾
¾
¾
A capacitive touch panel
A touch controller
A Serial (RS-232) cable or USB cable
A CD-ROM, which including driver software and documentation.
Remove all tapes on the package, and handle the touch panel carefully, place it on a
clean, anti-static pad, then remove the protective film and clean the touch panel with
natural cleaner and soft wiper.
Preparing the Monitor
First, please check the condition of the monitor before you install the touch panel into
the monitor. If the monitor is working properly, please turn off the power, disconnect
all cables and power plugs, disassemble your monitor then prepare all of tools and
material you need before installation.
Preparing your tools and materials
You should have all parts of the touch system and tools which include:
¾ Screwdriver
DanoTech Installation Guide
3
¾
¾
¾
¾
¾
¾
¾
¾
Screws for controller
Natural cleaner and soft wiper
Sealing tapes
Double-side sponge tapes
Plastic washers or spacers
Knife
Mounting poles for controller
Tape for affixing the tail of touch panel
DanoTech Installation Guide
4
CHAPTER 2
Mounting DanoTech Capacitive Touch Panel
Basic Mounting Procedure
Below is the exploding chart of assembling the touch panel and monitor:
Sealing Tape
Front Display
Touch Panel
Housing
(Front Bezel)
LCD Panel &
Chassis
Double-Side
Sponge Tape
Back Shield
Touch Panel
Controller
Rear display
casing
Figure 1
DanoTech Capacitive Touch Panel fits most monitors from 10.4 inches to 24 inches.
The installation components from left to right as Figure 1 include:
¾ Front display housing
¾ Sealing tapes
¾ Touch panel
¾ Double-side sponge tapes
¾ LCD panel and chassis
¾ Touch controller and back shield
¾ Rear display casing
DanoTech Installation Guide
5
Sealing Tape
It is important for using sealing tapes to prevent dust, dirt, water, and particle. We
recommend 3M VHB 4962 single-side sponge tape as the sealing tape. You can stick
the single-side sponge tape around the front bezel edge. Before you seal the clearance
between the front display housing and the touch panel, please make sure the thickness
of sponge tape is suitable.
Tail Considerations
¾
¾
¾
¾
¾
¾
Never pick up the touch panel by holding the tail.
If necessary, the tail can be bent only once.
Never bend the tail close to the edge within 10 mm from the panel edge.
After the assembly of the touch panel and LCD panel, affix the tail to the LCD
panel chassis.
Do not route the tail near the backlight inverter of the LCD panel.
If necessary, the tail can be extended by an optional extension cable (P/N:
A0C1-FXXX15100-00)
Double-Side Sponge Tape
The touch panel must to be mounted onto LCD panel by double-side sponge tape. It
will keep the touch panel away from LCD metal frame to prevent electric interfere.
The Back Shield
If the back shield of the LCD module is removed, please make sure to put back the
back shield.
DanoTech Installation Guide
6
Touch Panel Mounting Steps
1. Align the center of the viewing area of the touch panel to the center of the LCD
display area.
2. Use natural cleaner and soft wiper to clean the touch panel.
3. Apply the double-side sponge to the perimeter of LCD panel surface without gap.
4. Attach the touch panel to LCD panel carefully. Make sure there is no dirt, dust nor
particles between them, and align for the correct position.
DanoTech Installation Guide
7
CHAPTER 3
Touch Panel Controller installation
Positioning Your Controller
Before installing the controller, please make sure that there is enough internal space
for accommodating touch panel controller. Choose a proper location for the controller
on the back side of the LCD chassis. Determine the positions of the controller
mounting holes. Drill at least two mounting holes and tap the holes for mounting
screws. Choose proper poles for the electrical isolation between the controller and the
LCD chassis.
Interface Selection
Upon your selection of computer/controller interface (Serial or USB), switch the
jumper on your controller as indicated in Figure 2 and Figure3 to the selected
interface.
RS232
Figure 2
DanoTech Installation Guide
USB
Figure 3
8
Dimension of Touch Panel Controller
Jumper for RS232 or
USB selection
Figure 4
Controller mounting steps
1. Secure the touch controller onto the back side of the LCD chassis by using proper
size screws.
2. Reconfirm controller interface selection (RS232 or USB), Please see Figure 2 and
3.
3. Connect the tail of touch panel to the locking AMP connector on the controller,
DanoTech Installation Guide
9
and affix the tail to the chassis of LCD panel by tape. Be aware not to bend the tail
more than once as mentioned earlier.
4. Connect your Serial or USB cable to the controller and route the other side of
cable out of the rear case. Secure the cable to the case as well.
5. Test your touch controller by connecting the interface cable to your computer. For
serial type controller, connect both PS/2 and RS232 cables to the PS/2 port and
RS232 port on your computer respectively. For USB type controller, use a USB
cable to connect the controller with your computer. After the connection, the LED
light should keep blinking.
6. Reassemble the LCD panel and rear cover
.
Installing Software
DanoTech provides user the following operation systems for touch panel system.
¾
¾
¾
¾
¾
¾
Windows 95 / 98 / ME / NT4 / 2000 / XP /
Windows XP Tablet PC Edition
Windows CE 2.12 / 3.0 / .NET
Linux (up to kernel 2.6 )
iMac. OS9.x / OSX
MS-DOS:
Please install your driver and application according to User’s Manual in the
CD-ROM .
DanoTech Installation Guide
10