1
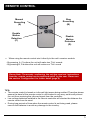
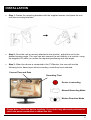
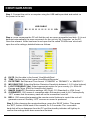
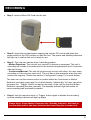
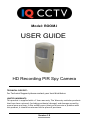
Model: ROOM-I USER GUIDE HD Recording PIR Spy Camera TECHNICAL SUPPORT: For Technical Support please contact your local distributor. LIMITED WARRANTY: This product is supplied with a 1 Year warranty. The Warranty excludes products that have been misused, (including accidental damage) and damage caused by normal wear and tear. In the unlikely event that you encounter a problem with this product, it should be returned to the place of purchase. Version 1.0 CONTENTS Safety Instructions ….....………………….……. 3 Product Contents ………..……….………….…. 3 Product Description ..….……………………….. 4 Remote Control ……….…………...….…..……. 5 Installation …..….…………...………….………. 6 Configuration ………….………………….….…. 7 Recording ….……………………..…………..…. 8 Playback ………………………..………….….… 9 Specification Table ……….…………….….…… 10 2 CAUTION The product is in conformity with CE/FCC and ROHS. It is authorized to bear the FCC/CE and ROHS mark. EU Environment Protection: Electrical waste products should not be disposed of with household waste. Please recycle where facilities exist. Check with your local Authority or retailer for recycling advice. SAFETY INSTRUCTIONS Please read these instructions before using the product: Since this product is controlled by a microcomputer chip it is possible that a system fault may occur if users operate it incorrectly. In this case please reset the unit. This product is neither waterproof nor dust proof and therefore it can not be used outdoors or in an adverse environment. Please use the provided DC power supply to avoid causing the device any damage, electric shock or fire. Unauthorised dismantlement of the device or replacement of device parts is forbidden. The manufacturer will not be responsible for any loss arising from such actions. To avoid an explosion please do not place the device into fire, oven or microwave oven. As a result of version changes the user manual may differ from the original product. PRODUCT CONTENTS The following items are included: • • • • • • • • ROOM-I ‘PIR’ Camera Camera Bracket Remote Controller Power Adapter AV Cable USB Cable x2 Screws and Wall Plugs User Manual 3 PRODUCT DESCRIPTION LED Lights AV Output Camera USB Port Micro SD Slot Microphone Standby Indicator IR Receiver Power Indicator Set Bracket Power ON/OFF Motion Detection (Trigger) 4 REMOTE CONTROL Manual Recording (A) Enable Motion Detection (C) Stop Recording (B) Disable Motion Detection (D) When using the remote control aim it directly to the unit’s receiver module: - By pressing A, C buttons the unit will make two ‘Tick’ sounds - By pressing B, D buttons the unit will make one ‘Tick’ sound Please Note: The sounds confirming the unit has received instructions from the remote control can be switched on/off by the user. Please see the section ‘Configuration’ for further detail (page 8). TIPS: The remote control is based on infra-red light waves being emitted. Therefore please ensure the head of the remote control is not blocked in any way, as this will prevent the unit from receiving the infra-red signal from the controller. Low voltage batteries installed in the remote controller will shorten the distance the remote control can be used. During long periods of time when the remote control is not being used, please remove the batteries to avoid any damage to the circuitry. 5 INSTALLATION Step 1: Fasten the mounting brackets with the supplied screws, and place the unit onto the mounting brackets. Step 2: Once the unit is securely attached to the bracket , adjust the unit to the desired viewing angle. The user can also connect the unit directly to a monitor, using the supplied AV cable, to confirm the required positioning and view angle. Step 3: When the device is connected to the TV/Monitor, the user will see the following icons, based upon which recording mode they have selected: Current Time and Date Recording Time Device is recording Manual Recording Mode Motion Detection Mode Please Note: Check the device regularly. If you detect any abnormal performance check the power connection or restart the unit. 6 CONFIGURATION Step 1: Connect the unit to a computer using the USB cable provided and switch on the power to the unit. USB CABLE Step 2: Once connected the PC will find the unit as a new removable hard disk. If it is not detected automatically the user can search for the unit via ‘My Computer’ on the PC. Once the relevant folder has been found open the file called ‘DVXSet.exe’ which will open the unit’s settings, detailed below as follows: DATE: Set the date in the format ‘Year/Month/Date’. TIME: Set the date in the format ‘Hour/Minute/Seconds’. DATE/TIME: Set Date and Time format ‘YY/MM/DD’ or ’DD/MM/YY’ or ‘MM/DD/YY’. MD SENSITIVE: Select the Motion Detection Sensitivity between 1-5 (5 is the highest) LIGHT FREQENCY (Hz): Select appropriate option for your country (i.e. 50Hz for Europe and China, 60Hz for America and Japan). F. IMAGE QUALITY: Resolution settings; HD (High), D1 (Standard) or VGA (Low). G. OVERWRITE: ‘ON’ means it overwrites when the memory card is full. Consequently ‘OFF’ means that the memory card will not be overwritten once full. H. BELL: ‘ON’ means that pressing the remote control buttons to control the unit will generate a sound. Similarly ‘OFF’ ensures no sound is produced. A. B. C. D. E. Step 3: After changing the required settings, press the ‘SAVE’ button. Then press the ‘SET’, button on the back of the camera, for 3-5 seconds. The removable hard disk will now disappear from the PC and the standby indicator will light up to confirm the settings have been saved and finished. 7 RECORDING Step 1: Insert a Micro SD Card into the unit. Step 2: Insert the provided power supply plug into the DC socket and place the power switch to the ‘ON’ position to start the unit. The power and standby indicators will light up to confirm the unit is ready to use. Step 3: The user can choose from 2 recording modes: - Motion Detection: The unit will only record if it detects a movement. The unit’s recording will include 3 seconds prior to the motion being detected and 15 seconds after the motion. - Continuous/Manual: The unit will continuously record until either the user stops recording or if the memory card is full. The unit has a data overwrite when the card reaches its capacity. Please see section ‘Configuration’ (page 7) for more details. The user can use the remote control to enable either the Continuous or Motion Detection recording (see page 5 for further details). Additionally the user can press the press the ‘Trigger’ button (located on the back of the unit) to start the Motion Detection recording function manually. The standby indicator light will switch off once recording has successfully started. Step 4: Use the remote control or ‘Trigger’ button again to disable the recording and the standby indicator will light up again Please Note: Under Motion Detection the ‘Standby Indicator’ will flash to confirm that motion has been detected and recording has commenced. 8 PLAYBACK Step 1: Connect the unit to a PC, using the provided USB cable, and ensure that the unit is switched on. USB CABLE Step 2: Once connected the PC will find the unit as a new removable hard disk. If it is not detected automatically the user can search for the unit via ‘My Computer’ on the PC. Additionally the user can also insert the micro SD card directly into a PC, if it has a specific drive/slot, or use a convertor/reader. Step 3: The recorded video files can then be found as AVI formatted files in a folder labelled ‘Videos’. Step 4: Double-click the desired video files to watch (using a suitable video player) Please Note: Check the device regularly. If you detect any abnormal performance check the power connection or restart the unit. Tips: Do not remove the micro SD card during recording or when the unit is starting, to avoid damaging the card, unit or files. The unit has an auto file overwriting function, which will begin to delete the earliest dated files. Therefore if you have any important files please copy them in time. To avoid false motion-triggering please avoid facing the unit directly to strong light. If the unit is facing a window, the changing light conditions may set off false triggers. In low-light conditions or if the moving object is the same as the background, the motion sensitivity may not be as accurate. 9 SPECIFICATION TABLE Resolution 1280x720, 720x480, 640x480 Internal Memory N/A (Micro SD Card required) Recording Modes Motion Detection Continuous Weather Resistant No Vandal Resistant No Mounting Type Wall Dimensons (mm) 60 (Width) x 103 (Height) x 29.5 (Depth) Weight (Kg) 0.08 Warranty 1 Year Limited Warranty Sensor Type CMOS DSP Type N/A DSP Functions N/A Minimum Illumination 1 Lux (IR off) 0 Lux (IR on) Night Vision Up to 10m Lens Type Colour - Pinhole Lens Size 2.8mm Viewing Angle 45° Audio Yes Power Supply 6V DC 800mA (power supply supplied) Battery N/A Battery Life N/A Operating Temperature -10°C - 50°C Operating Humidity 20-80% RH 10