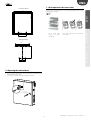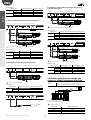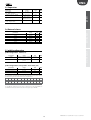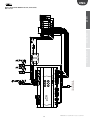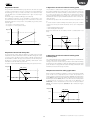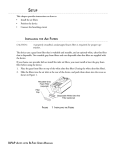
1
MCmultizone
atomising humidifiers
User manual
Integrated Control Solutions & Energy Savings
ENG
of data and information, costs of replacement goods or services, damage to
things or people, downtime or any direct, indirect, incidental, actual, punitive,
exemplary, special or consequential damage of any kind whatsoever, whether
contractual, extra-contractual or due to negligence, or any other liabilities
deriving from the installation, use or impossibility to use the product, even if
CAREL S.p.A. or its subsidiaries are warned of the possibility of such damage.
WARNINGS
CAREL S.p.A. humidifiers are advanced products, whose operation is specified
in the technical documentation supplied with the product or can be
downloaded, even prior to purchase, from the website www.carel.com. Each
CAREL S.p.A. product, in relation to its advanced level of technology, requires
setup/configuration/programming/commissioning to be able to operate in
the best possible way for the specific application. The failure to complete such
operations, which are required/indicated in the user manual, may cause the
final product to malfunction; CAREL S.p.A. accepts no liability in such cases.
The customer (manufacturer, developer or installer of the final equipment)
accepts all liability and risk relating to the configuration of the product in
order to reach the expected results in relation to the specific final installation
and/or equipment. CAREL S.p.A. may, based on prior agreements, act as a
consultant for the installation/commissioning/use of the unit, however in no
case does it accept liability for the correct operation of the humidifier and the
final installation if the warnings or suggestions provided in this manual or in
other product technical documents are not heeded. In addition to observing
the above warnings and suggestions, the following warnings must be heeded
for the correct use of the product:
DISPOSAL
The humidifier is made up of metal parts and plastic parts. In reference to
European Union directive 2002/96/EC issued on 27 January 2003 and the
related national legislation, please note that:
1. WEEE cannot be disposed of as municipal waste and such waste must be
collected and disposed of separately;
2. the public or private waste collection systems defined by local legislation
must be used. In addition, the equipment can be returned to the distributor
at the end of its working life when buying new equipment;
3. the equipment may contain hazardous substances: the improper use or
incorrect disposal of such may have negative effects on human health and
on the environment;
4. the symbol (crossed-out wheeled bin) shown on the product or on the
packaging and on the instruction sheet indicates that the equipment has
been introduced onto the market after 13 August 2005 and that it must
be disposed of separately;
5. in the event of illegal disposal of electrical and electronic waste, the
penalties are specified by local waste disposal legislation.
• DANGER OF ELECTRIC SHOCK
The humidifier contains live electrical components. Disconnect the mains
power supply before accessing inside parts or during maintenance and
installation.
• DANGER OF WATER LEAKS
The humidifier automatically and constantly fills/drains certain quantities of
water. Malfunctions in the connections or in the humidifier may cause leaks.
Warranty on materials: 2 years (from the date of production, excluding
consumables).
Important:
Approval: the quality and safety of CAREL S.P.A. products are guaranteed by
•
•
•
•
•
•
•
•
•
•
•
•
The installation of the product must include an earth connection, using the
special yellow-green terminal available in the humidifier.
The environmental and power supply conditions must conform to the
values specified on the product rating labels.
The product is designed exclusively to humidify rooms either directly or
through distribution systems (ducts, atomising racks).
Only qualified personnel who are aware of the necessary precautions and
able to perform the required operations correctly may install, operate or
carry out technical service on the product.
For the production of atomised water, only use water with the characteristics
specified in this manual. Important, demineralised drinking water must be
used (as specified in the manual). In addition, the particles of water that are
not absorbed by the air must be removed using the droplet collection tank
(in the humidification section) and the droplet separator (at the end of the
humidification section).
All operations on the product must be carried out according to the
instructions provided in this manual and on the labels applied to the
product. Any uses or modifications that are not authorised by the
manufacturer are considered improper. CAREL S.p.A. declines all liability for
any such unauthorised use.
Do not attempt to open the humidifier in ways other than those specified
in the manual.
Observe the standards in force in the place where the humidifier is
installed.
Keep the humidifier out of the reach of children and animals.
Do not install and use the product near objects that may be damaged when
in contact with water (or condensate). CAREL S.p.A. declines all liability for
direct or indirect damage following water leaks from the humidifier.
Do not use corrosive chemicals, solvents or aggressive detergents to clean
the inside and outside parts of the humidifier, unless specifically indicated
in the user manual.
Do not drop, hit or shake the humidifier, as the inside parts and the linings
may be irreparably damaged.
the ISO 9001 certified design and production system, as well as by the
mark..
CAREL S.p.A. adopts a policy of continual development. Consequently, CAREL
reserves the right to make changes and improvements to any product
described in this document without prior warning. The technical specifications
shown in the manual may be changed without prior warning.
The liability of CAREL S.p.A. in relation to its products is specified in the
CAREL S.p.A. general contract conditions, available on the website www.
carel.com and/or by specific agreements with customers; specifically to the
extent where allowed by applicable legislation, in no case will CAREL S.p.A.,
its employees or subsidiaries be liable for any lost earnings or sales, losses
3
“MCmultizone” +030221981 - rel. 2.3 - 09.12.2014
ENG
Content
1. INTRODUCTION AND ASSEMBLY
6.6 Scheduled set points ......................................................................................23
7
1.1 MCmultizone atomising humidifier .........................................................7
1.2 Models ........................................................................................................................7
1.3 Dimensions and weights ...............................................................................7
1.4 Components ..........................................................................................................8
1.5 Electrical specifications.....................................................................................8
1.6 Opening the packaging ..................................................................................8
1.7 Positioning the cabinet ....................................................................................8
1.8 Wall mounting........................................................................................................8
1.9 Opening the cabinet door .............................................................................9
1.10 Components and accessories ..................................................................9
2. WATER AND AIR CONNECTIONS
7. INSTALLER MENU
7.1 Type of control ....................................................................................................24
7.2 Probe configuration.........................................................................................24
7.3 Operating options ...........................................................................................24
7.4 Special functions ...............................................................................................24
7.5 Supervisor ..............................................................................................................25
7.6 External alarms....................................................................................................25
7.7 pLAN configuration .........................................................................................25
8. MAINTENANCE MENU
10
12
10. ADVANCED FUNCTIONS
28
36
11.1 Atomising head ...............................................................................................36
11.2 Assembly kit.......................................................................................................36
12. DESIGNING A SYSTEM
17
37
12.1 Sizing an MC system.....................................................................................37
12.2 Sizing the compressor .................................................................................37
12.3 Sizing air/water lines between cabinet & distribution
system ..............................................................................................................................37
13. INSTRUCTIONS FOR INSTALLATION IN ROOMS
19
39
13.1 Tips for correct installation .......................................................................39
13.2 Assembling the atomising head...........................................................39
13.3 Positioning the humidity probes..........................................................39
13.4 Important rules to be followed .............................................................39
5.1 Starting ....................................................................................................................19
5.2 Stopping .................................................................................................................19
5.3 First start-up (setting the language)......................................................19
5.4 Keypad ...................................................................................................................19
5.5 “Main” screen.........................................................................................................19
5.6 “INFO” screens (read-only) ............................................................................20
5.7 “SET” screen ...........................................................................................................20
5.8 “pLAN” screen .......................................................................................................20
5.9 Main menu ...........................................................................................................21
6. USER MENU
27
11. GENERAL CHARACTERISTICS OF THE
DISTRIBUTION SYSTEM
4.1 Applications for one large space or AHU (single point)............17
4.2 Applications for multiple spaces or AHUs (multizone) .............17
4.3 Setting the serial address for units with multiple slaves...........17
4.4 pLAN network connection (J11)..............................................................18
5. STARTING AND USER INTERFACE
9. TABLE OF ALARMS
10.1 Wiring diagrams ..............................................................................................28
10.2 Operating principle .......................................................................................32
10.3 Control principles ...........................................................................................32
10.4 Pressure control ...............................................................................................34
10.5 Drain/fill...............................................................................................................34
10.6 Periodical washing of the water line .................................................34
10.7 Automatic cleaning of the atomising heads.................................34
10.8 Pressure overboots ........................................................................................34
3.1 Power supply .......................................................................................................13
3.2 Remote ON/OFF (ID & COM) ......................................................................13
3.3 Modulating control signal (J24 & J2).....................................................13
3.4 Control signals from ext. voltage-free contact i.e. ON/OFF
humidistat (ID & COM) ...........................................................................................14
3.5 Control signals from air line pressure transducer (J2) ................15
3.6 Connection of NO drain solenoid valve at end of water line
(group of ID terminals)...........................................................................................15
3.7 External utility control (J13) ........................................................................15
3.8 Cumulative alarm relay (J14) ......................................................................15
3.9 Alarm inputs from external devices.......................................................16
3.11 Enable wash water line on external signal .....................................16
3.12 Supervisor network .......................................................................................16
3.13 Proportional 0 to 10 Vdc output ...........................................................16
4. MASTER/SLAVE APPLICATIONS
26
8.1 Reset configurations .......................................................................................26
8.2 System information (read only) ................................................................26
8.3 Manual procedure ............................................................................................26
8.4 Hour counter........................................................................................................26
8.5 Alarm log ................................................................................................................26
2.1 Characteristics of the water line...............................................................11
2.2 Type of supply water ......................................................................................11
2.3 Characteristics of the air line ......................................................................11
2.4 Type of compressed air..................................................................................11
2.5 Type of water and air lines ...........................................................................11
2.6 Water and air line accessories....................................................................11
3. ELECTRICAL CONNECTIONS
24
14. INSTRUCTIONS FOR INSTALLATION IN DUCTS
41
14.1 Positioning the atomisation manifold ...............................................41
14.2 Important rules to be followed .............................................................42
14.3 Positioning the humidity probes..........................................................42
14.4 Manifolds for installation in ducts ........................................................42
15. MAIN ADJUSTMENTS
22
43
6.1 Alarm thresholds ...............................................................................................22
6.2 Clock ........................................................................................................................22
6.3 Enable scheduler ...............................................................................................22
6.4 Set scheduler .......................................................................................................22
6.5 Weekly scheduler ..............................................................................................22
5
“MCmultizone” +030221981 - rel. 2.3 - 09.12.2014
16. MAINTENANCE
44
16.1 Maintenance procedures ..........................................................................44
16.2 Kits & optional accessories for the air/water line (see chap. 2)........44
16.3 Kits & optional accessories for the atomising heads
(see chap. 11) ...............................................................................................................44
16.4 Spare parts for air/water line (see paragraph 1.4) ......................45
16.5 Pre-programmed pCO3 controllers .....................................................46
16.6 Electrical panel kit and spare parts (see paragraph 1.4) .........46
17. TROUBLESHOOTING
47
17.1 Troubleshooting table .................................................................................47
ENG
1. INTRODUCTION AND ASSEMBLY
1.1 MCmultizone atomising humidifier
1.3 Dimensions and weights
Humidification system designed for medium/large installations, where are
a large humidification capacity is required with low energy consumption
(high water flow without excessive energy costs).
Water and air, suitably regulated in terms of flow-rate and pressure, are
delivered to the atomising nozzles in two separate lines. Due to the
special shape of the nozzles, the jet of water is nebulised into a mist of
very fine droplets (5 to 8 microns).
The atomised water can then easily change state and vaporise. The
energy required for this transformation is supplied by the ambient air.
For each litre/hour of water that vaporises, in fact, the environment
gives up around 590 kcal (149 SkJ) of energy. Consequently, there is a
decrease in temperature in the environment being humidified, and this
process may be useful in many applications (adiabatic cooling). A timed
automatic system ensures the atomising nozzles are cleaned periodically,
preventing debris or scale from causing malfunctions.
Each atomising head is fitted with a small piston for cleaning any deposits,
whenever the control cabinet stops operating. The system guarantees
optimal atomisation at all times and prevents dripping when the
installation is off. The electronic controller ensures the ambient humidity
is kept at the required value, showing the relative humidity read in the
room on the display.
The MCmultizone system is essentially made up of: control cabinet and
compressed air-water supply, atomising nozzles, nozzle assembly kit.
500
cabinet
Front view
28
Air Outlet
Water Inlet
Water Outlet
224
Air Inlet
Water Drain
detail of the cabinet, side view,
water and air inlet
150
detail of the cabinet, side view,
outlet (to nozzles)
8
maintenance
40
30 30 30
110
123
224
41
123
82
100
224
101
101
1.2 Models
The MCmultizone humidifiers are available by:
• size: with maximum flow-rate of 60 l/h (MC060*), or 230 l/h (MC
models230*);
• type of capacity modulation: ON/OFF (MC models***C*), or
proportional (MC models***H*);
• power supply: single-phase 230 Vac 50 Hz (MC models****D*), or 110
Vac 60 Hz (MC models****1*);
• version: Master (MC models*****M*), or Slave (MC models*****S*);
• type of water used: mains, drinking (MC models*********0), or
demineralised/aggressive (MC models*********1).
50
50
150
Packaging dimensions:
• height (H): 770 mm (30.14 inch);
• width (W) 605 mm (23.82 inch);
• depth (D) 255 mm (10.00 inch).
Models recommended for specific applications:
• for duct applications (or air handling units), proportional units with
high humidity limit probe are recommended.
• for applications directly in the room, both ON/OFF and proportional
control units are recommended
Packaged humidifier weight:
• models MC**H(D,1)*0*: 21 kg (46.3 lb);
• models MC**C(D,1)*0*: 20.5 kg (45.2 lb).
Installed humidifier weight:
• models MC**H(D,1)*0*: 19.5 kg (43 lb);
• models MC**C(D,1)*0*: 19 kg (42 lb).
Mechanical specifications:
• Installation: wall mounting;
• IP40;
• cabinet operating conditions: 1 to 40 °C (34 to 104 °F) <80 % rH noncondensing;
• storage conditions: 1 to 50 °C (34 to 122 °F) <80 % rH noncondensing.
7
distribution
580
Electric Intlet
Electric Intlet
Electric Intlet
“MCmultizone” +030221981 - rel. 2.3 - 09.12.2014
ENG
1.4 Components
1.6 Opening the packaging
16
1
3
make sure the humidifier is intact upon delivery and immediately
notify the transporter, in writing, of any damage that may be due to
careless or improper transport;
move the humidifier to the site of installation before removing from
the packaging, grasping the neck from underneath;
open the cardboard box, remove the protective material and remove
the humidifier, keeping it vertical at all times.
4
cabinet
2
5
6
7
8
9
10
11
12
13
14
1.7 Positioning the cabinet
15
reading the values on the display;
access to the keypad on the display;
opening the front panel;
access to the inside parts for checks and maintenance;
connection of the air and water supply lines;
connection of the air and water distribution lines;
power and control connections;
Key:
1.
2.
3.
4.
5.
6.
7.
8.
9.
10.
11.
12.
13.
14.
15.
16.
Electronic controller
Terminal (Master version only)
Transformer (CAREL code MCKTR00000)
Modulating valve regulator (modulating version only, CAREL code
MCKARVA000)
Terminal block (fuse kit MCKFUSE000)
Air inlet pressure gauge
Air pressure regulator/regulator
NC air solenoid valve
Air line pressure switch (ON/OFF versions only)
Air outlet pressure gauge
Water inlet pressure gauge
Water pressure regulator
NC water solenoid valve
Water outlet pressure gauge
NO water drain solenoid valve
Power supply 110/230 Vac 12 Vdc 0.5 A (modulating version only,
CAREL code MCKAL00000)
Important: the drain hose must be connected directly to a drain
located at least 50 mm below the level of the atomising nozzles
1.8 Wall mounting
Fasten the humidifier to a solid support surface using the screws and
bracket supplies.
Make sure there is enough space to connect the air and water inlet and
outlet lines.
1.5 Electrical specifications
Models MC****D*** (230 V 50 Hz) (1)
Vac
phases
Hz
Power
Current
(1)
MC***CD*00
230 V
1
50/60 Hz
37 W
0.26 A
MC***CD*01
230 V
1
50 Hz
44 W
0.29 A
MC***HD*00 MC***HD*01
230 V
230 V
1
1
50/60 Hz
50 Hz
41 W
48 W
0.30 A
0.33 A
390
maintenance
distribution
The humidifier should be positioned so as to guarantee the following:
Product in compliance with EN55014, EN61000, EN60335
Models MC****1*** (110 V 60 Hz) (1)
MC***C1*00
Vac
phases
Hz
Power
Current
(1)
37 W
0.54 A
MC***C1*01 MC***H1*00
110 V
1
60 Hz
44 W
41 W
0.60 A
0.64 A
MC***H1*01
48 W
0.70 A
Product approved to UL998 & CSA C22.2 No104
“MCmultizone” +030221981 - rel. 2.3 - 09.12.2014
8
ENG
1.10 Components and accessories
rear of the cabinet
Once having opened the front cover of the humidifier, make sure the
following are included:
kit of screws with
plugs
for
wallmounting;
200
PG13 cable glands for the electrical
connections
drilling template
440
maintenance
=
390
=
distribution
cabinet
440
=
=
200
1.9 Opening the cabinet door
1. press and turn anticlockwise using a flat-head screwdriver (max 8
mm) until releasing the door;
2. open the door on the cabinet by swinging to the left.
2
1
9
“MCmultizone” +030221981 - rel. 2.3 - 09.12.2014
ENG
2. WATER AND AIR CONNECTIONS
cabinet
Important: before proceeding, disconnect the humidifier from
the power supply.
10
12
DIN 74324
PA11 O 6
8x6
8
PA11 O 6
8x6
DIN 74324
--RILSAN
AIM 29 --
--RILSAN
AIM 29 --
PA11 O 6
8x6
DIN 74324
AIM 29 --
9
--RILSAN
13
13
14
distribution
11
Air
1
6
Water
2
3
6
1
5
maintenance
7
4
Connections:
Fittings provided for the water connections:
side view, water & air inlet
1. Install two manual valves upstream of the installation to allow the
air and water lines to be isolated (not supplied by CAREL).
2. Install an oil filter (CAREL code MCFILOIL01) to remove particles of
oil from the compressed air
3. Install a 5 micron air filter (CAREL code MCFILAIR01) upstream of the
cabinet to solid particles from the compressed air.
4. Install a 5 micron water filter (CAREL code MCC05PP005 and the
filter casing code MCFILWAT05) to remove solid particles from the
supply water.
5. Optional: install a UV lamp to sanitise the water (CAREL code
MCKSUV00000). The lamp has an external 230 V 50 Hz power supply.
These UV lamps are used to eliminate any bacteria from the supply
water.
6. Install the air and water lines
7. Prepare a hose at least 50 mm below the level of the atomising
nozzles to drain the water remaining in the lines when the installation
is in standby or off.
8. Atomising nozzle assembly kit for rooms and ducts (CAREL code
MCK1AW0000)
9. Atomising nozzles (for the models see par. 11)
10. Optional, install one of the following components:
• pressure gauge at the end of the air line (CAREL kit code
MCKMA04000) to display the pressure at the end of the line;
• a pressure probe at the end of the line (for the codes of the probes
see Chap. 16.2 “Maintenance“) to measure and display the pressure
at the end of the line on the humidifier display
11. Install the humidity probes (for the codes of the CAREL probes see
Chap. 16.2 “Maintenance“)
12. Install a manual valve at the end of the air line.
13. Install one of the following two valves:
• manual valve at the end of the line (not supplied by CAREL).
• drain solenoid valve (CAREL code MCKDVWL000 or code
MCKDVWL001) to perform the “drain”, “fill”, and “washing” functions
(see par. 10.5 “Operating principles”).
14. Optional, install a pressure gauge at the end of the water line
(CAREL code. kit MCKMW02501) to display the pressure at the end of
the water line
“MCmultizone” +030221981 - rel. 2.3 - 09.12.2014
1
2
Key:
1. air inlet and outlet
2. water inlet and outlet
3. drain water outlet
10
side view, outlet (to nozzles)
1
2
3
2.1 Characteristics of the water line
2.3 Characteristics of the air line
Models
MC060*D*0* MC060*1*0* MC230*D*0* MC230*1*0*
60 l/h
60 l/h
230 l/h
230 l/h
max flow130 lb/h
130 lb/h
500 lb/h
500 lb/h
rate (l/h, lb/h,
380G/d
130 lb/h
1450 G/d
1450 G/d
G/d)
0.3 to 0,7 Mpa
inlet pressure
3 to 7 Bar
(Mpa,Bar,PSI)
40 to 100 PSI
1 to 50 ºC / 34 to 122 ºF
temperature
G1/2”F
NPT1/4”F
G1/2”F
NPT1/4”F
inlet
G1/2”F
NPT1/2”F
G1/2”F
NPT1/2”F
outlet
TCF 8/10
NPT1/4”F
TCF 8/10
NPT1/4”F
drain
Models
MC060*D*0* MC060*1*0* MC230*D*0* MC230*1*0*
0.5 to 0.7 Mpa
inlet
5 to 7 Bar
pressure
80 to 100 PSI
(Mpa,Bar,PSI)
1 to 50 ºC / 34 to 122 ºF
temperature
G1/2”F
NPT1/2”F
G1/2”F
NPT1/2”F
inlet
G1/2”F
NPT1/2”F
G1/2”F
NPT1/2”F
outlet
cabinet
ENG
2.2 Type of supply water
☺
dry and oil-free air
Upstream of the cabinet connect the following devices (available upon
request):
• a 5 micron filter upstream of the cabinet.
• a filter to remove oil and particles upstream of the 5 micron air filter
The air line is tested, and checked at a pressure of 2.1 bars downstream
of the cabinet.
demineralised water by osmosis;
drinking water ((however more dust in the room
and more frequent maintenance and cleaning the nozzles);
softened water
(the mineral content dissolved in the water is not reduced).
recommended supply water characteristics unit of
limits
measure
min. max.
pH
6.5
8.5
μS/cm
0
50
Specific conductivity at 20 °C (σR, 20 °C)
0
25
Total hardness (TH)
mg/l CaCO3
Temporary hardness
mg/l CaCO3
0
15
Total dissolved solids (cR)
mg/l
(1)
(1)
1
(1)
Dry residue at 180° (R180°C)
mg/l
()
Iron + Manganese
mg/l Fe+Mn
0
0
Chlorides
ppm Cl
0
10
Silicon dioxide
mg/l SiO2
0
1
Chlorine ions
mg/l Cl0
0
0
5
Calcium sulphate
mg/l CaSO4
2.5 Type of water and air lines
YES
NO
copper pipes (mains drinking water only),
plastic hoses,
polypropylene hoses: ensure faster and simpler connections by
welding.
galvanised steel pipe: may lead to the detachment of impurities,
and cause blocking or damage to the nozzles.
Important: Apply sealant to the joints of the pipes and hoses
running to the atomising nozzles (preferably Teflon or liquid Teflon).
(1)= values depend on the specific conductivity; in general:
CR ≅0,65 * σR, 20 °C; R180 ≅0.93 * σR, 20 °C
Important: the supply water must comply with the requirements of
UNI 8884 UNI 8884 standard, “Characteristics and treatment of the water
in cooling and humidification circuits”. According to this standard, the
humidifier must be supplied with water that, as well as being drinkable
(EC directive 98/83), must remain within the following limits:
• electrical conductivity <100 μS/cm;
• total hardness <5 °fH (50 ppm CaCO3);
• 6.5 < pH < 8.5;
• chloride content <20 mg/l;
• silica content <5 mg/l;
• conductivity less than 30 μS/cm (it is recommended to use the MC
cabinet in the version for aggressive water).
Similar requirements are also specified in the European reference
standards VDI6022, VDI3803.
2.6 Water and air line accessories
code
MCFILOIL01
MCFILAIR01
MCFILWAT05
MCKSUV0000
MCKPT**000
MCKMA04000
description
3/8” oil filter for air
1/2” air filter
5” water filter container
UV sanitising kit
pressure transducer
air outlet pressure gauge 0
to 4 bars
MCKDVWL00* NO solenoid valve at end
of line
MCKMW02501 water outlet pressure gauge
0 to 2.5 bars
Upstream of the cabinet, connect the following to the water line:
• a water filter with a filter size no greater than 5 microns (filters available
upon request).
• an expansion vessel (not supplied by Carel SpA) with a capacity of several
litres, to avoid water hammer that may damage the installation.
The water line is tested, and checked at a pressure of 0.35 bars downstream
of the cabinet.
11
fittings
G3/8”F in /out
G1/2”F in /out
G1/2”F in /out
G1/4”F in /out
G1/4”M
G1/4”M
reference
dwg.
page 10
2
3
4
5
10 a
10 b
G1/4”F in /out 13
G1/4”M
14
“MCmultizone” +030221981 - rel. 2.3 - 09.12.2014
maintenance
YES
distribution
2.4 Type of compressed air
ENG
3. ELECTRICAL CONNECTIONS
J10
J11
cabinet
J9
J13 J14
J11
J9
J10
J12
J13
distribution
f i el d card
J1
J14
J15
ser vi ce card
J24
J2
ser i al card
J3
J5
J4
J24 J2
J4
1
ON
maintenance
0
Wiring
Control signals from humidity/
temperature probes, external controller
& air line pressure transducer
J2
Important:
• make sure that the cable glands are applied;
• to avoid interference, separate the power cables from the probe/external
signal cables.
Power supply
Important: install a power switch outside the humidifier to completely
isolate the mains power supply.
J13
External utility control
J14
Cumulative alarm relay
Digital Input
Control signals from external voltage-free contact i.e. ON/OFF humidistat
alarm input from external devices
enable wash water line from external signal
J11
Connection for master/slave communication networks (pLAN)
External supervisor systems
J24
Power supply for humidity/temperature probes and references for external
controllers
Proportional 0 to 10 Vdc output
“MCmultizone” +030221981 - rel. 2.3 - 09.12.2014
C8
J15
12
IDC1
ID8
ID7
ID6
ID5
ID4
ID3
ID2
ID1
Y4
Y3
Y2
Y1
VG0
VG
BC5
B5
BC4
B4
+VDC
J5
J4
NC8
NO8
C7
C7
NO7
C4
NO5
C4
NO4
NO6
J14
s e r i a l c a rd
J3
GND
B3
B2
J2
B1
+5V ref
GND
J24
C1
NO3
J13
fie ld ca rd
+V term
G0
G
J12
se r vice ca rd
J10
max. power: 40 VA / 15 W
J1
NO2
C1
J11
NO1
GND
Rx-/Tx-
J9
Rx+/Tx+
pCO3 terminal block
ENG
To set the type of operation, control and signal:
installer menu > type of control (see chap. 7).
3.1 Power supply
Depending on the model:
MC****D*** voltage 230V 1~ 50Hz
MC****1*** voltage 110V 1~ 60Hz
Y3
Y2
Y1
VG0
VG
BC5
J4
B5
BC4
B4
+VDC
J3
GND
B3
B2
J2
B1
GND
+V term
J24
0 to 10 V 2 to 10 V 0 to 20 mA 4 to 20 mA
+5V ref
0 to 1 V
Important: The cables must be shielded and conform to local
standards. Install a power switch outside the humidifier to completely
isolate the mains power supply.
G0
1
F2 1A
F1 1A
NO4
ID1
ID2
ID3
ID4
ID6
ID7
L
N/W
GR/PE
cabinet
a. Modulating control with external controller
COM1 COM2 COM3
1 External controller
Connections:
MC cabinet
Connections:
MC cabinet
L
N
GR
distribution
GR
N/W
COM1 COM2 COM3
L
G0
NO4
ID1
ID2
ID3
ID4
ID6
ID7
GR
Power cable
L/F (phase)
N/W (neutral)
GR/PE (earth)
J24
J2
external controller
REF
OUT
GND
B1
b. Modulating control with ambient humidity probe
1
F2 1A
F1 1A
GR
1 Ambient humidity probe
GR
COM1 COM2 COM3
N/W
COM1 COM2 COM3
L
G0
NO4
ID1
ID2
ID3
ID4
ID6
ID7
G0
NO4
ID1
ID2
ID3
ID4
ID6
ID7
1
Connections:
1 Remote ON/OFF
Connections:
MC cabinet
ID1
COM (1 or 2 or 3)
GR
MC cabinet
+V term
J24
GND
J2
B1
Remote ON/OFF
NC/NO
CON
shield
ambient humidity probe
+(G)
M
out H
c. Modulating control with external controller and limit
probe
cables
the signal can
come from
up to 30 m: shielded cables, size 0.5 mm2 (AWG20)
over 30 m: shielded cables, size 1.5 mm2 (AWG15)
connect the shield (cabinet side) to specific earth
terminal GR (see connection diagrams)
a. modulating control with external controller
b. modulating control with ambient humidity probe
c. external controller & limit humidity probe
d. ambient humidity probe & limit humidity probe
e. modulating control with temperature control
f. mod. control with temperature control & limit probe
Y3
Y2
Y1
VG0
VG
J4
BC5
B5
BC4
B4
+VDC
J3
GND
B3
B2
J2
B1
The input control signal connections depend on the control algorithm
activated.
J24
GND
+V term
3.3 Modulating control signal (J24 & J2)
0 to 10 V 2 to 10 V 0 to 20 mA 4 to 20 mA
+5V ref
0 to 1 V
1
GR
2
GR
1
13
Limit humidity probe
2
External controller
“MCmultizone” +030221981 - rel. 2.3 - 09.12.2014
maintenance
Y3
Y2
Y1
VG0
VG
BC5
J4
B5
BC4
B4
+VDC
J3
GND
B3
B2
J2
B1
J24
GND
+V term
Use two-wire shielded cable, AWG20/22
0 to 10 V 2 to 10 V 0 to 20 mA 4 to 20 mA
+5V ref
0 to 1 V
3.2 Remote ON/OFF (ID & COM)
ENG
Connections:
f. Modulating control with temperature control and
humidity limit probe
0 to 10 V 2 to 10 V 0 to 20 mA 4 to 20 mA
NTC
1
Y3
Y2
Y1
J24
GR
J2
limit humidity probe
+(G)
M
out H
2
GR
MC cabinet
+V term
J24
GND
B1
J2
B2
Y3
Y2
Y1
VG0
VG
J4
BC5
B5
BC4
B4
+VDC
Temperature probe
Connections:
NTC
J3
GND
B3
B1
B2
J2
+5V ref
GND
+V term
0 to 10 V 2 to 10 V 0 to 20 mA 4 to 20 mA
2
Limit humidity probe
(1) limit hum. probe
+(G)
M
out H
(2) temperature probe
+(G)
M
out T
-
1
3.4 Control signals from ext. voltage-free
contact i.e. ON/OFF humidistat (ID & COM)
GR
Ambient temperature probe
COM1 COM2 COM3
G0
COM1 COM2 COM3
GR
Y3
Y2
Y1
VG0
VG
J4
BC5
B5
BC4
B4
+VDC
J3
GND
B3
B2
J2
B1
+5V ref
GND
+V term
G0
J24
F2 1A
or
N/W
J2
1
L
J24
Ambient temperature and limit humidity probe
+(G)
M
out T
F1 1A
+V term
GND
B1
NO4
ID1
ID2
ID3
ID4
ID6
ID7
Connections:
MC cabinet
up to 30 m: shielded cables, size 0.5mm2 (AWG20)
over 30 m: shielded cables, size 1.5 mm2 (AWG15)
Cables:
NO4
ID1
ID2
ID3
ID4
ID6
ID7
1
Contact open: MC unit off
Contact closed: MC unit on
1
NTC
ON/OFF humidistat
MC cabinet
ID2
COM1
GR
“MCmultizone” +030221981 - rel. 2.3 - 09.12.2014
14
ON/OFF humidistat
ON/OFF
COM
shield
ID1
Y4
GR
e. Modulating control with temperature control
J24
Y3
1
amb. humidity probe
+(G)
M
out H
1
0 to 1 V
Y2
Ambient humidity probe
Connections:
MC cabinet
+V term
J24
GND
B1
J2
B2
Y1
VG0
VG
BC5
J4
B5
B4
BC4
J3
+VDC
B3
J2
B2
J24
B1
+V term
GR
+5V ref
Or:
2
2
Ambient temperature and limit humidity probe
+(G)
M
out T
out H
+V term
GND
B1
B2
GND
distribution
1
Limit humidity probe
ID1
Ambient temperature and limit humidity probe
GND
VG0
VG
BC5
B5
BC4
B4
+VDC
J4
Connections:
MC cabinet
1
Y4
GR
J3
GND
B3
B2
J2
Y3
Y2
1
0 to 10 V 2 to 10 V 0 to 20 mA 4 to 20 mA
+5V ref
J24
GND
+V term
0 to 1 V
maintenance
Y1
VG0
VG
BC5
J4
B5
BC4
B4
+VDC
J3
GND
B3
GND
J2
B2
J24
+5V ref
0 to 1 V
B1
external controller
REF
OUT
-
+V term
limit humidity probe
+(G)
M
out H
d. Mod. control with ambient probe & limit probe
B1
cabinet
MC cabinet
+V term
J24
GND
B1
J2
B2
ENG
Status of the contact in
function of MC status:
IDC1
ID8
ID7
ID4
ID3
ID2
ID1
Y4
Y3
Y2
Y1
VG0
VG
ID5
J5
J4
BC5
B5
BC4
B4
+VDC
GND
B3
B2
J3
shielded AWG 15/20
compressors
water treatment systems
power 500 VA
voltage 250 V
current 2 A resistive/inductive
MC cabinet OFF or in
contact open
standby
cabinet with
contact closed
production request
Electrical specifications of
the contact
s e r i a l c a rd
J2
B1
J2 4
+5V ref
f i e l d c a rd
GND
G0
+V term
input: 24 V / V ; 50 to 60 Hz
max. power: 40 VA / 15 W
G
Cable
Control to interface MC
with:
CAREL (for the codes of the probes see chap. 16.2
“Maintenance“) -0 to 4 bars/ 4 to 20 mA (-11 to
60 psi). Supplied with cable in different lengths,
depending on the code (10 m, 50 m, 100 m)
Transducer:
J1
3.7 External utility control (J13)
cabinet
3.5 Control signals from air line pressure
transducer (J2)
1
1
F1 1A
pressure probe
C
A
1 Start compressor / water treatment
3.6 Connection of NO drain solenoid valve at
end of water line (group of ID terminals)
Recommended
connection cables
Electrical specifications
of the contact
Connections:
MC cabinet
NO5
J13
C4
GR
CAREL code MCKDVWL000
or code MCKDVWL001 (20 VA 24 Vac)
up to 100 m: shielded cables, size 1.5 mm2
(AWG1.5)
up to 200 m: shielded cables, size 2.5 mm2
(AWG13)
power 500 VA
voltage 250 V
current 2 A resistive/inductive
3.8 Cumulative alarm relay (J14)
1
Activated when one or more alarms is detected via a contact/output that
can be transferred to a supervisory system
NO
F2 1A
F1 1A
Electrical specifications of
the relay
N/W
Status and operation of
the relay:
GR
COM1 COM2 COM3
L
COM1 COM2 COM3
shielded AWG 15/20
power 500 VA
voltage 250 V
current 2 A resistive/inductive
contact open
no active alarms
contact closed
active alarm/alarms
NO solenoid valve (normally open) water line
C8
J15
F1 1A
solenoid valve
1
2
4
F2 1A
J14
1
Alarm relay
Connections:
MC cabinet
C07
N07
J14
GR
15
GR
COM1 COM2 COM3
N/W
COM1 COM2 COM3
L
MC cabinet
G0
NO4
GR
NC8
NO8
C7
C7
1
Connections:
NO7
1
NO4
ID1
ID2
ID3
ID4
ID6
ID7
G0
NO4
ID1
ID2
ID3
ID4
ID6
ID7
Cable
G0
Output
ON/OFF
COM
shield
maintenance
NO solenoid valve
(normally open):
GR
COM1 COM2 COM3
N/W
COM1 COM2 COM3
L
cable
white
shield
black
F2 1A
J14
Connections:
MC cabinet
B3
J2
GR
+ VDC
distribution
C7
NO8
C7
J13
NO7
C4
NO6
NO5
Pressure probe
C4
1
NO4
GR
Output
COM
ON/OFF
shield
“MCmultizone” +030221981 - rel. 2.3 - 09.12.2014
ENG
Connections:
see installer menu > external alarms
G0
Compressor alarm relay
Ethernet™
PCO10000F0
LON in FTT10 (*)
Ethernet™
(Modbus®)
C8
C7
NO8
C7
C4
NC8
IDC1
ID8
ID7
ID
D
ID5
ID
D
ID4
ID
D
IID3
D
IID2
D
IID1
D
YY4
YY3
YY2
YY1
TCP/IP
SNMP v1 &v2c
BACnet™ Ethernet™ ISO8802-2/8802-3
BACnet/IP
LON-Echelon
BACnet™ MS/TP
(*) When suitably programmed
Flow switch alarm relay
Important: Follow the instructions provided with the optional
cards as regards the technical specifications, connections and
expansions.
Connections:
Relay
ON/OFF
Alarm relay from water treatment
COM
ON/OFF
Compressor alarm relay
COM
ON/OFF
Air flow switch alarm relay
COM
shield
3.13 Proportional 0 to 10 Vdc output (J4)
Parallel output to the 0 to 10 Vdc signal sent to the proportional valve.
J5
3.11 Enable wash water line on external signal
MC cabinet
VG0
Y1
shielded AWG 15/20
wash line not enabled
contact open
externally
Status and operation of
the contact:
wash line enabled
contact closed
externally
F2 1A
F1 1A
GR
N/W
NO4
ID1
ID2
ID3
ID4
ID6
ID7
NO4
ID1
ID2
ID3
ID4
ID6
ID7
COM1 COM2 COM3
External contact for activating the wash function
“MCmultizone” +030221981 - rel. 2.3 - 09.12.2014
ID4
ID2
ID1
Y4
Y3
ID3
Outputs
REF.
0 to 10 Vdc
Output specifications: maximum load 1 kΩ (10 mA)
1
COM1 COM2 COM3
Y2
Rif.
Cable:
G0
Y1
0...10 Vdc
Manages the washing of the water line based on an external signal.
To do this, set: installer menu > operating options > valve at the end of
the line (YES) > special functions > wash > manual
G0
VG0
VG
BC5
J4
16
IDC1
MC cabinet
ID3
COM1
ID4
COM1
ID6
COM2
GR
1
NO7
C4
NO5
C1
NO4
C1
NO2
NO3
V
VG0
V
VG
BC5
CAREL for remote connections
F2 1A
F1 1A
protocol supported
CAREL, Modbus®
RS485
RS232 (external
modem)
ID8
3
J5
J4
B5
BC4
B4
+VDC
GND
B3
J3
PCO1000WB0
PCO1000BA0
Alarm relay from water treatment
J15
ID7
2
COM1 COM2 COM3
J14
ID5
1
NO4
ID1
ID2
ID3
ID4
ID6
ID7
PCO100MDM0
J13
J1
3
se ri a l ca rd
J2
CAREL optional cards
network/card
PCOS004850
NO1
GND
Rx-/Tx-
Rx+/Tx+
J12
J1
2
fi e l d ca rd
J24
B2
J1
ID6
B1
ID4 COM2
+5V ref
COM1
input: 24 V / V ; 50 to 60 Hz
max. power: 40 VA / 15 W
GND
ID3
3
J11
sse
e rvi ce ca rd
J10
+V term
distribution
COM1
2
J9
G
1
Relay for activating wash on ext. signal
ON/OFF
COM
3.12 Supervisor network
water treatment system
contacts: ID3 & COM1
air compressor
contacts: ID4 & COM1
air flow switch
contacts: ID6 & COM2
Connections:
maintenance
MC cabinet
ID7
COM1
air flow sensor
air compressor alarm
water treatment system alarm
shielded AWG 15/20
G0
Inputs for signalling the
status of external devices
such as:
Cable:
Configuration of type of
contact:
L
cabinet
3.9 Alarm inputs from external devices
ENG
4. MASTER/SLAVE APPLICATIONS
• MC master cabinet: unit fitted with display to manage the operation
•
installation.
• The address is already configured: for the master unit=1; for the slave
unit=2.
• The slave units do not have terminals.
• In systems with a series of slaves, the serial address must be changed
to avoid having the same address (2) on all the units (causing conflict
in the event of pLAN communication).
• To set the pLAN address, use the kit PGD0002F0K.
Important: The serial addresses must be changed before
connecting the pLAN network.
Instructions for changing the serial address on the slave units using the
kit PGD0002F0K:
• complete the power supply connections (see paragraph 3.1);
• switch off the MC cabinet (make sure the power supply is
disconnected);
• connect the cable in the terminal kit to output J10 on the cabinet
• switch the cabinet on;
• press the ALARM and UP buttons together until the display shows the
message “self test please wait” (displayed for a few seconds, before the
address setting screen) ;
• set the required address using UP or DOWN (to a value higher than 2)
and press ENTER to confirm and exit;
• the MC slave unit has now been configured with a new serial address,
switch the unit off, disconnect the cable and repeat for the other
units.
Once configuration has been completed, connect the pLAN serial line
(see the following paragraph)
4.1 Applications for one large space or AHU
(single point)
• Ideal for large rooms (or air handling units) where the required water
capacity exceeds the output of a single MC cabinet.
• Only the master unit is fitted with a probe, and the values saved are
applied to all the units connected.
AHU /Room 1
pLAN
Master
Slave 1
Slave 5
up to 5 Slave units
Water & Air lines
Important: only change the serial address on the slaves, and not
on the master.
AHU - Air Handling Unit
Table of serial addresses (installer’s responsibility, see installer
menu > pLAN configuration):
serial
unit
unit name
room or AHU
address
4.2 Applications for multiple spaces or AHUs
(multizone)
master
slave 1
slave 2
slave 3
slave 4
slave 5
• Ideal for applications in a series of separate rooms (or air handling
units).
• Each MC cabinet is fitted with a probe, the values saved by each probe
are managed by the cabinet this is connected to.
• To ensure continuity of operation in the event of interruption of the
................................................
................................................
................................................
................................................
................................................
................................................
................................................
................................................
................................................
................................................
................................................
................................................
1
.......
.......
.......
.......
.......
serial communication see installer menu > type of control > stop slave
offline.
AHU /Room 1
AHU /Room 1 AHU /Room 2
pLAN
Master
Water & Air lines
Slave 1
cabinet
•
•
• The serial address is used to automatically identify each MC unit in the
Slave 5
up to 5 Slave units
AHU - Air Handling Unit
17
“MCmultizone” +030221981 - rel. 2.3 - 09.12.2014
distribution
•
maintenance
•
4.3 Setting the serial address for units with
multiple slaves
of the unit itself and the other units connected
MC slave cabinet: unit without display that normally works based on
the controls received from the master
pLAN: serial communication system to connect the master unit to the
slaves across a local network
each master unit can be connected to up to 5 slave units
serial address: numeric code that automatically identifies each unit
cabinet in the installation. Master unit: address 1, Slave unit: address
2. The serial address is already stored in the controller on the unit, and
should only be modified on the Slave unit when there are multiple
units (see paragraph 4.3)
for the software configuration of the pLAN network, see installer menu
> pLAN configuration
ENG
4.4 pLAN network connection (J11)
cabinet
Use two-wire cables plus earth, AWG 20/22, maximum distance between
two cabinets: 200 m (219 yd).
GR
GR
J1 0
J11
service card
J9
maintenance
Connections:
MC Master cabinet J11
RX+/TX+
J11
RX-/TXGND
MC Slave cabinet
RX+/TX+
J11
RX-/TXGND
In multizone mode, by disabling the “stop slave off line” function, if the
pLAN is interrupted the slaves operate independently according to the
signals from the probes or/and controllers. In this mode, the values will
not be shown on the master display.
“MCmultizone” +030221981 - rel. 2.3 - 09.12.2014
GND
Rx-/Tx-
J11
Rx+/Tx+
SLAVE
GND
Rx-/Tx-
distribution
J9
Rx+/Tx+
MASTER
18
J10
s e r vi ce ca rd
ENG
5. STARTING AND USER INTERFACE
Before starting the humidifier, check:
water and air connections (chap. 2). In the event of water leaks do not
start the humidifier before having resolved the problem;
electrical connections (chap. 3)
1
4
2
5
3
6
cabinet
5.4 Keypad
button
(1) alarm
(2) PRG
ON
0
(3) ESC
(4) UP
5.2 Stopping
(5) ENTER
1
0
(6) DOWN
OFF
Note: if the system is stopped for an extended time, open the
valve at the end of the water line to assist drainage. If the system
is fitted with drain solenoid valves at the end of the line (optional), this is
done automatically.
5.3 First start-up (setting the language)
function
list active alarms and reset any alarms present
return to the “main” screen
from the “main” screen access the main menu
return to the previous screen/display
circular navigation inside the menus, the screens, the
parameters and the values of the parameters
from the “main” screen, access an “INFO menu”
select and confirm (like the “Enter” key on a computer
keyboard)
from the main menu, access the “SET” screen
circular navigation inside the menus, the screens, the
parameters and the values of the parameters
from the main screen, access the pLAN screens and connect
to the SLAVE cabinets
maintenance
1
5.5 “Main” screen
On power-up, the following screen is displayed:
Select language:
1. English
2. Italiano
3. Deutsch
4. Francais
5. Espaniol
1
2
6
3
7
4
8
5
Press ENTER to go the list of languages, then UP to select the desired
language and ENTER to confirm. This screen remains displayed for 60
seconds.
(1)
(2)
(3)
(4)
Subsequently, the following screen will be displayed:
Show language mask at unit start-up Yes/No
• YES: the screen for choosing the language will be displayed when the
9
description of unit status (*)
line 2 description of unit status (**)
value read according to the type of signal connected
status of the atomising nozzles:
atomising nozzles operating
humidifier is started the next time;
• NO: the screen for choosing the language will no longer be displayed
on power-up.
(5)
(6)
(7)
(8)
(9)
Note: The language can also be changed from the maintenance
menu (maintenance menu > system info > language).
atomising nozzles off
time bands set
access the “INFO” screen (UP button)
access the “SET” screen (ENTER button)
access the “pLAN” screen (DOWN button)
Symbol on display:
no image: master unit not connected to a network (stand alone)
master unit connected to a pLAN network for multiple spaces
master unit connected to a pLAN network for single spaces
slave unit
19
distribution
5.1 Starting
“MCmultizone” +030221981 - rel. 2.3 - 09.12.2014
ENG
(*) Types of descriptions:
5.7 “SET” screen
• IN OPERATION: atomised water production in progress,
• SHUTDOWN ALARM: production stopped due to an alarm,
• OFF FROM SUPERVISOR: production stopped by supervisor,
• OFF FROM SCHEDULER: production stopped during the set time
Used to set the main values for the humidifier.
From the main screen press:
• ENTER to access the menu;
• ENTER to move from one value to the next;
• UP & DOWN to modify the selected value;
• ENTER confirm and go to the next value.
distribution
cabinet
band,
• OFF FROM REMOTE: production stopped due to opening of the
“Remote ON/OFF” contact,
• OFF FROM KEYPAD: production stopped from the keypad (see “SET”
screen),
Parameter
range
Set point
0 to 100
Humidifier
AUTO / OFF
Max. prod.
50 to 100
Prop. band
2 to 19.9
0 to 100
Limit set (limit probe set
point)*
Prop. band*
2 to 19.9
* visible only if the limit probe is enabled
• MANUAL MODE: manual mode activated (see maintenance menu)
• NO REQUEST: unit on without production request.
(**) Types of unit status description, line 2:
• DRAIN: unit draining;
• FILL: unit filling the water line;
• CLEANING: unit cleaning the heads on the air line;
• WASHING: unit washing the water line.
UOM
%rH- °C/°F
%
%rH- °C/°F
%rH
5
%rH
5.8 “pLAN” screen
5.6 “INFO” screens (read-only)
From the main screen press:
• DOWN to access the menu;
• ENTER to select the unit;
• UP & DOWN to move from one unit to the next;
• ENTER to confirm.
Series of read-only screens for displaying the main humidifier status
values. To access, press UP from the “Main” screen. There are two “INFO”
screens; to move from one screen to the next, press UP or DOWN.
Press ESC to return to the “Main” screen.
maintenance
default
50
OFF
100
5
80
Units connected
1 (master)
2 (slave)
3 (slave)
4 (slave)
5 (slave)
6 (slave)
Info (1/2)
Request
Air line
Water line
Type of op..
Press. sensor
Date & time
display
50-100
ON/OFF
ON/Drain
ON/OFF or Modulating
UOM
%
dd/mm/yy
bar/psi
00:00
display
UOM
Current:
Network:
Info (2/2)
Humidifier model
In production
Hours production
Date & time
YES/NO
dd/mm/yy
“MCmultizone” +030221981 - rel. 2.3 - 09.12.2014
h
00:00
20
Buttons:
• UP & DOWN: navigation inside the submenus, screens, and range of
values and settings;
• ENTER: confirm and save the changes made;
• ESC: to go back (pressed repeatedly returns to the “Main” screen).
1.
User
(no password)
1. Alarm thresholds
2. Clock
3. Enable scheduler
4. Set scheduler
5.Weekly scheduler
6. Scheduled setp.
2. Installer
(password 77)
1. Type of control
2. Probe configuration
3. Operating options
4. Special functions
5. Supervisor
6. External alarms
Main probe thresholds
7. pLAN config.
High alarm
Low alarm
Limit probe thresholds
High alarm
Alarm delay
Clock
Hour
Day
Month
Year
Format
Day
Enable scheduler
Scheduler On/Off
Variable set point
Set scheduler
P1-1
P1-2
P2
P3
P4
Weekly scheduler
Monday
Tuesday
Wednesday
Thursday
Friday
Saturday
Sunday
Scheduled set points
Z1
Z2
Z3
Z4
Type of operation
Type of signal or probe
Type of signal or probe
Main
Limit
Unit of measure
Stop slave offline
Main probe config.
Min value
Max value
Offset
Limit probe config.
Min value
Max value
Offset
Operating options (1/2)
Remote p. sensor
Max. air press.
Min air press.
Max air press. offset
Min air press. offset
Operating options (2/2)
Valve at end of line
Alarm relay logic
Prop. s. set point:
Special func. (1/3)
Independent cleaning
Enabled
Period
Duration
Special func. (2/3)
Washing
Start washing
Washing period
Washing duration
Enable filling
Filling duration
Special func. (3/3)
Select main screen
display
Language
Show language choice at
start-up?
Supervisor config.
3. Maintenance
(password 77)
1. Reset conf.
2. System info
3. Manual procedure
4 Hour counter
5. Alarm log
21
“MCmultizone” +030221981 - rel. 2.3 - 09.12.2014
distribution
To access press PRG from the main screen
ID number
for BMS network)
Com. speed
Type of protocol
Enable ON/OFF from
supervisor
External alarms
Water treatment
Logic
Compressor
Logic
Flow switch
Logic
pLAN config. (1/2)
pLAN
Mode
Press down arrow
to set unit
pLAN config. (2/2)
M1:
S2:
S3:
S4:
S5:
S6:
Alarm delay:
Configuration
Save config.
Load config
Default parameters
Restore default
parameters
code:
Type of humidifier
System info
Boot (read only)
Bios (read only)
Code:
Version:
Date:
Manual controls (1/2)
Manual procedure
Air valve
Water valve
Drain valve
Valve at end of line
Production status
Manual controls (1/2)
Alarm relay
Prop. output
Prop. valve
Hour counter
Hours of production
Reset hours
Alarm log
Alarm (read only)
Log deleted
Time (read only)
Date (read only)
maintenance
5.9 Main menu
cabinet
ENG
ENG
cabinet
6. USER MENU
From the main screen press:
• PROG to access the main menu;
• ENTER to select and access the selected menu;
• UP/DOWN to move between the submenus;
• ENTER to enter the submenus
• ENTER to select the parameter and move between the parameters;
• UP/DOWN to modify the parameter;
• ENTER to confirm selected parameter and go to the next parameter;
• ESC to return to the previous menu.
P1
P2
P3
P4
P1
distribution
maintenance
always ON
always OFF
Two daily ON time bands
OFF
Alarm thresholds
Clock
Enable scheduler
Set scheduler
Weekly scheduler
Scheduled set point
0
P2
ON
OFF
24h
P1-2
ON
P2
OFF
24h
Always ON
ON
6.1 Alarm thresholds
par. name
high alarm
low alarm
high alarm
0
range default UOM
0 to 100.0 100.0
%
0 to 100.0
0.0
%
0 to 100.0 100.0
%
0 to 999
1
P4
24h
Always OFF
OFF
0
24h
min
6.2 Clock
6.5 Weekly scheduler
Used to set the timed activation of the humidifier
parameter
hour / min
day
month
year
format
weekday
ON
Individual ON time band
OFF
P3
OFF
P1-1
0
parameter
Main probe alarm
thresholds
Limit probe alarm
thresholds
Alarm delay
13:00
21:00
21:00
Parameters P1 to P4 can be used set how many times atomised water
production is enabled/disabled over a 24h period:
User menu screens:
1.
2.
3.
4.
5.
6.
09:00
14:00
14:00
P1-1
P1-2
Note: this screen is visible if “scheduler ON/OFF” has been enabled
(see the enable scheduler screen).
range
0 to 23 / 0 to 59
1 to 31
1 to 12
00 to 99
dd/mm/yy - mm/dd/yy
Monday to Sunday
Setting of the weekly operation of the humidifier, using parameters P1 to
P4 (configured in the previous screen)
parameter
Monday
Tuesday
Wednesday
Thursday
Friday
Saturday
Sunday
6.3 Enable scheduler
Enable control of the time bands and the set points
parameter
Scheduler On/Off
variable set point
enabled
YES / NO
YES / NO
When the time bands are set, the display shows the
symbol.
6.4 Set scheduler
Note: this screen is visible if “scheduler ON/OFF” has been enabled
(see the enable scheduler screen).
Setting of the intervals for the operation of the humidifier over one day
(24h):
ON
OFF
time band
“MCmultizone” +030221981 - rel. 2.3 - 09.12.2014
22
type of time band
P1 to P4
P1 to P4
P1 to P4
P1 to P4
P1 to P4
P1 to P4
P1 to P4
ENG
6.6 Scheduled set points
Note: this screen is visible if “variable set point” has been enabled
(see the enable scheduler screen).
Setting of different levels of set points throughout the day (24 h):
Z1
Z2
Z3
Z4
SETP.
%rH
0.0 to
0.0 to
0.0 to
0.0 to
cabinet
ON
hours
00:00
00:00
00:00
00:00
parameter
Parameters Z1 to Z4 can be used to configure up to four different
temperature set points at different times of a day (parameters Z1, Z2, Z3,
Z4).
50% U.R
distribution
30% U.R
20% U.R
0
24h
Z1
Z2
Z3
Z4
By setting the “daily” and “variable set point” time bands, atomised water
production can be programmed according to the needs of the utility.
Note:
maintenance
• during the “OFF” time band, the humidifier is NOT actually off, but
rather atomised water production is temporarily disabled, even when
setting manually;
• the “daily” time bands have priority over the “variable set point” bands.
For example, setting P4 each Monday (humidifier off ), parameters
Z1, Z2, Z3, Z4 (different set point values) will not be observed, as the
humidifier is not programmed to operate on that day.
23
“MCmultizone” +030221981 - rel. 2.3 - 09.12.2014
ENG
cabinet
7. INSTALLER MENU
From the main screen press:
• PRG to access the main menu;
• DOWN to move to the installer menu;
• ENTER to move to the password;
• UP/DOWN to enter the password “77“
• ENTER to access the selected menu;
• UP/DOWN to move between the submenus;
• ENTER to select the parameter and move between the parameters;
• UP/DOWN to modify the parameter;
• ENTER to confirm the selected parameter and go to the next parameter;
• ESC to return to the previous menu.
7.3 Operating options
Operating options (1/2)
parameter
Remote p. sensor
distribution
maintenance
Type of control
Probe configuration
Operating options
Special functions
Supervisor
External alarms
PLAN configuration
parameter
valve at end of
line
logic alarm relay
description
to allow automatic
emptying and
periodical washing
of the water line
alarm relay status
setting
proportional signal
set point:
7.1 Type of control
parameter
Enabled
Period
0
range
YES/NO
default UOM
YES
NO/NC
NO
3 to 60
10
%
range default UOM
YES/NO
YES
0 to
30
min
999
60 to
160
s
999
Duration
Special functions: washing (2/3)
Automatic periodical washing of the water line to increase the hygiene of
the installation.
parameter
washing
start washing
washing period
washing duration
enable filling
filling duration
range
manual/
automatic
NO/YES
1 to 99
0 to 15
NO/YES
1 to 1000
default UOM
man.
NO
6
10
NO
5
h
min
s
Special functions (3/3)
parameter
Setting of the minimum value, maximum value and offset for the probes
used.
Limit probe
config.
0 to 9.9
bar
bar
Nozzle self-clean cycles to reduce the frequency of maintenance.
options/range description
ON/OFF
modulating
External contact
External proportional signal
External proportional signal & limit probe
Humidity probe
Humidity probe & limit probe
Temperature probe
Temperature probe & limit probe
select between: NTC; 0-1 V; 2-10 V; 0-10 V (default);
0-20 mA; 4-20 mA; 0-135 ohm; 135-1k ohm
°C - bar (default)
°F - psi
YES
if the pLAN network is offline the slave units
default stop
NO
if the pLAN network is offline the slave units
continue
settings
Min value
Max value
Offset
Min value
Max value
Offset
2.1
1.2
0
Special functions: automatic cleaning (1/3)
7.2 Probe configuration
parameter
Main probe
config.
0 to 4
0 to 4
0 to 9.9
7.4 Special functions
Settings: type of operation (ON/OFF or modulating), type of signal or
probe, main probe, limit probe, unit of measure & stop slave offline.
Main probe
Limit probe
Unit of
measure
Stop slave
offline
default UOM
NO
Operating options (2/2)
To navigate inside the screens:
• UP or DOWN to change the value (within the options/range),
• ENTER to confirm and move the cursor to the next value
• ESC to return to the installer menu.
parameter
Type of
operation
Type of signal
or probe
range
YES/NO
max. air pressure
min. air pressure
max air press.
offset
min air press.
offset
Installer menu screens:
1.
2.
3.
4.
5.
6.
7.
description
pressure sensor
at end of line
for balancing
compressed air
system
range
0 to 100
0 to 100
-10 to 10
0 to 100
0 to 100
-10 to 10
“MCmultizone” +030221981 - rel. 2.3 - 09.12.2014
default
0
100
0
0
100
0
select display on main screen
UOM
%rH °C/ °F
%rH °C/ °F
%rH °C/ °F
%rH °C/ °F
%rH °C/ °F
%rH °C/ °F
Language
Show language choice at startup?
24
range
default UOM
% signal;
Hours; %rH;
%rH
°C/°F
Italian, English,
French,
German,
Spanish
YES/NO
YES
ENG
7.5 Supervisor
type of protocol
enable ON/OFF
from supervisor
range
0 to 200
def.
1
UOM
1200; 2400; 4800;
9600; 19200
Carel; Modbus®; Lon;
RS232; Winload
YES/NO
19200
bps
cabinet
parameter
ID number
for BMS network
communication speed
Carel
NO
7.6 External alarms
range
NO/YES
NC/NO
NO/YES
NC/NO
NO/YES
NC/NO
def. UOM
NO
NC
NO
NC
NO
NC
distribution
parameter
water treatment
logic
compressor
logic
flow switch
logic
maintenance
7.7 pLAN configuration
pLAN configuration : mode (1/2)
parameter
pLAN
range
master/master+slave
def.
master
Mode
multizone/single
point
multizone
UOM
pLAN configuration: units present and names (2/2)
parameter
M1(*)
S2/S3/S4/S5/S6(*)
Alarm delay
range
YES/NO
YES/NO
def.
YES
NO
30
0 to 99
UOM
S
The MASTER and SLAVE units are named by default, however they can be
renamed using the list of the characters shown below.
A
M
Y
+
B
N
Z
-
C
O
0
*
D
P
1
:
E
Q
2
;
F
R
3
,
G
S
4
(
H
T
5
)
I
U
6
/
J
V
7
#
K
W
8
%
L
X
9
To modify the character in the space selected, use UP and DOWN, to
confirm the character and move to the next space press ENTER.
25
“MCmultizone” +030221981 - rel. 2.3 - 09.12.2014
ENG
8. MAINTENANCE MENU
maintenance
distribution
cabinet
Important: the operations described in this menu must only be
carried out by qualified personnel.
8.3 Manual procedure
Important: these operations must only be performed by qualified
personnel, incorrect use may cause serious damage.
From the main screen press:
• PRG to access the main menu;
• DOWN to move to the maintenance menu;
• ENTER to move to the password;
• UP/DOWN to enter the password “77“
• ENTER to access the selected menu;
• UP or DOWN to move between the submenus;
• ENTER to select parameter and move between the parameters;
• UP/DOWN to modify the parameter;
• ENTER to confirm the selected parameter and go to the next
parameter;
• ESC to return to the previous menu.
These procedures are used to manually test the main functions and
operations of the humidifier.
Manual procedure (1/2)
parameter
manual procedure (*)
air valve
water valve
drain valve
valve at end of line
production status
Maintenance menu screens:
1.
2.
3.
4.
5.
Reset conf.
System info
Manual procedure
Hour counter
Alarm log
range
YES/NO
ON/OFF
ON/OFF
ON/OFF
ON/OFF
ON/OFF
default
NO
OFF
OFF
OFF
OFF
OFF
range
YES/NO
ON/OFF
ON/OFF
default
NO
OFF
OFF
Manual procedure (2/2)
parameter
alarm relay
proportional output
proportional valve
(*) To activate the individual manual procedures, first enable the manual
procedure parameter.
8.1 Reset configurations
Configuration
Functions:
• save the set configurations,
• recall the saved configuration
parameter
save configurations
load configuration
8.4 Hour counter
range
YES/NO
YES/NO
parameter
hours production
reset hours
default
NO
NO
range/display
display
YES/NO
Default parameters
Functions:
• restore default parameters
• code
parameter
restore default parameters
code
8.5 Alarm log
range
YES/NO
display only
Recorded trace of the alarms (events) that have been activated. The
humidifier memory can record up to 200 events (complete with
description and date, press DOWN to scroll the list).
default
NO
parameter
Alarm
Log deleted
Time
Date
8.2 System information (read only)
information
Boot
Bios
Code
Version
Date
“MCmultizone” +030221981 - rel. 2.3 - 09.12.2014
display
read only
read only
read only
read only
read only
26
display
event description
hh:mm
dd/mm/yy
ENG
9. TABLE OF ALARMS
cabinet
When an alarm is activated, the alarm button starts flashing
intermittently.
In these conditions, pressing the alarm button once displays the type of
alarm .
In the case of potentially dangerous alarms, the controller automatically
stops production. For some alarm events, the alarm relay is also activated
at the same time as the signal (see the table below).
high humidity
humidity
outside of set
limits
cause
value measured
by the probe
greater than the
humidity alarm
threshold
low humidity
humidity
value measured
outside of set
by the probe
limits
less than the
humidity alarm
threshold
humidity probe humidity probe main humidity
broken or
broken or
probe
disconnected
disconnected or
disconnected
broken
high humidity
limit humidity
value measured
limit probe
outside of set
by the probe
limits
greater than the
humidity alarm
threshold
limit probe
broken or
disconnected
limit probe
broken or
disconnected
slave (2-3-4-5-6) slave unit not
unit offline
connected to
the pLAN
master unit
master unit not
offline
connected to
the pLAN
low pressure
insufficient air
alarm
pressure
compressor
alarm from air
compressor
flow switch
alarm from AHU
flow switch
water treatment alarm from
system
water treatment
system
pressure
pressure
sensor faulty or sensor faulty or
disconnected
disconnected
pressure off
air pressure
scale
outside of set
limits
clock fault
clock error
solution
reset
alarm
relay
action
notes
check the set parameter
manual
inactive
signal only
on
check the set parameter
manual
inactive
signal only
on
check the connection & the operation
of the probe
manual
active
stop
production
on
check the set parameter
manual
inactive
signal only
flash
limit humidity
probe
disconnected or
broken
pLAN network
disconnected
check the connection & the operation
of the probe
manual
active
stop
production
on
check connection of pLAN cable to
terminals on controller
manual
active
signal only
on
pLAN network
disconnected
check connection of pLAN cable to
terminals on controller
manual
active
signal only
on
insufficient air
pressure
compressor fault
alarm
no air in AHU
alarm
water treatment
system fault
alarm
pressure
sensor faulty or
disconnected
insufficient air
pressure
check air line pressure
manual
active
on
check air compressor
manual
active
stop
production
signal only
check AHU
manual
active
signal only
on
check water treatment system
manual
active
signal only
on
check pressure sensor
manual
active
stop
production
on
check air supply pressure
manual
active
stop
production
on
replace clock
manual
inactive
signal only
off
backup battery
completely
discharged or
generic clock
fault
27
distribution
meaning
can only be
reset switching
the unit off
from “set”,
signalled only in
sequence after
other alarms
but not when
forced.
for ON/OFF
units
on
for proportional
units with air
pressure sensor
for proportional
units with air
pressure sensor
“MCmultizone” +030221981 - rel. 2.3 - 09.12.2014
maintenance
alarms
displayed
ENG
10. ADVANCED FUNCTIONS
Wiring diagram for ON/OFF version, Master codes:
MC***C*M**
“MCmultizone” +030221981 - rel. 2.3 - 09.12.2014
28
PRESSOSTATO LINEA ARIA
PRESSURE SWITCH AIR LINE
PS
maintenance
distribution
cabinet
10.1 Wiring diagrams
ENG
29
PRESSOSTATO LINEA ARIA
PRESSURE SWITCH AIR LINE
PS
maintenance
distribution
cabinet
Wiring diagram for ON/OFF version, Slave codes:
MC***C*S**
“MCmultizone” +030221981 - rel. 2.3 - 09.12.2014
ENG
maintenance
distribution
cabinet
Wiring diagram for modulating version, Master codes:
MC***H*M**
“MCmultizone” +030221981 - rel. 2.3 - 09.12.2014
30
ENG
maintenance
distribution
cabinet
Wiring diagram for modulating version, Slave codes:
MC***H*S**
31
“MCmultizone” +030221981 - rel. 2.3 - 09.12.2014
cabinet
ENG
10.2 Operating principle
10.3 Control principles
The humidifier controller - based on the input signal from a probe, an
ON/OFF contact or external controller - activates the cabinet to start the
production of atomised water (at maximum capacity), and stops the
production when the set point is reached.
As well as the room probe, the limit probe for humidity control is fitted
in a significant point of the installation to avoid excessive condensation.
Normally the humidity control probe is located in the ducts of the air
handling unit.
ON/OFF control from contact
The action is all or nothing, activated by an external contact that
consequently determines the control set point and differential.
The external contact may be a humidistat, whose status determines the
operation of the humidifier:
• contact closed: the humidifier produces atomised water if the remote
ON/OFF contact is also closed;
• contact open: production ends.
ON/OFF operation
ON/OFF control with humidity probe
The activation logic is:
distribution
Request ON (contact closed)
No request OFF (contact open)
The action is all or nothing, activated based on the reading of the probe,
production starts and reaches the maximum when the relative humidity
is lower than the set point by the set differential.
To set the set point and differential for the main control probe: SET
menu.
To check that the value measured by the probe is within certain preset
values, two alarm thresholds can be set:
• high humidity alarm threshold;
• low humidity alarm threshold.
When these thresholds are exceeded, an alarm is activated, after a set
delay.
J Humidifier in production
J Humidifier in stand by
(not in production)
Status of the outputs:
Humidifier in production:
• Water line active (NO drain solenoid valves active, NC fill solenoid valve
active)
• Air line active (NC air line activation solenoid valve active)
maintenance
Humidifier off (not in production):
• Water line inactive (NO drain solenoid valves deactivated, NC fill
solenoid valve deactivated)
• Air line inactive (NC air line activation solenoid valve deactivated)
Request
P. Max
Operation in modulating versions
Hy
The humidifier controller - based on the input signal from a temperature
or humidity probe, or external controller - activates and modulates the
quantity of compressed air so as to achieve a humidification capacity
proportional to the request from the external controller, or to the
difference between the desired value (set point) and the value measured
by the probe.
0
0
100
%rH
ON/OFF control with temperature probe
In this case too, the limit probe is also used to measure the humidity in a
significant point of the installation and avoid excessive condensation.
In modulating operation, the system MANAGES a humidity set point,
with an optional limit signal from the second probe, a temperature set
point or a request signal (proportional).
The action is all or nothing, activated based on the reading of the probe,
production starts and reaches the maximum when the temperature is
lower than the set point by the differential.
To set the set point and differential for the main control probe: SET
menu.
To check that the value measured by the probe is within certain preset
values, two alarm thresholds can be set:
• high temperature alarm threshold;
• low temperature alarm threshold.
When these thresholds are exceeded, an alarm is activated, after a set
delay.
Standard control of humidity production is performed using a
proportional valve (AO2) controlled by a 0 to 10 V signal. The system
behaves as follows:
Status of the outputs:
Humidifier in production:
• Water line active (NO drain solenoid valves active, NC fill solenoid valve
active)
• Air line active (NC air line activation solenoid valve active, Proportional
valve controlled proportionally to required pressure)
Request
P. Max
Humidification not request:
• Water line inactive (NO drain solenoid valves deactivated, NC fill
solenoid valve deactivated)
• Air line inactive (NC air line activation solenoid valve deactivated,
proportional valve closed)
H
The use of the request signal and the extent of control of the proportional
air valve depends on the type of control selected.
ON/OFF and modulating control share the ratio between the values, that
is, the maximum signal applicable to the proportional solenoid valve
corresponds to the rated production (Pnom).
“MCmultizone” +030221981 - rel. 2.3 - 09.12.2014
Set point
0
0
32
Set point
100
°C/°F
Independent control with relative humidity probe
The production of atomised water is proportional to the value of a signal
“Y” from an external device. The type of signal can be selected between
the following: 0 to 1 Vdc, 0 to 10 Vdc, 2 to 10 Vdc, 0 to 20 mA, 4 to 20 mA,
0 to 135 Ohm, 135 to 1000 Ohm (installer menu > type of control > type
of signal)
The entire range is indicated as BP (proportional band).
The maximum production of the humidifier, corresponding to the
value maximum of the external signal, can be set from 50% t 100%. The
minimum production corresponds to 10% (default, range 3-60%) of the
external signal:
• if set point < 10%, hysteresis of 2%;
• if set point > 0 = 10%, hysteresis of 5%.
The production is related to the reading of the probe and increases as
the relative humidity value read decreases. The production reaches the
maximum when the relative humidity is lower than the set point (St)
by a value at least equal to the differential. The maximum production
can be programmed between 50% and 100% of the rated value of the
humidifier. To set the set point and differential for the main control probe:
“quick set menu”.
The minimum production has an activation hysteresis, “hy”, equal to 0.2%
rH
To check that the relative humidity measured by the probe is within
certain preset values, two alarm thresholds can be set in independent
control:
• high humidity alarm threshold;
• low humidity alarm threshold.
When these thresholds are exceeded, an alarm is activated, after a set
delay.
Request
P. Max
distribution
Proportional control
Request
Diff_Humid
P. Max
(50%) P. Min.
H
H
0
0
100
Set point
BP
Segnale
proporz.
cabinet
ENG
P. Min.
0
Set point
100
%rH
Proportional control with limit probe
See “proportional control”, with the addition of a limit probe, generally
installed in the air duct downstream of the humidifier. This type of control
is used to reduce production if the relative humidity, downstream of
the humidifier, is within the proportional band set for the limit probe.
Production is stopped if the relative humidity, downstream of the
humidifier, reaches the limit set point %rH2.
To set the set point and differential for the limit probe: “quick set menu”.
Independent control with relative humidity probe
and limit probe
See control with main probe, combined with a limit probe, installed in the
air duct downstream of the humidifier.
This type of control is used to reduce production if the relative humidity,
downstream of the humidifier, is within the differential band of the limit
probe. Production is stopped if the relative humidity, downstream of the
humidifier, reaches the limit set point %rH2.
Request
Diff_Humid
P. Max
Temperature control for cooling applications
H
When using the humidifier for adiabatic cooling, instead of the humidity
probe in the room, a temperature probe is used. The production of
atomised water is related to the temperature T read by the temperature
probe (AO1), and increases as the distance from the set point St increases.
Maximum production (Pmax), which occurs when the room temperature
is greater than the set point by a value equal to the differential (T
differential), can be set between 50% and 100% of rated production
(Pnom). The activation hysteresis (default 0.2 °C) is indicated in Figure
4.2 as hy.
P. Min.
0
0
Set point
100
%rH
Request
Diff_Temp
P. Max
H
P. Min.
0
0
33
Set point
100
°C/°F
“MCmultizone” +030221981 - rel. 2.3 - 09.12.2014
maintenance
0
ENG
cabinet
Temperature control with humidity limit probe
10.5 Drain/fill
The production of atomised water depends on the reading of the
temperature probe, with a second humidity probe (AO3) that limits
production, so as to limit the humidity level in the cooled air. The limit
probe has a set point (L set point), a differential (L diff.) and an activation
hysteresis (0.2% rH). Production is the result of the difference between
the two readings.
Important: this function requires the installation of a CAREL NO
drain solenoid valve at the end of the water line, available as an
option.
For hygiene reasons, when the system is not operating the water line
is emptied to avoid bacterial formation inside. This is done using the
normally-open drain solenoid valves located inside the cabinet and at
the end of the line. The fill operation is performed as follows, starting from
empty:
• the NC water fill solenoid valve in the cabinet is activated (opened);
• the NO drain solenoid valve in the cabinet is activated (closed);
• the NO solenoid valve at the end of the line is deactivated (opened).
The duration of the fill cycle can be set by parameter and depends on the
length of the line. During the filling phase, the air line is deactivated. At
the end of the cycle, the NO drain solenoid valve at the end of the line will
be closed and the air line will be activated so as to resume production.
The function can be activated by parameter, and when deactivated, the
status is as illustrated in chapters 3 and 4.
maintenance
distribution
10.4 Pressure control
Pressure control in the air line is fundamental as this is used to control
production. Depending on the model, pressure may be controlled
using:
• Manual regulating valve (ON/OFF operation)
• Manual regulating valve & pressure transducer in line (ON/OFF operation)
• Proportional valve (modulating operation)
• Proportional valve & pressure transducer (modulating operation)
MC models with ON/OFF controller
The pressure is controlled using the pressure gauges installed in the air
line, which signal if the value is above or below the calibration of the
manual pressure regulator. The correct operating pressure will be thus be
controlled by the operator, when commissioning the installation, using
the pressure gauges in the line and the manual regulating valve.
10.6 Periodical washing of the water line
Function required for hygiene/health reasons when the humidifier is not
operating. To activate this function: installer menu > special functions
> special functions (2/3), can be performed automatically by time or
manually.
The washing procedure is similar to the fill cycle described above, starting
from empty
• the NC water fill solenoid valve in the cabinet is activated (opened);
• the NO drain solenoid valve in the cabinet is activated (closed);
• the NO solenoid valve at the end of the line is deactivated (opened).
The duration of the wash cycle is longer than the fill cycle and, in this case
too, depends on the length of the line.
The duration and the frequency of the wash cycle can be set by
parameter.
During the washing phase, the air line is deactivated
MC models with ON/OFF controller and pressure
transducer (recommended)
The transducer is available as an optional component, upon request,
including 10 m, 50 m or 100 m cable.
The system works in “all or nothing” mode and displays the signal of
the pressure transducer, providing indications to the operator on the
calibration of the air line using the manual regulating valve.
MC models with control by proportional valve
The system provides a signal to the proportional valve to modulate the
pressure in the air line, from a minimum to a maximum, depending on
the request from the humidity probe or the external controller.
The minimum and maximum pressure values are set using the related
parameters.
If there is significant pressure drop along the line - measured by the
operator using a pressure gauge installed at the end of the line - a
parameter (see installer menu > operating options (1/2) can be used to
set a pressure offset as compensation. The pressure offset is summed to
the signal sent to the proportional valve to compensate for the pressure
drop.
10.7 Automatic cleaning of the atomising heads
To activate this function: installer menu > special functions > special
functions (1/3); can be performed:
• During a production cycle
• At the end of a production cycle
Cleaning involves deactivating the water fill, keeping the air line active
(at 100% in the case of modulating operation, or simply activated for
ON/OFF operation), activating (opening) the NO water drain solenoid
valves at the end of the line and in the cabinet.
The duration of the operation can be set by user parameter, in addition
the frequency during the production cycle can also be set, as well as
whether or not to perform the operation at the end of the production
cycle.
MC models with control by proportional valve &
pressure transducer (recommended)
The transducer is available as an optional component supplied upon
request by Carel SpA, the kit includes:
• transducer
• connector
• 10 m, 50 m or 100 m cable.
10.8 Pressure overboost
In this case, as well as control with the proportional valve, the pressure
transducer installed at the end of the line measures the air pressure and
tells the electronic controller (which manages the proportional valve) to
automatically compensate for pressure drop along the line.
In this way, the system can supply the required pressure and automatically
manage any pressure drop in the line.
“MCmultizone” +030221981 - rel. 2.3 - 09.12.2014
To ensure the correct opening and modulation of the atomising heads, at
the start of each production cycle, these are supplied with compressed
air only, at a pressure of:
• 2.1 bars for ON/OFF versions.
• 3 bars for proportional versions.
During this phase, the water line is not activated.
This function is not managed by parameter.
34
ENG
maintenance
distribution
cabinet
Notes:
35
“MCmultizone” +030221981 - rel. 2.3 - 09.12.2014
ENG
11.1 Atomising head
11.2 Assembly kit
The atomising heads are available in AISI 316 stainless steel with 5
different flow-rates, yet all with the same dimensions and weights. Each
atomising head has a marking on the nozzle indicating the model and
thus the flow-rate.
This is a series of components designed to make the assembly of the
atomising heads on the air-water lines simpler and faster; it can be used
for both normal water and demineralised water (aggressive).
Code
MCAA200000
MCAB200000
MCAC200000
MCAD200000
MCAE200000
Only one model is available:
• MCK1AW0000 for assembly of the heads on the lines in the room or
in the duct.
Capacity
2.7 l/h
4.0 l/h
5.4 l/h
6.8 l/h
10 l/h
Kit MCK1AW0000
1. 1/4” FF elbow connector
2. 1/4” H43 MF column
3. 1/4” nipple
4. 1/4” MF 2-way valve
5. 1/4” PVSF 2-way valve
6. 1/4” 180° M connector
7. B TFN nylon tube dia. 6/8 mm
8. 1/4” FF elbow connector dia. 6/8 mm
9. 1/4” FF hose coupling”
32
Marking
A
B
C
D
E
73
maintenance
distribution
cabinet
11. GENERAL CHARACTERISTICS OF THE DISTRIBUTION SYSTEM
“MCmultizone” +030221981 - rel. 2.3 - 09.12.2014
36
ENG
12. DESIGNING A SYSTEM
When sizing an MC system, several factors must be considered: air flows,
flow speed, presence of cooling coils, dimensions of the room where
the humidifier will be installed. For correct sizing, given the relative
complexity of the factors involved, the applications should be designed
using the documents provided by CAREL.
Calculation example:
Installation of 18 MCAC2 heads supplied by a 230 l/h cabinet.
V = Cheadx n = 6.86x18 = 123.5 Nm3/h = 2058 l/m
(referred to the rated data of the compressor)
To calculate the humidification requirements of a certain space, a series
of factors need to be considered:
• volume of the local (m3);
• current conditions of the room: temperature (°C) and relative humidity
(% rH);
• desired conditions in the room: temperature (°C) and relative humidity
(% rH);
• characteristics of the materials inside (quantity, hygroscopic factor,
number of people);
• time required to reach steady operation;
• inlet of outside air (infiltration, occasional opening of doors or
windows);
• air change (m3/h);
• outside design conditions: temperature (°C) and humidity (% rH);
• condensation on the cooling coil.
Note: In order to guarantee the right air flow-rate in all conditions,
the size should be overrated by 10%.
The pipes or hoses carrying air and water to the atomising heads must
be made from copper or plastic. DO NOT USE GALVANISED STEEL PIPES
as these may release impurities that block or damage the heads. When
supplying the cabinet with demineralised water, only use plastic or
stainless steel pipes. If the cabinet is supplied with demineralised water
(aggressive), Teflon or liquid Teflon must be used as the sealant.
In alternative to the above, polypropylene hoses can be used, which
allow faster and simpler connections by welding.
Careful attention needs to be paid to sizing the compressor. The air
consumption is determined by the capacity of the installation and not
by the maximum flow-rate of the cabinet. Consequently, the number
of atomising heads in the installation and their flow-rate need to be
considered. The air flow-rate of each head may have the following
values:
Nm3/h
CFM
MCAC2
6.86
4
MCAD2
8.64
5
To determine the diameters of the air/water outlet lines, refer to the tables
below. Make sure that the inside diameter of the pipes/hoses selected is
as described in the table under the item “ID”.
Always make sure that the rated pressure of the pipes/hoses is suitable
for the operating pressure of the installation, in any case PN8 or higher
diameter pipes/hoses are recommended.
MCAE2
12.7
7.5
The air consumption for all heads is equal to:
- 0.41 m3/h per litre of water at an operating pressure of 2.1 bars;
- 1.27 Nm3/h per litre of water at atmospheric pressure;
- 0.75 CFM per litre of water at atmospheric pressure.
type of heads
system
flow-rate l/h
30
A
B
C
D
line length
E
8
6
4
10 m
25 m
50 m
air
water
air
water
air
water
air
water
ID mm
ID mm
ID mm
ID mm
ID mm
ID mm
ID mm
ID mm
3
15
12
20
14
20
15
25
18
no. heads installed per
type
11
5m
60
22
15
11
9
6
20
12
25
14
30
15
30
18
120
44
30
22
18
12
30
12
30
14
35
15
40
18
230
85
58
43
34
23
35
12
40
14
45
15
55
18
37
“MCmultizone” +030221981 - rel. 2.3 - 09.12.2014
maintenance
12.3 Sizing air/water lines between cabinet &
distribution system
12.2 Sizing the compressor
MCAB2
5.08
3
distribution
where:
V = volume of air taken in by the compressor or introduced into the room
by the installation (Nm3/h)
Chead = air consumption of each head (Nm3/h)
n = number of heads
Note: If there is no fresh air inlet, once the required relative humidity
value is reach the humidification system will not need to work
much to maintain the humidity level.
Consequently, to save running costs when high capacities are required,
check the time required to reach steady operating conditions.
MCAA2
3.43
2
cabinet
The table below describes the specific consumption for each individual
head in Normal m3/h and CFM (Cubic Feet per Minute), referred to
atmospheric pressure:
12.1 Sizing an MC system
ENG
type of heads
system
flow-rate lb/h
A
B
C
D
line length
E
32 feet
80 feet
160 feet
air
water
air
water
air
water
air
water
ID mm
ID mm
ID mm
ID mm
ID mm
ID mm
ID mm
ID mm
65
11
8
6
4
3
5/8
1/2
3/4
5/8
3/4
5/8
1
3/4
130
22
15
11
9
6
3/4
1/2
1
5/8
1 1/4
5/8
1 1/4
3/4
260
44
30
22
18
12
1 1/4
1/2
1 1/4
5/8
1 3/8
5/8
1 1/2
3/4
500
85
58
43
34
23
1 3/8
1/2
1 1/2
5/8
1 3/4
5/8
2 1/4
3/4
Note: If the air line is more than 50 metres log, size the line so that
the pressure drop does not exceed 0.2 bar.
Try to limit the number of connections in the air and water lines to the
minimum possible.
The use of elbow or “T” connectors and reducers/adapters will increase
the pressure drop in the lines. The diameters shown in the tables have
been selected considering the use of a pair of connectors in each line, if
the number of connectors doubles choose the next largest diameter.
maintenance
distribution
cabinet
no. heads installed per type
16 feet
“MCmultizone” +030221981 - rel. 2.3 - 09.12.2014
38
ENG
13. INSTRUCTIONS FOR INSTALLATION IN ROOMS
Note: see Chapter 2 for the connection of the atomising heads.
The cabinet control system can be connected to:
• signal from an external controller.
• ambient humidity probe.
• signal from external controller plus limit probe.
• two humidity probes: ambient plus limit
• one temperature probe and one limit probe.
If installing humidity and temperature probes:
• The ambient humidity control probe must be located inside the
return air duct. This sensor can also be positioned in the room being
humidified. Make sure, however, that the place where it is installed is
away from flows of air that are hotter or colder than the environment,
or is not in contact with perimeter walls.
• The temperature probe must follow the same rules as described
above for the humidity probe.
• The high humidity limit probe should be located downstream of the
atomisation manifold in a position where it cannot be wet by the jet of
atomised water (e.g. after the cooling coil, or after a droplet separator,
or near the fan).
The air line also acts as the support for all the heads. The water line must
always be lower than the atomising heads to ensure emptying and drying
when the installation is off.
Size the water and air lines as shown in the table in paragraph 4.3
13.2 Assembling the atomising head
For each atomising head, a kit for assembly in the room is available that
makes installation simpler and faster. The assembly kit can be used both
for normal water and for aggressive water. The drawing (paragraph 3.2)
illustrates how to fit the kit.
• All the atomising heads must be installed at the same height to avoid
variations in pressure that would make the sprays of atomised water
less uniform.
• The assembly kit allows the head to be turned vertically so as to aim
the spray as desired.
• A readily accessible ball valve should be installed at the end of each
line for cleaning (bleeding) the lines when first starting and at the start
of each season.
• The water lines must not have “pockets” along the path so that the
installation can be drained completely by gravity when stopped.
• Make sure not to reverse the water/air inlets on the atomising heads;
the air inlet is always marked by a label showing “AIR”.
There are a number of important rules to be observed when installing an
MC humidification system:
1. The jet of atomised water must not come into contact with any
object along its path so as to avoid condensation and thus dripping.
Any obstacles in the trajectory of the jet of water can be avoided by
suitably aiming the atomising heads. Table shows the length and the
maximum diameter of the jet in relation to the humidity in the room.
The heads must also be installed so as to avoid two separate sprays
from overlapping. It is recommended to install them, inside the area
being humidified, as high as possible, without however wetting the
ceiling.
no
no
sì/yes
sì/yes
minimum installation height
4m
4m
4.6 m
6.1 m
9.4 m
max spray diameter
0.75 m
0.75 m
0.90 m
1.20 m
1.50 m
39
visible spray distance <50% rH
3.00 m
3.35 m
3.65 m
4.00 m
4.60 m
visible spray distance >50% rH
4.55 m
4.90 m
5.20 m
6.10 m
7.00 m
“MCmultizone” +030221981 - rel. 2.3 - 09.12.2014
maintenance
13.4 Important rules to be followed
Luce/Light
head flow-rate
2.7 l/h
4.0 l/h
5.4 l/h
6.8 l/h
10.0 l/h
cabinet
13.3 Positioning the humidity probes
distribution
13.1 Tips for correct installation
ENG
cabinet
2. The air/water lines must not have variations of height.
3. If the filling and washing functions are featured, install the NO
4.
maintenance
distribution
5.
6.
7.
8.
9.
10.
drain solenoid valve supplied as an option at the end of the line.
The drain hose connected downstream of the solenoid valve must
have a diameter that is greater than or equal to diameter of the line
upstream. If this is not installed, fit an easily accessible ball valve for
cleaning (bleeding) the line when commissioning and restarting
each season.
At the end of the air line, an easily accessible ball valve should be
fitted for cleaning (bleeding) the line when commissioning and
restarting each season.
To control the pressure in the air line, use one of the following devices,
installed at the end of the line:
• Pressure gauge (supplied as an option)
• Pressure transducer (supplied as an option)
• With the devices listed above, depending on the type of cabinet
used, refer to the following:
for ON/OFF cabinets:
• With a pressure gauge installed at the end of the line, the pressure
drop in the line can be displayed and, if necessary, the pressure
increased to 2.1 bars using the manual pressure regulator located
inside the cabinet.
• With the pressure transducer, the pressure at the end of the line
can be shown on the controller display and, if necessary, increased
using the manual pressure regulator.
for cabinets with modulating control:
• With a pressure gauge installed at the end of the line, the pressure
at the end of the line can be read and, if necessary, increased using
the corresponding parameter on the electronic controller.
• With the pressure transducer, the cabinet automatically controls
the pressure in the installation to the optimum value so as to
compensate for any pressure drop in the line.
The cabinet drain line must be connected directly to a drain cycle at
a height of at least 50 mm below the level of the heads.
The position of the cabinet must be selected so as to guarantee
the shortest path to the lines. If the lines are very long (>50 m),
the cabinet should be positioned in the centre of the line, so as to
balance the pressure.
The atomising heads must be distributed so as to uniformly cover the
entire area involved. The control cabinet must always be located in a
central position in reference to the layout of the heads.
The humidity sensor must be positioned where possible in a central
area of the space being humidified, in a point in which there are no
flows of humidified air and atomised water from the atomising heads.
In addition, avoid fitting the humidity sensor on a perimeter wall of
the building, as the temperature of the wall may be affected by the
outside temperature and thus influence the reading.
Shielded cables should be used to connect the control cabinet to the
following devices:
• humidity, limit and temperature probes, air line pressure sensor
(optional)
• water line drain solenoid valve (optional).
Avoid running these cables near other power cables (electric motors,
contactors, high voltage wires, etc...)
“MCmultizone” +030221981 - rel. 2.3 - 09.12.2014
40
ENG
14. INSTRUCTIONS FOR INSTALLATION IN DUCTS
For duct applications, the solution with two probes is recommended:
• humidity probe or signal from external controller
• limit probe
this solution can be used indifferently for both types of cabinet:
• ON/OFF
• Modulating
Figure 12 shows the possible positions for the atomised water manifold.
The control cabinet must where possible be installed near the manifold
with the atomising heads.
Critical measurements for the assembly of the manifold in the duct:
1. Distance of the heads from the surfaces of the duct::
The maximum distance H reached by the jets of atomised water
is shown in the under table. The distance H is very important for
preventing the jet of atomised water from wetting the duct; this is
the most typical installation the manifold (Fig. 14.a).
The modulating cabinet is recommended for this type of application.
By modulating the capacity of the atomisation system, the maximum
possible production can be delivered without ever reaching saturation
conditions inside of the duct. The atomisation manifold (Fig. 11) is made
up of an air line and a water line located below. At the end of the lines,
two ball valves should be installed for bleeding the lines.
distribution
duct
front view
H
air flow
cabinet
14.1 Positioning the atomisation manifold
air flow
Fig. 14.a
water line
air line
cabinet
230 l/h
60 l/h
air line
22 mm (1/2”G)
14 mm (1/2”G)
water line
22 mm (1/2”G)
14 mm (1/2”G)
2.7 l/h
4.0 l/h
660
610
559
508
457
406
356
737
686
610
559
508
432
381
5.4 l/h
6.8 l/h
distance H in mm
914
1219
838
1092
737
965
660
838
559
711
483
584
406
432
10 l/h
1792
1605
1419
1232
1045
859
635
If the height available is not sufficient, the manifold can be installed
as shown in Fig. 14.b. This type of installation is used to humidify in
smaller ducts. Any losses due to condensation and removed by the
droplet separator will however be greater.
air flow
Fig. 14.b
Never fit the heads against the flow
If, based on the top table, the height of the duct is not sufficient, one
solution may be to fit the manifold outside the duct, with the ends
of the nozzles spraying inside, as can be seen in Fig. 14.c. This saves
around 20 cm.
air flow
Fig. 14.c
41
“MCmultizone” +030221981 - rel. 2.3 - 09.12.2014
maintenance
air speed
in m/s
2.0
3.0
4.0
5.0
6.0
7.5
10.0
--RILSAN PA1 1 O 6 8 x 6 DIN 74324 AIM 29 --
--RILSAN PA1 1 O 6 8 x 6 DIN 74324 AIM 29 --
--RILSAN PA1 1 O 6 8 x 6 DIN 74324 AIM 29 --
--RILSAN PA1 1 O 6 8 x 6 DIN 74324 AIM 29 --
Maximum distance H in mm reached by the jet
cabinet
ENG
14.2 Important rules to be followed
14.3 Positioning the humidity probes
1. The minimum distance between two adjacent heads must never be
If installing humidity and temperature probes:
• The ambient humidity control probe must be located inside the
return air duct. This sensor can also be positioned in the room being
humidified. Make sure, however, that the place where it is installed is
away from flows of air that are hotter or colder than the environment,
or is not in contact with perimeter walls.
• The temperature probe must follow the same rules as described above
for the humidity probe.
• The high humidity limit probe should be located downstream of the
atomisation manifold in a position where it cannot be wet by the jet of
atomised water (e.g. after the cooling coil, or after a droplet separator,
or near the fan).
less than 100 mm. This is also the minimum distance between the
heads at the end and the side of the duct.
2. To determine the distance between heads, divide the width of the
duct by the number of heads plus one. If the distance is less than
100mm, more manifolds should be used, and if possible, larger
capacity heads.
3. If the height of the duct (D) is greater than::
D = 2 x H + 100 mm
distribution
(where H is the maximum distance in mm reached by the jet sprayed
by the heads to the top of the duct, as in Table 4), then the manifold
can be placed in the centre of the duct with the heads facing
alternately up and down.
4. The minimum height of the duct (M) to be able to install the
distribution manifold with a 90° jet is equal to:
M = H + 180 mm
5.
maintenance
6.
7.
8.
9.
14.4 Manifolds for installation in ducts
If this space is not available, then the heads must be installed outside
of the duct with the jet spraying inside (Fig. 14.c) or lower capacity
heads used.
The jet of atomised water must never come into contact with
obstacles (wall reinforcement bars) before total evaporation (free
path of evaporation - PL).
Never fit the heads in the opposite direction to the air flow.
If the filling and washing functions are featured, install the NO
drain solenoid valve supplied as an option at the end of the line.
The drain hose connected downstream of the solenoid valve must
have a diameter that is greater than or equal to diameter of the line
upstream. If this is not installed, fit an easily accessible ball valve for
cleaning (bleeding) the line when commissioning and restarting
each season.
At the end of the air line, an easily accessible ball valve should be
fitted for cleaning (bleeding) the line when commissioning and
restarting each season.
To control the pressure in the air line, use one of the following devices,
installed at the end of the line:
Pressure gauge (supplied as an option)
Pressure transducer (supplied as an option)
With the devices listed above, depending on the type of cabinet
used, refer to the following:
for ON/OFF cabinets:
• With a pressure gauge installed at the end of the line, the pressure
drop in the line can be displayed and, if necessary, the pressure
increased to 2.1 bars using the manual pressure regulator located
inside the cabinet.
• With the pressure transducer, the pressure at the end of the line
can be shown on the controller display and, if necessary, increased
using the manual pressure regulator.
for cabinets with modulating control:
• With a pressure gauge installed at the end of the line, the pressure
at the end of the line can be read and, if necessary, increased using
the corresponding parameter on the electronic controller.
• With the pressure transducer, the cabinet automatically controls
the pressure in the installation to the optimum value so as to
compensate for any pressure drop in the line.
“MCmultizone” +030221981 - rel. 2.3 - 09.12.2014
Special manifold kits are available for installations in ducts, sized according
to the number of atomising heads required and the dimensions of the
AHU/ducts.
42
ENG
15. MAIN ADJUSTMENTS
cabinet
There are fundamentally three components that require adjustments:
• atomising heads;
• air and water lines;
• electronic controller.
Heads
distribution
The screw on the rear of the head is used to adjust the atomised water
flow-rate. This is calibrated in the factory to the reference values (2.1 bars
air, 0.35 bars water) for the design flow-rate, which may be 2.7; 4.0; 5.4; 6.8
or 10 l/h. If the spray is visibly different in intensity from the other similar
heads, or the environmental conditions mean higher or lower absorption,
the screw can be adjusted to increase or decrease the water flow-rate.
This operation should only be performed by authorised personnel (CAREL
service centres).
Air and water line
maintenance
The air and water pressure in the respective lines must have the following
values:
• Cabinet air inlet: 5 to 7 bars
• Cabinet air outlet: 2.1 bars
• Cabinet water inlet: 3 to 7 bars
• Water outlet:
• 0.35 bars if the heads and cabinet are at the same height;
• (0.35+Hx0.1) bars if the heads and cabinet are at different heights.
H is the height between the heads and the cabinet water line in
metres.
Note: maximum height between the cabinet and the water line
is 20 m.
The MC modulating humidification system can modulate the production
of atomised water by adjusting the air pressure at the heads, allowing a
proportional variation in flow-rate.
• The minimum pressure is set as default to 1.2 bars.
• The maximum pressure is set as default to 2.1 bars
These values can be modified so as to optimise:
• the minimum pressure according to the type of atomising head used
• the maximum pressure according to the pressure drop in the line (also
see chapters 5.3; 6.2).
in the case of modulating units with pressure transducer at the end of the
air line, the maximum pressure is controlled automatically (the transducer
is supplied by CAREL as an option).
43
“MCmultizone” +030221981 - rel. 2.3 - 09.12.2014
ENG
16. MAINTENANCE
cabinet
16.1 Maintenance procedures
Even if the MC humidification system does not generally require special
maintenance, preventive maintenance should be performed regularly,
annually or before starting each season. The richer the water in salts or
impurities, the more frequently checks are required.
distribution
Devices requiring checks:
Compressor: follow the manufacturer’s instructions
Atomising heads: once a year remove and clean the nozzle, lubricate the
o-ring with silicone grease and in case change them.
Air and water line: once a year the air and water lines should be bled to
remove any sediments, traces of oil and dirt. To do this, follow the system
start-up procedure.
Pressure regulators and solenoid valves: once a year open and clean to
remove any debris and deposits.
pCO3 electronic controller + pGD terminal and humidity probes: once
a year check the condition of the probes and recalibrate if necessary. Do
not use compressed air or solvents to clean the probe sensor.
maintenance
16.2 Kits & optional accessories for the air/
water line (see chap. 2)
NO solenoid valve at end of line for NW (normal water)
NO solenoid valve at end of line for AW (aggressive water)
M
M
C
C
K
K
D
D
V
V
W
W
L
L
0
0
0
0
0
1
pressure transducer l=10 m
pressure transducer l=50 m
pressure transducer l=100 m
M
M
M
C
C
C
K
K
K
P
P
P
T
T
T
0
0
1
1
5
0
0
0
0
0
0
0
0
0
0
air outlet pressure gauge 0 to 4 bars
water outlet pressure gauge AW 0 to 2.5 bars
M
M
C
C
K
K
M A
M W
0
0
4
2
0
5
0
0
0
1
UV lamp sanitising kit
UV lamp
M
M
C
C
K
K
S
U
U
V
V
0
0
0
0
0
0
0
0
0
5” water filter container
5μ water filter cartridge
1/2” air filter
3/8” oil filter for air
M
M
M
M
C
C
C
C
F
C
F
F
I
0
I
I
L
5
L
L
W
P
A
O
A
P
I
I
T
0
R
L
0
0
0
0
5
5
1
1
humidity probes for ducts 10 to 90% rH
humidity probes for ducts 0 to 100% rH
ambient humidity probes 10 to 90% rH
temperature-humidity probes for industrial environments -10 to 70 °C/ 0 to 100% rH
temperature-humidity probes for industrial environments 0 to 50 °C / 10 to 90% rH
D
D
D
D
D
P
P
P
P
P
D
D
W
P
P
C
C
C
C
C
1
2
1
2
1
1
1
1
1
1
2
2
2
2
2
0
0
0
0
0
0
0
0
0
0
0
0
0
0
0
Atomising head assembly kit
M
C
K
1
A
W
0
0
0
0
Atomising head mod. A 2.7 l/h
Atomising head mod. B 4.0 l/h
Atomising head mod. C 5.4 l/h
Atomising head mod. D 6.8 l/h
Atomising head mod. E 10 l/h
M
M
M
M
M
C
C
C
C
C
A
A
A
A
A
A
B
C
D
E
2
2
2
2
2
0
0
0
0
0
0
0
0
0
0
0
0
0
0
0
0
0
0
0
0
0
0
0
0
0
16.3 Kits & optional accessories for the
atomising heads (see chap. 11)
“MCmultizone” +030221981 - rel. 2.3 - 09.12.2014
44
ENG
exploded drawing
1
MCKA060D00
ON/OFF air line 60 l/h
2
3
4
6
5
2
MCKA060DU0
ON/OFF air line
60 l/h UL
MCKA230D00
ON/OFF air line 230
l/h
1
2
3
4
5
6
2
MCKA230DU0
ON/OFF air line
230 l/h UL
MCKA060H00
modulating air line
60 l/h
1
4
2
3
5
component code
component description
M C K M A 1 2 0 0 0 pressure gauge 0 to 12 bars
M C K M N F D 0 0 0 manifold
manual air pressure
MCKMR0A060
regulator 60 l/h
NC air solenoid valve
MCKFSVBC00
60 l/h/water NW
air outlet pressure gauge 0
MCKMA04000
to 4 bars
M C K P S 0 0 0 0 0 pressure switch
n.
1
2
M C K M A 1 2 0 0 0 pressure gauge 0 to 12 bars
M C K M N F D 0 0 0 manifold
manual air pressure
MCKMR0A230
regulator 230 l/h
M C K F S V A C 0 0 NC air solenoid valve 230 l/h
M C K M N F D 0 0 0 manifold
1
2
3
MCKPS00000
6
MCKA230H00
modulating air line
230 l/h
1
4
2
3
5
MCKW000000
ON/OFF normal water
line 230 l/h
1
2
3
4
5
2
5
6
4
2
1
2
M C K A M V A 0 0 0 modulating valve
3
NC air solenoid valve
60 l/h/water NW
4
M C K M N F D 0 0 0 manifold
2
M C K M A 1 2 0 0 0 pressure gauge 0 to 12 bars
M C K M N F D 0 0 0 manifold
1
2
M C K A M V A 0 0 0 modulating valve
3
MCKFSVAC00
MCKA230HU0
modulating air line
230 l/h UL
4
M C K M A 1 2 0 0 0 pressure gauge 0 to 12 bars
M C K M N F D 0 0 0 manifold
MCKFSVBC00
MCKA060HU0
modulating air line 60
l/h UL
pressure switch
3
NC air solenoid valve
230 l/h
4
M C K M N F D 0 0 0 manifold
2
M C K M A 1 2 0 0 0 pressure gauge 0 to 12 bars
M C K M N F D 0 0 0 manifold
1
2
MCKMR0W000
manual water pressure
regulator
3
6
NC air solenoid valve
60 l/h/water NW
water outlet pressure
MCKMW02500
gauge NW 0 to 2.5 bars
NO solenoid water
MCKDSVWC00
valve NW
MCKFSVBC00
MCKW0000U0
ON/OFF normal water
line 230 l/h UL
MCKW000001
ON/OFF aggressive
water line 230 l/h
inlet pressure gauge AW 0 to
10 bars
M C K M N F D 0 0 0 manifold
MCKMW10001
1
2
3
4
5
2
6
5
6
1
2
manual water pressure
MCKMR0W000
regulator
3
MCKFSVWC01
4
NC water solenoid valve AW
water outlet pressure gauge
MCKMW02501
AW 0 to 2.5 bars
MCKW0000U1
ON/OFF aggressive
water line 230 l/h UL
4
5
M C K D S V W C 0 1 NO solenoid water valve AW 6
45
“MCmultizone” +030221981 - rel. 2.3 - 09.12.2014
distribution
code & description
maintenance
line drawing
cabinet
16.4 Spare parts for air/water line
(see paragraph 1.4)
maintenance
distribution
cabinet
ENG
NC air solenoid valve 60 l/h/water for NW
NC air solenoid valve 230 L/h
NO water solenoid valve for NW
NC water solenoid valve for AW
NO water solenoid valve for AW
M
M
M
M
M
C
C
C
C
C
K
K
K
K
K
F
F
D
F
D
S
S
S
S
S
V
V
V
V
V
B
A
W
W
W
C
C
C
C
C
0
0
0
0
0
0
0
0
1
1
pressure gauge 0 to 12 bars
inlet pressure gauge AW 0 to 10 bars
air outlet pressure gauge 0 to 4 bars
water outlet pressure gauge NW 0 to 2.5 bars
water outlet pressure gauge AW 0 to 2.5 bars
M
M
M
M
M
C
C
C
C
C
K
K
K
K
K
M A
M W
M A
M W
M W
1
1
0
0
0
2
0
4
2
2
0
0
0
5
5
0
0
0
0
0
0
1
0
0
1
manual air pressure regulator 60 l/h
manual air pressure regulator 230 l/h
manual water pressure regulator
modulating valve
M
M
M
M
C
C
C
C
K
K
K
K
M R
M R
M R
A M
0
0
0
V
A
A
W
A
0
2
0
0
6
3
0
0
0
0
0
0
M
M
M
M
M
M
M
M
M
M
M
M
M
M
M
M
C
C
C
C
C
C
C
C
C
C
C
C
C
C
C
C
K
K
K
K
K
K
K
K
K
K
K
K
K
K
K
K
C
C
C
C
C
C
C
C
C
C
C
C
C
C
C
C
0
0
0
0
2
2
2
2
0
0
0
0
2
2
2
2
6
6
6
6
3
3
3
3
6
6
6
6
3
3
3
3
C
C
C
C
C
C
C
C
H
H
H
H
H
H
H
H
D
1
D
1
D
1
D
1
D
1
D
1
D
1
D
1
M
M
S
S
M
M
S
S
M
M
S
S
M
M
S
S
0
0
0
0
0
0
0
0
0
0
0
0
0
0
0
0
M
M
M
M
M
M
P
C
C
C
C
C
C
G
K
K
K
K
K
K
D
M
P
A
T
F
A
0
N
S
L
R
U
R
0
F
0
0
0
S
V
0
D
0
0
0
E
A
2
0
0
0
0
0
0
F
0
0
0
0
0
0
0
0
0
0
0
0
0
K
16.5 Pre-programmed pCO3 controllers
pre-programmed pCO3 controller, 60 l/h ON/OFF Master CE
pre-programmed pCO3 controller, 60 l/h ON/OFF Master UL
pre-programmed pCO3 controller, 60 l/h ON/OFF Slave CE
pre-programmed pCO3 controller, 60 l/h ON/OFF Slave UL
pre-programmed pCO3 controller, 230 l/h ON/OFF Master CE
pre-programmed pCO3 controller, 230 l/h ON/OFF Master UL
pre-programmed pCO3 controller, 230 l/h ON/OFF Slave CE
pre-programmed pCO3 controller, 230 l/h ON/OFF Slave UL
pre-programmed pCO3 controller, 60 l/h modulating Master CE
pre-programmed pCO3 controller, 60 l/h modulating Master UL
pre-programmed pCO3 controller, 60 l/h modulating Slave CE
pre-programmed pCO3 controller, 60 l/h modulating Slave UL
pre-programmed pCO3 controller, 230 l/h modulating Master CE
pre-programmed pCO3 controller, 230 l/h modulating Master UL
pre-programmed pCO3 controller, 230 l/h modulating Slave CE
pre-programmed pCO3 controller, 230 l/h modulating Slave UL
16.6 Electrical panel kit and spare parts
(see paragraph 1.4)
manifold
pressure switch
power supply 110/230 Vac 12 Vdc 0.5 A
transformer
fuses
modulating valve regulator
pGD0 kit for setting pLAN address
“MCmultizone” +030221981 - rel. 2.3 - 09.12.2014
46
ENG
17. TROUBLESHOOTING
cause
C1 active alarm
C1 no power to the cabinet
C2 the fuses are blown
solution
S1
check the alarm in “table of alarms”
S1
check that there is power at terminals LN
S2
check the fuses
C1 failure to detect the flow switch alarm
S1
S2
5
the air outlet pressure doesn’t reach 2.1
bars
C1 compressor undersized
S1
C2 for proportional units, without the transducer at
the end of the line: maximum limit pressure too
low.
C3 for ON/OFF units, pressure regulator set too low.
C1 air line long and made from deformable material
S2
6
in proportional systems: the air outlet
pressure swings
7
air line active yet the heads don’t atomise C1
water.
C2
C3
C4
C5
C6
8
9
water pressure reaches high values and is C1
not controlled.
for duct installations: low absorption
C1
of atomised water and area under the
atomisation heads wet
C2
10
water leaks from the NO solenoid valve in C1
the cabinet or at the end of the line
11
with the unit off or in stand-by with the
NC solenoid valve closed, water leaks
C1
12
atomising heads with abnormal flow,
adjusting the calibration screw brings no
improvement.
C1
C2
C3
13
14
the heads produce a jet of water when
there is no air
the ambient humidity stabilises at values
below the set point
C1
C1
make sure the flow switch is connected to
terminals ID6-COM on the unit
check the correct configuration of the flow
switch alarm contact: installer menu>external
alarms.
check the flow-rate of the compressor in
relation to the to the consumption expected
for the installation
check the maximum pressure set: installer
menu>operating options
S3
S1
check the calibration of the pressure regulator
decrease inlet pressure to the cabinet while
ensuring the pressure at the heads reaches 2.1
bars
the air outlet pressure is too low
S2.1 ON/OFF unit: check the inlet air pressure and
the air pressure regulator
S2.2 proportional unit, without pressure transducer
end of the line: check air pressure limit, installer
menu>operating options
water line NC solenoid valve not powered
S2
check 24 V power to the solenoid valve.
water line NO solenoid valve not powered
S3
check 24 V power to the solenoid valve.
water pressure regulator closed (fully unscrewed) S4
adjust the pressure regulator so the outlet
pressure is 0.35 bars
regulator not adjusted according to the height of S5
adjust the pressure regulator so the outlet
the heads
pressure is 0.35 bars plus 0.1 bars for each
metre of difference in height between the
cabinet and distribution line
water pressure regulator dirty
S6
remove the water pressure regulator and clean
any impurities.
water pressure regulator dirty
S1
remove the water pressure regulator and clean
any impurities.
air speed in the duct too high in relation to the
S1
check the sizing of the installation
free path between the atomising heads and
droplet separator.
overlapping sprays of atomised water or contact S2
optimise the positioning of the heads
between the spray of atomised water and the
walls of the duct
impurities in the solenoid valve that prevent
S1
remove the solenoid valve, remove the coil,
complete closing.
unscrew the sleeve, remove the impurities,
clean the body and sleeve and reassemble.
impurities in the solenoid valve that prevent
S1
remove the solenoid valve, remove the coil,
complete closing.
unscrew the sleeve, remove the impurities,
clean the body and sleeve and reassemble.
atomising heads dirty
S1
remove the head and clean.
air and water pressure at the heads outside the
S2
check the air and water pressure in the cabinet
limits
and at the end of the line
oil in the air line
S3
check the oil separator filter upstream of the
cabinet.
air/water connections reversed
S1
reverse the connection observing the markings
on the heads
the capacity of the installation is not sufficient to S1.1 review the sizing of the installation
meet the requirements
S2.1 adjust the heads to increase production
increase the number of the heads in relation
to the maximum flow-rate of the cabinet. See
points 8 and 9.
CAREL reserves the right to modify the features of its products without prior notice.
47
“MCmultizone” +030221981 - rel. 2.3 - 09.12.2014
distribution
4
problem
alarm status displayed
unit powered and enabled, the switch
on the front is in position “1” yet the
humidifier won’t start.
saturation and condensation inside the
duct caused by the fan stopping.
maintenance
line
1
2
cabinet
17.1 Troubleshooting table
Notes:
Notes:
Notes:
CAREL INDUSTRIES HQs
Via dell’Industria, 11 - 35020 Brugine - Padova (Italy)
Tel. (+39) 049.9716611 - Fax (+39) 049.9716600
e-mail: [email protected] - www.carel.com
“MCmultizone” +030221981 - rel. 2.3 - 09.12.2014
Agenzia / Agency: