1
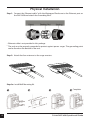
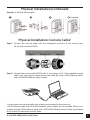
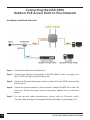
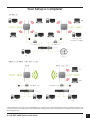
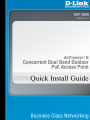
DAP-3690 Quick Install Guide
This installation guide provides basic instructions for installing the DAP-3690 Wireless Access
Point on your network. For additional information about how to use the Access Point, please
refer to the User Manual which is available on the CD included in this package or from the
D-Link support website.
System Requirements
• Computers with Windows®, Macintosh®, or Linux-based operating system with an
Ethernet adapter installed
• Internet Explorer 6.0, Firefox 3.0, Chrome 2.0, and Safari 3.0 and above.
Package Contents
•
•
•
•
•
•
•
•
•
•
•
DAP-3690 Concurrent Dual Band Outdoor PoE Access Point
CD-ROM (with Product Documentation)
PoE Base Unit
Four Dipole Antennas
Grounding Wire
Power Cord
Power Adapter
Mounting Kits
Console Cable (Indoor use only)*
Console Cable Waterproof Enclosure
Two LAN port Waterproof Enclosures
If any of the above items are missing, please contact your reseller.
* Do not use the console cable in an outdoor environment for long term use. We strongly recommend
a type CMX console cable for outdoor use.
2
D-Link DAP-3690 Quick Install Guide
Before You Begin
This chapter describes safety precautions and product information you have to know and
check before installing DAP-3690.
Professional Installation Required
1. Please seek assistance from a professional installer who is well trained in RF installation and
knowledgeable with local regulations.
2. To keep you safe and install the hardware properly, please read and follow these safety
precautions.
Safety Precautions
1. If you are installing an antenna for the first time, please seek assistance from a professional
installer.
2. Keep safety as well as performance in mind when selecting your installation site, especially
where there are electric power and phone lines.
3. When installing your antenna, note the following:
• Do not use a metal ladder;
• Do not work on a wet or windy day;
• Wear shoes with rubber soles and heels, rubber gloves, long sleeved shirt or jacket.
4. When the system is operational, avoid standing directly in front of the antenna. Strong RF
fields are present when the transmitter is on.
5. A safety grounding system is necessary to protect your outdoor installation from lightning
strikes and the build-up of static electricity. When mounting the Outdoor AP on the antenna
mast, you have to connect the Outdoor AP to the same grounding system* with the AC wall
outlet.
Note: The grounding system must comply with the National Electrical Code and safety
standards that apply in your country.
6. Always check with a qualified electrician if you are in doubt as to whether your outdoor
installation is properly grounded.
D-Link DAP-3690 Quick Install Guide
3
Physical Installation
Step 1: Connect the Ethernet cable1 with the Waterproof Enclosure to the Ethernet port on
the DAP-3690 and attach the Grounding Wire2.
Ethernet cable is not provided in this package
The unit must be properly grounded to protect against power surges. The grounding point
can be found on the bottom of the unit.
1
2
Step 2: Attach the four antennas to the surge arrestors.
Step 3a: Install Wall Mounting Kit
Complete
4
D-Link DAP-3690 Quick Install Guide
Physical Installation (continued)
Step 3b: Install Pole Mounting Kit
Complete
Physical Installation: Console Cable1
Step 1: Connect the console cable with the waterproof enclosure to the console port
(RJ-45 side) on the DAP-3690.
Step 2: Connect the console cable (RS232 side) to your laptop or PC. If the supplied console
cable is too short, please extend the console cable by using a CAT5e Ethernet cable2
and a CAT5e RJ45 Modular Inline Coupler2.
Do not expose the console cable in an outdoor environment for long term use.
CAT5e Ethernet cable and CAT5e RJ45 Modular Inline Coupler are not included. Please use a
straight-through CAT5e Ethernet cable and a CAT5e RJ45 Modular Inline Coupler (two female
RJ-45 sockets) to extend the console cable.
1
2
D-Link DAP-3690 Quick Install Guide
5
Connecting the DAP-3690
Outdoor PoE Access Point to Your Network
Hardware Installation Overview
Step 1: Complete the Physical Installation first.
Step 2: Connect the Ethernet (connected to the DAP-3690 in Step 1 on page 4) to
the P+ DATA OUT port on the PoE base unit.
Step 3: Connect an Ethernet cable from a router/switch or PC to the DATA IN port on the
PoE base unit.
Step 4: Attach the power adapter to the connector labeled POWER IN on the PoE
base unit. Attach the power cord to the power adapter into an electrical
outlet.
Step 5: For the console cable requirements, please refer to “Physical Install:
Console Cable” on page 5 and connect the console cable to your laptop or PC.
6
D-Link DAP-3690 Quick Install Guide
Your Setup is Complete!
* Maximum Wireless signal rate derived from IEEE 802.11n specifications. Actual data throughput will vary. Network conditions and
environmental factors, including volume of network traffic, building materials and construction, and network overhead lower actual
data throughput rate.
D-Link DAP-3690 Quick Install Guide
7
Configuration
Connect the DAP-3690 to a Local Computer
If you are configuring the DAP-3690 locally (without connecting its power injector to a wired LAN),
connect a PC to the power injector’s Ethernet port using a CAT5 Ethernet cable.
1. Assign a static IP address to your PC which is in the same network segment with the DAP-3690.
The default IP address of this unit is 192.168.0.50.
2. To test the link status between your PC and the DAP-3690, click Start > Run and type cmd in
the box. At the prompt, execute a continuous ping command “ping 192.168.0.50 –t”. If the ping
request is getting replies, press CTRL-C to stop pinging. Open your web browser and enter the
bridge’s IP address in the address filed and press Enter.
Tech Support
D-Link’s website contains the latest user documentation and software updates for D-Link
products. U.S. and Canadian customers can contact D-Link Technical Support through our
website or by phone.
United States
Canada
Telephone
877-354-6555
Telephone
877-354-6560
Internet
Internet
http://www.dlink.com
http://www.dlink.ca
Version 1.0
June 28, 2011
Copyright ©2011 D-Link Corporation/D-Link Systems, Inc. All rights reserved. D-Link and the D-Link logo are registered trademarks
of D-Link Corporation or its subsidiaries in the United States and other countries. Other trademarks are the property of their
respective owners. Actual data throughput will vary. Network conditions and environmental factors, including volume of network
traffic, building materials and construction, and network overhead lower actual data throughput rate. Product specifications,
size and shape are subject to change without notice, and actual product appearance may differ from that depicted on the
packaging. Visit www.dlink.com for more details.
8
D-Link DAP-3690 Quick Install Guide