1
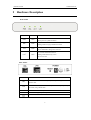
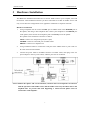
KD318RI ADSL Router
FOUR-PORT ADSL ROUTER
ADSL ROUTER
USER MANUAL
NOTICE
This document contains proprietary information protected by copyright, and this Manual and all the
accompanying hardware, software, and documentation are copyrighted. All rights are reserved. No
part of this document may be photocopied or reproduced by mechanical, electronic, or other means
in any form.
The manufacturer does not warrant that the hardware will work properly in all environments and
applications, and makes no warranty or representation, either expressed or implied, with respect to
the quality, performance, merchantability, or fitness for a particular purpose of the software or
documentation. The manufacturer reserves the right to make changes to the hardware, software, and
documentation without obligation to notify any person or organization of the revision or change.
All brand and product names are the trademarks of their respective owners.
© Copyright 2004
All rights reserved.
1
Content
1
Overview.................................................................................................................... 2
1.1
1.2
1.3
1.4
1.5
2
3
4
5
Features .......................................................................................................................2
Packet Contents...........................................................................................................3
System Requirements..................................................................................................4
Factory Defaults..........................................................................................................4
Warnings and Cautions ...............................................................................................4
Hardware Description.............................................................................................. 6
Hardware Installation .............................................................................................. 7
Software Installation ................................................................................................ 8
PC Configuration Guide .......................................................................................... 9
5.1
5.2
5.3
5.4
5.5
Local PC Configuration ..............................................................................................9
Access the program...................................................................................................10
Edit PVC ...................................................................................................................10
Routing mode setting ................................................................................................11
Reset Router..............................................................................................................12
Appendix
Frequent Asked Questions ...................................................................... 14
ADSL ROUTER
1
USER MANUAL
Overview
Thank you for using this Asymmetric Digital Subscriber Line (ADSL) router. With the asymmetric
technology, this device runs over standard copper phone lines. In addition, ADSL allows you to have
both voice and data services in use simultaneously all over one phone line. It is an ideal solution for
the small and medium size business environment.
This ADSL router provides a 10/100BaseT interface for Ethernet connection and an USB interface
for USB connection at the user end. Computers can simultaneously connect to the route either via its
USB, Switch, or both ports to share its high-speed Internet access. You can connect to its Switch port
regardless of the operating system you are using, or connect to its USB port to allow easy installation
to a USB equipped computer. It receives adaptive rates up to 24Mbps and transmits 1Mbps
upstream.
1.1
Features
1.1.1
ADSL Compliance
ANSI T1.413 issue 2
Dying Gasp
VLAN tagging
Downstream: Up to 24Mbps.
Max upstream speed: 1Mbps.
Rate Adaptive at 32 Kbps steps
Interoperable with all major DSLAM equipment
TR-068
TR-069
1.1.2
Standards & Protocols Conformance
ITU G.994 G.992.1(G.DMT) G.992.2(G.LITE) G.992.3
ITU G.992.3(G.DMT.BIS)
ITU G.992.5
T1.413
PPPoE
PPPoA
IPoA
1.1.3
Operating System Support
WINDOWS 98
WINDOWS 98 SE
2
ADSL ROUTER
USER MANUAL
WINDOWS ME
WINDOWS 2000
WINDOWS XP
Macintosh
LINUX
1.1.4
ATM Capabilities
ATM Connection
VPI Range: 0-255
VCI Range: 32-65535
Auto-search PVC
AESA (E.164, DCC, ICD)
SVC&PVC Support
UNI 3.0 & 3.1 Signaling
Support AAL 5
1.1.5
Management Support
Web Based GUI
Upgrade or update via FTP/HTTP
Command Line Interface via Telnet
Diagnostic Test
Firmware upgrade-able for future feature enhancement
1.1.6
1.2
Environmental
Operating humidity: 10%-90% non-condensing
Non-operating storage humidity: 5%-95% non-condensing
Packet Contents
The packet contents are as the following:
ADSL Router
x1
External Splitter
x1
AC adapter
x1
Telephone Line
x2
Ethernet Cable
x1
User Manual
x1
USB Cable
x1
CD
x1
3
ADSL ROUTER
1.3
USER MANUAL
System Requirements
Before using this ADSL router, verify that you meet the following requirements:
Subscription for ADSL service. Your ADSL service provider should provide you
with at least one valid IP address (static assignment or dynamic assignment via
dial-up connection).
One or more computers, each contains an Ethernet 10/100M Base-T network
interface card (NIC).
A hub or switch, if you are connecting the device to more than four computers.
For system configuration using the supplied web-based program: A web browser
such as Internet Explorer v5.0 or later, or Netscape v4.7 or later.
1.4
Factory Defaults
The device is configured with the following factory defaults:
IP Address: 192.168.1.1
Subnet Mask: 255.255.255.0
Encapsulation: RFC 2516 LLC
VPI/VCI: According to local information
1.5
Warnings and Cautions
Never install telephone wiring during storm. Avoid using a telephone during an
electrical storm. There might be a risk of electric shock from lightening.
Do not install telephone jacks in wet locations and never use the product near
water.
To prevent dangerous overloading of the power circuit, be careful about the
designed maximum power load ratings. Not to follow the rating guideline could
result in a dangerous situation.
Please note that telephone line on ADSL router must adopt the primary line that
directly outputs from junction box. Do not connect ADSL router to extension
phone. In addition, if your house developer divides a telephone line to multi
sockets inside the wall of house, please only use the telephone that has
connected with the splitter of ADSL router when you access the Internet. Under
the above condition, if you also install telephone with anti-cheat-dial device,
4
ADSL ROUTER
USER MANUAL
please pull out this kind of telephone, otherwise ADSL router may occur
frequently off-line.
5
ADSL ROUTER
2
USER MANUAL
Hardware Description
Front Panel
LED
Color
PWR
Green
DSL
Green
ACT
Green
LAN)
Green
Function
On: Power
Off: No power or system boot failed
Strady: ADSL link established and active
Blinking: ADSL is trying to establish a connect
Blinking: ADSL data activity occurs.
Off: No ADSL data is being sent or received.
On: LAN link established and active
Blinking: ADSL data activity occurs.
Off: No LAN link.
Rear Panel:
Port
DSL
LAN
Function
Connects the device to an ADSL telephone jack or splitter using a RJ-11
telephone cable
Connects the device to your PC's Ethernet port, or to the uplink port on your
hub/switch, using a RJ-45 cable
Reset
System reset or reset to factory defaults.
PWR
Connects to the supplied power adapter
Switches the unit on and off
6
ADSL ROUTER
3
USER MANUAL
Hardware Installation
This Hardware Installation describes how to connect ADSL router to your computer, LAN and
the Internet. This Installation assumes you have subscribed to an ISP for ADSL service and
only covers the basic configurations to be applied to residential or corporate networks.
Hardware Connection
1. Using a telephone line to connect the DSL port of ADSL router to the MODEM port of
the splitter, and using a other telephone line connect your telephone to the PHONE port
of the splitter, then connect the wall phone jack to the LINE port of the splitter.
The splitter comes with three connectors as below:
LINE: Connects to a wall phone jack (RJ-11 jack)
MODEM: Connects to the DSL jack of ADSL router
PHONE: Connects to a telephone set
2.
Using an Ethernet Cable to connect the LAN port of the ADSL router to your LAN or a
PC with network card installed.
3.
Connect the power cable to the PWR connector on ADSL router, then plug in the AC
power adapter to the AC power outlet, and then press the on-off button.
Notes: Without the splitter and certain situation, transient noise from telephone can interfere
with the operation of the ADSL router, and the ADSL router may introduce noise to the
telephone line. To prevent this from happening, a small external splitter must be
connected to each telephone.
7
ADSL ROUTER
4
USER MANUAL
Software Installation
This chapter shows you how to install the router’s USB drivers when PC connects to the router
via its USB port.
1. Insert the rectangular end of a USB cable into the USB port of your PC.
2. Insert the square end of the USB cable into the USB port of the Router.
3. Power on the router and then a dialog box of “ A new hardware is found” is displayed on
the screen.
4. Press “Next” button, the system then search for hardware driving program. Choose the
soft driver in the “assigned position” and press “next”, the system will automatically
install the driving program recorded on the soft disk into the system.
8
ADSL ROUTER
5
USER MANUAL
PC Configuration Guide
5.1
Local PC Configuration
5.1.1
Windows 95, 98, ME, XP
1. In the Windows task bar, click the “Start” button, point to “Settings”, and then click
“Control Panel”.
2.
Double-click the “Network” icon.
3.
On the “Configuration” tab, select the TCP/IP network associated with your network
card and then click “Properties”.
4.
In the “TCP/IP Properties” dialog box, click the “IP Address” tab. Set the IP address
as 192.168.1.x (x can be a decimal number from 2 to 254.) like 192.168.1.2, and the
subnet mask as 255.255.255.0.
5.
On the “Gateway” tab, set a new gateway as 192.168.1.1, and then click “Add”.
6.
Configure the “DNS” tab if necessary. For information on the IP address of the DNS
server, please consult with your ISP.
7.
Click “OK” twice to confirm and save your changes.
8.
You will be prompted to restart Windows. Click “Yes”.
5.1.2
Windows 2000
1.
In the Windows task bar, click the “Start” button, point to “Settings”, and then click
“Control Panel”.
2.
Double-click the “Network and Dial-up Connections” icon.
3.
In the “Network and Dial-up Connections” window, right-click the “Local Area
Connection” icon, and then select “Properties”.
4.
Highlight “Internet Protocol (TCP/IP)”, and then click “Properties”.
5.
In the “Internet Protocol (TCP/IP) Properties” dialog box, set the IP address as
192.168.1.x (x can be a decimal number from 2 to 254.), and the subnet mask as
255.255.255.0 and the default gateway as 192.168.1.1. Then click “OK”.
6.
Configure the “DNS” tab if necessary. For information on the IP address of the DNS
server, please consult with your ISP.
7.
Click “OK” twice to confirm and save your changes.
9
ADSL ROUTER
5.2
USER MANUAL
Access the program
After configuring the IP Address of you computer, powering on the ADSL Router, and
launching a web browser, such as Internet Explorer, use http://192.168.1.1 to log on to setting page.
Enter username ‘admin’
and password ‘adslroot’
Click OK
Attention: the username and password are both lowercase.
All the parameters shown in this page are the factory default settings.
5.3
Edit PVC
1.
Click“Device info WAN” to check whether the pre-defined PVC values contain the
value you need.
2.
If not, please select from “Advanced Setup WAN” and click “Edit” button.
10
ADSL ROUTER
USER MANUAL
3.
Please enter the VPI/VCI value you want, and continue clicking the“Next”button till the
confirmation page displays.
4.
Click the“Save”button in the summarize page to save the settings..
5.
Select from“Management Save/Reboot” and then click the “Reboot” button to restart
the ROUTER.
5.4
Routing mode setting
1.
Click“Device Info WAN” and check whether there is VPI/VCI value provided by
operator.
2.
If not, please operate according to steps “5.3 Editing PVC”till the instructions shown in
the figure display.
Select“PPP over Ethernet ( PPPoE )”in Connection Type and “LLC/SNAP-BRIDGING”
11
ADSL ROUTER
USER MANUAL
in Encapsulation Mode and then click“Next”.
3.
Enter user name and password provided by operator, then click“Next”.
4.
Click“Next”in the following page.
5.
Click the“Save”button in the summarize page to save the settings.
6.
Select from“Management Save/Reboot”and then click the“Reboot”button to restart the
ROUTER.
7.
If factory default settings of ROUTER includes VPI/VCI provided by operator, please
select from“Advanced Setup WAN” and find corresponding VPI/VCI value in the page
and click the“Edit”button. Then follow the steps as specified above.
8.
After routing settings are finished, if you want to enable DHCP service, then please set IP
address of PC network card to obtain an IP address automatically. If you don’t want to
enable DHCP service, then you need to assign an IP address for your PC network card and
set DNS address to the address provided by operator (If operator doesn’t provide the DNS
address, then the address is set to 192.168.1.1 that is the address of ROUTER).
Note: If you want to cancel all modification that you do on the router, please select from
“Management Setting Restore Default Settings” to restore factory default settings.
5.5
Reset Router
For convenience: shutdown your computer first.
1.
Switch the ADSL router OFF.
12
ADSL ROUTER
USER MANUAL
2.
On the Rear Panel of the ADSL router you will find a small hole with the word "reset"
written below it. It's just big enough for a ball-point tip. Insert a ball-point tip into this little
hole (actually it's a reset switch) and keep the ball-point tip in there.
3.
Switch the router ON, and hold the ball-point tip in the little hole.
You can release the ball-point after about 10 seconds. You have then completed the full-reset.
Your ADSL router will now have its factory default settings. IP address will be 192.168.1.1 and
the subnet mask will be 255.255.255.0.
Now you can reboot your PC again.
13
ADSL ROUTER
Appendix
USER MANUAL
Frequent Asked Questions
Q:
A:
None of the LEDs are on when you power on the ADSL router?
Please make sure what you use is the power adaptor attached with the ADSL router package,
and check the connection between the AC power and ADSL router.
Q:
A:
DSL LED does not turn on after connect telephone line?
Please make sure what you use is the standard telephone line (as attached with the package),
make sure the line is connected correctly and check whether there is poor contact at each
interface. Wait for 30 seconds to allow the ADSL router establishes connection with you ADSL
operator.
Q:
A:
DSL LED is in the circulation of slow-flashing and fast-flashing after connect telephone line?
This situation means the ADSL router is in the status of failing to establish connection with
Central Office. Please check carefully and confirm whether the ADSL router has been installed
correctly.
Q:
A:
LAN LED does not turn on after connect Ethernet cable?
Please make sure Ethernet cable is connected hub/PC and ADSL router correctly. Then please
make sure the PC/hub have been power on.
Please make sure that you use parallel network cable to connect UpLink port of hub, or use
parallel network cable to connect PC. If connect normal port of hub (not UpLink port), you
must use cross-cable. Please make sure that your network cables meet the networking
requirements above.
Q:
A:
PC cannot access the Internet?
First check whether PC can ping the interface Ethernet IP address of this product successfully
(default value is 192.168.1.1) by using ping application. If ping application fails, please check
the connection of Ethernet cable and check whether the states of LEDs are in gear.
If the PC uses private IP address that is set manually (non-registered legal IP address), please
check:
1. Whether IP address of the PC gateway is legal IP address. Otherwise please use the right
gateway, or set the PC to Obtain an IP address automatically.
2. Please confirm the validity of DNS server appointed to the PC with ADSL operator.
Otherwise please use the right DNS, or set the PC to Obtain an IP address automatically.
3. Please make sure you have set the NAT rules and convert private IP address to legal IP
address. IP address range of the PC that you specify should meet the setting range in NAT
rules.
Central Office equipment may have problem.
Q:
A:
PC cannot browse Internet web page?
Please make sure DNS server appointed to the PC is correct. You can use ping application
program to test whether the PC can connect to the DNS server of the ADSL operator.
Q:
A:
Initialization of the PVC connection failed?
Be sure that cable is connected properly from the DSL port to the wall jack. The DSL LED on
the front panel of the ADSL router should be on. Check that your VPI, VCI, type of
14
ADSL ROUTER
USER MANUAL
encapsulation and type of multiplexing setting are the same as what you collected from your
service provider, Re-configure ADSL router and reboot it. If you still can not work it out, you
may need to verify these variables with the service provider.
If the cause is not above given,please contact your local service provider!
15