1
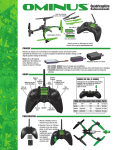
BEFORE FLYING, PLEASE
READ & UNDERSTAND
THESE INSTRUCTIONS!
and go to www.knowbeforeyoufly.org
™
Spare Blades
(2 black, 2 color)
Radio Controlled
Quadcopter
Controller
AA
Batteries (4)
Ominus Quadcopter
USB Charger
Flight
Battery
2G Memory
Card
Phone Mount
Card Reader
Light Shield
CHARGING
Plug the charger into a USB port or AC adapter (not included) as shown and connect the battery.
The charger LED is steady on when charging. The LED flashes when charge is complete.
• NEVER leave the battery unattended while charging.
• DO NOT allow the USB port to power down while the
charger is connected to the battery.
• ALWAYS unplug the charger from the USB port and
the battery when charging is complete.
INSTALL BATTERIES INTO RADIO
Slide the cover down and insert 4 AA batteries.
LINKING
H
ITC
W
RS
WE
PO
1. Turn on the radio with the throttle
at its lowest position.
2. Connect the battery to the Ominus and place it on a level
surface. The LED on the quad will flash rapidly when the
quad is linked to the radio and ready to fly.
ALWAYS unplug the battery after flying!
FLYING
Up
rd
wa
For
Rotate Right
ht
Rig
Rotate Left
t
Lef
Down
rd
wa
ck
Ba
FLYING BASICS
1. Take off by “slowly” advancing the left
stick until the quad takes off.
Up
Forward
2. Control altitude using the left stick.
Rotate Left
Rotate Right
Down
3. Use the right stick to move left, right,
forward, or backward.
4. Use the left stick (left/right) rotate or
spin left or right.
Right
Left
Backward
5. Always use small movements until you
learn how the model behaves.
DUAL RATES
The low rate sensitivity will always be 25% less than the high rate.
The overall controls can be adjusted by
Control sensitivity can be changed by pushing down on the right stick on
the controller. The controller will make a short, low-pitched beep.
This mode should be used when flying indoors or when learning
how to fly. The controller will make a short, high-pitched beep
when changing to high rates. This mode should be used when
flying outdoors or when more agility is desired.
1. Holding down the right stick until the controller starts beeping.
2. Continue holding down the right stick and advance the throttle
to the desired setting.
3. Release the right stick and return the throttle to 0%.
The default setting is when the throttle stick is at 50% (midstick).
FLIGHT MODE
Flight Mode Flight Mode Button Dual Rate
To toggle between the normal and expert flight
(accelerometers off) modes, press the Flight Mode Button.
When the accelerometers are off, the flight controller will
make the Ominus more agile, but also it is easier to crash.
Easy
Normal
Advanced
Expert
OFF
OFF
ON
ON
Low
High
Low
High
FLIGHT MODES (FLIGHTMODE)
Push down on right top button and
release. Audible low and high tone.
Flight Mode LEDs steady on: Easy and normal flight (accelerometers on)
Flight Mode LEDs flashing: Advanced and expert flight (accelerometers off)
LOW BATTERY INDICATOR
The LEDs on the Ominus will flash slowly when the battery voltage is low. The Ominus FPV should be landed as soon as possible to avoid damaging the battery.
Always unplug the battery after flight. The battery needs to be charged before the quadcopter is stored.
QUADCOPTER SENSOR CALIBRATION
If the quadcopter is constantly drifting in the same direction or a new flight control board has been installed, the sensors on the Ominus should be calibrated.
1. Center all the trim adjustments. To check the trim, push the trim button once on one side and then once on the opposite side. When the trim is centered,
the transmitter will emit a long, low pitched beep. The transmitter will emit a short beep of lower pitch as the adjustment gets closer to center and higher
pitch as the adjustment moves away from center. Continue pressing the trim button that has the lower pitch until the adjustment is centered.
2. Push down on the right stick and hold it. The radio will steadily beep while the stick is held down.
3. Press down on the left stick 3 times within 2 seconds. The radio will stop the steady beep and make a short beep when the stick is pressed the third time.
4. Release both sticks and push up on the throttle trim button. The red LED will flash slowly and become steady again when the calibration is complete.
5. Press down on the left stick to save the settings.
FIRST PERSON VIEW (FPV) SETUP
1. Install the “FPVCAM” app from Google Play (Android®) or the App Store (Apple®).
RE
MO
VE
INS
ER
T
2. Remove the protective film
from the camera lens.
3. Insert the memory card into the camera
on the quad. NOTE: ALWAYS have the
power off to the camera when installing
or removing the memory card.
Onboard camera is not to be used for commercial
ventures. Be sure to fly in a safe environment and
respect the privacy of others. Apple and the Apple
logo are trademarks of Apple Inc., registered in
the U.S. and other countries. App Store is a service
mark of Apple Inc. Android™ and Google Play are
trademarks of Google Inc.
4. Install the phone mount onto the controller. For optimal
performance, please keep the controller’s antenna at least 7"
(18cm) away from smartphones. Failure to do so may result in
unwanted interference which can cause pilots to lose control of
their model and/or experience poor video reception. Do not alter
the smartphone holder in any way.
6. Turn on the controller and plug in the battery for the Ominus FPV.
®
7. Go to the Wi-Fi setting on your phone and check that the FPVCAM is
on. The password for the FPV Cam is 1234567890.
Wi-Fi® is a registered trademark of the Wi-Fi Alliance.
5. Install the Light shield if desired.
8. Open the FPVCAM app on your phone and push the “+” in the upper
right hand corner. This will locate the camera.
9. Once the device finds the camera, push the
camera should be displaying at this point.
button. The FPV
FPV VIDEO RECORDING/PICTURES
EA
&
USH
P
REL
PUS
E
EAS
EL
&R
H
PUS STARTS
RECORD
H&
PUS
REL
EAS
E
RSTOPS
ELE
ASE
RECORD
H&
D
LOA
N
DOW
1. To activate the “record” function, simply push and release the Video
On/Picture Button on the back/right hand side of the controller.
2. While recording, you can take a still photo. Push and hold the Video
On/Picture Button for 2 seconds.
3. To stop recording video push the Video Off Button on the back/left
hand side of the controller.
5. To download the videos or photos to your computer, remove the
memory card from the camera, install it into the USB card reader. Then
insert the card reader into a USB port on your computer. Open the
removable disk folder and drag and drop the files onto your computer.
NOTE: You can also take pictures and stop/start videos directly from
the app. Access the controls by tapping on the screen.
6. Once videos/pictures are downloaded, they can be viewed in the
“picture” folder and be shared through social media.
4. Once you are done recording video or photos, click the download
button from the main screen. NOTE: The quad must still be plugged
in for this to work. This will download the video to your phone.
NOTE: If your computer doesn’t recognize .flv video formats, download
“VLC Media Player” from http://www.videolan.org
DELETING FILES
1. Files can be deleted from the memory card while the USB adapter is still installed into your computer by selecting the desired file(s) and deleting them.
2. If the memory card is installed in the camera you can delete the videos or photos by simply pushing and holding the desired video or photo for one
second. A box will appear with a trash can. Simply push the trash can icon and the video or photo will be deleted. You can select more than one file at
a time to be deleted. This can be done before or after they have been downloaded to your phone.
TROUBLESHOOTING
PROBLEM: The quadcopter will not respond to the radio.
SOLUTION: (1) Charge or change the battery on the quadcopter. (2) Turn off
the radio and disconnect the battery for the Ominus. Re-link the
quadcopter and radio.
PROBLEM: Gyro not working properly.
SOLUTION: (1) Battery voltage low. (2) Re-link. (3) Land onto the ground for 3
seconds and take off again.
PROBLEM: Red radio LED light flashing after linking.
SOLUTION: Replace with new AA batteries.
PROBLEM: Will not take off.
SOLUTION: Rotor blades incorrectly installed. See Rotor Blade Replacement
section.
PROBLEM: Unable to flip.
SOLUTION: Battery voltage too low.
PROBLEM: Quadcopter is shaking.
SOLUTION: Check the canopy, chassis, motors and rotor blades for damage.
BLADE REPLACEMENT
1. Remove screw that secures the rotor blade to the gear shaft.
2. Pull prop off the gear shaft.
3. Install new rotor blade and secure with screw.
Note: The rotor blades have arrows that indicate which direction they rotate. Please
refer to this diagram to verify that the correct replacement rotor blade is installed.
FRONT
Color Blades,
Color LEDs
REAR
Black Blades,
White LEDs
GEAR SHAFT REPLACEMENT
MOTOR REPLACEMENT
1. Remove the rotor blade from the gear shaft.
2. Push the shaft down to remove it from the gear.
3. Install the new gear shaft and rotor blade if it is not damaged.
Note: While the gear is out, check it carefully for any cracks or damage to
the teeth.
1. Remove the screw securing the motor cover to the arm and pull the cover
off the motor.
2. Use a small flat blade screwdriver to separate the motor plug from the
socket. DO NOT pull the wires.
3. Remove the motor from the frame and insert the replacement. Make sure
that the wire colors on the replacement motor are the same as the original.
The motors for the clockwise props have black and white wires. The
counter-clockwise props use motors with blue and red wires.
FLIGHT CONTROL BOARD REPLACEMENT
1. Remove all 4 motor covers.
2. Disconnect the camera wires from the quad.
3. Remove the 4 screws that secure the battery frame to the main frame.
4. Remove the LED covers on each arm.
5. Remove the control board. Transfer
the O-rings to the LEDs on the new
board.
6. Install the new control board and
route the wires for motors. To
prevent damage to the wires, route
them between the guides on the
inside of the arms.
7. Install the LED covers. There are openings on the cover for the wires. Before tightening the
screws, make sure the wires are positioned correctly.
8. Replace the motor covers.
9. Calibrate the quadcopter sensors.
BATTERY PRECAUTIONS
The Ominus FPV uses a lithium polymer (LiPo) battery. Follow these precautions to insure safe and trouble-free operation.
• ALWAYS disconnect the battery from the quadcopter when not in use.
• Only use the included charger with the flight battery.
• Do not attempt to use this charger with NiCd or NiMH battery packs.
• Do not attempt to use a damaged battery.
• This product contains a LiPo battery. Must be recycled or disposed of
properly.
• Do not leave the charger unattended while charging. Disconnect the
battery and unplug the charger immediately if either becomes hot!
However, it is normal for the charger to get warm.
• Disconnect the battery from the charger and carefully move the
battery to a fireproof location if the battery begins to swell or smoke!
• Never allow the battery temperature to exceed 140° F [60° C].
• Do not attempt to charge a battery if it is swollen or hot.
• Do not place the charger or any battery on a flammable surface or
near combustible materials while in use.
• Never disassemble or modify pack wiring in any way or puncture cells.
• Never charge inside a vehicle.
• Always disconnect the battery and remove the charger from the USB
port when not in use.
• Land your model immediately when the LEDs flash to indicate that the
battery power is low. Recharge the battery before attempting another
flight. A dangerous situation can occur when attempting to recharge
an over-discharged battery!
• ALWAYS keep a supply of sand accessible when charging. Dumping
sand on the battery will extinguish a LiPo chemical fire.
• ALWAYS KEEP OUT OF REACH OF CHILDREN
SAFETY PRECAUTIONS
Follow these safety precautions when operating this or any model quadcopter.
• Adult supervision required.
• Your Ominus FPV quadcopter should not be considered a toy, but rather
a small, working model. If not operated correctly, the model could
• Before flying, go to www.knowbeforeyoufly.org.
possibly cause injury to you or spectators and damage to property.
• Do not touch the spinning blades or fly over another person’s head.
• You must check the operation of the model before every flight to
• Keep your face and body as well as all spectators away from the
insure that the model has remained structurally sound.
rotors whenever the battery is connected.
• Do not alter or modify the model, as doing so may result in an unsafe
• Stay clear of buildings, trees and power lines. AVOID flying in or near
or unflyable model.
crowded areas. DO NOT fly close to people, children or pets.
• Maintain a safe pilot-to-quadcopter distance while flying.
REPLACEMENT PARTS
1
1
1
1
2
2
2
2
3
4
5
6
6
6
6
7
8
9
10
11
11
11
11
12
13
13
13
13
14
15
16
17
DIDE1150
DIDE1151
DIDE1152
DIDE1153
DIDE1154
DIDE1155
DIDE1156
DIDE1157
DIDE1141
DIDE1158
DIDE1114
DIDE1159
DIDE1160
DIDE1161
DIDE1162
DIDE1163
DIDE1131
DIDE1130
DIDE1164
DIDE1135
DIDE1136
DIDE1137
DIDE1138
DIDE1140
DIDM1105
DIDM1106
DIDM1107
DIDM1108
DIDE1165
DIDP1101
DIDE1166
DIDZ1502
DIDE1167
DIDJ1101
DIDP1120
DIDZ1501
HMXZ0002
Canopy GREEN
Canopy RED
Canopy BLUE
Canopy YELLOW
Prop Set GREEN
2
Prop Set RED
Prop Set BLUE
Prop Set YELLOW
Screw Set
Gear Set
4
Bearing Set
Main Frame GREEN
5
Main Frame RED
Main Frame BLUE
Main Frame YELLOW
Main Gear Shaft
5
Main Motor CCW R/F L/R
Main Motor CW L/F R/R
7
Motor Covers
LED Covers GREEN
LED Covers RED
LED Covers BLUE
10
LED Covers YELLOW
LED O-Rings
10
E-Board GREEN
E-Board RED
E-Board BLUE
E-Board YELLOW
Battery Frame
LiPo 1S 700mAh 35C
Camera Foam Tape
WIFI HD Camera
Q200 Phone Holder
Q200 Transmitter
16
USB 1S LiPo Charger
Micro Card Reader
Micro Card Reader
17
1
3
2
2
3
3
3
2
6
4
5
11
4
8
5
11
5
9
6
3
5
11
10
10
12
10
10
3
10
7
10
7
8
11
9
12
12
12
13
3
12
15
14
3
3
3
3
90-DAY LIMITED WARRANTY
PLEASE DO NOT RETURN YOUR PRODUCT TO THE STORE. Dromida will repair or replace factory defects for 90 days from the date of purchase.
This warranty specifically does not cover crash damage, misuse or abuse. To make a warranty claim, please contact our product support team at
1-217-398-8970 option 6 or e-mail us at [email protected]. If requested by Product Support, please send defective product to:
Hobby Services
3002 N Apollo Dr., Suite #1
Champaign, IL 61822
Please include a note about the problem, your contact information, and a copy of the receipt.
This warranty applies only if the product is operated in compliance with the instructions and warnings provided with each model. Dromida assumes
no liability except for the exclusive remedy or repair of parts as specified above. Dromida shall not be liable for consequential or incidental damages.
Some states do not allow the exclusion of consequential or incidental damages so the above exclusion may not apply to you. This warranty gives
you specific legal rights and you may also have other rights which vary from state to state.
FCC REQUIREMENT
This device complies with part 15 of the FCC rules. Operation is subject to the following two conditions.
(1) This device may not cause harmful interference.
(2) This device must accept any interference received, including interference that may cause undesired operation.
NOTE: THE MANUFACTURER IS NOT RESPONSIBLE FOR ANY RADIO OR TV INTERFERENCE CAUSED BY UNAUTHORIZED MODIFICATIONS TO THIS
EQUIPMENT. SUCH MODIFICATIONS COULD VOID THE USER’S AUTHORITY TO OPERATE THE EQUIPMENT.
CE COMPLIANCE INFORMATION FOR THE EUROPEAN UNION
INSTRUCTIONS FOR DISPOSAL OF WASTE EQUIPMENT BY PRIVATE USERS IN THE EUROPEAN UNION:
This symbol on the product or its packaging indicates this product must not be disposed of with other household waste. Instead, it is the
user’s responsibility to dispose of their waste equipment by handing it over to a designated collection point for the recycling of waste
electrical and electronic equipment. The separate collection and recycling of your waste equipment at the time of disposal will help to
conserve natural resources and ensure that it is recycled in a manner that protects human health and the environment. For more information about
where you can drop off your waste equipment for recycling, please contact your local city office, your household waste disposal service or location
where you purchased the product.
DECLARATION OF CONFORMITY:
FCC ID: U45-NEOT015
Dromida Wi-Fi Camera
Product: Dromida 2.4GHz 4-Channel Tx Rx
Item number: DIDJ1101 Q200
Equipment class: 1
Q200 transmitter: The objects of the declaration described here are in conformity with the requirements of the specifications listed below, following
the provisions of the European 2006/95/EC Low Voltage Directive:
EN 60950-1:2006 Safety
The objects of the declaration described here are in conformity with the requirements of the specifications listed below, following the provisions of
the European R&TTE directive 1995/5/EC:
EN300 328 V1.8.1.
Technical requirements for radio equipment
ETSI EN 301 489-1 V1.8.1, 301 489-17 V1.3.2 General EMC requirements for radio equipment
Hobbico, Inc.
2904 Research Road
Champaign, IL USA 61826
Distributed in Europe by Revell GmbH
D-32257 Bünde Germany
The associated regulatory agencies of the following countries recognize
the noted certifications to this product as authorized for sale and use.
UK
EE
RO
NL
DE
LV
SI
LU
DK
LT
AT
MT
BG
PL
IT
CY
SE
CZ
ES
FI
SK
PT
GR
HU
IE
DIDE02xx Mnl v1.1 • © 2015 DROMIDA, A HOBBICO COMPANY
dromida.com