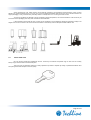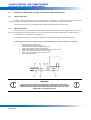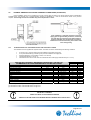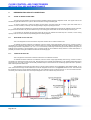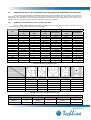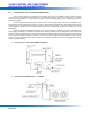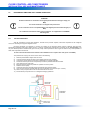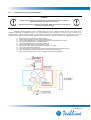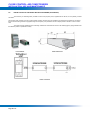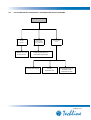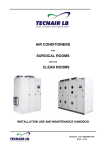
1
CLOSE CONTROL AIR CONDITIONERS INSTALLATION AND MAINTENANCE ROUTINE AND MAJOR TECHNICAL MANUAL Manual cod. 75807207B.0610 “ORIGINAL VERSION” CLOSE CONTROL AIR CONDITIONERS INSTALLATION, USE AND MAINTENANCE Page 2 of 72 CONTENTS 1 DESCRIPTION OF THE UNIT 1.1 1.2 2 4 12 2.1 2.2 12 14 15 17 18 20 3.1 3.2 3.3 3.4 3.5 20 22 23 24 25 CONDENSATE DRAIN AND SIPHONS WATER COILS WATER-COOLED CONDENSERS (ACCESSORY) HYDRAULIC CONNECTIONS FOR FREE COOLING AND TWO SOURCES UNITS INTERNAL IMMERSED ELECTRODE HUMIDIFIER CONNECTIONS (ACCESSORY) REFRIGERATION CIRCUIT CONNECTIONS 26 4.1 4.2 26 TYPES OF PIPING TO BE USED DIMENSION VALUES OF THE REFRIGERANT PIPES AND ADDITIONAL COMPONENTS OF THE CIRCUIT REFRIGERANT EMPTYING AND LOADING OPERATIONS 27 32 ELECTRICAL CONNECTIONS 39 5.1 5.2 40 5.3 5.4 5.5 5.6 6 TRANSPORTATION AND RECEIVING THE MACHINES ON SITE POSITIONING THE UNIT AND INSTALLATION CLEARANCES FOR ORDINARY MAINTENANCE PLENUMS AND PLINTHS (ACCESSORY) EXTERNAL FILTERED AIR INTAKE (ACCESSORY) CEA AIR-COOLED CONDENSERS WATER CONNECTIONS 4.3 5 8 11 TRANSPORT, POSITIONING AND INSTALLATION PROCEDURES 2.3 2.4 2.5 3 8 UNIT CODE OPERATING LIMITS INSTALLATION OF THE REMOTE CONTROL INTERFACE (ACCESSORY) INSTALLATION OF THE TEMPERATURE AND HUMIDITY SENSOR SUPPLIED (ACCESSORY) ROOM INSTALLATION OF THE DIFFERENTIAL PRESSURE SWITCH (ACCESSORY) INSTALLATION OF THE WATER DECTECTION PROBE (ACCESSORY) CONNECTION OF THE LOCAL NETWORK (ACCESSORY) MODBUS® SERIAL CIRCUIT BOARD RS485 (ACCESSORY) 41 41 42 43 44 ROUTINE AND MAJOR MAINTENANCE 46 6.1 6.2 47 50 ROUTINE MAINTENANCE MAJOR MAINTENANCE 7 DEACTIVATION, DISASSEMBLY AND SCRAPPING 52 8 APPENDIX 1: CLEARANCE NEEDED FOR ROUTINE MAINTENANCE 53 9 APPENDIX 2: PRELIMINARY AND PERIODICAL CHECKS AT FIRST START-UP 56 10 APPENDIX 3: FAULT DIAGNOSIS 59 10.1 10.2 10.3 10.4 10.5 10.6 60 61 63 64 65 67 VENTILATION PROBLEMS DIRECT EXPANSION AIR CONDITIONERS - REFRIGERATION CIRCUIT PROBLEMS CHILLED WATER AIR CONDITIONERS - REFRIGERATION CIRCUIT PROBLEMS HEATING SECTION PROBLEMS DEHUMIDIFICATION PROBLEMS HUMIDIFICATION PROBLEMS 11 GLOSSARY 69 12 NOTES 70 Page 3 of 72 CLOSE CONTROL AIR CONDITIONERS INSTALLATION, USE AND MAINTENANCE LIST OF REVISIONS Revision Date Author Chapters A 09/2009 AF All First version B 04/2010 AF All The layout of the manual has been modified. The parameter list for software version 1.10 has been modified Page 4 of 72 Description IMPORTANT WARNINGS The equipment described in this manual has been constructed to operate without risk for the intended purposes, provided that: • • Appliance installation, connection, operation and maintenance are carried out by qualified personnel in accordance with the instructions contained in these manuals. All the conditions stipulated in the user manual of the unit microprocessor are observed. Any other use or modification of the equipment, unless expressly authorised by the manufacturer, is deemed improper. Any injuries or damage sustained as a result of improper use shall be the sole responsibility of the user. THE INSTRUCTIONS IN THIS MANUAL ENABLE ADEQUATE MANAGEMENT BY THE USER AND GUARANTEE EFFICIENT UNIT OPERATION. FOR MORE DETAILED INSTRUCTIONS, REFER TO THE TECHNICAL MANUALS PROVIDED IN THE I.T. MEDIA SUPPLIED WITH THE UNIT. WARRANTY TECNAIR LV air conditioners are subject to the following warranty conditions which are automatically deemed to have been understood and accepted by the customer at the time of placing the order. TECNAIR LV guarantees that the products supplied are well made and of good quality. It undertakes during the period of warranty specified herein to repair or to replace with new at its own discretion, in the shortest time possible, any parts found to present recognised defects in materials, construction or workmanship that render them unfit for the intended use, provided that these faults are not the result of negligence on the part of the purchaser, neglect or inexperience of the user, normal wear and tear, damage caused by third parties, acts of God or other causes not arising from manufacturing defects. TECNAIR LV, however, shall not be liable to compensation for direct or indirect damage of any nature incurred for any reason. Defective components will be replaced at the Uboldo manufacturing plant, and all transportation and replacement costs shall be borne by the Purchaser. The duration of the warranty is 2 (two) years from the date of consignment. The warranty shall be rendered void automatically if the equipment is repaired or modified or in any way completed (such as, for example, in the case of non-supply of an electrical panel or similar) or in the case of the installation of non-original parts (parts not supplied by TECNAIR LV). The above warranty conditions apply provided that the Purchaser has fulfilled all contractual obligations and in particular those regarding payment. Page 5 of 72 CLOSE CONTROL AIR CONDITIONERS INSTALLATION, USE AND MAINTENANCE SYMBOLS USED WARNING! DANGER! This symbol is used to indicate situations or procedures which are potentially hazardous, or which require particular care to be taken by the operator. NOTE! This symbol is used to indicate tips and suggestions which may be useful to the operator. ELECTROCUTION HAZARD! This symbol is used to indicate situations or procedures which may present a potential electrocution hazard for the operator. HAZARDOUS MOVEMENT! This symbol is used to indicate situations or procedures which may present a potential crushing hazard for the operator. HEAVY LOADS! This symbol is used to indicate situations or procedures involving the use of heavy equipment. SECURITY STANDARDS This equipment is exclusively meant for professionally prepared operators that know the fundamentals of cooling, cooling systems, cooling gasses and the possible damages that pressured equipment may cause. Carefully read this manual, carefully observing the procedures shows is an essential condition for operator safety, integrity of the equipment and the consistency of declared performance. The compressor must exclusively operate with refrigerants indicated by the manufacturer. Oxygen must never be allowed to enter the inside of the compressor. Do not start-up the compressor when there are significant vacuum conditions inside of it. During the various operations refrigerant must never be dispersed into the environment; such precautions, besides being required by international environmental protection standards, is absolutely necessary in order to avoid that the presence of refrigerant in the room may render finding possible leaks very difficult. Avoid inhaling refrigerant fumes. Do not tamper with or modify the calibration of safety and control systems. Wearing suitable protections, such as safety glasses and gloves, is recommended; some unit components may cause physical damage to the operator. Page 6 of 72 RECOMMENDED EQUIPMENT AMERICAN TYPE HEAVY DUTY PIPE WRENCH Minimum nominal size 2 ½” PIPE REAMER FOR COPPER TUBING ADJUSTABLE WRENCH EXPANDER FOR COPPER TUBING SLOTTED SCREWDRIVER OXYGEN/PROPANE SOLDERING KIT PHILLIPS SCREWDRIVER NITROGEN TANK FOR VERIFYING THE CIRCUIT TORX SCREWDRIVER® HIGH-PERFORMANCE VACUUM PUMP PIPE BENDING DEVICE FOR COPPER TUBING MANOMETRIC UNIT WITH FLEXIBLE PIPING PIPE CUTTER FOR COPPER TUBING REFRIGERANT THAT IS SUITABLE FOR THE UNIT (R407C-R410A) REVERSABLE RATCHET WRENCH ELECTRONIC SCALES DIGITAL TESTER WITH AMPEROMETRIC CLAMP ELECTRONIC LEAK DETECTOR Page 7 of 72 CLOSE CONTROL AIR CONDITIONERS INSTALLATION, USE AND MAINTENANCE 1 DESCRIPTION OF THE UNIT The machine in question is an air conditioner with direct expansion or chilled water coil designed for use in computer centres. The cabinet consists of hot-galvanised sheet panels in a frame constructed of painted aluminium section; the panels are made from hot-galvanised sheet steel covered in a PVC film, secured by quick-thread screws that can be unscrewed using a special safety wrench. The structure incorporates a thermal and acoustic insulation system using self-extinguishing materials (polyurethane foam) protected by plastic film. The machine comprises the following sections: 1.1 Ventilation section: consisting of one or more plug fans; Filter section: self-extinguishing non-regenerable filters; the machine includes provision for the use of a differential pressure switch to allow display of the clogged filter warning signal; Refrigeration circuit: comprising an expansion coil with copper pipes and aluminium cooling fins, a scroll compressor fixed to the machine frame on rubber mountings, thermostatic expansion valve, receiver-drier, plate-type condenser (accessory), low pressure switch (automatic reset) and high pressure switch (manual reset), pressurisation nitrogen charge, antifreeze lubrication oil charge; Hydraulic circuit: with cooling expansion coil featuring copper pipes in aluminium cooling fins, 3-way motorised valve with manual emergency control, water circuit with anti-condensation thermal insulation; Electrical power and control panel. UNIT CODE The code contains the following information: O C A 5 1 a H FC R407C 1 2 3 4 5 6 7 8-9 10 O Upflow air discharge U Downflow air discharge A Direct expansion coil with remote/water-cooled condenser U Chilled water coil with remote cooling 1 O Air discharge type: 2 C Series for technology rooms 3 A Cooling type: 4 5 Nominal size (nominal cooling capacity in TONS) 5 1 Number of cooling circuits or number of rows on chilled water coil 6 a Series modification index 7 H Air flow rate/cooling capacity ratio: 8 FC FREE COOLING unit type 9 TS TWO SOURCES unit type 10 R407C Page 8 of 72 Refrigerant type H High air flow rate L Low air flow rate 1.1.1 O / OVER (UPFLOW DISCHARGE) Page 9 of 72 CLOSE CONTROL AIR CONDITIONERS INSTALLATION, USE AND MAINTENANCE 1.1.2 U / UNDER (DOWNFLOW DISCHARGE) Page 10 of 72 1.2 OPERATING LIMITS SERIES C AIR CONDITIONING UNIT UNIT TYPE CHARACTERISTICS DIRECT EXPANSION L CHILLED WATER H - OC UC OC UC OC UC MAXIMUM INTERNAL TEMPERATURE 30°C 30°C 30°C 30°C 30°C 30°C MINIMUM INTERNAL TEMPERATURE 21°C 21°C 19°C 19°C 18°C 18°C MAXIMUM INTERNAL HUMIDITY 60% 50% 60% 50% 60% 50% MINIMUM INTERNAL HUMIDITY 30% 30% 30% 30% 30% 30% STORAGE CONDITIONS Temperature from -20°C to + 50°C - Humidity 10%Ur to 90 %Ur non condensing – Store in a room that is closed and protected from external atmospheric agents. CONDENSERS AND DRY COOLER UNIT TYPE CHARACTERISTICS MAXIMUM EXTERNAL TEMPERATURE AIR WITH VARIATOR AND ELECT. PANEL. Air IN T° MINIMUM EXTERNAL TEMPERATURE WATER WITHOUT VARIATOR AND ELECT. PANEL. Up to 30°C: ∆T = 17°C Up to 35°C: ∆T = 15°C Up to 40°C: ∆T = 13°C Up to 46°C: ∆T = 10°C - 25 °C WITH PRESSURE CONTROLLED VALVE WITHOUT PRESSURE CONTROLLED VALVE 45°C Water IN T° -40°C -10°C 25°C WATER CIRCUITS TYPE CHILLED WATER HOT WATER INTERNAL HUMIDIFIER WATER-COOLED CONDENSER MAXIMUM PRESSURE 16 bar (1.6 Mbar) 16 bar (1.6 Mbar) 8 bar (0.8 Mbar) 16 bar (1.6 Mbar) MINIMUM PRESSURE - - 1 bar (0.1 Mbar) 1 bar (0.1 Mbar) MAXIMUM ∆P AT VALVE 1 bar (100 kPa) 1 bar (100 kPa) - - MAXIMUM TEMPERATURE - 85°C 40°C - MINIMUM TEMPERATURE 5°C - 1°C - For different work conditions contact TECNAIR LV offices Page 11 of 72 CLOSE CONTROL AIR CONDITIONERS INSTALLATION, USE AND MAINTENANCE 2 TRANSPORT, POSITIONING AND INSTALLATION PROCEDURES WARNING! ALWAYS USE SUITABLE EQUIPMENT TO MOVE THE UNIT. 2.1 TRANSPORTATION AND RECEIVING THE MACHINES ON SITE During transportation the machines must not be laid on their sides or overturned but must remain upright at all times; otherwise their internal components could be damaged. As the Carrier is always responsible for damage sustained by the goods during transport, before signing the delivery note to accept the supply, make sure the packaging is intact and that there are no visible signs of damage to the air conditioner or oil/refrigerant leakage. In the event of evident damage to the unit, or if there is the slightest doubt as to whether the conditioner has been damaged during transport, it is necessary to express your reservations in writing to the Carrier, whilst also informing the TECNAIR LV Sales Department. Unless otherwise agreed with the Customer, TECNAIR LV shall supply their machines ex works with standard packaging consisting of: wooden pallet (1), protective polystyrene packing (2, 3) and polythene sheet (4). Page 12 of 72 When unloading the units, please observe the procedures indicated in the illustrations reproduced below, which are also affixed to the original packaging of the unit. If the unit is not to be installed immediately after its arrival on site, it should be stored in its original packaging, in a dry, enclosed area, preferably heated to a temperature of 15 °C during the winter months. To avoid any problems and damage to the air conditioners during transportation, we recommend that the units should only be removed from their packaging when they have reached their final destination. It also essential to ensure that the floor on which the air conditioner is to be installed is capable of supporting its weight. The weight of the unit can be found in the commercial documentation or read directly from the data plate located inside the unit. 2.1.1 FRONT PANEL KEYS Keys for the front panels are supplied with the unit. These keys are inserted in duplicate copy for each lock and a safety backup copy is also left inside of the electrical panel. This type of key is numbered, meaning it is always possible to purchase a duplicate by visiting a specialised hardware store and quoting the number stamped on the lock (5333). Page 13 of 72 CLOSE CONTROL AIR CONDITIONERS INSTALLATION, USE AND MAINTENANCE 2.2 POSITIONING THE UNIT AND INSTALLATION CLEARANCES FOR ORDINARY MAINTENANCE 2.2.1 DIMENSIONS FOR INSTALLATION AND CLEARANCES The figure below shows the dimensions to be taken into account during installation. For the exact values of the dimensions indicated in the figure, refer to the following table and, in every case, to the drawings supplied with the order confirmation. The unit must be positioned differently based on the type of unit, and always following the design and manufacturing requirements of the unit. During installation, observe the clearances required for routine maintenance (and if needed for major) indicated in the drawing enclosed with the order confirmation, and in the appendix chapters of this manual. Installation dimensions Unit Dimensions (mm) Clearances (mm) Length (A) Depth (B) Height (H) OCA 21 H – 31 H – 41 H – 51 L – OCU 20 750 621 1965 UCA 21 H – 31 H – 41 H – 51 L – UCU 20 750 621 1965 OCA 51 H – 71 L – 81 L – OCU 30 750 771 1965 UCA 51 H – 71 L – 81 L – UCU 30 750 771 1965 OCA 71 H – 81 H – 101 L – 72 H – 102 L – OCU 50 860 871 1990 UCA 71 H – 81 H – 101 L – 72 H – 102 L – UCU 50 860 871 1990 OCA 101 H – 131 L – 151 L – 102 H – 142 L – 162 L 1410 871 1990 UCA 101 H – 131 L – 151 L – 102 H – 142 L – 162 L 1410 871 1990 1750 871 1990 1750 871 1990 OCA 202 H – 262 H – 302 L 2300 871 19990 UCA 202 H – 262 H – 302 L 2300 871 19990 OCA 302 H – OCU 160 2640 871 1990 UCA 302 H – UCU 160 2640 871 1990 OCA 220 3496 871 1990 UCA 220 3496 871 1990 OCA 131 H – 151 H – 142 H – 162 H – 202 L – 262 L OCU 80 - 110 UCA 131 H – 151 H – 142 H – 162 H – 202 L – 262 L UCU 80 - 110 Page 14 of 72 External Air (C) Edging (D) 50 30 2.3 PLENUMS AND PLINTHS (ACCESSORY) Various types of air distribution plenum and plinth are available as accessories for both the Under (U) and Over (O) versions of the unit. The various options are listed in the table below: Type Front view Right - Left Side View Front view Overview Plenum with opaque panels (Drilling is responsibility of the client) Plenum with front grille Plenum with front and side grilles Soundproofed duct section Adjustable plinth with and without baffle Type Dimensions (mm) Length (A) Depth (B) Height (H) Plenum A* B* 550 Soundproofed Duct Section A* B* 550 Plinth A* B* Variable** * The dimensions are the same as those of the unit (see table in previous chapter) ** Agreed upon during the order phase (se order confirmation) Adjustable +/- 15 mm Page 15 of 72 CLOSE CONTROL AIR CONDITIONERS INSTALLATION, USE AND MAINTENANCE 2.3.1 INSTALLATION OF PLENUMS AND DUCT SECTIONS The plenums and duct sections at the top of the unit are installed using the four brackets supplied, which are to be fitted to the upper frame members of the unit. Fixing bracket To install the brackets proceed as follows: 2.3.2 1) Fix the brackets to the aluminium frame of the unit using self-tapping screws. 2) The brackets should be positioned centrally on each side of the unit and fixed with two self-tapping screws. 3) Position the seal supplied along the edges of the plenum/plinth. 4) Position the plenum/duct section making sure that the aluminium sections are properly aligned. INSTALLATION OF THE ADJUSTABLE PLINTHS The plinths are installed as follows: 1) Position the plinth on the finished floor surface. 2) Adjust the vibration damping feet to ensure that the plinth is flush with the finished floor surface and perfectly level. 3) Position the unit on the plinth, making sure that the aluminium sections are properly aligned with each other. Plinth positioning Page 16 of 72 2.4 EXTERNAL FILTERED AIR INTAKE (ACCESSORY) The external filtered air intake accessory makes it possible to connect a duct for feeding external air to the unit. The external filtered air intake is arranged on the right side panel or inside of the technical service compartment for the units where it is foreseen. For the exact values of the dimensions indicated in the figure, refer to the following table and, in every case, to the drawings supplied with the order confirmation. Preparing flexible tubing for simplifying filter replacement procedures, and panel removal in case of routine or major maintenance, is recommended. Units with filtered external air intake Unit Filtered air intake Installation dimensions Positioning (mm) Height (A) Depth (B) OCA 21 H – 31 H – 41 H – 51 L – OCU 20 556 104 UCA 21 H – 31 H – 41 H – 51 L – UCU 20 655 94 OCA 51 H – 71 L – 81 L – OCU 30 556 104 UCA 51 H – 71 L – 81 L – UCU 30 655 94 OCA 71 H – 81 H – 101 L – 72 H – 102 L – OCU 50 566 114 UCA 71 H – 81 H – 101 L – 72 H – 102 L – UCU 50 846 164 OCA 101 H – 131 L – 151 L – 102 H – 142 L – 162 L 1600* 100* UCA 101 H – 131 L – 151 L – 102 H – 142 L – 162 L 1096* 87* 566 114 846 164 OCA 202 H – 262 H – 302 L 1600* 100* UCA 202 H – 262 H – 302 L 1096* 87* OCA 302 H – OCU 160 566 114 UCA 302 H – UCU 160 846 164 OCA 220 566 114 UCA 220 846 164 OCA 131 H – 151 H – 142 H – 162 H – 202 L – 262 L OCU 80 - 110 UCA 131 H – 151 H – 142 H – 162 H – 202 L – 262 L UCU 80 - 110 Dimensions (mm) Height (C) Depth (D) 207 121 * For these models the external air intake is located inside of the technical compartment Page 17 of 72 CLOSE CONTROL AIR CONDITIONERS INSTALLATION, USE AND MAINTENANCE 2.5 CEA AIR-COOLED CONDENSERS CEA air-cooled condensers must be installed in accordance with the following instructions: HORIZONTAL INSTALLATION SINGLE ROW 1) 2) 3) 4) Remove the condenser from the packaging. Fit the fixing brackets (2) to the condenser (1). Position the condenser horizontally (4) on a support (3). Fix the feet (5) using the screws provided (6). DOUBLE ROW 1) 4) Remove the fixing screws (2) from the packaging (1) and remove the condenser (3). Position the condenser horizontally on a support (4). Remove the fixing brackets by undoing the relevant screws (5). Fix the feet (6) using the screws provided (5). 1) 2) 3) Remove the condenser from the packaging. Position the condenser (1). Fix the brackets using the screws provided (2). 1) Remove the fixing screws (2) from the packaging (1) and remove the condenser (3). Position the condenser (4). Fix using the screws provided (5). 2) 3) VERTICAL INSTALLATION SINGLE ROW DOUBLE ROW 2) 3) REGULATOR POSITIONING ( CEA – C) Page 18 of 72 Clearances for horizontal installation Clearances for vertical installation Page 19 of 72 CLOSE CONTROL AIR CONDITIONERS INSTALLATION, USE AND MAINTENANCE 3 WATER CONNECTIONS WARNING! TECNAIR LV tests water components with dried compressed air at 24 bar. This ensures that no water is present in the water circuits, thereby preventing the possibility of freezing during storage prior to installation. However, during the positioning and installation procedures, it is essential to take extra care not to fill the water circuits, even accidentally, before all the necessary antifreeze measures stipulated in the design specifications have been implemented (e.g. insulation, addition of glycol, etc.). 3.1 CONDENSATE DRAIN AND SIPHONS All air conditioners, whether direct expansion or water chilled coils, require a condensate drain connection, and the humidifier drain of the building waste drainage system. The siphon, essential for draining condensate as the bowl is located in a point of negative pressure, is supplied already installed on the unit and should be connected when the unit is placed in position by the installer. The drain pipe used is 19x25 Retiflex with ½’ fittings. The drainage water of the humidifier may reach temperatures of 100°C. The humidifier drain, which does not require a siphon, is supplied ready connected to the termination of the condensate drain. WARNING! THE CONDENSATE DRAIN IS SUPPLIED ALREADY SIPHONED! IN ORDER TO AVOID DRAINAGE PROBLEMS DO NOT ADD SIPHONS TO THE DRAINAGE LIINE AND PLAN ON A FUNNEL TYPE FITTING! Page 20 of 72 3.1.1 CONDENSATE DRAIN PUMP (ACCESSORY) Both direct expansion and chilled water conditioners can be supplied with a condensation pumping trap (accessory). The condensation pumping trap is supplied mounted and installed and the drain pipe is connected to the building drainage system during the unit positioning phase. The drainage pipe is flexible and transparent, with a Ø 6 mm diameter. The humidifier drain, that cannot be connected to such pump, is separately supplied with a Retiflex 19x25 pipe with a ½’ fitting. The drainage water of the humidifier may reach temperatures of 100°C. Condensation pumping trap WARNING! THE CONDENSATE DRAIN IS SUPPLIED ALREADY SIPHONED! IN ORDER TO AVOID DRAINAGE PROBLEMS DO NOT ADD SIPHONS TO THE DRAINAGE LIINE AND PLAN ON A FUNNEL TYPE FITTING! Page 21 of 72 CLOSE CONTROL AIR CONDITIONERS INSTALLATION, USE AND MAINTENANCE 3.2 WATER COILS It will be necessary to install inlet and outlet pipes on both machines with chilled water coils and those with hot water coils. The diameters of the pipes and the inlet and the outlet unions are indicated in the order confirmation. The water inlet and outlet unions are indicated in the figure below. The unions can also be identified by their adhesive labels. The maximum pressure of the water supply to the coils is 16 bar (1.6 MPa). The maximum pressure difference between the water inlet pipe and the outlet pipe is 1 bar (100 kPa), as at pressure differences greater than this value the return spring would not be able to shut off the water flow. In the event of greater pressure differences, it will be necessary to install a pressure reducing valve upstream of the 3-way valve. To ensure that circuit pipes are installed correctly, we recommend that the following indications are observed: • • • • • • • • Page 22 of 72 Use pipes made of copper or steel. Support pipes with suitable brackets (1). Insulate both pipes with Armaflex type insulation (2). Install shut-off valves to facilitate maintenance (3). Install a Thermometer (4) and Pressure gauge (5) on the inlet and outlet. Install a drain outlet at the lowest part of the circuit (6). Install a 50 µ mechanical filter on the supply line (7). Use a water/glycol solution where necessary. 3.3 WATER-COOLED CONDENSERS (ACCESSORY) For machines with integral water-cooled condensers, it will be necessary to install the supply and discharge lines to the condenser. The diameters of the pipes and the inlet and the outlet unions are indicated in the order confirmation. 3.3.1 PRESSURE CONTROLLED VALVE (ACCESSORY) The pressure controlled valve (accessory) is essential when the water is supplied from a well, river or aqueduct; however it is not necessary when the water is supplied from a water tower. In practical terms, the valve is necessary if there is a chance that the water temperature may fall so low during winter (e.g. below 15 degrees) that the machine's condensation temperature is consequently reduced too much. The valve is factory-installed on the condenser water inlet. If the water supply is obtained from a well or river, two filters of suitable characteristics for the type of water must be installed in parallel, (one as backup for the other) to prevent the condenser from becoming clogged by impurities in the water. To ensure that circuit pipes are installed correctly, we recommend that the following indications are observed: • • • • • • • • Use pipes made of copper or steel. Support pipes with suitable brackets (1). Insulate both pipes with Armaflex type insulation (2). Install shut-off valves to facilitate maintenance (3). Install a Thermometer (4) and Pressure gauge (5) on the inlet and outlet. Install a drain outlet at the lowest part of the circuit (6). Install a 50 µ mechanical filter on the supply line (7). Use a water/glycol solution where necessary. Page 23 of 72 CLOSE CONTROL AIR CONDITIONERS INSTALLATION, USE AND MAINTENANCE 3.4 HYDRAULIC CONNECTIONS FOR FREE COOLING AND TWO SOURCES UNITS 3.4.1 FREE COOLING UNITS The water circuits of Free Cooling type units are provided made by TECNAIR LV, it will be necessary to complete the water connection to and from the external Dry Cooler, with the related circulator, or circulation pump, and expansion chamber. The water inlet and outlet unions are highlighted with self-adhesive labels applied on the actual unions. 3.4.2 TWO SOURCES UNITS The water circuits of Two Sources type units are identical to what is included in the previous chapters. Based on the type of primary and secondary source it will be possible to have one or two water connections with modulating valves or ON/OFF type ones. To complete those connections please see chapter 3.1.1. For refrigeration connections for units with direct expansion circulations, refer to chapter 4 and the following ones. To ensure that circuit pipes are installed correctly, we recommend that the following indications are observed: • • • • • • • • Use pipes made of copper or steel. Support pipes with suitable brackets (1). Insulate both pipes with Armaflex type insulation (2). Install shut-off valves to facilitate maintenance (3). Install a Thermometer (4) and Pressure gauge (5) on the inlet and outlet. Install a drain outlet at the lowest part of the circuit (6). Install a 50 µ mechanical filter on the supply line (7). Use a water/glycol solution. WARNING! WATER CIRCUITS OF FREE COOLING AND TWO SOURCES UNITS (WITH DIRECT EXPANSION CIRCUITS) NEED TO BE LOADED WITH A WATER/GLYCOL SOLUTION TO AVOID FROST PROBLEMS DURING WINTER OPERATION AND IN CASE THE DIRECT EXPANSION CIRCUIT MALFUNCTIONS! Page 24 of 72 3.5 INTERNAL IMMERSED ELECTRODE HUMIDIFIER CONNECTIONS (ACCESSORY) During installation of the unit it is necessary to connect a supply pipe (as shown in the figure) with the system characteristics indicated below. The drainage pipe is supplied already installed by TECNAIR LV; it must be connected as shown in the previous chapters. The drainage water of the humidifier may reach temperatures of 100°C. Once installation is complete, bleed the air from the supply pipe for approximately 30 minutes, channelling the water directly to the drain pipe without letting it enter the humidifier. This will eliminate any waste or rubble which could block the filling valve and/or create foam during boiling 3.5.1 CHARACTERISTICS OF THE WATER CIRCUIT AND THE SUPPLY WATER The humidifier must be supplied with aqueduct water. The water connection should satisfy the following conditions: • • • • • A shut-off cock (1 previous Figure) must be installed on the water supply pipe. A 50 µ mechanical filter (2 previous Figure) must be installed on the supply line. Pressure between 0.1 and 0.8 MPa (1-8 bar, 14.5-116 PSI) Temperature between 1 and 40 °C Instantaneous flow rate no lower than the nominal flow rate of the supply solenoid valve (0.6 - 1.2 l/m) LIMIT VALUES FOR SUPPLY WATER WITH CONDUCTIVITY VALUES FOR AN IMMERSED ELECTRODE DEHUMIDIFIER IN THE MID-HIGH RANGE Hydrogen ion activity Specific conductivity at 20 °C Total dissolved solids Fixed residue at 180 °C Total hardness Temporary hardness Iron + Manganese Chlorides Silica Residual chlorine Calcium sulphate Metallic impurities Solvents, thinners, soaps, lubricants pH σR, 20 °C TDS R180 TH - µS/cm mg/l mg/l mg/l CaCO3 mg/l CaCO3 mg/l Fe µMn ppm C1 Mg/l SiO2 mg/l C1 mg/l CaSO4 mg/l mg/l LIMITS Min. Max. 7 300 (¹) (¹) 100 (²) 60(³) 0 0 0 0 0 0 0 8.5 1250 (¹) (¹) 400 300 0.2 30 20 0.2 100 0 0 (1) Values dependent on specific conductivity; generally: TDS ≅ 0.93 * σ20; R180 ≅ 0.65 * σ20 (2) not lower than 200% of the chloride content in mg/l of Cl(3) not lower than 300% of the chloride content in mg/l of Cl- IMPORTANT - WARNING! THERE IS NO NEED TO USE WATER SOFTENERS! THERE IS NO RELIABLE RELATION BETWEEN WATER HARDNESS AND CONDUCTIVITY! Page 25 of 72 CLOSE CONTROL AIR CONDITIONERS INSTALLATION, USE AND MAINTENANCE 4 REFRIGERATION CIRCUIT CONNECTIONS 4.1 TYPES OF PIPING TO BE USED The piping must be Gelidus type copper, therefore suitable for direct expansion refrigerant circuits. The copper must be soft annealed for pipes with diameters of up to 26 - 28 and hard drawn for larger diameter pipes. To prevent copper dust or swarf from getting into the system, the pipes should be cut using a pipe cutter rather than a hacksaw. It is then necessary to carefully clean the pipe endings using the specific pipe reamer. If the ends are to be soldered, they should be cleaned with grade 00 glasspaper to eliminate all oxidisation and dirt. After this, the pipe should be inserted in the joint and heated evenly to the melting point of the solder so that it flows easily around the joint. It is important to remember that the pipes should be as short as possible with bends kept to a minimum, as the cooling capacity of the circuit can be reduced exponentially (see the following chapters. 4.1.1 DISCHARGE OR HOT GAS LINE This is the refrigerant line that connects the compressor outlet to the air-cooled condenser inlet. To facilitate connection inside the air conditioner, there is a section of pipe approximately 200 mm long, of which one end is connected to the compressor outlet with its cock, while the other end is crimped and soldered shut. During air conditioner operation, the discharge pipe reaches a temperature of 70 - 80 °C. It is not necessary to thermally insulate this pipe as heat dispersal along this line facilitates correct operation of the refrigeration cycle. The pipes should only be insulated for safety reasons in cases where there is a possibility of someone coming into accidental contact with the discharge pipe. 4.1.2 LIQUID OR RETURN LINE This is the pipe that connects the condenser outlet to the air conditioner inlet valve. To facilitate connection inside the air conditioner, there is a section of pipe approximately 200 mm long, of which one end is connected to the liquid receiver inlet with its cock, while the other end is crimped and soldered shut. The operating temperature of this pipe is about 40 °C; it does not need to be thermally insulated except in cases where the air conditioning system also has to operate in winter with temperatures below zero. The refrigeration circuit inlet and outlet unions on the air-cooled condenser can be identified by their adhesive labels. In any case, note that the exchange of heat between the air and the refrigerant should occur in the opposite direction to flow. This means that the condenser inlet union for the gaseous refrigerant is the union furthest from the air inlet into the coil, i.e. the union nearest the fans. Conversely, the condenser outlet union for the liquid refrigerant is the union furthest away from the fans. Refrigerant connections opposite to flow direction Page 26 of 72 4.2 DIMENSION VALUES OF THE REFRIGERANT PIPES AND ADDITIONAL COMPONENTS OF THE CIRCUIT Correct routing of the refrigeration circuit pipes is essential to the successful operation of the air conditioner. It is necessary to take special care in the selection and positioning of the compressor discharge and suction pipes, above all when these lines are relatively long. The total equivalent length of the pipes (discharge + return) affects the cooling capacity of the units in a more or less significant manner. The following pages will define the leaks based on the type of positioning. 4.2.1 DIAMETERS OF REFRIGERATION CIRCUIT CONNECTION PIPES Use the following table to determine the recommended diameters for the supply and return pipes in accordance with the machine size (given by the numerical sequence in the product code). Compressor Pipes up to 15 m long Size Rated power (Hp) Rated power (kW) Ø Discharge (mm) 21 31 41 51 71 81 101 131 151 72 2 3 3.5 5 6.5 7.5 10 12 15 2 × 3.5 6 10 11 15 22 24 30 40 45 25 102 2×5 30 142 2 × 6.5 162 Pipes beyond 15 m long Ø Liquid (mm) Ø Discharge (mm) Ø Liquid (mm) Ø 12/14 Ø 14/16 Ø 14/16 Ø 16/18 Ø 16/18 Ø 20/22 Ø 20/22 Ø 26/28 Ø 26/28 Ø 10/12 Ø 10/12 Ø 10/12 Ø 10/12 Ø 10/12 Ø 14/16 Ø 14/16 Ø 16/18 Ø 16/18 Ø 14/16 Ø 16/18 Ø 16/18 Ø 20/22 Ø 20/22 Ø 26/28 Ø 26/28 Ø 26/28 Ø 26/28 Ø 10/12 Ø 10/12 Ø 10/12 Ø 14/16 Ø 14/16 Ø 14/16 Ø 16/18 Ø 16/18 Ø 20/22 2 × Ø 14/16 2 × Ø 10/12 2 × Ø 16/18 2 × Ø 10/12 2 × Ø 16/18 2 × Ø 10/12 2 × Ø 20/22 2 × Ø 14/16 42 2 × Ø 16/18 2 × Ø 10/12 2 × Ø 20/22 2 × Ø 14/16 2 × 7.5 45 2 × Ø 20/22 2 × Ø 14/16 2 × Ø 26/28 2 × Ø 14/16 202 2 × 10 64 2 × Ø 20/22 2 × Ø 14/16 2 × Ø 26/28 2 × Ø 16/18 262 2 × 12 75 2 × Ø 26/28 2 × Ø 16/18 2 × Ø 26/28 2 × Ø 16/18 302 2 × 15 90 2 × Ø 26/28 2 × Ø 16/18 2 × Ø 26/28 2 × Ø 20/22 Inner/outer diameters of refrigerant pipes Diameters Equivalent metres (m) Ø 10/12 0.50 0.25 0.75 2.10 1.90 Ø 12/14 0.53 0.26 0.80 2.20 2.00 Ø 14/16 0.55 0.27 0.85 2.40 2.10 Ø 16/18 0.60 0.30 0.95 2.70 2.40 Ø 20/22 0.70 0.35 1.10 3.20 2.80 Ø 26/28 0.80 0.45 1.30 4.00 3.30 Calculation of circuit component equivalent metres Diameters mm Inches mm Inches mm Inches Ø 10/12 3/8 '' Ø 14/16 5/8 '' Ø 20/22 7/8 '' Ø 12/14 1/2 '' Ø 16/18 3/4 '' Ø 26/28 1 - 1/4 '' Page 27 of 72 CLOSE CONTROL AIR CONDITIONERS INSTALLATION, USE AND MAINTENANCE 4.2.2 ROUTING OF THE REFRIGERATION CIRCUIT PIPES The table below includes the most common installation examples indicating the recommended length of the line: Installation with condenser at top Maximum recommended length The equivalent of 30 m (15m + 15m) Cooling capacity decrease for lines that go beyond 30 m About 2% for each equivalent 10 m Precautions - Plan for oil traps and a gradient as shown in figure. - Periodically verify the oil level of the compressor. - For lines beyond 60 m install an oil separator. - For lines beyond 30 m install an oversize liquid receiver. Installation with condenser on a level Maximum recommended length The equivalent of 60 m (30 m + 30 m). Cooling capacity decrease for lines that go beyond 60 m About 2% for each equivalent 10 m. Precautions - Plan for the gradient as shown in figure. - Periodically verify the oil level of the compressor. - For lines beyond 60 m install an oversize liquid receiver. Installation with condenser at bottom Maximum recommended length The equivalent of 10 m (5 m + +5 m). Cooling capacity decrease for lines that go beyond 10 m About 2% for each equivalent 10 m. Precautions - Plan for the gradient as shown in figure. - Plan for refrigerant undercooling > by 6 °C. - Periodically verify the oil level of the compressor. - For lines beyond 20 m install an oversize liquid receiver. Page 28 of 72 4.2.3 NON-RETURN VALVES ON DISCHARGE AND RETURN PIPES IMPORTANT - WARNING! In installations with refrigeration circuit pipes longer than 10 m featuring vertical pipe runs and the condenser located higher than the machine, it will be necessary to install a non-return valve on the refrigerant discharge pipe as near as possible to the compressor outlet. This will prevent the refrigerant, in the event of compressor shutdown, from flowing back down the discharge pipe to the compressor and damaging it at the next start-up and/or preventing normal operation by causing a high-pressure blockage. Naturally the valve must be installed vertically and the right way round in accordance with the refrigerant flow direction. In the case of pipe sections more than 20 m long and where minimum temperatures below -10 °C may be expected, it will be necessary to install another non-return valve at the outlet of the air-cooled condenser, and as close to it as possible; the valve should be installed vertically to prevent the refrigerant from flowing back to the condenser when the system is off and the external temperature is very cold, and thereby preventing efficient condensation of the refrigerant the next time the compressor is started. 4.2.4 SOLENOID VALVE ON THE LIQUID PIPE (ACCESSORY) The scroll compressors installed on TECNAIR LV air conditioners will not be damaged by the presence of any liquid refrigerant in the crankcase. However, when the refrigeration circuit is shut down in the summer season, i.e. when the external temperature is just a few degrees higher than the internal temperature, the liquid refrigerant flows towards the compressor (the coldest point of the circuit) and, depending on the amount of refrigerant in the system, floods it partially or completely. In this case, the high pressure switch may trip at the next start-up. It is therefore necessary to compare the refrigerant charge in the circuit, calculated as the sum of the contents of the various components of the circuit, with the maximum amount compatible with correct operation without the solenoid valve on the liquid pipe, as indicated in the table below. Size 21 Compressor Rated power (Hp) Rated power (kW) 2 6 Maximum amount of refrigerant (kg) 2.8 31 3 10 3.6 41 3.5 11 5.4 51 5 15 5.4 71 6.5 22 5.4 81 7.5 24 7.3 101 10 30 10.0 131 12 40 12.5 151 15 46 13.5 Table of maximum compatible refrigerant amounts per circuit without installation of solenoid valve on liquid pipe If the calculated charge is greater than the maximum compatible amount, it will be necessary to install a solenoid valve on the liquid pipe, which, by closing when the compressor is shut down, will prevent the refrigerant from flowing back towards the compressor through the liquid pipe. Obviously it is also necessary to prevent refrigerant from flowing back to the compressor through the discharge pipe. This is achieved by installation of the non-return valve on the refrigeration discharge lines. The latter valve, unlike the solenoid valve, is not offered by TECNAIR LV as an optional accessory as it must be installed when the refrigeration circuit external to the machine is installed, while the solenoid valve is installed inside the machine itself. Page 29 of 72 CLOSE CONTROL AIR CONDITIONERS INSTALLATION, USE AND MAINTENANCE 4.2.5 OPERATION WITH VERY LOW EXTERNAL TEMPERATURES Tecnair LV direct expansion air conditioners, as an accessory, come with an air condensation pressure control via reduction of the air flow rate in accordance with the reduction in the condensation pressure. This system is very efficient up to external temperatures of approximately -25 °C, also thanks to the delay of 180 seconds implemented by the low pressure sensor when the compressor is activated. At external temperatures below this level and above all in the event of lengthy periods of non-use of the refrigeration circuit, the temperature of the liquid refrigerant can become so low that, in spite of the abovementioned delay, the low pressure sensor trips on compressor start-up, thus making starting impossible. In order to overcome this inconvenience, a condenser flooding valve is installed on the refrigeration connections of the air-cooled condenser, as well as an oversize liquid receiver and a non-return valve on the discharge pipe. When the condensation temperature falls below +40°C, the valve closes the condenser outlet, flooding it and reducing the heat exchange proportionally. The refrigerant that bypasses the condenser is gaseous and at high temperature; it mixes with the liquid refrigerant at very low temperature at the condenser outlet, so that the resulting temperature is high enough to permit successful system start-up. The volume of refrigerant present in the circuit must therefore be sufficient to be able to almost completely flood the condenser coil. During summer operation, however, the condenser coil must be almost completely free of liquid refrigerant in order to perform correctly. An oversize receiver is therefore installed in order to accommodate in summer the extra amount of refrigerant that is required in winter to flood the condenser. LT KIT FOR OCA - UCA AIR CONDITIONER (ACCESSORY) LT KIT FOR CEA CONDENSER (CEA ... LT VERSION) Page 30 of 72 4.2.6 REFRIGERATION CIRCUIT INSTALLATION Here below explanatory images are included for the most important operations for installing the refrigerant circuit. Not following one or more of the following recommendations may compromise proper system operation. Using pipe cutters with rotating blade guarantee a cut that is perfectly perpendicular to pipe axis and do not produce metal fillings that may clog the slotted plates of the refrigerant circuit. A correct internal and external trimming of the copper pipe simplify the soldering phases and reduce possible load losses due to pipe diameter reduction. Correct curving of the pipes reduces load loss caused by a curve radius that is too tight or possible crushing of the pipes. A correct capillary brazing decreases the danger of possible refrigerant leaks that would compromise the correct operation of the system. 4.2.7 SEAL TEST OF THE REFRIGERANT CIRCUIT WITH NITROGEN PRESSURISATION Once the refrigerant circuit is completed, a verification of soldered joints and union fittings by way of nitrogen pressurisation is recommended. A reminder that units are tested with nitrogen pressure at 3 MPa and shipped with 0.3 MPa nitrogen pressurisation. It will therefore only be necessary to verify pressure during installation. CEA air condensers are tested with 3 MPa nitrogen pressurisation, and shipped: • • discharged for standard implementations and must therefore be pressurised along with the circuit that was made during installation. pressurised with 0.3 MPa nitrogen and therefore only the pressure only needs to be verified during installation. The test pressure for systems is shown on the specific pressure gauge of the kit and is the following: • • From 4.0 to 4.2 MPa – for R410A systems From 2.8 to 3.2 MPa – for R22 and R407C systems Page 31 of 72 CLOSE CONTROL AIR CONDITIONERS INSTALLATION, USE AND MAINTENANCE 4.3 REFRIGERANT EMPTYING AND LOADING OPERATIONS WARNING! Remote condenser air conditioners are shipped pressurised with a nitrogen charge (0.3 MPa). Air-cooled condensers are shipped non-pressurised. The air condensers are for LT implementations and shipped pressurised with nitrogen (0.3 MPa). Air conditioners with internal water-cooled condensers are supplied FULLY CHARGED with refrigerant. 4.3.1 VACUUM OPERATIONS After all connections and seal test operations, included in the previous chapters, have been completed for the refrigerant circuit, it is necessary to empty the refrigerant circuit. Emptying operations are necessary to remove any residue of the technical gasses used for soldering and seal tests, atmospheric air and the water vapour that is part of it. In order to complete such operations it is necessary to use vacuum pumps. The very low residual pressures obtained with good vacuum pumps make it possible to remove gas and also boil any small quantities of water, both evaporation and removal. A correct vacuum level that can be reached in the installation area is equal to 300 ÷ 350µ (0.39 ÷ 0.46 mBar). The procedure for carrying out vacuum in the circuit is the following: 1) 2) 3) 4) 5) 6) 7) 8) 9) 10) 11) Page 32 of 72 Remove pressurisation nitrogen from the circuit. Connect pressure gauges as shown in the diagram (see the next chapters). Connect the vacuum pump and the tank of refrigerant to the pressure gauges. Power the machine (but not the compressors) to heat the possible crankcase oil heater. Verify that all circuit cocks open. Bring the pressure gauges in position for operation in vacuum phase. Start the vacuum pump. Check that vacuum is achieved through the specific pump pressure gauge. Once vacuum has been reached leave the pump in operation for a few hours (min. 2 hours). Switch of the pump and after a few minutes check the vacuum level. Disconnect the pump and move on to refrigerant charging operations. 4.3.2 CALCULATION OF CIRCUIT REFRIGERANT CHARGE To charge the refrigeration circuit/s of a machine, it is necessary to consider the total amount of refrigerant required which, for a direct expansion unit equipped with remote condenser, is determined by adding the refrigerant content of each individual component in the circuit. The refrigerant content of the individual components are given in the following table. Compressor Size Type Water-cooled condenser Circuit content Rated power (Hp) Rated power (kW) Refrigerant (kg) Refrigerant (kg) OC UC OC + LT UC + LT 2 3 3.5 5 5 6.5 6.5 7.5 7.5 10 10 12 12 15 15 0.4 0.5 0.5 0.5 0.5 0.8 0.8 1.0 1.0 1.2 1.2 1.6 1.6 1.9 1.9 2 x 0.5 2.5 2.5 2.5 2.5 2.8 2.8 2.5 2.8 2.5 2.5 3.7 3.7 4.5 3.7 4.5 2x2 2.5 2.5 2.5 2.5 2.8 2.8 3.5 2.8 3.5 3.5 4.5 4.5 6 4.5 6 2x2 3 3 3 3 3 3.5 3.5 5 5 6.5 6.5 6.5 6.5 6.5 6.5 2x3 3 3 3 3 3 3.5 3.5 5 5 6.5 6.5 6.5 6.5 6.5 6.5 2x3 Refrigerant (kg) 21 31 41 51 51 71 71 81 81 101 101 131 131 151 151 72 H H H L H L H L H L H L H L H H 2 × 3.5 6 10 11 15 15 19 19 25 25 30 30 36 36 45 45 25 0.2 0.4 0.6 0.7 0.7 1.2 1.2 1.2 1.2 1.8 1.8 2.4 2.4 2.4 2.4 2 x 0.6 102 L 2×5 30 2 x 0.5 2x2 2x2 2x3 2x3 2 x 0.7 102 H 2×5 30 2 x 0.5 2 x 2.5 2x3 2x3 2x3 2 x 0.7 142 L 2 × 6.5 42 2 x 0.8 2x3 2 x 3.5 2 x 3.5 2 x 3.5 2 x 1.2 142 H 2 × 6.5 42 2 x 0.8 2 x 2.5 2x3 2 x 3.5 2 x 3.5 2 x 1.2 162 L 2 × 7.5 45 2 x 1.0 2x3 2 x 3.5 2x5 2x5 2 x 1.2 162 H 2 × 7.5 45 2 x 1.0 2x3 2 x 3.5 2x5 2x5 2 x 1.2 202 L 2 × 10 64 2 x 1.2 2x4 2 x 4.5 2 x 6.5 2 x 6.5 2 x 1.8 202 H 2 × 10 64 2 x 1.2 2 x 4.5 2 x 4.5 2 x 6.5 2 x 6.5 2 x 1.8 262 L 2 × 12 75 2 x 1.6 2x4 2 x 4.5 2 x 6.5 2 x 6.5 2 x 2.4 262 H 2 × 12 75 2 x 1.6 2x4 2 x 4.5 2 x 6.5 2 x 6.5 2 x 2.4 302 L 2 × 15 90 2 x 1.9 2x4 2 x 4.5 2 x 6.5 2 x 6.5 2 x 2.4 302 H 2 × 15 90 2 x 1.9 2x7 2x7 2 x 6.5 2 x 6.5 2 x 2.4 Refrigerant content of the unit Page 33 of 72 CLOSE CONTROL AIR CONDITIONERS INSTALLATION, USE AND MAINTENANCE Weight of refrigerant in the discharge and liquid pipes: Weight of refrigerant in kg per metre of pipe (R407C) Diameters Ø 10/12 Ø 12/14 Ø 14/16 Ø 16/18 Ø 20/22 Ø 26/28 Liquid pipe 0.08 0.11 0.15 0.20 0.31 0.53 Discharge pipe 0.02 0.03 0.05 0.06 0.09 0.16 Air-cooled condensers with CEA/CEA…LT axial fans: Model Circuit refrigerant content (kg) Circuit refrigerant content (kg) Model CEA 21 H/V 0.66 CEA 91 H/V 3.8 CEA 21/LN H/V 1.0 CEA 101 H/V 5.2 CEA 31 H/V 1.32 CEA 101/LN H/V 4.0 CEA 31/LN H/V 2.0 CEA 111 H/V 5.3 CEA 41 H/V 1.32 CEA 111/LN H/V 6.0 CEA 41/LN H/V 1.9 CEA 121 H/V 4.0 CEA 51c H/V 1.95 CEA 121/LN H/V 7.3 CEA 51/LN H/V 2.9 CEA 131 H/V 4.0 CEA 61 H/V 2.58 CEA 131/LN H/V 8.0 CEA 71 H/V 1.89 CEA 151 H/V 6.0 CEA 71/LN H/V 3.6 CEA 181 H/V 8.0 CEA 81 H/V 2.88 CEA 181/LN H/V 8.0 CEA 81/LN H/V 4.0 CEA 201 H/V 10.5 Refrigerant content of the condenser circuit For condensers not included in the CEA table, the refrigerant content will be 0.3 times the internal volume of the condenser indicated in the technical specifications supplied with the order confirmation. The sum of the refrigerant content (air conditioner + liquid pipe + discharge pipe + condenser) gives the total refrigerant charge required by the system: Refrigerant content of air conditioner OCA 71H: Content of the CEA 61c H condenser: 10 metres of 16/18 diameter discharge pipe = 0.06 kg/m x 10 m = 10 metres of 10/12 diameter liquid pipe = 0.08 kg/m x 10 = 3.3 2.6 0.6 0.8 Total refrigerant content: 7.3 WARNING! THE WEIGHTS INCLUDED IN THE PREVIOUS TABLES ARE THEORETICAL AND MAY CHANGE WHEN THERE ARE ACCESSORIES AND SPECIAL IMPLEMENTATIONS! Page 34 of 72 4.3.3 CHARGING THE CIRCUIT WITH REFRIGERANT WARNING! Refrigerant circuit charging operations must be carried out with the unit in operation. Make sure that electrical connections are correct. Refrigerant must always be charged in liquid phase. Make sure that piping connections to the tank are completed correctly. Refrigerant charging operations must be completed while the unit is in operation, therefore the user must ensure that all installation procedures are completed correctly. It is recommended that such operations are carried out with a minimum room temperature tat is equal to the one included in the operational limits table. A lower temperature may compromise the actual circuit charge. In order to charge completely proceed as follows, keeping in mind that the coolant must always be charged in liquid phase: 1) 2) 3) 4) 5) 6) 7) 8) 9) 10) 11) Make sure that circuit cocks are completely opened. Connect pressure gauges as shown in the example diagram. Verify that the refrigerant tank is compatible with what the unit requires (R407C – R410A). Position the refrigerant tank on the calibrated scales. Connect the refrigerant tank to the pressure gauge unit. Position the pressure gauge unit to complete the charge. Open the filling valve until the gauge reaches a pressure of 6 - 7 Bar Turn on the unit fans and compressors. Open the filling valve to insert refrigerant until it approximately reaches the calculated quantity. Verify overheating and operational parameters in order to evaluate the charge. Open and close the filling valve in order to integrate small quantities of refrigerant. Page 35 of 72 CLOSE CONTROL AIR CONDITIONERS INSTALLATION, USE AND MAINTENANCE 4.3.4 VERIFICATION OF REFRIGERANT CHARGE Correct system equilibrium depends on the choice of fundamental components and measuring the refrigerant charge. It can be demonstrated by measuring overheating in refrigerant exiting the evaporator and the undercooling upon exiting the condenser. A correct overheating value, between 4 and 6 K, demonstrates that the coolant supplied to the evaporator is completely evaporated and there is no liquid in the suction line. This also proves that the system has been charged with the correct amount of refrigerant. Limited overheating shows that refrigerant fluid in the evaporator is not completely evaporated, resulting in liquid that returns to the compressor, and it may be caused by an excessive refrigerant charge, from the thermostatic valve that is open too much or excessively large, but even simply by the valve bulb not being fasten to the suction pipe well, or influenced by an air flow. It is also important to verify the undercooling value. An undercooling value that is excessively limited means that condensation of refrigerant fluid in the condenser is incomplete; this results in a shortness of liquid refrigerant to the thermostatic valve. A correct Undercooling value is between 2 and 10 K. OVERHEATING MEASUREMENT 4.3.5 UNDERCOOLING MEASUREMENT ADDING OIL TO THE REFRIGERATION CIRCUIT If, at the end of the operations included in the previous chapters and after a few hours of operation, it were to be verified that the quantity of oil in the compressor sight glass is not at a proper level that is able to guarantee good operation, it may be necessary to integrate a small quantity of lubricant oil. If that were to happen, it is necessary to integrate a type of lubricant oil that has the following characteristics: TYPICAL CHARACTERISTICS Viscosity @ 40°C, cSt Page 36 of 72 68 Viscosity @ 100°C, cSt 8.7 Viscosity Index 100 Ignition Point, °C 260 Freezing Point, °C -39 4.3.6 PRESSURE REGULATOR OF CEA CONDENSERS (ACCESSORY) TECNAIR LV installs speed regulators for CEA remote condenser fans inside the actual unit (Except for CEA-C implementation). Therefore, after installation of the refrigeration circuit for the units, the unit and the external condenser need to be connected electrically. The regulators are supplied calibrated for a condensation pressure of 19 bar. Adjust the condensation pressure using the relevant screw so that the condensation temperature, as read on the gauges, stabilises around the desired pressure value. Speed adjustment of the fans (and consequently the condensation pressure) takes place in accordance with the model installed, as listed in the table: XGE type regulator RGE type regulator 1 = ADJUSTMENT SCREW 2 = SET POINT INDICATOR P215PR type regulator FSC type regulator (External Regulator CEA – C) 1= SET-POINT 2 = CUT-OFF Page 37 of 72 CLOSE CONTROL AIR CONDITIONERS INSTALLATION, USE AND MAINTENANCE 4.3.7 EXAMPLE OF REFRIGERATION CIRCUIT The following image represents the refrigeration circuit in series C units. Page 38 of 72 5 ELECTRICAL CONNECTIONS WARNING! BEFORE CARRYING OUT ANY PROCEDURES ON THE UNIT, SET THE MAIN SWITCH TO POSITION “O” The external electrical connections of the air conditioner must satisfy the following prescriptions: • They must be suitably dimensioned to withstand the maximum load in Amperes indicated on the electrical wiring diagram and on the data plate located inside the electrical compartment of the unit itself. The electrical wiring diagram suggests dimension values for the electricity line and the corresponding protective devices. • The power supply must be within the following limits in order to avoid possible malfunction of the installed components, according to EN 60654-2 & EN 61000-4-11 standards: o o Voltage tolerance limits: ± 15% Frequency tolerance limits: ± 2% • The power supply line from the external differential thermal-magnetic circuit breaker to the machine must be direct without any interruptions or junctions. • The thermal-magnetic circuit breaker, whose installation is responsibility of the Customer, is necessary to protect against over-currents in the power supply line (Article 7.2.1 and 7.2.6 of the CEI EN 60204-1 Standard), it must be located as close as possible to the machine. The thermal-magnetic circuit breaker must be equipped with a residual current device (RCD) with a trip setting of 30 - 300 mA to provide personal protection against both indirect and direct contact, in addition to thermal and magnetic overload protection. The RCD serves also to protect the air conditioner against insulation failure. • The earth connection must be made with a conductor with a minimum cross-section as indicated in the electrical wiring diagram. • To prevent operating problems with the microprocessor controls, it is necessary that no other loads (pumps, condensers, etc.), even those that are part of the same system, are connected downstream of the main switch for the air conditioner, unless explicit permission is granted by TECNAIR LV. If this condition cannot be met, it will be necessary to connect suppressors (R + C) in parallel with the coils of the relays of any such loads. • The signal/control cables must be kept separate from high-current cables, power cables and any cables that are potential sources of electromagnetic interference. • To avoid potential damage to electrical and electronic equipment caused by voltage surges in the electricity supply line, TECNAIR LV recommends evaluating the necessity of installing SPDs (Surge Protection Devices) appropriately rated for the type of installation and the frequency of direct lightning strikes on the electricity supply line. Page 39 of 72 CLOSE CONTROL AIR CONDITIONERS INSTALLATION, USE AND MAINTENANCE 5.1 INSTALLATION OF THE REMOTE CONTROL INTERFACE (ACCESSORY) If the complete terminal or reduced version is to be panel or recess-mounted, the maximum thickness of the panel must be 6 mm; if the terminal is to be recess-mounted in a wall, a masonry box with internal dimensions sufficient to accommodate the terminal and the connection cables must be provided. The dimensions and drilling templates are as follows: Recess-mounted installation Wall installation The user terminal is connected to the main board via a 6-wire telephone cable. To make the connection, simply plug one of the telephone connectors into one of the terminals of the TCON6 board and the other into the terminal connector, as shown in the wiring diagram. For safe connection, use the toroid supplied with the user terminal to avoid interference on the line which could damage the memory or components on the board itself. If the terminal is disconnected from the board while the unit is powered on, we recommend waiting at least 5 seconds before reconnecting it. Connection of the remote terminal Page 40 of 72 5.2 INSTALLATION OF THE TEMPERATURE AND HUMIDITY SENSOR SUPPLIED (ACCESSORY) Two types of sensor are supplied (accessories): 1) 2) Temperature or temperature and humidity sensor, for duct installation: • Duct-installed temperature sensor for supply monitoring: this should be installed inside the supply duct for the room nearest to the inlets. The humidity sensor will be installed on the machine, in the return compartment. • Duct-installed temperature and humidity sensor for return monitoring: this should be installed inside the return duct for the room nearest to the return inlets. Temperature or temperature and humidity sensor, for wall installation: this should be installed in the room you wish to monitor, at a height of approximately 1.7 m. The connection cable is sot supplied by TECNAIR LV! 5.3 ROOM INSTALLATION OF THE DIFFERENTIAL PRESSURE SWITCH (ACCESSORY) The differential pressure switch to be installed in the controlled environment is of fundamental importance as it transmits a continuous environmental pressure reading to the microprocessor. It therefore allows the microprocessor to take the most suitable action in order to maintain the correct overpressure or negative pressure level for the controlled room. The pressure switch used has two air inlets and an electrical terminal board, which should be connected to the electrical panel terminal board using a shielded 3x0.35 cable (AWG22), as illustrated in the electrical wiring diagram. The connection cable is sot supplied by TECNAIR LV! The difference in pressure between the controlled room and the reference environment is measured using two small flexible and transparent hoses, with a 4/7 diameter. Page 41 of 72 CLOSE CONTROL AIR CONDITIONERS INSTALLATION, USE AND MAINTENANCE 5.4 INSTALLATION OF THE WATER DECTECTION PROBE (ACCESSORY) The accessory for detecting water provides an alarm if the pinpoint probe, supplied with the device, is even partially covered with water. The pinpoint probe is made of an anti-corrosive metal container, through which it is possible to access the two terminals for connecting the line and the closing resistance (supplied along with the probe). It is possible to connect multiple probes in series to control a wider area. The probe must be positioned in the area being checked and connected as shown in the following figure, paying attention that the detection portion is positioned correctly. Flood detector Probe dimensions Probe connection Page 42 of 72 5.5 CONNECTION OF THE LOCAL NETWORK (ACCESSORY) To create a local network, simply connect the SURVEY circuit boards via the connectors with extractable terminals on the mother board, using a cable with the following characteristics (see electrical wiring diagram for further information): Type Cable cross-section Resistance Max. length Twisted pair cable with GND AWG20/22 cross-sect. min. 0.2 mm2 / max. 2.5 mm2 2.5 mm2 120Ω, 0.25W 1.000 m Connection cable example Local network connection example WARNING! DO NOT CREATE BRANCHES DO NOT LAY WITH POWER CABLES Page 43 of 72 CLOSE CONTROL AIR CONDITIONERS INSTALLATION, USE AND MAINTENANCE 5.6 MODBUS® SERIAL CIRCUIT BOARD RS485 (ACCESSORY) SURVEY microprocessors may be fitted as part of a supervisory and/or remote assistance network adopting the Modbus® RS485 standard through a serial circuit board (optional). The table lists the applications of the connector pinout on the RS485 serial circuit board: PIN APPLICATION 1 D+ 2 D- 3 GND The serial communication protocol used has the following characteristics: SERIAL COMMUNICATION PROTOCOL CHARACTERISTICS Page 44 of 72 Protocol Modbus® Slave, RTU mode Communication Std. RS485 Opto-isolated in terms of the network Baud Rate Varies between 1200 and 38400 Baud Word Length 8 Parity None Stop Bits 1 5.6.1 SERIAL CIRCUIT BOARD CONNECTION To create a RS485 network, simply connect the SURVEY circuit boards via the connectors with extractable terminals on the serial board, using a cable with the following characteristics: Type Cable cross-section Closing resistance Max. length Belden 3106A/3107A AWG20/22 cross-sect. min. 0.2 mm2 / max. 2.5 mm2 2.5 mm2 120Ω, 0.25W 1.000 m Connection cable example RS485 network connection example WARNING! DO NOT CREATE BRANCHES DO NOT LAY WITH POWER CABLES Page 45 of 72 CLOSE CONTROL AIR CONDITIONERS INSTALLATION, USE AND MAINTENANCE 6 ROUTINE AND MAJOR MAINTENANCE WARNING! BEFORE CARRYING OUT ANY PROCEDURES ON THE UNIT, SET THE MAIN SWITCH TO POSITION “O” FANS AIR FILTERS CONTROL MICROPROCESSOR INTERNAL HUMIDIFIER ELECTRICAL PANEL WATER CIRCUITS REFRIGERATION CIRCUITS CONDENSERS Check general condition: corrosion, mountings, cleanliness Check motor noise Check the rotor: vibration, imbalance Check power consumption Clean the rotor and the motor Check the condition of the filters: Mountings, signs of damage Check filters are not clogged Check operation and calibration of differential pressure switches Check the system operates correctly Check the display LEDs and the alarm status Check the mother board connections Check the control and display boards Check that the unit's sensor readings are correct Check the condition of the cylinder Carry out the automatic cylinder washing procedure Check the condition of the filling and drain valves Carry out manual washing with limescale preventer Inspect the gaskets/seals Replace if necessary Check the unit is receiving power correctly Check the electrical connections Check the power consumption of electrical components Test safety devices Replace protection fuses Check circuits for leaks Bleed air from circuits Check circuit temperatures and pressures Check operation of the 3-way valve Check the amount of glycol in the circuit Check the water circulates correctly Check the operating temperatures and pressures Check the condition of the compressor Check the condition of the liquid sight glass filter Check operation of the safety devices Check the calibration and operation of the control valves Check the refrigerant charge level and for circuit leaks Check the lubricating oil level Check the condition of the remote condenser Check the calibration of the remote condenser regulator Check that the remote condenser is receiving power correctly Check the pressure controlled valve of the water cooled condenser Check the condenser water circulates correctly ROUTINE MAINTENANCE MAJOR MAINTENANCE Page 46 of 72 1 YEAR 6 MONTHS 3 MONTHS COMPONENTS 1 MONTH CHECK EVERY X X X X X X X X X X X X X X X X X X X X X X X X X X X X X X X X X X X X X X X X X X to be performed by the user To be performed by the maintenance service or assistance centre 6.1 ROUTINE MAINTENANCE 6.1.1 MAINTENANCE OF THE AIR FILTERS In TECNAIR LV air conditioners, all air filters are equipped with differential pressure switches in order to monitor pressure loss caused by clogging. The microprocessor signals when the measured pressure difference exceeds the set value. To change the trip setting of a differential pressure switch, simply unscrew the cover and turn the setting dial to the desired pressure differential value. FILTER TYPE POSITION VALUE [Pa] G4 / F7 filter Suction 250 Note: G4 filters can be partially regenerated by washing in hot water and neutral detergents. F7 filters CANNOT be regenerated. To guarantee the efficiency of the G4/F7 filters, it is necessary to install the 15x3 mm seal (supplied with replacement filters). 6.1.2 AIR FILTER REPLACEMENT To replace the air filters the following instructions must be observed, as well as full compliance with safety obligations regarding use of the equipment: 1. 2. 3. 4. 5. 6. Set the main switch to “0”. Open the front panels via the relevant safety locks. Remove the filter support by adjusting the fixing screws. Replace clogged filters with clean or regenerated versions. Position the support and secure using the fixing screws. Close the front panels and return the main switch to “I”. Air filter position Page 47 of 72 CLOSE CONTROL AIR CONDITIONERS INSTALLATION, USE AND MAINTENANCE 6.1.3 REPLACING THE EXTERNAL AIR INTAKE FILTERS To replace the air filters the following instructions must be observed, as well as full compliance with safety obligations regarding use of the equipment: 1. 2. 3. 4. 5. 6. Set the main switch to “0”. Remove the external air duct from the specific brackets. Remove the brackets using the specific screws. Replace clogged filters with clean or regenerated versions. Position the supports and secure them using the fixing screws. Reconnect the external air duct and bring the main switch to the “I” position. Units with filtered external air intake 6.1.4 External air Filter/Duct supports External Air Filter CONTROL MICROPROCESSOR MAINTENANCE The microprocessor requires periodical controls to verify operational statuses and the presence of possible alarms in components that may compromise proper unit operation. This control must take place according to what is contained in the user manual of the installed microprocessor. For more detailed and specific information on control procedures, please refer to the unit MICROPROCESSOR OPERATION MANUAL accompanying the IT media supplied. Page 48 of 72 6.1.5 MAINTENANCE OF INTERNAL HUMIDIFIER WARNING! THE CYLINDER MAY BE HOT! LEAVE TO COOL BEFORE HANDLING OR USE PROTECTIVE GLOVES The lifetime of the humidifier cylinder depends on various factors, including: correct sizing and operation, water supply within nominal values, hours of operation and correct maintenance. After a variable period of time, the cylinder will inevitably need to be replaced. To meet the above requirements, follow the instructions below. The humidifier requires periodic checks to ensure correct operation and extended cylinder lifetime. These checks should be performed as follows: Within and not exceeding the first 300 hours of operation: check operation, make sure there are no significant leaks of water, and check the general condition of the housing. Make sure that no sparks or arcs between electrodes are generated during operation. Quarterly and not exceeding 1000 hours of operation: check operation, make sure there are no significant leaks of water, and replace the cylinder if necessary. Yearly and not exceeding 2500 hours of operation: proceed with cylinder replacement After prolonged use, and above all in the event of water with a high salt content, solid deposits may cover the electrodes completely and adhere to the side walls. In some cases the heat produced may deform the cylinder and, in more serious cases, may create holes with resulting leaks of water into the tray. To prevent this problem, increase the frequency of checks, halving the intervals between maintenance procedures. 6.1.6 CYLINDER REPLACEMENT To replace the humidifier cylinder the following instructions must be observed, as well as full compliance with safety obligations regarding use of the equipment: 1. 2. 3. 4. 5. 6. 7. 8. Drain all water from the cylinder using the relative function. Set the main switch to “0”. Open the front panels via the relevant safety locks. Slide out the cylinder steam tube. Detach the electrical connections from the top of the cylinder. Release the cylinder from its fixture and lift to remove. Connect the new cylinder and secure to the support. Close the front panels and return the main switch to “I”. No. 1 2 3 4 5 6 Description Load-bearing structure Cylinder Drainage solenoid valve 90° positionable drain coupling Filling tank + conductivity meter Supply solenoid valve Page 49 of 72 CLOSE CONTROL AIR CONDITIONERS INSTALLATION, USE AND MAINTENANCE 6.2 MAJOR MAINTENANCE 6.2.1 MAINTENANCE OF THE FANS Fan maintenance procedures must be carried out in conditions of maximum safety and always with the unit switched off. During maintenance, check the following: 6.2.2 • Periodically check that the fan blades are clean and remove all dirt and encrusted deposits that could affect the balance of the rotor and thus damage the bearings. • Check that the cooling fins of the fan motors are clean. If the fans produce any unusual noises during operation, switch off the machine and identify and rectify the problem, replacing the fan or the motor if necessary. REFFRIGERATION CIRCUIT MAINTENANCE The refrigeration circuit does not require any maintenance other than the periodic checks indicated in the chapter “Start up”. The first of these checks is to look for leaks, as indicated by the presence of small bubbles visible in the liquid viewed through the sight glass. The cooling coil must be inspected and, if necessary, cleaned with hot soapy water using a brush with long soft bristles. Compressed air may also be used, provided that it is free of oil. 6.2.3 MAINTENANCE OF THE ELECTRIC HEATER It is sufficient to check that the battery is clean and that the power consumption in Amps is as specified by the technical data sheet. If the machine is equipped with a modulating electric heater, it is advisable to also check occasionally that the modulator is functioning correctly. To do this, it is sufficient to check that the machine behaves correctly during heating operation, with the corresponding screen showing a voltage of 0-10 V for the microprocessor output to the modulator. (See User manual). 6.2.4 MAINTENANCE OF THE ELECTRICAL PANEL Clean using a compressed air jet at a minimum distance of 30 cm (to avoid damaging plastic parts), pay particular attention to cooling fans and heat sinks. 6.2.5 MAINTENANCE OF THREE-WAY VALVES The three-way control valves do not require any specific maintenance procedures. It is, however, wise to familiarise yourself with the actuator removal and manual opening procedures: Remove the valve actuator. Do not use tools. Page 50 of 72 Use the special screw-on hood to open or close the valve. 6.2.6 MAINTENANCE OF CEA AIR-COOLED CONDENSERS Air-cooled condensers require regular inspection of the evaporator coils, which should be cleaned if the cooling fins become clogged with dirt. It is also necessary to check the fan power draw, while listening for abnormal fan noise and checking the condition of the speed control. The coils should be cleaned in accordance with the following indications: Page 51 of 72 CLOSE CONTROL AIR CONDITIONERS INSTALLATION, USE AND MAINTENANCE 7 DEACTIVATION, DISASSEMBLY AND SCRAPPING WARNING! BEFORE CARRYING OUT ANY PROCEDURES ON THE UNIT, SET THE MAIN SWITCH TO POSITION “O” TECNAIR LV air conditioners must only be dismantled by specialised technical personnel. In any case, the following points must be observed: • Switch off the air conditioner first using the microprocessor. • Open the machine's main door lock switch. • Open the external thermal-magnetic circuit breaker to isolate the air conditioner from the electrical power supply. • The refrigerant contained in the air conditioner should be disposed of in accordance with the waste disposal and safety regulations applicable in the country of installation. • Disconnect, where applicable, the refrigerant lines, the water connections and the condensate drain lines from the air conditioner. • The scrapping of air conditioners is subject to the prevailing legal requirements in the country of installation. • TECNAIR LV recommends that you contact an authorised waste disposal contractor for this purpose. • Air conditioners are made primarily from raw materials such as aluminium, copper and steel. Page 52 of 72 8 APPENDIX 1: CLEARANCE NEEDED FOR ROUTINE MAINTENANCE WARNING! THE NEEDED CLERANCE INCLUDED IN THE FOLLOWING ARE RELATING TO ROUTINE MAINTENANCE OF THE UNIT COMPLETE WITH ALL OF ITS ACCESSORIES. UNITS IN STANDARD IMPLEMENTATION DO NOT REQUIRE SIDE CLERANCE. MODELS UCA/U 21 H – 31 H – 41 H – 51 L – 20 OCA/U 21 H – 31 H – 41 H – 51 L – 20 UCA/U 51 H – 71 L – 81 L – 30 OCA/U 51 H – 71 L – 81 L – 30 Page 53 of 72 CLOSE CONTROL AIR CONDITIONERS INSTALLATION, USE AND MAINTENANCE UCA/U 71 H – 81 H – 101 L – 72 H – 102 L – 50 OCA/U 71 H – 81 H – 101 L – 72 H – 102 L – 50 UCA 101 H – 131 L – 151 L – 102 H – 142 L – 162 L OCA 101 H – 131 L – 151 L – 102 H – 142 L – 162 L UCA/U 131 H – 151 H – 142 H – 202 L – 262 L – 80 – 110 OCA/U 131 H – 151 H – 142 H – 202 L – 262 L – 80 – 110 Page 54 of 72 UCA 202 H – 262 H – 302 L OCA 202 H – 262 H – 302 L UCA/U 302 H – 160 OCA/U 302 H – 160 UCU 220 OCU 220 Page 55 of 72 CLOSE CONTROL AIR CONDITIONERS INSTALLATION, USE AND MAINTENANCE 9 APPENDIX 2: PRELIMINARY AND PERIODICAL CHECKS AT FIRST START-UP WARNING! BEFORE CARRYING OUT ANY PROCEDURES ON THE UNIT, SET THE MAIN SWITCH TO POSITION “O” Before the Manufacturer's personnel proceed with machine testing and start-up, the checks listed on the following form must be carried out. DATE PLACE OPERATOR'S SIGNATURE CUSTOMER'S SIGNATURE PERIODICAL OR PRELIMINARY CHECKS AT FIRST START-UP Start-up or verification of machines with refrigeration circuit require that the units are powered on for at least two hours prior to the arrival of the technician, in order to allow the compressor's crankcase oil heater to reach working temperature and allow evaporation of any refrigerant deposited in the compressor, so as to ensure that the compressors function correctly. The crankcase heaters switch on automatically when the machine is powered on. REFRIGERATION CIRCUIT CHECKS DESCRIPTION 1 Check the discharge pipe diameter conforms with the indications in the installation manual. 2 Check “horizontal” sections of the discharge and return pipes have a gradient of at least 1% in the direction of refrigerant flow. 3 Check that siphons are installed at the lowest point of each rising pipe and every 3 m along rising pipe sections, as well as a counter siphon at the highest point of the rising pipe. 4 Check the non-return valve is installed as near as possible to the compressor with the aperture in the direction of refrigerant flow (pipes longer than 5 m). 5 Check the non-return valve is installed as near as possible to the compressor with the aperture in the direction of refrigerant flow (pipes longer than 10 m). 6 Check that the discharge pipe is insulated in the sections where accidental operator contact is possible (pipe temperature in operation approx. 70/80 °C). 7 Checks that support brackets are installed on the discharge pipe every 3 m and are not too tight, so as to allow expansion of the pipe. 8 Check that liquid pipe diameter conforms with the indications in the installation manual. Page 56 of 72 POSITIVE NEGATIVE 9 Checks that support brackets are installed on the discharge pipe every 3 m and are not too tight, so as to allow expansion of the pipe. 10 Check that the refrigeration circuit valves are open, including the valve on the hot gas injection pipe. 11 Check the electrical connections to the condenser disconnect switch. 12 Check that the disconnect switch is in the closed position (condenser powered on). 13 Check that refrigeration circuit pipe connections of the condenser with the evaporator are opposite the flow direction of the air flow. 14 Check that the condenser is positioned correctly, to prevent air recirculation that would otherwise impair performance. 15 Check the seal of the refrigeration circuit. 16 Check the vacuum level of the refrigeration circuit. 17 Check the refrigerant charge level in the refrigeration circuit. 18 Check the evaporation pressure. 19 Check the condensation pressure. 20 Check the superheating of the refrigerant aspirated by the compressor. 21 Check the sub-cooling of the liquid refrigerant. 22 Check that the liquid line filter is not clogged. 23 Check the power consumption of the compressor. 24 Check operation of the high pressure control switch. 25 Check operation of the low pressure control switch. 26 Check the compressor operating temperature. WATER CIRCUIT CHECKS DESCRIPTION 27 Check that the inlet and outlet of the hot and cold water supplies conform with the arrows marked on the fittings. 28 Check that all liquid supply pipes have manual shut-off taps just outside the machine, and that these taps are open. 29 Check that the condensate drain outlet does not have taps or sections with upward gradients. 30 Check that the humidifier supply fitting is connected to the mains drinking water supply and that it is provided with a manual shut-off valve just outside the machine. 31 Check that the hardness of the supplied water is between 10 and 40 French degrees. POSITIVE NEGATIVE Page 57 of 72 CLOSE CONTROL AIR CONDITIONERS INSTALLATION, USE AND MAINTENANCE ELECTRICAL POWER SUPPLY CHECKS DESCRIPTION 32 Check the connection of the three phases, neutral and earth. 33 Check that the power supply voltage and frequency tolerance limits are within the range of +/- 15% and +/- 2% respectively. POSITIVE NEGATIVE VERIFY CONNECTIONS TO ROOM PROBE, REMOTE TERMINALS, LAN AND RS485 SERIAL BOARD (IF PRESENT) DESCRIPTION 33 Check positioning of the room probes as described in the installation manual. 34 Check that electrical connection between the sensors and the electrical panel is as indicated in the electrical wiring diagram and the installation manual. 35 Check connection of LAN cable as indicated in the electrical wiring diagram and the installation manual. 36 Check wiring of the LAN opening and terminating resistance. 37 Check that wiring of the RS485 board follows the electrical diagram and the installation manual. 38 Check wiring of the terminating resistance of the RS485 network. POSITIVE NEGATIVE TYPE KG CIRCUIT REFRIGERANT CHARGE DESCRIPTION 39 Charging refrigerant during the testing/start-up phase. 40 Possible field integration. NOTES ON ANOMALIES ENCOUNTERED DURING CHECKS …………………………….…………………………………………………………………………………………………………… …………………………….…………………………………………………………………………………………………………… …………………………….…………………………………………………………………………………………………………… …………………………….…………………………………………………………………………………………………………… Page 58 of 72 10 APPENDIX 3: FAULT DIAGNOSIS WARNING! BEFORE CARRYING OUT ANY PROCEDURES ON THE UNIT, SET THE MAIN SWITCH TO POSITION “O” This chapter contains information to assist the operator in tracing any faults that may arise with the machine. Starting with a description of the nature of the problem, we provide indications on the probable causes and possible solutions. The causes described are generic and therefore also apply to the most complete versions of the machine; it is the task of the operator to determine which part of the information provided applies to the machine in question. All servicing and repair of the machine must be carried out by qualified personnel only. We strongly recommend that you do not attempt any procedures on the machine unless you have a good understanding of its operating principles. Key to the fault diagnosis diagram: Page 59 of 72 CLOSE CONTROL AIR CONDITIONERS INSTALLATION, USE AND MAINTENANCE 10.1 VENTILATION PROBLEMS NO AIR FLOW OPERATION WITH PANELS OPEN CLOSE THE PANNELS LOW POWER SUPPLY VOLTAGE MEASURE IF THE VOLTAGE IS CORRECT Page 60 of 72 INTERVENTION OF THERMAL PROTECTION DUE TO HIGH LEVELS OF POWER CONSUMPTION DIRTY FILTERS WATER FLOW SWITCH BLOCK MECHANICAL BREAKDOWN NO AIR CLEAN CHECK MECHANISM CALIBRATION AND OPERATION FILTERS HIGH AIR FLOW LEVEL REDUCE THE SPEED MODIFYING THE ELECTRICAL CONNECTION CREATE ADDITIONAL LOAD LOSSES IN THE AIR CIRCUIT HIGH AIR TEMPERATU RE LEVEL AIR FLOW RATE IS TOO LOW REPLACE IT CHECK AERAULIC CIRCUIT AND DIRECTION OF FAN ROTATION 10.2 DIRECT EXPANSION AIR CONDITIONERS - REFRIGERATION CIRCUIT PROBLEMS LOW PRESSURE BLOCK DISCHARGED REFRIGERATI ON CIRCUIT DEFECTIVE THERMOSTATIC VALVE SEARCH FOR THE LEAK AND THEN RESTORE REPLACE THE BELLOW CLEAN THE AIR FILTERS LOW AIR FLOW LEVEL IN THE EVAPORATOR NO COMPRESSION LOW CONDENSATION PRESSURE CHECK THE CONDENSATION CONTOL SYSTEM CHECK AIR CIRCUIT AND RESTORE ORIGINAL CONDITIONS MECHANICAL BREAKDOWN VALVE BREAKDOWN DISCONNECT COMPRESSOR AND REPLACE VERIFY FAN SETTINGS Page 61 of 72 CLOSE CONTROL AIR CONDITIONERS INSTALLATION, USE AND MAINTENANCE HIGH PRESSURE LEVEL BLOCK AIR COND. AIR FLOW LEVEL IS TOO LOW AT THE CONDENSER CHECK FOR POSSIBLE OBSTRUCTIONS ON THE COIL WATER COND. AIR INFEED TEMPERATURE IS TOO HIGH MEASURE AIR TEMPERATURE REFRIGERATION CIRCUIT IS TOO CHARGED MISSING FAN OPERATION ELIMINATE POSSIBLE RECIRCULATION OF EJECTED AIR CHECK THE EFFICIENCY OF THE CONDENSATION CONTROL SYSTEM CHECK THERMAL PROTECTIONS AND POWER CONSUMPTION CHECK AND BRING BACK WITHIN LIMITS CLEAN CONDENSER COIL NO WATER CHECK HYDRAULIC CIRCUIT PUMPS AND SHUT-OFF COCKS Page 62 of 72 DEFECTIVE PRESSURE CONTROLLED VALVE CHECK OPERATION AND CALIBRATION REFRIGERATION CIRCUIT IS TOO CHARGED DIRTY CONDENSER CHECK AND BRING BACK WITHIN LIMITS CLEAN WATER INFEED TEMPERATURE IS TOO HIGH CHECK AND RESTORE ORIGINAL CONDITIONS 10.3 CHILLED WATER AIR CONDITIONERS - REFRIGERATION CIRCUIT PROBLEMS NO COOLING WATER TEMPERATURE TOO HIGH EXITING THE EVAPORATOR AIR PRESENT IN THE CIRCUIT VERIFY AND REMOVE ANY AIR IN THE CIRCUIT THREE WAY VALVE DID NOT OPEN CHECK CHILLER AND BRING TEMPERATURE BACK TO DESIGNED CONDITIONS CHECK THE ELECTRONIC BOARD CHECK OPERATION OF THE SERVOMOTOR CHECK THAT THERE ARE NO MECHANICAL BLOCKS IN THE OPENING SYSTEM Page 63 of 72 CLOSE CONTROL AIR CONDITIONERS INSTALLATION, USE AND MAINTENANCE 10.4 HEATING SECTION PROBLEMS NO HEATING HOT GAS POST WATER ELECTRIC NO POST HEATING NO SERVO CONTROL OPERATION NO HEATING CIRCUIT BREAKER INTERVENTION SHORTCIRCUITED RESISTANCE OR EARTHED SAFETY THERMOSTAT INTERVENTION HIGH TEMPERATURE FOR REDUCED AIR FLOW Page 64 of 72 VALVE DID NOT OPEN CHECK SERVO CONTROL CHECK AND BRING BACK TO DESIGN CONDITIONS DISCONNECT AND REPLACE CLEAN THE AIR FILTERS WATER TEMPERATURE IS TOO LOW CHECK POWER SUPPLY AND MUDULATING SIGNAL CHECK AND BRING BACK TO DESIGN CONDITIONS VERIFY FAN CONNECTIONS AND OPERATION OPERATION CHECK OPERATION OF THE SERVOMOTOR CHECK POWER SUPPLY AND MUDULATING SIGNAL CHECK THAT THERE ARE NO MECHANICAL BLOCKS ON THE OPENING SYSTEM 10.5 DEHUMIDIFICATION PROBLEMS NO DEHUMIDIFICATION DIRECT CHILLED WATER EXPANS. COMPRESSOR DID NOT STARTUP HIGH AIR FLOW LEVEL CHECK CONSENTS ON ELECTRONIC BOARD BRING BACK TO DESIGN CONDITIONS HIGH AIR FLOW LEVEL BRING BACK TO DESIGN CONDITIONS HIGH WATER TEMPERATU RE LEVEL CHECK ELECTRONIC BOARD POWER VALVE DID NOT OPEN CHECK OPERATION OF THE SERVOMOTOR REMOVE POSSIBLE MECHANICAL BLOCKS OF THE CLOSING SYSTEM Page 65 of 72 CLOSE CONTROL AIR CONDITIONERS INSTALLATION, USE AND MAINTENANCE EXCESSIVE DEHUMIDIFICATION AIR FLOW LEVEL DIRECT EXPANSION CHILLED WATER IS TOO LOW EVAPORATION TEMPERATURE IS TOO LOW CHECK BLOCKED FAN CHECK OPERATION OF THERMOSTATIC VALVE Page 66 of 72 CHECK IF REFRIGERATIO N CIRCUIT IS DRAINED WATER TEMPERATUR E IS TOO LOW CHECK INTERVENED FAN CIRCUIT BREAKER CHECK THAT CONDENSATION PRESSURE IS NOT LOW CHECK FAN ELECTRICAL CONNECTION CLEAN FILTERS CHECK AIR CIRCUIT BRING BACK TO DESIGN CONDITIONS 10.6 HUMIDIFICATION PROBLEMS WATER IS NOT FILLING NO VOLTAGE IN LOAD SOLENOID VERIFY ELECTRICAL BOARD OF THE HUMIDIFIER FILLING VALVE SOLENOID FAULT CYLINDER IS SHORT CIRCUITED NO WATER DISCONNECT AND REPLACE THE SOLENOID PLAN FOR SOFTNER BASED ON ALLOWED VALUES VERIFY CONTACTOR CONSENT CHECK WATER COCKS WATER IS TOO CONDUCTIVE PRESENCE OF POLYPHOSPH ATES CLEAN THE PRESSURE REDUCER CLEAN THE FILTER OF THE WATER FILLING ELIMINATE DISPENSERS Page 67 of 72 CLOSE CONTROL AIR CONDITIONERS INSTALLATION, USE AND MAINTENANCE CONTINUOU S WATER DISCHARGE CYLINDER IS TOO FULL DISCHARGE MANUALLY AND RESTORE FOAM IN THE CYLINDER MANUALLY DISCHARGE THE CYLINDER NO BOILING CYLINDER IS TOO FULL FOR LOW CONDUCTIVITY WATER DISCHARGE VALVE CUT-OFF IS OPEN FUSE INTERVENTION EXHAUST CYLINDER ADD SALT TO THE FILLING TANK CLEAN THE SOLENOID AND THE FILLING TANK DISCHARGE MANUALLY AND RESTORE DISCONNECT AND REPLACE THE CYLINDER CHECK WATER COCKS WATER IS NOT DISCHARGIN DISCHARGE VALVE SOLENOID IS DEFECTIVE DISCONNECT THE SOLENOID AND REPLACE Page 68 of 72 NO VOLTAGE IN DISCHARGE SOLENOID CHECK ELECTRONIC BOARD OF THE HUMIDIFIER CYLINDER IS TOO FULL FUSE INTERVENED DISCHARGE MANUALLY AND RESTORE NO WATER DISCHARGE VALVE CUTOFF IS OPEN CLEAN FILTER AND WATER FILLING VALVE CLEAN SOLENOID AND DISCHARGE WATER OVERFLOWS FROM THE TANK LOW CONDUCTIVIT Y WATER DISCHARGE PIPING IS CLOGGED AND HAS A COUTERSLOPE DISCHARGE PIPING IS VERY SMALL VERIFY WATER SUPPLY VALUES CLEAN AND REMOVE COUNTERSLOPE DISCONNECT AND REPLACE PIPING 11 GLOSSARY • Proportional band: defines a temperature range of just a few degrees starting from the setpoint, within which the system operates the control devices. • Default: this term is used to describe the values (e.g. setpoint and proportional band values) that will be automatically applied by the system if the operator fails to set them. • Free Cooling: introduction of external air into the environment by opening a damper or using cold water, thereby cooling the environment while saving energy. • Step: defines an area of the proportional band (of temperature or humidity) within which a device is switched on and at the same time defines the values at which the device is switched on and off. • Supply: the air delivered to the room by the air conditioner. • Screen: the screen appearing on the display. • Ramp: the operating range of a variable valve from 0% to 100%. • Range: range of values that may be assumed by a parameter. • Return - Suction: air from the controlled environment returned to the air conditioner. • Setpoint: defines the temperature (or humidity) value to which the system is set; the system activates the heating or cooling devices until the temperature (or humidity) in the controlled environment matches the setpoint value. • 3-point valve - modulating valve: the 3-point valve is a commonly used valve that is operated by 2 relays, one to control the opening and one to control the timed closing of the valve; the modulating valve is controlled by a signal with voltage varying from 0 to 10 V. • Dead band - neutral band: define a very narrow temperature range between the setpoint and the proportional band within which the control devices are not operated. Page 69 of 72 CLOSE CONTROL AIR CONDITIONERS INSTALLATION, USE AND MAINTENANCE 12 NOTES Page 70 of 72 Page 71 of 72 CLOSE CONTROL AIR CONDITIONERS INSTALLATION, USE AND MAINTENANCE TPi Klimatimport AB www.tpiab.com [email protected] Page 72 of 72