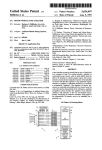
1
H16 Engine USER MANUAL Version – 12b Aug 4th 2015 © Copyright 2015 Hybl Turbines s.r.o H16 Engine USER MANUAL ©2015 Hybl Turbines s.r.o. 2/45 H16 Engine USER MANUAL Content: Introduction ......................................................................................................................................5 1. Purchase agreement ...................................................................................................................6 2. Engine Specification...................................................................................................................7 2.1. Performance and operating limitations .................................................................................7 2.2. Dimensions, weight ...............................................................................................................7 2.3. Package Contents: ................................................................................................................7 2.4. Engine Description ...............................................................................................................8 2.5. Systems Description ..............................................................................................................8 2.5.1. Starter system ................................................................................................................8 2.5.2. Ignition system ..............................................................................................................8 2.5.3. Fuel system....................................................................................................................8 2.5.4. Control system...............................................................................................................8 2.5.5. Containment system.......................................................................................................8 3. Safety Instructions .....................................................................................................................9 3.1. Main Safety Risks..................................................................................................................9 3.2. Basic rules summary for engine operation...........................................................................10 4. Warranty Cover.......................................................................................................................12 5. Installation ...............................................................................................................................13 5.1. Engine Installation..............................................................................................................13 5.1.1. Engine Mounting .........................................................................................................13 5.1.2. Inlet System.................................................................................................................14 5.1.3. Exhaust Duct ...............................................................................................................15 5.1.4. External Containment...................................................................................................15 5.1.5. External Installation .....................................................................................................16 5.1.6. Internal (fuselage) Installation......................................................................................16 5.1.7. Internal (fuselage) Installation – “by-pass”...................................................................17 5.1.8. FOD Protective Mesh Installation ................................................................................17 6. 5.2. Fuel System Installation......................................................................................................18 5.3. Electronics Installation .......................................................................................................18 Electronic Control Unit ...........................................................................................................22 6.1. Using and programming the ECU .......................................................................................22 6.1.1. Adjusting the ECU to the Transmitter...........................................................................22 6.1.2. Failsafe for PCM and 2,4GHz Systems.........................................................................23 6.1.3. Recommended ECU Settings .......................................................................................23 6.1.4. ECU Engine Log..........................................................................................................24 6.1.5. Engine Systems Testing and Fuel Priming....................................................................25 6.1.6. ECU Menu Structure....................................................................................................26 6.1.7. ECU messages .............................................................................................................27 ©2015 Hybl Turbines s.r.o. 3/45 H16 Engine USER MANUAL 7. Engine Operation.....................................................................................................................28 7.1. Prestart Preparation...........................................................................................................28 7.1.1. Engine Pre-sSart/Pre-Flight Checklist: .........................................................................28 7.2. Engine Starting...................................................................................................................29 7.2.1. Startup Checklist:.........................................................................................................29 7.2.2. Solving Startup Issues:.................................................................................................30 7.3. Engine Running –In ............................................................................................................30 7.4. Engine Test – Calibration ...................................................................................................30 7.5. Engine Running ..................................................................................................................30 7.6. Shutdown ............................................................................................................................31 7.7. Low Temperature Operation ...............................................................................................31 7.8. Abnormal Engine Operation ...............................................................................................32 8.8.1 Compressor Stall..........................................................................................................32 7.9. 8. Engine Logbook..................................................................................................................32 Maintenance.............................................................................................................................34 8.1. Regular Maintenance..........................................................................................................34 8.1.1. Inspection A – After Each 5 Hours of Operation...........................................................34 8.1.2. Inspection B - After Each 10 Hours of Operation .........................................................35 8.1.3. Inspection C - After 30 Hours of Operation ..................................................................35 8.2. Life limited parts.................................................................................................................35 8.3. Storage and Conservation...................................................................................................35 8.4. Rotor Bearings Maintenance...............................................................................................36 8.4.1. Inspection A –Listening ...............................................................................................36 8.4.2. Inspection B - Manual..................................................................................................36 8.5. Front Cover Disassembly/Assembly ....................................................................................36 8.6. Starter Maintenance............................................................................................................37 8.6.1. Starter Motor Maintenance or Replacement..................................................................37 8.6.2. Clutch O-Ring Replacement.........................................................................................39 8.7. 9. Battery and Charging..........................................................................................................39 Troubleshooting .......................................................................................................................41 ©2015 Hybl Turbines s.r.o. 4/45 H16 Engine USER MANUAL Introduction Dear customer, We appreciate your decision in choosing our H16 engine. We have spent a huge effort during development of the engine you have now in your hands and our goal is to deliver only top quality, highly reliable and safe engines. By reading and following the best practices described in this user manual and the engine manufacturer’s Technical Notes (published at www.hyblturbines.cz}you will help us to reach this goal and you will enjoy this engine. We wish you pleasant flying. Hybl Turbines Team Important: This manual contains technical specifications, safety risks, installation and engine operation instructions. The Engine H16 is not a toy; it is dedicated for professional model applications and shall be operated only by persons of at least 18 years old. It is expected that the user has good technical knowledge. Before operating the engine, you shall be familiar with this manual, applicable Manufacturer’s Technical Instructions published at www.hyblturbines.cz and local legal regulations. Not following this manual an applicable Technical Notes could lead to warranty voidance and an increased risk of engine damage or even personnel injuries. It is forbidden to use the engine other than for model propulsion, under no circumstances shall the engine be used in any vehicles with animals or humans on board. What is not allowed by this manual is forbidden. If you sell or give away the engine you shall pass all documentation together with the engine to the new owner. Manufacturer: Hybl Turbines s.r.o. Marty Krasove 922/1 Prague 19600 Czeh Republic Website: www.hyblturbines.cz e-mail: [email protected] ©2015 Hybl Turbines s.r.o. 5/45 H16 Engine USER MANUAL 1. Purchase agreement By purchasing the H16 engine the User agrees that operation of the turbine engine is solely at the user’s own risk and he/she understands and will follow the instructions in this manual and the Technical Notes (available at www.hyblturbines.cz). The Manufacturer can not supervise installation, maintenance, operation, adherence with the operation manual, applicable Technical Instructions or legal laws. Therefore the Manufacturer is not liable for any injuries, damage, losses or costs caused by improper operation of the engine. Under any circumstances the joint liability is limited to the price paid for the engine. In case the User is not ready to fully accept this Purchase agreement it is advised to return the engine immediately in unused condition to the seller. ©2015 Hybl Turbines s.r.o. 6/45 H16 Engine USER MANUAL 2. Engine Specification 2.1. Performance and operating limitations Max thrust @ 122 000 RPM 17 kp +-3% Idle thrust 0.7 kp +- 0.3kp Max. physical speed (max 60s) 122 000 RPM Max. physical speed continuous 115 000 RPM Min. idle physical speed 36 000 RPM Measured turbine inlet temperature @ max thrust ~ 800°C (may vary, exact value in test protocol) Max allowed exhaust gas temperature 750°C (not measured by ECU) Fuel consumption @ max thrust ~ 470g/min Specific fuel consumption ~ 0.460 g/kp/s Ambient Temp. operability limits -10°C – +35°C Fuel Jet A1 + 4-6% Oil MIL-L-23699, Mogul TB 32 EP, Mobil DTE Oil light RC system voltage 4.8 – 6V Main Accu LiPol 2s 7.4V, 4Ah 25C or more Operating voltage 7.8 – 8.4V Note: Engine performance is for ISA conditions. 2.2. Dimensions, weight Engine Diameter at attachments position 111 mm Engine length 273 mm Engine weight without external accessories 1610g 2.3. Package Contents: Engine H16 Mounting cradle with stainless steel M3 bolts and washers Electronic Engine Control Unit - ECU Fadec v10 Kero START Hand Data Terminal (HDT) Fuel pump Häusl ZP30020(S)F including 0.5m connection cable, MPX plug and Accu cable Connection cable between ECU and Engine FOD Protective mesh + 2pcs locking O-rings User’s manual Engine service and log book Test protocol ©2015 Hybl Turbines s.r.o. 7/45 H16 Engine USER MANUAL 2.4. Engine Description The H16 engine is a single shaft turbojet engine with a single stage centrifugal compressor, annular combustion chamber with 10 vaporisers and single stage axial turbine. The shaft is supported by two high precision cageless hybrid bearings (ceramic balls, stainless steel races) and the front bearing is axially preloaded and soft supported. This specially designed rotor support provides an operating range free of resonances, with low vibrations and enables long bearing life. Only high quality and verified components and materials are used in the engine. Most of the components are designed and developed in-house specifically for the H16 engine. Our original turbine wheel is investment cast from virgin Inconel 713LC in a vacuum furnace and inspected (FPI, X-Ray) according to our strict specifications. We are one of very few manufacturers to use an NGV cast from Inconel 713LC to prevent any deformation during engine life such to provide maximum engine reliability. 2.5. Systems Description 2.5.1. Starter system The Engine is equipped with an electric starter motor and automatic clutch which connects the starter motor to the main shaft during the start-up and cooling phases. During normal engine operation the starter motor is disconnected from the main shaft and does not spin. The starter motor disconnects at approximately 19 000RPM. The starter motor is housed in an Al-Alloy carrier which provides stiffness and effective cooling much better than plastic carrier designs. 2.5.2. Ignition system The Engine is equipped with an internal torch igniter (“kero burner”) which provides heating to the vaporisers during the startup sequence. The torch igniter contains a ceramic glow element which provides vaporization of the kerosene fuel and its ignition. The ceramic glow element has a superior life endurance and during normal operation does not require maintenance from the user: Note: The user is not allowed to change the ceramic heat element. The glow element can be damaged by voltages above approx 6.8V (ECU value) and therefore for long life it is necessary to keep the glow element voltage as low as possible. 2.5.3. Fuel system Fuel flow is metered by an external electric fuel pump and controlled by the ECU. Fuel distribution is controlled by the main fuel valve (MFV) and the ignition fuel valve (IFV). Both valves and the plumbing are installed in the engine under the aluminum cowl, this enables the use of only a single fuel line to the engine for simple installation and reliable operation. A small amount of fuel is driven through the fuel filter and restrictor (all under the engine cowl) to the rotor bearings to provide lubrication and cooling. For optimum operation it is necessary to mix the fuel with 4-6% (1:20) oil Mogul TB 32 EP or turbine oil according to specs Mil-L-23699 2.5.4. Control system The Engine is controlled by an Electronic Control Unit v10 Kero START from Xicoy. The Electronic Control Unit, according to a signal from the RC receiver, controls automatic start-up, engine run within safe limits and provides cooling down after shutdown. The ECU measures rotor speed and turbine inlet temperature marked as EGT (please understand that this is not the temperature in the nozzle which is about 150°C lower at max RPM) 2.5.5. Containment system The Engine is equipped with a fully integrated turbine containment system consisting of dry Aramide fiber (Kevlar) wound around the engine case. Although the turbine blisk is carefully designed and manufactured to high standards (full X-Ray and capillary penetration inspection) to be reliable during normal engine operation, we decided to use this device for additional safety. ©2015 Hybl Turbines s.r.o. 8/45 H16 Engine USER MANUAL Important: Kevlar is a very strong material used for ballistic protection, however due to high case temperatures it is necessary to change the Kevlar ring after each 90h of operation to keep its ballistic properties. Also it is necessary to protect the Kevlar ring against exposure to UV radiation. In the case of Kevlar ring damage the engine should not be operated. 3. Safety Instructions This Turbine engine is not a toy. It is dedicated for professional model applications and shall only be operated by persons of at least 18 years old. Before operating the engine you shall fully understand and comply with the instructions in the engine manual and legal regulations. 3.1. Main Safety Risks The main safety risks with respect to engine operation are listed in the following chapter. High rotating speed – rotor burst risk The engine contains a fast spinning rotor with high accumulated energy. The peripheral speed can reach 460 m/s. Even a small turbine blade released from the rotor has energy comparable to a hand gun projectile. Although the engine is designed, manufactured and inspected to fully withstand the operational speed and contains an integrated turbine containment ring, caution shall always be taken during engine operation as the rotor could burst unexpectedly. Debris trajectory is 15deg on both side from the plane of rotation according to the FAA AC 20-128. As an engine user you are responsible for maintaining and keeping the safety area clear according to Figure 1. Additionally, we strongly recommend to use external safety containment according to chapter 5.1.2. High temperature During normal operation the engine surface can reach local temperatures of up to 220°C (428F), the exit nozzle surface and exit jet temperature can reach up to 800°C (1470F). Never touch the engine surface or place a hand in the exit jet during engine operation or within 5 minutes after shut down – severe burns could result. Fire hazard The Turbine engine is a high energy machine with continuous burning inside. Also, a relatively large amount of fuel is carried onboard the vehicle making it a potential fire hazard in the case of a crash. Important: It is forbidden to operate the engine in or close to fire risk areas. To minimize fire risk always have a fully charged CO2 fire extinguisher with at least 2kg of filling weight at hand. Suction The air speed at the engine inlet is over 120m/s (430km/h) which creates strong suction. Keep in mind that the engine suction force is so strong, that even metal objects like screws, nuts etc. can easily be sucked into the engine and cause severe damage and injuries. The boundary of the suction is very sharp, so never put your hand close to the engine intake to test the suction; your hand or object may be sucked briskly and with a very strong force. Important: We strongly recommend use of the FOD mesh at the engine intake which is delivered with the engine. Use of the FOD mesh significantly reduces the risk of engine impeller damage. Performance loss impacts of our FOD mesh is very low. Jet blast High speed exhaust gases create an effect known as “Jet Blast”. Although the jet blast is not so strong as to move a heavy object (as in large sized engines), the risk stems from the acceleration of relatively light objects like sand, dust, etc. to very high velocity. These objects can then act as projectiles and can cause damage and/or injuries. ©2015 Hybl Turbines s.r.o. 9/45 H16 Engine USER MANUAL Important: Never use the engine to blow dust or point the exit gases at people or sensitive objects. Acceleration times Although it is not a specific safety risk, it is worth remembering that a gas turbine engines throttle response is much slower compared to that of a piston or electric engine. The acceleration in the first half of the RPM range is significantly slower than in the second half where the acceleration is almost instant. If you keep this behavior in mind, you will operate your plane safely without problems and will enjoy this type of propulsion. 3.2. Basic rules summary for engine operation The engine shall not be used in any vehicles with animals or humans on board. It is forbidden to operate the engine solely by person younger than 18 years or under the influence of any drugs and/or alcohol or by person with reduced ability which could affect safe engine/model operation. The user is responsible for operating the model in such a way, that in case of an engine or other model systems failure no persons and/or properties would be endangered. Always comply with local legal regulations. No persons, flammable or any other sensitive objects shall be present within the minimum safe distance as shown in the H16 safety sheet (Figure 1) during engine operation, and especially when the engine is operated at maximum speed. Not following this rule can cause damages, serious injuries and even death. During engine testing at high speed no persons shall be present in the plane of rotation enlarged 30deg on each side. It is forbidden to operate the engine in fire risk areas. Do not operate the engine in dusty or wet areas; especially the electronic components which should not be exposed to water. Always have a fire extinguisher close to you when operating the engine, CO2 types are recommended (at least 2kg extinguishing agent). Fire blankets are also very effective. Never touch a burning engine with an unprotected hand, severe burns could result. Never touch the engine casing and exhaust nozzle with anunprotected hand during engine operation and up to 5 minutes after shut down, severe burns could result. Never expose any part of your body to the exhaust jet, injuries resulting from high temperature, high velocity objects and flue gasses could result. Never point the exit nozzle at any persons or objects. The Engine intake area must be clear of any loose objects which can be sucked into the engine. Never change ECU settings other than described in this manual or recommended by the engine manufacturer. Especially never increase the maximum rotor speed limit. Never operate the engine/model if you are in doubt of safe engine and all model systems function. ©2015 Hybl Turbines s.r.o. 10/45 H16 Engine USER MANUAL If you realize any uncommon sound or behavior with your engine, do not run the engine until the cause of the problem is clearly solved. If in doubt do not hesitate to contact the Manufacturer directly. It is forbidden to modify or disassemble the engine other than described in this manual or allowed by the engine manufacturer. It is forbidden to use a higher accumulator voltage than the LiPol 2s 7.4V. An increased risk of engine overspeed in the case of an ECU malfunction will result. Also the engine electronics could be damaged. The Engine must be installed, operated and serviced only according to the procedures described in this manual or recommended by the engine manufacturer. After engine installation and after any modification or settings changes to the engine/model systems, always check the operability of the engine and all model systems. The User is obliged to keep records in the engine Log Book. ThisLog Book documentation is considered part of the engine. Instructions for record keeping are given in the Log Book. Always use appropriate ear protection. We strongly recommend to use eye protection; especially during ground testing. Jet intake 300litres/sec 450km/h 220°C The engine may be hot for more than 5 minutes after shut down. 800°C Jet blast 1700km/h 800°C min. 25m . 1m min min 20° Minimum safe distance with ext. containment 5m min. 30° min. 180m Minimum safe distance without ext. containment Figure 1 ©2015 Hybl Turbines s.r.o. 11/45 30° H16 Engine USER MANUAL 4. Warranty Cover The warranty covers the free repair or replacement of parts with proven defects of manufacturing or material defects within the warranty period of 2 years from the date of purchase. Any further claims are excluded. Warranty and after service is provided by the engine manufacturer. Costs for packaging and shipping are paid by the Owner. No liability is assumed for loss during transport. When sending the defective article to the Manufacturer a detailed description of the fault, the invoice stating the date of purchase and Engine Logbook must be included. The warranty is void if the defect of the part or the model is caused by an accident, improper handling, improper use, by not performing regular maintenance or engine disassembly other than described in this manual or approved by the Manufacturer. The warranty does not also cover: damages caused by wear or fatigue or corrosion damages due to model crash damages due to flooding with water damages due to foreign object ingestion or as an result of any external cause damages due to the compressor stall (see chapter 8.8.1) Warranty is void in these cases: the engine was not operated according to this manual or to the engine manufacturer’s Technical Notes or manufacturer’s direct recommendation. the engine was disassembled more or differently than recommended by this manual or the engine manufacturer. The engine damage was the result of improper maintenance as defined within this manual or the engine manufacturer’s recommendation ©2015 Hybl Turbines s.r.o. 12/45 H16 Engine USER MANUAL 5. Installation 5.1. Engine Installation 5.1.1. Engine Mounting The Engine is fastened to the airframe via a 2pc aluminum cradle which is supplied with the engine. It is recommended to place a separating strip of paper between the engine casing and the cradle; this will prevent casing staining by the alumina from the cradle. These stains are almost impossible to clean. The larger half of the cradle (with 4 attachment holes of 4mm diameter and threaded rivets) is to be mounted onto seats in the airframe. The seats must be capable of withstanding all forces occurred during flight. Forces of 450N in the flight direction, 450N up and down and 100N to the sides could be used for guidance. The smaller half fixes the engine in the cradle using 4 bolts M3. The engine shall be positioned according to Figure 2 to provide the best ignition. Before tightening the M3 bolts push the engine as far as possible forward, so the stop ring manufactured on the case sits on the side of the cradle (see Figure 3). Do not tighten the M3 bolts with excessive force or the cradle function could be negatively affected and the engine casing could be damaged. Top 0°±5° 4X M3 FIXING BOLTS SMALLER HALF BIGGER HALF Figure 2- engine installation position – engine inlet view ©2015 Hybl Turbines s.r.o. 13/45 H16 Engine USER MANUAL Stop ring Fuel inlet Interconnecting cable to ECU Figure 3 – fuel and electric lines connection Figure 4 – installation dimensions 5.1.2. Inlet System To minimize inlet losses the minimum throat cross-sectional area of the inlet must be of 130cm2 or greater. If the inlet is long, highly curved, split into many openings or otherwise complicated the minimum throat area should be increased by at least an additional 20%. An inlet area that is too small can cause reduced engine performance and possibly hot exhaust recirculation or fuselage overheating. ©2015 Hybl Turbines s.r.o. 14/45 H16 Engine USER MANUAL 5.1.3. Exhaust Duct The Exhaust Duct should be an ejector type and have dimensions and be positioned as shown in the Figure 1. This ensures adequate secondary air can be induced into the tailpipe. It is important that there is no other restriction to the secondary flow going into the duct. A gap between the bellmouth and nozzle or other part of the engine that is too small can cause reduced thrust, excessive running temperature and unstable running. Too large a gap can allow overspill of the exhaust around the edges of the bellmouth and cause fire of the model. Only dual-walled exhaust ducts made from stainless steel should be used. It must have an ejector feature located in the duct exit to force tertiary air to flow inbetween the two duct walls. Figure 1 – exhaust duct positioning 5.1.4. External Containment To provide maximum safety it is recommended to use external containment.Containment must be designed to capture all possible fragments in the case of a critical rotor failure. Recommended containment design: Recommended containment material and its minimum thickness is shown in the following table: Table 1 Containment material A Aramide fiber (e.g. KEVLAR® 29, Twaron® typ 1000, 2000, 2040, 2200) B Min. thickness 3.1 mm dry 3 900kg/m 1.3 mm density* Steel – ultimate tensile strength min. 500 MPa, ductility min. 15% * dry density means without resin. If the dry density is lower, increase the thickness proportionally. Containment dimensions and placement are shown in the following figure. thickness max 70° max80° min 10mm Figure 2 – external containment dimensions and placement ©2015 Hybl Turbines s.r.o. 15/45 min H16 Engine USER MANUAL Containment attachment must provide correct positioning under any operational load. Containment can be made as an integral part of other model structures, e.g. fuselage thickening. Design requirements mentioned above must be complied with. 5.1.5. External Installation Generally this is the least problematic installation. It enables good access to the engine for inspection and servicing. Design guideline: It is necessary to keep the area behind the exhaust nozzle (see Figure 3) free from model parts which could be damaged by hot exhaust gases. Keep a minimum of 10mm space around the engine case to enable enough air ventilation and to prevent model/engine components from overheating. It is recommended to provide appropriate fuel resistant painting on the model components below the engine. No nitrocellulose or other highly flammable materials shall be used in the engine compartment. We recommend to cover the model components below the engine and after the exit nozzle by Aluminum foil as heat/flame protection. 10° Figure 3 – exhaust gases impacted area 5.1.6. Internal (fuselage) Installation This installation is more complicated compared to an external installation and requires more experience from the installer and user. The fire risk is higher compared to that of an external installation, any fire is additionally more difficult to extinguish. Design guidelines: Provision for fuel draining from the engine compartment, inlet and exhaust system must be provided. Fuel can accumulate during engine startup or during the priming of fuel lines. Sufficient ventilation of the engine compartment and exhaust duct must be provided. Any areas with stagnating hot air can lead to fire or structural deformations. Especially dangerous is exhaust gas penetration into the fuselage, which can be caused by exhaust duct system misalignment and/or deformations. Keep a minimum of 10mm space around the engine case to enable enough air ventilation and prevention of model/engine components overheating. All exhaust duct components which are, or could be, in contact with exhaust gases shall be made of stainless steel. The Internal fuselage structure must sufficiently withstand all operating temperatures. It is necessary to enable thermal expansion of the exhaust duct. ©2015 Hybl Turbines s.r.o. 16/45 H16 Engine USER MANUAL After engine installation and first runs and also regularly during service examine the fuselage internal area and look for any signs of thermal damages, e.g. deformations, melting, burns, carbonized parts etc. If such damages are found, better cooling must be provided. Do not fly the model until all problems are solved. Also be prepared that the risk of fire is very high at that time. Installation must enable enough engine inspection before each flight day, see the maintenance chapter of this manual. 5.1.7. Internal (fuselage) Installation – “by-pass” This is the most difficult installation and very sensitive to correct installation design. Additionally, engine inspection and servicing is more complicated. We do not recommend by-pass installation. Design guidelines are the same as for normal fuselage installation as described in chapter 5.1.6, but additionally: Sufficient ventilation around the engine and around the bypass must be provided; see Figure 4. Ventilation also outside the by-pass is important so that no stagnating hot air areas can form inside the fuselage. By-pass material must withstand all operating temperatures. Correct by-pass design by-pass external ventilation fuselage inlet exhaust duct ejector by-pass Wrong by-pass design hot flow reversed/stagnating Figure 4 – by-pass installation design guideline 5.1.8. FOD Protective Mesh Installation We strongly recommend to use the protective mesh supplied with the engine to prevent the ingestion of large sized debris (stones, grass, insects, etc..). This protective mesh has only a minimal effect on engine performance so we recommend to use the protective mesh under all circumstances. Insert the FOD mesh on the starter cover and fix it with the 2 O-rings delivered with the engine, then push the FOD mesh so it sits tightly on the engine front cowl. Always keep the FOD protective mesh clean. ©2015 Hybl Turbines s.r.o. 17/45 H16 Engine USER MANUAL 5.2. Fuel System Installation The H16 engine has all fuel valves integrated into the engine, this makes the fuel installation very simple. The user is responsible for designing, manufacturing and maintaining the external fuel installation. Basic rules for reliable fuel installation are provided in the following chapter. Fuel and electronics installation schematics are shown in the Figure 6. Design guideline: 5.3. The Fuel system must provide a fuel supply that is free of air bubbles and leakages under all operating conditions; this is essential for safe and reliable operation. We recommend use of an “Air-Trap” tank with an integrated fuel filter as is now common in most RC models. This minimizes the possibility of air bubbles and dirt entering the fuel pump and engine. The Main fuel tanks should use a fuel clunk with an integrated filter of sufficient capacity. Fuel tubes shall have an inner diameter with a minimum of 2.9mm. The selected material must not get degraded by the fuel. Quick connect fittings usually need fuel tubes with calibrated external diameter. PTFE tubes or similar with a minimum temperature resistance of 200°C shall be connected directly to the engine fuel port. The length of this tube should be a minimum of 300mm. Fuel tubes between the fuel pump and engine must withstand a minimum of 10bars. Fuel tubes connecting fuel tanks and the fuel pump are recommended to have inner diameter of 4mm. Sharp corners or necks on the fuel lines should be prevented. Fuel lines must not move freely, must not be in contact with any sharp edges, hot parts or any engine surface. A risk of rubbing or burn-through exists. All push on fuel connections must be secured with a wire lock. Use stainless steel wire with a thickness of 0.4 – 0.6mm. The Fuel pump should be oriented horizontally and must be attached only through the electric motor body, not through the aluminum body of the gear pump. This is important for reliable fuel pump functioning. The fuel pump should not be installed any higher than 300mm above the fuel level. It should also not be lower than the fuel level when the model is standing on the ground. This will prevent fuel leaks through the fuel pump. The fuel pump shall be placed in such a way, that in the case of leakage the fuel cannot be in contact with hot engine surfaces and/or exhaust ducting. Draining provisions must be designed to prevent fuel accumulation inside the fuselage. Before the fuel pump install a fuel filter with a maximum of 0.1mm mesh screen size of sufficient capacity. E.g. Alu Kraftstoff-Luftfilter 4 mm from Jautsch Modellsport. We strongly recommend to use an independent fuel valve inbetween the fuel tank and fuel pump. Operate this valve by an independent RC channel. Electronics Installation The Engine is delivered with a Xicoy Fadec unit FADEC v10 Kero START. Electrical installation is very simple and straight forward via interconnecting the sheathed cable delivered with the engine. The connection setup is shown in the Figure 6. Warning: it is necessary to comply with color coding on the ECU and cables, see Figure 5 ©2015 Hybl Turbines s.r.o. 18/45 H16 Engine USER MANUAL Warning: wrong polarity connection of the main accumulator will damage the ECU Red Black Figure 5 – valves cable connection -color coding General rules: Be careful when connecting the connectors such that they are not damaged. Use only original MPX connectors for replacement of damaged ones. It is important to secure the cables so that they cannot move freely, causing possible source of cable rubbing, breaking or connector disconnecting Lead the interconnecting cable as far as possible from the engine to minimize risk of RPM measurement interferences. The cable between the ECU and Accu should be as short as possible. Use cable of a minimum 1mm cross-section for Accu cable of 500mm length. If a longer cable is needed, increase the cross-section proportionally. The minimum fuel pump cable cross-section is 0.5mm . We recommend to use only highly flexible cables. 2 2 Accumulator (battery): The Battery should be of high quality LiPol 2s (7.4V) type with recommende capacity 4000mAh or more and current rating 25C or more. Warning: wrong polarity connection of the main accumulator will damage the ECU Grounding: Static electricity can buildup in the fuel system and engine flow path during engine operation. Discharge of this static electricity can shutoff or damage the ECU which leads to immediate engine shutdown. To minimize this happening, connect the Engine body, Tailpipe, Fuel pump, Fuel tanks (through metal fuel tubes, fittings) together with copper wire – the cross-section of the wiring is not critical. This is called grounding. Wire cross-section is not critical, parts connection design is at discretion of the user. ©2015 Hybl Turbines s.r.o. 19/45 H16 Engine USER MANUAL Fadec v10 Kero START Throttle input Data T/PC + Banana connector - white-green PTFE cable + LiPo 2s >4000mAh >25C Receiver 4 pins JRC batery Customer Connector HDT or PC 3 pins JRC (ground) (starter+) (glow plug+) RPM sensor thermocouple gas valve fuel valve fuel pump - 6 pins MPX Gas and fuel valve JRC connector position must comply with ECU color coding Fuel filter Recommended Cut-off valve Main Fuel Pump MFP Fuel tube OD 4 mm Fuel tube ID 4mm PTFE tube OD 4mm Figure 6 Engine connection ©2015 Hybl Turbines s.r.o. 20/45 H16 Engine USER MANUAL INTENTIONALLY LEFT BLANK ©2015 Hybl Turbines s.r.o. 21/45 H16 Engine USER MANUAL 6. Electronic Control Unit 6.1. Using and programming the ECU Following text gives basic information about functions and using the ECU Xicoy Fadec. Information is based on the original Xicoy Fadec V10 user manual, the original ECU manual is in English and is available from Xicoy manufacturer http://www.xicoy.com/ . All readings o, engine parameters and ECU programming can be done via the Hand Data Terminal (HDT) shown in the Figure 7. Use UP and DOWN arrows to scroll within the display pages and (-) (+) to decrease resp. increase the parameter value. Figure 8 – Hand Data Terminal – Base page Important: To minimize chance of interferences it is not recommended to leave the HDT connected to the ECU in the plane. 6.1.1. Adjusting the ECU to the Transmitter Prior to the first start adjustment is required for the ECU so it knows the throttle travel of the radio system. This needs to be done whenever there is any change to the radio system which can influence the throttle travel value. The sequence for adjusting the Transmitter is initiated by the listing on page C3 according to Chapter 6.1.5 and confirmed by pressing Enter (push button +), this will then roll out the menu for Transmitter Adjustment. According to the menu on page C5 - move the throttle and trim to the maximum position (Full power) and press button (+) According to the menu on page C6 - move the throttle and trim to the minimum position (Engine stop) and press button (+) According to the menu on page C7 - move the throttle to the min position and trim to the maximum position (Engine idle) and press button (+) Now the ECU should be calibrated to the RC system. Important: If the ECU shows “RC SIGNAL LOST/INCORRECT” message, the ECU is probably not calibrated to the transmitter, you have to perform the transmitter adjust process as described above. If your transmitter is equipped with digital trims you can simulate the trim up and down by the throttle Cut off switch (consult this function with your transmitter manual). ©2015 Hybl Turbines s.r.o. 22/45 H16 Engine USER MANUAL The setting during transmitter adjustment procedure should be as follows: Cut off switch OFF = trim down Cut off switch ON = trim up The next step is the setting of the throttle response curve – menu options C9 – C11 The basic and most common setting for theThrust curve is NORMAL-FULL EXPO this option is generally recommended for high Thrust/Weight ratio aircrafts as it provides better thrust control in the low thrust range and enables more precise taxiing and landing approach. By setting the LINEAR the thrust curve is closely linear to the throttle stick position, rotor speed reaction at low thrust range will be very sharp, taxiing and landing could be difficult. HALF EXPO is the setting between the FULL EXPO and LINEAR. Importantn for Futaba RC systems – in some cases it may be necessary to reverse sense of the throttle channel if using Futaba RC systems. 6.1.2. Failsafe for PCM and 2,4GHz Systems It is strongly recommended to program your RC system failsafe mode in such a way that in case of a signal loss it sends the throttle position lower than the STOP signal. Never operate the engine with failsafe set to HOLD on the throttle channel. 6.1.3. Recommended ECU Settings In following tables the recommended ECU settings are shown. Values are for reference only and are valid only to the H16 engine. Exact ECU setting is recorded in the original test protocol unique to each engine. Important: In the case of an ECU change, it is necessary to set the ECU parameters according the Test Protocol values. Always record an ECU change in the Engine Log Book. Never increase the full speed limit (Full Power Speed) over 122 000RPM, not following this rule increases the risk of a hazardous engine failure and will invalidate your engine warranty. ©2015 Hybl Turbines s.r.o. 23/45 H16 Engine USER MANUAL Table 2 – START – Recommended ECU startup settings ECU Parameter typ. value recommended range Pump start point Pump start ramp Glow plug power Low Batt. Volts Starter Power at ignition Starter Power at FuelRamp RPM 100% starter power RPM OFF starter RPM to reconnect starter RPM IGNITION K. Pump Pw Ignit. K Engine min. Flow EGT End Preheat RPM PREHEAT K RPM Fuel Ramp K Preheat fuel Ignition TimeOut Start Mode AUTO+1 11 6,4V 6,0V 80 AUTO+0 - AUTO+2 010-016 6,2-6,8V 6,0V (for LiPol 7,4V) 060-090 80 12 000 18 000 17 000 4 000 20 50 120 4 000 10 000 off 20s AUTOKERO 080-100 9 000-13 000RPM 18 000RPM 1 000RPM lower than RPM OFF starter 3 000-5 000Rpm 018-024 040-080 100-160°C 4 000-6 000RPM 8 000-12 000 RPM off <20s AUTO-KERO Table 3 – RUN – recommended ECU run settings ECU Parameter typ. value Full Power Speed Idle Speed Stop Speed Start/Min. Temp 122 000 36 000 25 000 100°C Max.Temperature Acceleration Delay Deceleration Delay Stability Delay PUMP LIMIT individual 006 003 80 0500 recommended range must be <=122 000Rpm >=36 000Rpm 25 0000Rpm 100°C value specified in test protocol for each engine >=003 >=003 80 0400-0600 Note: The Acceleration and Deceleration delays can be changed if necessary, keep in mind that decreasing these values can increase the risk of possible engine flameout or unstable operation as compressor stall see 8.8.1. 6.1.4. ECU Engine Log Important engine parameters such as start count and run time are logged by the ECU. This information is accessible after selecting Info on page D2 of the Data Terminal (see 6.1.5). On page B3 than you can find: Tot total engine run time in minutes Cy number of starts (counts up to 255, than starts from 0) Last last start duration in seconds The used battery capacity estimate is displayed on page B4, this can be reset by pressing (+) button. ©2015 Hybl Turbines s.r.o. 24/45 H16 Engine USER MANUAL Page B5 displays the count and total duration of error signal from the RC systen (out of calibrated range, see 6.1.1). Using this information the first rapid diagnostics of the RC system can be performed. Important: The start counter (Cy) counts up to a maximum of 255, then it resets to 0 again. The total run time is unaffected. 6.1.5. Engine Systems Testing and Fuel Priming The menu on pages B7-B12 (see Chapter 0) for systems testing are accessible only if the throttle and trim are in the Stop position (stick down, trim down). B7 starter test – Beware: the engine rotor starts spinning B8 glow plug test (high frequency whistling should be heard), do not forget to switch off. Sometimes it can happen that after the glow plug test, the ECU returns to the initial info page, this doesn’t affect ECU operation. B9 fuel pump test – not recommended for fuel priming B10 fuel valve test (you should hear a click) B11 kero burner valve test (you should hear a faint click) B12 kero burner priming – recommended for fuel priming Fuel Priming Fuel priming is used for fuel system charging. Which is usually necessary to be done after engine installation or fuel lines aeration, e.g. after complete fuel consumption. During normal operation the fuel system is charged and priming is not performed. In case you do not perform fuel priming and start the engine with empty fuellines, the engine will probably not start due to exceeding the start time limit In the case of air in the fuel lines (aeration), the start could be unstable and accompanied by flames from the exit nozzle. We recommend in the case of aeration to disconnect the fuel tube from the engine and perform fuel priming into a container until all the air bubbles disappear. Fuel priming is initiated by the listing on page B12 and pressing the button under the On sign, fuel pump stop is done by pressing the button under the Off sign accordingly. Beware, the fuel pump will start pumping fuel relatively fast, thus we recommend to use only short approx 0,5s bursts. Fuel priming must be stopped as soon as the fuel reaches approx 5cm from the engine fuel port. Important: Care must be taken during priming as the engine can become flooded with fuel. In such a case the engine cannot be started until all excess fuel is dumped from the engine by tilting the engine vertically so that exit nozzle is pointing skywards. We recommend to use the B12 page – “Prime Burner” for fuel priming, this creates less risk of excessive engine flooding in case you stop the fuel pump inaccurately. ©2015 Hybl Turbines s.r.o. 25/45 H16 Engine USER MANUAL 6.1.6. ECU Menu Structure The ECU menu structure is accessible using the Data Terminal after connection to the ECU (powered from RC system) and is shown in the following chart. A 1 B C Xicoy Electronic Terminal V x.x Fadec Kerostart c2011 Xicoy El Trim Low T=022°C Rpm 00000 Pw 000 Pulse=0769uS 00% Ub= 8.2V V.6.16i 2 Error 3 Startup Parameters Timer : Tot : 0142m Last : 520s Cy: 031 4 Pump start point AUTO+1 Battery used: 0854mAh Reset ( + ) 5 Pump start ramp 012 RX Errors 0000 Error time 00.0s 6 Glow plug power 6.4V 7 Low Batt. Volts 6.0V 8 Starter Power at Ignition: 080 Test Glow-Plug On Off 9 Starter Power at FuelRamp: 080 Test/Prime Pump Caution! On Off Enter Info Start Run Radio Normal RUN Parameters Full Power Speed 122.000 Rpm Must be: Stick down Trim down Test Starter On Transmitter Adjust D Off Stick Up Trim Up: (Full power) Idle Speed 36.000 Rpm Stick Down: Trim Down (Stop) Stop Speed 25.000 Rpm Stick Down: Trim Up (Idle) Start/Min. Temp 0100°C Max. Temperature 0900°C Thrust curve: HALF EXPO Acceleration Delay 003 10 RPM 100% starter power: 10.000 Rpm Test Gas valve On Off Thrust curve: NORMAL-FULL EXPO Deceleration Delay 003 11 RPM OFF starter 18.000 Rpm Test Fuel valve On Off Thrust curve: LINEAR Stability Delay 060 12 RPM to reconnect starter 17.000 Rpm 13 RPM IGNITION K. 04.000 Rpm 14 Pump Pw Ignit. K 020 15 Engine min.Flow: 050% 16 EGT End Preheat: 0120°C 17 RPM PREHEAT K 04.000Rpm 18 RPM Fuel Ramp K 008.000Rpm 19 Preheat fuel: Off % 20 Ignition TimeOut 20 s 21 Start Mode AUTO-KERO ©2015 Hybl Turbines s.r.o. Prime Burner Caution! On Off 26/45 PUMP LIMIT 0450 H16 Engine USER MANUAL 6.1.7. ECU messages TrimLow: Indicates that the signal received from the transmitter corresponds to the lowered trim, that is to say, engine OFF. Ready: Indicates that the engine is ready for starting, and that the transmitter signal corresponds to IDLE, (green LED lit) StickLo!: This indicates that the throttle stick is in a position above IDLE, the engine will not start with the stick in this position. Glow Test: Verification of glow plug StartOn: Test of the starter Ignition: Ignition phase. Preheat: Phase of heating of the combustion chamber after detecting the gas ignition. FuelRamp: Phase of acceleration up to IDLE speed. Running: Engine working correctly, pilot has full control of the engine power. Stop: Engine off. Cooling: Starter is in operation to cool the engine. GlowBad: Defective or disconnected glow plug. StartBad: Defective starter, insufficient RPM reached during start, RPM sensor failure. Low RPM: Engine speed below the minimum. HighTemp: Excessive temperature FlameOut: Exhaust GAS Temperature below the minimum. * Extracted from the FADEC system - Autostart 10 user guide. ©2015 Hybl Turbines s.r.o. 27/45 H16 Engine USER MANUAL 7. Engine Operation The engine shall be operated in compliance with this manual and local legal regulations. We recommend to minimize engine use in dusty environments which significantly reduces the life limits of engine components especially compressor wheel and bearings. Warning: Never operate the engine in case you suspect model and/or engine malfunction or you doubt safe operation. 7.1. Prestart Preparation The following actions are necessary to be performed at least before each flight day. 7.1.1. Engine Pre-sSart/Pre-Flight Checklist: 1. Visually inspect the engine surface condition, look for signs of damage to the compressor blades leading edges, engine casing, nozzle, loose screws, thermal damage. 2. Manually check the engine attachment to the airframe. 3. Visually inspect the air inlet system, inside fuselage areas, focus on loose objects and thermal damage. 4. Visually inspect electric and fuel installation, also check they are secure and not loose.. 5. Visually inspect for traces of fuel leakage. Repair all sources of leakage. 6. Prime the fuel if necessary (follow Chapter 6.1.5) 7. Ensure if in doubt, that the engine is empty of possibly accumulated fuel by tilting the engine nozzle skywards. (accumulated fuel will be drained through air inlet system using this method) ©2015 Hybl Turbines s.r.o. 28/45 H16 Engine USER MANUAL 7.2. Engine Starting The engine startup procedure is fully controlled by the ECU, however it is necessary for it to be monitored. In case of unusual behavior stop the engine immediately by moving the stick down trim down (cut of switch). 7.2.1. Startup Checklist: 1. Remove the inlet and outlet protective covers. 2. Switch off the RC system power 3. Connect the HDT (Not necessary). 4. Connect the engine battery (if disconnected after previous run). 5. Check the stick down, trim down/cut off switch OFF => on your transmitter. 6. Switch on the radio system. 7. Check there is enough fuel and power battery voltage of minimum 7.9V. 8. Prepare fire extinguisher 9. Anchor the plane facing the wind and level the model horizontally. 10. Engine area is clear. 11. Initiate the startup sequence on your transmitter - trim up/cut off switch ON => stick up for 2-3s => stick down 12. Monitor the automatic startup sequence. Abort the sequence by stick down, trim down/cut of switch OFF if any of these situations occur: o Long bright intensifying flames (>15cm) from the exhaust nozzle for longer than ~5s. o Strange noise, vibrations o Abnormally long acceleration o Bright red glowing exhaust nozzle o Any doubt of abnormal behavior 13. Usualy the engine should reach idle in less than 60s from the startup command. 14. After startup disconnect the HDT if needed. Important: The startup can be interrupted anytime by setting the transmitter to the stick down, trim down/cut of switch OFF. In case of some residual fuel still burning inside the engine after startup abort,blow air through the engine by setting trim up/cut of switch ON => stick up on your transmitter (this activates the starter motor). If it does not help use the fire extinguisher. ©2015 Hybl Turbines s.r.o. 29/45 H16 Engine USER MANUAL rd Important: Before the 3 startup after unsuccessful start attempts, check the starter motor cover temperature itshould be below 40°C, otherwise the starter motor can be damaged. You can speed up cooling of the starter by blowing compressed air into the starter motor cover front hole. Important: ECU is programmed in such a way, that it is not possible to start the engine without switching off and on the RC power, which means it is not possible to restart in flight 7.2.2. Solving Startup Issues: In case of startup problems check: Main battery voltage, must be at least 7.8V (recommended 7.9+V) Air bubbles in the fuel or fuel quantity Recheck/modify ECU start parameters. Use Table 2 and test protocol for guidance. Follow the troubleshoot list recommendations in chapter 9. The highest sensitivity in case of flame out or excessive flames is to the “Pump Start Point” parameter (page A4 of the Data Terminal) and to the ‘Pump Start Ramp” (page A5). 7.3. Engine Running –In After longer than 6 months of engine inoperative it is necessary to run-in the engine using 10% oil-fuel mixture for approx 2min at ~50 000RPM. 7.4. Engine + Systems Testing, Calibration After engine installation or made some modifications to the engine/model system or in case you modified the ECU settings it is necessary to perform an engine test and thrust curve calibration before you start normal engine operation. Procedure: Startup normally. Have the Data terminal connected to the ECU. On engine running at idle, check all model systems (controls, landing gear, etc..), monitor engine and RPM readings stability. Slowly (~10s) accelerate to max speed and wait until the max speed has stabilized not longer than 1 minute Perform 3 slow accelerations (5s) from idle to full speed Perform 3 fast accelerations (less than 1s) from idle to full speed Cool the engine down at 25% throttle for ~30s and shut down. WARNING: In case of any interference found between the engine and the model systems it is necessary to find and remove cause of the problem before any further flying. 7.5. Engine Running After the startup sequence the engine will stabilize at idle speed (if the throttle stick is in idle position) and the engine control is handed over to the user. During engine run the ECU automatically keeps the engine within the specified limits of rotor speed, EGT (TIT) and acceleration and deceleration times. Important: Maximum speed of 122 000 RPM can be used for no longer than 60s, after that at least similar lenght of run at speed same or below max continous (115 000RPM) shall be used. An engine run must be smooth without vibrations and visible flames. In case of abnormal engine behavior shut down the engine immediately. Note: Acceleration and deceleration times for turbine engines are longer than that of piston engines. The slowest engine reaction is within the first half of the engine speed range, be confident about this behavior. ©2015 Hybl Turbines s.r.o. 30/45 H16 Engine USER MANUAL 7.6. Shutdown Shutdown is normally commenced by the radio transmitter setting to Stick down, trim down/cut off switch OFF (follow your transmitter manual to program the alternative cut off switch). After this command the ECU automatically stops the fuel and oil pump and closes the fuel valve. An Automatic cooling sequence is initiated after shut down. During the cooling sequence the starter motor is switched on and off periodically until the EGT reading drops below 100°C. Do not interrupt the cooling process unless necessary; it is very important for the engine components’ life. The engine will also be shut down in these cases: Loss of the RC signal, or invalid throttle range for longer than 2s Disconnecting the RC receiver cable or loss of RC system voltage Loss of RPM and EGT reading Note: During shutdown listen carefully to the sound of the decelerating engine. The sound produced by the bearings should be regular and clean of any rattling, beating or irregularity. By monitoring this you can detect oncoming defects of the bearings which can lead to catastrophic effects on the engine in the future. If you notice any suspicious sound follow the engine maintenance practices – Bearings Checking chapter 8.4. 7.6.1. Normal Shutdown Checklist: 1. Set the throttle stick to approx. ¼ (50-60k RPM) and let the engine cool down for about 30s 2. Shut down the engine by setting the RC transmitter to Stick down, trim down/cut off switch OFF. 3. Listen to the bearing sound of the decelerating engine and check that there are no “strange” sounds. Also check for an abnormally fast rotor stopping. 4. Wait until the cool down procedure finishes 5. Connect the Data Terminal and read the run time and starts counter and record them in the logbook. (Optional) 6. Turn off the RC system if needed (Optional) 7. Disconnect the engine battery if needed (for longer times) (Optional) 8. Cover the A/C or engine air inlet and outlet to prevent any dust contamination to the engine. 7.7. Low Temperature Operation For low temperature operation - outside air temperature (OAT) below 0°C - we recommend to use fully synthetic turbine oils according to the MIL-L-23699 e.g. AeroShell Turbine oil 555, 560. These oils have a lower viscosity at low temperatures and do not increase the bearing drag significantly that is essential for a successful start-up. High bearing drag can cause hot starts and even damage to the starter motor. A second option is to preheat the engine by blowing hot air in the engine inlet (e.g. hairdryer). The temperature of this preheating air should not exceed 120°C. Warning: Never increase the starter motors power parameter to overcome this issue, severe damage to the starter motor and/or ECU can occur. ©2015 Hybl Turbines s.r.o. 31/45 H16 Engine USER MANUAL 7.8. Abnormal Engine Operation 8.8.1 Compressor Stall Compressor stall is an engine phenomenon when compressed air in the combustion chamber flows back through the compressor due to a stall on compressor/diffuser blades, then after combustor pressure drops the flow is restored. This sequence repeats periodically and is accompanied by very loud growling sound and unusually by flames from exit nozzle and exhaust gas temperature increase. Compressor stall is very dangerous, it can destroy the compressor and turbine blades in very short time.The exhaust gas temperature increases significantly,creating a high fire risk. Compressor stall can be identified relatively easy as very loud growling sound. Usually it occurs at high rotor speed and especially during fast acceleration. Important: If you encounter compressor stall, immediately reduce power. If you need to restore thrust again, accelerate slowly and carefully. The H16 Engine is not prone to compressor stall. However, the stall margin may be reduced by improper installation (strongly uneven inlet flow) or due to compressor blade leading edges damage. It is important to have knowledge about this phenomenon and to know how to solve it. Note: Damage caused by compressor stall is not covered by the warranty. 7.9. Engine Logbook Engine logbook is part of each individual engine documentation and is unique for each specific engine serial number. Log book is primary record of the engine history - start count , total run time and maintenance. Instructions for records keeping are stated in the log book. Important: The user is responsible for keeping regular records about the engine operation time, cycles and maintenance in the logbook. ECU logging is not a primary record of the engine history as it can be damaged or lost. An engine with unknown history is considered potentially dangerous for operation and must not be operated until serviced by the engine manufacturer. ©2015 Hybl Turbines s.r.o. 32/45 H16 Engine USER MANUAL INTENTIONALLY LEFT BLANK ©2015 Hybl Turbines s.r.o. 33/45 H16 Engine USER MANUAL 8. Maintenance The engine has no consumable parts, but the engine components are subject to wear and fatigue which depends on type of operation (aerobatics, scale flying, etc.) and environment where used. Important: An engine that is not serviced regularly is potentially dangerous. Engine failure can lead to material damage, injuries and even death. Never run the engine until all issues are repaired. It is compulsory to record maintenance in the engine Logbook. 8.1. Regular Maintenance Regular maintenance is necessary to keep your engine in good condition and to aid in early detection of failures. Specific inspection and maintenance procedures are described in following chapters. Prescribed inspection times shall not be exceeded by more than 1 hour. 8.1.1. Inspection A – After Each 5 Hours of Operation This inspection is performed by the engine user. Visually check the engine outer surface for any mechanical damage, cracks or discolorations indicating abnormal overheating. (the exit nozzle is discolored normally) Visually check condition of the containment Kevlar ring. Loose fibers can be glued using a drop of epoxy or superglue. In case of thermal or significant mechanical damage it is necessary to repair it at the engine manufacturer. Perform bearing inspection according to the Chapter 8.4.2. Visually inspect the compressor and turbine wheel for any FOD (Foreign Object Damages), rubbing or burns. Any impacts on the leading edge must not exceed 0,2mm and must not have a sharp tip (cuts), in case of deeper impact damage the engine must be serviced by the manufacturer. No cracks are allowed. Slight rubbing (under 30mm long) on turbine shroud is allowed. Compressor case/rotor rubbing is not allowed. If in doubt contact the engine manufacturer. Visually check the security of all bolts to make sure they are not loose. Loose bolts must be unscrewed, cleaned and after an application of the Loctite 243 carefully tightened. Do not use Loctite for M2.5 bolts around the exhaust nozzle, these bolts should be carefully tightened in order not to deform the back plate. Visually and/or manually check all tubing and electrical cables condition and check for loose connectors. Repair or replace faulty items if necessary. Visually inspect the fuel pump for signs of leakage. If it is significant (>0.5ml/h) and is increasing in intensity then the fuel pump should be serviced/replaced with the same type. Inspect the fuel system for contamination, clean if necessary. Disassemble and clean the fuel filter, replace the filter if needed. Visually inspect the mounting cradle for any cracks and manually check if the engine is firmly held in place. Record the performed inspection + findings/repairs in the engine logbook. ©2015 Hybl Turbines s.r.o. 34/45 H16 Engine USER MANUAL 8.1.2. Inspection B - After Each 10 Hours of Operation DELETED 8.1.3. Inspection C - After 30 Hours of Operation This inspection/service is performed by the engine manufacturer. General description: Engine disassembly, cleaning and thorough inspection Exchange/repair of worn/damaged parts (at least bearings) Engine assembly Engine balancing Test run This inspection is charged according to the current price list at the time of receiving the engine. The cost of the repair work depends on the condition of the engine. It is necessary to deliver the engine with the logbook and ECU. It is recommended to deliver also the fuel pump,.The engine can be then be tested as a complete system. It is recommended to send the engine in its original box, specially designed for safe transport, minimizing the risk of damage during delivery. Important: Engine must be delivered without fuel. The fuel inlet port must be blanked off (e.g. with piece of fuel tube with melted and pressed end). Engine must be placed in an airtight PE bag. 8.2. Life limited parts Life limited parts are listed in the following table. The shown life is considered a maximum, parts can be replaced even sooner if their condition is unsatisfactory for continued safe operation. Table 4 – life limited parts Part Rotor bearings Turbine wheel Compressor wheel Rotor shaft Kevlar containment ring 8.3. life [hours] 30 180 90 180 90 Storage and Conservation If the engine is not operated it is essential to protect the engine from dust contamination by appropriate inlet and exhaust nozzle covers, clean soft fabric works also well for this purpose. Important to know that dust is present everywhere and can very effectively decrease bearings life. Usually it is not necessary to specially conserve the engine during normal engine operation, as there is always oil film presented on the bearings and shaft and other parts are made from stainless material (valid for continental environment). Increased corrosion formation can occur if the engine is operated in salt laiden atmospheric conditions such as near the sea. In case of intended long time storage (more than 1 year) it is recommended to perform run according to the 7.3. In case of the engine being floodedwith water contact the engine manufacturer immediately. ©2015 Hybl Turbines s.r.o. 35/45 H16 Engine USER MANUAL 8.4. Rotor Bearings Maintenance In any microturbines the bearings must be in perfect condition, any failure of the bearing will result in fatal damage to the engine. The H16 engine uses state of art high precision (ISO – P4) GRW bearings. Even during normal engine operation the bearings are subject to wear and fatigue so they need to be inspected regularly Maximum bearing life is stated in 8.2. Important factors affecting bearing life: Dust Dirty fuel No or improper fuel filter before engine or fuel pump Low oil content in the fuel Rotor imbalance (e.g. caused by foreign object damage) Detailed bearing inspection can be performed only after engine disassembly by the engine manufacturer. There are two methods that the user can perform a bearing check and these aredescribed in the following chapter. Although these checks are not a 100% inspection, they can be quite successfully In identifying a potentially hazardous bearingcondition. The important factor for both methods is regularity and trendmonitoring. 8.4.1. Inspection A –Listening This is a simple and fast procedure performed during rotor spin down after the engine shuts down or after the starter engaging. Focus on these factors: 1. Listen to the sound generated by the bearings when the rotor is decelerating (starter motor disengaged). The noise generated by the rotor bearings should be quiet continuous rustle with no irregularities. 2. The rotor deceleration should be regular. The rotor can decelerate slightly more rapidly just before stopping, this is normal behavior caused by the cageless bearings. 3. Remember the bearings noise and rotor deceleration behavior and monitor any changes. If in doubt continue with inspection according to Chapter 8.4.2. 8.4.2. Inspection B - Manual A more sensitive method is performed by spinning the compressor nut with your fingers. 1) Spin up the rotor with your fingers and monitor the behavior according to Chapter 8.4.1 2) Gently spin the rotor with your fingers back and forth, you must not feel any irregularities or “rough” running.NOTE:– you may feel slight rotor seize whilst spinning the rotor, this is normal behavior of the cageless bearings. Under no circumstances should you feel rough, bumpy running. Important: You must send the engine to the manufacturer for servicing in case the bearings do not meet the criteria described in chapter 8.4, or if you are in doubt about safe bearing operation. 8.5. Front Cover Disassembly/Assembly DELETED ©2015 Hybl Turbines s.r.o. 36/45 H16 Engine USER MANUAL 8.6. Starter Maintenance Starter maintenance is performed only in case of problems or during regular engine maintenance. 8.6.1. Starter Motor Maintenance or Replacement Tool, material Hexagonal key wrench 2 mm Soldering iron, solder, flux MoS2 or graphite Grease Turbine oil Loctite 243 Spare starter motor set Count 1 1 as needed Available at Local hardware shops. Local hardware shops. Local shops. same as used in the fuel Loctite H16 engine manufacturer Unscrewing/screwing Figure 9 Disassembly: 1) Position the engine vertically (starter pointing up) 2) Loosen the bolt located on the starter cover by 2-3 turns. 3) Using your hand unscrew the starter cover. Hold the engine by the starter holder arms, do not bend the starter to the sides during unscrewing. 4) Mark the starter motor position and the holder 5) Unsolder the cable from the electric motor 6) Remove the electric motor 7) Remove the clutch outer cylinder from the clutch assembly Starter Motor Maintenance: 1) If needed lubricate the front and rear bearings with a small drop of thin mixture of turbine oil and MoS2 or graphite. The rear bearing (commutator) lubrication should not be done more than once per 10hrs of engine operation as it can result in commutator contamination. 2) Inspect and clean the commutator brushes in case of starter motor problems. ©2015 Hybl Turbines s.r.o. 37/45 H16 Engine USER MANUAL Assembly: 1) If sticking, cleanup all parts of the clutch assembly and then slightly lubricate the spindle with a mixture of turbine oil and MoS2 or graphite. 2) Degrease the clutch O-ring 3) Locate the starter motor with the M3 threaded hole against the anti-rotating pin in the starter motor holder as seen in Figure 10 4) Proceed with the assembly in the reverse order as the disassembly. Position the brass washer correctly as seen in the Figure 11. 5) Apply Loctite 243 to the bolt in the starter cover and tighten it slightly. over tightening can damage the starter motor. 6) Check if the clutch axis is approximately collinear with the engine rotor. If not, then loosen the bolt, realign the motor by holding it by the clutch and tighten slightly again. The clutch must not strike any part of the starter holder. 7) Check the starter after assembly by spinning up the rotor (trim up, stick up), rotor must reach at least 6-7000 RPM. If the starter lacks power, then the starter cover bolt is probably over tightened, unscrew it by approx. ¼ turn and re-check the starter again. If you hear an abnormal rattling sound, the starter motor is probably too loose,tighten the cover bolt approx ¼ in and check again. Care must be taken with regards to the positioning of the brushes cables, these need to be as shown in Figure 12 to enable free brush movement, essential for reliable motor operation. To prevent a short circuit use a paper strip wound around the motor for isolation. Figure 10 – starter motor must be positioned with the M3 threaded hole on the anti-rotating pin Figure 11 – correct washer location is with the shallower end towards electric motor ©2015 Hybl Turbines s.r.o. 38/45 H16 Engine USER MANUAL ~2mm spring Figure 12 – brush cables “positioning” – make a bow - cables must not touch any part of the brush holder - spring must rest on the cut on the brush back face and in between the cables 8.6.2. Clutch O-Ring Replacement Tool, material New O-ring 9x2 NBR90 DIN3770 Count 1 Hexagonal key wrench 2 mm Soldering iron, solder, flux MoS2 or graphite Grease Turbine oil Loctite 243 1 1 Available at Can be ordered from Hybl Turbines or local hardware shops. Local hardware shops. Local hardware shops. Local shops. same as used in the fuel Loctite Disassembly: Follow disassembly procedure in Chapter 8.6.1. O-Ring Replacement: 1) Remove the O-ring from the clutch cylinder by the use of wooden toothpick 2) Install a new O-ring and align it using a blunt tool. It must sit in uniformly with no waves, best to check it with your finger. Assembly: Follow assembly procedure in Chapter 8.6.1. 8.7. Battery and Charging Li-Pol battery is not supplied with the engine package. It is up to the user to use a suitable battery and perform the appropriate care. Important: It is essential to charge the battery only when disconnected from the ECU, otherwise the ECU and/or other engine components can be damaged. ©2015 Hybl Turbines s.r.o. 39/45 H16 Engine USER MANUAL INTENTIONALLY LEFT BLANK ©2015 Hybl Turbines s.r.o. 40/45 H16 Engine USER MANUAL 9. Troubleshooting If you experience any issue with operating your engine please go through the following troubleshooting checklist and sort out the problem before any further operation. Contact the engine manufacturer in case you were not able to solve the problem by using this checklist. Group Issue No. Cause 1-1 ECU No reading on the hand data terminal No RPM reading when rotor is spinning Incorrect RPM reading especially during ignition 1-2 1-3 2-1 2-2 2-3 Electromagnetic interference 3-1 No Temp reading or incorrect. ECU-Engine cable bad connection or faulty. FUEL Check connection, inspect cable. Reposition the power cables farther from the engine intake. Check connection, inspect cable. Check the fuel lines. Remove source of leak. Blocked fuel lines outside the engine Bad Fuel/Kero valve 5-3 connection, broken cable or bad valve. 6-1 Bad fuel pump connection or broken cable 6-2 Fuel pump jammed with foreign object. 7-1 Bad connection or cable Starter Replace faulty item Check RC system voltage (4,8V minimum) 5-1 Fuel system leaking 6-3 Bad pump. 7-2 Starter not running or weak Check the operation of the radio system. 3-2 Thermocouple damaged 5-4 Bad fuel pump Fuel pump not running Verify connection or check with other ECU if available. Measure the thermocouple resistance at the connector to the ECU. Resistance should be very small (order of ohms). Contact manufacturer in case of faulty thermocouple. 5-2 Fuel pump runs but no fuel is pumped Corrective action Hand data terminal not connected and/or connector problem. Radio system not engaged or receiver battery discharged Data terminal or ECU failure Low RC battery voltage ECU-Engine cable bad connection or faulty. Worn or misaligned commutator brushes Clutch slipping - greasy compressor nut 7-5 Clutch slipping - worn O-ring ©2015 Hybl Turbines s.r.o. Test the fuel valve (chapter 6.1.5), listen for silent snapping sound. Check connector and cable for wear or broken parts. Repair if needed. Contact manufacturer if valve bad. Disconnect the fuel line from the engine and test the pump by Priming the fuel line procedure (chapter 6.1.5). If faulty, replace the fuel pump with the same type. Record replacement in the engine logbook. Check connector, cables and soldered joints. Repair/replace faulty parts if necessary. Try to spin the pump rotor using wooden toothpick. If the pump is jammed than the pump needs to be serviced by the pump manufacturer. Any user disassembly voids fuel pump warranty. Pump servicing/replacement shall be recorded in the engine logbook. Replace the fuel pump with the same type. Record replacement in the engine logbook. Check connector, cables and soldered joints. Test starter (chapter 6.1.5) Perform starter motor maintenance (chapter 8.6.1) 7-3 Damaged starter motor 7-4 Check the fuel lines, tanks and filters. 41/45 Order new motor from manufacturer and replace it (see chapter 8.6.1). Degrease compressor nut using cotton soaked in gasoline or acetone. Replace the O-ring with the new one (see chapter 8.6.2) H16 Engine USER MANUAL Group Issue Ignition Glow Bad message No ignition message or long ignition time. No. Cause Corrective action Check all connectors, cables and soldered joints. 8-1 Bad connection or broken cable Check igniter (see chapter 6.1.5) 8-2 Bad igniter or other cause Contact engine manufacturer Air bubbles in the fuel lines, or Check if the fuel lines are flooded with fuel. Perform 9-1 fuel lines empty. another start attempt. 9-2 Fuel filter blocked Check and clean the fuel filter. Wrong engine installation Check the engine installation position if it conforms to 9-3 position the engine manual. Try to increase the "Pump Pw Ignit" parameter (ECU Too low fuel pump power 9-4 page A14) by 1 point. Check if it is within during ignition recommended limits. To high "RPM IGNITION" and/or "Starter Power at Too high rotor speed during 9-5 ignition" parameter (ECU pages A13 and 8). Check if it ignition phase is within recommended limits. 9-6 Fuel flow issues Follow troubleshoot section 5 and 6 Increase the "Glow plug power" parameter by 0,2V (ECU page A6). Check if it is within recommended 9-7 Low igniter voltage limits. Use minimum necessary voltage for highest igniter life. Check for air bubbles in fuel lines, perform another 10-1 Air bubbles in the fuel lines start attempt. Flameout 10-2 Fuel filter blocked Long time or even flameout during preheat 10-3 Too low fuel pump power Check and clean the fuel filter. Try to increase "Pump Pw Ignit" parameter by 1 point (ECU page A14). Check if it is within recommended limits. Check "RPM PREHEAT" parameter (ECU page A17) 10-4 Too high rotor speed if it is in recommended limits. Check if at least 7.8V (7.9V and more recommended), 11-1 Too low power battery voltage recharge if needed. Check for air bubbles in fuel lines, perform another 11-2 Air bubbles in the fuel lines Long time or even start attempt. flameout during 11-3 Fuel filter blocked Check and clean the fuel filter. switchover or "Low Gas" message Try to increase "Pump start point" parameter by 1 point 11-4 Too low fuel pump power (ECU page A4). Check if it is within recommended limits. 11-5 Fuel valve issue Follow troubleshoot section 5-3 12-1 Fuel lines leaking Repair fuel installation. 12-2 Fuel filter blocked Check and clean the fuel filter. 12-3 RC system issue Engine Flameout during operation 12-4 Fuel flow issues 12-5 Electrostatic discharge 12-6 RPM reading issues Check all connections and RC system functionality. Check Error logger (ECU page B5). Follow troubleshoot section 5 and 6 Ground engine and all metal parts of the fuel system and exhaust duct according to the recommendations in chapter 6.3. Follow troubleshoot section 2. 12-7 Temperature measuring issues Follow troubleshoot section 3. 12-8 Other issue ©2015 Hybl Turbines s.r.o. Do not operate the engine until resolved. 42/45 H16 Engine USER MANUAL Group Issue No. Cause Corrective action In case of excessive flames STOP the Engine immediately by "stick down, trim down". 13-1 Air bubbles in the fuel lines Check for air bubbles in fuel lines, perform another start attempt. 13-2 Engine flooded with fuel Stop engine immediately, cool the engine by stick up trim up. Spill the fuel by tilting the engine head down. Excessive flames Wrong engine installation during ignition and 13-3 position preheat phase 13-4 Too high fuel pump power 13-5 Too low rotor speed 13-6 Starter issues Excessive flames 15-1 Air bubbles in the fuel lines Excessive flames during switchover phase 15-2 Engine cold It is normal that short bluish flames (<15cm) may occur during cold engine start. Flames should be significantly smaller during warm engine start. 15-3 Too high fuel pump power Try to decrease the "Pump start point" parameter by 1 point (ECU page A4). Check if it is within recommended limits. Important: too low setting may cause flameouts during switchover phase. 15-4 Starter issues 16-1 Air bubbles in the fuel lines 16-3 Too high fuel pump power 16-4 Too sharp fuel ramp gradient 17-1 Air bubbles in the fuel lines 17-2 Restricted intake air flow area Flames during operation 17-3 Too low idle speed setting 17-4 Other cause Engine vibrations during operation Other Strange noise during operation and spool down. Follow troubleshoot section 7. Check for air bubbles in fuel lines, perform another start attempt. It is normal that bluish flames (<15cm) may occur during cold engine start. Flames should be significantly smaller during warm engine start. 16-2 Engine cold Excessive flames during fuel ramp phase Check the engine installation position if it conforms to the engine manual. Try to decrease "Pump Pw Ignit" parameter (ECU page A14) by 1 point. Check if it is within recommended Check "RPM ignition" and "RPM preheat" parameters (ECU pages A13 and 17). Check if they are within recommended limits. Follow troubleshoot section 7. Check for air bubbles in fuel lines, perform another start attempt. 18-1 Bearings damage 18-2 Other cause Try to decrease the "Pump start point" parameter by 1 point (ECU page A4). Check if it is within recommended limits. Important, too low setting may cause flameouts during switchover phase. Try to decrease "Pump start ramp" parameter by 1point (ECU page A5). Check if it is within recommended limits. Check for air bubbles in fuel lines, perform another start attempt. Remove obstacle and/or correct inlet duct. Try to increase the "Idle Speed" parameter by 2000RPM (ECU page A5). Check if it is within recommended limits. Do not operate the engine until solved. Contact manufacturer if needed. Perform bearings inspection according chapter 8.4 of this manual. Do not operate the engine, service the engine by manufacturer. 19-1 Bearings damage Perform bearings inspection according chapter 8.4 of this manual. 19-2 More severe damage Do not operate the engine, contact manufacturer.if needed. 20-1 Too low main battery voltage Check if in recommended limits (7,6-8,2V) 20-2 Fuel lines leaking Repair fuel installation. Engine does not 20-3 Fuel filter blocked Check and clean the fuel filter. reach full speed Try to increase the "Pump Limit" parameter current "Pump Limit 20-4 To low "Pump limit" parameter value by 10% (ECU page D12). Check if it is within reached" message recommended limits. displayed Replace the fuel pump with the same type. Record 20-5 Worn fuel pump replacement in the engine logbook. ©2015 Hybl Turbines s.r.o. 43/45 H16 Engine USER MANUAL Warning: Before a 2nd startup after an unsuccessful start attempt check the starter motor cover temperature, it should be below 40°C, otherwise the starter motor could get damaged. Also take care about possible engine flooding during prolonged unsuccessful start attempts. Fuel can be drained by tilting the engine head down. Note: The ECU recommended parameters setting and ranges are listed in the Using and Programming ECU chapter 7.1 of this manual. ©2015 Hybl Turbines s.r.o. 44/45 H16 Engine USER MANUAL INTENTIONALLY LEFT BLANK ©2015 Hybl Turbines s.r.o. 45/45