1
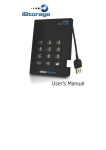
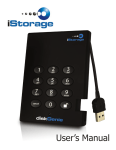
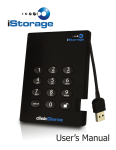
Quick Start Guide
Your iStorage diskGenie is preformatted in NTFS for Windows® and is ready for use. For the
Mac OS please refer to the directions on the reverse to reformat your drive to a compatible
format.To access the iStorage diskGenie plug your drive into a powered USB port, enter the
default PIN number of 123456 and press
.
The indicator light will change from RED to GREEN indicating the drive is unlocked and can be
accessed.
Changing the ADMIN PIN number to your own unique PIN number
You are the “administrator” of this drive. The first thing you will want to do is change the
Administrator PIN number from the default 123456 to a unique, secure PIN number that you
will remember.
To change the Admin PIN number follow the instructions below:
1.
To enter Admin Mode, first plug the drive into the USB port and wait until the LED light
turns RED.
2.
Next, press and hold 0 +
3.
Enter the Admin PIN number (default is 123456) and press
BLUE indicating you are in Admin Mode.
4.
While in Admin Mode, press and hold 9 +
5.
Enter the new PIN number (minimum 6 digits) and press
GREEN 3 times if successful.
6.
Re-enter the new PIN number and press
. The LED light will stay solid GREEN for
2 seconds then solid BLUE indicating you have successfully changed the Admin PIN.
7.
To exit admin mode and begin using your iStorage diskGenie drive, press the CANCEL
button until the LED turns RED. Now enter your new PIN number and press
.
for 5 seconds until the LED light flashes RED.
. The LED light will turn
until the LED light flashes BLUE.
. The LED light will flash
Remember to save your password in a safe place. If
lost or forgotten, there is no way to access the drive.
1
1
2
abc
def
4
ghi
5
jkl
mno
7
8
wxyz
cancel
0
pqrs
tuv
3
6
2
9
If you are having difficulty please refer to the
complete user’s manual which is loaded on your
iStorage diskGenie drive and is also available at
iStorage’s website at: www.istorage-uk.com
1
2
3
3
Cancel button
button
LED Indicator light
iStorage diskGenie Setup for Mac
®
Your iStorage diskGenie is preformatted in NTFS for Windows®. To reformat the drive to a
Mac compatible format please read the below.
Once the drive is unlocked, open Disk Utility from Applications/Utilities/Disk Utilities.
To format the iStorage diskGenie:
1. Select the iStorage diskGenie from the list of drives and volumes. Each drive in the
list will display its capacity, manufacturer, and product name, such as 232.9 iStorage
diskGenie.
2. Click the ‘Erase’ tab.
3. Enter a name for the drive. The default name is Untitled. The drive’s name will
eventually appear on the desktop.
4. Select a volume format to use. The Volume Format dropdown menu lists the available
drive formats that the Mac supports. The recommended format type is ‘Mac OS
Extended (Journaled).’
5. Click the ‘Erase’ button. Disk Utility will unmount the volume from the desktop, erase
it, and then remount it on the desktop.
Your iStorage diskGenie is now formatted and ready to use. To change your ADMIN PIN
please refer to the directions on the reverse.
Technical Support
iStorage provides the following helpful resources for you:
1. iStorage’s Website (http://www.istorage-uk.com)
This gives you the ability to check for up-to-date information.
2. E-mail us at [email protected]
3. Or call the Technical Support Department at +44 (0) 20 8537-3435.
iStorage’s Technical Support Specialists are available from 8:00 a.m. to
5:00 p.m., GMT, Monday through Friday.
© iStorage 2010. All rights reserved.
iStorage Limited, Research House, Fraser Road
Greenford, Middx. UB6 7AQ, England
www.istorage-uk.com