Transcript
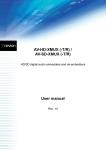
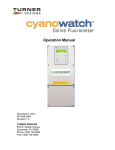
DS XPress Quick Installation Guide
(with XMUX or XMUX2)
Connect the I/O Port end
Connect cameras 1-16 to these
of the XMUX ccabl
abl
e her
e
connect
or
s on the ttop
op rro
ow
able
here
onnector
ors
XMUX/XMUX2
Cable
1
2
3
4
5
6
7
8
9
10
11
12
13
14
15
16
Aux1
1. Unpack the DS
XPress and XMUX
units and peripheral
equipment.
Aux3
In
Outputs
G
N
9 10 11 12 13 14 15 16 D
Alarm Inputs
1
Out
Aux2
2
3
4
5
6
7
8
N
0
C
N
C
I/O Port
Aux4
Connect your
alarm points her
e
here
Connect the lloop-thr
oop-thr
ough cconnect
onnect
or
s
oop-through
onnector
ors
to anal
og de
vic
es as desir
ed
analog
devic
vices
desired
Connect the 4 Aux switched
outputs to external monitors
Loop-throughs available only on 16-input DS XPress. On
32-input systems, connect cameras 17-32 here
Aux1 is a multi-camera analog video output
Plug this into a 25-pin
connector on the back
of the DS XPr
es
s unit
XPres
ess
2. Install the DS XPress
and XMUX units in
their permanent
location.
Plug this into the
“I/O Port” connector
on XMUX or XMUX2
INTEGRAL
XMUX or
XMUX2
INST
ALLING HARD
W ARE
INSTALLING
HARDW
(15 pins)
(26 pins)
Plug in your
netw
ork ccabl
abl
e her
e
network
able
here
Do not plug a phone line here!
DS XPress
Rear Panel
Connect the 25-pin
connector of the
XMUX ccabl
abl
e her
e
able
here
SCSI interface to
external RAID
storage (optional)
Plug the power
cabl
e her
e
able
here
This is the power supply switch.
er e
Turn this on aft
after
evverything is
connected!
STOP!
Do not install any unsupported software or
hardware on your DS XPress system! This
could automatically void the warranty.
RXRX+
TXTX+
Mouse
Ke
yboar
d VGA monitor
Keyboar
yboard
RLYA
RLYB
Wir
e PTZ ccamer
amer
as
Wire
ameras
to this connector
Connect audio
inputs her
e
here
#LQ 10021 1005
4. Turn on the power
supply switch on the
DS XPress rear panel.
5. Turn on the power
switch on the
DS XPress front
panel.
6. See the reverse side
for information about
configuring the DS
XPress unit.
The user manual and
installation/field service
manual contain more
information about the
installation and configuration of your DS XPress
system.
See PTZ installation
instructions on CD for details
© 2005 Integral Technologies
3. Connect all peripheral equipment to the
connectors as shown
in this diagram.
#3000-40128