1
RH60
User's Manual
Comfortable use with touch screen
lu{ly
jo
}vs
General Information
IMPORTANT INFORMATION ON SAFE AND EFFICIENT OPERATION
READ THIS INFORMATION BEFORE USING RH60
NOTICE
I Section 15.19 Labelling requirements.
This device complies with part 15 of the FCC rules.
Operation is subject to the following two conditions:
(1) This device may not cause harmful interference and
(2) This device must accept any interference received, including interference
that may cause undesired operation.
I Section 15.21 Information to user.
The changes or modifications not expressly approved by the party responsible for
compliance could void the user’s authority to operate the equipment.
I IMPORTANT NOTE :
To comply with the FCC RF exposure compliance requirements, no change to
the antenna or the device is permitted. Any change to the antenna or the device
could result in the device exceeding the RF exposure requirements and void user’s
authority to operate the device.
C o n t e n t s
Chapter 1 | Preparing to Use the Product
Product Features
1
Safety Precautions
2
Components
4
Parts Diagram
5
Battery Removal and Insertion
9
Recharging and Turning Power On/Off
10
Product Specifications
11
Chapter 2 | Learning to Use the Menus
www.remotesolution.co.kr
Menu Structure
14
Display Structure
15
<DEVICES> Mode
18
<MY PICK> Mode
21
<OTHERS> Mode
22
Chapter 3 | Configuring the Settings
<SETTING> Mode
28
Chapter 1 | Preparing to Use the Product
Product Features
Chapter 1 | Preparing to Use the Product
Product Features
1
1
Product Features
Safety Precautions
2
2
3
About the Power Supply
About the Product
Components
4
4
4
Standard
Optional
Parts Diagram
5
5
6
7
8
Remote
Cradle
SubRemote (Optional)
RF Receiver & IR Converter (Optional)
Battery Removal and Insertion
9
9
9
Battery Removal
Battery Insertion
Recharging and Turning Power On/Off
10
10
10
Recharging with an Adapter
Turning the Remote Control Power On/Off
Product Specifications
11
11
Product Specifications
I Product Features
1
Touch screen that facilitates usage convenience
2
Wheel mechanism that allows for easy page navigation
3
Simple user interface that promotes intuitive use
4
Low power consumption that extends battery life
5
Distinctive design including a 3.9-inch color LCD
6
RF function that enables multi-room control
I
Chapter 1 | Preparing to Use the Product
Chapter 1 | Preparing to Use the Product
Safety Precautions
Safety Precautions
The following information is included to promote user safety and prevent any possible injury or
property damage. Please read the directions carefully and use the product correctly..
I About the Power Supply
Only charge using the power supply
provided.
An incorrect power supply can cause damage
to the product.
I About the Product
Do NOT touch the power plug with wet
hands.
This can result in electric shock.
Do not use the product in high temperatures
or high humidity.
This can cause damage to the product.
Do not disassemble the product.
This can result in damage to the product.
lu{ly
}vs
jo
lu{ly
}vs
jo
Make sure the plug fits tightly into the outlet.
Loose plugs can cause electric shock.
Do not fold the power cable or place
anything heavy on it.
This can result in electric shock.
Do not place heavy objects on the product.
This can cause breakdown or damage to the
product.
Clean the product with a soft, dry cloth. Do NOT
use any flammable cleaners or chemicals.
This can cause damage to the surface of the
product.
lu{ly
lu{ly
Do Not use too many plugs in a single
power outlet.
This can result in electric shock.
Unplug the power plug during electrical
storms.
Lightning can cause an electric shock.
}vs
jo
}vs
jo
Do not allow foreign objects or liquid to get
inside the product.
This can result in damage to the product.
Do not allow children to play with the remote.
If the product is dropped, this can cause
damage or injury.
lu{ly
jo
}vs
lu{ly
jo
I
}vs
I
Chapter 1 | Preparing to Use the Product
Chapter 1 | Preparing to Use the Product
Components
Parts Diagram
Components may be replaced without any prior notice in the interest of improving product quality or
performance. The components shown here in the manual may differ from the components included
with purchase.
The diagram may differ with the purchased product.
I Standard
I Remote
Safety Frame
LCD Screen
lu{ly
}vs
jo
Main Unit
Cradle
Adapter
4-Menu Link Bottom Button
or Device Link Button
USB Cable
Product Manual
Wheel Control or Cursor
Navigation Button
SETUP CD
lu{ly
jo
}vs
Function Button
I Optional
USB Port
POWER
VID1
VID2
VID3
1
2
VID4
3
4
5
7
8
9
100
0
INFO
6
MUTE
GU
ID
NU
EV
ME
IT
EX
PR
E
SEL
CH
CH
VOL
VOL
Sub-Remote Control
I
Cradle Charge Docking Connector
RF Receiver
Adapter
6-CH IR Flashers
I
Chapter 1 | Preparing to Use the Product
Chapter 1 | Preparing to Use the Product
Parts Diagram
Parts Diagram
The diagram may differ with the purchased product.
The diagram may differ with the purchased product.
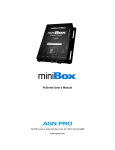
I SubRemote (Optional)
I Cradle
The SubRemote is used when the Main Remote is being recharged
SubRemote is available when the Main Remote is plugged into the Cradle, and the
Main Remote must be selected to RF mode
DC 5.0V
POWER
VID1
VID2
VID3
VID4
1
2
3
4
5
6
7
8
9
100
0
INFO
Cradle
Buttons that are used to choose devices
The procedure of using vid1,vid2,vid3,vid4 with the Sub Remote
Control is the same as using Device link with the RH60.
Ex : Main Remote(RH60) Device link part.
MUTE
GU
ID
ME
NU
IT
PR
EX
EV
E
SEL
CH
CH
VOL
VOL
Recharging Status
LED
Note
■
■
■
I
The LED glows red when charging is needed.
After fully charged, the lamp turns green.
Recharging time can vary.
When the device is first connected to a power source, the LED flashes orange.
SubRemote Device Link
VID1
VID2
VID3
VID4
AUDIO
CABLE
DVD
DVR
I
Chapter 1 | Preparing to Use the Product
Chapter 1 | Preparing to Use the Product
Parts Diagram
Battery Removal and Insertion
The diagram may differ with the purchased product.
I RF Receiver & IR Converter (Optional)
I Battery Removal
Adaptor Spec : DC 12V, 300mA
Receives and changes a RF signal from the Main Remote or SubRemote to an IR signal
Open the battery cover by pushing
IR Flasher connector
DC12V
IR Signal Indicator. LED
When it is first turned on IR Signal Indicator LED will blink 4 times
If it does not blink 4 times, contact your distributor.
When the RF ID correctly corresponds with the RF Code, the IR Signal Indicator LED
will turn on and the IR code will be transmitted.
* The back (side) Rotary Switch
in the direction of the arrow.
I Battery Insertion
Connect 1 and secure the cover to 2 and then close it.
1
RF ID Change
2
I
I
Chapter 1 | Preparing to Use the Product
Chapter 1 | Preparing to Use the Product
Recharging and Turning Power On/Off
Product Specifications
Product specifications can be changed without any prior notice to improve product performance
and quality.
I Recharging with an Adapter
I Product Specifications
Insert the adapter cable into the cradle and then plug the other end into a power outlet.
Item
lu{ly
jo
I Turning the Remote Control Power On/Off
The
icon is NOT related to the remote control power function.
Open the cover at the rear of the remote control and
unplug the wire to turn off the remote control power.
lu{ly
}vs
jo
As the wire can be severed, be careful when unplugging.
Note
In case that overvoltage, over 6V, impacts the remote
control unit, the product does not work by the operation
of the protective circuit. In order to resume the remote
control unit’s operation, remove the battery and then
reinsert it to the unit.
I 10
}vs
SoC
Processor Type
Processor
CPU Core
Memory Controller
LCD Controller
USB Controller
Memory
Flash Memory
SDRAM
SRAM
External keys
Touch Panel
Touch Key
Touch Wheel
Backlight
LCD
Key
Signal Transmitted IR
Zigbee (RF)
PC Interface
USB Device
Battery
Rechargeable
Li-Polymer
LCD
Color LCD
Operating Current RUN
IDLE
SLEEP
Operating Voltage
Operating Distance IR
ZIGBEE (RF)
259 QFP
Hynix HMS30C7202
Processor 80MHz
ARM 720T
16&32 bit modes,
Mono/Color STN, TFT LCD
USB (Slave) 1.1
64Mb x 16 bit or 128Mb x 16 bit
64Mb x 16 bit
8Mb x 16 bit [JTAG Debug]
Touch panel controller ADS7843
Touch sensor controller QT1080
Touch slider controller MP1025
CCFL Controller MP1025
EL. Controller ZSP4403
Infrared
2.4GHz [IEEE® 802.15.4 Standard]
USB 1.1 H/S
3.7V/ 1600mA
3.9” STN Color LCD (320x240)
MAX 500 mA @3.7V
TYP. 300 mA @3.7V
MAX. 8mA @3.7V
3.0V ~ 6.0V
MIN. 10m
MIN. 20m
11 I
Chapter 2 | Learning to Use the Menus
Menu Structure
14
14
Menu Structure
Display Structure
15
15
16
17
<HOME> - Screen
<DEVICES> - Screen
<DEVICES> - TV Screen
<DEVICES> Mode
18
18
19
20
<DEVCIES> - Using the TV Remote Control
Different Methods to Move to Another Page
<DEVICES> - Changing a Link
<MY PICK> Mode
www.remotesolution.co.kr
<MY PICK> - Navigation
21
21
<OTHERS> Mode
22
22
23
24
25
<BIO RHYTHM> - Screen
<GAMES> - Screen
<MEMO> - Screen
<ALARM> - Screen
Chapter 2 | Learning to Use the Menus
Chapter 2 | Learning to Use the Menus
Menu Structure
Display Structure
I Menu Structure
The following shows menu buttons that are displayed on the LCD screen. Please refer to each function in the details shown below.
I <HOME> - Screen
Alarm Set
Battery Charge Indicator Time and Date Display
Current Page Display
Menus
■ The following <HOME> icons are explained below.
: move to the device group that the user wishes to control.
: Watch is jump to Watching group.
: move to the My Pick group.
: move to the other functions menu.
: LISTEN is jump to listening group.
: move to the system settings menu.
I 14
: System Power is power control on all devices.
15 I
Chapter 2 | Learning to Use the Menus
Chapter 2 | Learning to Use the Menus
Display Structure
Display Structure
I <DEVICES> - Screen (
)
I <DEVICES> - TV Screen (
)
Display of IR/RF Signal
Current Page Display
Move to <HOME> Screen
Mode change
Move to <DEVICE> Screen
| Page Number Display
Menus
Function Icons
Return to <Home>
Device Link Setting Buttons
<DEVICE> Link Button
■ The <DEVICES> menu is explained below.
■ The following <Device> TV icons are explained as follows.
●
●
: moves to <MY PICK>.
●
: moves to <DEVICES>.
● The function icons : are used to operate the device functions.
● Device link setting buttons: buttons to set device links (refer to page 20).
● <Device> link buttons : moves to pages preset in device link set.
● Menus : user selects and moves to the page
lu{ly of the desired device.
● Home : return to the home
screen by pressing the Home button}vsor clicking on the box below jo
the Home button.
I 16
lu{ly and displays the current mode.
: moves to the device screen
jo
}vs
17 I
Chapter 2 | Learning to Use the Menus
Chapter 2 | Learning to Use the Menus
<DEVICES> Mode
<DEVICES> Mode
[ <TV>, <CABLE>, <DVD>, <DVR>, <VCR>, <SAT>, <AUDIO>, <CD>, <TAPE> ] [HOME] Use the same method to move to the [DEVICES] menu.
I <DEVCIES> - Using the TV Remote Control
1
Press
I Different Methods to Move to Another Page
on <HOME> screen.
1
Move by pressing the
icon.
2
Move by pressing the
icons.
3
Move by pressing the
Displays the [DEVICES] screen.
2
Press
on <DEVICES> screen.
Displays the [DEVICES] TV screen.
3
Press the function icons on the TV screen to turn
the channels.
Use the wheel to move to another page.
[ Wheel ]
device link buttons.
1
4
Press
2
to exit this mode.
Displays <HOME> screen.
(Refer to 33~35 page to set the brand.)
Press the
to show page information. Select the page name to move to the desired page.
(The wheel can also be used to move between pages)
1
jo
2
I 18
lu{ly
lu{ly
}vs
jo
lu{ly
}vs
jo
}vs
lu{ly
jo
lu{ly
}vs
}vs
jo
19 I
Chapter 2 | Learning to Use the Menus
Chapter 2 | Learning to Use the Menus
<DEVICES> Mode
<MY PICK> Mode
I <DEVICES> - Changing a Link
1
Press
on the <DEVICES> screen.
I <MY PICK> - Navigation
1
Displays the TV screen.
2
3
Press
icon on the Home screen.
Displays the [My Pick] screen.
.
Displays the [Device] screen.
Press
Press the
2
Press
.
Displays the [My TV] screen.
.
Shows the menu for the changed link.
3
The My Pick Macro begins operation when
the operation button on the <My TV> screen is
pressed.
Refer to page 30~31 for My Pick settings.
[ Wheel ]
4
I 20
Press the
button to end.
Displays the <Home> screen.
21 I
Chapter 2 | Learning to Use the Menus
Chapter 2 | Learning to Use the Menus
<OTHERS> Mode
<OTHERS> Mode
I <BIO RHYTHM> - Screen (
)
I <GAMES> - Screen (
Game Start
Move to the <Bio
Rhythm> Screen
Move to the
<Entertainment> Screen
)
Go button after DOB
Exit
Game Screen
Year/Month/Date Display
<Bio Rhythm> Link
■ The <BIO RHYTHM> icons are explained as follows.
■ The <GAMES> icons are explained as follows.
●
●
: moves to the <Bio Rhythm> Screen.
: Moves to the Entertainment Screen.
● Date of birth : Touch the DOB screen to change the background color.
The date of birth can then be modified using the wheel.
●
: Press to save modifications and display new bio rhythm information.
I 22
● Use [▲▼
] on the wheel.
● UP (▲) : rotate/turn
● Down (▼) : send to bottom
● Left ( ) : move left
● Right ( ) : move right
* The start function is inoperable once the game has started.
23 I
Chapter 2 | Learning to Use the Menus
Chapter 2 | Learning to Use the Menus
<OTHERS> Mode
<OTHERS> Mode
I <MEMO> - Screen (
)
I <ALARM> - Screen (
)
Current Mode Display
Alarm On/Off Memo Screen
Alarm Cycle
Alarm Time
Special Dates for Alarm
Setting
Tools
Pen Color
Memo
Save & Exit
Alarm Sound On/Off
Remote Control Function
Setting
Previous Screen
OK
Current Color
■ The <MEMO> icons are explained as follows.
■ The <ALARM> icons are explained as follows.
● Memo Screen: Users can write memos.
● Pen Color: User can choose pen colors.
● Current Color: shows the current pen color selected by the user.
● Tools :
●
(Pen)
(Brush)
(Eraser)
Remote Control Function Setting :
The My Pick setting function controls both this alarm function as well as those of other devices.
The setting method is identical to that of the My Pick function (refer to page 30~31).
: pressing this icon brings up the Save & Exit window.
[ screen when
I 24
pressed ]
25 I
Chapter 3 | Configuring the Settings
www.remotesolution.co.kr
<SETTING> Mode
28
28
29
30
32
33
36
37
39
40
41
43
43
44
45
46
46
47
48
48
49
50
<SETTING> - Menu Descriptions
<CONFIG> - Screen
<MYPICK>
<BRAND SET> - Screen
<BRAND SET> - TV Remote Control Setting
<IR/RF> - Output Mode Setting
<LEARN> - Learning Function Setting(Buttons)
<LEARN> - Learning Function Setting(Devices)
<LABEL> - EDIT Screen
<LABEL> - Group Label Edit
<LABEL> - MyPick Edit / Bio Rhythm Edit
<LABEL> - Device Button / Mypick Button
<CALIBRATE> - Touch Screen Setting
<CALIBRATE> - Wheel Setting
<DEFAULT> Menu Descriptions
<FACTORY DEFAULT> - Moving
<DEFAULT> - BRAND SET
<DEFAULT> - MYPICK
<DEFAULT> - LEARN
<DEFAULT> - ALL CLEAR
<DEFAULT> - CLONE
Chapter 3 | Configuring the Settings
Chapter 3 | Configuring the Settings
<SETTING> Mode
<SETTING> Mode
I <SETTING> - Menu Descriptions
I <CONFIG> - Screen (
)
Current Mode Display
<Config> Configure the remote control display.
<Mypick> Customize the remote control to the user’s preferences.
Current Time
LCD Contrast Control
LCD Brightness Control
<Brand set> Enter the remote control programming.
<IR/RF> Set the output mode.
<Learn> Learn the functions of a remote control.
<Label> Modify the button labels.
<Calibrate> Adjust the sensitivity of the LCD screen and the wheel.
LCD Off Time
RF CODE
Sound ON/OFF
Return to Home
Change value using (-, +)
or the wheel
Save
■ The <CONFIGURATION> icons are explained as follows.
To change any value, select the menu to change and adjust the value using the +/- buttons or rotating the wheel.
<Default> Reset to factory defaults.
(All previously saved functions are deleted.)
I 28
29 I
Chapter 3 | Configuring the Settings
Chapter 3 | Configuring the Settings
<SETTING> Mode
<SETTING> Mode
I <MYPICK>
Customize the remote control to the user’s preferences.
1
on아이콘을 눌러 이동합니다.
the <REMOTE SETTING> Screen.
Press
4
Displays the [My Pick Setting] Screen.
2
3
Press
TV
DVD FM and
when finished.
Press the desired button.
Pressing the <Save> button saves
the information, and is followed
by the appearance of a message
asking, “Changes to LABEL?”
Yes: moves to the label edit screen.
No: moves to <Select My pick key>
screen.
.
Select a button for macro installation.
Ex : TUNER
Note
■ Exit
■ Jump
■ Edit
■ Save
Press a button to install the macro. A saved
button macro can be edited.
Press the desired button.
If there are saved buttons, the Edit list screen appears.
Press CD
press
5
Press
: go back to the previous screen.
: move to the Jump Screen Setting.
: move to the Edit List (refer to page 30).
: After saving, move to label editing (refer to page 40~42).
.
Please refer to the label editing screen. (page 40~42).
Note
■ Cancel
■ ■ Delete
■ Add
1
2
3
<Edit List Screen>
I 30
: go back to previous screen without saving.
: check the buttons saved on the device.
: delete the buttons saved. (Select a button to delete and press delete.)
: go to previous screen after saving.
6
After pressing the
icon, press the
icon to end the mode.
1 Delay window: set the delay time after a function is inputted.
Select a function button and set the delay time using the wheel (0.2~20 secs).
2 This will be shown when the button is selected. 3 Up/down:. More than 5 buttons can be viewed.
(Up to 20 buttons can be saved).
31 I
Chapter 3 | Configuring the Settings
Chapter 3 | Configuring the Settings
<SETTING> Mode
<SETTING> Mode
[ <AUDIO>, <CABLE>, <DVD>, <DVR>, <TAPE>, <TV>, <SAT>, <VCR>, <CD>, <AUX1~5> ] <HOME> Use the same method to move to the <BRAND SET> menu.
I <BRAND SET> - Screen (
I <BRAND SET> - TV Remote Control Setting
)
■ Turn on the desired TV.
■ Ex : TV brand name LG (Goldstar).
01. Current Mode Display 1
02. Brand Display
Press
■ Point the remote control at the TV.
in the <HOME> screen.
Displays the <REMOTE SETTING> screen.
03. Input Keypad
2
04. Zoom Out
06. Back
05. Next
Press
.
Displays the [Devices] TV screen.
07. Delete Letters Entered
08. Display Letters Entered
■ The <BRAND SET> icons are explained as follows.
01. Display Current Mode and Device Settings.
02. Display current brand, and click button to go to the next screen.
03. Keypad to enter the brand.
04. Zoom out.
05. Go to the next screen if the brand is correct.
06. Move to the <Preprogram> screen.
07. Deletes the letters entered.
08. Displays the letters entered.
3
4
Press
.
Displays the <BRAND SET [TV]> touch pad.
Press the first letter of the brand name (for instance, “L” for “LG”) on the <Brand set [TV]>
screen.
Displays the touch pad to enter the brand name.
I 32
33 I
5
Chapter 3 | Configuring the Settings
Chapter 3 | Configuring the Settings
<SETTING> Mode
<SETTING> Mode
If the brand name displayed is a match, press the
icon.
10
Press
11
Press the
Rotate the wheel left or right to scroll up and down
through the brand names.
6
Press
testing the power.
and check if your selection is correct by
Continue pressing [LG(GOLDSTAR)] to select the correct model from the list. (Do NOT hold the button down)
7
If the TV power works, press the
.
to save.
The TV remote control setting is complete.
The <BRAND SET> screen appears.
button to end.
Repeat steps 3~11 to configure another TV.
Note
■ Check the power supply status of the TV by using the LG (GOLDSTAR) icon.
■ If power button works, verify all the functions with the <Verify> button. (move between screens using the wheel).
■ Move to the next page using the wheel.
8
Check once again if it is the correct selection by
using the number icons in the BRAND SET TV
screen and/or wheel.
[ Wheel ]
9
Press
I 34
if all TV functions work.
35 I
Chapter 3 | Configuring the Settings
Chapter 3 | Configuring the Settings
<SETTING> Mode
<SETTING> Mode
I <IR/RF> - Output Mode Setting
1
Press
in 아이콘을 눌러 이동합니다.
the <Remote Setting> screen.
Displays the [IR/RF Setting] screen.
I <LEARN> - Learning Function Setting(Buttons)
Point the original remote control towards the 5X remote control directly at each other and keep both
remotes within About 1 inch in order to enable the learning function.
1
Learning Buttons
아이콘을 눌러 이동합니다.
Press
in the <REMOTE SETTING> screen.
Displays the <Learning> screen.
2
3
Press
.
: RF output
: IR output
After pressing the
icon, press the
icon to end the mode.
2
Press
3
Press
4
Press the icon to be learned.
.
Buttons learn: transfers button functions.
Devices learn: transfers device functions.
.
Select a device to be learned. The SELECT LEARN BUTTON message will continue
to flash if a key is not pressed.
Note
■ You can learn the Power Key in two modes; Power On mode and Power Off mode.
I 36
Signals from the original remote control have a lag time
of approximately 5 seconds. If no signal is registered
for 5 seconds, a beep is sounded and the button
pressed is reset.
37 I
Chapter 3 | Configuring the Settings
Chapter 3 | Configuring the Settings
<SETTING> Mode
<SETTING> Mode
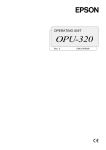
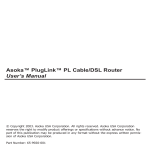
I <LEARN> - Learning Function Setting(Devices)
Point the original remote control and the remote control to undergo learning directly at each other within 1 inch.
5
1
Press the original remote control’s button you
want to be learned within 5 seconds.
Saving is automatic after the signal is received.
After saving, the message, “Changes to LABEL?”
appears.
Yes: moves to the Label Edit screen.
NO : moves to the Select Learn Button screen.
.
2
Please refer to page 40~42 for label editing methods.
: shows functions undergoing learning.
Press the
in the <LEARNING> screen.
[Select the screen button] appears briefly.
Press a device button to be learned.
Signals from the original remote control have a lag time
of approximately 5 seconds. If no signal is registered
for 5 seconds, a beep is sounded and the button
pressed is reset.
icon to end.
Repeat steps 4~5 for more buttons to be learned.
3
Press the original remote control’s button you
want to be learned within 5 seconds.
The signal is saved automatically after it is received.
Note : How to learning
4
VOL
VOL
ME
SEL
CH
ID
GU
icon to end.
[Select the screen button] message appears briefly.
(repeat steps 2~3 if there are more devices to be
learned).
CH
9
0
E
8
7
100
6
INFO
5
4
MUTE
VID4
2
3
POWER
VID3
1
lu{ly
VID2
NU
jo
VID1
Press the
}vs
<Original Remote>
<RH60>
I 38
IT
EX
EV
7
Press
Press
PR
6
Learning Devices
1 inch
39 I
Chapter 3 | Configuring the Settings
Chapter 3 | Configuring the Settings
<SETTING> Mode
<SETTING> Mode
I <LABEL> - EDIT Screen (
)
I <LABEL> - Group Label Edit
1
01. Current Mode Display Press
03. Label Input Pad
06. Cancel
07. Delete the Letters
Entered
1
2
Press
1
3
Press
1
4
Press
05. Pad Switch
01. Displays current mode.
02. Display the selected icon and label.
03. Keypad to enter the label.
04. Caps lock.
05. Move to a different pad page. (total of four)
06. Cancel.
07. Delete letters entered.
08. Save.
09. Enter a space.
I 40
아이콘을 눌러 이동합니다.
.
Group Label Edit
● Device Edit ● MyPick Edit ● Bio Rhythm Edit
08. Save
09. Display Letters
■ The <LABEL EDIT> menus are explained as follows.
in the <REMOTE SETTING> screen
Displays the [Label Edit] screen.
02. Selected Icon and
Label Display
04. Caps Lock
Device Edit 아이콘을 눌러 이동합니다.
아이콘을 눌러 이동합니다.
.
아이콘을 눌러 이동합니다.
.
41 I
Chapter 3 | Configuring the Settings
Chapter 3 | Configuring the Settings
<SETTING> Mode
<SETTING> Mode
I <LABEL> - MyPick Edit / Bio Rhythm Edit
The setting method for the MyPick Edit and the Bio Rhythm Edit is the same (refer to page 41~42).
1
5
Press “1” in the <Label Edit> screen.
아이콘을 눌러 이동합니다.
Displays a magnified pad.
1
MyPick Edit 아이콘을 눌러 이동합니다.
/ Bio Rhythm Edit
Press
.
Displays the [LABEL EDIT] screen.
1
6
Press “1” in the
<Label Edit> screen.
아이콘을 눌러 이동합니다.
Displays the changed icon.
I <LABEL> - Device Button / Mypick Button
The setting method for the Device Button and the Mypick Button is the same (refer to page 41~42).
1
7
Press
to
end.
아이콘을 눌러 이동합니다.
The <Label Edit> screen appears.
Repeat steps 4~7 if more label editing is desired.
1
Device Button
/ Mypick Button
아이콘을 눌러 이동합니다.
Press
.
Displays the [LABEL EDIT] screen.
Note
■ Press
I 42
to go to a different pad page. (Total 4 pages)
43 I
Chapter 3 | Configuring the Settings
Chapter 3 | Configuring the Settings
<SETTING> Mode
<SETTING> Mode
I <CALIBRATE> - Touch Screen Setting
1
Press
in the <Remote Setting> screen.
I <CALIBRATE> - Wheel Setting
1
Press the Wheel in the <Calibration> screen.
2
Press
Displays the <CALIBRATION> screen.
2
Press <Touch Screen>.
Displays the <Touch Screen> setting screen.
Displays the Wheel setting screen.
to adjust.
: decrease sensitivity.
: increase sensitivity.
Caution : Check that the wheel works properly after adjustment is complete.
3
4
Press
in sequence.
(Caution: Mark the center point precisely.)
3
Press the
icon to end.
The message “Would it action really true Changes to
Wheel value?” appears.
Yes : moves to the Remote Setting screen.
No: returns again to the sensitivity adjustment screen.
The <Calibration Success> message appears
when finished, followed by saving and a return to
the <Home> screen.
Displays the <Home> screen.
I 44
45 I
Chapter 3 | Configuring the Settings
Chapter 3 | Configuring the Settings
<SETTING> Mode
<SETTING> Mode
I <DEFAULT> Menu Descriptions
I <DEFAULT> - BRAND SET
1
Delete data settings.
Press the
<Brand Set> Deletes remote control settings.
<Mypick> Deletes the customized settings.
<Learn> Deletes the information saved in learning mode.
Displays the <BRAND SET DEFAULT> screen.
2
<All Clear> Performs the deletions for all of the above.
<Clone> Copies information between remote controls. (Can only be used when having two or more remote controls.)
icon in the <FACTORY
DEFAULT> screen.
3
Press
.
Select a device to delete. (Ex : AUDIO)
→
: When selected, the check
mark disappears.
Press
selected.
to delete the AUDIO device
After deletion, the <FACTORY DEFAULT> screen
appears.
I <FACTORY DEFAULT> - Moving
1
Press
→
icons in turn in the Home screen.
Displays the <FACTORY DEFAULT> screen.
I 46
47 I
Chapter 3 | Configuring the Settings
Chapter 3 | Configuring the Settings
<SETTING> Mode
<SETTING> Mode
I <DEFAULT> - MYPICK
The deletion procedures are identical with those of the <Brand Set> (refer to page 47).
1
Delete data settings
Press
I <DEFAULT> - ALL CLEAR
Deletes all information saved in <Brand Set>, <My Pick>, and <Learn>.
1
in the <FACTORY DEFAULT> screen.
Press
Displays the <MYPICK DEFAULT> screen.
The deletion procedures are identical with those of the <Brand Set> (refer to page 47).
1
in the <FACTORY DEFAULT> screen.
Displays the <FACTORY SETTING> screen.
2
I <DEFAULT> - LEARN
Delete all data settings
Press
.
After full deletion, the <FACTORY DEFAULT> screen
appears.
: delete all.
: go back to the previous screen without saving.
Delete data settings
Press
in the <FACTORY DEFAULT> screen.
Displays the <LEARNING DEFAULT> screen.
I 48
49 I
Chapter 3 | Configuring the Settings
<SETTING> Mode
MEMO
I <DEFAULT> - CLONE Using two remote controls, a user can save all the information from one to the other.
1
1st Remote Control
Press
in the <FACTORY DEFAULT> screen.
Ex : a completely configured remote control.
Press
.
2
2nd Remote Control
Press
in the <FACTORY DEFAULT> screen.
Ex : a non-configured remote control.
Press
.
3
When the progress bar has completed, it
automatically saves and ends.
[ SOURCE Remote ]
I 50
[ TARGET Remote ]
MEMO