1
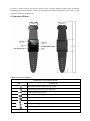
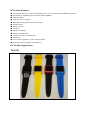
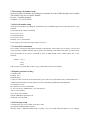
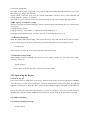
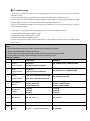
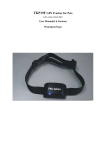
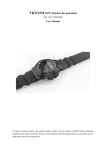
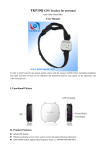
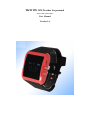
TKW19S GPS Tracker for personal
(GPS+GSM+SMS/GPRS)
User Manual
Version 1.6
In order to install correctly and operate quickly, please read this manual carefully before attempting
installation and online activation. Pictures are for indication and illustration purposes only, please see the
appearance and color in kind prevail.
I. Functional Picture
LED Screen Icon Instructions:
G19 Display Screen Icon Instructions
Icon
Instructions
GPS mould opened,but didn’t get gps signal
GPS mould opened also get gps signal well
GSM signal strength volume
No GSM sim card
Battery volume
Battery in charging under working status
Battery in charging under off-working status
Battery fully
SOS
Status of SOS
II. Product Features
●
●
●
●
●
●
●
●
●
●
●
●
●
●
Personal gps tracker,e.g.:mountain-climbing,detective work, person(the old and children) guardian
Worldwide use (GSM frequencies:850/900/1800/1900MHz)
GPS chip: MTK
24 hours real-time tracking
Both SMS tracking and web tracking available
Inbuilt antenna
Remote Control
Geo fence
Inbuilt GPS Module
Supports fast dial button
One dail, two ways communication
SOS button
Voice monitoring,Built-in speaker and microphone
Removable and rechargeable internal battery
III. Product Appearance
TKW19S
IV. Product Specifications
GSM module
GSM 850/900/1800/1900 MHz Quad frequency
GPS sensitivity
-163dBm
GPS center frequency
L1, 1575.42MHz
GPS positioning accuracy
5-25m
GSM positioning accuracy
100-500m
Speed accuracy
0.1 m/s
Time accuracy
Synchronous with GPS
GPS Datum
WGS-84
Hot start
< 1s
Warm start
< 38s
Max. altitude
18000m
Max. speed
515m/s
Gravitational acceleration
﹤4g
(2). Others
Operating temperature
-30---75℃
Humidity
5%---95%
Dimensions
48mm×38mm×16 mm
Voltage
Rechargeable 450mAh battery
Power supply
DC5V
Standby time
>72h
Buttons
SOS button for emergency aid.
V. Installation Instructions
6.1 The preparing work before installation
6.1.1 Please check whether the model is right and hardware accessories are complete when you received
the product. If not, please contact your dealer as soon as possible.
6.1.2 Choosing the type of the SIM card is GSM card, Please refer to the distributor’s advice.
Note:
Please use SIM card with GSM network;
Please turn off the device before insert or take out the SIM card;
Please make sure that the terminal SIM card has opened GPRS function;
Please make sure that the terminal SIM card need to open the caller id function.
VI. Message Setup
All the following function command need setup by lowercase. And every command has reply. If the
parametric command setup is right, it will reply message: “set successfully”. If not, need setup again. If
send query command, your mobile phone will reply corresponding information.
7.1 Center Number Setup
You need setup center NO. first, if you need check monitor or other operations by message. The device
only accept message command sent from center NO., so you can setup center NO. by your phone NO.. In
order to ensure the safe using, the setup needs password, so the initial passwords is “123456”. Password
can be changed.
Format: pw,123456,center,your phone NO.#
(Note: No space in any words.)
Example: pw,123456,center,13524258458#
If the setup is successful, there will be a reply “Center number set successfully!”
Remark: Only 1 center NO. is allowed.
7.2 APN Setup
Create the SMS “APN,APN name,,#” and send it to the terminal; after executing this command, the
terminal will automatically start and connect to GPRS with APN set.
Format: APN,APN name,,#
Example: apn,cmwap, ,#
(No space between “,”).
(“cmwap” is the apn name for China mobile)
If the setup is successful, there will be a reply “APN set successfully!”
7.3 Server connection setting
Command: ip,***.***.***.***,port,****#
Example: ip,59.188.20.67 ,port,7018#
If the command is set successful, the device will reply “IP and port Settings OK”
7.4 Changing Password
The initial password of user name is “123456” and you can also change it. The password need be 6 words.
The command as below:
Format: pw,123456#
Example: pw,888888#
If the setup is successful, the setting mobile phone will receive message “Password set successfully!
PW:888888.”
7.5 Presetting call number setup
Setup presetting call number by sending the command in form of SMS through center number.
The number only can use mobile number.
Format : f1,mobile number#
Example : f1,13567832209#
7.6 SOS call number setup
Setup SOS call number by sending the command in form of SMS through center mobile phone NO. to the
terminal.
Can set three SOS number, Command:
sos1,11111111111#
sos2,22222222222#
sos3,33333333333#
Example: sos1,13412345678#
If the setting is successful, then reply "SOS set success!".
7.7 Cancel SOS call number
If you want to cancel SOS call number and don’t remember the serial number you set before, you can send
query parameter condition message first to get the corresponding serial number. Secondly, you send cancel
SOS call number to the device. command in form of SMS through center mobile phone NO. to the
terminal.
Format: sos1 #
sos2 #
sos3 #
If the setup is successful, there will be a reply “SOS number delete successfully!”.
7.8 Inquire parameter setting
Command: test#
Example: test #
Reply Message:
ver:TQ-v0.1-2013/07/04-22:51;ID:7893267561;ip:219.142.106.193;port:8500;center:13640927062;slave:1
3682431464;upload:65535s;work mode:1;bat level:3;GPS:OK(7);GPRS:OK(100);LED:OFF;
ver: firmware version
ID: 7893267561– device ID Number
ip: 219.142.106.193, PORT:8500 -- Server IP and port
center: Center number
slave: Slave center number
upload: GPRS Data upload interval
workmode: working mode
7.9 Work mode setup
Command: m1,20# or m2, 600# or m3,20# or m4#
The default working mode is mode 1,
m1,20#: mode 1, GSM and GSP always working, every 20 seconds send GPS data to server. (Range:
10~65535S, default 60S)
m2, 600#: mode 2, power saving mode, every 600 seconds turn on GPS, and send GPS data to server once,
then enter sleep. (Range: 300~65535S)
m3,20#: mode 3, GPS not work, every 20 seconds send GSM’s cell ID to server, some commands can
wakeup GPS once. (Range: 10~65535S)
m4#: mode 4, no server, always sleeps, only wakeup by SMS or call, can get google map link by SMS.
7.10 Language and time zone setting
The device provide two kinds of language, Chinese and the English. The different areas use different time
zone setting.
Command: lang,x,zone,n#
Language options x: 0 is English, 1 is Chinese, the default language x=1.
Time zone n: East eight area for 8, west three areas for -3, the default time zone n=+8.
7.11 Restart the device
When the GPRS cannot link normally, such as that all setup is successful, but the device still not on line,
you can send message to the device. The device will restart and then the device can work as usual.
Format: reset#
If the setup is successful, the device will restart after 1min and no reply.
7.12 Restore factory setup
When sending incorrect command cause the device can’t work as normal, you can setup restore factory
message to the device.
Format: factory#
If the setup is successful, the device will restore to be the default.
VII .Operating the device
8.1 Power on/ off
Power on: Put effective SIM card in to the device, and turn on the power, the power light will on and blink.
After the power is on, the device will begin to search the GSM network signal. At this time, the light will
brighten 1s and darken 2s. When the GPS is successful positioning, the light will brighten 1s and darken 2s.
Power off: Press power off button when the device is power on. The device can work as normal as long as
the SIM card is effective and has GPRS function. The device will send data to the backend server timing.
8.2 Address tracking
8.2.1 Address tracking by message
Format: where#
If the setup is successful, the device will reply you a address. If not it will reply “Unable to get GPS data
correctly, please try again! !”
Remark: This function need supported by platform.
8.2.2 Address tracking by web link
Format: url#
If your mobile phone has GPRS, WIFI or 3G function, you can open the web link and you will see the
tracked address by map. And you can also write down the link on your computer, then you will get the
address.
8.2.3 Real time tracking on platform
You can login the GPS tracking platform to look the position.
8.3 SOS button
In case of emergency, please press SOS button, and the device will call the there SOS NO. you have set in
sequence. If no one answer SOS call, the device will stop call after twice.
Notice: The SOS alarm can only call the phone NO. you have setup.
8.4 Monitoring voice number setting
When you call the device by the set mobile phone NO., the device will start monitor automatic.
The caller will hear the voice from the device.
When the calls are not from the set phone NO., the device can’t be in the monitoring state.
Format: monitor,00000000000#
If the setup is successful, the device will reply you “Montior number set successfully!”
Note: 1. Before you using this function, you need setup mobile phone NO. for monitoring first.
2. The SIM card put in the device need has call screening function
IX .Login GPS service platform
Platform website: http://www.track188.com/?locale=en&back=true
If you already have your account information to login the platform, you can go into the back-end server
directly.
Otherwise, please contact your provider to give you the account and password. When you login the
platform website, please input the account and the password, then you can see the online tracking
information.
1..singal unit login:
2.Management account Login:
Ⅹ.Troubleshooting
1. If the device couldn’t be on line in the tracking platform after you keep the power on, please check the
problems as below:
1) Please according to the specification to check whether the SIM card is installed correctly.
2) Please make sure the LED indicator light condition is right. When it is functioning normally, the GSM
indicator lighting-on time is 0.1S, and on GPS indicator lighting-off time is 2S.
3) Please check whether the GPS has been located in the platform. If not, please put the device in outside
with good signal reception.
2. If the device is showing off line on the platform, please check the problems as below:
1) Check LED indicator light condition is right.
2) Whether the charge of SIM card is overdue.
3) Whether SIM card open GPRS function.
4) Query the parameter Setting. Check serial number of the equipment, and the interval of GPRS upload
time is correct.
Comparision List of GPS Watch Tracker commands (Model: LDW-TKW19G/19M)
Note:
1, All commands as below are by SMS. (default device password: 123456)
2, All the commands letter in lower case format.
3, All the setting or checking commands will be replied with related content by SMS.
4, If successful, it will reply: Set successfully! If not you need to re-set it.
Settings as below:
Commands
Example
pw,123456,center, 18688751382#
1
Service
Center Number
pw,device
password,center,number#
2
Slave
Center Number
pw,device
password,slave,numbers#
pw,123456,slave, 18688751392#
3
Delete
Center Number
1.pw,device password,center,d#
2.pw,device password,slave,d#
pw,123456,center, d#
4
SOS Number
Setting
1.sos1,numbers#
2.sos2,numbers#
3.sos3,numbers#
1.sos1, 18688751382#
2.sos2, 18688751392#
3.sos3,13800138000#
5
Delete SOS
Number
1.sos1#
2.sos2#
3.sos3#
1.sos1#
2.sos2#
3.sos3#
6
APN Setting
apn,apn name,,,#
1.apn,cmnet,,,#
apn,cmnet
7
Server Setting
ip,IP Adress,port,Port Number#
ip,124.232.150.158,port,9500#
8
Work Mode
Setting
1: m1,t# (GPS has been working)
2: m2,t# (Power Saving Mode)
1. m1,20#
2. m2,600#
3: m3,t# (LBS Mode)
4, m4# (Disable GPRS Mode)
(”t” GPRS upload time interval)
3. m3,120#
4. m4#
9
Reboot Device
reset#
reset#
10
Modify User
Password
pw,New Password( 6 digits)#
pw,888888#
11
GPRS upload
time interval
setting
upload,t#
15<t<65535
upload,300#
12
Back to Factory
setting
factory#
factory#
Language and
time zone
setting
langx,zone,n#
(x=0,is English;x=1,is Chinese;
”n”is time zone
Western Time Zone=-n
Eastern Time Zone=+n
1.lang0,zone,-3#
2.lang1,zone,+8#
monitor,numbers#
(When the set number, dial in, can
be monitored)
monitor,13800138000#
Note:
1, Need to set the monitor NO. in advance.
2,Terminal Sim card need to open
Dialer-Identification function at first.
13
14
Monitor
Setting
Number
Checking
15
16
17
Location
checking
(Get Google
Map link)
Address
tracking
Check
parameter
url#
url#
Feedback:
location:Course:000,Speed:000.00,2013-09-30
02:58:21,
http://maps.google.com/maps?q=N22.540062,E1
14.077652
Where#
The device will reply you a address,if not will
reply you”unable to get GPS data correctly,
pls try again!”
This function need support by platform
test#
Feedback:
id:1308080030
ip:124.232.150.158
port:9500
AGPS:9
GPS:3
GPS fixed:0
GSM singal:100
battery:0
GPRS:1
18
Hardware
remotely
upgrade
upgrade,address#
Note: Address means download the
upgrading file address.
Please consult the downloading address
from your dealer!