1
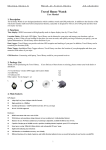
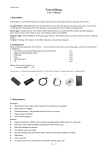
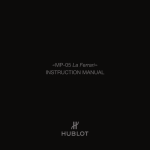
Travel Honey
Travel Honey Watch
User Manual
1. Description
Honey Watch is a new-creating product which combines watch and GPS. Not only watch function but many creative and
useful functions, especially designed for traveler who is fond of GPS function.
Time display: High quality Japanese SEIKO movement, display current time by 12 hour o’clock
Location Finder: With eight LEDs, Travel Honey directs you to reach the position you have saved, such as car position, or
hotel position. Searching your favorite location, you can upload it to Travel Honey for getting there.
Data Logger: Along with you, Travel Honey offers simultaneous use of real-time GPS reception and data logging to know
where you have been. What is more, Travel Honey is able to record POIs.
Photo Tagger: With installation of Photo Tagger software, Travel Honey shows you the locations you have taken the photos.
Sharing your memories with others!
2. Packing List
Thank you for purchasing the Travel Honey. If you find any of these items are missing, please contact your local dealer or
distributor.
1. Travel Honey wireless GPS logger and location finder
2. USB cable
3. CD
Option: Travel power supply 1 set
1.
2.
1 set
1 pc
1 pc
3.
3. Main features
GPS chipset:
z
Adopt SkyTraq Venus 6 chipset with 65-Channel for fast acquisition and reacquisition
z
High sensitivity (to -160dBm)
z
Excellent performance - Cold/Warm/Hot start time: 29/1 sec. (average)
z
WAAS / EGNOS supported
Hardware:
z
Japanese SEIKO movement with water resist 5ATM。
z
With satiny, exquisite and portable design; diameter of case: 44.91mm
z
Diameter of case: 44.91mm
z
Capable of keeping up to 100,000 records or positions, including longitude, latitude, speed, UTC and tag data
z
Two segment switch for two switch modes, Location Finder and Data Logger mode
z
USB Interface
(excluded ear) / 66.8g (included battery)
(excluded ear); watchstrap is adjustable; available for different size of writ.
z
Smart power saving / 800mAh Lithium-Ion Rechargeable battery/21 hours usage
z
Eight LEDs indicating clear directions
z
No installation needed, user friendly
Photo Tagger Software:
z
Support Windows, XP, and Vista
1
S k y t r a q
V e n u s
6
W a t c h
z
Free update
z
Multi-languages supported
z
User friendly interface
z
Able to export to KMZ, NMEA183, and GPX format
z
Able to view speed and altitude
z
Support Video playback (AVI, MP4) on the Tracks
o f
T r a v e l
H o n e y
6 5
c h a n n e l s
4. Icons and Indicators
Direction LEDs
Power Switch
POI Setting Button
Time Adjust Button
DL/LF Switch Button
Power Jack
GPS LED
Destination LED
Power Charging LED
A. Explanation for Buttons
DL/LF switch button is showed different mode by flashing type of GPS LED.
DL:Data Logger mode(flash in every second);POI is used to record point of interest button during DL mode; upload recorded data to Photo Tagger
software waiting for tagged.
LF:Location Finder mode (flash in every 5 sec.); POI is used to save current location during LF mode.
Time Adjustment Button: pull out to adjust time of Travel Honey Watch.
LED status
1 GPS (Green)
2 Power (Red)
Flash
GPS position is fixed
DL mode:Flash in every sec.;LF mode:Flash in every 5 sec.
Low Power
OFF
GPS Searching
Not Connected
Recharging
Sufficient Power
<15M to
destination
3 Destination (Blue)
4 Direction (Red)
ON
Set up the destination ( All direction LEDs flash )
<50m to destination (Flash in 1 sec.)
LED Indicators
1.
GPS Indicator (Green): Automatic search for GPS
(i)
Steady light on indicate searching for position.
(ii) Steady flash indicates fixed GPS position in DL mode (flash in every second)
(iii) Steady flash indicates fixed GPS position in LF mode (flash in five seconds).
2.
Power Indicator (Red):
(i)
Steady flashing every second indicates insufficient power
(ii) Steady light on indicate power charging
2
Indicate the
direction
Not Connected
S k y t r a q
3.
4.
V e n u s
6
W a t c h
o f
T r a v e l
H o n e y
6 5
c h a n n e l s
Destination Indicator (Blue): Steady light on indicate distance to destination is <15M
8 Direction Indicator :
(i)
Once destination has been successfully established, all 8 arrow direction lights would sequentially flash once
(ii)
Once POI of DL mode has been successfully established, all 8 arrow direction lights would sequentially flash once.
(iii)
Once destination has been established with LF mode, direction arrow would light steadily, pointing to the destination direction
continuously.
5. Operations
5.1 Before you use
For the first time using Travel Honey, please charge battery until it is fully charged. Take the USB cable and connect it to the power jack then connect another
side to PC, Laptop or car cigarette adaptor. This will begin to charge the battery. Charging time is 3 hours typically. A fully charged battery can last for 21
hours continuously operation.
5.2 Start to use
Turn on Travel Honey with switch into either LF or DL mode. Once Travel Honey power is turned on automatic search for GPS signal would begin. Once
GPS position is fixed, the GPS (Green) LED will start to flash once every second. When under DL mode with LEDs flashing every sec; pressing once
to switch to LD mode and LEDs flash in every 5 sec.
NOTE: Travel Honey is only workable outdoors.
1 To use Location Finder
NOTE: please confirm the GPS LED flashing in every 5 sec.
1-1. Set a destination:
1-1-1. Save current location: Confirm GPS position is fixed and indicator is flashing in every 5 sec. Current location
would be stored after 2 second press into POI button. Once destination has been successfully established, all 8 arrow
direction lights would sequentially flash once. LF mode would rewrite new destination over old by press POI button
once again.
* Press DL/LF button once again would switch to DL mode and become key locker which avoiding clear
memory.
1-1-2. Using soft-ware to pre-set destination
(1) Run Photo Tagger software and find a search engine by enter address or longitude and latitude on the
left hand button. After red sign of A has come out on the map,, then press “Save as target" function appeared in the dialog box and waiting for “Yes" button to
finish setup.
(2) Places you’ve been or a place has been marked: Upload your data/ photo,
and find the marked red “balloon” signs. Use “Save as target” function appeared in
the dialog box, and automatic connection with hard-ware would store the appointed
location as a destination within Travel Honey. After the location has been saved, a
successful storage dialog box would appear.
NOTE: The power charging LED must face the user and “12 o’clock” on
the watch must be toward the direction the user is going to.
3
S k y t r a q
V e n u s
6
W a t c h
o f
T r a v e l
H o n e y
6 5
c h a n n e l s
1-1-2. Look for the destination
Change the power switch to LF mode. Once the GPS position is fixed, one of the direction arrows (Red) LEDs will start to indicate the directions.
1-1-3. Approach to destination within 15m, then (Blue)LED flashing to finish indication of the direction
When you are within 15 meters of the destination, the destination (Blue) LED will be on. Following the indication of the direction (Red) LEDs, you can
simply find the position saved before.
2. TO use Data Logger
Data Log: Data log mode correctly when GPS indication light is flashing.
2-1. Record Points of Interest (POIs)
In DL mode, Travel Honey is able to record POIs. Press the setting button for 2 seconds, the position
will be recorded. All direction LEDs flashing together for 1 second indicates the position has been
recorded.
While uploading the tracks to PC, you can also see the POIs you have recorded.
NOTE: Direction LEDs will indicate the location that has been set up during LF mode. Even
through using mode has been switched to DL mode.
Only DL mode provides data logger function.
6.
To use G mouse
3-1 Plug the USB cable and connect with a laptop
The laptop must have mapping software installed. (We don’t provide it) After connecting with laptop by USB cable, Travel honey becomes your personal
navigator.
7. To use Photo Tagger
D-1 Install Photo Tagger software and enter the product key
The Photo Tagger software supports Windows, XP, and Vista. After completing installation, enter the product key which is on the package of the CD.
D-2 Read the user manual of Photo Tagger software
Go to <Help> to bring up the user manual of Photo Tagger software.
6. Warranty
Travel Honey is guaranteed to be free from defects in material and functions for a period of one year from the date of purchase.
Any failure of this product within this period, under normal conditions, will be repaired at no charge to the customers.
4