1
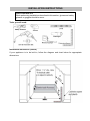
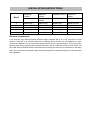
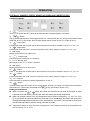
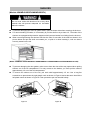
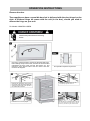
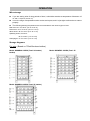
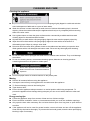
INSTRUCTION MANUAL Models: WNWR28-1SSRN WNWR55-1SSRN WNWR53-2SSRN WNWR42-2SSFN WNWB-2SSFN WNWR142-2SSRN WNWR150-2SS BEFORE USE,PLEASE READ AND FOLLOW ALL SAFETY RULES AND OPERATING INSTRUCTIONS Allavino has a policy of continuous improvement on its products and reserves the right to change materials and specifications notice ALLAVINO Distributed and Serviced by BEVERAGEFACTORY.COM 8510 Miralani Dr., San Diego, CA 92126 www.allavino.com 1-800-710-9939 TABLE OF CONTENTS Safety instructions and warnings………………………………………………………………………2-3 Transportation and unpacking …………………………………………………………………………4 Installation instructions ……………………………………………………………………….4-6 Operation ………………………………………………………………………………………………... 7-14 Cleaning and care …………………………………………………………………………………………15 Problems with your appliance? .……………………………………………………….……………….16 Limited warranty …………………………………………………………………………………………..17 SAFETY INSTRUCTIONS AND WARNINGS IMPORTANT SAFETY INSTRUCTIONS WARNING:Before the appliance is used, it must be properly positioned and installed as described in this manual. Please read the manual carefully. To reduce the risk of fire, electric shock or injury when using the appliance, follow basic precautions, including the following: To prevent injury or damage to the appliance, it should be unpacked and set up by two people. In the event that the appliance is damaged on delivery, contact the supplier immediately before connecting to the power line. To guarantee safe operation, ensure that the appliance is set up and connected as described in these operating instructions. Disconnect the appliance from the power source if any fault occurs. Pull out the plug, switch off or remove the fuse. When disconnecting the appliance, pull on the plug, not on the cable. Any repairs and work on the appliance should only be carried out by the customer service department, as unauthorized work could prove highly dangerous for the user. The same applies to changing the power cable. Do not stand on the base, drawers or doors or use them to support anything else. Do not allow flames or sources of ignition to enter the appliance. When transporting and cleaning the appliance, ensure that the refrigerant circuit is not damaged. In the event of damage, make sure that there are no ignition sources nearby. Keep the room well ventilated. This appliances is not intended for use by persons (including children) with reduced physical, sensory or mental capabilities or lack of experience and knowledge unless they have been given initial supervision or instruction concerning use of the appliance by a person responsible for their safety. Children should be supervised to ensure that they do not play with the appliance. Do not store explosives or sprays using combustible propellants such an butane, propane, pentane, etc., in the appliance. Electrical components might cause leaking gas to ignite. You may identify such sprays by the printed contents or a flame symbol. Do not use electrical devices inside the appliance. Before you throw away your old appliance: Take off the door. Leave the parts in place so that children may not easily climb inside. When disposing of your appliance, please choose an authorized disposal site. SATETY INSTRUCTIONS AND WARNINGS Children in the household DANGER, RISK OF CHILD ENTRAPMENT! Before you throw away your old appliances: Take off the door. Leave the shelves in place So that children may not easily climb inside. Never leave packaging materials with children. There is a danger of poisoning or suffocation by the cardboard boxes and plastic sheets! This appliance is in no way a toy for children! If you will no longer be using the appliance, remove the doors and gasket seals and store in a safe place. In this way you will avoid the danger of children becoming trapped inside the appliance. Never allow children to operate, play with or crawl inside the appliance. Child entrapment and suffocation are not problems of the past. Junked or abandoned appliances can be dangerous…even if they, ”just sit in the garage a few days,” they can be causes of child entrapment and suffocation if stored improperly. Grounding instructions Improper use of the grounding Plug can result in a risk of electric Shock. This appliance must be grounded. If the power socket of the home system is not grounded in accordance with the current legal regulations, connect the appliance to the grounding lead itself after consulting a specialized technician. Do not use an extension cord with this appliance This appliance is equipped with a power cord having a grounding with a grounding plug. The plug must be plugged into an outlet that is properly installed and grounded. Consult a qualified electrician or service technician if the grounding instructions are not completely understood or if doubt exists as to whether the appliance is properly grounded. If the outlet is a standard 2-prong wall outlet, it is your personal responsibility and obligation to have it replaced with a properly grounded 3-prong wall outlet. For best operation, plug this appliance into its own electrical outlet to prevent flickering of lights, blowing of fuse or tripping of circuit breaker. Do not under any circumstances cut or remove the third (ground) prong from the power cord. Do not use an adapter plug with this appliance. TRANSPORTATION AND UNPACKING If the appliance is transported in a horizontal position, the oil from the compressor may leak into the cooling circuit. For this reason, allow the appliance to rest in a vertical position for 12 hours before turning it on, so that the oil flows back into the compressor. Remove the external packaging, remove the protective plastic film from the surface of the appliance (if used) and clean the external parts of the appliance with a cleaner designed for this purpose. Do not use steel wool or any coarse agents, which could irreparably damage the surface of the appliance. Carefully remove all papers and adhesive tape from the appliance, doors and other parts packed in polystyrene. Remove documents and accessories from inside the appliance. The packaging material is recyclable and is marked with a recycling symbol. For disposal, follow the local regulations. Packaging materials (plastic bags, polystyrene parts, etc.) must be kept out of the reach of children, because they present a possible source of danger. Carefully inspect the appliance. If you discover any faults, stop the installation and contact the vendor. INSTALLATION INSTRUCTIONS NOTE: The appliances can be installed as either built-in or free-standing units. For free-standing installation, allow at least 4” of clearance at the back, sides and top of the unit to permit the proper air circulation to cool the compressor and condenser. Even for built-in installation, certain clearances are necessary for optimal operation. In this case, allow 3/16” on both sides,2” at the rear and 1/16” at the top to ensure proper ventilation. Take care that the air vent at the front of the appliance is never covered or blocked in any way. Before installation of your appliance The placement of the appliance must meet the requirements in the section Operating Conditions on page 7 and must include a stable floor with a load-bearing capacity corresponding to the weight of the appliance. Level the appliance using the adjustable feet. Ensure there is a gap between the bottom edge of the appliance and the ground, so that there is sufficient circulation of air. This will ensure the optimal performance of the cooling system. Check whether any coolant circulation pipes have been damaged during the installation. Use the appliance only for the purposes for which it has been designed. The appliance must be located on a rigid and even surface. In this way you will ensure free circulation of the coolant and effective operation of you appliance. If possible, place the appliance in a cool, well ventilated and dry room. Do not locate the appliance in direct sunlight or in a room with a high ambient temperature, or in the vicinity of any sources of direct heat, such as a radiator or oven. This would cause the compressor to work harder, resulting in a substantially higher power consumption level. INSTALLATION INSTRUCTIONS FOR YOUR SAFETY While performing installations described in this section, gloves and safety glasses or goggles should be worn. Tools you will need: Installation dimensions (mm/in) If your appliance is to be built-in, follow the diagram and chart below for appropriate dimensions. INSTALLATION INSTRUCTIONS Model WNWR281SSRN WNWR551SSRN WNWR42-2SSFN WNWR1422SSRN WNWR532SSRN WNWB-2SSFN WNWR150-2SS A 660mm (26”) 660mm (26”) 660mm (26”) 680mm (26 3/4”) B 387mm (15 1/4”) 610mm (24”) 610mm (24”) 610mm (24”) C 883mm (34 3/4”) 883mm (34 3/4”) 883mm (34 3/4”) 1775mm (69 7/8”) C 152mm (6”) 152mm (6”) 152mm (6”) 230mm (9 1/16”) E 51mm (2”) 51mm (2”) 51mm (2”) 51mm (2”) Electrical requirements A 115 Volt (AC only)/ 60Hz grounded electrical supply equipped with a 15- or 20- amp fuse or circuit breaker is required. It is recommended that a separate circuit serving only this appliance is used. Connect this appliance to a 3-prong power supply outlet that has a ground terminal. If you only have a 2-prong outlet, have it replaced by a qualified technician with an outlet that meets the local codes. DO NOT USE AN EXTENSION CORD. Required nominal voltage and frequency are indicated on the rating plate. The connection to the power supply and grounding has to be made according to current standards and regulations. OPERATION Operating Conditions Proper operation of the appliance is guaranteed only if the following conditions are met: The temperature in the room where the appliance is located conforms to the climate class stated on the appliance’s rating label. Maximum ambient relative humidity: RH75%. The appliance must be placed at a sufficient distance from heat sources (e.g., ovens, central heating, direct sunlight, etc.). The appliance must be located in such a place that it is protected against the effects of weather. Regular maintenance is performed according to the instructions in this user’s manual. The ventilation openings on the appliance must not be covered. Correct installation (e.g. leveling, the capacity of the system corresponds to the specifications on the rating label of the appliance). For Models:WNWR42-2SSFN,WNWB-2SSFN,WNWR28-1SSRN and WNWR55-1SSRN Control elements 1) “ ”Button To turn the unit ON and OFF, press and hold this button for approximately 3 seconds. 2) “ ”Button Energy conservation button: Pressing this button for 3 seconds will turn the energy conservation mode ON or OFF. In this mode, the LED light display will turn off, and the ºC / ºF light will be on. 3) “ ”Indicator light Shows that the compressor is in operation. 4) “ºC / ºF” Indicator light The temperature scale is changed by pressing the “ºC / ºF” button. 5) “ ”Button Used to increase (warm) the temperature in steps of 1 ºF (or 1 ºC) 6) “ ”Button Used to decrease (cool) the temperature in steps of 1 ºF (or 1 ºC) 7) “ºC / ºF” Button Press this button to switch the indicator light between ºC / ºF”. 8) “ ”Button Turns the interior light ON and OFF. If you use this button, the light is no longer controlled by the reed switch, and remains on. (Light button deactivated when Energy conservation button is on.) 9) LED display Display screen shows the temperature setting. Setting the temperature Insert the power plug into a properly grounded power socket. Use the / buttons to set the desired temperature of the appliance. Each time the are pressed, the temperature will increase/decrease by 1 ºF (or 1 ºC) You can set the temperature in the range of 39 ºF to 64 ºF (or 4 ºC to 18 ºC). / buttons OPERATION FOR Model: WNWR53-2SSRN, WNWR142-2SSRN AND WNWR150-2SS Control elements 1) “ ”Button To turn this unit ON and OFF, press and hold this button for approximately 3 seconds. 2) “ ”Button Energy conservation button: Pressing this button for 3 seconds will turn the energy conservation mode either ON or OFF. In this mode, the LED light display will be turned off, the ºF/ ºC light will be on. 3) “ ”Button (left) Pressing this button will increase (warm) the temperature of the upper chamber in steps of 1 ºF (or 1 ºC) 4) “ ”Button (left) Pressing this button will lower (cool) the temperature of the upper chamber in steps of 1 ºF (or 1 ºC) 5) LED display Display temperature for the upper zone. 6) “ ”Indicator light Indicates that the compressor is in operation. 7) “ºC / ºF” Indicator light Will change as the “ºC / ºF” button is pressed. 8) LED display Display temperature for the lower zone. 9) “ ”Button Pressing this button will increase (warm) the temperature of the lower chamber in steps of 1 ºF (or 1 ºC) 10) “ ”Button Pressing this button will lower (cool) the temperature of the upper chamber in steps of 1 ºF (or 1 ºC) 11) “ºC / ºF” Button Press this button to switch the indicator light between ºC and ºF”. 12) “ ”Button Turns the interior light ON and OFF. If you use this button, the light is no longer con-trolled by the reed switch, and remains on. (Light button deactivated when Energy conservation button is on.) Setting the temperature When you press the or button, the system will enter the set-up mode in the upper or lower compartment automatically. The LED will flash and display the setting temperature. When you press the button once, the temperature will increase or decrease by 1 ºF (or 1 ºC). If you try to go beyond the minimum/maximum value that can be established, the display will jump to the lowest/highest adjustable temperature value automatically. If a button is not pressed for 5 seconds, the LED will stop flashing and the setting mode will be exited. Temperature range for upper and lower compartments: The temperature setting can be adjusted from 39ºF to 64ºF (or 4 ºC to 18 ºC). OPERATION Functions Temperature Memory Function If the power is suddenly lost, the set temperature will be saved by the unit. Once the power is back on, the unit will be at the same set temperature. “Close Door” Reminder Function When you forget to close the door or the door is not fully closed, there will be warning alarm after 5 minutes. Temperature Alarm Function If the interior temperature is higher than 73 ºF (23 ºC), ’HI” is shown on the display panel and the buzzer alarm sounds continuously after one hour. This indicates that the inner temperature is too high, and you should look for the reason. If the inner temperature is lower than 32 ºF (0 ºC),“LO” is shown on the display panel; the alarm and the malfunction indicator light go on at the same time. Note: If too many bottles are put in at once or the door has not been closed tightly, the unit will display the “HI” signal on the display panel. This is normal. Please wait 5 minutes after closing the door and “HI” will disappear. It is normal that the cabinet shows ”HI” or “LO” from time to time. If it occurs frequently or lasts for a long time, you can restart the unit by unplugging it, then re-plugging after 5 minutes. If the problem occurs again after restarting, please contact customer service. Before reconnecting the power, wait 3 to 5 minutes. You could damage your appliance if you attempt to start the appliance earlier and it may not turn on. If you turn on the appliance for the first time, or after a restart, or after it has been out of operation for a long time, there may be a temperature difference between the temperature inside the appliance and that on the LED display. This is a normal event caused by the duration of the activation period. Leave the appliance turned on for several hours and the temperature will stabilize during operation. SHELVES (Models: WNWR42-2SSFN/WNWB-2SSFN) Do not cover racks with aluminum foil or any other material that will prevent adequate air circulation within the cabinet. To prevent damaging the doors or gasket seals, open the doors wide when removing the shelves. For easier handling of bottles, it is necessary to pull the shelf out by at least 1/3. The sides of the shelves are equipped with protective stoppers which prevent bottles from falling from the shelves. When removing/inserting the shelves from/into the rails, lift one side of the shelf as shown in the picture below and pull the shelf out towards you, or push it in when inserting it, until one side is securely seated on the rail. (Model: WNWR28-1SSRN/WNWR55-1SSRN/WNWR53-2SSRN/WNWR142-2SSRN/WNWR150-2SS) To prevent damaging the door gasket, make sure to have the door all the way opened when pulling shelves out of the rail compartment. For easy access to the bottles, you must pull the shelves approximately 1/3 out of the rail compartment. To remove the shelves out of the rail, pull each shelf approximately 1/3 out. Use a long flat screwdriver to press down the right plastic notch as shown in Figure A and at the same time lift the left plastic notch as shown in Figure B. Then proceed to pull out the shelf slowly. Figure A Figure B OPERATION INSTRUCTIONS Reverse the door These appliances have a reversible door but is delivered with the door hinged on the right. A left-hand hinge kit comes with the unit (in the box), should you wish to reverse the hinge on your unit. For Models: WNWR28-1SSRN Disconnect power before removing doors Unscrew 2 screws at bottom and remove the Reed switch (6), then install (6) at top of door frame, Unscrew the screw located underneath the door frame and the limit device (5), and relocate it at the left end side of the door frame. The door revolves 180 degrees. Remove the decorative nails (8) from the top left of the cabinet and install the spare top hinge (Left) (7) at top left to the cabinet with 3 screws. Install the door once correctly aligned. This operation requires two persons. Take out the 3 hinge screws from the top right hinge (4) and remove it Open the door to a 90 degree angle, take out the 2 screws from lower door axis (2), remove the door (3) and the axis plate from the door. OPERATION INSTRUCTIONS For Models: WNWR55-1SSRN/WNWR53-2SSRN Disconnect power before removing doors Unscrew 2 screws at bottom and remove the Reed switch (6), then install (6) at top of door frame, Unscrew the screw located underneath the door frame and the limit device (5),and relocate if at the left end side of the door frame. The door revolves 180 degrees. This operation requires two persons. Remove the decorative nails (8) from the top left of the cabinet and install the spare top hinge (Left) (7) at top left to the cabinet with 3 screws. Take out the 3 hinge screws from the top right hinge (4) and remove it Install the spare top hinge (Left) (9) at top left of the cabinet with 3 screws. Install the door once correctly aligned. Open the door to at 90 degree angle, take out the 2 screws from lower door axis (2), remove the door (3) and the axis plate from the door. OPERATION Wine storage If you are storing wine for long periods of time, it should be stored at a temperature of between 10 ºC and 14 ºC(50 ºF and 57 ºF) This is the range of temperatures wine coolers are kept at, and it is just right to allow wine to mature properly. The following drinking temperatures are recommended for the various types of wine: Red wines: 57 ºF to 64 ºF (14 ºC to 18 ºC) Rose wines: 57 ºF to 54 ºF (10 ºC to 12 ºC) White wines: 46 ºF to 54 ºF (8 ºC to 12 ºC) Sparkling wines, Prosecco: 45 ºF to 48 ºF (7 ºC to 9 ºC) Champagne: 41 ºF to 45 ºF (5 ºC to 7 ºC) Storage diagrams For wine: (Based on 750ml Bordeaux bottles) Model: WNWR28-1SSRN (Total: 28 bottles) bottles) Model: WNWR53-2SSRN (Total: 53 bottles) Model: WNWR55-1SSRN (Total: 55 OPERATION Wine storage (For 750ml Bordeaux bottles) Model: WNWR42-2SSFN (Total: 42 bottles) MODEL: WNWR150-2SS (Total: 150 Bottles max) Model: WNWR142-2SSRN (Total: 142 bottles max) Wine and Beverage Storage (For 750ml Bordeauxs and 335ml cans) Model: WNWB-2SSFN CLEANING AND CARE Cleaning the appliance Wipe the internal surface of the appliance with a soft sponge lightly dipped in a table salt solution. Add 2 tablespoons of table salt to a quart of warm water. Wash the shelves in warm water with a small amount of kitchen dishwashing liquid, rinse and wipe dry. Allow the wooden shelves(if the appliance has them) to dry completely before returning them to the wine cooler. Use a glass cleaner to clean the glass surfaces and a commercially available stainless-steel cleaning agent for the stainless-steel surface. All parts that you wash with a soft sponge lightly dipped in water must be properly wiped dry. Wipe the outer surface with a soft sponge lightly dipped in water with a small amount of dishwashing liquid. Wipe dry using a clean cloth. Dust and drink can cause door gaskets to stick to the cabinet and tear when you open the door. Wash gaskets with a mild detergent and warm water. Rinse and dry thoroughly after cleaning. Do not use steel wool or sponges with steel wool on stainless steel surfaces. They could damage the surface. Do not use cleaning waxes, concentrated cleaning agents, bleaches or cleaning products containing derosene on the plastic or rubber parts. Never clean appliance parts with flammable fluids. The fumes can create a fire hazard or explosion Never use paper towels or window cleaners on the plastic parts. Moving Remove all contents before moving the appliance Use tape to secure freely moving parts such as racks inside the appliance. To Prevent damage, screw in the leveling feet. Tape the door shut. Ensure that the appliance always remains in a vertical position while being transported. To prevent the appliance from damage during transport you can cover it with a blanket or other soft cloth. Energy-saving tips Locate the appliance away from sources of heat and out of direct sunlight. Ensure sufficient ventilation. Under no circumstances should you cover the ventilation openings. Only open the door when necessary. Do not leave the door open for a long time or open the door too often. If the appliance will not be used for several months, remove all items and turn off the appliance. Clean and dry the interior thoroughly. To prevent odor and mold growth, leave the door open slightly, blocking it open if necessary. PROBLEMS WITH YOUR APPLIANCE? You can solve many common appliance problems easily, saving you the cost of a possible service call. Try the suggestions below to see if you can solve the problem before calling the servicer. Troubleshooting guide Problem Possible cause Appliance does not operate Not plugged in. The appliance is turned off. Tripped circuit breaker or blown fuse. Appliance is not cold enough. Check the temperature control setting. External environment may require a higher setting. The door is opened too often The door is not closed completely The door gasket does not seal properly. Turns on and off frequently. The room temperature is higher than normal. A large amount of contents has been added to the appliance. The door is opened too often The door is not closed completely. The temperature control is not set correctly. The door gasket does not seal properly. The light does not work. Not plugged in. Tripped circuit breaker or blown fuse. The bulb has burned out. The light button is OFF. Or Energy conservation button is on. Vibrations. Check to be sure the appliance is level. The appliance seems to made too much noise. The rattling noise may come from the flow of the refrigerant, which is normal. As each cycle ends, you may hear gurgling sounds caused by the flow of refrigerant in your appliance. Contraction and expansion of the inside walls may cause popping and crackling noises. The appliance is not level. The door will not close properly The appliance is no level. The door was reversed and not properly re-installed. The gasket is dirty. The shelves are out of position. Warranty information WHAT IS COVERED LIMITED ONE-YEAR WARRANTY: For one year from the date of purchase by the original owner, Allavino will, at its option, repair or replace any part of the unit, which proves to be defective in material or workmanship under normal use. During this period, Allavino will provide all parts and labor necessary to correct such defects free of charge, so long as the unit has been installed and operated in accordance with the written instructions in this manual. Allavino will provide you with a reasonably similar replacement product that is either new or factory refurbished. In rental of commercial use, the warranty period is 90 days. All Allavino Appliances of 3.5 cubic feet capacity or less must be brought / sent to the appliance service shop for repair. LIMITED SECOND THROUGH FIFTH YEAR WARRANTY: For the second through the fifth year from date of original purchase, Allavino Products will provide a replacement compressor free of charge due to a failure. You are responsible for the service labor and freight charges. In rental or commercial use, the limited compressor warranty is one year and nine months. Cost to move the appliance to the servicers’ shop and back to the user’s home, as may be required, are the user’s responsibility. WHAT IS NOT COVERED: Content losses of food or other, due to spoilage. Incidental or consequential damages. Parts and labor costs for the following will not be considered as warranty: O Door springs, and /or frames. O Inner door panels, door rails and/or door supports. O Light bulbs and /or plastic housing. O Plastic cabinet liners. O Punctured evaporator that voids the warranty on the complete sealed system. O Repairs performed by unauthorized with the replacement of the unit. O Service calls that do not involve defects in material or workmanship such as customer education, door reversal, or proper installation. O Surcharges including, but not limited to, any after hour, weekend, or holiday service calls, tolls, ferry trip charges, or mileage expense for service call to remote areas, including the State of Alaska. O Service calls that are related to external problems, such as abuse, misuse, inadequate electrical power, accidents, fire, floods, or acts of God. O Replacement of house fuses or resetting circuit breakers. Failure of the product if it is used for other than its intended purpose. This warranty does not apply outside the Continental USA. SERVICE FOR YOUR CHILLER: With the purchase of your Allavino appliance, you can have the confidence that if you ever need additional information or assistance, the BeverageFactory.com Customer Service team will be here for you. Whatever your questions are about our products, help is available. Just call us toll-free. BEVERAGEFACTORY.COM PRODUCT CUSTOMER SERVICES: Product Information, Part Orders and In-Home Repair Service:800-710-9939 www.allavino.com 1-800-710-9939