1
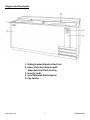
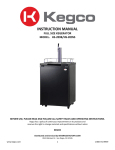
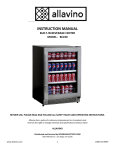
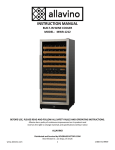
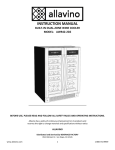
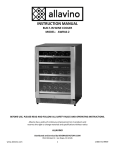
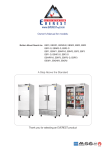
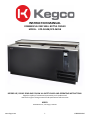
INSTRUCTION MANUAL
COMMERCIAL DEEP WELL BOTTLE COOLER
MODEL:XCD-2650B/XCD-2695B
BEFORE USE, PLEASE READ AND FOLLOW ALL SAFETY RULES AND OPERATING INSTRUCTIONS.
Kegco has a policy of continuous improvement on its products and
reserves the right to change materials and specifications without notice
KEGCO
8520 Miralani Dr., San Diego, CA 92126
www.kegco.com
1
1-888-980-4810
Table of Contents
Diagram and
Description
.......................................................................................................................................
3
Safety Tips
.......................................................................................................................................
4
Installation Instructions
.......................................................................................................................................
5
Setting Temperature
.......................................................................................................................................
6
Care and Maintenance
.......................................................................................................................................
7
Troubleshooting
.......................................................................................................................................
8
Technical Specifications
.......................................................................................................................................
9
Warranty Information
.......................................................................................................................................
10
www.kegco.com
2
1-888-980-4810
Diagram and Description
1. Sliding Brushed Stainless Steel Lids
2. Heavy-Duty Steel Exterior with
Wear-Resistant Black Coating
3. Security Locks
4. Front Mounted Bottle Opener
5. Cap Catcher
www.kegco.com
3
1-888-980-4810
Safety Tips
Before using this appliance, it must be properly positioned and installed as described in this manual, so please read the
manual carefully. To reduce the risk of fire, electrical shock or injury when using the appliance, follow these basic
precautions. Failure to heed these safety requirements may result in severe personal injury or death.
•
•
•
•
•
Plug into a grounded 3-prong outlet. Do not under any circumstances cut or remove the third ground prong
from the power cord supplied, do not use an adapter, and do not use an extension cord.
It is recommended that a separate circuit, serving only your appliance be used. Do not use outlets that can be
turned off by a switch or pull chain.
Never clean appliance parts with flammable fluids and do not store or use gasoline or other flammable vapors
and liquids in the vicinity of this or any other appliance. The fumes can create a fire hazard or explosion.
Unplug the appliance or disconnect power before cleaning or servicing. Failure to do so can result in electrical
shock or death.
Do not attempt to repair or replace any part of your appliance unless it is specifically recommended in this
manual. All other servicing should be referred to a qualified technician.
•
•
Use two or more people to move and install appliance. Failure to do so can result in back or other injury.
To ensure proper ventilation for your appliance, the front of the unit must be completely unobstructed. Choose
a well-ventilated area that is protected from the elements, such as wind, rain, water spray or drips.
• The appliance should not be located next to ovens, grills or other high heat sources or in areas of extreme cold.
• The appliance must be installed in accordance with state and local codes. A standard electrical supply (115 V AC
only, 60 Hz), properly grounded in accordance with the National Electrical Code and local ordinances is required.
• Do not kink or pinch the power supply cord of appliance.
• The fuse (or circuit breaker) size should be 15 amperes.
• It is important for the appliance to be leveled in order to work properly.
• Never allow children to operate, play with or crawl inside the appliance. Child entrapment and suffocation are
not just problems of the past, junked or abandoned appliances are still dangerous. When no longer using your
old appliance, take off the door and leave the shelves in place so that children may not climb inside easily.
• Do not use solvent-based cleansers or abrasives on the interior as they may damage or discolor the interior.
• Because of potential safety hazards under certain conditions, it is strongly recommended that you do not use an
extension cord with this appliance. However, if you must use an extension cord, it is absolutely necessary that it
be a UL/CUL-Listed, 3-wire grounding type appliance extension cord having a grounding type plug and outlet and
that the electrical rating of the cord be 115 volts and at least 10 amperes.
• If the appliance is going to be used in an area that is prone to power surges/outages, it is suggested that you use
a power surge protector. The surge protector that you select must have a surge block high enough to protect
the appliance it is connected to. Damages due to power surges are not considered a manufacturer covered
defect and will void your product warranty.
• The cord should be secured behind the appliance and not left exposed or dangling to prevent accidental injury.
Never unplug the appliance by pulling the power cord. Always grip the plug firmly and pull straight out from the
receptacle. Repair or replace immediately all power cords that have become frayed or otherwise damaged. Do
not use a cord with cracks or abrasion damage along its length or at either end. When moving the appliance, be
careful not to damage the power cord.
• Do not use this apparatus for other than its intended purpose.
• California Proposition 65 Warning: This product may contain a substance known to the State of California to
cause cancer, birth defects or other reproductive harm.
Failure to heed these safety warnings may result in extensive product damage, serious personal injury, or death.
www.kegco.com
4
1-888-980-4810
Installation Instructions
BEFORE USE:
• Remove the exterior and interior packaging.
• Before connecting the unit to the power source, let it stand upright for approximately 24 hours. This will reduce
the possibility of a malfunction in the cooling system from handling during transportation.
• Clean the interior surface with lukewarm water using a soft cloth.
• This appliance is designed for freestanding use. A space of at least 4” should be allowed between the
surrounding walls and the cabinet wall for air circulation.
• Place the unit on a flat, solid floor that is strong enough to support it when it is fully loaded
• When moving your refrigerator, please do not incline it more than 45 degrees.
• Locate the appliance away from direct sunlight and sources of heat (stove, heater, radiator, etc.). Direct sunlight
may affect the acrylic coating and heat sources may increase electrical consumption. Extreme cold ambient
temperatures may also cause the unit to perform improperly.
• Install the unit in a dry place to prevent rust from forming on the compartment body, which may affect the
electrical insulation.
• Plug the cooler into an exclusive, properly installed and grounded wall outlet. Do not under any circumstances
cut or remove the third (ground) prong from the power cord. Any questions concerning power and/or electrical
grounding should be directed to a certified electrician or authorized products service center.
• After plugging the appliance into a wall outlet, allow the unit to cool down for 3 to 4 hours before stocking it
with beverages.
SEALING THE CABINET TO THE FLOOR:
This method may be used when sanitation codes require sealing the cooler to the floor.
1. Position the Cabinet
Allow 1 inch between the wall and the rear to assure proper ventilation
2. Level Cabinet
The cabinet should be level side to side and front to back. Place a carpenter’s level in the interior cabinet floor
in four places:
• The inside floor of the unit near the door. Level should be parallel to the front of the cabinet.
• The inside rear of the unit near the door. Level should be parallel to the back of the cabinet.
• The inside left and right sides. Level should be parallel to the depth of the cooler.
3. Apply Sealant
• Draw an outline on the base of the floor
• Raise and block the front sides of the cabinet
• Apply a bead of NSF approved sealant to the floor half an inch inside of your drawn outline. The bead
must be heavy enough to seal the entire cabinet surface when it is set down on the sealant.
• Raise and block the rear of the cabinet.
• Apply sealant on the floor as outline above.
• Examine to see that the cabinet is sealed to the floor around the entire perimeter.
ADJUSTING THE BIN DIVIDERS:
The factory installed bin dividers can be repositioned as you see fit. To remove the bin dividers, simply push the divider
towards the back wall unit until the front of the divider is removed from the positioning holes. To install, position the
divider into the desired holes, making sure that the pressure spring is installed properly.
LOADING PRODUCT:
Pay close attention to the load limit stickers located on the interior walls of the unit. Do not load product above the load
limit stickers or above the top cross bar of the bin dividers. Loading product above the load limit stickers will harm the
performance of the unit.
www.kegco.com
5
1-888-980-4810
Setting the Temperature
The Kegco Deep Well Bottle Cooler is factory-set to maintain an average temperature of 38°F in refrigeration when
installed correctly in the proper environment. To maintain a different temperature, simply adjust the control knob
located inside the unit. Avoid opening and closing the door of the cooler too often to ensure a consistent temperature
inside the unit.
The temperature range of the thermostat goes from 32°F to 41°F
(-0.5°C to 5°C). Adjust the thermostat between 7 (coldest) to 1
(warmest) to reach the desired temperature range. To turn off
the cooler, turn the control knob to the “OFF” position.
CAUTION: Leaving the temperature control on the coldest setting
may cause the evaporator coil to freeze and ice up. This will
eventually result in a warmer cabinet temperature.
If you are going on vacation, you may leave the cooler operating during vacations of less than three weeks. If the
appliance will not be used for several months, you should remove all items and turn off the appliance. Clean and dry the
interior thoroughly. To prevent mold growth, leave the door open slightly, blocking it open if necessary.
Care and Maintenance
Cleaning your cooler:
• Turn off the power, unplug the appliance, and remove all items.
• Wash the inside surfaces with warm water and baking soda solution. The solution should be about 2
tablespoons of baking soda to a quart of water.
• Wring excess water out of the sponge or cloth when cleaning area of the controls, or any electrical parts.
• Wash the outside cabinet with warm water and mild liquid detergent. Rinse and wipe dry with a clean soft cloth.
• Do not use steel wool or a steel brush, caustic soap, abrasive cleaners or bleach on the stainless steel. These will
damage the stainless steel or contaminate the stainless steel with steel particles and rusting may occur.
• Wash door gaskets on a regular basis, preferably weekly. Simply remove the door gasket from the frame of the
door, soak in warm water and soap for 30 minutes, dry with a soft cloth, and replace.
• Check door gaskets for a proper seal after they are replaced.
• Periodically remove the shelves and pilasters from the unit and clean them with mild soap and warm water. To
remove the pilasters, first remove the shelves and shelf brackets. Then, simply lift the pilaster up and out.
• It is recommended to clean the unit completely inside and out yearly to maximize the longevity of the product.
Cleaning the condenser coil:
• For efficient operation, it is important that the condenser surface be kept free of dust, dirt, and lint. We
recommend clearing the condenser coil and fins at least once per month.
• Turn off the power and unplug the appliance.
• Clean with a commercial condenser coil cleaner, available from any kitchen equipment retailer. Brush the
condenser fins from top to bottom, not side to side.
• After cleaning, straighten any bent condenser fins with a fin comb.
Cleaning the fan blade and motor:
• If necessary, clean the fan blades and motor with a soft cloth
• If it is necessary to wash the fan blades, cover the fan motor to prevent moisture damage.
www.kegco.com
6
1-888-980-4810
Troubleshooting
There are many common issues you may experience with your cooler that can be solved very easily, without the need of
a service call. Try the tips below to troubleshoot your unit should you experience any problems:
PROBLEM
Cooler does not operate
Cooler is not cold enough
Condensing unit runs for long periods of time
The light does not work
Vibrations
Cooler is noisy
www.kegco.com
POSSIBLE CAUSE
Not plugged in or the appliance is turned off.
The circuit breaker tripped or a fuse has blown out.
The thermostat is set too high.
The cooler is in defrost cycle.
Check the temperature control setting.
The circuit breaker tripped or a fuse has blown out.
External environment may require a higher setting.
There is too much warm product in the cooler.
Air flow is being blocked.
The door is opened too often.
The door is not closed completely.
The door gasket is not sealing properly.
The condenser coil is dirty.
The evaporator coil has iced over.
There is too much warm product in the cooler.
The door is opened too often.
The door is not closed completely.
The door gasket is not sealing properly.
The condenser coil is dirty.
The evaporator coil has iced over.
Not plugged in.
The circuit breaker tripped or a fuse has blown.
The light bulb has burned out.
Check to assure that the cooler is on a level surface.
There are loose parts.
Tubing is in contact with other tubing or components.
7
1-888-980-4810
Technical Specifications
Capacity
Dimensions
Weight
Voltage / Frequency
Running Amps
Operating Temperature
www.kegco.com
XCD-2650B
XCD-2695B
576 12-oz. Bottles or 780 12-oz. Cans
900 12-oz. Bottles or 1320 12-oz. Cans
33" H x 65" W x 28.5" D
34" H x 95" W x 28" D
181 lbs.
420 lbs.
115v / 60 Hz
115v / 60 Hz
8.5 A
8.5 A
32°F - 41°F
8
32°F - 41°F
1-888-980-4810
Warranty Information
WHAT IS COVERED LIMITED ONE-YEAR WARRANTY:
For one year from the date of purchase by the original owner, Kegco will, at its option, repair or replace any part of the
unit, which proves to be defective in material or workmanship under normal use. During this period Kegco will provide
all parts and labor necessary to correct such defects free of charge, so long as the unit has been installed and operated
in accordance with the written instructions in this manual. Kegco will provide you with a reasonably similar replacement
product that is either new or factory refurbished. In rental or commercial use, the warranty period is 90 days. All Kegco
Appliances of 3.5 cubic feet capacity or less must be brought/sent to the appliance service shop for repair.
LIMITED SECOND THROUGH FIFTH YEAR WARRANTY:
For the second through the fifth year from date of original purchase, Kegco Products will provide a replacement
compressor free of charge due to a failure. You are responsible for the service labor and freight charges. In rental or
commercial use, the limited compressor warranty is one year and nine months. Cost to move the appliance to the
servicers’ shop and back to the user's home, as may be required, are the user's responsibility.
WHAT IS NOT COVERED:
•
•
•
•
•
Content losses of food or other, due to spoilage.
Incidental or consequential damages.
Parts and labor costs for the following will not be considered as warranty:
o Door springs, and/or frames.
o Inner door panels, door rails and/or door supports.
o Light bulbs and/or plastic housing.
o Plastic cabinet liners.
o Punctured evaporator that voids the warranty on the complete sealed system.
o Repairs performed by unauthorized servicers.
o Shipping and handling costs associated with the replacement of the unit.
o Service calls that do not involve defects in material or workmanship such as customer education, door
reversal, or proper installation.
o Surcharges including, but not limited to, any after hour, weekend, or holiday service calls, tolls, ferry trip
charges, or mileage expense for service call to remote areas, including the State of Alaska.
o Service calls that are related to external problems, such as abuse, misuse, inadequate electrical power,
accidents, fire, floods, or acts of God.
o Replacement of house fuses or resetting circuit breakers.
Failure of the product if it is used for other than its intended purpose.
This warranty does not apply outside the Continental USA.
SERVICE FOR YOUR COOLER:
With the purchase of your Kegco appliance, you can have the confidence that if you ever need additional information or
assistance, the Kegco Customer Service team will be here for you. Whatever your questions are about our products, help
is available. Just call us toll-free.
KEGCO PRODUCT CUSTOMER SERVICES:
Product Information, Part Orders and In-Home Repair Service: 888-980-4810
www.kegco.com
9
1-888-980-4810