1
Full color and monochrome laser quality printer
SJ-144
UsersManual
Federal (kmmunicatkms Commission Radiu Frequency Interference Statement
This equipment hm been tcsw~ and found to cornpl> with the Iimi[s for a C1:LWB digital device, pursuant 10 Part 15 of
FCC Rules. These limiLs arc designed k) provide rc:isonablc pmtcction agains~ h:irmful inturfcrcncc in a residential
install aLimr. This equipment gencrakx, uses and can ra(iialc radio frequency energy an(i, if rrol installed and uscci in
accordance with the instructions, may cause harmful inkrfcrcnce to radio communications. However, there is no
guarantee Lhat intcrfcrcncc will rrol occur in a particular installation. If this ec]uipmcnt (ioes cause harmfui intcrfcrcncc to
radio or television rcccption, which can hc (ictcrrnined by turning tile equipment off and {m, tbc user is encnuragcci to lry
to comcct the inLcrfcrcncx! by one or more of the following measures.
Reorient or rclocatc the rccciving imtcnna.
Incrcasc the separation bctwccn the cquiprnent and rcceivcr.
@ Connect ti~c equipment into an outicl on a circuit diff’ercnt from thal to which the receiver is connected.
Consult the dealer m an experienced radioflV tcchnicim for help.
Unauthori~.cd modifications of this product by the user will void his autlmrit~ k) opcralc the equipment unless expressly
approved by [hc par[y rcsponsihic for compliance,
For compliance wi[h [k Fcdcmil Noise ln~crfcrcmce Standard, this equipment requires a si]icl(ir.d cahlc.
The above ,lla~emen[ upplit.t only to pritiers marketed in fhe ILS.A
●
●
●
Statement of’The Canadian Department of>(hnnlunici]th)ns Radio Jnterf’erwwe Regulations
This digital :ipparatus (ic)es rro[ cxcccd lhc. Cl:iss f3 Iinli[s for ra(iio nc)isc emissions from digi[:il :ippara[us SCIool in k
Radio interference kcgula~ions of the Cana( iian D{p;ir[n)cn[ C)I’(’t~[l]llltlrlicatic)rls.
Lc prc%cnt apparcii numdrique n’~rnc.npas de hrui[s r:t(li(,dlcc[i[l~]cs ddpassan[ Ics Iimiks applicab]cs aux :ipparcik
numeriqucs de la CIUSCB prcscrites (i:ms k RJg.lc.n]cm[ sur Ic Im)u iila;c ra(iioclcclriquc 6(Iictt par k minishrc dcs
Communications du Canaciti.
The above .v[atcrrwn[applies only 10prirticr.s mwk(:tcd in Canud(I.
VDE Statement
This dcvicc carries the VDE RFI protcc[ ion mark M certify that it meets the r:itiiu intclf.:rcncc rcquircmcrr[s of ti]c i’oskri
Ordinance No. 243/1 991. The addit ionai marking “Vlg.243/l’” cxprcs.scs in si~fw[form LiIa[this is a pcripilcral dcvicc
(not opcrabk alone) which only indikidu: ill} nim:ts the Cl:iss B RFI rcquircmcnls m acc(,rdancc witil lilc DiN VDE 0878
part 3/1 1.89 and the i>os[;i!ordinwrcc 243/ 1991.
lf this dcwicc is opcr:itcci in conjunction witil o[bcr dcviccs within a wt up, in order to t:ikc advantage of a “General
(Operating) Authorii.a[iun” in accorciancc. wit}] the Postal or<iinanc:c ~43/ i 991, tbc conlplclc sc(.up must comply with tk
Class B limits inaccordancc witil tbc iJIN VI)E 087S p:irt 3/1 1.89, as well :ISsii[isf!r the preconditions in accorcitincc wilh
$21 and tile prcrcquisiks in accordance will, $3 ()[”tl]c I’,)st:il ordhancc 243/19°1.
As a rule, this is only fulfilled v+hcrrthe dcbrcc is operated i]] a sc,i-up wi]icb hLIShccn type l{s[cd ami ]m~vidcd widl a
VDE RFI protec[iorr mark with [hc a(i{litifm:il marking “\’fN 213”.
Machine Noise Inform: ition Orciinarrcc 3. GS(; V. J:inuary 18. 1‘J()I : ‘flc soun~i pressure ICWC1
aLdie npcra[or posi[iorr is
equal or ICSSthan 70 di3 (A) :iccording, to IS() 7779
7’he above statemerrl upplic.s only to pritticr.$ markeicd in (~trmcq
Trademark Ackno\\ledgenlellts
S.J-144, S.]-48, NX-2420 Rtiinbow/Colour,
AX-2-IN), 1.(124-20, LC24-200 (.’olour: Star \licronics
HKM-l>C/AT, PC-DOS, 1’S/2, I’roprintcr X24/X2411: International
IIl]siness \lachines Corp.
MS-DOS, Windows 3.1, NIicrosoft BASIC: Microsoft Corp.
LQ-8S0, LQ-tMO: Seiko Epson Cnr-p.
TrueType:
Apple (hmputer,
Inc.
Xerox 4024: Xerox Corportitiorr
Co., Ltd.
Notice
All rights rescrvcci. Rcprmiuction of ar]> part of [his manu:il in ~inyI’[lrmwbatsocver witimut STAR’S express
permission is forbidden,
The contents of this manual arc suhjccL [o change wilimo[ notice.
Q All efforts have ban made to ensure tiw accuracy of tbc conkmts of (his manual al the lime of press. However,
should any errors he dc[cctmi, STAR wouki grea~ly apprcc i:ik king inforlncci of thcrn.
The above nolwithstandirrg, STAR can :Lssunw no rcsponsihilil> for any errors in thk manual
●
●
●
@ Copyright
1993 Star Micr-onics Co., [Jrt.
Introduction
--—
—.
Thank you forpurchasing the SJ-144 Laser-Quality Prin[er. This Users manual has been organized into
nine chapters and an index to help you learn the proper operalion your printer. Thefirst five chapters
explain the basic functions and operation of the prinler, while the remaining chapters are intended as a
reference guz”de
for programming, The later chapters, therefore, assume a degree of knowledge of computers. Thefollowing describes the contents of each chapter.
Chapter 1 Setting up your printer
Thischapterdetailstheproperway LOsetup yourprinter.It includeshow to plug in the AC adapterand
connectorto yourcomputerand the installationof thepapersupportand ribboncassclLc.
Chapter 2 Paper handling
Thischapterexplainsthepaperlimitsfor printingand the threepaperpathsand theirrestrictions
Chapter 3 Control panel operation
Thischaptertakesyoustep-by-stepthrougheachof the controlpanel’soperationsso thatyou can soonput
theprinter’sbasicfunctionsto use.
Chapter 4 Electronic Dip Switch settings
Thischapterexplainshowto makeyourown defaultsettingsusingtheprintersbankof electronicdip
switches.
Chapter 5 Printing
Thischapterkxplainshow to prepareyoursoftwareforprintingwithWindows3.1.
Chapter 6 Maintenance and troubleshooting
Thischapterprovidesbriefchecklistson severalareasof theprinterfunctions.It also includesinformation
on routinecleaningwhich you can carryout on yourown. Pleasenotethatthischapteris not intendedto bc
an exhaustiveservicemanual. Shouldyoube unsureof yourabilityto performany maintenanceor servicing
by yourself,call a qualifiedservicetechnician.
Chapter 7 Printer control commands
Thischapterexplainstheemulationsof whichyourprinteris capableand the softwarecommandsusedto
drivethem. You can use thischapterif youare writingor modifyingprogramsto takeadvantageof the
printer’sfeatures.
Chapter 8 Download characters
Thischapterexplainshowto createyourown downloadcharactersand symbols.
Chapter 9 Reference information
Thischapterliststheprinter’sspecifications.It alsocontainscharactertablesand customerservicephone
numbers.
Index
Thislists,in alphabeticalorder,termswhichappearin this manual. It alsocontainscommandsummaries.
I
How to use this manual
Each chapterprovidesyou with simpleexplanationsof theoperationof thisprinter. Illustrationshavealso
beenincludedwhereverspaceallowed. Oneparticularfeatureof thismanual,however,deservessome
attention.We havealso includedin Chapter3 a toolfor quickreferencewhichsummarizestheexplanations
providedon eachpage. (SeeExampleSummarybelow.) Eachnumberedstepcorrespondsdirectlyto the
explanationprovidedin the text. The shadedportionsof thekey illustrationsshowwhichkeysare usedfor
eachparticularoperation. As this is intendedas onlya referencetool,you are stronglyurgedto read the
entireexplanationto fullyunderstandthe operation.
Example Summary
Paper feed
In Summary
ZoamPa
Steps:
r F!edy
!
ALT
Paper eject
n Y “f %“
1.
1. Press Ready: Not Ready mode ~
2. Press and release Paper
Slcps:
[II
Macro 2&w
●
1
C&r
2.
or press or hold Paper
Features of the printer
Thisprinteris capableof manyusefuland highqualityprintingfunctionsrangingfromcolorprintingto
overheadprojection(OHP)filmand labelsheetprinting.
The main featuresof thisprinter:
. The abilityto printsharp,crisp laser-qualitytextand graphics.
.
The abilityto printvibrant,glossyfullcolordocumentsfroma palletteof up to 256colors(dependingon
yoursoftware).
.
Highspeedthroughputdue to Star’sunique2.5 line 144clementmulti-lineprinthead.
.
360 DPI for highresolutiongraphicsoutput.
.
Small,compactsize.
.
Color,overheadprojection(OHP)filmand labelprintingcapabilitiesare standard.
.
Threepaperfeedpathswhichincludethe standardpapertrayand frontand rear feeding.
.
Zoomand the 2-Pagefunctionwhichis a greatpapersavingdevice.
.
The newlydevelo~d thinribbonprocessallowsyou to produceIargcrquantitiesof documents.
.
CompressedData ModeforWindows3.1 applications.
.
TrueTypefontsdiskcontaining35 scalablefontsfor Windows3.1 applications.
I
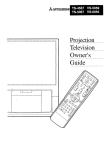
Printer components
Paper tray lever
This releases pressure cmthe paper.
‘his lever must be forward to release paper and
back to feed paper.
Thispage’showsand explain variousprinter components.
(A
Front Cover
4
/.
I
This covers the internal wo
‘flris cover shuuld be closed at ill drnes, _turless
cleaning the printer, removing paper jams or
changing ribbuns.
Ribbon carriage
This carries the ribbcmacross the print area.
Never push or putl on it directly with your hands
Friction rollers
These pull paper through the print area
Paper release lever
‘fIrisreleases pressure on the paper.
This lever musLlx down to feed paper and
Upto release ~per
Control panel
This indicates the status of the printer and
makes control over rhe printer’s various functions
easy snd convenient.
Print density dial
/
I
This changes the print density. It is set at
100%in the factory set-up.
Power switch
..-~-”-
This turns power to the printer ON and OFF
AC adapter cable connector
–~”—Tk
Paper tray
The paper tray can hold up to 30 sheets of
paper for automatic paper feed.
\
connects the plug of the AC adapter.
Do not remove the plug when the printer is on.
Interface connector
This connects the computer to
the
printer
Contents
Introduction
How to usethis manual
Features of the printer
Printer components
Chapter 1 Setting up your printer
1
Unpacking and confirming the packagecontents
2
Placing the printer
2
Plugging in the AC adapter
3
Connecting the printer to your computer
3
Installing the ribbon cassette
4
Installing the paper support
6
Setting the print density
6
Chapter 2 Paper handling
7
Selecting paper types
8
Loading paper from the paper tray
9
Loading paper from the rear path
Loading paper from the front path
Clearing paper jams
Other printing functions
Printingwithcolorribbons
Printingwithoverheadprojection(OHP)film
Printingwithstrip labels
Chapter 3 Control panel operation
10
11
12
13
13
13
13
15
Key and lamp explanation
16
Ready/ClearKcy
Paper/2-PageKey
Zoom/MacroKey
ALT Key
16
Conditions indicated by the lamps
17
Control paneI operations
18
Power-on
Ready/NotReady
Paperfeed
Papercjccl
Forwardmicro-feed
16
17
17
18
18
18
18
19
Rcvcrsc micro-feed
Chunging the auto-load position
Saving macro definition
Clearing lhc. twffc.r/All reset
Zoom mode
2-Page mode
‘l-he test modes
The color lCS1mode
The long test mode
optimizing print quality
Print quality ;i(ljuslmcnt,rnofic
Hexadecimal dump mode
Chapter 4 Electronic Dip Switch settings
19
20
20
21
22
22
23
23
24
25
25
26
27
What and where are they?
28
Entering the Electronic Dip Switch mode
28
Electronic Dip Switch controls
28
Electronic Dip Switch functions
29
Chapter 5 Printing
33
Preparing your application sof’tware
34
Printing with Windows 3.1
35
Insullingthe SlarSJ-144prinlcrdriver
in Windows
3.1
Insmlling TrucTypc fonts in Windows 3.1
Chapter 6 Maintenance and troubleshooting
35
36
37
Requirements
38
Cleaning the printer
39
Cleaning dir[ from the printer
39
Cleaning the print head
39
Cleaning [he platen
40
C[c:ining friclion rOllCI’S
40
‘1’rout)leshooting
41
Powersupply
Printing
42
Paper feeding
44
Chapter 7 Printer control commands
45
42
Font control command
47
Character set commands
48
Character size and pitch commands
50
Vertical position commands
52
Horizontal position commands
55
Graphics commands
58
Download character commands
61
Other printer commands
62
Chapter 8 Download characters
63
How to define your own characters
64
Assigningcharacter data
64
Assigningthe value of the character and spaces
Chapter 9 Reference information
Specifications
Printer supply options
Pinout of interface connector
Character tables
Epsoncharactertable#2
Internationalcharactersets
IBMcharacterset #2
Characterset#1
IBMspecialcharacterset
66
69
70
73
74
75
76
77
78
81
82
Customer service information
83
Index
85
Command summary
88
Standwd mode
88
IBMmode
Customer response
90
92
Chapter 1 Setting up your printer
This chapter
explains how to get your new printer set up and operating.
While the explanations in this chapter are easy to follow, they should, nonetheless, be read by every owner before starting up the printer.
Unpacking and confirming the package contents
Placing the printer
2
2
Plugging in the AC adapter
3
Connecting the printer to your computer
3
Installing the ribbon cassette
4
Installing the paper support
6
Setting the print density
6
Setting up your printer––-
-
Yourprinter is a reliable and quali/y precision instrument. It is every owner’s responsibility lo make sure
that their equipment is properly placed and sensibly used. If [hefollowing conditions are met, you can
expect your printer to perform at itsfinest and to last a long [ime.
Unpacking and confirming the pack ,ge contents
When you openthe box,you willfindthe itemsin lhe
listbelowincluded. Removeall of thepackingmalcrials,
suchas thecardboardpieceto stabilizetheribboncarriage
insidetheprintercover,etc. Checkto make sure, when
removingthecontentsof thecarton,thateach itcmhas
been included. Themshouldbe a totalof sevenitcms.
If youare missingany of them,contactyourdealer
immediately.
Items:
1 SJ-144 printer
2 Blackribboncassette
4 AC adapter
3 Colorribboncassette
5 U-shapedpapersupport 6 User’smanual
7 Printerand fontdriverdisks
We recommendthatyou savethebox and all of thepacking
materialsfor thisprinter. Theyare usefulshouldyouever need
to transportit to a new location.
QQ
Warning: Neverpushor pu-llon the ribboncarriagedirectlywith
yourhands.
.—
—.
Placing the printer
For prolongedand properUSC,your printershouldbe placedand used in an area which meets the following
conditions.
. A firm,levelsurfacewhichis freefromvibration.
An area free.fromexcessiveheat suchas directsunlightor heaters.
A dust free environment.
A steadypowersupply. Do not connectit to itemswhichuse thesamecircuitas refrigeratorsor air
conditioners.
Only the line voltagespecifiedon the identificationplateshouldbe used.
The printershouldbe positionedrelativelycloseto thecomputer. The maximumrecommendedlengthof
theparallelinterfacecable(notsupplied)is 2 metersor 6 feet.
●
✎
✎
✎
✎
2
Plugging in the AC adapter
Warning: Useonly the AC adapterincludedwith this printer. Usinga differentadaptercould
resultin damageto the printeror personalinjury.
J
The power button is located on thetop left handsideof the
printer. When it is protruding outward, the printer is OFF.
When the button is pressed inward,the printer is ON and the
powerlampwillbe lit. Makecertainthatthisprinterbutton
is turnedOFF beforepluggingin theAC adapter.
Steps:
1. Confirmthatthe powerbuttonis in the OFFposition.
2. Insertthe AC adapterintothe socketlocatedon the
printer’slowerleft side. (Seethe illustrationat right.)
3. Plug the AC adapterintoa properlygroundedAC outlet.
Connecting the printer to your computer
Usea standardCentronicsparallelinterfacecable(notsupplied).
For PS/2 or PC/AT type computersuse the 25 pin D-typeconnectorforthecomputerport,andAmphenol-type36pin connector for the printer’sport.
Steps:
1. TurnOFF the powerto theprinterandcomputer.
2. Insertthe plug intothe interfaceconnectorof theprinter.
Makesure thatthe connectorfit is snug.
/
. .. .
3. Fit the interfaceclipsinto theextendedprongsof the
connector. (Seeillustrationat right.)
*
... ...
.’.-...:.
:-. . . ...
4. Connectthe interfacecable(notsupplied)to thecomputer.
Referto yourcomputerinstructionmanualfor installation.
3
Installing the ribbon cassette
Steps:
1. TurnON powerto the printer.
Confirmthatthe printeris in the Not Readymode.
The Ready lamp shouldnot be lit. If the Ready
lamp is lit, theprinteris in the Readymode. Pressthe
Ready key to enter theNotReadymode. The carriage
willmoveautomaticallyto the centerof theprinting
area. Keepthecoverclosedwhen turningON theprinter.
2. Removethe accessoryribboncassettefromits box.
Holdit verticallybetweenyourthumband indexand
middlefingersso thatthenamesealis uprightand is
facingyou. Turn the ribbontensionknobin the
directionof thearrowto takeup any slackin theribbon.
(Seethe illustrationat right.)
3. Open the frontcoverof the printer. Foldthecoverin
halfwhenopening.
o
~
4. Insertso thatthe holesin the ribboncassettefit onto
thefour spindles. The ribbon,itself,shouldbe
betweenthe printheadand the platen.
Whenthe ribbonis properlyin place,the appropriate
ribbonlamp will light. (ie: Color/OHP/Label)
(Seethe illustrationat right.)
@
5. Closethe coverof theprinter.
Pressthe Ready key to enterto the Readymode. The
Ready lamp willilluminate.
Warning: Neverput yourfingersintothe printerwhen turningthe powerON becausethe
carriagemovesautomaticallyto the centerwhenthe poweris turnedON.
--J
.—
Note: This ribbonhas been createdusinga new-technologywhich allowsfio~e-a~most
half of the thicknessof currentribbons. Take specialcare notto tear or damage
the ribbonwhen installingor changingribbons.
Do not use the ribbonmorethan once.
......-.1
5
Installing the paper support
0
Theendsof theU-shapedpapersupportfit intotheholeslocated
in the top of the paper tray. Using the paper supportwill keep
yourpaperfromfailingoutof thepapertrayand it willhelppreventpaperjams.
Steps:
1. Insertthe endsof the U-shapedpapersupportall the
way into the two holeson the top of thepapertray.
(Seethe illustrationat right.)
Warning: Neverplaceyourfingersintothe internalworkingsof the printer.
Settirw
u the mint density
A
d
This printerusesa heat fusionprocessfor printingonto a wide
varietyof printmedia. You can changethe densityof the final
printby usingthedensitydiallocatedon thetoplefthandsideof
the printer,next to the powerswitch. This dial is set to the full
densitypositionwhen shipped. You can lower the densityby
rotatingthe dial in the counter-clockwisedirection.
6
[~—=~
//
,,,,4!!,!,,,
L.
Chapter 2 Paper handling
There are three convenient feeding methods from which you can choose with
this printer. They are the standard feeding from the paper tray, and the front
and rear feeding methods. This chapter explains the types of paper you can
use and how to load and feed paper from each of these three paths.
Selecting paper types
Loading paper from the paper tray
8
Loading paper from the rear path
10
Loading paper from the front path
11
Clearing paper jams
12
Other printing functions
13
9
7
Paper handling
Yourprinter can print paper from three differen( directions. You can select which one you wan[ to meet your
specific requirements. It can handle differing sizes of paper and types, but we suggest that you read lhis
section which explains [hepaper types which you can use.
Selecting paper types
Use onlygoodqualitypaperequivalentto Xerox4024 for
all threefeedpaths. Use the followinginformationto
determinethe size of paperyoucan use.
Width:
Length:
Thickness:
Surface:
100.0- 242.Omm(3.94” - 9.53”)
I
)m
I
●
5mn
1
(
Maximum Printing Widti
8.0”
)
100.0- 242.Omm/3.94 -9.53 in.
100.0- 355.6mm/3.94-14.0 in.
0.06-0. IOmm/O.00236
-0.00394 in.
Xerography- qualitysheetpapersuchas
Xerox4024or smoother.
Laser-quality,overheadprojection(OHP)
film,post cardsand labelsheetscan also
be used.
Caution’: Do not use paperthickerthan that indicatedin this manual.
Do not use perforatedor stapledpaper,nor paperattachedwith paperclips.
Alwaysusethe appropriateribbonand paperpathfor eitheroverheadprojection
(OHP)film or labelprintingwhen usingthe specialoverheadprojection(OHP)or
label printingfeatures.
Loading paper from the paper tray
Theconvenientpapertray can loadand printup to 30
sheetsof paperat a time. With thispaperfeedingmethod,
youcan printboth colorgraphicsand text. Youcan use
paperwidthsof 100.0to 242.0mm(3.94- 9.53in.)and
lengthsof 100.0to 355.6mm(3.94-14.0 in.). It can also
handlepaperthicknessof 0.06 to O.IOmm(0.002360.00394in.).
Steps:
Makecertainthat thepoweris OFF.
1. Reclinethepapertray on the backof lheprinter.
2. Movethe papertray Icvcr,locatedon the rightside
of thepapertray,to the forwardposition.
3. Adjustthepaperguidesto thepapersizeyou willuse.
Nevermovethe inner,card sizedpaperguide.
4. Fan approximately30 sheetsof paperand stack them in
thepapertray. Movethepapertray leverto therear
position. (Seeillustration)
5. Movethepaperreleaselever,locatedon the frontside
of theprinter,to the lowerposition.
6. TurnON the printer’spower. Paperwillfeed whenthe
printcommandis given.
f—
(1
I Note: Usethe micro-feedfunctionsto adjustthe top of form. SeeChapter3 for details.
9
I
Loading paper from the rear path
The rear feed path is thebest way to printthosethicker
sheets. Use thispath for printingon postcards,overhead
projection(OHP)film. Thisfeedpathcan handlewidthsof
100.0to 242.Omm(3.94- 9.53in.)and lengthsof 100.0to
355.6mm(3.94-14.0 in.). It can alsohandlepaperthicknessof 0.06 to 0.23mm(0.00236-0.00906 in.).
(j
Steps:
Makecertainthatthepoweris ON.
1. Place thepapertray in its verticalposition.
The printerwillautomaticallyentertheNotReady
mode. The Ready lampwillnot be lit.
2. Movethepaperreleaselever,locatedon the
frontsideof theprinter,to thelowerposition.
3. Alignthe paperto the sizeof paperyou willuse
with thepagemarkerson theprinter.
4. Paperwill automaticallyfeed to the top of form
position. (Seetheillustrationat right.)
5. When you haveconfirmedthatthe paperhasbeenfed to
the top of formcorrectly,pressthe Ready key to enter
theReadymode. The Ready lampwillilluminate.
@
Note: You can use paperthicknessesof 0.06mmto 0.23mmwith the rearfeed path.
Allow a’onesecond intervalbetweenpaperfeeds. Paperwill be fed automaticallyto the
top of“formpositionwhen inserted.
If paper is beingfed incorrectly,clearthe problemand startagain.
See Clearingpaperjams on page 12.
Caution: Alwaysusethe rear pathwhen usingoverheadprojection(OHP)film.
10
Loading paper from the front path
The frontfeedpath feedspaperone sheetat a time. When
usingthispath,paperwillexit the machinefromthe paper
exit,whichis abovethispath,in the samedirectionfrom
whereit was inserted. Use thispaperpathonly forprinting
textor graphicson singlesheets. Thisfeedpath can handle
widthsof 100.0to 242.Omm(3.94- 9.53in.)and lengthsof
100.0to 355.6mm(3.94-14.0 in.). It can alsohandle
paperthicknessof 0.06 to O.10mm(0.00236-0.00394 in.).
Steps:
Makecertainthatthe poweris ON.
1. Placethepapertray in its verticalposition.
TheprinterwillautomaticallyentertheNot Ready
mode. The Ready lampwillnot be lit.
2. Movethepaperreleaselever,locatedon the
frontsideof theprinter,to the lowerposition.
3. Alignthe rightedgeof thepapa with theproperpage
markeron theprinter.
/
4. Paperwill automaticallyfeed to the top of form
position. (Seethe illustrationat right.)
Whenprinting,paperwillreturnwiththeprintface
up.
5. When you haveconfirmedthatthe paperhasbeenfed to
the top of formproperly,pressthe Ready key to enter
theReadymode. The Ready lampwillilluminate.
Caution: Always inseripaperwith the sideon which youwant to printfacingdownward
when printingwith the front path.
Note: Allowa one secondintervalbetweenpaperfeeds. Paperwill be fed automaticallyto the
top of form positionwhen inserted.
If paper is beingfed incorrectly,clearthe problemand startagain.
See Clearingpaperjams on page 12.
11
Clearing paper jams
If paperbeeomesjammed,the Paper lampon thecontrol
panelwillflashand theprinterwillenterthe NotReady
mode. When this happens, removethejammedpaper
accordingto the followingsteps.
Steps:
1. Lift up on thepaperreleaselever,locatedon the
frontsideof theprinter.
——
/.;.
../-
/
‘——
2. Removethejammedpapercarefullyby pullingon the
end of the paper.
3. Open the frontcoverand confirmthatthereis no more
paperjammedinside.
4. Pulldownthereleaselever.
5. Confirmthatthereis no slack in the ribbon.
If thereis slack,sw page5, “Installingtheribbon,”for
details.
6. Closethe frontcover.
7. Load a new sheetof paperand pressthe Ready key to
enter theReadymode. The Ready lampwill
illuminate.
12
‘s=i-”-
Other printing functions
Thissectionexplainsthe otherprintingfunctionsof whichtheprinteris capable. Theiroperationis basically
thesameas theregularprintingfunction,althoughyou shouldadhere10the followingpointsfor optimum
printingquality.
Printing with color ribbons
Whenprintingwith colorribbons,youcan performprintingjust as youwouldwilhthe monochromeribbon.
Just rememberthe followingpoints.
Whenyou inserta colorribbon,the Color lampwilllight.
You may insertpaperfromanyof the threefeedpalhs.
Be awarethat if you usc Iargcamountsof oneparticularcolorat onc time,the ribbonIifcwillbc
shortened.Alwaystry to crealccolordocumentswhichusea relativelyeven spreadof colorchoicesin
orderto use the fullcapacityof thecolorribbon.
●
■
●
Printing with overhead projection (OHP) film
Whenprintingon overheadprojection(OHP)filmyoushouldrcmcmbcrthe lollowingpoints.
Alwaysuse the ribbonespeciallymadefor overheadprojection(OHP)film. Whenyou insertthis ribbon,
the OHP lampwill light.
Alwaysfeedoverheadprojection(OHP)filmfromtherear feedpalh.
●
●
Printing with strip labels
The maximumprintinglength,when using striplabels,is 7.2 inches. The followingexplainsthe stepswhen
usingstriplabels.
Caution: Alwaysuse eitherthe Windowslabeldriver,which is includedwith the diskette,or
the strip labelprogram(S-LABEL.EXE)when printinglabels. Failureto do so may
resultin damaaeto the mechanism.
Steps:
1. Turn the printerOFF.
2. Removeall paperfromtheprinter. Open the frontcoverand rcmovetheribbonCMSSCMC.
See Chapter1 “Installingthe ribboncasscue”fordctaiis. Placethe papertray in the verticalposition.
3. Confirmthat the tip of the striplabelis stickingout
fromthe slit in thecassette. If the tip is not sticking
out fromthecassette,gentlypull it out withyourfingers.
Makecertainthatthe labelstripfitsthroughthecassette
slit as shownin the illustrationat right.
@
13
4. Whilegentlyliftingup on the protrudingportionof the
striplabel,mountthe Labelcassetteontothe carriage.
Makesurethat theribbonand the labelare between
theprintheadand the platen.
5. Closethe frontcover.
6. TurnON thepowerto theprinter. The Label lampwill light.
7. Whenlabelprintingis complete,openthe front
coverand cut the end of the labelusinga scissors,
as shownin the illustrationat right. Be carefulnot
to touchtheribbon.
8. Grasptheotherend of the cut striplabelwithyour
fingemand pull the labelthroughthecassetteas
shownin the illustrationat right. If theprintedlabel
is not longenoughto go to exit sideof thecassette,
you can pull the labelback throughthe openingwhere
it wascut.
9. Peel off the backingof the cut striplabelbefore
attachingit.
u
‘m
Caution: :Always usegenuineStar suppliesto ensureoptimumprint quality. We do not
guaranteeprintingqualitywhen usingribbonsby other manufacturers.
Alwaysuse eitherthe Windowslabeldriver,which is includedwith the diskette,or
the strip labelprogram(S-LABEL.EXE)when printinglabels. Failureto do so may
resultin damageto the mechanism.
14
Chapter 3 Control panel operation
I
This chapter will lead you step by step through each type of key operation so
that you will soon be able to put your printer to its most effective use.
Key and lamp explanation
16
Conditions indicated by the lamps
17
Control panel operations
18
The test modes
23
Optimizing print quality
25
Hexadecimal dump mode
26
15
—
Control panel operation
The controi panel is equipped with 15 lamps andfour keys which, when used correclly, will allow you to
print manyfile types in both color and black. Before you begin, however, you should become familiar with
the arrangement and meanings of the keys on thefront control panel.
Key and lamp explanation
The fourkeysare, fromleft to right:
Zoom
Pa
r
ALT, Zoom, Paper andReady.
The followingsectionis a briefexplanation
of the generaluse of the fourkeysand their
correspondinglamps.
Ready
Zoom AEC
P
‘ i ,p,o~
80%0
00[
ALT
M~ro
2-Page
m
.8.
b
Clear ,@,o,~ty!e
(hlor
o
Pa @r
E!l~
OH, Rib&on
,~~1
Me&
Power
=
C&W
3
Micro Fee~
‘
‘%--~._—=———’
Ready/Clear Key
“ Ready setstheprinterto theReadyor Not Readymode
●
●
with eachpress. This allowsthe printerto bc readyto
receiveand printdata. TheReadymodeis indicated
p~~~~~-zd
by the Ready lamp.
The printerwillpower-upin theReadymodeif paperis
loaded.
Clear clearsthebufferwhen usedwiththe ALT key.
When thereis data in thebuffer,the Data lampwilllight.
$
T “
-
“
-
Note: Alwayspress Ready beforeand afterany operation.
Press Ready to pause printing. Printingwill resumewhen pressedagain.
Paper/2-Page Key
“ Paper feedspaperonelineat a time.
●
●
Consecutiveline feedswilloccurif thiskey is helddown.
D ‘[ ‘1””[
]-:
2-Page selectsa papersavingdevicewhenthiskey is
ALT Macro 2-Page Clear
usedwith the ALT key. Thisuniquefeaturereducesthe
—.——--”
dataof two screensto fit ontoone sheetof paper. This is L
indicatedby the 2-Page lamp.
16
:-=
:
-—--=--
Zoom/Macro Key
Zoomallowsyou to print documents at 80%,
●
67?10or 50% of their actual size.
This is indicated by any of the Zoom lamps.
“ Macro is usedto saveyourcontrolpanelkey
settingswhenthiskey is usedwith the ALT key.
WhenMacrois set, it is indicatedby the Macro lamp.
ALT Key
●
ALT is usedin combinationwith theotherthreekeysto
allowuse of eachkey’sotherfunction,namely,savinga
Macro, selectingthe 2-Page modeor to Clear
thebuffersof datacomingfromcomputer.
Conditions indicated by the lamps
m
m
This tableexplainsthe meaningsof the lampson the controlpanel.
Lamp
Meaning
Power
Illuminates whenever the power is turned ON.
Ready
Macro
Color
Illuminates when the printer is ready to receive data.
Flashes three times when the printer is reset with the control panel.
Illuminates when the printer is receiving data into its buffer.
Flashes when print data remains in the buffer.
Illuminates when paper is not loaded in the printer or when paper is jammed
inside the printer.
Illuminateswhen the printer detects the end of a ribbon.
Illuminates when the macro function is selected.
Illuminates when a color ribbon is installed.
OHP
Illuminates when a ribbon for overhead projection (OHP) film is installed.
Label
Illuminateswhen a label ribbon is installed.
Data
Paper
Ribbon
Flashes when the label ribbon and sheet are intalled.
Illuminates when the Auto Emulation Change mode (AEC) is selected with the
Electronic Dip Switch (EDS)mode.
Illuminates when your application software sends data in the Compressed Data mode
AEC
CDM
2-Page
Zoom80%67%50%
All lamps flashing
(CDM).
Illuminates when the 2-Page mode is selected with the control panel.
Illuminates when the Zoom function is selected with the control panel.
An error has occured.
Caution: If all Iampsareflashing,turn OFF the powerto the printer,checkChapter6
:’Maintenanceandtroubleshooting”or contactyour nearestservicerepresentative.
17
Control panel operations
Yourprinteris capableof manyfunctions,suchas top of formadjustment,and lineand formfeed. You
performall operationsby eitherusingthecontrolpanelkeysindividuallyor in differentcombinationsunder
any of the followingthreeconditions.Theseconditionsare oftencalled: Power-on,Readyand NotReady.
The followingis a briefexplanationof theirmeaning.
Power-on
Power-onis the timewhenyou turn thepowerto the printerON usingthe powerswitch. Youcan perform
severaloperationsby pressinga key whileturningtheprinter’spowerON.
Ready/Not Ready
Readyis the statewheretheprinteris readyto receive
printinginformationfromthe computer. Thisis sometimes
referredto as ON LINE. Theprinteris set in eitherthe
Readyor Not Readymodeby pressingthe Ready key. As
above,you can performvariousoperationsby
mentioned
pressingcertainkey combinationswhiletheprinteris in
eitherthe Readyor Not Readymode.
8
T m “
m -
=
Note: Always press Ready beforeandafter any operation.
PressReadytopause:printing. Printingwill resumewhen pressedagain.
Paper feed
Normally,theprinterwill loadpaperautomaticallyfromthepapertray whenprintdata is receivedfromthe
computer. However,youcan loadpapermanuallyusing the controlpanel.
Steps:
1. PresstheReady key to entertheNot Readymode. The Ready lampwillextinguish.
2. Pressand releasethe Paper key and paperwillfeed forwardoneline.
3. Holdingthe Paper key downwillfeed paperin consecutivelines.
Caution: DCInot use paperteed kset the printer’stop of form adjustment.
Paper eject
Paperwillbe ejectedwhenthe printerreceivestheformfeedcommandfromthecomputer. However,youcan
ejectpapermanuallyby usingthe controlpanelkeys.
[n Summary
Steps:
1.
2.
18
Paper feed
Z=
Pap R*
Steps:
Paper eject
Z=
Pap P.@
Steps:
1. Pressthe Ready key to entertheNot Readymode. The Ready lampwillextinguish.
2. Whileholdingdownthe Paper key,presstheReady key andpaperwilleject fromtheprinter.
Papercan alsobe ejectedby pressingthe Paper key,if the Data lampis not lit and the Ready lampis
lit.
Note: Whenusingthe 2-Pagemode,this functionfeedspaper.tothe secondpagepositionon ~:
the ~i@page,
~‘Warning:. [email protected]@&@r’fromthe frontor redr”’pathsof the printerwhen paperi~’”lbacfed
in ‘thepapertray becausethis will causepaper to becomejarnrned.
Forward micro-feed
Forwardmicro-feedadvancespaperin verysmallincrementswhichallowsyouto makefineadjustmentsin
orderto set the top of formposition.
Steps:
1. Pressthe Ready key to entertheNot Readymode. The Ready lampwillextinguish.
2. Pressthe Ready keyagainandholdit down. Whileholdingdownthe Ready key,pressthe Paper key.
Paperwill advancein very smallincrements.To stop: releasebothkeys.
Reverse micro-feed
You can use reversemicro-feedto retreatpaperin verysmallincrementswhichallowsyou to returnto a
higherpositionon thepage in orderto set the top of formposition.
Steps:
1. Pressthe Ready key to enterthe Not Readymode. The Ready lampwillextinguish.
2. Pressthe Ready key againand holdit down. Whileholdingdownthe Ready key,pressthe Zoom key.
Paperwillretreatin very smallincrements.To stop: releasebothkeys.
Caution: YOU~annotuse Reversemicro-feedwhen usingthepaper tray: ‘Ifyou needto
usethe FRh@fse
micro-feedfunction,use eitherthe frontor.the reaffeetf paths.
Note: Set the top of form usingeitherthe Forwardor Reversemicro-feedwhile feedingpaper
fmrn eitherthe front or rearfeed paths.
In Summary
steps:
Forward micro-feed ~,,P~:
Zm
Pa
Reverse micro-feed
Ready
1. Press Reedy: Nor Rady mode
1. Press Ready: NorReady mode
2. Press Paper while
2. PZESS
Zoom white holding
holdingReady
00
ALT km
[1
2-Pa9EC&
Ready
z
P
;:
$iy
;
null
ALT Mxm 2Pa9e Ckv
19
I
Changing the auto-load position
Theprinter automatically loads paper to a preset or previously saved position. This functionallowsyou to
changethatposition.
Steps:
1. Loadpaperintothe frontor rear paperpath.
2. Changethepositionusingthe micro-feedfunction.
3. Press theReady keyto savetheposition’s
value.
Thispositionwill be effectiveuntilyou turnOFF thepowerto the printer. If you wantto storethis
position,use the Macrofunctionwhichis describedbelow.
Caution: You can only changethis valueimmediatelyafter loadingpaper. You can not
changethe auto-loadpositionif you use the Paperfeed function.
Note: We recommendthat you usethe frontor the rearfeed pathfor this operation
becausethe Reversemicro-feedfunctioncan not be usedwith the papertray.
Saving macro definition
Savingthe currentsettingsis called“macrodefinition”whichallowsyou to savethosesettingsfor lateruse.
Steps:
1.
2.
3.
4.
Pressthe Ready key toenterthe Not Readymode. The Ready lampwill extinguish.
Press the ALT key and holdit down.
Pressthe Zoom/Macro keywhileholdingdown the ALT key.
Releasebothkeysat thesametimeafterthe Macro lamplightsand yoursettingswillbe saved. If you
releasethosekeysafter the lampis no longerlit, the macmhasbeencleared.
—
Note: You can only storethefollowing settingswith this procedure.
Currentauto-loadposition
2-page mode
Current zoom~unctionsize,
In Summary
Changing a~~o~oa~,)osition
Steps:
1. Load paper
2. Usemicro-feed
3. Press Ready
20
D
D
Ill
ALT Mncm2.Pa9eClex
●
Saving macro definition
Steps:
1. Press Ready: Not Readymode
2. Pressand hold ALT
3. Press Zoom/Macro while
holding ALT
zoomPa
~
Red)’
~;
i
I
n
ALT Mac?.Z.PageC!+aI
Clearingthe buffer/All reset
Printdatais receivedand storedin theprinter’smemorybuffer. The buffercan be clearedby turningthe
powerOFForby cancelingtheprintingprogramon thecomputer. (Printingshouldstopshortlyand the
Data lampshouldextinguish.)1fprintingdoesnotstop:
Steps:
1. Pressthe Ready key to entertheNot Readymode. The Ready lampwillextinguish.Printingwillstop,
but theremay stillbe data in thebuffer.
2. Pressand holddownthe ALT key.
3. WhilepressingtheALTkey, pressthe Ready/Clear key.
TheData lampwillextinguish.Holdingthesekeysdownlongerwillcausethe Data lamptoflashthree
times.Thisindicatestheprinterhasbeeninitializedtothepower-ondefaultsettings.
4. Releasethesekeys,makeany controlpanelsettingchangesthatyou mayrequireand pressthe Ready
keytoreturnto theReadymode.
Caution: Alwayscancelprintingon the computer. If you fail to do so beforegoingto the
Not Readymode,the printerwill resumeprintingfrom wherethe bufferwas
clearedwhen you re-enterthe Readymode.
In Summary
Clearing the buffer/All reset
Steps:
1. Press Ready: NotReadymede
2. Pzess and hold ALT
3. Press Ready/Clear while
holdingALT
Zmm Pa r Ready
$
IHHll
‘: )kro 2-Pa9eClear
ALT
Steps:
ZmmP
Rendy
4. Releaseboth, make control
panel setting changes
Fhss Ready: Readymode
D
D
l’11
ALT MKSO2-Paw Cl@W
●
21
Zoom mode
The Zoomkey selectsthe Zoommode. Zoomallows
you to print documents at 60%, 67%and 50% of their
normalprint size.
Steps:
1. Pressthe Ready keytoentertheNot Readymode.
The Ready lampwillextinguish.
2. Pressthe Zoomkey.
The Zoom lamp will illuminatein the followingorder
witheach pressof the key. (Whenno lampis lit, 1007o
is selected.)
Zoomsize
1 ine
1 ine
1 ine
This
This
This
1 ine is
1 ine is
1 ine is
This
This
This
This
This
is
is
is
80%
Original
S i ze .
Original
Size .
Orig ina 1 Size .
ZOOM.
80% ZOOM.
80% ZOOM.
line
line
is
is
line
is 67% ZOOM.
line
line
67% ZOOM.
67% ZOOM.
is 50% ZOOM.
is 50% ZOOM.
This line is .50%Z(XM.
Lamp.
1O(MO
Zoom OFF
80%
67%
Zoom80%
Zoom67%
Zoom50%
50%
This
This
This
2-Page mode
The 2-Page modeusesthe Zoommode,mentionedbefore. However,this modeprints2 pageson one
singlesheetof paper,allowingyou to savepaper.
Steps:
1. PresstheReady key to entertheNot Readymode. The Ready lampwillextinguish.
2. Pressthe ALT key and holdit down.
3. Whilepressingthe ALT key, pressand holdthe Paper/2-Page key.
The2-Page andZoomSO%lampswill light.
4. Releasethesekeyswhilethe 2-Page lampis ON.
Releasingafterthe 2-Page lampis no longerlit willcancelthe 2-Page mode,but the Zoom 50Y0
modewillremaineffective.
5. Pressthe ALT andPaper/2-Page keystocancelthe2-Page mode. Thencancelthe Zoommodeby
pressingthe Zoomkey untilall Zoom lampsare extinguished.
r
Caution: If youchange”theZoomsizewhile in the 2-Page mode,the 2-Page modewill be
cancelled. If you changeto the 2-Page mode,the Zoom modewill enter 50?40.
Zoom
In Summary
Steps:
1. press Ready: Not Readymode
2. PIHS Zoom
D
Zom P
Ready
~
1
Inl
ALT Macro2.PageCleat
●
22
steps:
mod.
1. PressReady:NorReiidy
2, Pressand hold ALT
3. Press Paper/2-Page while
holding ALT
4. Release both keys while
lamp is ON.
2-~~~~m~~~
]
::;
[
D
$
III
ALT krm 2.Pa9eCkx
The test modes
Thereare two tests which can be performedby pressingkeyson thecontrolpanelwhileturningON the
powerto the printer. In this sectionwe willtakeyou step-by-stepthroughbothof thesetestmodesto help
you get the mostout of thisprinter.
The color test mode
The colortest modeis used to printthe printer’sROMversionnumberwhichis followedby sevenlinesof
the characterset in color. Each lineis offsetonecharacterfromtheonebeforeit.
Step:
1. Makesurethatthe printeris turnedOFF.
2. Installa colorribbonintotheprinter.
3. Pressand holdthe Ready keywhileturningON theprinter’spower.
The printerwillentertheReadymodeafter7 lineshavebeenprinted.
If theReady key is pressedwhileprintingthistest,it willprintan additional7 lines.
Caution: We recommendthat you use the widestpaperpossibleto avoiddamageto the print
headand/orthe platenbecausethis test printsacrossthe full width of the carriage.
Alwaysuse a cotorribbonfor this test,
Color test mode sample
ROM
Vt:rs
Rev i s Ion
011
: 0334A2
: 1.0
335H2
1-*$~& , )*+ – /fl123 A5678q :;<=> 7@ AR(2DEF(;HIJKLMNOPQRSTUVWXYZ
[\ ]‘–’ a t>cdef z h i j k 1mno
: <=> ?@ ABCDl;FGH IJKI.MNf)PQRSTUVWX Y7.[\ ]‘— abcdef gh ijk i❑ nop
! “#$%& ( *+, – /0 I 234s6789:
“#$%& t)*+, -. /0123456789: :<=> 7@ABCDEFGHI J KLMNOPQRSTUVWXYZ
[\ 1“– ab~def gtlijk 1mnopq
[ \ 1‘– abcdef gh i .ik 1rnnomr
#$%& ()*+ .–. /0 123456789: ;<=> ?@ABCDEFGHIJ KLMNOPQRSTUVWXYZ
$%&
( ) = + ,– /0 123456-?89 : ; <=> ?@ AflCDEFGtiIJKLMNOPQRSTUvwXYZ
[\ 1“– ab~de f~ll i J k 10lrlowrs
‘x,& ( ) *+. -. /0 123456789:
:<=> ?@ABCDEFGH IJ KLMNOPQRSTUVWXYZ
[\ 1‘– abcde f ?,h ij k 1 mnopqrs t
& ( )*+ .–./fI123456789: ;<= >?@ABCDEFGH IJ KLMNOPQRSTUVWXYZ
[\ 1“– abcde f.%hi.;k 1mnopqrst u
In Summarv.
steps:
Color test mode
Zcan
P
1. PowerOFF
2. Installcolorribbon
3. Press Ready while
turningON the~wer.
00
Ready
[i
ALT Macro2.Pa5eCl&
●
23
The long test mode
The longtestmodeis used to printtheprinter’sROM versionnumber,thecurrentElectronicDip Switch
(EDS)settingsand the entirecharacterset in each fontand pitchavailable.
Step:
1. Makesure thattheprinteris turnedOFF.
2. Pressand holdthe Paperkey whileturningON the printer’spower.
Afterprinting2 pages,theprinterwillentertheReadymode.
Caution: We recommendthat you usethe widestpaperpossibleto avoiddamageto the print
headancVorthe platenbecausethis test printsacrossthe full width of the carriage.
Thistest printsa considerablenumberof lines - morethan can be printedon a
singlesheetof paper,so we recommendthat youfeed paperfromthe papertray for
this test.
Long test mode sample
ROM Version
Revision
: 0334A2
: 1.0
335Et2
EDS SETTINGS
( Current setting.
are I%lphasized )
BANK: Switch : Funct ion
Set ON
Set OFF
––––+–––-–– -–+-–––––––––- –––––––-–––– +-––––––––– -–––––+––– ––––-––––--–
A:l
:
Standard/Epson
:
IBM
: Emulat ion
2
: AEC Mode
: Enabled
: Di Sabled
3
: Input Buffer
: RAM Usage
: I)ownload Buffer
4
: Ribbon Save Mode
: Enabled
: Disabled
: T ime Out Paper Eject
: Enabled
: Disabled
Page Lenv +b
::
: Letter / 11“
: A4 / 11. 7“
––––+––––––––~
–+-––––-–-– —–——–-–—+–– –-–––––-–––-–
-hl
t Roman
~d
Enabled
>
0@8V+44 OOOB#? )fi4*~t !!WS-IT 1+-I--AT !“#$%& ‘( )*+ ,– ,/0123456789 :;<=> ?@ABCDEFGHIJKLMNO
. A .
.
.
. .
PQRSTUVWXYZ
[\ ]“–’ abcdef ghi jk I,mnopqrstuvwxyz { I)‘dQueaaaAqeee,
1 lA~lhE60dfiUyd~$fY~f
&i0uiifS~Qir7~~
i (())~’I;E%
117W41
‘+ I+ FIILIT%I+W%LLF* I-U pmuw~~e~~mzcn
stls rJ +:” . .{n2
.......li+ilm+l
In Summary
Long test mode
Steps:
1. Power OFF
2. Press Paper while
turning ON the power.
24
ZOcmPOw Ready
D
n
i
n
ALT Mac,. 2.P&e Clew
●
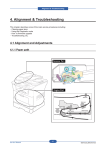
Optimizing print quality
You can preciselytuneyourprinter’spaperfeed systemto optimizegraphicand textprintqualityto adjustan
effectknownas banding. The illustrationbelowshows,for yourreference,the two typesof banding which
mayoccur,and theoptimumprintquality.
Izilvtzi
E&ia
OptimizedPrintQuality
DarkLine Banding
WhiteLineBanding
Print quality adjustment mode
Theprintqualityadjustmentmodeallowsyouto optimizethisprinter’sprintqualityby eitheradvancingor
retreatingpaperin preciseincrementsof 1/720of an inch,aftereach printingpass. The followingexplains
the steps.
Steps:
1. Turn the powerto theprinterOFF.
Reclinethepapertray and load severalsheetsof paper. The paperreleaselevermustbe set to the lower
positionand eithera coloror monochromeribbonshouldbe installedfor this mode.
2. Turn the printerON whileholdingdowntheZOOtIIand Ready keys. Paperwill automaticallyloadand
theprinterwillprinta testpattern.
If your print sample haswhite fines, see Step 3. If your print sample has dark lines, see Step 4.
3. Press the Zoomkey once. Paperwillretreat 1/720of an inchand anothersamplewillbe printed.
4. Pressthe Paper keyonce.Paperwilladvance1/720of an inchand anothersamplewillbe printed.
RepeateitherStep 3 or Step4 untilyou havefinetunedyourprinterfor optimumprintquality.
Rememberthata samplewillbe printedeach timeyoupresseithertheZoomor Ready key whileusing
thismode. Paperwillautomaticallyfeed whenevera new sheetis required.
Afteryou haveadjustedyourprinter’sprintquality,savethissettingand exitusingsteps5 and 6.
5. Pressand holdthe ALT keyuntiltheMacro lampblinksthreetimes.
6. TurntheprinterOFF.
\
Caution: Alwayspress and holdthe ALT key untilthe Macro lampblinksthreetimes before I
turningOFFthe printer. If you fail to do this beforeturning OFFthe printer,the print
qualityadjustmentmodewill nottake effect.
In SUWKY
st~p~:
Print quality adjustment mode
1. Power OFF
Recline paper trayfload papluse
or monochrome ribbon
2. Power ON while holdirw down
Zoom and Ready. “
Zm
color
~
[
~
D
P
]
[[
Ready
~
i~T Micro2-Pige Cl&r
m
.
* or ●
●
3. Press Zoom to retract paper
4. Press Paper toadvance paper.
5. Press and hold ALT. Macro
lamp flashes 3 times
6. Turn the printer OFF.
25
Hexadecimal dump mode
This functionwillallowtheprogrammerto seethe actualcodestheprinteris receivingfromthecomputer
whichis usefulwhendebuggingprintingprograms. (Somecomputerschangethecodestheprogrammer
intended.)In thismode,all datareceivedwillbe printedin hexadecimalformat,ratherthancontrolcodes
beingactedon as commandcodes.
Steps:
1. Makesure thattheprinteris turnedOFF.
2. TurnON the powerto theprinterwhilepressingand holdingtheZoom key.
3. Starta printingprogram.
The printerwillprinta formatteddumpof exactlywhatdata theprinteris receivingin placeof the usual
printout. Each linerepresentssixteencharacterswiththeirhexadecimalcodeson the leftand printable
characterson the right.
4. Whenthe hexadecimaldumpis completed,pressthe Ready keytoentertheNot Readymode. Thiswill
printthelastline.
Hexadecimal dump mode print sample
0000
0010
0020
0030
0040
0050
0060
0070
0080
0090
OOAO
OOBO
Ooco
OODO
OOEO
OOFO
0100
0001
10 11
20 21
3031
4041
5051
6061
7071
0203040506070809
OA OB OC OD OE OF
12 13 14 15 16 17 18 19 1A IB IC ID IE IF
22 23 24 25 26 27 28 29 2A 2B 2C 2D 2E 2F
3233343536373839
3A 3B 3C 3D 3E 3F
4243444546474849
4A 4B 4C 4D 4E 4F
5253545556575859
5A 5B !5C 5D 5E 5F
6263646566676869
6A 6B 6C 6D 6E 6F
72 73 74 7576 77 7879 7A 7B 7C 7D 7E 7F
8081 8283848586878889
8A 8B
9091 9293949596979899
9A 9B
AO Al A2 A3 A4 A5 A6 A7 A8 A9 AA AB
BO B1 B2
CO Cl C2
DO D1 D2
EO El E2
FO F1 F2
OD OA
B3
C3
D3
E3
F3
B4
C4
D4
E4
F4
B5
C5
D5
E5
F5
B6
C6
D6
E6
F6
B7
C7
D7
E7
F7
B9
C9
D9
E9
F9
BA BB
CA CB
DA DB
EA EB
FA FB
Hexadecimal dump
In Summary
ZocnlP
Steps:
1. PESS Zoom whiteturning
power ON
program
2. Stat print
3, Press Ready when done.
26
B8
C8
D8
E8
F8
I
1
[[
Ready
ALT M;’&o2-PagoU&
●
●
................
........
“ ; ;,#$;~
; ~
) ;,+,
–
. /
01 23456789: ; <=>?
CMBCDEFGHIJKLMNO
FQRSTUVWXYZ
[\] “–
‘ abcdef gh i jklmno
pqrstuvwxyz{ I}-.
8C 8D 8E 8F . . . . . . . . . . . . . . . .
9C 9D 9E 9F . . . . . . . . . . . . . . . .
AC AD AE AF . . . . . . . . . . . . . . . .
BC BD BE BF . . . . . . . . . . . . . . . .
CC CD CE CF . . . . . . . . . . . . . . . .
DC DD DE DF . . . . . . . . . . . . . . . .
EC ED EE EF . . . . . . . . . . . . . . . .
FC FD FE FF . . . . . . . . . . . . . . . .
..
Chapter 4 Electronic Dip Switch settings
I
T
c
e
E
m
t
t
e
w
r
t
ac
S
d
E
p
i
l
(
S
s
(
f
f
u
c
c
w
E
E
E
E
t
S
S
S
c
f
27
I
Electronic Dip Switch settings
Y
p
c
t
i p
t m
e
w
p
t
&
w e
s
e
ab
e
y
w
h
d
p
t
s
t
w
a
w
h
a
c
y
t
t
s
p
p
y
T
w
y
O
c
T
c
a
u
k
c
al
s
What and where are they?
b
s
p
E
S
f
a
b
(
C
A
i
ap
p
f
l
f
1t
s
c
p
e
l
b
Entering the Electronic Dip Switch mode
T
p
f
w
m
f
k
w
p
t m
u
d
f
e
S
T
p
w
h
w b
l
O
d
A
i
k
t
h
e
D
‘D
m
Electronic Dip Switch controls
Q A
u
s
b
l
s
●
s
n
A
D
●
l
s
t
O
s
●
O
P
M
p
t
P
f
k
t
t
R
B
t
S
t
c
r
m
p
h
t
~
8
n
❑
2
M
Z
8
Z
6
b
l
l
d
2
l
l
s
~
t
s
l
w
m
a
w
p
~
P
l
f
k
~~
L
p
e
i
●
U
l
‘[
c n—a
O
c
P
s
c
W
l
D
●
w
i
‘T
l
B
B
B
S
S
S
, S
S
S
A
B
C
n
n
n
n
n
n
1
2
3
4
5
6
Electronic Dip Switch functions
p
d
W
a
s
p
t
h
s
t
p
u
y p
l
r
p
v
f
n
s
t
s
B
s
S
I
I
I
t
m
R
T
P
A
(
(
F
E
—
E
u
C
s
II c-1
I
I
I c-2
]I
y
p
b
s
s
m
w
s
s
t
e
m
C
f
n
A
ap
s
t
w h
p
e
S
E
I
E
E
I
ID
D
D
D
b
I
b
l
w
u
u
s
—
c
t
t
p
d
D
IE
R
G
Ii
IH
I
I
—
c
c
f
(
m
c
N
o
d
F
E
A
I
s
(
p
d
(
p
d
I
I
f
29
f
e
S
A
T
p
o
s
m
e
f
E
s
m
l
o
t
c
E
l
w y
m
L
P
c
s
m
S
g
X
p
s
S
m
p
m
m
p
m
S
A
T
p
t
A
s
E
A
E
s
p
a
y
a
S
A
o
S
A
W
u
O
p
t
m
d
t s
p
r
a
A
T
l
e
l
I
d
e
p
p
u
p
p
p
t
u
m
a
e
l
w
p
w
u
s
c
m
t
W
r
2i
t s
T
e
b
(
p
t
w
f
f c
T
m
p
p
d e t
t
r
w
s
t
p
a
p
p
p
t d
e
p
u
r
F
F c
p
t
w
d
l
d
c
f
c
f
r
p
l
u
i
l
f
T
t
s
p
w
s
as
p
p
s
s
o
d
p
p
A
c
c
l
r
w
t
O
t
m
m
r
a
P
B
t
t
S
m
l
t s
d f
t
s
s
s
S
s
c
R
A
t
r
M
l
t
s
d
m
p
t s
r
a
O
p
S
W
e
p
p
S
m
u
c
t
L
C
e
c
s
a
b
(
u
d
m
i
C
s
s
e
o
al
l
l
c
b
f
c
ac
c
r
f
r
b
d
s
l
ac
l
c
f
e
r
s
t
l
w
s
o
t
r
f
al
ac
f
s
s
c
e
e
I
Switch B-4: Font selection
Thereare two resident font families: Romanand H-Gothic.Whenthis switchis ON, theprinterselectsthe
Romanfontfamily. Whenit is OFF,the printerselectsthe H-Gothicfontfamily.
Switch B-5: Epson character table
The Epsonprintersupportsboththe Graphicstableand the Italiccharactertable. Turn thisswitchOFF to
selectthe Italiccharactertable. If you leavethis switchON, you willget graphiccharacters,international
charactersand mathematicalsymbolsof IBMcharacterset#2 insteadof italics.
Switch B-6: IBM character table
The IBMprintersupportsbothcharactersets#1 and #2.
ON selectscharacterset#2 whichhas internationalcharactersand fewercontrolwords. OFF selectscharacter set #1, for computerswitha 7-bitinterface.
Switch C-1 to C-3: International character set
Internationalcharactersetsdifferin theirassignmentof 14charactercodesin the EpsonItaliccharactertable.
Withtheseswitches,youcan selectoneof eightcharactersets. Theyare:
Country
c-1
U.S.A.
France
Germany
England
ON
OFF
ON
OFF
c-2
ON
ON
OFF
OFF
c-3
ON
ON
ON
ON
Country
c-1
DenmarkI ON
Sweden
OFF
Italy - ~ON
SpainI
IOFF
c-2
ON
ON
OFF
OFF
c-3
OFF
OFF
OFF
OFF
Switch C-4 to C-6: IBM code page
Exceptin theEpsonItaliccharactertable,theseswitchesselectthedefaultcharactercodepageas shown
below.
Code Page
c-4
#437U.S.A.
ON
#850 Multi-lingual OFF
#860 Portuguese
ON
c-5
ON
ON
OFF
C-6
Code Page
c-4
ON #861 Icelandic
OFF
ON #863canadian
FrenChoN
ON– #865 Nordic
OFF
c-5
OFF
ON
ON
C-6
ON
OFF
OFF
31
Chapter 5 Printing
T
c
e
p
s
p
W
a
P
a
P
s
W
33
Printing
W
M
e
u
y
p
w
s
p
o
u y
h
I
P
w
W
w
P
c
e
y
y
3
s
w
u
s
a
p
s
u
t
P
w
h
a
Preparing your application software
W
i
a
p
s
p
p
g
t
S
i
b
w
a
b
T
y
S
(
S
2 *S
S
3
N
L
N
4
S
S
(
5 [ E
6
w
N
I
y
p
@
T
s
y
o
y
R
a
s
m
s
t
l
s
w h
E
m
m
I* P
*P
X
]
R
C
m
a
s
N
s
2
s
p
s
“
a
s
X
“
“
I
a
t
w
c
p
i
t p
y p
m
L
L
E
S
q
s
O
m
s
p
a
f
] 1\ S
f
y
b
“
p
p
q
p
p
ab
i
n
c
—s
p g
y p
N
n
“
s
p
p
f
T
g
S
I
ah
S
e
m
t
w
f
p
f
Y
w o
b
c
P
E
I S
C
C
P
S
c
M
h
I
p
e
I
I
e
1
V
s
c
s
i
t
t
E
S
c
s
r
(
u
d
e
i
d
s
<
a
N
34
w
p
c
E
e
t
-
c
s
p
a
p
s
q
r
Printing with Windows 3.1
d
t
w
w
i
w
W
I
S
p
c
P
D
T
f
w
3
S
f
y
S
p
e
d
i
W
p
d
S
S
M
W
C
3
<
C
P
c
d
P
d
al
i
M
i
C
w a
a
p
g
P
h
n
W
i
v
ap
d
p
e
<
b
u
s
C
c
d
<
C
Ad
b
w e
d
P
b
<
c
C
d
t
<
C
B
s
<
d
c
t
w
b
n
d
q
S
p
t
t
p
t
s
s
f
c
c
b
E
b
S
w a
D
p
c
U
U
b
d
i
W
s
b
c
S
U
i
d
p
<
<
i
y
ad
d
d
s
P
b
w a
d
d
L
S
S
l
<
P
l
b
y
p
p
C
“
P
M
G
b
35
I
T
f
f
W
e
i
T
f
S
S
M
W
O
W
D
C
P
c
C
c
S
L
F
d
a
d
b
f
C
I
F
m
m
t
P
N
t
w
c
w a
F
f
F
S
d
b
T
f
3
d
i
d
(
“
l
d
b
f
f
f
a
s
F
d
l b
a
w a
f
w a
W
a
r
y
T
d
f
a
n
c
<
i
A
b
c
y
p
f
P
w a
S
a
S
3
R
Broadway
G&n openlfacc
4
Hobo
Plagbill
P B
Humanist 52 I Extra Bold
J
B
Seagull Heavy
Black
O
S
U
36
C
R
Chapter 6 Maintenanceand troubleshooting
w
ew
d
w
ar
w
e
t
p
t
p
c
c
a
i
s
m
p
t
s
p
r
a
c
R
C
p
T
Maintenance and troubleshooting
Y
p
p
as
y
s
i
a
t
b
r
f
s
y
c
n
e
t
w
y
c
t
w
m
f al
Requirements
.
A
k
.
s
.
A
.
P
.
N
p
y
s
p
y
a
p
l
s
e
t
(
m
w
m
1
d
f
p
p
p
a
e
c
e
i
c
(
v
ad
p
w
e
j
p
i
A
c
ac
c
.
.
y
p
c
T
c
w
s
w
as
c
t
p
v
b
U
c
d
c
a
c
a
f
a
c
s
i h
t
e
Cleaning the printer
k
y
p
f
w
c
p
c
y
p
u
t
p
A
A
A
W
p
t
r
C
●
d
W
c
d
i
e
i
as
●
f
d
C
.
.
.
.
.
.
t
b
P
T
O
I
p
e
A
l
P
c
b
a
p
d
f
p
q
p
d
f
p
s
d
as
a
c
s
l
d
p
e
c
p
a
a
i
p
W
w
F
c
c
d
s c
w a
a
c
p
w
o
d
‘
N
c
a
d a
c
c
w
h
p
h b
d
p
s
e
p
i
d
b
c
p
c
s
i
a
p
p
f
c
r
r
O
P
F s
h
p
e
t
i
a
w
c
i
a
c
w
h
at (
C
p
q
q
a
h
J
c
b
p
s
b:,,.,.
39
C
p
p
d
b
d
(
p
p
.
P
.
T
.
R
.
P
t
q
y
c
p
a
c
c
n
t
S
.
R
p
u
.
R
r
c
.
L
y
p
p
●
O
●
L
a
l
t
c
f
c
r
w
p
d
f
a
f
c
c
c
s
p
c
i
a
c
s
r
c
t
f
p
t
p
p
p
f
p
c
i
A
w
o
a
t
r
T
●
f
f
●
o
c
.
P
p
p
r
C
b
c
t
F
●
h
f
m
d
.
C
f
p
c
Troubleshooting
Y
s
p
ar
p
H
p
s
h
i
p
w
y
p
o
i
v
r
W
w
R
g
t
f
e
t
R
P
P
f
s
p
s
d
t
s
i
e
i
t
e
t
p
t
c
h
o
d
d
g
p
w
f
as
t
p
D
P
b
d
f
a
p
p
s
p
p
u
s
(
w
s
e
s
r
e
s
r
p
s
t
d
b
f
p
o
p
(
o
(
d
e
w
p
(
p
p
f
s
p
p
I
P
T
u
t
ah
p
w
o
t
I
f
t
d
e
I
P
c
p
m
o
o
p
r
h
y
w
p
a
t
t
ab
s
s
c
l
w
f
w
(
l
e
p
(
p
p
(
p
r
f
l
p
p
f
b
p
l
(
(
(
p
p
p
41
P
S
P
l
d
i
f
c
f
P
C
I
I
p
A
p
I T
c
i
e
O
E
p
O
U
t
t
b
a
c
1C
i
o
p
b
T
a
s
o
I
R
I
c
v
p
d
a
b
e
I A
a
e
s
s
l
o
I
w
P
y
p
d
p
s
s
p
c
P
C
i
I
c
c
s
R
C
I c
b
R
m
t
r
l
I
c
-p
c
m
s
t
I
i
i
j
s
u
p
i
foryourprinter?
R
e
l
i
p
f
p
p
r
p
e
C
n
c
p
i
p
s
s
y
M
s
c
s
r
I
I
1
p
I
s
p
T
I k
t
r
d
p
t
b
t
r
w
h
d
I
d
b
c
r
w
e
a
o
= f
s
I
b
p
f
u
c
f
P
C
p
d
k
t
I
t
I m
I
I
i
I T
p
I
w
u
42
aS
r
o
y
d
d
I
I
p
r
M
b
R
c
R
r
A
g
s
C
c
S
M
h
I
1
s
-
y
a
s
c
p
f
c
s
P
C
y
a
s
C
p
f
T
C
f
p
c
o
t
p
s
e
I
p
p
w
o
s
R
Y
a
e
p
H
i
i
n
f
i
f
n
c
s
u
w
w
I
s
s
(
b
s
c
s
C
c
c
h
t
o
p
P
i
s
t
s
p
C
t
w
b
w
c
e
e
s
r
t
d
d
l
ad
s
p
e
s
d
R
C
H
t
s
s
e
c
p
r
s
C
a
e
‘
i
c
E
(
c
g
a
t
b
I
p
f
i
b
s
c
C
m
a
w e
e
T
b
c
m
e
s
h
o
d
r
f
c
f
P
R
)
p
p
s
g
e
O
A
s
r
p
M
w
l
c
t
A
p
q
u
P
Q
f
P
R
p
g
O
A
p
M
p
q
u
P
Q
p
t
O
A
p
M
p
q
u
P
Q
43
P
f
p
t
II
o
l
f
p
p
p
t
p
l
p
j
p
n
S
p
c
c
P
R
l
f
r
r
p
j
p
s
r
c
p
w
p
f
f
l
h
I
l
g
r
t
c
t
m
p
p
M
p
t
p
f
p
b
c
b
f
f
R
s
t
p
o
b
p
f
at
M
s
t
j
u
o
p
t
t
n
l
p
a
s
f
p
R
s
p
r
s
u
w
p
t
w
p
(
l
I
w
R
m
p
p
f
I
d
p
p
h
m
p
O
t
a
f
t
f
u
t
u
w
al
t
b
t
p
c
p
t
t
b
g
t
R
T
t
m
n
t
l
p
l
t
p
d
p
I
t
p
f
s
w
f
r
f
r
p
d
I
I t
t
l
r
f
p
R
p
t
s
p
t
d
f
p
T
p
l
t
h
l
t
w
e
b
b
l
P
s
l
t
p
l
p
v
I
p
I
p
b
C
t
I
p
e
t
b
f
R
l
I
p
e
c
P
C
p
p
C
C
w
j
u
r
b
b
r
c
f
d
p
f
R
E
l f
ac
E
t
e
<
S
s
p
E
p
t
S
s
<
p
c
m
s
y
s
A
p
Chapter 7 Printer control commands
T
c
e
s
t
p
c
v
c
e
u
w
w
d
p
t
m
c
i
p
a
f
c
c
C
c
C
p
V
H
D
O
c
p
c
p
c
G
c
c
c
p
c
45
Printer control commands
T
p
h
t
e
S
m
m
N
2
c
c
a
e
T
m
E
t
a
m
e
t
I
i
t
p
t
m
p
I
t
E
m
L
e
t
a
I
t
P
g t
c
X
A
e
s
O
a
f
m
as
w
s
p
p
c
w
m
S
A
W
m
(
w
s
p
p
w
S
C
a
c
e
m
c
T
c
d
p
m
e
c
f
c
c
c
at
M
S
c
d
B
f
S
c
c
l
w
c
g
af
b
S
f
n
b
A
D
D
H
<ESC>
k
n
27
107
n IB
6B
n S
+s>
c
n
28
67
n IC
43
n
a
t
v
O R
H
C
G
M
I
S
S
B
A
B
n
e
c
m
m
S
m
s
(
I
b
w
(
A
e
m
d
H
G
c
h
D
D
c
m
t
c
c
v
s
c
G
w
r
O
m
D
P
c
C
c
c
c
c
e
p
c
c
c
c
s
i
i
l
s
m
Font control commands
IH
D
A
D
R
n S
af
S
CEsc>
S
27
4
52
IB
34
c
S
t
S
<ESC>
27
5
53
I
c
B
E
:ESC>
E
27
IB
35
I
69
IB
45
C i s
b
g
S
I
t
v
c
e
p
i
p
I
i
a
c
h
s
c h
C
s
s
p
a
c
a
e
e
t
m
h
s
C
e
B
:ESC>
F
27
70
IB
46
C
B
cESC>
–
n 127
45
nllB
2f)
n IC
w
n
B
g
e
p
m
p
U
s
c
a
O
I
<ESC>
–
n
27
95
n IB
5F
n C
w
S
<ESC>
q
n
2
n IB
1
71e
n S
B
<Esc> s
<
27
83
0 IB
53
n
u
o
n
t
c
a
a
t
b
C
n
C
O N
2
S
1 O
3
S
s
s
v
w
h
s
n
s
o
s
o
C
s
c
a
s
g
S
a
s
n
v
c
w
a
t
S
o
S
u
c
h
o
n
s
a
cs
n c
D
o
p
t
c
p
B
.
<ESC>
S
<
27
83
1 IB
53
C
s
s
c
D
n
p
c
t
S
c
p
.
B
w s
<ESC>
T
27
84 C
IB
54
S
r
p
s
n
s
a a
p
47
Character set commands
A
H
D
:ESC.
t
<
I
n
D
7
116
n B
74
n
8
73
n c
49
n
~
a character
table
according
tothevalue
b
fn ass
~
C
t
O E
c
1 I
c
2
d
S
t
t
c
(
m
o
:Esc>
7
7
5
B
~
c
s #
:ESC>
6
7
5
B
~
c
s #
&SC>
R
7
82
n
,
B
52
n
~
i
c
g
:
7
<
[
<b
<b
4
<
n
?
o
91
nl
84 B
n;
5B
O
nl
C
t
s
g
C
8
J
1 F
9
N
2
G
3
E
4
D
5
S
6
I
7
S
t
E
v
s
D
I
L
A
K
I
I
L
t c
p
t
a
t
s
b
d
d
C
D
#
U
3
#
M
3
#
P
3
#
I
3
#
C
3
#
N
1
t
c
d
c
t
n
1
h
s
a
O U
h
o
c
t
54 ~
n2
a
p
F
c
E
I
v
s
s
C
C
I
C
E
a c
D
M
p
~
:Esc> \
n
c
!7
d
H
92
n]
D
B
ti
nl
d
E
p
c
t
i
t
c
w
a
T c
n
c
m
I
c
e
w
f
2
a
A
n
!
94
1 B
5E
l
n c
n T
e
c
L n
a
D
a
t
e
t
o
t
r
a
c
r
X 2
b
i
r
c
t rI
+
n
c
Oa
c
ac
a
d
a c
f
w
p
a
p
l
e
c
as
<
f
o
o
49
Character size and pitch
commands
—
A
H
D
cESC>
P
27
IB
80
D
S
50
m
c
s
:
c
1
e
I
cESC.
S
p
@
j
I
C
(
(
B
27
I
77
58
@Se>
:
27
disc>
g
2
<
27
:
4D
IB
3A
IB
67
IB
:ESC>
P
n
:ESC>
I
n
112
nlfB
70
27
80
n IB
50
27
73
n IB
49
I
I
e
f
(
e
c
c
p
(
f
e
f
(
n
n
e
n
p
n IC
t
n
w
s
s
c
p
c
p
p
c
m
p
s
c
fm e
p i ( c
S
!
e
c
p
f
e
f
(
c
f
C
d
OF
1
n 127
p
]
p
:Esc> p
e
e
p
c
c
(
c
1
15
m
p
C
I
,
c
IB
I
1
]
B
m
p
M
f
p
e
s
c
p
e
c
p
I
(
f
f
c
m
a
n
a
(
cpi)
c
c
e
c
c
p
w
c
n
n C
I
t
p
p
s
a
t
v
b
m
:ESC>
dl!i>
W
E
n
n
27
I
87
28
69
1
:
27
n IB
I
1
57
n IC
45
IB
P
3
P
n C
(
n w
c e
w
s
c
(
e
n
a
c
c
e
C
<
(
c
n
f
n
E
P
c
w
C
OE
c
s
d
O
14
2
r
l
f
a
t
d
n
(
<
w
T
“
p
c
w
Oc
<
a
t
<
a
c
.
D
H
D
o
:
m
o
e
:
)
:ESC>
!
n
7
3
IB
21
p
@
n
c
n e
<
“
ac
p
v
T
g
v
s w
<
m
a
v
n
b
f
t
t
s
d
c
x
F
F
U
C
1
I
Expanded
32
E
:ESC>
<SP>
n
7
3
IB
20
t
<FS>
<1:
V
<1:
.8
:Esc> w
<0
:
-+s>
:ESC>
<4>
<
v
[
<b
n
<
1
86
1
1 IB
1 IC
56
oIB
77
@
<
m
O
c
an
n
f
O
1
m
01 h
v
01
:
s
c
m
t
r
OC ~
u
;
v
*
O
77
b
n
=1=
,
s
w
J
:Esc> w
1
8
n n
k
4
2
P
E
l
b
s
d
c
p
h
a
s
t
b
D
n
v
m
l
@ L
C
s
O U
U
1 U
S
2
D
m
p
h
c
s
na
3
a
n
ac
a l
b
d
h
a w
l
U
S
l
U
S
l
S
S
l
D
D
l
U
D
l
S
D
l
D
C
h
h
h
b
h
h
b
w
O U
1 S
2
D
w
w
(
<
(
<
“
“
51
Vertical position commands
D
M
,Esc>
o
7
~H
4
IB
D
S
30
t
q
:ESG
:ESG
2
+
,7
n
,7
50
IB
. IB
43
2B
l
S
q
t
n S
t
32
:
<4>
<
3
n
[
<b
<b
4
.
.
0
:8
51
:7
91
—
.
n IC
9
33
n t
f
d p
1 i
t
5C S
00
00
.1
m
b
t
u
3
n
7
51
n IB
33
l
1
1
i
s
a
t
d
b
d
(
m
t
v
b
i
s
1
s
.
i
(
p
m
baseunit.
n
b
m
t
I
r
u
i
.
i S
“
a
.
t
e
<
p
f
a
u
b
“
T
s
c
c
<
l
b
c
“
2
T
t
n
s
<
i
i
1
T
t
a
s
o
q
s
w
1
1
d
1
n S
s
L
o
o
:ESC>
a
i
f
“
~
c
s
2
b
i
a
a
n
c
o
p
f
Oa
5B
p
1 i
d
l
0 04
.
t
f
d
l
q
-d%
d
Oa
l
m
2
n=
d
t
s
c
i
:ESC>
A
n
!7
65
I
B
n
S
m
a
w
l
n
t
d
l
b
Oa
s
d
a
b
i
n=
m
d
t
l
p
n
I
t
s
n
t
f
1
s
c
w
s
s
t
t
p
f
.
i
1 and85.Thenew line
spacing
doesnottakeeffect
untif
thenext
EESC> “2”c
:ESC>
2
!
5
B
S t l
t l p
t l
s
-
52
s
t v
d
<
“ c
1 m
t
S
C
M
L
B
A
D
H
D
-
o
F
c
B
o
f
‘“
P
‘
r
S
l
ESG
ESC>
J
j
n
n
!
!
7
n
1
B
Esc> c
n
!
n
f
S
t f s
t
p
a
(
T v
i
b
m
u
t
D
n
m
D
n
c
nt
f
t
n
p
f
t
n
t
n F
v
t
d
p
D
n
m
D
n
c
n S
t
l
S
s
p
n
n
p
l
ei
t
1a
p
l
l
s
t
b
b
1
r
nb
n
m
2
b
l
w
1a
s
u
w
t
f
r
f
t
t
S
b
p
t
E
n
6
t
f
c
n F
f
p
p
I
I
P
t
t
c
1a
1
I
1a
m
C
t p
I
i
S
p
t
i
S
c
t
S
b
i
B
ESC>
—
!
C
a I
—
!
ESC>
4
B
ESC>
N
B
Esc> o
F
B
<
—
2
—
n
J
S
n t
6
O
n
o p
p
c
52
b
m
F
f
t
s
l
t
p
1a
a
l
T
d
c
n
a
l
b
p
l
ni
S
w
n
m
b
IBM mude.Thecurrent
fine
SetsLhecurrent
pusition
asLhetop-of-page
pc
sition.
IB
I
!
7
n IB
4E
7
IB
4F
n Setsthebouummarginton lines,
w
b
1a 1
S
m
t
1a 2
I
m
T b
m
r
w
y c
t p
l
C
t
b
F
t p
L t
c
L p
p
p
t
f
e
t c
N
p
—
t
r
f
p
becomesLhetopofLhepage.
m
.
t
w
L p
f
n is
m
t
t
p
c
L
t
t
l
m
l
s
n
p
a
a
m
w
t
c
p
t
t
c
2
m
t
c
p
53
:ESC>
/s2
B
...
nl
<b
7
2
D
H
D
A
66
...
nl
B
c 2
n
...
C
a c
v
n
w
n n
2
a
t
s
c
a
s
t
t
c
m
t
l
F
m
t p
t p
p
al
f
—
54
l
S
n
v
v
t
t
‘
s
v
f
s
t s
m
t
t
a
l
v
v
t l
F
b
t
c
t
p
p
a
o
t
n
c
a
<
a
l
s
s
v
s
c
P
1a
t
t
t
s
e
b
m
a
a
n
n
s
o
t
1
e
t
s
s
l
v
‘
c
<
t
s
Am
s
t
v
t
t
a
t
b
t
t
c
s
a
s
n
l
Horizontal ~osition commands
;
Ml
A
Esc> 1
m
D
n
7
H
108
n
3
D
n S
t
l
b
1
m
c
n(
n
Oand255)inshecurrent
character
p
(
p
l
T
c
p
m
p
l
d
c
l
r
s
m
t
m
m
l
I
t
w
t
i
‘
c
a
s
n
l
l
d
b
Pica
Elite
Semi-condensed
Condensed
pica
Condensed
elite
Expanded
p
E
e
E
s
E
c
p
E
c
e
‘
c
m
b
s
a t
1
al
t
t
h
ec
;
‘Esc> Q
n
7
81
f
B
n S
c
i
t
t
r
c
l
c
l
l
m
T
c
s
C
p
n
t
p
s
d
c
n
p
c
m
t
m
(
p
t
r
t
nb
l
T
c
p
m
m
r
w
b
Pica
Elite
Semi-condensed
Condensed
pica
Condensed
elite
Expanded
pica
Expanded
elite
Expanded
semi-condensed
Expanded
condensed
pica
Expanded
condensed
elite
T
C
m
t
m
p
s
t
t
t
t
f
al
m
c
55
x
:E.SG
n
7
B
88
nl
n
:TZSc>
5
<
!7
S
nl
d
53
B
35
5
<1
!7
53
(
B
35
marginatcolumn a
c
n
m
r
f
n
p
m
t
E
s
p
al
01 C
t
r
<
a
c
E
:ESc>
l
t
n2 m
m
R
D
3
c
D
H
D
ASCII
—
D
n2
A
!7
68
2
.
n.
(
B
2
44
T
s
c
a
t
p
o
e
a c
c
o
p
T
E
o
p
s
B
c
t
p
t
c
c
l
l
u
o
c
h
c
(
c
n
3
S
s
c
p
n n
T
1a
2
t
s
m
a
6
o h
i
a
i t
w
b
i
s
t
p
s
n
m
t
n
n
p
a
p
p
a c
s
t
a
r
a<
p
m
s
e
a
ac
t
c
t
t
c
O
b
e
r
t
r
n
l
s
p
f
t
nl C
m n
t
B
p
I
:E.SC>
o
B
M
8
r
c
p
T
c
8
t
p
a
p
t
w
r
t
f
l
s
00 C
S
i
I
m
T
o
t
s
m
a
n
t
t
s
S
t
c
c
“
s
a
v
a
o
t
l
t
a t
s
<
c
s
<
a
—
:
R
:7
82
B
R
t
h
v
w
c
d
9
9
s
v
t
M
t s
t
t
s
t
at
c
s
s e
A c
p
8
a
s
p
p
t n
h
Ignored
ifthere
isnonexthorizontal
tabstop
intfre
current
line.
Notethat
w
u
r
56
s
t
s
a
n
u
s
h
M
C
R
s
h
D
A
<ESC>
\
n
S
27
nl
n
D
H
92
IB
SC
n2
M
s
t
p
p
r
d
p
I
b
T
t
t
f
f
t
r
d
l a
r
l
m
a
d
o
f
b
r
m
y
a
I
l
<ESC>
M i i
S
M
h
n
d
n
t
I
<ESC>
27
27
$
n
d
100
nl
d
e
IB
36
nl
64
n2
IB
d
24
w
m
o
a
f
a
l
‘
u
S
t
6
a
r
r
t
r
n
f
p
l
v
i
h
f
p
m
n
p
t
t
i
2
l
m
t
c
p
b
t
p
p
f
I
1
i
f
position
to(nl+ n2 X
T
r
h
s
m
I
m
t
p
d
i
c
t
b
2
S
Oa 6 t p
h
+
X 2
d
(
(
t
l
i t
m
p
r
8i
+
X
t
b
o
Graphics commands
D
A
K
ESC>
nl
n.
B
d
n
rn2
4B
nl
P
b
g
h
n
m
...
D
H
75
1
... a
w
m2
Wd
T
+
g
X 2
d
8i
d
d
r
8v
s
b
c
b
b
t
r
f
w
t
+
m
s
D
b
t
p
r
d
i
t
toc
l
n
X 2
a
p
t
2
m
t
T
. a
O
t
a
t
m
t
i
m m
v
d
t
h
M
d
al
i
8d
w
(
e
p
i
s
e
b
a
m
—
ESC>
L
d
nl
m2
ESC>
7
m
...
Y
?
76
d
m2
7
d
m
m
ESC>
nl
d
n
4C
nl
8
d
.
89
n
m
B
59
n2
.
n
90
m
d
s
“
n
c
5A
d
ti
1
d
9
o
d p
w
i
S
d
i
s
i
..
nl P
h
b
d
.1
g
2
(
p
m
g
(
f
nl
5A
B
b
ml
d
90
n
m
??s3
nl P
h
... <
m
...
Z
d
7
m
m2
I%
B
m
Z
d
n
m
d
e
s
t
S
P
h
2
... h
w
1
d
t
<
f
+
h
... e
d
t
l
s
3
d
(
m
d
i
d
t
b
m
p
b
w
M
t
d
v
t
t
t
t
e
m
d
t
d
f
l
m
s
b
t
n
l
s
b
t
s
t
t
f
t
t
s
t
d
s
b
d
m
ther
t
m
s
f
t
t
f
s
‘
n
3X (
+
X 2
s
t
t
t
m
r
t
d
i
d
d
b
p
i
X 2
8i
p
w
o
d g
T g
a
n
d
d
b
A
l
d
‘
d
b
D
E
m
marginareignored.
Attheendofdo
graphics
printing,
theprinter
returns
automatically
tocharacter
mode.
58
A
Esc>
n
m2
D
I
*
8
124
42
d
m3
m
1
r2
n2
rn3
ml
..
D
H
1 7C
1
2A
%
4
n2 ml H
rrs3
... ~
2
d
g
a
8i
t
. e
X 2
s
l
l
t
7
m
m2
42
nl
...
d
nl
3
d
1
f
t
t
s
t
b
t
s
t
a
n
o
X 2
D
t
r
t
:
m
p
o
t
... y
) g
T
a
f
m
<
:
“ “
(
n
n
n
“
m
p
S
(
4
m m
6X
t
m
g
g
a
t
t
d
v
d
m
b
r
t
d
b
e
t
d
r
d
s
s
e
‘
d
d
m
l
n
nO ;
2A
nl
d
t
t
t
m i
nO
p
t
d
m
v
b
T
d
r
e
i
M
t
s
+
n
w
n
i
*
d
b
t
p
d
d
m
b
d
i
(
t
:
g
+
v
l
ESC>
3
T
d
b
<
2
“
g
g
(
f
.
@
G
O
8
N
m
(
1
8
D
(
d
p
i
2
8
D
(
d
p
i
3
8
Q
d
p
i
4
8
C
g
m
6
8
C
g
m
d
(
2
(
d
H
p
i
(
d
d
p
p
i
2
D
2
C
(
2
T
(
2
4
H
N
(
(
(
d
d
d
p
p
p
D
4
C
4
T
(
d
p
4
H
(
d
p
(
i
i
d p
d p i
4
g
i
I
N
g
p
d
d
p
p
i
i
A
:
I
D
[
n
d
m
m
g
D
2
91
103 IB
5B
? n
... m
n2
m
nil IInl
n2
... \ml
m2
67 ;
nil m t
c
v
e
g
a
m
b
p
. I
d
l
‘
+
X 2
(
8
w
g
) g
<
f
@ G
O 8
e
– 1d
i
B
6
?
n
m
n
m
3F
n
<
“
(
2
m m
,
d
i
m
N
(
p
1
8
D
(
d
p
i
2
8
D
(
d
p
i
3
8
Q
8
2
N
(
9
2
D
(
2
T
(
2
H
(
(
:ESC>
S
— ;
m :
“
:
“
g
i
d
<
“
f
t
m
n
m
.
p
i
p
“
“
t
<
<
i
p
d
ad
t
[c
d
<
c
i
p
p
s
“
<
Z
d
d
“
m
“
c
< i
b
d
“
m
o
Download character commands
A
&
n
n
ns2
dl
...
dx
m
d2
\ H
D
CEse=
O
<fb
t
d
26
OC D
t
n
m2
..
dl
m
o
m
n
R
f l
s O
o
b
n d
c
i
b
i
a
t
d c
a
d
n
d
c
t
c
s
A
s
u
c
c
t
a
E
R
t
f
c
e
c
m
c
t
l
l
f e
c
s
w t
s
p
s
a
t f
b
r s
t l s
d c
d s
b
m s
t c
w
t t
b
M s
f t r
s
t c
T
v
m n e
t f
T
b
u
d
m
l
m
C
P
E
S
P
S
P
S
c
N
h
d
m
b
s
t
d
d
m
d
d
d
t
+
+
N
m
c
3X
s
p
t c
h
m
2X
b
d
E
d b
i
e
v
d
w t m s
b
b
t t d a t l
s
b
r
t b
d
d
i
:ESC>
:
n
<b
7
( B
5
n
(
3A
W
n
C
s
;
l
;
<ESC>
<ESC>
%
~o
<
<
!
!
3
3
1
( IB
25
25
01 S
w
Of S
t
I
—
t
t
b
s
R
a
d
n
o
h
A
~
R
H
t
E
u
c
t c
a
o
p
s O
d
s
t d
t b
w
E
s
d
a
I
c
A
R
s
w
d
w
s
E
I
s O
c
c
A
s a
s
s O
r
I
61
Other printer
:
:ESC>
H
D
r
n
!
1
IB
D
72
n S
v
t
p
c
1
1
1
:
4
Y
M
5
O
C
6
G
3
V
t
c
l
l
106
IB
6A
C
<
@
@
<
R
t
p
r
a
p
w
‘
a
t
s
a
c
27
64
IB
40
R
b
a
r
s
a
e
c
c
i
p
t
p
c
t
o
p
t
o
n
a s
c
p
c
d
d
s o
e
t
p
c
r
t
52 E
d
t
o
k
P
t
v
p
T
19
40
c
l
c
IB
IC
w
w
25
64
h
r
R
R 27
28
l
p
t
c
a
c
o
c
d p
27
l
p
R
j
I
h
ac
t
a
cESC>
r
r
t
S t
a s
1
c
b
T
1
*
B
1
e
:
t
i
2
D
p
1
t
I
~
p
wp
—
:
a
h
n
D
t l
7
s
r
&
o
<
c
n
i
b
T
R
e
p
t
p
C
s
D
n
c
c
t
t
d i
b
p
l
Chapter 8 Download characters
T
c
l
c
p
w
i
c
d
d
c
A
A
v
c
c
s
63
Download Characters
t
a
a
c
p
c
w
p
t
r
t
s
y
h
s
y
c
c
c
f
u
s
n
r
t
i
c
a
c
ac
l
s
s
w
d
p
t
t
Y
c
m
a
c
d
g
c
C
How to define your own characters
R
c
p
u
s
O
D
c
c
n
p
s
B
c
d
p
r
w
●
c
b
o
s
i
s
t
r
d
m
c
d
d
b
c
d
c
i
c
d
R
d
i
n
d
p
s
s
u
c
y
y
i
s
d
p
c
s
s
o
f
c
m
g
w
d
y
c
d
p
m
s
b
C
M
H
V
P
E
S
P
S
,
●
r
u
P
“
e
24
s
m
D m
.
w
o
c
d
●
s
c
f
p
t
1
r
d
y
d
A
c
u
t
p
c
g
f
p
h
Assigning character data
w
c
g
b
N
n
P
d
c
r
d
v
e
t
t
b
64
at
s
i
g
t
an
T m
3g
c
c
p
t e
T
s
e
d
e
3g
e
e h
a
u
v
g
c
v
d
w
d
w c
E
g
e
b
d
v
t
c
c
b
e
d
e
e
1
n
t
c
T
e
ASCII Code
L
s
C
w
R!ghi space
80
J
2
65
Assigning the value of the character and spaces
T
p
a
s
s
a
f
y
t
w
c
p
p
g
t
b
t
a
e
e
w
s
W
o
(
C
c
c
P
E
S
P
S
P
e
d
b
n
s
L s
P p
2s
o
e
w
w
C
w
e
r
e
s
p
w
m
p
t
e
s
n
v
g
t
m
c
w p
c
c
a
c
w
w
c
e
c
u
a
w
d
w i
c
w
c
p
i
p
c
R
T
s
p
l
(
l
3
r
s
b
m
m
;;
-
4
T 19
e
-
u
7
s
S
L
a
s
T
K
s
c
e
c
m
s
c
l
d
p
w
c
“--”
u
A
p
t
c
a
u
d
“
R
p
l
N
1000
1010
1020
1030
1040
1050
1060
1070
1080
1090
1100
1110
1120
1130
1140
1150
p
B
p
C
w
“L
C
N
L
C
1: “,2
(2 ) ; “ : “ ;C
(
c
f
ar
p
w p
ag
T
s
( O) ; CHR$(O);c
LPRINT CHR$(27);“&”;CHR$(O);
LPRINT CHR$(60);CHR$(61);
FOR N=60 TO 61
READ LS :LPRINT CHR$(LS);
READ CW :LPRINT CHR$(cw);
READ RS :LPRINT CHR$(RS);
C
FOR
R
L
N
t
c
8
p
c
d
W
L
c
d
O
(o)
);
M
N
CHR$(27):“D“ ;cHR$(11);CHR$(O)
LPRINT CHR$(27);“k “;CHR$(12):CHR$(27);“4“;
LPRINT CHR$(27);“W“ ;CHR$(1 ) ; CHR$(27);“W ; C
(I ) ;
c
1160 L
D
R
O
1170 L
C
& T
1180 L
C
1190 L
W
C
;
CHR$(27j;”k”;CHR$(0);CHR$(27);“5”;
1200 L
CHR$(27);”%“;CHR$(l);
1210 L
“USA”:CHR$(9);
1220 L
:LPRINT CHR$(60); :NEXT I
1230 FOR 1=0 TO 661 STEP 25
1240 LPRINT
1250 LPRINT CHR$(9);
:LPRINT CHR$(61); :NEXT I
1260 FOR 1=0 TO 781 STEP 25
1270 LPRINT
1280 LPRINT “GERMANY”;CHR$(9);
:LPRINT CHR$(tIO); :NEXT I
1290 FOR 1=0 TO 412 STEP 25
1300 LPRINT
1310 LPRINT CHR$(9);
:LPRINT CHR$(61); :NEXT I
1320 FOR 1=0 TO 488 STEP 25
1330 LPRINT
1340 LPRINT “JAPAN’’;CHR$(9):
I
:LPRINT CHR$(60); :
1350 FOR 1=0 TO 347 STEP 25
1360 LPRINT
1370 LPRINT CHR$(9);
I
:LPRINT CHR$(61); :
1380 FOR 1=0 TO 493 STEP 25
1390 LPRINT
1400 LPRINT CHR$(9);“+–”;
1410 SCALE$=’’+-+-”
:NEXT I
:LPRINT SCALE$;
1420 FOR 1=2 TO 8
1430 LPRINT “+–+”
1440 LPRINT CHR$(9);”o “;
1450 FOR 1=1 TO 8
1460 LPRINT “ “;1;
1470 NEXT I
1480 LPRINT CHR$(27);’’%’’:cHR$(o)
1490 LPRINT CHR$(27);’’M”;
;
1500 LPRINT CHR$(27);’’S”;CHR$(o)
(100 UNITS/1000 PERSONS)”
1510 LPRINT CHR$(9);”
1520 LPRINT CHR$(27);’’T”;
1530 LPRINT CHR$(27);”@”
1540 END
1550 ‘ DATA
S
1560 ‘ T
3, 31,
2
1570 DATA
0, 40, 0, 0
0, 23,
0,
0,
0,
0,
7,
0,
0,
8,
0,
1580 DATA
1590 DATA 19, 15,192, 40, 16, 0, 80, 47,192, 32, 80, 0, 80,175,192
1600 DATA 47, 80, 0, 80,175,192, 47, 80, 0, 80,163,192, 33, 64, 0
1610 DATA 80,163,192, 33, 64, 0, 80,163,192, 47, 80, 0, 80,175,192
1620 DATA 47, 80, 0, 80,175,192, 32, 80, 0, 80, 47,192, 40, 16, 0
1630 DATA 19, 15,192, 40, 0, 0, 23, 0, 0, 8, 0, 0, 7, 0, 0
0, 0, 0
1640 DATA
Symbol
1650 ‘ C
3, 31, 2
1660 D
0, 0, 0, 0, 30, 0, 0, 0, 0. 0, 60, 0, 0, 3, 0
1670 D
1,252,128,
2, 3, 64, 5,124,128
0,252,128,
0, 3, 64,
1680 D
10, 3, 0, 20,124,
0, 40, 0, 0, 80.126,
o! 32! o! O
1690 D
0, 64,124,
0
0, 64,126,
0, 63,128,
64,126,
0, 63,128,
1700 D
32, 3, 0, 64,124,128, 32, 3, 64, 64,124,128, 48, 3, 64
1710 D
0
76,124,128, 51, 3, 0, 12,252,
0, 3, 0, 0, 0,254,
1720 D
0, 0, 0
1730 D
67
D IFFUS / ON RANGES OF
CARS & TELEPHONES
+
0
–
(
U
P
+
Chapter 9 Reference information
T
c
c
s
p
w
t
e
y
p
s
v
S
s
P
P
o
i
c
C
C
s
t
i
Specifications
P
s
P
p
R
H
X
P
s
d
l
P
E
S
C
C
C
C
C
C
C
p
e
d
P
h
s
F
s
B
i
6l
C
C
i
e
C
C
C
s
5
U
r
l
C
O
L
m
s
e
1
b
T
(
i
C
D
L
L
p
C
N
P
f
f
f
d
b
m
e
p
n
n
R
B
T
B
H
B
1
1
i
n
n
R
H
A
C
R
G
D
B
H
R
I
R
I
B
H
H
I
B
B
4 C
O
C
B
S
C
B
D
C
E
E
D
B
F
7 F
5 H
H
H
E
B
I
K
O
O
O
P
P A
P
P
R
D
B
S
B
C
S
S
T
U
R
R
V
W
N
T
W
I
f
a
3 a
s
d
f
u
w
C
A
I
n
s
s
b
c
g
p
6s
(
D
(
70
S
S
#
F
F
L
@
#
G
A
#
(
E
K
(
D
I
i
S
L
#
(
I
S
#
(
J
N
#
D
(
N
c
C
C
P
E
S
C
C
P
m
C
C
P
E
S
C
C
P
(
d
i
X
X
X
X
X
Xn
C
C
C
p
e
i
8
2
4
1
e
d
6
6
6
6
R
g
P
f
f
P
e
V
C
P
C
C
C
p
e
1
1
1
1
d
S
F
F
d
d
d
d
i
p
t
r
r
s
i
i
i
i
(
f
f
w
f
f
f
s
c
f
r
1
p
p
i
s
p
W
L
T
3
3
P
R
X
L
l
S
M
W
W
b
D
D
-9
(
-1
(
t
0
p
0
a
-2
-3
-0
-0
s
p
u
b
b
(
(
o
s
s
+3l
+3l
(
(
(
-O
-0
X
(
f
4
p c
E
S
E
m
L
2
P
m
C
I
G
c
X
p
E
T
+ C
+ c
+
C
+ C (
%
%
%
S
O
S
S
O
S
H
C
O
L
+
c
c
c
R
M
M
P
b
r
l
h
D
f
(
d
c
1
2
h
p
m
h
p
y
e
W
3
1
1
W
D
H
W
a
F
p
s
1
(
(
(
(
(
2
2
a
F c
m
S
3p
f p
w
A
p
aw
L
p
p
e
Z
f
2
m
s
T
f
72
2
5
c
p
l
C
s
v
r
q
l
p
p
p
W
p
q
m
t
m
p
i
c
a
f
I
Printer supply options
r
T
c
T
L
M
3
r
(
c
p
L
W
T
r
T
T
L
L
W
C
T
L
M
2
r
(
c
p
t
r
T
g
p
(
r
(
O
c
t
u
6
(
c
p
m
1
T
L
L
W
C
1
r
p
(
t
u
(
c
c
X9
F
c
l
b
g
p
m
1
l
T
C
M
S
T
T
T
T
T
T
T
T
T
T
F
1
S
c
c
l
M
X9
m
p
c
L
p
u
(
c
L
W
S
c
1
p
T144CL0
u
6L
m
o
c
t
(
(
#
B
T
W
B
G
Y
G
S
T
W
T
W
l
l
h
p
s
(
l
i
7
(
0
C
P
C
B
B
B
B
B
B
B
B
B
B
73
Pinout of interface connector
f
d
p
i
c
(
w
w
a
o
=n-i.lvc-””””Funct
G
~
f
h
(
7
-
i~~ATA6
D
D
9
B
P
1
I 14,15 IN/C
IS
*
I 1
I 31
I 32
74
I
‘
7
w
a
.
‘-””
]DATA1‘
, ~
2 (
IH
H
4
IH
a
a
a
p
p
p
-
---..
--–.-.,..........-..———....
w
w
w
w
IS
C
g
g
IT
IW
1O
t
t
-
a
r
r
(
f
m
i
d
s
g
r
l
p
p
b~;:nd ‘
w
d
r
c
r
c
.h
‘
Character tables
f
t
s
E
r
f
l
h
c
d
C
s
i
c
X
r
c
– H
(
c
1= 6
c
r
w
t
l
-
c
e
T
t
e
c
‘
e
c
i
a
i
p
e
b
C
—
[
c
n
i
p
v
C
d
e
h
o
—
t
c
H
(
D
v
o
v
c
75
I
E
76
c
t
I
W
c
i
E
c
I
c
c
W
s
ks
s
nm
OU
1F
2G
3E
4D
5S
c
i
c
6
7
8
9
I
ac
s
f
c
m
t
c
C
I
S
J
N
D
S
I
(
c
B
n
v
L
K
I
L
na
A
77
c
C
p
78
#
S
C
O
p
c
#
(
(
i
C
P
#
O
c
k
C
P
#
I
1
E
a=
224
240
225
241
B*
x
226 242
~
227 243
r
z
22a 244
u
i
J
229 245
+
w
230 246
=
-r
231
241
232
248
0°
e“
233
249
Q.
6
i
234 250
-r
235 251
a
kikl
231
253
238
254
239
255
Em
n
79
C
O
p
c
#
(
i
C
P
H
O
(
i
c
1
t
I
I
F
#
I
1
1
1
1
C
p
O
#
(
c
1
C
i
I
I
C
I
I
I
P
#
I
O
c
d
w a7
I
I
i
c
i
c
e
c
o
c
s
f
Customer service information
e
t
“
p
s
l
w
f
t
S M
b
b
e
s
T
c
d
p
f
c
y
aw v
w
y
S
t
t
w
y S p
w e m
p
r
C
rr
d
e
s
s
o
c
t
A
S
s
p
D
P
s
r
p
A
H
1
K
8
6
6
A
Z
a
n
p
N
R
a
af
m
b
w
N
R
N
U
c
1
ac
A
K
F
G
N
A
r
A
Z
m
1
4
3
4
3
6
Index
T
i
i
a
a
a
t
m
o
l
n
r
e
w
e
I
C
s
I
A
D
A
h
a
r
c
20
B
25
s
u
p
E
E
E
c
p
F
F
F
F
F
n
c
c
5
4
4
4
5
c
s
c
f
p
p
p
#
#
#
#
#
#
m
s
s
P
3
(
i
c
s
c
3
m
p
c
(
5
c
m
H
H
H
H
H
H
H
h
3
3
3
3
3
3
3
1
p
g
G
G
r
b
p
p
r
t
2
2
S
G
m
p
86
6
F
B
C
C
C
C
C
C
C
c
m
d
v
C
C
C
C
C
C
C
C
C
C
C
C
c
c
E
A
A
A
B
B
B
D
D
3
c
(
C
g
d
p
c
5
s
I
c
I
I
I
c
J
(
s
c
c
s
7
3
4
J
p
K
K
8
1
d
i
L
L
L
L
m
s
p
9
L
t
m
R
R
R
R
R
R
M
M
M
M
d
3
p
m
N
N
d
2
t
m
m
c
f
R
g
s
o
S
S
S
S
S
S
S
S
S
f
t
O
O
O
O
l
f
c
p
c
p
q
P
P
P
P
P
P
P
P
P
P
P
P
P
P
P
P
P
P
P
P
P
(
e
f
h
p
50
d
c
7
l
T
T
T
T
8
s
s
t
s
8
6
9
p
i
c
s
50
74
3
6
d
q
c
4
4
L
m
U
U
U
c
2
z
Z
9
p
3
v
V
V
V
p
h
l
4
2
W
70
S
s
f
s
w
o
s
w
2
4
u
a
c
c
s
s
m
P
P
P
R
R
R
R
R
p
p
c
s
5
Command Summary
m
f
C
<
<
<
c
t
e
w
S
m
P
F
B
H
L
V
F
C
E
C
c
<
<
<
<
<
<
<
<
<
<
<
<
<
<
<
<
<
<
<
<
<
<
<
<
<
<
@
“
f
f
r
p
p
o
p
C
c
p
p
n
n
o
1
@
“*” nO nl n2 ml m2 ...
“+” n
,
~
<
<
<
<
<
<
<
<
&
.
C
C
E
C
E
I
S
A
S
S
D
S
n
n
n
. <
e
p
l
p
p
I
p
c
m
s
m
p
h
i
c
d
d
g
l s
S
S
S
S
C
C
R
*
88
o
l
l
l
l
n
<
<
<
o
c
c
m
n
i
U
n
,,?9, n *
l
s
s
s
i
i
i
n
i
u
c
c
c
c
c
f
g
i
d
p
l
v
p
p
h
s
n
i
s
l
l
i
l
s
C
<
<
<
<
<
<
<
<
<
<
<
<
<
<
<
<
<
<
<
<
<
<
<
<
<
<
<
n
m
m
n
<
<
<
<
<
<
p
e
<
n
n
n
n
n
n
o
1
r
n
n
n
o
1
b
m
c
s
s
p
d
q
8
g
8
c
g
p
h
p
n
r
f
m
s
o
p
c
c
c
t
n
h
d
h
c
4
l
R
%
E
S
R
P
P
D
m
i
P
S
S
S
R
P
P
n
“
50
I
n
g
g
m
r
m
m
f
8
&
p
S
S
S
C
E
P
P
S
R
S
P
S
n
I
n
d
p
b
n
n
o
1
“
“
p
t
C
P
<
<
<
<
<
<
P
F
E
C
P
P
P
E
c
s
g
i
n
p
f
p
c
t
n
d
h
h
c
2
l
c
g
s
I
f
f
C
<
<
<
<
<
<
c
t
c
<
<
<
<
<
<
<
<
<
<
<
<
<
<
<
<
<
<
<
<
<
<
<
<
<
<
<
<
<
<
<
<
<
<
<
<
~
e
w
m
F
B
H
L
V
F
C
E
C
P
C
C
E
C
E
U
P
f
f
r
p
p
p
o
l
e
I
l
s
<
s
l
i
p
C
,
a
“
I
. <
n
n
s
m
m
l
l
n
o
1
90
i
l
s
e
S
P
P
P
p
p
t
I
n
d
b
C
P
R
S
S
C
i
p
C
n
n
s
E
n
n
p
f
c
c
p
p
l
v
p
p
h
n
c
I
f
a
S
S
E
R
“
p
l
p
p
p
E
n
l
f
%
8
m
b
m
s
s
s
s
g
g
C
<
<
<
<
<
<
<
<
<
<
P
F
E
n
p
l
m
m
<
<
<
<
n
<ESC> “ “ n
<
<ESC> J.
<
n
<
n
<ESC> “t” n
r
d
q
c
S
m
8
g
8
h
c
b
m
,
nm
P
P
S
S
u
g
E
p
E
p
c
n
c
O
R
h
S
p
S
f
S
p
c
S c
s
g
w
l
p
l s
m
a c
a c
t
c
i
s
Customer response
S
P
M
a
C
y
W
i
y
s
c
C
L
y
p
t
U
m
H
S
2
S
A
M
N
J
P
N
S
S
7
P
A
E
4
M
A
M
A
M
E R
I
W
0
M
P
M
S
W
D
F
A
U
L
c
M
D
G
e
F
G
P
M
M
S
M
S H
P
B
P
G
R
H W
B
H
7
U
A
P
M
L
M
F
S
F
A
A
M
M
S
P
M
S
92
P
A
F
Y
C
M
M
1 T
9S
A
F
A
Y
E
R
M
L
S
K
B
H
K
I
PRINTED IN JAPAN