1
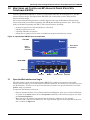
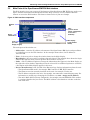
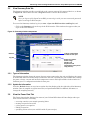
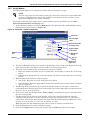
Power Availability
MP ADVANCED POWER STRIPS™
USER MANUAL
50 & 60 Hz
120, 200, 208 & 240V
15, 20 & 30 A
Single-Phase & Three-Phase
TABLE OF CONTENTS
IMPORTANT SAFETY INSTRUCTIONS . . . . . . . . . . . . . . . . . . . . . . . . . . . . . . . . . . . . . . . . . . . . . . . .1
1.0
INSTALLATION . . . . . . . . . . . . . . . . . . . . . . . . . . . . . . . . . . . . . . . . . . . . . . . . . . . . . . . . . .2
1.1
Vertical or Horizontal Mounting . . . . . . . . . . . . . . . . . . . . . . . . . . . . . . . . . . . . . . . . . . . . . . . . 2
1.2
Mounting MP Advanced Power Strips Vertically in a Liebert Foundation . . . . . . . . . . . . . . 3
1.2.1
1.2.2
1.2.3
1.3
Attach Brackets to the Power Strip—Vertical-Mount Inside the Rail . . . . . . . . . . . . . . . . . . . 4
Attach the Power Strip to Corner Post—Vertical-Mount Inside Corner Post . . . . . . . . . . . . . 4
Attach Power Strip to the Rail—Vertical-Mount Outside the Rail . . . . . . . . . . . . . . . . . . . . . . 5
Mounting the MP Advanced Power Strip or Access Server Horizontally in a Liebert Foundation6
1.3.1
1.3.2
Attach Mounting Brackets to the Power Strip or Access Server—Horizontal-Mount . . . . . . . 6
Attach the Access Server or Power Strip to Rack Rails—Horizontal-Mount . . . . . . . . . . . . . . 7
2.0
USING THE LIEBERT MP ADVANCED POWER STRIPS . . . . . . . . . . . . . . . . . . . . . . . . . . . . . .8
2.1
Monitoring and Controlling Methods . . . . . . . . . . . . . . . . . . . . . . . . . . . . . . . . . . . . . . . . . . . . 8
2.2
Monitoring Connections—Low Voltage Wiring . . . . . . . . . . . . . . . . . . . . . . . . . . . . . . . . . . . . 8
2.2.1
2.2.2
2.2.3
2.2.4
2.2.5
2.2.6
2.2.7
What’s Included . . . . . . . . . . . . . . . . . . . . . . . . . . . . . . . . . . . . . . . . . . . . . . . . . . . . . . . . . . . . . . 8
Configuration with OpenComms EM . . . . . . . . . . . . . . . . . . . . . . . . . . . . . . . . . . . . . . . . . . . . . 8
Assign an IP Address . . . . . . . . . . . . . . . . . . . . . . . . . . . . . . . . . . . . . . . . . . . . . . . . . . . . . . . . . . 9
Open the Web Interface and Log In . . . . . . . . . . . . . . . . . . . . . . . . . . . . . . . . . . . . . . . . . . . . . 10
Configuration with Liebert MP-S Access Server . . . . . . . . . . . . . . . . . . . . . . . . . . . . . . . . . . . 10
Make Connections . . . . . . . . . . . . . . . . . . . . . . . . . . . . . . . . . . . . . . . . . . . . . . . . . . . . . . . . . . . 11
Establish Communication With Card . . . . . . . . . . . . . . . . . . . . . . . . . . . . . . . . . . . . . . . . . . . . 11
3.0
MONITORING AND CONTROLLING MP ADVANCED POWER STRIPS WITH
OPENCOMMS EM PDU13
3.1
Open the Web Interface and Log In . . . . . . . . . . . . . . . . . . . . . . . . . . . . . . . . . . . . . . . . . . . . 13
3.2
Main Parts of the OpenComms EM PDU Web Interface . . . . . . . . . . . . . . . . . . . . . . . . . . . . 15
3.3
Web Interface Tabs. . . . . . . . . . . . . . . . . . . . . . . . . . . . . . . . . . . . . . . . . . . . . . . . . . . . . . . . . . 16
3.4
Color-Coded Status Indicators. . . . . . . . . . . . . . . . . . . . . . . . . . . . . . . . . . . . . . . . . . . . . . . . . 16
3.5
View Summary Data Tab. . . . . . . . . . . . . . . . . . . . . . . . . . . . . . . . . . . . . . . . . . . . . . . . . . . . . 17
3.5.1
3.5.2
Types of Information . . . . . . . . . . . . . . . . . . . . . . . . . . . . . . . . . . . . . . . . . . . . . . . . . . . . . . . . . 17
Update the Information . . . . . . . . . . . . . . . . . . . . . . . . . . . . . . . . . . . . . . . . . . . . . . . . . . . . . . . 17
3.6
View the Power Data Tab . . . . . . . . . . . . . . . . . . . . . . . . . . . . . . . . . . . . . . . . . . . . . . . . . . . . 17
3.7
Change Threshold Settings for Warnings and Alerts . . . . . . . . . . . . . . . . . . . . . . . . . . . . . . 19
3.8
View the Alerts Tab . . . . . . . . . . . . . . . . . . . . . . . . . . . . . . . . . . . . . . . . . . . . . . . . . . . . . . . . . 19
3.8.1
3.8.2
3.8.3
3.9
Enable E-mail Alerts . . . . . . . . . . . . . . . . . . . . . . . . . . . . . . . . . . . . . . . . . . . . . . . . . . . . . . . . . 20
Set Up Modem . . . . . . . . . . . . . . . . . . . . . . . . . . . . . . . . . . . . . . . . . . . . . . . . . . . . . . . . . . . . . . 21
Set Up SNMP Traps . . . . . . . . . . . . . . . . . . . . . . . . . . . . . . . . . . . . . . . . . . . . . . . . . . . . . . . . . . 22
View the Security Tab . . . . . . . . . . . . . . . . . . . . . . . . . . . . . . . . . . . . . . . . . . . . . . . . . . . . . . . 22
3.9.1
Create a Password for the Default Liebert Account—Administrators Only . . . . . . . . . . . . . . 23
3.10
Exit the Web Interface . . . . . . . . . . . . . . . . . . . . . . . . . . . . . . . . . . . . . . . . . . . . . . . . . . . . . . . 23
4.0
MONITORING AND CONTROLLING THE LIEBERT MP ADVANCED POWER STRIPS WITH THE MP
ADVANCED ACCESS SERVER24
i
4.1
Monitoring and Controlling the MP Advanced Power Strip . . . . . . . . . . . . . . . . . . . . . . . . . 25
4.1.1
Open the Web Interface . . . . . . . . . . . . . . . . . . . . . . . . . . . . . . . . . . . . . . . . . . . . . . . . . . . . . . . 25
4.2
Accessing Receptacle Controls and Status . . . . . . . . . . . . . . . . . . . . . . . . . . . . . . . . . . . . . . . 26
4.3
Changing MP Advanced Power Strip Parameters . . . . . . . . . . . . . . . . . . . . . . . . . . . . . . . . . 27
4.3.1
4.3.2
4.3.3
4.3.4
4.3.5
4.3.6
Opening HyperTerminal . . . . . . . . . . . . . . . . . . . . . . . . . . . . . . . . . . . . . . . . . . . . . . . . . . . . . .
Customizing MP Advanced Power Strip Alarm Thresholds . . . . . . . . . . . . . . . . . . . . . . . . . .
Recommended Alarm Thresholds for Under Voltage, Over Voltage and Low Current . . . . .
Receiving Alarms . . . . . . . . . . . . . . . . . . . . . . . . . . . . . . . . . . . . . . . . . . . . . . . . . . . . . . . . . . . .
Customizing MP Advanced Power Strip Settings—Outlet Groups . . . . . . . . . . . . . . . . . . . . .
Accessing Outlet Controls . . . . . . . . . . . . . . . . . . . . . . . . . . . . . . . . . . . . . . . . . . . . . . . . . . . . .
27
28
29
29
29
31
FIGURES
Figure 1
Figure 2
Figure 3
Figure 4
Figure 5
Figure 6
Figure 7
Figure 8
Figure 9
Figure 10
Figure 11
Figure 12
Figure 13
Figure 14
Figure 15
Figure 16
Figure 17
Figure 18
Figure 19
Figure 20
Figure 21
Figure 22
Figure 23
Figure 24
Figure 25
Figure 26
Figure 27
Figure 28
Figure 29
Figure 30
Figure 31
Figure 32
Hardware components for vertical-mount . . . . . . . . . . . . . . . . . . . . . . . . . . . . . . . . . . . . . . . . . . . . . 3
Liebert MP Advanced Power Strip mounted vertically inside the rail . . . . . . . . . . . . . . . . . . . . . . 4
Marking mounting position . . . . . . . . . . . . . . . . . . . . . . . . . . . . . . . . . . . . . . . . . . . . . . . . . . . . . . . . 4
Liebert MP Advanced Power Strip ready for vertical installation outside a rail . . . . . . . . . . . . . . 5
Hardware components for horizontal-mount . . . . . . . . . . . . . . . . . . . . . . . . . . . . . . . . . . . . . . . . . . 6
Liebert MP Advanced Power Strip ready for installation in a rack—horizontal-mount . . . . . . . . 6
Rack-mounting the power strip or access server. . . . . . . . . . . . . . . . . . . . . . . . . . . . . . . . . . . . . . . . 7
Communication ports on OpenComms EM PDU and MP Advanced Power Strip . . . . . . . . . . . . . 8
Use IPSet to set power strip’s IP address . . . . . . . . . . . . . . . . . . . . . . . . . . . . . . . . . . . . . . . . . . . . . 9
Communication ports on MP Advanced Power Strip and MP Advanced Access Server. . . . . . . . 10
Disabling DHCP and entering IP address. . . . . . . . . . . . . . . . . . . . . . . . . . . . . . . . . . . . . . . . . . . . 12
OpenComms EM PDU ports and indicators . . . . . . . . . . . . . . . . . . . . . . . . . . . . . . . . . . . . . . . . . . 13
MP Advanced Power Strip login window. . . . . . . . . . . . . . . . . . . . . . . . . . . . . . . . . . . . . . . . . . . . . 14
Web interface components . . . . . . . . . . . . . . . . . . . . . . . . . . . . . . . . . . . . . . . . . . . . . . . . . . . . . . . . 15
Color coded display—example . . . . . . . . . . . . . . . . . . . . . . . . . . . . . . . . . . . . . . . . . . . . . . . . . . . . . 16
Summary window components. . . . . . . . . . . . . . . . . . . . . . . . . . . . . . . . . . . . . . . . . . . . . . . . . . . . . 17
Power data window components . . . . . . . . . . . . . . . . . . . . . . . . . . . . . . . . . . . . . . . . . . . . . . . . . . . 18
Status heading links to threshold settings . . . . . . . . . . . . . . . . . . . . . . . . . . . . . . . . . . . . . . . . . . . 18
Alerts tab components . . . . . . . . . . . . . . . . . . . . . . . . . . . . . . . . . . . . . . . . . . . . . . . . . . . . . . . . . . . 19
Alerts tab . . . . . . . . . . . . . . . . . . . . . . . . . . . . . . . . . . . . . . . . . . . . . . . . . . . . . . . . . . . . . . . . . . . . . . 20
Alerts tab—modem components. . . . . . . . . . . . . . . . . . . . . . . . . . . . . . . . . . . . . . . . . . . . . . . . . . . . 21
Alerts tab—SNMP Traps components . . . . . . . . . . . . . . . . . . . . . . . . . . . . . . . . . . . . . . . . . . . . . . . 22
Security window components . . . . . . . . . . . . . . . . . . . . . . . . . . . . . . . . . . . . . . . . . . . . . . . . . . . . . . 23
MP Access Server with MP-DS74 modules . . . . . . . . . . . . . . . . . . . . . . . . . . . . . . . . . . . . . . . . . . . 24
Web interface components—MP Access Server. . . . . . . . . . . . . . . . . . . . . . . . . . . . . . . . . . . . . . . . 25
Access module status and control window. . . . . . . . . . . . . . . . . . . . . . . . . . . . . . . . . . . . . . . . . . . . 26
MP Advanced Power Strip control options . . . . . . . . . . . . . . . . . . . . . . . . . . . . . . . . . . . . . . . . . . . 28
Changing the Temperature Alarm Threshold. . . . . . . . . . . . . . . . . . . . . . . . . . . . . . . . . . . . . . . . . 29
Grouping outlets . . . . . . . . . . . . . . . . . . . . . . . . . . . . . . . . . . . . . . . . . . . . . . . . . . . . . . . . . . . . . . . . 30
Naming outlet groups . . . . . . . . . . . . . . . . . . . . . . . . . . . . . . . . . . . . . . . . . . . . . . . . . . . . . . . . . . . . 30
Outlet controls on MP Advanced Access Server . . . . . . . . . . . . . . . . . . . . . . . . . . . . . . . . . . . . . . . 31
Outlet group details . . . . . . . . . . . . . . . . . . . . . . . . . . . . . . . . . . . . . . . . . . . . . . . . . . . . . . . . . . . . . 32
TABLES
Table 1
Table 2
MP Advanced Power Strip specifications . . . . . . . . . . . . . . . . . . . . . . . . . . . . . . . . . . . . . . . . . . . . . 2
Summary of tab functions . . . . . . . . . . . . . . . . . . . . . . . . . . . . . . . . . . . . . . . . . . . . . . . . . . . . . . . . 16
ii
IMPORTANT SAFETY INSTRUCTIONS
!
WARNING
Opening or removing the cover of MP Advanced Power Strips may expose you to lethal
voltages within this unit.
Observe all cautions and warnings in this manual. Failure to do so may result in serious
injury or death. Do not attempt to service this product yourself. Refer all service to qualified
service personnel. Never work alone.
SAVE THESE INSTRUCTIONS
This manual contains important safety instructions. Read all safety, installation and operating
instructions before installing the Liebert MP Advanced Power Strip. Adhere to all warnings on the
unit and in this manual. Follow all operating and user instructions. Individuals without previous
training can install and operate this equipment.
The Liebert MP Advanced Power Strip is not intended for use with life support or other designated
critical devices. Maximum load must not exceed that shown on the Liebert MP Advanced Power Strip
rating label. The Liebert MP Advanced Power Strip is designed for data processing equipment. If
uncertain, consult your local dealer or Liebert representative.
Operate the Liebert MP Advanced Power Strip in an indoor environment only in an ambient temperature range of 32°F to +104°F (0°C to +40°C). Install it in a clean environment, free from conductive
contaminants, moisture, flammable liquids, gases and corrosive substances.
The Liebert MP Advanced Power Strip contains no user serviceable parts. Under no circumstances
attempt to gain internal access due to risk of electric shock or burn. Do not continue to use the Liebert
MP Advanced Power Strip if the LED panel or monitoring interface indicators are not in accordance
with these operating instructions. Refer all faults to your local dealer, Liebert representative or Liebert Global Services.
Never block or insert any object into the Liebert MP Advanced Power Strip.
DO NOT CONNECT equipment that could overload the Liebert MP Advanced Power Strip.
Refer to Table 1 to determine the electrical ratings and specifications of your Liebert MP Advanced
Power Strip. It is imperative that the power supply and connections match the specifications of the
power strip being installed.
!
CAUTION
!
CAUTION
Connecting your Liebert MP Advanced Power Strip and rack equipment to a power supply
with an incorrect rating in either voltage, amperes or phase may damage the connected
equipment and your Liebert MP Advanced Power Strip.
If you have questions about the power supply connections, contact your local Liebert
representative or Liebert Technical Support at 1-800-222-5877.
Shut down and unplug all equipment in your rack enclosure before beginning to connect the
equipment to your Liebert MP Advanced Power Strip.
When connecting the rack equipment to the Liebert MP Advanced Power Strip’s receptacles, arrange
cables and connections to avoid tangling and crisscrossing the power cables.
For power management purposes, record the receptacle where each piece of equipment is connected.
Receptacles on the Liebert MP Advanced Power Strip have a numerical designation. Liebert MP
Advanced Power Strips with more than one circuit are named with numbers and letters.
When connecting power to the Liebert MP Advanced Power Strip’s receptacles, follow generally
accepted procedures, such as routing the power cables separately from low-voltage communication
and control wires to prevent electromagnetic interference.
!
CAUTION
All configuration steps in 2.2 - Monitoring Connections—Low Voltage Wiring must be
completed before attempting to start up equipment connected to the Liebert MP Advanced
Power Strip.
1
Installation
1.0
INSTALLATION
This manual contains information on installing and operating Liebert MP Advanced Power Strips of
all power levels and sizes contained in Table 1. Refer to your unit’s installation manual for procedures to follow to connect equipment to a Liebert MP Advanced Power Strip.
1.1
Vertical or Horizontal Mounting
Liebert’s MP Advanced Power Strips may be mounted in a rack for better cable management and to
simplify connections to the rack equipment.
The narrower MP Advanced Power Strips may be mounted horizontally, similar to mounting the
other equipment in the rack. Longer MP Advanced Power Strips are designed for vertical mounting in
a Zero U configuration. See Mounting Method & Size in Table 1 for specific configurations.
Table 1
MP Advanced Power Strip specifications
Input
Liebert PN
Mounting
Method
& Size
VoltageCurrent (A)Phase
Output
Cord
Connection Length,
Type (Quan) Ft. (m)
VoltageCurrent (A)Phase
Remote Monitoring and Control
MP-C5120 Rckmnt/1U
120V-15A-1ph
MP-C5121 Rckmnt /1U
120V-20A-1ph
MP-C5122 Rckmnt/1U
120V-20A-1ph
MP-C5123 Rckmnt/1U
120V-30A-1ph
MP-C5124 Rckmnt/1U
200/240V-20A-1ph
MP-C5125 Rckmnt/1U
200/240V-30A-1ph
MP-C5147 Vert. / 68.18"
120V-20A-1ph
MP-C5148 Vert. / 68.18"
120V-20A-1ph
MP-C5131 Vert. / 68.18"
120V-30A-1ph
MP-C5132 Vert. / 68.18" 200/240V-20A-1ph
MP-C5133 Vert. / 68.18" 200/240V-30A-1ph
MP-C5134 Vert. / 68.18" 120/208V-20A-3ph
5-15P (1)
5-20P (1)
L5-20P (1)
L5-30P (1)
L6-20P (1)
L6-30P (1)
5-20P (1)
L5-20P (1)
L5-30P (1)
L6-20P (1)
L6-30P (1)
L21-20P (1)
6 (1.8)
6 (1.8)
6 (1.8)
6 (1.8)
6 (1.8)
6 (1.8)
10 (3)
10 (3)
10 (3)
10 (3)
10 (3)
10 (3)
MP-C5135
Vert. / 68.18"
120/208V-20A-3ph
L21-20P (1)
10 (3)
MP-C5136
Vert. / 68.18"
120/208V-30A-3ph
L21-30P (1)
10 (3)
3 ph/208V-30A-1ph
Remote Monitoring Only
MP-M5109 Rckmnt/1U
MP-M5110 Rckmnt/1U
MP-M5111 Rckmnt/1U
MP-M5112 Rckmnt/1U
MP-M5113 Rckmnt/1U
MP-M5114 Rckmnt/1U
MP-M5115 Vert./33.25"
MP-M5116 Vert./33.25"
MP-M5117 Vert./33.25"
MP-M5118 Vert./50.75"
MP-M5034 Vert./50.75"
MP-M5035 Vert./50.75"
MP-M5036 Vert./57.75"
MP-M5037 Vert./57.75"
120V-15A-1ph
120V-20A-1ph
120V-20A-1ph
120V-30A-1ph
200/240V-20A-1ph
200/240V-30A-1ph
120V-15A-1ph
120V-20A-1ph
120V-20A-1ph
120V-20A-1ph
120V-20A-1ph
120V-30A-1ph
200/240V-20A-1ph
200/240V-30A-1ph
5-15P (1)
5-20P (1)
L5-20P (1)
L5-30P (1)
L6-20P (1)
L6-30P (1)
5-15P (1)
5-20P (1)
L5-20P (1)
5-20P (1)
L5-20P (1)
L5-30P (1)
L6-20P (1)
L6-30P (1)
6 (1.8)
6 (1.8)
6 (1.8)
6 (1.8)
6 (1.8)
6 (1.8)
10 (3)
10 (3)
10 (3)
10 (3)
10 (3)
10 (3)
10 (3)
10 (3)
120V-15A-1ph
120V-20A-1ph
120V-20A-1ph
120V-30A-1ph
200/240V-20A-1ph
200/240V-30A-1ph
120V-15A-1ph
120V-20A-1ph
120V-20A-1ph
120V-20A-1ph
120V-20A-1ph
120V-30A-1ph
200/240V-20A-1ph
200/240V-30A-1ph
MP-M5119
120/208V-20A-3ph
L21-20P (1)
10 (3)
120/208V-20A-1ph
Vert./68.18"
* Twenty switchable receptacles; one receptacle is always On.
2
Connection
Type(s) (Quan)
120V-15A-1ph
120V-20A-1ph
120V-20A-1ph
120V-30A-1ph
200/240V-20A-1ph
200/240V-30A-1ph
120V-20A-1ph
120V-20A-1ph
120V-30A-1ph
200/240V-20A-1ph
200/240V-30A-1ph
120V-20A-1ph
5-15/20R (8)
5-15/20R (8)
5-15/20R (8)
5-15/20R (8)
IEC320 C13 (8)
IEC320 C13 (8)
5-15/20R (21*)
5-15/20R (21*)
5-15/20R (21*)
IEC320 C13 (21*)
IEC320 C13 (21*)
5-15/20R (21*)
NEMA L21-20 (1)
3 ph/208V-20A-1ph
+ IEC320 C13 (18)
NEMA L21-20 (1)
+ IEC320 C13 (18)
5-15/20R (10)
5-15/20R (10)
5-15/20R (10)
5-15/20R (10)
IEC320 C13 (10)
IEC320 C13 (10)
5-15/20R (12)
5-15/20R (12)
5-15/20R (12)
5-15/20R (24)
5-15/20R (24)
5-15/20R (24)
IEC320 C13 (24)
IEC320 C13 (24)
5-20R (2)
+IEC320 C13 (24)
Envir.
Port
0
0
0
2
0
2
2
2
2
2
2
2
2
2
2
2
2
2
2
2
2
2
2
2
2
2
2
2
2
Installation
1.2
Mounting MP Advanced Power Strips Vertically in a Liebert Foundation
Many Liebert MP Advanced Power Strips are suitable for vertical-mounting in an equipment rack
(see Mounting Method & Size in Table 1).
Units that may be mounted vertically are shipped with hardware to attach the power strip to the rack
rails:
• flat-tab, vertical-mount brackets, 2
• screws, 4 Phillips head
For mounting inside the corner post and inside or outside the rail, obtain Bracket Kit 525472G1L,
which includes:
• vertical-mount brackets, 2
• hex bolts,
• cage (captive) nuts, 4
Figure 1
Hardware components for vertical-mount
Use slot to attach
brackets to the MP
Advanced Power
Strip
Hex Bolts and Captive
Nuts—attach the rack-mount
bracket to the rack for
mounting outside the rail or
inside the corner post
Screws pass through slot on
brackets and are threaded into
holes on the back of the
MP Advanced Power Strip
Captive nuts snap into slots
on brackets when mounting to
corner post (not necessary
when mounting inside rail)
Slots used to
mount strip to
EX channel
Back of Vertical-Mount
MP Advanced Power Strip
Vertical-Mount Bracket
(comes with factory-installed units)
Holes used to
attach brackets
to power strip
Screws attach flat tab
brackets to power strip
Flat-Tab Vertical-Mount Bracket
3
Installation
1.2.1
Attach Brackets to the Power Strip—Vertical-Mount Inside the Rail
1. Hold one Liebert mounting bracket against the back of the Liebert MP Advanced Power Strip,
aligning the proper narrow slot in the bracket with the two round holes in the back of the power
strip. The two side flanges of the bracket should point toward the front of the power strip.
2. Attach the bracket to the power strip with two Phillips head screws.
Align top or bottom edges of brackets with top or bottom edges of strip and tighten the screws.
3. Repeat Steps 1 and 2 for the bracket on the opposite end of the Liebert MP Advanced Power
Strip.
4. Remove nuts from two of the four bolts attaching the rail to the corner post.
Remove nuts from these bolts only:
• the bolt near the top of the corner post
• the bolt near the bottom of the power strip mounting position
(It is imperative that nuts be removed from no more than two bolts. The mounting brackets are
adjustable to reach two bolts for all lengths of Liebert MP Advanced Power Strips.)
5. Hold the power strip with mounting brackets attached against the inside of the rail, fitting the
wide slot of the mounting bracket over the existing rail hardware.
6. Reattach the nuts removed in Step 4, fastening the mounting brackets and rails together and
securing the power strip into position.
Figure 2
Liebert MP Advanced Power Strip mounted vertically inside the rail
1
2
3
4
5
6
7
8
9
10 11 12
Bolt attaches Liebert
vertical-mount bracket
to Foundation rail
13 14 15 16 17 18
1.2.2
Attach the Power Strip to Corner Post—Vertical-Mount Inside Corner Post
1. Hold power strip against the inside of the corner post in the desired mounting position. Note the
location of the mounting holes in the outer flange of the corner post nearest the ends of the power
strip.
2. Insert captive nuts into the brackets and mount the brackets on the corner post using the holes
noted in Step 1.
3. Hold the power strip against the brackets in the selected mounting position. Mark locations on
the face of the brackets where the top and bottom edges of the power strip will be positioned.
Figure 3
Marking mounting position
C
B
RS-232
SENSOR INPUTS
B
A
ALM
PWR
SEL
4
Installation
4. Remove the brackets from the corner post.
5. Attach the brackets to the power strip with four Phillips screws while aligning the top and bottom
edges of the power strip with the marks made in Step 3 and shown in Figure 3.
6. Mount power strip inside the Foundation corner post.
a. Put lock washers on hex screws for fastening the power strip to the Foundation (a minimum
of two hex screws must be used; bracket holes permit using four screws).
b. Insert a hex screw into a captive nut and tighten.
c. Repeat Step b for each hex screw.
The captive nuts may be adjusted slightly within the bracket for better vertical alignment.
1.2.3
Attach Power Strip to the Rail—Vertical-Mount Outside the Rail
Liebert MP Advanced Power Strips may be attached to the outside face of a rail in a variety of configurations. One mounting method is shown in Figure 4. You may also use the flat-tab brackets packed
with the power strip to mount the power strip so that it faces the rear of the Foundation.
Figure 4
Liebert MP Advanced Power Strip ready for vertical installation outside a rail
PWR
ALM
SEL
Cage Nut
inserted in rail
Bracket attached
to power strip and
positioned for
mounting on rail
1
5
4
8 12 16 20
9 13 17
RS-232
B
C
SENSOR
A
B
INPUTS
Network P
5
EMERS
Cage Nut
inserted in rail
Installation
1.3
Mounting the MP Advanced Power Strip or Access Server Horizontally in a Liebert
Foundation
All Liebert MP Advanced Access Servers and several MP Advanced Power Strips are suitable for horizontal mounting in an equipment rack (see Mounting Method & Size in Table 1).
Units that may be mounted horizontally are shipped with the brackets and other hardware necessary
to attach the power strip or access server to the Foundation:
• horizontal-mount brackets, 2
• screws, 4 Phillips head
Figure 5
Hardware components for horizontal-mount
Use round holes
to attach brackets to the
MP Advanced Power Strip
or Access Server
Use slots to attach
the assembly to the
rack-mount rail
1.3.1
Attach Mounting Brackets to the Power Strip or Access Server—Horizontal-Mount
Before attaching the horizontal-mount brackets to the Liebert MP Advanced Power Strip or Access
Server, determine whether to attach the brackets to the front edge or rear edge of the unit. This will
depend, in part, on whether the power strip or access server would be best placed in the front of the
rack or in the rear for routing power and communication wires. Bracket location also determines
whether the power strip or access server display is viewed from the front or rear of the rack.
When mounting the Liebert MP Advanced Power Strip or Access Server, position the unit for ease of
access and clearance.
To attach the brackets:
1. Hold one mounting bracket against the side of the Liebert MP Advanced Power Strip or Access
Server, making sure that the end of the bracket with the round holes is against the unit.
2. Attach the bracket to the unit with two Phillips head screws, tightening them firmly.
3. Repeat Steps 1 and 2 for the bracket on the opposite side of the Liebert MP unit.
Figure 6
Liebert MP Advanced Power Strip ready for installation in a rack—horizontal-mount
Bracket attached
to rear mounting holes
Front
mounting
holes
Slots will attach
to rack-mount rail
ALARM
XXXXXXXXXXXXXX
ALARM
6
XXXXXXXXXXXXXX
Installation
1.3.2
Attach the Access Server or Power Strip to Rack Rails—Horizontal-Mount
Determine where the Liebert MP Advanced Access Server or Power Strip would be best placed in the
rack for routing power and communication wires.
The rack-mount power strips and access servers (see Table 1) mount horizontally in standard rack
face position on the rails using the square, EIA-spaced holes. They use four captive nuts snapped into
the rail holes and four screws to attach the power strip or access server brackets to the rail.
As with all Liebert rack-mount equipment, obtain the appropriate size of rack-mounting hardware kit
for captive nuts and screws.
Figure 7
Rack-mounting the power strip or access server
Screws go through bracket
holes, through rail and insert
into the captive screws
NOTE: Some brackets
have only two
mounting holes
7
Using the Liebert MP Advanced Power Strips
2.0
USING THE LIEBERT MP ADVANCED POWER STRIPS
2.1
Monitoring and Controlling Methods
Liebert MP Advanced Power Strips may be monitored and controlled with either of two types of units:
• Liebert OpenComms EM PDU
• Liebert Managed Power Access Servers
Each controller offers varying levels and types of monitoring and control functions. The functions
available depend also on the type of MP Advanced Power Strip. Advanced Power Strips whose part
numbers begin with MP-C offer control features, including:
•
•
•
•
turning receptacles on or off individually or collectively
locking receptacles on or off
rebooting individual receptacles
linking two or more receptacles on the same strip or on different strips for simultaneous actions
2.2
Monitoring Connections—Low Voltage Wiring
2.2.1
What’s Included
Make sure you have all the items that should be included with your Liebert MP Advanced Power
Strip. If any item is missing or was damaged in shipping, file a damage claim immediately with the
shipping company and contact your local Liebert sales representative at 1-800-LIEBERT.
• RJ-45 to RJ-45 configuration cable, 5 ft. (1.5m)
• RJ-45 to DB-9 adapter for configuration cable
• 2 mounting brackets and hardware
Figure 8
Communication ports on OpenComms EM PDU and MP Advanced Power Strip
DCN Power Port
DCN
Liebert OpenComms EM
(EM PDU Controller)
Sensor Sensor
Modem
2
1
Serial
2
Serial
Ethernet
1
Ethernet
Port
Serial Ports - Connect either
to Power Strip EIA-232 Port
Liebert MP
Advanced
Power Strip
(MP-C5120)
Mounting
Bracket on
either side
EIA-232
POWER
1 3 5 8
EIA-232 Port
2 4 6 8
2.2.2
Configuration with OpenComms EM
1. Connect power to the DCN port on the OpenComms EM and to your MP Advanced Power Strip.
2. Connect the six-wire end of the serial cable provided with the OpenComms EM to the RS-232 port
of your MP Advanced Power Strip.
3. Connect the other end (eight-wire) of the serial cable—labeled “PDU”—to either Serial 1 or
Serial 2 of the OpenComms EM.
4. Connect a straight-through CAT5 Ethernet cable from your network to the Ethernet port on the
back of the OpenComms EM.
8
Using the Liebert MP Advanced Power Strips
2.2.3
Assign an IP Address
NOTE
These steps must be done on the same network segment where the OpenComms EM is connected.
If your network uses static IP addresses and your computer has a Windows operating system, follow
the steps below. Otherwise, consult the OpenComms EM user manual (SL-28210).
1. Obtain an IP address for the OpenComms EM from your network administrator.
2. Insert the OpenComms EM CD in your computer’s CD drive.
3. Click on the Start button, then on Run, then Browse to the file IPSET.exe on the CD and click
Open.
4. Click OK to open the IPSet window (Figure 9).
Figure 9
Use IPSet to set power strip’s IP address
Enter a
unique
IP address
Subnet
mask
Default
gateway
address
Enter the unit’s
MAC address
(look on
bottom of unit)
Apply button
5. In the Target area:
a. Enter the OpenComms EM IP address
b. Enter your network’s Subnet Mask
c. Enter your router’s IP address in the Default box.
d. Enter the MAC address found on the bottom of your OpenComms EM.
6. Apply the changes. If the device identification is successful, the message “Successfully set IP
address” appears in the Status box. (If not, the message “No response from target” appears in the
Status box.)
7. Click on the Close button.
9
Using the Liebert MP Advanced Power Strips
2.2.4
Open the Web Interface and Log In
1. Open an Internet browser and enter the unit’s IP address or hostname into the browser’s address
bar and press the Enter key. The Login window appears.
Address
bar
Login
window
User Name
default = “liebert”
Password
default = no password
2. Enter the default user name—liebert— in the User Name box (case-sensitive).
3. Leave the Password box blank (the default liebert user account has no password).
4. Click OK. If the login is successful, a message appears. Click OK.
When ready to exit the user interface, click on the Summary tab at the top of the Web interface, then
click on the Log Out button.
2.2.5
Configuration with Liebert MP-S Access Server
Figure 10 Communication ports on MP Advanced Power Strip and MP Advanced Access Server
Liebert MP Advanced
Power Strip
(MP-C5120)
Mounting
Bracket on
either side
EIA-232
POWER
1 3 5 8
EIA-232 Port
2 4 6 8
EIA-232 Port -Connect to
COM port on computer
MP-DS74 Card With
Configurable
Communication Ports
Ethernet Port
100-240VAC
??????????
0.21-0.12AMPS
DS74
CX1 CX2
1
2
3
4
LINE
CX3 CX4
EIA-232
I/0 MODULE
ROUTE
DS62
NETWORK
INTERFACE
ETHERNET
EIA-232
Liebert MP
Advanced
Access
Server
(MP-S5138)
MADE IN USA
10
On/Off Switch
(not on all
Access Servers)
Using the Liebert MP Advanced Power Strips
2.2.6
Make Connections
Connect power to the Liebert MP Advanced Access Server and to the Liebert MP Advanced Power
Strip.
!
CAUTION
Before connecting power to the Liebert Advanced Power Strip, ensure that any connected
equipment is shut down. If any connected equipment cannot be shut down, disconnect that
unit’s power cord from the Liebert Advanced Power Strip.
Attach the adapter (RS-232 to RJ-45) to one end of a silver configuration cable (included) and connect
that end of the cable to a COM port on a computer. Connect the other end of the cable to the EIA-232
port of the MP-DS62 module on your Liebert MP Advanced Access Server.
Plug one end of the second silver RJ-45 cable into any of the MP-DS74 ports on your MP Advanced
Access Server; plug the other end of the cable into the EIA-232 port on your Liebert MP Advanced
Power Strip.
2.2.7
Establish Communication With Card
Use terminal emulation software, such as HyperTerminal™, to open a direct connection to the
MP-DS62 card. Use the settings below:
1.
2.
3.
4.
Baud Rate: 9600
Data Bits: 8
Parity: None
Stop Bits: 1
Flow Control: N/A
Press Enter for the Main Menu, then press hit the “C” key to enter the configuration.
Select the module number where the EIA-232/Ethernet port is installed.
By default, the EIA-232/Ethernet port will be installed in Module 1.
Choose “1” to change Module 1.
Enter “8” for Network Port Configuration, then “7,” then “N” to disable DHCP (see photo at left in
Figure 11).
Set the Access Server’s IP Address
Liebert’s MP Advanced Power Strips and Access Servers will operate with DHCP enabled. However,
DHCP will prevent utilization of the monitoring features of the units. Because the units’ addresses
would change when rebooted and at other times, personnel would have difficulty determining the
address and status of units supplying power to particular pieces of equipment.
To set the IP Address:
1. Select “1” to set the IP Address for Module 1.
2. Enter an IP address (see photo at right in Figure 11).
The address must be unique on your system (obtain this from your network administrator).
3. Press Enter to return to the Network Port Configuration menu.
11
Using the Liebert MP Advanced Power Strips
Figure 11 Disabling DHCP and entering IP address
Enter “N” to disable DHCP
Enter IP address
4. Choose “2” to set the Subnet Mask for your system (obtain this from your network administrator).
5. Return to the Network Port Configuration menu and choose “3” to set the Gateway Address (the
IP address of your network router).
6. Follow the prompts to exit HyperTerminal and save your changes.
Verify that your settings are correct and were saved by using a command prompt to ping the Liebert
MP-S Access Server: Start>Run>CMD. At the command prompt enter:
ping [IP address]
Press “Enter.”
12
Monitoring and Controlling MP Advanced Power Strips With OpenComms EM PDU
3.0
MONITORING AND CONTROLLING MP ADVANCED POWER STRIPS WITH
OPENCOMMS EM PDU
Liebert’s OpenComms EM PDU is Liebert’s recommended controller for managing one or two MP
Advanced Power Strips. The OpenComms EM PDU will accommodate no more than two MP
Advanced Power Strips.
The control and monitoring functions available depend on the type of MP Advanced Power Strip.
Power strips with part numbers beginning with MP-M offer monitoring features only. Power strips
with part numbers beginning with MP-C, offer control features, including:
•
•
•
•
turning receptacles on or off individually or collectively
locking receptacles on or off
rebooting individual receptacles
linking two receptacles on the same or on different strips for simultaneous actions
Figure 12 OpenComms EM PDU ports and indicators
TOP VIEW
EMERSON
Network Power
Serial device
indicators
Power
and port
indicators
Power
Link
Serial
1
Serial
2
Modem
Sensor
1
Sensor
2
REAR VIEW
DCN
Sensor Sensor
Modem
2
1
Serial
2
Serial
Ethernet
1
Power
Modem
Sensors
3.1
Serial devices
Ethernet
Open the Web Interface and Log In
The Web interface used with the OpenComms EM PDU to configure and monitor Liebert MP
Advanced Power Strips is accessible with most Internet browsers. You must log in each time you open
the Web interface. To allow you to log in the first time, the unit is set up with a default User Name,
liebert, with no password.
To open the Web interface and log in:
• Open an Internet browser, such as Microsoft® Internet Explorer. (One way to do this in Windows
is to click on the Start button, then on Programs and finally on the browser program, for example, Internet Explorer.)
• Enter the unit’s IP address or hostname into the browser’s address bar—for example,
126.4.203.246—and press the Enter key. The Login window appears on the right side of the window, as shown in Figure 13.
13
Monitoring and Controlling MP Advanced Power Strips With OpenComms EM PDU
Figure 13 MP Advanced Power Strip login window
Address
bar
Login
window
User Name
default = liebert
Password
default = no password
1. Enter the appropriate user account name in the User Name box; user names are case-sensitive.
The default user name is liebert (all lowercase). For instructions on creating user accounts, see
the OpenComms EM user manual, SL-28210).
Leave the Password box blank (the default liebert user account has no password).
NOTE
Liebert recommends creating a password for the default liebert user account to prevent
unauthorized users from changing configuration settings. For details, see the OpenComms EM
user manual (, SL-28210).
2. Click OK. If an error message appears, try entering the user name again. Remember that the
user name is case-sensitive.
3. If the login is successful, a message appears. Click OK.
14
Monitoring and Controlling MP Advanced Power Strips With OpenComms EM PDU
3.2
Main Parts of the OpenComms EM PDU Web Interface
The Web interface gives you access to all the features of the OpenComms EM PDU device used to configure, monitor and control the MP Advanced Power Strip. You may use any standard Internet
browser to access the Web interface. The browser shown below is just one example.
Figure 14 Web interface components
Address
bar
Tabs
(used to access
status, configuration
and control
windows)
Device
identification
Main display
(Login window
shown)
Links
(for main
display at right)
The main parts of the window are:
• Address bar - enter the IP address or hostname of the OpenComms EM device and press Enter
(or click Go) to access the Web interface. In the example shown above, the IP address is
126.4.203.246.
• Tabs - click on any tab to change the window shown in the Main display.
• Main display - this area varies according to the tab selected. The example above shows the Login
window that appears when you first open the Web interface and log in.
• Links - click on additional options to change the information that appears in the Main display on
the right side of the window, depending on the tab selected. If no additional options are available,
a description of the Main display appears in this area.
• Device identification, below and left of the Emerson logo, displays information about the unit:
• The OpenComms EM model—for example, EM Controller or EM PDU Controller.
• The firmware version currently installed on the unit—for example, Version 2.0.
• The IP address assigned to the unit—for example, 126.4.203.246—entered during setup. For
information on setting up or changing the IP address, see 2.2.3 - Assign an IP Address.
• The unit’s MAC address (factory-configured)—for example, 00:08:67:FF:F0:E6. This number
is a unique identifier for your device. The MAC address is also found on a sticker on the bottom of the unit.
15
Monitoring and Controlling MP Advanced Power Strips With OpenComms EM PDU
3.3
Web Interface Tabs
The tabs at the top right of the Web interface window provide access to all the functions of the
OpenComms EM device. Table 2 summarizes these functions and where to find more information.
Table 2
Tab
Display
Additional
Links
Description
For details, see:
Summary
Summary
window
—
View current value & status of all
connected devices
3.5 - View Summary Data
Tab
Power
(EM PDU
Controller
only)
Power
window
—
View and set up MP Advanced
Power Strips
3.6 - View the Power Data
Tab
Email
Activate and configure automatic Email alerts
3.8.1 - Enable E-mail Alerts
Modem
Activate and configure automatic
pager alerts
3.8.2 - Set Up Modem
SNMP Traps
Activate and configure automatic
SNMP trap alerts
3.8.3 - Set Up SNMP Traps
—
Change password to Web interface;
set up additional users, type of
access, timeout after inactivity
3.9 - View the Security Tab
Network
Connectivity
Configure network settings
OpenComms EM User
Manual, SL-28210
SNMP
Information
Configure unit for SNMP
OpenComms EM User
Manual, SL-28210
Data
Presentation
Change time intervals for updating
sensor data, Web page refresh;
change temperature units (°F / °C)
OpenComms EM User
Manual, SL-28210
Serial Ports
(not used)
View or change settings for serial
ports 1 and 2
OpenComms EM User
Manual, SL-28210
Alerts
Security
Sys Info
3.4
Summary of tab functions
Alerts
window
Security
window
Sys Info
window
Color-Coded Status Indicators
The Web interface uses color coding to indicate the status of MP Advanced Power Strips connected to
the unit, as shown in Figure 15, to help you quickly identify sensors that require attention.
These colors are used to display the port’s name, the current reading and the status of the sensor; the
colors are also used in line graphs to indicate alarm thresholds.
Figure 15 Color coded display—example
Overall Status:
Red (critical - high critical or
low critical)
Port Status:
Red (critical high critical or
low critical)
Port Status:
Gray (not connected
to OpenComms EM)
Single parameter: Yellow (warning high warning or low warning)
16
Single parameter: Green (normal)
NOTE: Alert values were set artificially
low for illustrative purposes.
Monitoring and Controlling MP Advanced Power Strips With OpenComms EM PDU
3.5
View Summary Data Tab
The Summary window provides a quick look at the current status of all connected devices, as shown
in Figure 16. This window also has a Log Out button to exit the Web interface.
NOTE
Once you log out of the OpenComms EM, you must log in with your user name and password
before accessing the Web interface.
To access the Summary window, log in (see 2.2.4 - Open the Web Interface and Log In) and:
• Click on the Summary tab at the top of the Web interface. This window also appears after you
log in to the Web interface.
Figure 16 Summary window components
Summary tab
Refresh
Links to configuration
window for each port
Log Out
Power strip status:
Power usage
Voltage level
Amps used and
Temperature of the power
strip (internal)
3.5.1
Types of Information
The Summary window shows the status of power strips connected to the unit and displays the status
of Liebert MP Advanced Power Strips connected to the unit, including the port number and readings
for power, voltage, current and internal temperature sensors. Each port number in the window is a
link that goes to a configuration window for that port.
3.5.2
Update the Information
Click the Refresh button at any time to update the data displayed in the right side of the Summary
window. Data is sampled at regular intervals (see OpenComms EM User Manual, SL-28210, to
change the sampling interval).
3.6
View the Power Data Tab
The Power data window displays the status of your Liebert MP Advanced Power Strips and to perform various functions, including:
•
•
•
•
•
accessing controls to set normal operating limits
turning receptacles On or Off
cycling power to receptacles
linking receptacles
specifying rearm values (not available with all power strips)
17
Monitoring and Controlling MP Advanced Power Strips With OpenComms EM PDU
To access the Power data window, log in (see 2.2.4 - Open the Web Interface and Log In) and click
on the Power tab at the top of the Web interface. This brings up the main Power data window, shown
below.
Figure 17 Power data window components
Overall
Power Strip
status
Power Strip output
levels of power,
voltage and current, plus internal
temperature
Turn On all
receptacles
Turn Off all
receptacles
Rename
either port
Link two receptacles
for simultaneous
control actions
Individual receptacle
On and Off controls
Reboot a single receptacle
or two linked receptacles
The headings in the Status table on the Power Data window are links to Web interfaces that can be
used to set thresholds for warnings and alerts.
Figure 18 Status heading links to threshold settings
Clicking the headings in the
power status window
brings up sensor windows
where high and low
threshold settings may
be set
Links (in blue, at left) ...
... open sensor
windows (below)
18
Monitoring and Controlling MP Advanced Power Strips With OpenComms EM PDU
3.7
Change Threshold Settings for Warnings and Alerts
Default values to trigger warnings and alerts are factory-set for Liebert MP Advanced Power Strips,
based on the strip’s circuitry, capacity and other specifications. These may be reset, changing the levels at which the OpenComms EM reports status changes to users through e-mail messages, pager
calls, SNMP traps and color-coded changes in the Web interface.
To reset a threshold:
1. Access the Power data window.
2. Open the sensor displaying the values to be changed by clicking on the associated link in the
Status table.
3. Enter the new threshold value.
4. To save the change, click the Apply button; to revert to the previous setting, click on the Reset
button or the Close button (pressing Close returns the interface to the Power data window
without saving the change).
3.8
View the Alerts Tab
The OpenComms EM is capable of sending alerts by:
• E-mail messages
• Pager calls
• SNMP traps
The values in the four sensor windows in Figure 18 determine when the OpenComms EM sends
alerts and warnings to personnel monitoring the MP Advanced Power Strips. The alerts recipient list
is set by opening the Alerts tab, shown in Figure 19.
Figure 19 Alerts tab components
E-mail enable;
default is No;
use dropdown list to
change
E-mail
sender
Links
to Alerts
methods
E-mail
recipients
Obtain
address from
network
administrator
Resend
interval
(drop-down
list)
Apply button makes
changes effective
Reset button returns
to previous values
19
Test button sends e-mails
to test for proper setup
Monitoring and Controlling MP Advanced Power Strips With OpenComms EM PDU
3.8.1
Enable E-mail Alerts
To generate automatic e-mail alerts when a sensor reading crosses a threshold, log in (see 2.2.4 Open the Web Interface and Log In) and:
1. Click on the Alerts tab at the top of the Web interface, as shown below.
Figure 20 Alerts tab
Alerts tab
Activate e-mail
alerts
Sender’s
e-mail
address
Email
link
Recipients’
e-mail
addresses
Outgoing
mail server
Send a test
e-mail alert
Resend
2. At the Summary window, click on the Email link on the left side of the window. The right side of
the window displays setup information for e-mail alerts, as shown above.
The Send Mail on Error box allows you to enable or disable e-mail alerts. Click on the Down arrow
to the right of the box and select Yes to activate or No to deactivate e-mail alerts.
3. Enter e-mail addresses for the sender and up to four recipients:
• Mail From - Enter the e-mail address of the sender.
• Mail To - Enter the e-mail address of the person who should receive the alert.
• Carbon Copy #1- #3 (optional) - Enter up to three e-mail addresses of additional recipients.
4. In the Outgoing Mail Server box, enter the sender’s outgoing mail server, using either an
IP address or a fully qualified name. Using a fully qualified name requires that DNS be properly
configured. If needed, contact your e-mail service provider or your network administrator.
5. The Resend box, on the left side of the window, allows you to specify whether
the unit will continue to send alerts at certain intervals as long as the
monitored area is in a warning or critical state. Click on the Down arrow to the
right of the Resend box and select Never or a time interval: 15 or 30 seconds, 1,
5, 10, 15 or 30 minutes or 1 hour (shown at right).
Note: The unit will stop sending e-mail alerts as soon as it detects a normal
state.
6. Click the Test button to send a test e-mail message.
7. Click on the Apply button to keep your changes. (Or click Reset to cancel the changes and revert
to the previous setting.)
20
Monitoring and Controlling MP Advanced Power Strips With OpenComms EM PDU
3.8.2
Set Up Modem
The OpenComms EM may be configured to send a numeric message to a pager.
NOTE
The unit requires an external modem to send pager alerts. The modem port is set at 9600 baud,
no parity, 8 data bits and 1 stop bit. For details on connecting the unit to a modem, see the
OpenComms EM PDU user manual, SL28210.
To generate automatic pager alerts when a sensor reading crosses a threshold, log in (see 2.2.4 Open the Web Interface and Log In) and:
1. At the Summary window, click on the Modem link. The right side of the window displays setup
information for pager alerts (see Figure 21).
Figure 21 Alerts tab—modem components
Alerts tab
Activate pager
alerts
Optional access #s
or country code
Pager number
to be dialed
Modem
link
Wait before
dialing
Resend
Type of
dialing
Send a test
pager alert
2. The Call on Error box allows you to enable or disable pager alerts. Click on the Down arrow to the
right of the box and select Yes to activate or No to de-activate pager alerts.
3. If needed, enter numbers in the Access/Country Code box as follows:
a. Enter any numbers needed to access an outside line—for example, 9—where the call is being
placed.
b. If dialing from outside the U.S., enter the country code of the location where the call is being
placed.
4. Enter numbers to be dialed to reach the pager:
a. Area Code - Enter the area code of the pager to be dialed.
b. Phone Number - Enter the pager phone number (the number may be entered with or without
spaces or hyphens).
5. The Message Delay box allows you to specify the amount of time to wait after a connection is
established before dialing begins. Click on the Down arrow to the right of the box and select from
the list: 5, 10, 15, 20 or 30 seconds.
6. Click on one of the Dial Using buttons—Tone or Pulse—to indicate the type of connection where
the call is being placed.
7. The Resend box, on the left side of the window, allows you to specify whether the unit will
continue to dial the pager at certain intervals as long as the monitored area is in a warning or
critical state. Click on the Down arrow to the right of the Resend box and select Never or a time
interval: 15 or 30 seconds, 1, 5, 10, 15 or 30 minutes or 1 hour.
Note: The unit will stop attempting pager alerts as soon as it detects a normal state.
8. Click the Test button to send a test pager message.
9. Click on the Apply button to keep your changes. (Or click Reset to cancel the changes.)
21
Monitoring and Controlling MP Advanced Power Strips With OpenComms EM PDU
3.8.3
Set Up SNMP Traps
The OpenComms EM may be configured to send SNMP trap alerts whenever the status of a sensor
changes from normal to a warning or critical state, as well as a return-to-normal alert when the reading falls within the normal range. These alerts may be sent to up to four IP addresses, typically Network Management Station (NMS).
If you activate SNMP traps, refer to the SNMP information sections in the OpenComms EM user
manual, SL-28210.
To generate SNMP traps when a sensor reading crosses a threshold, log in (see 2.2.4 - Open the Web
Interface and Log In) and:
1. At the Summary window, click on the SNMP Traps tab. The right side of the window displays
setup information for SNMP Trap alerts (see Figure 22).
Figure 22 Alerts tab—SNMP Traps components
Alerts tab
SNMP Traps
link
Resend
Activate SNMP
trap alerts
IP address
Community
name
2. Configure the following settings for each of the traps you wish to use:
a. In the State box, click on the Down arrow and select On to activate or Off to deactivate SNMP
trap alerts
b. In the Destination IP box, enter the IP address of the computer where traps should be sent.
c. In the Community Name box, enter the community string of the computer where traps are
directed—for example, liebert or public. Community strings are case-sensitive.
3. Click on the Apply button to keep your changes. (Or click Reset to cancel the changes.)
3.9
View the Security Tab
To protect configuration settings from unauthorized users, the Web interface allows you to set up
users with different levels of access.
• A user with Administration privileges has full access, including creating and modifying other
user accounts.
• Users with Read/Write access may change their own password, but are not permitted to make
any other modifications.
22
Monitoring and Controlling MP Advanced Power Strips With OpenComms EM PDU
3.9.1
Create a Password for the Default Liebert Account—Administrators Only
The OpenComms EM comes with a user account named liebert with full administrative privileges to
permit initial login. By default, this user account has no password. Liebert recommends creating a
password for this account to prevent configuration by unauthorized users.
To do this, log in as an administrator (see 2.2.4 - Open the Web Interface and Log In) and:
• Click on the Security tab to display the Security window (see Figure 23).
Figure 23 Security window components
Security tab
User drop-down list
Enter & confirm password
• Choose liebert from the User drop-down list.
• Enter a password in the Password box. The password is case-sensitive and must be alphanumeric
(spaces are allowed).
• Verify the password by entering it again in the Confirm Password box.
• Click Apply to make these changes effective. (To cancel the changes, click Reset.)
For details about altering and creating user accounts, see the user manual supplied with your
OpenComms EM unit (SL-28210).
3.10
Exit the Web Interface
• Click on the Summary tab at the top of the Web interface.
• To exit the Web interface, click on the Log Out button in the left side of the window. The opening
Login window appears, allowing you either to log in again or to close the Internet browser and
exit the program.
23
Monitoring and Controlling the Liebert MP Advanced Power Strips With the MP Advanced Access Server
4.0
MONITORING AND CONTROLLING THE LIEBERT MP ADVANCED POWER STRIPS
WITH THE MP ADVANCED ACCESS SERVER
Liebert’s MP Access Server permits controlling and monitoring multiple MP Advanced Power Strips.
The number of power strips that may be monitored depends on the number of MP-DS74 modules
installed in the access server. Each MP-DS74 module has four ports, each of which may be connected
to a power strip.
The functions available depend on the type of MP Advanced Power Strip used. Power strips with part
numbers beginning with MP-M offer only monitoring features. Power strips with part numbers beginning with MP-C, offer control and monitoring features, including:
•
•
•
•
turning receptacles On or Off individually or collectively
locking receptacles On or Off
rebooting receptacles individually or collectively
grouping receptacles for simultaneous actions
Figure 24 MP Access Server with MP-DS74 modules
MP-DS74 Modules ...
... installed and ...
DS74
CX1 CX2
... positioned for
installation
1
2
3
4
CX3 CX4
EIA-232
VO MODULE
ETHERNET
DS62
NETWORK
INTERFACE
EIA-232
CX
RX/TX LINK
DS74
CX1 CX2
1
2
3
4
CX3 CX4
24
Ports to control
MP Advanced
Power Strips
Monitoring and Controlling the Liebert MP Advanced Power Strips With the MP Advanced Access Server
4.1
Monitoring and Controlling the MP Advanced Power Strip
4.1.1
Open the Web Interface
After configuring the MP Advanced Access Server (see 2.0 - Using the Liebert MP Advanced
Power Strips), open the Web interface by:
The Web interface used with the MP Access Server to configure and monitor Liebert MP Advanced
Power Strips is accessible with most Internet browsers. To open the Web interface:
1. Open an Internet browser, such as Microsoft Internet Explorer. (One way to do this in Windows is
to click on the Start button, then on Programs and finally on the browser program, for example,
Internet Explorer.)
2. Enter the unit’s IP address or hostname into the browser’s address bar—for example,
126.4.203.246—and press the Enter key. This opens the main Web interface window, as shown in
Figure 25.
Figure 25 Web interface components—MP Access Server
Control
module
summary
Data
sampling
intervals
MP
Advanced
Power Strip
summary
Link to
controls and
status of
Power Strip
receptacles
Status
summary for
modules
The Web interface offers summary status of the control module, power strip and each module
installed in the access server. The interface also permits the user to access information about the individual power strips and controls for each receptacle on any power strip connected to the MP Advanced
Access Server.
The Web interface also permits changing the interval at which the access server samples data for the
power strips. The rate may be set to not refresh the data or to refresh the data at intervals of 15, 30,
45 or 60 seconds. Data for a particular unit may be checked immediately by clicking on one of the
Refresh Data buttons.
25
Monitoring and Controlling the Liebert MP Advanced Power Strips With the MP Advanced Access Server
4.2
Accessing Receptacle Controls and Status
Receptacle commands and status information about the MP Advanced Power Strip and about individual receptacles are reached through the Web interface. To view the status or execute a command:
1. Connect to the Web interface (see 4.1.1 - Open the Web Interface).
2. Click on the name of the MP Advanced Power Strip in the Quick MPC Status table. This opens
the window for module status and commands, as shown in Figure 26.
Figure 26 Access module status and control window
Overall
status of MP
Advanced
Power Strip
Numeral “1”
indicates an
outlet is On
(“0” would
indicate outlet is Off)
Controls for
all outlets:
On, Off,
Reboot, Lock
& Unlock
The number
of outlets
displayed
depends on
the type of
MP Advanced
Power Strip
Controls for
individual
outlets (more
outlets may
be viewed by
scrolling
down)
3. Execute a command affecting
a. all outlets on a power strip by clicking on a button in the All Outlet Commands box
b. a single outlet by clicking on the corresponding button in the Outlet Command section of the
Individual Outlets box
The Web interface permits these commands for one or all outlets: On, Off, Reboot, Lock and
Unlock. The reboot command cycles power to one or more outlets, turning it off for 10 seconds,
then returning power to the outlet. The lock command locks one or more receptacles in their
present state of On or Off.
Whenever a command button is pressed, the Web interface
displays a confirmation box, such as the one shown at right.
An OK is required before the command is executed.
26
Monitoring and Controlling the Liebert MP Advanced Power Strips With the MP Advanced Access Server
4.3
Changing MP Advanced Power Strip Parameters
Various default values are set at the factory for MP Advanced Power Strips. Many of these may be
changed to integrate the units into the user’s power supply and monitoring system.
Most changes are made through terminal emulation software, such as Windows HyperTerminal, used
to set up the server and power strip (see 2.2.7 - Establish Communication With Card).
NOTE
Only MP Advanced Power Strips with part numbers that begin MP-C offer control and
monitoring options. MP Advanced Power Strips part numbers that begin with MP-M offer only
monitoring. Some parameters for those units may also be changed from factory settings.
Use the settings below when using HyperTerminal™ to access the MP Advanced Power Strip:
Baud Rate: 9600
Data Bits: 8
Parity: None
Stop Bits: 1
Flow Control: N/A
4.3.1
Opening HyperTerminal
One way to open HyperTerminal in Windows XP is to click on Start > Programs > Accessories >
Communications > HyperTerminal.
1. Press Enter for the Main Menu, then press the “C” key to enter the configuration.
2. Select the module number where the EIA-232/Ethernet port is installed.
By default, the EIA-232/Ethernet port will be installed in Module 1.
3. Enter “C” for configuration settings.
4. Determine which module is to be configured and enter the number for that module.
(In Figure 27, only one Ethernet module is connected; it is accessed by entering “1.” If another
module were connected, it would be designated “2” and so on for all installed modules.)
5. Enter “10” for RPC Management.
This brings up the window shown in Figure 27, which offers configuration for:
• Temperature Alarm Threshold
• Under Voltage Alarm Threshold
• Over Voltage Alarm Threshold
• Low Current Alarm Threshold
• Environmental Sensors
• Outlet Groups
27
Monitoring and Controlling the Liebert MP Advanced Power Strips With the MP Advanced Access Server
Figure 27 MP Advanced Power Strip control options
Entering “1” as shown
below will open options for
the first option on the list:
Temperature Alarm
Threshold
4.3.2
Customizing MP Advanced Power Strip Alarm Thresholds
!
CAUTION
Care must be exercised when changing the default thresholds in the Liebert MP Advanced
Power Strip.
If you are uncertain whether a desired threshold might permit equipment damage, contact
Liebert Application Engineering for assistance.
Liebert’s MP Advanced Access Server and MP Advanced Power Strips permit the user to alter settings that trigger alarms and warnings.
The same procedure is used to change settings for Temperature Alarm Threshold, Under Voltage
Alarm Threshold, Over Voltage Alarm Threshold, Low Current Alarm Threshold, Environmental
Sensors and Outlet Groups.
Accessing RPC Management
1.
2.
3.
4.
Open HyperTerminal.
Press Enter for the Main Menu, then press the “C” key to enter the configuration.
Enter “C” for configuration settings and press Enter.
Determine which module is to be configured and enter the number for that module; press Enter.
(In Figure 27, only one Ethernet module is connected; it is accessed by entering “1.” If another
module were connected, it would be designated “2” and so on for all modules installed in the
MP Advanced Access Server.)
5. Enter “10” for RPC Management and press Enter.
6. To change a setting, enter the appropriate numeral and press Enter.
• Temperature Alarm Threshold, enter “1” (proceed to
• Under Voltage Alarm Threshold, enter “2”
• Over Voltage Alarm Threshold, enter “3”
• Low Current Alarm Threshold, enter “4”
• Environmental Sensors, enter “5”
• Outlet Groups, enter “6”
28
Monitoring and Controlling the Liebert MP Advanced Power Strips With the MP Advanced Access Server
Changing Alarm Thresholds
After selecting the threshold to be changed, a window similar to the one shown in Figure 28 is displayed. The example in Figure 28 is for changing the temperature alarm threshold.
1. Select the power strip on which you wish to change a setting. In the example in Figure 28, only
one Liebert MP Advanced Power Strip is connected. That strip, designated “1,” is connected to the
MP Advanced Access Server’s Module 2, Port 1.
2. This brings up the window in Figure 28.
Figure 28 Changing the Temperature Alarm Threshold
MP Advanced Power
Strip ID number—Enter
this number in the
“Enter Request” line
Current Temperature
Alarm Threshold
Connection location of
MP Advanced Power
Strip (Module 2, Port 1)
Power Strip Part Number
4.3.3
Recommended Alarm Thresholds for Under Voltage, Over Voltage and Low Current
!
CAUTION
Care must be taken when customizing alarm thresholds so that settings are not changed
to values that permit equipment damage or performance degradation to occur before an
alarm is sent.
A current rating alarm threshold should be set at or below the maximum continuous current rating of the MP Advanced Power Strip. Some sample settings are:
• 15A rated power strips — 12A
• 20A rated power strips — 16A
• 30A rated power strips — 24A
Voltage alarm thresholds should be ±10% of the MP Advanced Power Strip’s rated voltage.
4.3.4
Receiving Alarms
To receive alarms from the Liebert MP Advanced Access Server and MP Advanced Power Strip:
• SNMP must be enabled (it is enabled by default)
• The user must be running network management software, such as Liebert’s Nform®, that will
receive SNMP traps.
4.3.5
Customizing MP Advanced Power Strip Settings—Outlet Groups
Up to four outlets on one or more MP Advanced Power Strips connected to a single MP Advanced
Access Server may be grouped for common actions, such as turning all outlets On or Off. This allows
the user to perform such tasks as rebooting several pieces of equipment at once or turning several
pieces of electronic gear On or Off simultaneously.
Grouping Outlets
To group outlets, open terminal emulation software and access the MP Advanced Server’s network
interface module, then follow the instructions through Configuration > RPC Management > Outlet
Groups > Outlet Group Configuration. Then:
1. Enter “2” to add a group. This brings up the screen shown in Figure 29.
29
Monitoring and Controlling the Liebert MP Advanced Power Strips With the MP Advanced Access Server
Figure 29 Grouping outlets
Three outlets
being grouped.
Each is on
Module 2 and
Port 1 (first two
numerals in each
outlet designator)
Comma separates numbers
designating outlets
Commas separate numbers
designating outlets
2. When prompted, designate the outlets to be grouped—a maximum of four may be grouped.
Designate the outlets as instructed by entering the module, port and outlet numbers. Separate
each numeral with a period. Separate the three-digit outlet identifiers with commas.
3. Press the Enter key.
4. Name the group—a maximum length of 23 characters is permitted. This may include any
combination of letters, numbers and symbols on the standard keyboard.
In the example in Figure 30, three outlets are being named “Illumination.” A group of three outlets has already been named “WebServer01-03.”
Figure 30 Naming outlet groups
Name entered
for new outlet
group
Previously
named outlet
group
30
Monitoring and Controlling the Liebert MP Advanced Power Strips With the MP Advanced Access Server
4.3.6
Accessing Outlet Controls
The MP Advanced Access Server, after setup, permits controlling outlets on an MP Advanced Power
Strip either singly or collectively. After an outlet group has been created and named, the access server
permits controls affecting only the grouped outlets. To view the outlet control, shown in Figure 31,
open a Web browser and enter the access server’s IP address.
Figure 31 Outlet controls on MP Advanced Access Server
NOTE: The
power strip
tree of outlets,
breaker and
outlet groups
at far left side
of window) is
not expanded
by default.
Outlet
group
names
(names
are links
to other
controls)
Outlet
group
commands
A “0”
indicates an
outlet is
Off. A “1”
indicates an
outlet is On.
The outlet group names serve as links to data and controls for outlets in the group. The window,
shown in Figure 32, permits actions affecting individual outlets in a group.
31
Monitoring and Controlling the Liebert MP Advanced Power Strips With the MP Advanced Access Server
Figure 32 Outlet group details
Outlet
group
name
Status of individual outlets
(#1 is Off;
#2 and #3 are
On
Controls
for individual
outlets in
“Illumination”
group
Detailed status of outlets
in “Illumination” group
32
Monitoring and Controlling the Liebert MP Advanced Power Strips With the MP Advanced Access Server
Notes
33
Monitoring and Controlling the Liebert MP Advanced Power Strips With the MP Advanced Access Server
34
Power Availability
MP ADVANCED POWER STRIPS™
The Company Behind the Products
With over a million installations around the globe,
Liebert is the world leader in computer protection
systems. Since its founding in 1965, Liebert has
developed a complete range of support and
protection systems for sensitive electronics:
•
Environmental systems—close-control
conditioning from 1 to 60 tons
air
•
Power conditioning and UPS with power
ranges from 300 VA to more than 1000 kVA
•
Integrated systems that provide both
environmental and power protection in a
single, flexible package
•
Monitoring and control—from systems of any
size or location, on-site or remote
•
Service and support through more than 100
service centers around the world and a 24/7
Customer Response Center
While every precaution has been taken to ensure the
accuracy and completeness of this literature, Liebert
Corporation assumes no responsibility and disclaims all
liability for damages resulting from use of this information
or for any errors or omissions.
© 2005 Liebert Corporation
All rights reserved throughout the world. Specifications
subject to change without notice.
® Liebert and the Liebert logo are registered trademarks
of Liebert Corporation. All names referred to are
trademarks or registered trademarks of their respective
owners.
SL-20815 (7/05) Rev. 0
USER MANUAL
Technical Support/Service
Web Site
www.liebert.com
Monitoring
800-222-5877
[email protected]
Outside the US: 614-841-6755
Single-Phase UPS
800-222-5877
[email protected]
Outside the US: 614-841-6755
Three-Phase UPS
800-543-2378
[email protected]
Environmental Systems
800-543-2778
Outside the United States
614-888-0246
Locations
United States
1050 Dearborn Drive
P.O. Box 29186
Columbus, OH 43229
Italy
Via Leonardo Da Vinci 8
Zona Industriale Tognana
35028 Piove Di Sacco (PD)
+39 049 9719 111
Fax: +39 049 5841 257
Asia
7/F, Dah Sing Financial Centre
108 Gloucester Road, Wanchai
Hong Kong
852 25722201
Fax: 852 28029250