1
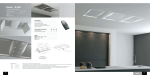
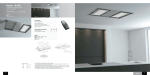
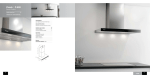
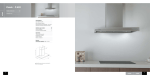
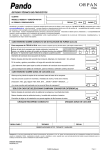
INSTALLATION GUIDE CURVE 660066400109 CURVE HOOD ATTENTION! Please read the User Manual before installing and using the range hood. The hood must be centered over the cooking area. If this requirement is not fulfilled, correct aspiration is NOT GUARANTEED. Before begin the installation, please verify that the diameter of the flue, the engine and the SEC tube are the indicated in their respectives characteristics table. Do not use the SEC tube as a cover of another tube smaller. Do not connect the hood to the main supply until the installation. (Step 8). 1 1– Unpack the range hood CURVE. Verify the condition of the range hood. 2– Drill the holes in the wall how is indicated in the fig.1, mantaining the axis in the middle of the cooking area. Put the decorative flue's mounting bracket furring to the ceiling, and in the middle of the axis, and drill the holes necessaries to fix it. AXIS CABINET CABINET Fig. 1 Advertise: This measures are the recommended for the installation, therefore for the CURVE C version as for the CURVE L version. 2 3- Insert the plugs, and put the hood support by screws. 4- Hang the hood, aligning the wall support to the hook in the rear of the hood. 3 5- Screw the hood by the holes as in the figure. 6- Intube the engine and the flue with the SEC tube, by following the tips of the User, Installation Manual. Fix the connections hermetically with the flanges. 4 7- Turn off the residual current device, connect the hood to the mains supply, then turn on the residual current device. Check the correct installation of the hood. 8- Put the decoratives flues in the upper of the hood, as in the figure, so that the holes in the external of the set coincide with the box's holes. 5 9- Screw the external part of the decoratives flues at the body of the hood, and push up the internal flue till align the holes in with the others in the decorative flues's mounting bracket. It must cover totally the flexible flue. Then, screw the upper decorative flue. 10- Verify the correct installation and function on the CURVE hood. Remove the non-scratch plastic and enjoy your new Pando hood. 6 Fabricado por INOXPAN S.L. Certificado de Empresa de Gestión de la Calidad UNE-EN ISO 9001:2000 Pol. Ind. El Cros — Camí del Cros, S/N Apdo. Correos nº21 08310 ARGENTONA (Barcelona Spain) The International Certification Network Quality Management System ISO 9001:2000 Tel. +34 93 757 94 11 Fax. +34 93 757 96 53 www.pando.es 7