1
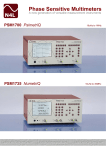
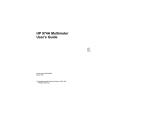
PPA5xx/15xx series
START UP GUIDE
Firmware v2_50
DECLARATION OF CONFORMITY
Manufacturer:
Address:
Newtons4th Ltd.
30 Loughborough Rd.
Mountsorrel
Loughborough
Leics.
LE12 7AT
We declare that the product:
Description: Power Analyser
Product name:
KinetiQ
Model:
PPA5xx/15xx Family
Conforms to the requirements of Council Directives:
89/336/EEC relating to electromagnetic compatibility:
EN 61326:1997 Class A
73/23/EEC relating to safety of laboratory equipment:
EN 61010-1
Oct 2012
Eur Ing Allan Winsor BSc CEng MIEE
(Director Newtons4th Ltd.)
PPA5xx/15xx Start Up Guide
CONTENTS
Contents.........................................................................
1.
Getting Started.......................................................
1.1
Unpacking and Contents..........................................
1.2
Handle Fitting........................................................
Page.1
Page.2
Page.2
Pages.3-4
2.
2.1
2.2
Safety....................................................................
Safety Instructions...................................................
Cautions.................................................................
Page.5
Page.5
Page.6
3.
3.1
Front Panel Layout Diagram......................................
Front Panel Display Key Functions..............................
Page.7
Pages.8-11
4.
Rear Panel Layout Diagram.......................................
Page.12
5.
5.1
5.2
5.3
5.4
5.5
5.6
Basic Key Operation.................................................
Set up for Power On.................................................
Setting the Time......................................................
Setting the Date......................................................
Adjusting the Screen Brightness................................
Adjusting Keyboard Beep..........................................
Setting User Data....................................................
Page.13
Page.13
Page.13
Page.14
Page.14
Page.14
Page.15
6.
6.1
6.2
6.3
6.4
6.5
6.6
Quick User Guide.....................................................
Wiring....................................................................
Start Up.................................................................
Zoom Functions.......................................................
Results Screen.........................................................
Harmonics Mode......................................................
Oscilloscope Mode....................................................
Page.16
Page.16
Page.17
Pages.18-19
Page.20
Pages.21-23
Pages.24-26
7.
Datalogs including transfer to a USB memory stick...
Page.27-30
8.
Repair / Recalibration...............................................
Page.31
9.
Specifications..........................................................
Page.32-34
10.
PPA Comparison Table..............................................
Page.35
Page 1
PPA5xx/15xx Start Up Guide
1 Getting Started
1.1
UNPACKING
When you receive your product, check that the following items are included for
the appropriate PPA. Refer to the contents list below for each model. If any item
is missing or damaged during transportation, immediately contact your N4L
office or local sales distributor
CONTENTS
MODEL
4mm
Mains Yellow
Lead
Lead
4mm
Black
Lead
4mm Yellow
Red
Croc
Lead
Clip
Black
Croc
Clip
Start
Red
Up
Croc Modem Guide Comms
Clip
Cable Manual Manual
PPA510/1510
1
1
2
1
1
2
1
1
1
1
PPA520/1520
1
2
4
2
2
4
2
1
1
1
PPA530/1530
1
3
6
3
3
6
3
1
1
1
Page 2
PPA5xx/15xx Start Up Guide
1.2
Fitment of the PPA series Carry/Tilt handle
PPA5/15/45/55 series power analyzers are supplied with a Carry/Tilt Handle that
is located within the accessory pack..............................................................
The handle allows a user to position the instrument upwards at one of two angles
for easier viewing when the instrument is positioned below the line of sight. The
design also allows storage under the unit without obstruction of the rubber feet
so that instruments can be stacked and is easily removed to allow the connection
of rack mounting brackets without the need to remove instrument covers.
Correct installation of the handle is important to ensure the correct operation
and long life the handle.
The following pictures illustrate correct and incorrect handle fitment:
Correct 1
Correct 2
Correct 1/2 – Correct fitting is from the top of the unit as shown here
Page 3
PPA5xx/15xx Start Up Guide
Correct 3
Correct 4
A correctly fitted handle will have the ‘N4L Newtons4th’ wording in the correct
reading plane when the handle is to the front of the instrument (Pic. 3)
Also, a correctly fitted handle will allow storage under the unit (Pic. 4)
Incorrect 1
Incorrect 2
Fitting the handle from the bottom of the unit as shown here wrong (Incorrect 1)
Incorrect fitting can be seen because the handle does not fit correctly under the
unit and handle sides do not fit flush with the registration washer (Incorrect 2)
Page 4
PPA5xx/15xx Start Up Guide
2
Safety
2.1
IMPORTANT SAFETY INSTRUCTIONS
This equipment is designed to comply with BSEN 61010-1 (2001) (Safety
requirements for electrical equipment for measurement, control, and laboratory
use) – observe the following precautions:
•
Ensure that the supply voltage agrees with the rating of the instrument
printed on the back panel before connecting the mains cord to the supply
•
This appliance must be earthed. Ensure that the instrument is powered from
a properly grounded supply
•
The inputs are rated at 1kV rms or dc cat II; 600V rms or dc cat III. Do not
exceed the rated input
•
Keep the ventilation holes on the underneath and rear free from obstruction
•
There are no user serviceable parts inside the instrument – do not attempt to
open the instrument, refer service to the manufacturer or his appointed agent
Note: Newtons4th Ltd shall not be liable for any consequential damages,
losses, costs or expenses arising from the use or misuse of this product
however caused
Page 5
PPA5xx/15xx Start Up Guide
2.2
•
CAUTIONS
Do not use a damaged power cord or cables
Doing so may cause an electric shock or a fire
•
Do not place any object on this instrument
•
Do not use this instrument if faulty
If you suspect the instrument to be faulty, contact your local N4L office or
representative for repair (see section 7)
Page 6
PPA5xx/15xx Start Up Guide
3 Front Panel Layout
1.
2.
3.
4.
5.
6.
7.
8.
9.
10.
Display Screen
Screen Display Function Buttons
Power Analyzer Mode Buttons
Handle
Measurement Control Function Keys
Power On / Off Button
Rubber Feet
Menu Selection and Cursor Controls
Measurement Settings Buttons
Front USB Port
PPA5xx
1
2
3
4
5
6
10
Page 7
9
8
7
PPA5xx/15xx Start Up Guide
3.1
1
PPA5xx/15xx DISPLAY KEY FUNCTIONS
Display
Screen
Screen
Display
2
Function
Buttons
Zoom (PPA15xx)
Zoom+ Zoom(PPA5xx)
Real Time
Table
Graph (PPA15xx)
Power
3 Analyzer
Mode Buttons
Power
Harm
RMS
Scope (PPA15xx)
Integ (PPA5xx)
4
Handle
Fixture
480x272 dot full colour TFT screen for displaying all information,
Note: screen brightness can be set as described in section 5 of this
user guide
Increase or Decrease font size of selected parameters on display
screen
Individual buttons to increase or decrease selected parameters font
size
Displays data information in real time within display screen press
again to place on screen information into hold
Displays results from Datalog/Harmonics in table format
Displays results from Datalog/Harmonics in graph format
Sets
Sets
Sets
Sets
Sets
PPA
PPA
PPA
PPA
PPA
into
into
into
into
into
Power Analyzer measurement mode
Harmonic measurement mode
True RMS Voltmeter measurement mode
Scope measurement mode
Power Integrator measurement mode
Carrying handle utilised to site the instrument in an angular
position
Measurement
5 Control
Function Keys
Start
Stop
Zero
Trigger
Press
Press
Press
Press
6
Power On / Off button
Power Button
7 Rubber Feet
to
to
to
to
enable any Datalog measurement (see section 9)
stop any Datalog measurement
re-zero measurement inputs
re-synchronise instrument to input signal
Rubber standoff feet
Page 8
PPA5xx/15xx Start Up Guide
Menu
Selection and
8 Cursor
Control
Buttons
Enter / Next
Delete / Back
Home / Esc
Measurement
9 Settings
Buttons
ACQU
Wiring
Speed
Smoothing
Smoothing
Response
Frequency
Reference
Frequency
Reference
Phase Angle
Reference
Frequency Filter
Low Frequency
ADVANCED
OPTIONS:
DFT Selectivity
Ignore Overload
Frequency Lock
COUPLING
Coupling
Noise Filter
Page 9
Press to confirm any parameter configuration setting or move
through selected mode screen displays
Press to delete any inputted data or scroll back within any results
screen display
Press to return to the home page when any parameters have been
adjusted and entered, or will escape from any screen view and
return to the selected mode’s home screen
Select wiring configuration to reflect instruments connections to
DUT
Select speed to which the instrument will update computed results
Smoothing filter settings, enables smoother data results in noisy
environments
Filtering reset settings, in response to significant input signal
change - auto or fixed
Allows the frequency to be measured from voltage or current
reference
Allows the frequency to be measured from any channel on a multi
phase instrument
Input reference point for phase angle measurements
Frequency filter for a PWM waveform, to detect fundamental
frequency (parallel digital filter)
Low fundamental frequency measurement option, enable if
fundamental is below 5Hz
Bandwidth settings for DFT analysis
Ignores over ranging spikes in measurements caused in noisy
environments
Manually input a frequency to be used for measurements, or use
dynamic when input frequency is fluctuating / ramping
Set instrument fundamental frequency detection range;
ac+dc = dc to 2MHz
ac = 5Hz to 2MHz
dc = No frequency detection
Set to remove noisy frequency components from
measurements (in-line digital filter)
any
PPA5xx/15xx Start Up Guide
RANGE
Voltage Input
Autoranging
Minimum Range
Scale Factor
Current Input
Autoranging
Minimum Range
Scale Factor
DATALOG
Datalog
Mode
APP
Default Settings
MATHS
Formula
Set voltage input to external BNC or internal voltage attenuator
Will allow the instrument to take full control and select correct
ranges, or set manually as required
Select minimum voltage range
Manually enter any scale factor required
Set current input to external BNC or internal current shunt
Will allow the instrument to take full control and select correct
ranges, or set as required
Select minimum current range
Manually select any scale factor required
Enables user to select memory format to save log measurements
and to set log data information
Select appropriate application mode for measurements
Select to set instrument into default settings for respective APP
mode
Maths calculation functions are available from a dropdown menu. To
display maths functions on the main display screen it will be
necessary to set the “penultimate/last line” parameter to “maths
functions” This is found within the MODE menu (section 9-MODE)
and selecting power analyzer/RMS mode
ALARM
Alarm 1 Data
Alarm Type
High Threshold
Low Threshold
Select parameter to be monitored with alarm settings
Select alarm rules
Set upper limit threshold, selected parameter will activate alarm
Set lower limit threshold, selected parameter will activate alarm
Alarm 2 Data
Alarm Type
High Threshold
Low Threshold
Select parameter to be monitored with alarm settings
Select alarm rules
Set upper limit threshold, selected parameter will activate alarm
Set lower limit threshold, selected parameter will activate alarm
Page 10
PPA5xx/15xx Start Up Guide
REMOTE
Resolution
Interface
Recall with
Program
Screen Print
AUX
Auxiliary Device
SYSTEM
System
Mode
MODE
PROG
Memory
Data
Action
Location
Name
Execute
10 USB Port
Page 11
Press to set the data resolution and change the format to which the
instrument responds to future commands
Normal = Data Resolution to 5 decimal points
High = Data Resolution to 6 decimal points
Binary = Transmitted in Binary Format
Press to select mode for communications interface connection
between PPA and PC
When enabled recalls communication port settings from any stored
memory location
Print screen options, when USB memory stick is enabled, press and
hold the “START” button to dump screen data to memory stick
Select if any auxiliary device is to be connected to the instrument
View all instruments current firmware levels and update user
information
Mode specific settings, see user manual for more information
Select memory application: internal or USB memory stick
Select data type to be stored
Select action to be applied to data
Select memory location to store test parameters / results
Name selected stored test
Select to execute any changes made within the above PROG menus
USB port for memory stick device. Note when rear USB port is in
use front USB port will be disabled
PPA5xx/15xx Start Up Guide
4 Rear Panel Layout
1.
2.
3.
4.
5.
Voltage & Current Internal Inputs
Voltage & Current External Analogue Inputs
Auxiliary Port
Communication Ports
Mains Supply Inlet
1
2
3
5
4
Page 12
PPA5xx/15xx Start Up Guide
5 Basic Key Operations
This chapter is designed to help the user familiarise themselves with the
instrument by setting up some basic functions
5.1 SET UP FOR POWER ON
Install Equipment
Installation of Equipment
Plug in and turn on power
Power Supply Connection
5.2
SETTING THE TIME
Power Analyzer Default Screen Appears
Press “SYS” Key
System Option Screen Opens
Press
Flashing Red Cursor will surround Hours
Key
Use Numerical Keys
Set Hours within cursor
Press Enter Key
Hours in clock now set
Press
Flashing Red Cursor moves to Minutes
Key
Use Numerical Keys
Set Minutes within cursor
Press Enter Key
Minutes in clock now set
Press
Flashing Red Cursor moves to Seconds
Key
Use Numerical Keys
Set Seconds within cursor
Press Enter Key
Clock timings will now be complete
Page 13
PPA5xx/15xx Start Up Guide
5.3
Press
SET THE DATE
Key
Flashing Red Cursor moves to Date
Use Numerical keys
Set Date within Cursor
Press Enter Key
Numerical Day of Month is set
Press
Key
Flashing Red Cursor moves to Month
Press
Key
Month Calendar Opens
Press
Key
Select Month to be entered
Press Enter Key
Month will be set
Press
Flashing Red Cursor moves to Year
Key
Use Numerical Keys
Set Year within Cursor
Press Enter Key
Date will now be Set
5.4
ADJUSTING THE BRIGHTNESS
Press
Key
Flashing Red Cursor moves to Brightness
Press
Key
Changes between High or Low option
Press Enter Key
5.5
Screen Brightness will now be set
ADJUST KEYBOARD BEEP
Press
Key Twice
Red cursor moves to Keyboard beep
Press
Key
Changes between Enable / Disable option
Press Enter Key
Keyboard beep now set
Page 14
PPA5xx/15xx Start Up Guide
Now that you have familiarised yourself with the instruments keypad we can now
complete this section by filling in the User Data Information
5.6
USER DATA
Press “SYS” Key
System Option Screen Opens
Press
Key
User settings screen appears
Press
Key
Red cursor moves to supervisor access
Press
Key
Changes between Enable / Disable option
Press Enter Key
Supervisor access selected
Press
Red cursor moves to user data
Key
Use Numerical Keys
On this line we can enter a Company Name
Press Enter Key
Company Name now set
Press
Red Cursor moves to user data
Key
Use Numerical Keys
Enter an Individuals Name or Department
Press Enter Key
Name / Department now set
Press
Red cursor moves to User Data
Key
Use Numerical Keys
Enter a unique ID for the instrument
Press Enter Key
User Data now set
Press
Red cursor moves to Save
Key
Press Enter Key
Page 15
All User Data details will be saved
PPA5xx/15xx Start Up Guide
6 PPA15xx Quick User Guide
N4L Power Analyzers cover 1 to 3 phase applications depending on the model
and up to 12 phases via N4L’s PPALoG software application in both low and high
current models. Each phase input has wide ranging voltage and current channels
which are fully isolated from each other and from ground
The voltage and current inputs are simultaneously sampled and the data is
analysed in real time by a high speed DSP (digital signal processor). A separate
CPU (central processing unit) takes the DSP results for display and
communications. At the heart of the system is an FPGA (field programmable gate
array) that interfaces the various elements
This powerful, versatile structure allows the measurement of a wide range of
power related parameters
6.1
WIRING
Care must be taken when connecting up the instrument
Remember to configure the Voltage and Current inputs as per the drawing shown
Current in Series – (Hi in Low out)
Voltage in Parallel
HI
Three
Phase
Source
Ph1
HI
Ph2
HI
Ph3
ACH1 LO
Ph1
ACH2 LO
Ph2
Phase
Load
ACH3 LO
HI
VCH1
HI Ph3
HI
VCH2
LO
N
Three
VCH3
LO
LO
N
Example shown is a 3 phase 3 wattmeter configuration
Page 16
PPA5xx/15xx Start Up Guide
6.2
START UP
Once connected, power on
the
instrument
and
the
analyzers
factory
default
settings
from
memory
location 0 will be displayed as
per Fig 1 Note: these can be
altered to your own desired
settings (see the User Data
section
under
System
Options,
section
6
of
the main user guide)
Fig 1
Within the Power screen you
will
notice
2
sets
of
measurements; “Total” and
“Fundamental” as seen in
Fig 2
Fig 2
Total Measurements
Fundamental Measurements
Total Measurements = Fundamental + Harmonics + Noise
Fundamental = Fundamental Power Measurements (All Distortion Removed)
Each measurement mode is pre-configured to display relevant parameters. Up to
4 functions can be selected and zoomed in. These can be viewed within 3 zoom
screens, the Zoom function is described in the next section of this manual
Page 17
PPA5xx/15xx Start Up Guide
6.3
ZOOM FUNCTION
Within the Power screen you are able to select up to 4 measurements that can
be made more prominent from the rest, these can be selected and changed by
the user as required
To select or change any zoom measurement
Action
Press “ZOOM” until:
Result
4 flashing red boxes appear
Press “DELETE”
Red boxes will disappear replaced by 1 white
flashing box
Press
Keys
Press “ENTER”
Press
Press “ENTER”
Move box to desired measurement
Measurement will be selected
Keys
Move box to desired measurement
Measurement will be selected
Continue until all measurements you require are selected, up to a maximum of 4
By pressing the “ZOOM” button you can now alter the on screen display to show
a different configuration of the selected measurements
Page 18
PPA5xx/15xx Start Up Guide
Zoom 3:
In zoom 3 mode you will
display only the 4 selected
zoomed measurements as
shown (Fig 3)
Note: These will be displayed
in the order they were
selected
Fig 3
Zoom 4:
In zoom 4 mode you will
display only the first 3
selected zoomed
measurements as shown
(Fig 4)
Fig 4
Continue to press the “ZOOM” button to scroll through all screen options
Page 19
PPA5xx/15xx Start Up Guide
6.4
RESULTS SCREEN
We will now take a look at
the results screen as shown
in Fig 5 and explain why we
have a difference in the “pf”
readings between the Total
and Fundamental readings
Fig 5
As you will notice there is quite a difference within the Power Factor readings
from the same DUT (Device Under Test)
In the Total measurement the Power Factor is calculated by W / VA or (V x I x
Cos ϑ)
In the Fundamental Measurement the Power Factor is derived by taking the Cos
of the Phase Angle, often referred to as “cos phi”
Total Measurement = 25.640 ÷ 49.219 = pf 0.5210
Fundamental measurement = 360° – 340.55° = 19.45°
0.9430
Cos (19.45) = pf
The difference in the pf measurements is the result of distortion being present
You will now be able to see this distortion within the next set of screenshots
using Harmonics and Oscilloscope Mode
Page 20
PPA5xx/15xx Start Up Guide
6.5
HARMONICS MODE
By selecting the “HARM”
mode button we are now able
to see the Harmonic Analyzer
results screen Fig 6, showing
all distortion present
Fig 6
As you will see we are showing both the Voltage and Current THD (total
harmonic distortion) with the Current exhibiting a greater value
Now press the “GRAPH” button
(PPA15xx) and you will see a
representation of the distortion
as a bar graph as shown in Fig 7
Fig 7
Fig 7 displays a full bar graph of results over all of the harmonic range; it will
also allow you to see any individual harmonic data on its own. In the bar graph
above we can see that a significant amount of distortion is appearing within the
Current which corresponds with the results seen in Fig 6, you can also see a set
of selected data on the left hand side of the bar graph, these are the results
collected from the 3rd harmonic (H3). To scroll through and select other harmonic
data use the left and right arrow buttons to move the cursor at the bottom of the
bar graph to your desired harmonic
Page 21
PPA5xx/15xx Start Up Guide
Within Fig 6 there was a small
amount of Voltage distortion but
this was not visible within the
bar graph of Fig 7. In default
mode both the Voltage and
Current graphs will be set and
viewed at 100% of the set
range as shown in Fig 8
Fig 8
To view a small amount of distortion you will need to reset the bar graph scaling
to a smaller value of the maximum scale
To view the Harmonic Distortion within the Voltage in this case it is required to
reconfigure the Harmonic bar graph scale parameters as shown in Fig 9. To
change the bar graph scaling you need to access the Harmonic Analyzer screen
as shown
ACTION
RESULT
Press “HARM”
Harmonic Analyzer Screen will appear
Press
Cursor will move to Voltage Bargraph Scale
5 Times
Press “5”
5.000% will now be selected
Press “ENTER”
Scaling will now be set to 5% of max Voltage
Press “HOME” 2 Times
Display will return to results screen
Page 22
PPA5xx/15xx Start Up Guide
Press “GRAPH” to show the
new bar graph results with
the voltage results set to 5%
of full voltage range as
shown in Fig 10
Fig 9
As you can now see, a bar
graph of Voltage distortion is
present, the data on the left
stays the same but due to the
fact we are now only looking
at a graph that is 5% of the
voltage
range
the
small
amount of distortion is clearly
visible
Fig 10
Page 23
PPA5xx/15xx Start Up Guide
6.6
OSCILLOSCOPE MODE
By pressing the “SCOPE”
button we can now confirm
that the distortion seen
within the power results is
present
visually
on
the
oscilloscope
Fig 11
Press “SCOPE” again to go to
the Oscilloscope’s settings
page. Here we will enable the
screens cursors in order to
obtain a measurement on
both the Voltage and Current
Waveforms
Fig 12
ACTION
Press
Press
RESULT
9 Times
Key
Press “ENTER” Key
Red box will move to cursors parameter
Select “ON” from the dropdown menu (Fig 12)
Cursors will become active on scope screen
Page 24
PPA5xx/15xx Start Up Guide
Now we will set which of the
waveforms are to be viewed
on the scope screen. All
options can be seen in Fig 13,
on this occasion we will select
dual
Fig 13
ACTION
RESULT
Press
Key
Red box will move to trace parameter
Press
Key
Select “DUAL” from the dropdown menu (Fig 13)
Press “ENTER” Key
Dual graphs will now be displayed upon the screen
Press “SCOPE” Key
Screen will show Voltage & Current waveforms with
cursors present (Fig 14)
Fig 14
Page 25
PPA5xx/15xx Start Up Guide
Fig
15
shows
the
measurements relating to
cursor 1 and its position
within
the
Voltage
and
Current waveforms
Fig 15
To switch between the cursors on the screen display use the
keys
Fig
16
shows
the
measurements relating to
cursor 2 and its position
within
the
Voltage
and
Current waveforms
Fig 16
Viewing both Fig’s 15 & 16 above and looking at the measurements from the
Voltage waveform we can see that by setting both cursor 1 and cursor 2 to
encompass an integral number of cycles the Vrms value is the same as in the
“POWER” mode
It is important to remember that an integral number of cycles are required
(within the cursors) in order for the instrument algorithms to output correct
results
Page 26
PPA5xx/15xx Start Up Guide
7 Datalogs including transfer to a USB
Memory stick
Datalogs can be stored to the PPA RAM or directly to a USB memory stick.
Datalogs saved to RAM can later be transferred to a USB memory stick.
This section explains the procedure for setting up and running a datalog. The
procedure for exporting the datalog from internal RAM to a USB memory Stick is
then described.
It is recommended to use N4L USB sticks.
1. Setup Datalog (DATALOG MENU)
Press the datalog button on the front panel.
Use the
to datalog.
key to step down
Select either RAM or USB
memory stick from the drop
down menu.
Fig 17
When the RAM option is
selected: Use the
key to
step down to “interval” and
enter
the
time
between
datalog measurements.
Fig18
Page 27
PPA5xx/15xx Start Up Guide
When the USB memory stick
option is selected:
Use the
key to step down
to “location” and the number
of the location on the memory
stick where the datalog is to
be stored.
Fig 19
Use the
key to step down to “name” and give the location a name.
Use the
key to step down to “interval” and enter the time between datalog
measurements.
2. Starting / Stopping the Datalog.
Press the start button on the
front panel of the PPA to start
the datalog.
Press the Stop button to end
the datalog.
Fig 20
Page 28
PPA5xx/15xx Start Up Guide
3. Store Datalog to External USB Memory Stick
To store the Datalog to a USB stick, press the PROG button on the front panel.
Use the
key to step
down to “memory”. Select
USB memory stick from the
drop down menu.
Use the
key to step
down to “data” and select
datalog from the drop down
menu.
Fig 21
Use the
menu.
key to step down to “action” and select store from the drop down
Use the
key to step down to “location” and the number of the location on the
memory stick where the datalog is to be stored.
Use the
key to step down to “name” and give the location a name.
Use the
key to step down to “execute” and then press “Enter”
The datalog will then be
transferred to the USB stick.
The
message
will
be
displayed during transfer but
will disappear once the
transfer is complete.
Fig 22
Page 29
PPA5xx/15xx Start Up Guide
4. Locate file on memory stick, the file format will have a .txt extension
D001 represents “location 1” as specified in item 3 above.
5. NOTE: Data presented within the .txt file for time will be displayed as a
fraction of an hour, to convert this data back into real time the user will
need to multiply the data by 3600 (seconds within an hour)
Page 30
PPA5xx/15xx Start Up Guide
8 Repair / Recalibration
In the event of any problem with the instrument, during or outside of the
guarantee period, contact your local representative
Newtons4th Ltd offer a full repair and re-calibration service
It is recommended that the instrument be re-calibrated annually
Contact details:
1
Tel:
Fax:
Newtons4th Ltd
30 Loughborough Road
Mountsorrel
Loughborough
LE12 7AT
United Kingdom
(0116) 230 1066
(0116) 230 1061
International:
International:
+44 116 230 1066
+44 116 230 1061
E-mail address: [email protected]
[email protected]
Web site:
www.newtons4th.com
We have a policy of continuous product improvement and are always keen to
hear comments, whether favourable or unfavourable, from users of our
products. Please telephone, fax, write or e-mail with your comments
Page 31
PPA5xx/15xx Start Up Guide
9
Specifications
Frequency Range
Normal:
x10 mode:
Voltage Input
Ranges:
Accuracy:
External sensor input:
DC and 10mHz to 1MHz
DC and 10mHz to 100kHz
Normal - 1Vpk to 2500Vpk (1000Vrms) in 8 ranges
x10 mode - 100mVpk to 300Vpk in 8 ranges
Normal - 0.05%Rdg +0.1%Rng +(0.005% x kHz) +5mV*
x10 mode - 0.05%Rdg +0.1%Rng +(0.01% x kHz) +1mV*
1mVpk to 3Vpk in 8 ranges – BNC connector
Accuracy 0.05%Rdg +0.1%Rng +(0.005% x kHz) +1µV*
Current Input
20Arms
Accuracy:
30Arms
Accuracy:
External sensor input:
Phase Accuracy
Normal:
x10 mode:
Watts Accuracy
Normal - 0.05%Rdg +0.1%Rng +(0.005% x kHz) +500uA*
x10 mode - 0.05%Rdg +0.1%Rng +(0.01% x kHz)
+100uA*
Normal - 0.05%Rdg +0.1%Rng +(0.005% x kHz) +1A*
x10 mode - 0.05%Rdg +0.1%Rng +(0.01% x kHz)
+300uA*
1mVpk to 3Vpk in 8 ranges – BNC connector
Accuracy 0.05%Rdg +0.1%Rng +(0.005% x kHz) +1µV *
10 millidegrees + (10 millidegrees x kHz)
10 millidegrees + (20 millidegrees x kHz)
Normal:
x10 mode:
[0.1% +0.1%/pf +(0.015% x kHz)/pf] Rdg +0.1%VA Rng
[0.1% +0.1%/pf +(0.02% x kHz)/pf] Rdg +0.1%VA Rng
40Hz-850Hz
Accuracy – V,A
and Watts
As above with range error reduced from +0.1%V,A,VA Rng
to +0.05%V,A,VA Rng
Page 32
PPA5xx/15xx Start Up Guide
DC Accuracy
Voltage:
Current:
(20Arms)
(30Arms)
External sensor input:
0.1% Rdg + 0.1% Rng + 10mV (or +2mV in X10 mode)
0.1% Rdg + 0.1% Rng + 1mA (or +200µA in X10 mode)
0.1% Rdg + 0.1% Rng + 3mA (or +600µA in X10 mode)
0.1% Rdg + 0.1% Rng + 10µV
Total Harmonic Distortion (THD) Accuracy
𝑖=𝑛
Voltage:
Normal:
x10 mode:
Current:
20A Normal:
20A x10 Mode:
30A Normal:
1
𝑇𝐻𝐷 + 𝑇𝐻𝐷 𝐸𝑟𝑟𝑜𝑟 = �
� ��(ℎ𝑖 + ℎ𝑖 𝑒𝑟𝑟𝑜𝑟)2
ℎ1 + ℎ1 𝑒𝑟𝑟𝑜𝑟
𝑖=2
hi error (Voltage) = 0.05% hi rdg + 0.1% rng + 0.005% * KHz + 5mV
hi error (Voltage) = 0.05% hi rdg + 0.1% rng + 0.01% * KHz + 1mV
hi error (Current) = 0.05% hi rdg + 0.1% rng + 0.005% * KHz + 500uA
hi error (Current) = 0.05% hi rdg + 0.1% rng + 0.01% * KHz + 100uA
hi error (Current) = 0.05% hi rdg + 0.1% rng + 0.005% * KHz + 1A
30A x10 Mode: hi error (Current) = 0.05% hi rdg + 0.1% rng + 0.01% * KHz + 300uA
External Sensor Input:
hi error (Voltage) = 0.05% hi rdg + 0.1% rng + 0.005% * KHz + 1uV
Common Mode Rejection
Total Common Mode and Noise effect on current channels
Applied 250V @ 50Hz – typical 1mA (150dB)
Applied 100V @ 100kHz – typical 3mA (130dB)
Datalog
Functions
Datalog window
Memory
Page 33
Up to 4 measured functions user selectable
(30 with optional PC software)
From 10ms with no gap between each log
RAM up to 16,000 records
PPA5xx/15xx Start Up Guide
General
Crest factor
Sample rate
Low power accuracy
Remote operation
Application modes
Ports
RS232
LAN (option L)
USB
Extension
Aux
Physical
Display
Size
Weight
Safety isolation
Power supply
Voltage and Current – 20
Real time no gap - 1Ms/s on all channels
Compliant with IEC62301 using internal shunt
Refer to low power measurement application note
Full capability, control and data
Ballast
Inrush
Standby Power
Calibration
Baud rate to 38400 – RTS/CTS flow control
10/100 Base-T Ethernet auto sensing RJ45
USB device – 2.0 and 1.1 compatible
N4L accessory port
N4L auxiliary port
480 x 272 pixel 4.3” colour TFT
91H x 213W x 313D mm – excluding feet
3.6kg – 1 phase; 4kg – 3 phase
1000V rms or dc – category II
90-265 rms 50-60Hz
35VA max
* measured fundamental value
Page 34
PPA5xx/15xx Start Up Guide
10
Comparisons
Model
Item
USB Port on front
Colour Display
Speed and Torque
Standard
GPIB, LAN
Standard
IEC61000
Standard
Current Options
Bandwidth
V&I Accuracy
W Accuracy
PWM Mode
Transformer Mode
Minimum Window
Size
Scope
Harm order
PWM Filter options
Internal Datalog
Internal logging
parameters
TTV 105
Harm comp/sec
Range
Internal Memory
Page 35
PPA15xx
PPA45xx
PPA55xx
Y
Y
Y
Y
Y
Y
N
Y
Y
N
N
Y
N
N
Y
20, 30
1MHz
0.05 + 0.1
0.1 + 0.1
N
N
10,30,50
2MHz
0.03 + 0.04
0.04 + 0.05
Y
Y
10,30,50
2MHz
0.01 + 0.038
0.03 + 0.02
Y
Y
2ms
10ms
2ms
Y
50
NA
16000
records
Y
100
7
16000
records
Y
417
7
4
16
16
300
8
192kB
N
600
8
200MB
1800
9
1GB
10M records