1
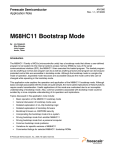
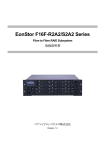
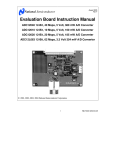
Build Your Own MC68HC11 Computer Trainer
Geoffrey C. Yerem
Department of Electrical Engineering
University of Tennessee, Knoxville
1
Introduction
The electronic computer has been called the most complex machine built by
man, and anyone fascinated by technology recognizes the computer as t h e
ultimate machine. Infinitely configurable through programming, the computer
is a machine that is malleable as clay is to a skilled sculptor. If you love
computers, you probably want to become a skilled computer sculptor. Becoming
a skilled programmer provides half of the skills you need. Completing your
skills means understanding computer hardware, at the heart of which is t h e
microprocessor. If learning about computer hardware is your goal, then read on.
This paper is going to show you how to build your own practical, working
computer from scratch.
This document will show you how to build your own computer trainer based
on the Motorola MC68HC11 microprocessor. The design used here is similar to
many of the commercially available MC68HC11 single board computers,
particularly the Motorola M68HC11 Evaluation Board (EVB). You will learn a
great deal by building this project and, in the end, you will have a working
EVB of your very own that you can program and customize.
This document contains six sections:
Section 1 - Introduction
Section 2 - The Structure of a Small Computer System
Section 3 - Building the Computer
Section 4 - Testing the Computer
Section 5 - Using the Computer
Section 6 - Conclusion
The instructions in the rest of this document assume that you have h a d
little or no exposure to microprocessor electronics. You should, though, have
some computer programming experience, particularly with assembly language.
Also, you should have some experience with digital electronics as well as some
experience with basic electronic assembly. Barring no problems, you can
construct this project in about one full week. Good luck, you are on your way to
building your first, but probably not your last, computer.
Copyright © 1999 by Geoffrey C. Yerem, First Printing
2
2
Yerem: Build Your Own MC68HC11 Computer Trainer
The Structure of a Small Computer System
The purpose of a computer is to act out a series of directions given by a person,
ultimately performing some physical action. This goal starts with numbers.
Numbers, as it turns out, can represent any type of information. Since computers
manipulate numbers, computers also manipulate representations of information.
The form of numbers that electronic computers use are groups of binary digits or
bits. Bits are simply numerical digits which only have two states, 0 and 1.
This is just like a digit in our decimal system which has ten states, 0 through 9,
one state for each finger on our two hands. So you might say that by using t h e
binary system, a computer probably has only one finger on each of its hands! A
consequence of bits having fewer states than decimal digits is that you need
more binary digits to represent the same number in the decimal system.
Nonetheless, both number systems can each represent every possible number.
Ultimately, electronic computers use binary digits because by only having two
states it has a minimal chance of confusing one state with the other and t h a t
provides a maximum level of reliability.
A computer uses its electronic versions of numbers to perform its purpose;
acting out a series of directions given by a person. Since numbers can represent
anything, we can use numbers to represent the instructions that we want t h e
computer to follow as well as raw information and even some physical actions
like turning on an indicator light, sending messages to a teletype or making a
sound.
The microprocessor chip contains all of the electronics needed to perform a
majority if not all of the actions of a computer system. Usually though, a
certain amount of the resources of a computer are too expensive or impractical to
squeeze onto one integrated circuit chip. The most notable of these resources is
memory. Memory is the single most expensive element of a computer system.
Memory gives the computer a place to store numbers. The more memory a
computer has, the more numbers it can store. Computer memory typically stores
raw data and programs.
If a microprocessor is going to work with external memory it needs external
signals to control the memory. These signals can be broken into three parts: an
address bus, a data bus and a control bus.
The address bus is a series of digital signal lines which can send out a
binary number which in turn represents a single location in the computer’s
memory space. Since the address bus can only represent a finite amount of
unique numbers, there can only be a finite number of memory locations in a
computer system.
Once you have a place to store numbers, you need a way access them. That’s
where the data bus comes in. Just like the address bus, the data bus is a series of
digital signal lines which can send and receive numbers. In this case, t h e
numbers represents raw data, physical actions or a program.
Finally, the control bus uses its digital signals to keep the address and data
busses of the microprocessor synchronized with the external components.
3
2.1
The Design
The computer we are about to build will have the Motorola MC68HC11
microprocessor at its core. Motorola designed the MC68HC11 so that it requires
a minimum of support circuitry in order to build a working design with it. This
will suit our purposes nicely since it will allow us to learn how to build a
computer without sinking in excessive complexity.
(U1)
MC68HC11A1P
25
24
41
40
PB7
MODA(*LIR)
MODB(Vstby)
PB6
PB5
PB4
PB3
PB2
*IRQ
*XIRQ
22
VRH
21
VRL
26
AS
27
E
28
R/*W
47
PD5/*SS
46
PD4/SCK
45
PD3/MOSI
44
PD2/MISO
43
PD1/TxD
42
PD0/RxD
38
37
PC6
36
PC5
35
PB4
34
PC3
33
PC2
32
PC1
31
PC0
PC7
PA7/PAI/OC1
PA6/OC2/OC1
PA5/OC3/OC1
PA4/OC4/OC1
PA3/OC5/OC1
6
PA2/IC1
7
PA1/IC2
8
PA0/IC3
*RESET
XTAL
30
10
11
12
13
14
15
PB1
16
PB0
20
PE3/AN3
19
PE2/AN2
18
PE1/AN1
17
PE0/AN0
1
2
3
4
5
9
39
EXTAL
29
The MC68HC11 has many useful circuits already built into it. For example,
it has built-in digital I/O ports, a sophisticated timing system, an
asynchronous serial port for RS-232 communications, a synchronous serial port,
an analog-to-digital converter and a built-in crystal oscillator circuit. It also
has built-in memory such as 256 bytes of Random Access Read/Write Memory
(RAM), 512 bytes of Electrically Erasable Programmable Read Only Memory
(EEPROM) and in some versions, 8 kB of Read Only Memory (ROM). Having
all these resources on one chip allows the MC68HC11 to be used as a single-chip
microcontroller requiring no extra support chips. For this project though, we
will treat the MC68HC11 as a conventional microprocessor by adding various
external resources to it.
Following is a block-by-block description of the computer’s design using
sections taken from the main schematic diagram. The complete schematic
diagram can be found in Appendix 3.
Address Bus (A0:A15)
(U5)
(U3)
74HC373
9
10
PB6
11
PB5
12
PB4
13
PB3
14
PB2
15
PB1
16
PB0
PB7
AD7 1 8
8D
AD6 1 7
7D
AD5 1 4
6D
AD4 1 3
5D
AD3 8
4D
AD2 7
3D
AD1 4
2D
AD0 3
1D
A15
A14
A13
A12
A11
A10
A9
A8
C
11
26
AS
27
E
28
R/*W
19
*EN
38
37
PC6
36
PC5
35
PB4
34
PC3
33
PC2
32
PC1
31
PC0
PC7
AD7
AD6
AD5
AD4
AD3
AD2
AD1
AD0
AD7 1 1
B8
AD6 1 2
B7
AD5 1 3
B6
AD4 1 4
B5
AD3 1 5
B4
AD2 1 6
B3
AD1 1 7
B2
AD0 1 8
B1
PAL16L8-12
19
16
7Q
15
6Q
12
5Q
9
4Q
6
3Q
5
2Q
2
1Q
8Q
*OE
A7
A6
A5
A4
A3
A2
A1
A0
A15
1
A14
2
A13
1
3
A12
4
A11
5
A10
6
I
O
I
I/O
I
I/O
I
I/O
I
I/O
I
I/O
I/O
O
19
*BOOT
18
*SPARE
17
*WRIO
16
*RDIO
15
*PIA2
14
*PIA1
13
*EXTRA
12
*RAM
1
A-B
9
8
A7
7
A6
6
A5
5
A4
4
A3
3
A2
2
A1
A8
D7
D6
D5
D4
D3
D2
D1
7
8
I
I
I
I
11
9
E
R/*W
D0
74HC245
(U4)
1. This is the address/data demultiplexer
circuit. It separates the one address/data
bus into distinct address and data busses.
Multiplexing the address and data bus
saves 8 pins which can be dedicated to
other resources at the expense of requiring
an external demultiplexing circuit.
2. This is the Chip Select PAL. Its job is to
decode the address space and select the
appropriate memory chip. Its inputs are
the address lines as well as the E and
R/*W lines. Its outputs are the various
chip select signals.
Yerem: Build Your Own MC68HC11 Computer Trainer
Vcc
Vcc
(RP1)
4.7 kΩ
J4
PE0
(U1)
MC68HC11
25
MODA(*LIR)
24
MODB(Vstby)
3. These are the mode pins. These two pins
allow you to configure the MC68HC11 to
run in one of four modes. Pulling both
pins high, as in this case, puts the
microprocessor in Expanded Mode.
4. This is the “J4” jumper. The BUFFALO
monitor program uses this jumper to
determine whether or not to jump to the
internal EEPROM or run the BUFFALO
monitor at startup.
Vcc
XTAL
30
EXTAL
(R2) 10 MΩ
29
(RP1)
4.7 kΩ
(Y1) 8.0 MHz
(U10)
MN13811-Q
1
2
LVI
RESET
(C11)
22 pF
(C12)
22 pF
5. This is the oscillator circuit. It provides
the “heartbeat” for the microprocessor.
The oscillator generates an 8 MHz square
wave which is divided internally by a
factor of four to supply a 2 MHz clock
pulse to the microprocessor.
6. This is the reset circuit. Pressing the Reset
button will cause the computer to stop
what it is doing and start from scratch.
The LVI (Low Voltage Interrupt) chip can
also assert the Reset line if the power
supply voltage drops below 4 V. This
prevents the microprocessor from running
before the power reaches a meaningful
level.
(U8)
(U6)
27C64-250
19
O7
18
O6
17
O5
16
O4
15
O3
13
O2
12
O1
11
O0
D5
D4
D3
D2
D1
D0
Vcc
1
27
22
Vpp
*PGM
*OE
2
A12
2 3 A11
A11
2 1 A10
A10
24
A9
A9
25
A8
A8
3
A7
A7
4
A6
A6
5
A5
A5
6
A4
A4
A3
7
A3
8
A2
A2
9
A1
A1
10
A0
A0
A12
*CE
20
7. This is one of the two EPROMs (Erasable
Programmable Read Only Memory). The
computer uses this memory chip to store
programs and data semi-permanently. In
other words, the information stored here
can only be erased by shining an
ultraviolet light into the glass window on
the chip.
D7
D6
D5
D4
D3
D2
D1
D0
HM62256-LP15
19
A14
I/O7
18
A13
I/O6
17
A12
I/O5
16
I/O4
A11
15
A10
I/O3
13
I/O2
A9
12
I/O1
A8
11
I/O0
A7
A6
A5
A4
1
26
2
23
A14
A13
A12
A11
2 1 A10
24
A9
25
A8
3
A7
4
A6
A5
5
6
7
A3
8
A2
9
A1
10
A0
22
*OE
R/*W
*CE
Address Bus (A0:A15)
D7
D6
Vcc
3
Data Bus (D0:D7)
4
A4
A3
A2
A1
A0
27
20
8. This is the RAM (Random Access
Memory) chip. While the MC68HC11 has
256 bytes of RAM internally, this usually
is not enough for software development.
The HM62256 provides the computer
with an additional 32 kB of R/W memory.
5
Notice that the EPROM and the RAM chip have similar pin outs. This is
due to the JEDEC standard which specifies the pin outs of byte-wide (8-bit)
memory devices. The JEDEC standard allows memory of different sizes and
from different manufacturers to be used in the same sockets, with little or no
modifications.
(U2)
MC68B21
D7
D6
D5
D4
D3
D2
D1
D0
26
D7
27
D6
28
D5
29
D4
30
D3
31
D2
32
D1
33
D0
(U9)
MAX232CPE
Vcc
24
CS1
22
CS0
35
RS1
36
RS0
23
*CS2
25
E
21
R/*W
34
*RESET
A1
A0
PD1
10
PD0
9
PPA7
PPA6
PPA5
PPA4
PPA3
PPA2
PPA1
PPA0
39
CA2
40
CA1
19
CB2
18
CB1
CB2
CB1
9
PA7
8
PA6
7
PA5
6
PA4
5
PA3
4
PA2
3
PA1
2
PA0
17
PB7
16
PB6
15
PB5
14
PB4
13
PB3
12
PB2
11
PB1
10
PB0
PPB7
1
3
10µF
2
PPB6
PPB5
PPB4
PPB3
T
12
(C13)
10µF
2
8
RxD
3
DCD
6 DSR
14
4
13
5
8 CTS
DTR
9
R
C1+
C2+
C1-
C2-
V+
TxD
7
R
11
*PIA1 ($A000)
E
R/*W
*RESET
(C14)
CA2
CA1
T
1
7
V-
4
(C15)
5
10µF
6
(C16)
10µF
Vcc
PPB2
PPB1
PPB0
9. This is the PIA (Peripheral Interface
Adapter) chip. Since we are using the
MC68HC11 in expanded mode, I/O ports
B and C are unavailable for our use. The
MC6821 will give us two bi-directional
8-bit I/O ports to work with.
10. This is the RS-232 circuit. The MAX232
provides the interface between the serial
port on the MC68HC11 and the DB-9
connector. This buffer chip is required
because RS-232 requires relatively high
voltages (about ±12 V). Additionally, the
MAX232 has a charge pump circuit which
uses four capacitors to generate ±10 VDC
from the 5V supply. This way the whole
computer can run from a single 5V supply.
Additionally, the computer requires a +5 VDC @ 0.3 A power supply. For
this project, you can either purchase one or build a simple one from scratch.
Keep in mind that this design isn’t inscribed in stone. Feel free to modify
the computer in any way you see fit. You can learn a great deal by customizing
the computer.
6
3
Yerem: Build Your Own MC68HC11 Computer Trainer
Building the Computer
Before you start ordering the parts and constructing the computer, skim through
this whole document to get an idea of what to expect. While this document is
presented in chronological order, you can avoid many pitfalls as you’re building
the computer if you know where you’re heading.
To build this computer you will need some common pieces of electronic tools
and test equipment. The major tools you will need access to are an EPROM
programmer and a 15 W soldering iron with a small tip. The test equipment you
will need are a +5 VDC power supply, a voltmeter, a personal computer with an
RS-232 serial port, a terminal emulation program and possibly an oscilloscope.
Additionally, it would help to have access to the World Wide Web.
The following timeline depicts a minimum-time schedule required to
complete this project. If all goes well, you can probably finish this project in a
week or two. Keep in mind though that this estimate does not include the time
required to overcome learning how to build a computer or the time required to
debug the computer which can be two large variables in this schedule. Of
course, overcoming these obstacles embodies the whole purpose of this project.
Monday
3.1
Tuesday
Order Parts.
Download Software.
Order Data Sheets.
Buy parts from Radio Shack.
Wednesday
Receive Mail Order Parts.
Thursday
Program PAL and EPROM.
Lay out the board.
Friday
Wire the computer.
Saturday
Wire the computer.
Sunday
Test the computer.
Ordering the Parts
Mail-order is the best way to obtain electronic parts. While it’s tempting to run
down to the local electronics store and buy the parts off the shelf, you will
usually have trouble getting exactly what you need and wind up paying a lot
extra. With mail-order, you can almost always get exactly what you want at a
good price. All you need is a credit card and a telephone. Begin signing up on
the mailing lists of mail-order houses which sell electronic parts. This is easy
to do since every major mail-order house has a toll-free number as well as a
World Wide Web (WWW) site.
7
There are three parts listings given for this project, one for each parts
supplier. Generally, the fewer orders you make, the less overall shipping
charges you have to pay. It turns out that JDR Microdevices, Digi-Key and
Radio Shack have all of the parts that we’ll need. JDR Microdevices and
Digi-Key are mail-order houses, while Radio Shack is usually just a car ride
away.
Keep in mind that the parts list, and the whole design for that matter,
isn’t etched in stone. If you find a better supplier, come up with better parts, or
just want to save money, many of these parts can be substituted or even left out
entirely. Look over the part list carefully and check the items with the mailorder catalogs. Try to understand what you’re buying.
If you find that a particular part isn’t in stock, it would be best to substitute
the part for another or order it somewhere else, as opposed to backordering t h e
part. Backorders can mean waiting weeks or possibly not getting the part a t
all, not to mention extra shipping charges. Be sure to keep the mail-order
catalog handy when you place your order in case you need to make a quick
substitution. Backorders shouldn’t be a problem for this project since most of t h e
parts are pretty commonplace.
If you choose, you can order all of the mail-order parts over the Internet.
Simply go to the respective WWW site and follow the ordering procedure. One
advantage to ordering parts over the Internet is that you can instantaneously
check the stock for each item as you go along. Also, you won’t feel rushed in
case you need to change your mind while ordering.
If you place your order early in the day, the parts suppliers will usually
ship the order the same day. As a result, the shipping method you choose will
determine the amount of time it will take to get the parts. Second-day airmail is usually a good buy. With second-day air-mail, the parts will arrive
within two business days of when they are shipped.
The prices and part numbers which are listed below reflect what was
available at the time of printing. As time progresses, the prices, availability
and part numbers will change. If you can't find a part in the recent catalogs,
find substitutes using the master parts list in Appendix 1.
The parts marked (*) are ones you might already have in your parts box. I f
you don't have them, go ahead and order them since you're getting a pretty
good deal from the mail-order houses. The parts marked (†) are optional and
can be substituted for something less exotic.
Digi-Key, 1-800-344-4539 (http://www.digikey.com)
#
1
1
1
1
1
1
1
1
Part No.
AE1020-ND
ED1609-ND
ED4648-ND
MN13811-Q-ND
EG1403-ND
923252-ND
923292-ND
L20165-ND
*
*
*
†
†
*
Part Description
Male-Female DB-9 Cable (2m)
2 Position Terminal Block
48-Pin DIP WW Socket 3-Level
3.8V O.D. Low Voltage Detector
SPST Momentary Square Yellow Pushbutton
6.5" Solderless Breadboard w/Power Busses
54 Point Terminal Strip with Solder Tails
PC Board Mount Green LED With Holder
Sub Total
Unit
Price
5.35
0.37
5.49
0.85
0.98
19.25
9.65
0.67
Total
Price
5.35
0.37
5.49
0.85
0.98
19.25
9.65
0.67
$42.61
8
Yerem: Build Your Own MC68HC11 Computer Trainer
JDR Microdevices, 1-800-538-5000 (http://www.jdr.com)
#
Part No.
1
1
1
1
1
2
1
1
74HC245
74HC373
MAX232CPE
68HC11A1P
68B21
27C64A-200
HM62256LP-10
16L8B
1
1
10
10
1
4
2
9
8.0MHZ
RPS7-4.7K
R10.0M
R330
100R16
10R63
22PF
T.1-35
1
DB09SRS
1
3
3
1
16 PIN WW
20 PIN WW
28 PIN WW
40 PIN WW
10
1
JUMPER-KT-10
HDR-40R
Part Description
Integrated Circuits
Octal Tri-State Transceiver
Octal Tri-State D Type Latch
+5V Powered Dual RS-232 Trans./Rcvr.
8-bit HCMOS MCU
2 PIA 2 MHz
8kx8 250ns EPROM
32kx8 100ns Static RAM
PAL 16L8B 15ns
†
*
*
*
*
*
*
Unit
Price
Total
Price
0.39
0.45
1.39
11.99
2.89
2.89
1.99
1.49
0.39
0.45
1.39
11.99
2.89
5.78
1.99
1.49
Discrete Components
8.0 MHz Crystal
4.7 kΩ SIP 7 Resistor Network
10 MΩ 1/4 W Resistor
330 Ω 1/4 W Resistor
100 µF 16V Radial Electrolytic Capacitor
10 µF 63V Radial Electrolytic Capacitor
22 pF Ceramic Capacitor
0.1 µF Tantalum Capacitor
1.39
0.19
0.05
0.05
0.14
0.10
0.05
0.15
1.39
0.19
0.50
0.50
0.14
0.40
0.10
1.35
Connectors
Right Angle PC Mount Female DB-9 Connector
0.59
0.59
IC Sockets
16-Pin DIP WW Socket 3-Level
20-Pin DIP WW Socket 3-Level
28-Pin DIP WW Socket 3-Level
40-Pin DIP WW Socket 3-Level
0.79
1.09
1.49
1.69
0.79
3.27
4.47
1.69
0.99
0.89
0.99
0.89
$43.63
Unit
Price
2.79
3.49
7.49
Total
Price
2.79
3.49
7.49
$13.77
Headers
† Shorting Jumper Block
† 1x40 Snappable Header with Right Angle Pins
Sub Total
Radio Shack (http://www.radioshack.com)
#
1
1
1
Part No.
278-503
276-1396
276-1570
*
Part Description
50' 30-Gauge Blue Wrapping Wire
6"x8” IC-Spacing Perfboard
Wire-Wrapping Tool
Sub Total
3.2
Downloading the Software
While you are waiting for the parts to arrive, you can download the software
required for the computer from the Internet. Motorola has an FTP site which
has lots of free software that can be used for developing computers based on
Motorola microprocessors. For this project, the one important piece of software
required is the BUFFALO monitor program. BUFFALO is a stand alone
program written for operating a simple MC68HC11 computer through a dumb
terminal. We will put the BUFFALO program in an 8 kB boot EPROM so t h a t
the computer will be ready for work at power up.
Additionally, there are two other pieces of software that would be useful
for this project. The AS11 program is a freeware cross-assembler provided by
Motorola. It’s invaluable for writing software for the MC68HC11. Also, t h e
FTP site has a copy of BASIC11, a stand alone BASIC interpreter for t h e
MC68HC11. The interpreter is fairly complete and fits inside of an 8 kB ROM.
The Motorola FTP site is located at:
http://www.mot.com/pub/SPS/MCU/
9
Alternatively, the University of Alberta Motorola Archive is a mirror site:
ftp://nyquist.ee.ualberta.ca/pub/motorola/
Download the BUFFALO Monitor - You only need the “.s19” file, but if you
want an up-to-date source listing for BUFFALO, then download the “.zip” file.
Path
/mon/buf34.s19
Size
19182
Date
03/30/1994
/mon/buf34.zip
116221
03/02/1995
Comments
BUFFALO 3.4 monitor for the
HC11.
BUFFALO 3.4 monitor for the
HC11 with source code.
Download a cross-assembler - AS11 is a freeware cross-assembler for t h e
MC68HC11. It has been ported to many platforms since Motorola has
distributed the C source code for the assembler.
Path
/ibm/as11.exe
Size
18870
Date
03/30/1994
/ibm/as11new.exe
/mac/XASMHC11.MAC
19584
49024
03/30/1994
03/30/1994
Comments
Cross assembler for the
MC68HC11.
Improved version of as11.
This is as11 ported to the
Macintosh by Georgia Tech.
Use MacBinary to download
this application.
While you’re downloading software you might want to get a copy of
PALASM. PALASM is a freeware program from American Micro Devices
(AMD) which you can use to compile the program for the Chip Select PAL.
The AMD WWW site is located at:
http://www.vantis.com/software/software.html
Download PALASM - When you reach the web site, follow the registration
procedure for downloading PALASM.
3.3
Ordering the Data Sheets
Component manufacturers publish data books and data sheets for all of their
components. Usually the literature and the phone call are free. Additionally,
most major manufacturers have World Wide Web sites which have t h e
literature in electronic form.
For this project, it would be a good idea to get the data sheets for some of
the components. Particularly, the data sheets for the MC68HC11 and t h e
MC6821 are indispensable.
You have two options for ordering the literature. You can either call up
Motorola literature group or you can access their WWW site. I would
recommend using the WWW site since it is as simple as filling out a form. If you
choose to go to Motorola’s web site, be sure to browse around to see the other
services they provide.
Here is the phone number for the Motorola Literature Distribution:
1-800-441-2447
10 Yerem: Build Your Own MC68HC11 Computer Trainer
While here is their WWW address:
http://mot2.mot-sps.com/home/lit_ord.html
Here are the part numbers for the data books to order:
MC68HC11A8/D
MC6821/D
M68HC11EVB/D1
3.4
MC68HC11A8 Technical Data Book
MC6821 Peripheral Interface Adapter Data Sheet
M68HC11EVB Evaluation Board User's Manual
Construction
Now that the parts have arrived, it is time to assemble your computer. W e
will start by programming the boot EPROM and the chip select PAL. Following
will be a tutorial on wire-wrapping. Finally, we will lay out the components on
the board and do the actual wiring.
3.4.1
Programming the EPROMs
The boot ROM will give our computer a program to run every time the computer
is powered up. This is possible since the boot ROM provides non-volatile
storage (it doesn’t lose its memory when the power is turned off).
This step will require the use of an EPROM programmer. This might be
troublesome if you don’t have access to one. Since an EPROM programmer can be
an expensive item, you might want to get help from someone who owns one. The
Electrical Engineering department at your local university would have one as
well as your local electronics trade school. It is also possible that your local
electronics repair shop would have one that you can use. If these options aren’t
available to you or if you think you will be building more computers in t h e
future, you might want to invest in your own personal EPROM programmer.
Most electronics supply stores carry them. For this project, be sure that t h e
programmer you use is able to program both EPROMs and PALs.
You can erase an EPROM by using an EPROM eraser which contains an
ultraviolet lamp. The ultraviolet light is shined through the window on t h e
chip. Never look directly at an ultraviolet lamp as it can cause serious eye
damage.
Programming the Buffalo EPROM
1. Load the “buf34.s19” file into the EPROM programmer. You might
have to tell it that the file is in Motorola Hex format. Specify a base
address of $E000.
11
2.
Program and verify the BUFFALO EPROM.
Programming the Test EPROM
1. Store the test program in Listing 1 into a text file.
Listing 1:
The test program listing.
**** test.as
RegBase equ
PORTA
equ
TCTL1
equ
TFLG2
equ
PACTL
equ
PIA_PRA equ
PIA_CRA equ
PIA_PRB equ
PIA_CRB equ
start
delay
loop
3.4.2
****
$1000
$00
$20
$25
$26
$A000
$A001
$A002
$A003
org
ldx
clr
clr
ldaa
staa
staa
ldaa
staa
staa
ldaa
staa
clr
ldab
clc
$E000
#RegBase
PIA_CRA
PIA_CRB
#$FF
PIA_PRA
PIA_PRB
#$04
PIA_CRA
PIA_CRB
#$80
PACTL,x
TCTL1,x
#$38
ldy
brclr
ldaa
staa
dey
bne
rolb
stab
stab
stab
bra
#7
TFLG2,x $80 loop
#$80
TFLG2,x
org
fdb
$FFFE
start
Initialize PIA.
Initialize test pattern.
Wait 0.23 seconds by counting seven timer overflows.
Wait for timer overflow.
Clear timer overflow flag.
loop
PORTA,x
PIA_PRA
PIA_PRB
delay
Rotate test pattern.
Write test pattern.
2.
Assemble the program using the AS11 assembler.
3.
Load the resulting .s19 file into the EPROM programmer as before
specifying a base address of $E000.
4.
Program and verify the test EPROM.
Programming the Chip Select PAL
The Chip Select PAL (Programmable Array Logic) chip is used to perform t h e
logic which “glues” the computer together. By using a PAL, we reduce t h e
12 Yerem: Build Your Own MC68HC11 Computer Trainer
number of components by eliminating many discrete logic gates. The PAL can
provide much more complex designs than normally would be attempted with
discrete logic. Also, if the logic needs to change, a new chip can be programmed
replacing the old design.
Since all of the memory and I/O chips share the same data and address
busses, they need a way to know when they are being addressed. The PAL will
do this job by decoding the current value on the address bus and selecting t h e
appropriate chip. Additionally, the PAL gates the RAM and ROM chip select
signals with the E clock signal since the data bus isn’t ready until E is high.
Also, the ROM chip selects are gated with the R/*W line so that the ROM is
only selected during a read cycle.
Programming the PAL
1. Using a text editor, type in the program shown in Listing 2 and save i t
in a text file.
Listing 2:
The program listing for the Chip Select PAL.
;---------------------------------- Declaration Segment -----------TITLE
EVB Address Decoder
PATTERN
REVISION
AUTHOR
G. Yerem
COMPANY UTK
DATE
06/19/97
CHIP _CSPAL PAL16L8
;---------------------------------- PIN Declarations --------------PIN 1
A15
COMBINATORIAL ;
PIN 2
A14
COMBINATORIAL ;
PIN 3
A13
COMBINATORIAL ;
PIN 4
A12
COMBINATORIAL ;
PIN 5
A11
COMBINATORIAL ;
PIN 6
A10
COMBINATORIAL ;
PIN 7
RW_EN
COMBINATORIAL ;
PIN 8
IO_EN
COMBINATORIAL ;
PIN 9
RW
COMBINATORIAL ;
PIN 10
GND
;
PIN 11
E
COMBINATORIAL ;
PIN 12
/RAM_SEL
COMBINATORIAL ;
PIN 13
/EXTRA_SEL
COMBINATORIAL ;
PIN 14
/PIA1_SEL
COMBINATORIAL ;
PIN 15
/PIA2_SEL
COMBINATORIAL ;
PIN 16
/RDIO_SEL
COMBINATORIAL ;
PIN 17
/WRIO_SEL
COMBINATORIAL ;
PIN 18
/SPARE_SEL
COMBINATORIAL ;
PIN 19
/BOOT_SEL
COMBINATORIAL ;
PIN 20
VCC
;
;----- Boolean Equation Segment. ---EQUATIONS
RAM_SEL
= (/A15)*E
EXTRA_SEL = ( A15*/A14*/A13)*E*RW
PIA1_SEL = ( A15*/A14* A13*/A12*/A11*/A10)
PIA2_SEL = ( A15*/A14* A13*/A12*/A11* A10)
RDIO_SEL = ( A15*/A14* A13*/A12* A11*/A10 + IO_EN)*(E* RW + RW_EN)
WRIO_SEL = ( A15*/A14* A13*/A12* A11* A10 + IO_EN)*(E*/RW + RW_EN)
SPARE_SEL = ( A15* A14*/A13)*E*RW
BOOT_SEL = ( A15* A14* A13)*E*RW
INPUT
INPUT
INPUT
INPUT
INPUT
INPUT
INPUT
INPUT
INPUT
GND
INPUT
OUTPUT
OUTPUT
OUTPUT
OUTPUT
OUTPUT
OUTPUT
OUTPUT
OUTPUT
VCC
;
;
;
;
;
;
;
;
$0000
$8000
$A000
$A400
$A800
$AC00
$C000
$E000
-
$7FFF
$9FFF
$A3FF
$A7FF
$ABFF
$AFFF
$DFFF
$FFFF
13
2. Using PALASM or a similar program, compile the PAL program to
generate a JEDEC file. (PALASM is a freeware program from AMD which runs
under DOS.)
3.
Using an EPROM programmer, program the PAL using the JEDEC file.
You can test your PAL by placing it in a solderless breadboard and
examining the outputs for different input combinations.
3.4.3
Board Layout
The next step is to lay out the components on the board.
First place the sockets and discrete components on the perfboard. The scale
drawing in Appendix 2 offers a suggested layout. Keep in mind that the DIP
wire-wrap sockets have an indentation which marks pin 1 of the chip. The
indentation on the socket corresponds to the indentation on the chip itself.
Next label the underside of the board. This will prevent errors when you
are wiring the board. It can be very frustrating to finish wiring a project, only to
find out that you’ve wired the chips backwards. White adhesive correction
tape, which can be found at office supply stores, works good for this purpose.
Also, you can buy preprinted labels for wire-wrapping if you don’t want to make
the labels yourself. For this project, Appendix 4 has some pre-printed labels
that you can cut out and glue to the board.
Now remove the discrete components and carefully turn the board over. Cut
out the labels in Appendix 4 and glue them underneath the appropriate sockets.
A knife and tweezers are helpful for placing the labels. Also, double check to
make sure you have the orientations correct.
14 Yerem: Build Your Own MC68HC11 Computer Trainer
3.4.4
How to Wire Wrap
Wire wrapping involves spinning 30-gauge wire onto special sockets with
rectangular posts in order to make point-to-point electrical connections. Does
that sound simple? Well, actually it is. Wire wrap connections are very
reliable and well suited for digital signals.
Some tools you might find useful for wire-wrapping are: tweezers, a wirewrapping tool, an X-Acto knife, diagonal cutters, needle nose pliers, and a
wrapping wire dispenser.
Here is a close-up picture of the wire-wrapping tool that Radio Shack
sells. It’s a manual tool which is very reliable. Also, hidden in the handle you
will find a handy wire stripper.
If you shop around you will find that there are many varieties of wirewrapping tools available. Some tools will dispense, strip and cut the wire
automatically for you and some are also motorized to spin the wire for you. I
personally use a manual tool because it is inexpensive and yields very reliable
results.
Here is a step-by-step description of wire-wrapping:
1. Strip off about a half-inch of insulation
from the end of the spool of wire.
2. Measure the point-to-point length
needed, keeping in mind an extra halfinch plus some slop.
15
3. Mark the length with your fingernail.
4. Cut the wire.
5. Strip off a half-inch of insulation from
the other end using some needle nose
pliers.
6. Place the wire in the special slot in the
tool with about an eighth-inch of
insulation inside of the tool. Bend the
wire at a right angle at the tip of the tool.
7. Place the tool over the first post. With
the forefinger of your free hand, hold the
socket to the board and with your
thumb, hold the wire taught. Turn the
tool in one direction until all of the bare
wire is spun onto the post.
Now, while holding the socket, give the
turns a push with the tool. This will
eliminate the gap between the turns and
the board, mechanically holding the
socket firmly to the board.
8. Place the free end of the wire into the
tool the same way as before, with about
an eighth-inch of insulation inside of the
tool.
16 Yerem: Build Your Own MC68HC11 Computer Trainer
9. Place the tool over the destination post
and pull the wire taught with some
pliers. Be careful not to break the wire.
10. Spin the wire onto the destination post
and give it a press when your done.
11. This is the end result.
To correct a mistake, you can spin the tool in the opposite direction which
removes the wire. Be careful though not to inadvertently unwrap any wires
underneath.
Here are some handy tips to follow when wire-wrapping:
• There should be about 1 turn of insulation and about 4 turns of bare wire
wrapped around a post.
• While spinning wires onto a post, be sure not to oppose the direction of wires
already tied there.
• Try not to tie too many wires to a single post. Four connections to a single
post is about the limit while two connections is the average.
• A nice straight connection usually works best. It may take a few trys to
thread the wire to its destination. Tweezers help for doing this.
• Try not to force the tool when you are spinning it because the wire may
break and you will have to start over. With a little practice, you will find
that a light touch works best.
• When wiring the discrete components, cut the leads to about 1/2 inch long.
• Be careful not to twist and break the leads of a discrete component.
• Do not solder the chip connections! Soldered wire-wrap connections are
impossible to remove if a mistake has to be corrected or if a repair is
needed. The wire-wrap connection alone is strong enough to last 10-20
years.
• Do not cut the wire wrapping pins if you can help it. Again, corrections and
modifications are easier to make if you leave the posts intact.
17
• Do solder the discrete component connections.
Discrete component
connections usually require some soldering since the leads are rounded,
unlike the rectangular wire-wrapping posts. As a result, there are no edges
for a wire to grip on to. A 15 watt soldering iron with a small tip does a
good job in this case.
• Don’t ruin your eyes. Use a magnifying glass and good lighting when you
work
Wire-wrapping can be a juggling act at times, but you will get used to it and
come across many tricks and shortcuts as you progress.
3.4.5
Wiring the Board
Now it’s time to do some wiring. While you are wiring the computer, you will
have to refer to the schematic diagram in Appendix 3. The schematic diagram
depicts all of the connections that must be made. It will be helpful to mark t h e
connections on the schematic with a red pencil as you wire them.
Before wiring, cut the leads of the discrete components to be 1/2 inch long.
Here is a step-by-step description of the wiring:
1.
Wire the Bypass Capacitors - Wire a 0.1µF tantalum bypass capacitor to
the power connections of all nine chips. The power connections for each chip
are listed in the table on the schematic diagram. The bypass capacitors
will help filter switching transients from the power lines. Since t h e
tantalum capacitors are polarized, be sure to wire the plus lead to the Vcc
connection and the other lead to ground.
When you spin the wire around each lead, be extra careful not to twist and
break the lead off. Also, the connection to the capacitor won’t be as good as
the connection to the chip since the leads on the capacitor are round with no
edges for the wire to grip on to. When we’re done with the whole computer
and see it working, we can solder the capacitor connections for extra
18 Yerem: Build Your Own MC68HC11 Computer Trainer
reliability. For now though, don’t solder anything just in case you need to
make corrections.
2.
Wire the Internal Connections - The internal connections in this case are t h e
leads which are grounded or pulled high. The 74HC373, the PAL16L8, t h e
27C64s, the HM62256 and the MAX232 all have internal connections.
3.
Wire the Multiplexed Address/Data Bus - These are the lines labeled AD0
through AD7 which connect the MC68HC11 to the 74HC245 and 74HC373.
4.
Wire the Data Bus - These are the lines labeled D0 through D7. The Data
Bus connects the 74HC373 to the 27C64s the HM62256 and the MC68B21.
5.
Wire the Address Bus - These are the lines labeled A0 through A15. The
lines A0 through A7 originate with the 74HC373 and go to the 27C64s t h e
HM62256 and the MC68B21, while the lines A8 through A15 originate
with the MC68HC11 and go to the 27C64s the HM62256 and the PAL16L8.
19
6.
Wire the Control Bus - The signals in the control bus include *RESET, AS, E,
R/*W, *BOOT, *SPARE, *RAM and *PIA1.
7.
Wire the 4.7kΩ Resistor Pack - These connections go to the MC68HC11. B e
careful, the pins are short and fragile. We’ll solder the connections later.
The pin with the dot above it is the common which goes to Vcc. You can use
tweezers to manually wrap the wires to the resistor pack. Alternately, you
can wire the pins first, then thread the wires through the board. In t h a t
case, you may need to drill the holes out a little.
8.
Wire the Reset Circuit - Use a resistor in the 4.7kΩ resistor pack for t h e
pull-up resistor. A bead of solder on each pin of the push-button will
mechanically secure it to the board. Be careful not to burn any of the wires.
9.
Wire the Crystal Connections - This includes wiring Y1, R2, C11 and C12 to
the MC68HC11.
20 Yerem: Build Your Own MC68HC11 Computer Trainer
10. Wire the J4 jumper - Cut off a 3x1 section of the header connector. Unbend
the right-angle pins so that they are straight. This will give us some extra
long pins to wire wrap to.
11. Wire the MAX232 - Wire the capacitors to the MAX232 and wire t h e
MAX232 to the micro.
12. Drill and Cut the Holes for the DB-9 Connector - Since the row of five pins
on the connector aren’t aligned with the perfboard, we need to cut a slot for
them. Also, drill out the two mounting holes.
13. Mount and Wire the DB-9 Connector - Connect the DCD, DSR, CTS and DTR
lines together. Also, prewire the TxD, RxD and GND lines with some wire
of an appropriate length. Now thread the three loose wires through t h e
perfboard, screw the DB-9 connector to the perfboard and wire the connector
to the MAX232.
21
14. Prepare the Wireless Breadboard - Cut off two small rectangles of the foam
backing of the wireless breadboard behind the top and bottom power strips.
Four metal strips should be exposed, two on the top and two on the bottom.
We will use these openings to wire power directly to the bread board. The
photograph in Step 15 shows the recommended orientation for the holes.
One thing to keep in mind is that the power strips on the breadboard are
actually divided in half. In other words, the strips don’t connect all t h e
way across. An easy solution is to put small jumper wires in the top of t h e
board.
15. Mount the Breadboard and Terminal Strip - Drill all the mounting holes for
the solderless breadboard and the terminal strip. Also, drill and cut t h e
two holes for the power connections to the breadboard. Screw on t h e
breadboard and terminal strip.
16. Wire the Terminal Strip - The connections to the terminal strip are
arbitrary. A recommended series of signals to bring out is listed on the label
in Appendix 4.
22 Yerem: Build Your Own MC68HC11 Computer Trainer
17. Wire the Power Connections , Power Connector and LED - Use heavier
gauge wire for the power busses. Wire the power busses on the breadboard.
You might want to paint the power busses on the breadboard so that you
remember the polarity.
The final step in construction is to solder the discrete components. Using a
15W iron with a small tip, place a small bead of solder on the discrete
component connections. After soldering the discrete components, you can cut
their leads shorter. Again, do not cut or solder the chip sockets. It’s a good
idea that you wait before doing any soldering until after the testing stage when
you are sure that the computer is working.
Additionally, it would be a good idea to add some standoffs to the corners
of the board. Machine screws work good for this purpose. Alternatively, you
can mount it in a box to protect the wiring. You might want to hold off on
mounting the computer until after the computer is tested out though.
Wow! That was a lot of work! Now it’s time to test the computer out.
23
4
Testing the Computer
Now let’s test the computer and see if it works. The testing stage is an
opportunity where you can learn the most, so try not to get frustrated i f
everything doesn’t work the first time. Every problem that you face can be
conquered with a little patience and the success will be rewarding and
educational. Turn on your detective skills. The process of elimination will
illuminate many hidden problems.
While you are testing, check for obvious errors. For example, go through
and double check your connections with a continuity tester. Sometimes a broken
or shorted connection is not visible to the naked eye. Remember, a single
miswired connection can have bad effects. Here is a common sense checklist to
keep in mind during the testing:
• Is the power on? Check the power light.
• Is the power supply set to +5 VDC? Be careful not to supply a high voltage
to the computer because that will damage the chips. On the other hand, i f
the power supply voltage is too low (<4 V) the LVI chip will activate
holding the computer in a Reset state.
• Are any chips loose? Check to make certain that each chip is firmly
plugged in.
• Is a pin bent under? Sometimes a chip’s pin can be bent underneath when
inserting the chip into its socket causing the pin not to make contact.
• Is a chip plugged in backwards or wired backwards?
Here is a step-by-step procedure for testing the computer:
1.
Check for shorts in the power buss with a continuity meter. If you use an
ohmmeter to check for continuity, keep in mind that the filter capacitors
will charge up giving you a changing reading. Now hook up a +5 VDC
power supply to the computer. With no chips installed, power t h e
computer and check each socket for power with a voltmeter. Make certain
that you read +5 VDC at the correct polarity.
Vcc
330 Ω
PA7
PA6
PA5
PA4
PA3
2.
Turn off the power and plug in the MC68HC11, the Test ROM, the 74HC373,
the 74HC245 and the PAL16L8. The Test ROM should be plugged into t h e
24 Yerem: Build Your Own MC68HC11 Computer Trainer
Boot ROM socket.
MC68HC11.
Also, wire five LEDs to PA3 through PA7 of t h e
It’s time to perform a smoke test. A smoke test is simply a test where you
turn on the project and check for smoke. After you turn on the computer, feel
each chip to make sure that none are getting hot. This could indicate a
backwards power connection. Keep one hand on the power switch and be
ready to turn off the power at the first sign of trouble.
Now check the LEDs. Are they blinking? Is the program running? If not,
it’s time to do some troubleshooting.
• Is the EPROM programmed properly?
• Is the PAL programmed properly?
• Is the crystal oscillator running? Check the E clock signal on an oscilloscope
and look for a 2 MHz square wave.
• Is the Reset line high? Try pressing the Reset button and see if the program
starts running.
3.
Don’t disconnect the LEDs yet. Turn off the computer and plug in t h e
MAX232 chip. Power up the computer again and perform another smoke
test. Make sure that the MAX232 is not getting hot. Using a voltmeter,
check pin 2 of the MAX232, it should be +10 VDC with respect to ground.
Now check pin 6, it should be -10 VDC with respect to ground. Also, make
certain that the test program is still running.
4.
For this step you need a serial terminal program for your personal computer.
Turn off the project, remove the Test ROM and plug the BUFFALO ROM in
its place (don’t plug the ROM in backwards). Also, make certain that t h e
J4 jumper is grounded.
Hook up the computer to the serial port on your personal computer. Set t h e
serial terminal program to 9600 Baud, 8 Data Bits, No Parity, 1 Stop B i t
and No Handshaking.
25
Now power up the computer and perform another smoke test. Did you get a
BUFFALO prompt similar to the one below? Try hitting the Return key on
your personal computer.
BUFFALO 3.4 (ext) - Bit User Fast Friendly Aid to Logical Operation
If nothing happened then:
• Is the DB-9 connector wired properly?
• Do you see a data transmission every time you hit the Reset switch? You
can check for this by placing an oscilloscope on the transmit pins, 10 and 7 of
the MAX232 and pin 43 of the MC68HC11.
• Did you plug in the right ROM (BUFFALO)?
• Are you connected to the correct serial port on your personal computer?
• Do you have a good connection between the two computers?
5.
Turn off the computer and plug the Test ROM into the Extra ROM socket.
Turn the computer back on and perform another smoke test. Now from
BUFFALO type: go C000 [ENTER]. Are the LEDs blinking? To stop t h e
program press the Reset button. Now, try disassembling the test program.
Type: asm C000 [ENTER]. Hit [ENTER] to advance to the next line. To
exit the disassembler type: [Control-A].
6.
Turn off the computer and plug in the HM62256. Turn the computer on and
perform the smoke test as usual. Using the BUFFALO Block Fill command,
try to write to locations in the RAM. Type: bf 7000 7100 AA [ENTER].
Now type: md 7000 [ENTER]. Were you successful writing to the RAM?
Also, try running the test program. Is it still working?
26 Yerem: Build Your Own MC68HC11 Computer Trainer
Vcc
330 Ω
PPA7
PPA6
PPA5
PPA4
PPA3
PPA2
PPA1
PPA0
7.
Turn off the computer and plug in the MC68B21. Wire eight LEDs to t h e
PIA. Perform the usual smoke test. Run the test program. Are the LEDs
blinking?
Congratulations!
scratch.
You have just built your own working computer from
27
5
Using the Computer
Now that the computer is finished you can start putting it to use. This section
will describe what is required to program your new computer.
In addition to reading this section, read through the MC68HC11A1 data
book, the MC6821 data sheet and the M68HC11EVB Evaluation Board user’s
manual. These documents cover a lot of information not dealt with here.
Our computer was designed to be similar to the Motorola MC68HC11
Evaluation Board (EVB) which you may be familiar with. Nonetheless, our
board has many differences from the EVB, so keep this in mind when you are
programming. This section will cover what those differences are.
5.1
Programming
When you are programming your computer, the most important thing to be
aware of is the memory map. The Chip Select PAL divides up the 64 k B
memory space among the external memory and peripherals while t h e
MC68HC11 handles the addressing of its internal devices. When there is an
address space conflict between the internal and external devices, the internal
devices have priority. In the memory map drawn below, you can see that t h e
internal RAM and Control Registers overlap the 32 kB of external RAM.
Boot ROM
5
E000-FFFF
10
Spare ROM
C000-DFFF
15
Internal EEPROM
B600-B7FF
20
PIA 2, A400-A7FF
PIA 1, A000-A3FF
WR IO, AC00-AFFF
RD IO, A800-ABFF
25
Extra ROM
PD2
PD3
PD4
PD5
PE0
PE1
PE2
PE3
VRL
VRH
PA0
PA1
PA2
PA3
PA4
PA5
PA6
PA7
PIA2
D0
D1
D2
D3
D4
D5
D6
D7
8000-9FFF
30
35
Main RAM
0000-7FFF
40
45
Internal Registers
1000-103F
50
Internal RAM
0000-00FF
A0
A1
IRQ
XIRQ
RESET
R/*W
E
PPB0
PPB1
PPB2
PPB3
PPB4
PPB5
PPB6
PPB7
CB1
CB2
PPA0
PPA1
PPA2
PPA3
PPA4
PPA5
PPA6
PPA7
CA1
CA2
Use this memory map to plan the organization of any hardware and
software that you add to the computer.
The MC68HC11 has a large number of on-chip peripherals to take
advantage of. The MC68HC11 data book describes how to program the on-chip
peripherals.
28 Yerem: Build Your Own MC68HC11 Computer Trainer
5.1.1
Using BUFFALO
The BUFFALO monitor program will allow you to do most of your program
development. In BUFFALO you can view and modify memory and registers,
assemble and disassemble programs, and perform advanced debugging. The
most important feature of BUFFALO is its Load command. It allows you to
download Motorola Hex (.s19) files to the computer’s RAM through the serial
port. Here is a procedure for using BUFFALO in your program development:
1.
2.
Write the source code.
Give the source code a base address somewhere in the RAM’s address
space between $0000 - $7FFF (watch out for the MC68HC11’s Control
Registers).
3. Cross-compile your program as an .s19 file.
4. At the BUFFALO prompt, type: load t [ENTER]. Now BUFFALO
will wait to receive a .s19 byte stream over the serial port. Use your
terminal emulator program to send the .s19 text file to BUFFALO.
5. If everything goes well, BUFFALO will print the message: done and
provide the command prompt again.
6. You can now run your program by using the go command.
If you forget a command in BUFFALO, typing: help [ENTER] will display
the list of commands. The EVB manual has detailed descriptions of the other
BUFFALO commands.
5.1.2
Programming Your Own ROMs
You can write your program to fit in a boot ROM. First you have to place t h e
program in the space between $E000 - $FFFF and place a jump vector to your
program in the address $FFFE. When your new ROM is programmed you must
physically remove the BUFFALO ROM and replace it with your new ROM.
Subsequently, your new program will run every time the computer is turned on.
Alternately, you can use the Spare ROM socket for your program. In this
case you must place your program within the space $C000 - $DFFF. This time
though, you won’t be able to modify the Reset jump vector to jump to your
program. You can either run your program from the BUFFALO prompt, or pull
the J4 jumper high to tell BUFFALO to jump to the first location of t h e
MC68HC11’s internal EEPROM at $B600. Then you simply need to put a jump
instruction at $B600 to call your new program. Keep in mind that the Spare
ROM socket is for your use and can be left empty most of the time.
Most of the time though, you will be loading your program into t h e
computer’s RAM and executing the program from there. The advantage of this
is that you will be able to rapidly change your program and try it out. The
disadvantage is that the program will disappear when the computer is turned
off.
5.2
Interfacing
In order to keep the design practical certain built-in resources of the MC68HC11
aren’t available on our computer. For example, in this design the pins PD0 and
PD1 are used for the serial port and as a result aren’t readily available for use
as digital I/O. Also, since the BUFFALO monitor program uses PE0 as an input
29
for the J4 jumper, PE0 shouldn’t be used for other purposes. Additionally, lines
PE4 through PE7 of Port E aren’t pinned out on the MC68HC11A1P version used
in this design. This is because the DIP (Dual Inline Package) version of t h e
MC68HC11A1 used here doesn’t have enough pins to accommodate all of Port E.
The pins PE4 through PE7 are only available on the PLCC (Plastic Leaded
Chip Carrier) version. The PLCC version wasn’t used for this project because i t
would have been harder to wire by hand. Finally, Port B, Port C, STRA and
STRB are unavailable because we are operating the MC68HC11 in expanded
mode as opposed to single chip mode. Expanded mode is what allows us to
connect external memory like the HM62256 RAM chip and the 27C64 EPROM
chip to the microprocessor.
Despite these limitations, expanded mode allows us to add as much I/O to
the computer as we require, albeit with a few extra chips required. In this
design, the MC68B21 chip augments the available digital I/O. The following
sections will describe how to use the MC68B21 and how add even more digital
I/O to the design.
5.2.1
How to use the MC6821
The MC6821 Peripheral Interface Adapter (PIA) chip provides bi-directional
digital I/O for the 6800 family of microprocessors with a minimum of fuss. The
MC6821 has two bi-directional 8-bit data ports along with two handshaking
control lines for each port. The handshaking lines allow each port to be used as
parallel communication ports.
(U2)
Vcc
MC68B21
D7
D6
D5
D4
D3
D2
D1
D0
CA2
CA1
PPA7
PPA6
PPA5
PPA4
PPA3
PPA2
PPA1
PPA0
26
D7
27
D6
28
D5
29
D4
30
D3
31
D2
32
D1
33
D0
24
CS1
22
CS0
35
RS1
36
RS0
23
*CS2
25
E
21
R/*W
34
*RESET
A1
A0
*PIA1 ($A000)
E
R/*W
*RESET
39
CA2
40
CA1
19
CB2
18
CB1
CB2
CB1
9
PA7
8
PA6
7
PA5
6
PA4
5
PA3
4
PA2
3
PA1
2
PA0
17
PB7
16
PB6
15
PB5
14
PB4
13
PB3
12
PB2
11
PB1
10
PB0
PPB7
PPB6
PPB5
PPB4
PPB3
PPB2
PPB1
PPB0
Internally, the MC6821 has six registers for operating the chip, three
registers for Port A and three registers for Port B. When RS1=0 the Port A
register set is selected and when RS1=1 the Port B registers are selected. When
RS0=1 the Control Register for the given port is selected. When RS0=0 t h e
register that is accessed depends on bit 2, the DDR Access Bit, of the Control
Register. If the DDR Access Bit is 0, the Data Direction Register is selected. I f
the DDR Access Bit is 1, the Peripheral I/O Register is selected.
The MC6821 Control Register
b7
IRQ A(B) 1
Flag
b6
IRQ A(B) 2
Flag
b5
b4
CA2 (CB2)
Control
b3
b2
DDR
Access
b1
b0
CA1 (CB1)
Control
30 Yerem: Build Your Own MC68HC11 Computer Trainer
The Data Direction Register for each port allows any of the lines on a port
to be configured as inputs or outputs. A zero bit will configure a line as an input
while a one bit will configure the line as an output. Similarly, the Peripheral
I/O Register allows you to read from and write to the I/O ports.
A simple procedure for programming a port on the MC6821 is to:
1.
2.
3.
4.
Set the DDR Access Bit in the Control Register to 0.
Program the Data Direction Register.
Set the DDR Access Bit in the Control Register to 1.
Access the Peripheral I/O Register to read and write the I/O port.
This procedure applies for both Port A and Port B. Once you have
programmed the Data Direction Register, you probably will want to leave t h e
DDR Access Bit set to 1 for the rest of the program.
Here is a code snippet which demonstrates how to program the MC6821:
clr
clr
ldaa
staa
ldaa
staa
ldaa
staa
staa
ldaa
staa
ldaa
$A001
$A003
#FF
$A000
#0F
$A002
#04
$A001
$A003
#FF
$A000
$A002
Set the DDRA Access Bit to 0.
Set the DDRB Access Bit to 0.
Set all bits on Port A to output.
Set upper bits of Port B to input and lower bits to output.
Set the DDRA Access Bit to 1.
Set the DDRB Access Bit to 1.
Turn on all of the bits on Port A.
Read Port B.
Check the MC6821 data sheet to find out how to use its more advanced
features.
Adding a Basic Input Port
If you need digital inputs, the following one chip circuit will do the job,
Data Bus
D7
D6
Control Bus
5.2.2
D5
D4
D3
D2
D1
D0
*RDIO ($A800)
74HC244
3
2Y4 2A4
5
2Y3 2A3
7
2Y2 2A2
9
2Y1 2A1
12
1Y4 1A4
14
1Y3 1A3
16
1Y2 1A2
18
1Y1 1A1
19
1
*2G
*1G
17
15
13
11
8
6
4
2
In7
In6
In5
In4
In3
In2
In1
In0
Vcc - Pin 20
Gnd - Pin 10
To read the current state of the input lines simply perform a read from t h e
address $A800. The following line of assembly language will read the values
of the eight input lines into the A register:
ldaa $A800
This circuit can apply to other type of digital input that you would want to
connect to the computer, such as an analog-to-digital converter.
31
5.2.3
Adding a Basic Output Port
Here is a circuit similar to the previous one which provides eight digital
outputs to the computer,
Control Bus
Data Bus
D7
D6
D5
D4
D3
D2
D1
D0
*RESET
*WRIO
74HC273
18
8D
8Q
17
7D
7Q
14
6D
6Q
13
5D
5Q
8
4D
4Q
7
3D
3Q
4
2D
2Q
3
1D
1Q
1
11
19
16
15
12
Out7
Out6
Out5
Out4
9
6
5
2
Out3
Out2
Out1
Out0
Vcc - Pin 20
*CLR
CLK
Gnd - Pin 10
A simple write to the address $AC00 will change the states of the outputs.
The following two lines of assembly language show how to do this:
ldaa #AA
staa $AC00
You can of course use this circuit as an example for connecting other types of
output devices to the computer.
Adding More PIAs
If you require more sophisticated I/O, you can add more PIAs to the computer.
Simply plug the new PIA into the breadboard and wire it directly to the data
bus through the terminal strip. The only difference between the second PIA and
the original one is that the *CS2 pin of the new PIA is connected to the *PIA2
signal. This means that the base address of the new PIA begins at $A400
instead of $A000.
D4
D3
D2
D1
D0
26
27
28
29
30
D7
D6
D5
D4
D3
31
D2
32
D1
33
D0
39
40
CA2
CA1
9
PA7
8
PA6
7
PA5
6
PA4
5
PA3
4
PA2
3
PA1
2
PA0
24
CS1
22
CS0
35
RS1
36
RS0
23
*CS2
25
E
21
R/*W
34
*RESET
19
CB2
18
CB1
PB7
PB6
PB5
PB4
PB3
A1
A0
Control Bus
Vcc
MC68B21
D7
D6
D5
Address Bus
Data Bus
5.2.4
*PIA2 ($A400)
E
R/*W
*RESET
Vcc - Pin 20
Gnd - Pin 1
17
16
15
14
13
12
PB2
11
PB1
10
PB0
Now you have two extra bi-directional ports to work with. Similarly, you
can add as many PIAs to the computer as you need, keeping in mind that there
are only a finite number of unused address locations available.
32 Yerem: Build Your Own MC68HC11 Computer Trainer
6
Conclusion
I hope this was a great learning experience for you. When I built my first
computer it was pretty frustrating. Part of the frustration was due to t h e
complexity of the computer and part was due to errors in the instructions. I hope
that I’ve at least eliminated those two variables for you. Nonetheless, after a
lot of struggling I was able to get the computer working and learned a lot in t h e
process.
I’m sure you will get much use out of your new computer and I know there
will be more home-built computers in your future. Just think, ten years from now
you will look back fondly to this experience.
33
References
[1]
Ciarcia, Steve and Burt Brown. “Using the Motorola MC68HC11.”
Circuit Cellar INK 18 (1990): 36-48.
[2]
Farmer, Brian. “Planting Geraniums by Robot/Build an MC68HC11based 2-D Sensor.” Circuit Cellar INK 29 (1992): 12-21.
[3]
Greenfield, Joseph D. The 68HC11 Microcontroller. Orlando, FL:
Saunders College Publishing, 1992.
[4]
Motorola Inc. MC68HC11A8 Technical Data Book (Lit. No.
MC68HC11A8/D). Phoenix, AZ: Motorola Inc., 1991.
[5]
Motorola Inc. MC6821 Peripheral Interface Adapter Data Sheet (Lit.
No. MC6821/D). Phoenix, AZ: Motorola Inc., 1985.
[6]
Motorola Inc. M68HC11EVB Evaluation Board User’s Manual (Lit. No.
M68HC11EVB/D1). Phoenix, AZ: Motorola Inc., 1986.
[7]
Olney, Bruce L. “Inexpensive 68HC11 Cross-development.” Circuit
Cellar INK 44 (1994): 22-29.
[8]
Swiger, Frank and Joe Glover. “The FS-100 MC68HC11-Based SingleBoard Computer.” Circuit Cellar INK 24 (1991): 52-59.
34 Yerem: Build Your Own MC68HC11 Computer Trainer
Appendix 1 - Master Parts List
This is the master parts list for the prototype computer that was built. The
quantity, manufacturer, manufacturer part number and general description is
shown. Specific manufacturers aren't listed for easy to find generic parts.
#
1
1
1
1
1
2
1
1
1
U1
U2
U3
U4
U5
U6, U7
U8
U9
U10
1
1
1
1
1
4
2
9
Y1
RP1
R1
R2
C1
C13-C16
C11, C12
C2-C9
Part No.
MC68HC11A1P
MC68B21
74HC373
74HC245
16L8B
27C64-250
HM62256LP-10
MAX232CPE
MN13811-Q
Manufacturer
Motorola
Motorola
123-93-648-41-001
Mill-Max
PC Board Mount Green LED With Holder
SPST Momentary Square Yellow Pushbutton
2 Position Terminal Block
6"x8” IC-Spacing Perfboard
6.5" Solderless Breadboard w/Power Busses
54 Point Terminal Strip with Solder Tails
5381H5
520-01-2
ED1609
276-1396
923252
923292
Industrial Devices, Inc.
E-Switch
On-Shore Technology, Inc.
Radio Shack
3M
3M
1
Male-Female DB-9 Cable (2m)
AK131-2
Assmann
1
Wrapping Wire, 50’ Spool
1
1
1
Maxim
Panasonic
8.0 MHz Crystal
4.7 kΩ SIP 7 Resistor Network
330 Ω 1/4 W Resistor
10 MΩ 1/4 W Resistor
100 µF Radial Electrolytic Capacitor
10 µF Radial Electrolytic Capacitor
22 pF Ceramic Capacitor
0.1 µF Tantalum Capacitor
Right Angle PC Mount Female DB-9 Connector
J4
J4
1
3
3
1
1
1
1
1
1
1
1
Part Description
8-bit HCMOS MCU
PIA 2 MHz
Octal Tri-State D Type Latch
Octal Tri-State Transceiver
PAL 16L8B 15ns
8kx8 ≤250ns EPROM
32kx8 ≤250ns Static RAM
+5V Powered Dual RS-232 Trans./Rcvr.
3.8V O.D. Low Voltage Detector
Shorting Jumper Block
1x3 WW Header Pins
16-Pin DIP WW Socket 3-Level
20-Pin DIP WW Socket 3-Level
28-Pin DIP WW Socket 3-Level
40-Pin DIP WW Socket 3-Level
48-Pin DIP WW Socket 3-Level
LED1
35
Appendix 2 - Suggested Board Layout
+
C14
C13
+
+
+
(EEPROM)
J4
(BUFFALO)
(U9)
MAX232
C2
C15
+
C16
5
RP1
C11
(U5)
PAL16L8B
RESET
10
+
C3
C12
R2
Y1
U10
15
+
(U1)
MC68HC11
C4
20
C10
(U4)
74HC245
25
+
C6
(U3)
74HC373
+
+
C5
(U8)
HM62256-LP15
30
+
C7
35
(U6)
27C64-250
40
+
C8
(U7)
27C64-250
45
50
+
C9
(U2)
MC68B21
R1
+
C1
LED1
36 Yerem: Build Your Own MC68HC11 Computer Trainer
Appendix 3 - Schematic Diagram
Address Bus (A0:A15)
Vcc
(RP1)
4.7 kΩ
(U1)
(U3)
MC68HC11A1P
25
MODA(*LIR)
PB7
24
MODB(Vstby)
PB6
PB5
41
PB4
*IRQ
40
*XIRQ
PB3
VRH
VRL
PE3
PE2
PE1
J4
PE0
PD5
PD4
PD3
PD2
PD1
PD0
PA7
PA6
PA5
PA4
PA3
PA2
PA1
PA0
20
PE3/AN3
19
PE2/AN2
18
PE1/AN1
17
PE0/AN0
74HC373
AD7 1 8
8D
8Q
AD6 1 7
7D
7Q
AD5 1 4
6D
6Q
AD4 1 3
5D
5Q
AD3 8
4D
4Q
AD2 7
3D
3Q
AD1 4
2D
2Q
AD0 3
1D
1Q
A15
A14
A13
A12
A11
A10
A9
13
14
PB2
15
PB1
16
PB0
22
VRH
21
VRL
47
46
45
44
43
9
10
11
12
A8
PD5/*SS
PD4/SCK
1
PA7/PAI/OC1
2
PA6/OC2/OC1
3
PA5/OC3/OC1
4
PA4/OC4/OC1
5
PA3/OC5/OC1
6
PA2/IC1
7
PA1/IC2
8
PA0/IC3
A7
A6
A5
A4
A3
A2
A1
1
27
A0
1
*OE
*CE
AD7
AD7
AD6
AD5
AD4
AD3
AD2
AD6
AD5
AD4
AD3
AD2
AD1
AD0
AD1
AD0
19
*EN
11
B8
12
B7
13
B6
14
B5
15
B4
16
B3
17
B2
18
B1
1
A-B
9
A8
8
A7
7
A6
6
A5
5
A4
4
A3
3
A2
2
A1
D7
D7
D6
D5
D4
D3
D2
D6
D5
D4
D3
D2
D1
D0
D1
D0
74HC245
(U4)
19
O7
18
O6
17
O5
16
O4
15
O3
13
O2
12
O1
11
O0
1
27
Vpp
*PGM
22
*OE
*CE
Vcc
3
123
(C12)
22 pF
Vcc
GND
U1
U2
U3
U4
U5
MC68HC11A1P
MC68B21
74HC373
74HC245
PAL16L8-12
48
20
20
20
20
23
1
10
10
10
U6,U7
U8
U9
27C64-250
HM6264-LP15
MAX232CPE
28
28
16
14
14
15
(U9)
MAX232CPE
10
PD0
9
T
11
7
TxD
2
8
RxD
3
14
T
12
1
4
13
D5
D4
D3
D2
D1
D0
D7
D6
D5
D4
D3
8 CTS
DTR
D2
D1
D0
5
CA2
1
(C14)
3
10µF
2
(C13)
10µF
C1+
C2+
C1-
C2-
V+
V-
4
CA1
(C15)
5
11
9
E
R/*W
*BOOT ($E000)
20
*SPARE ($C000)
20
19
I/O7
18
I/O6
17
I/O5
16
I/O4
15
I/O3
13
I/O2
12
I/O1
11
I/O0
*OE
1
A14
2 6 A13
A13
2
A12
A12
2 3 A11
A11
2 1 A10
A10
A9
24
A9
A8
25
A8
A7
3
A7
A6
4
A6
A5
5
A5
6
A4
A4
A3
7
A3
A2
8
A2
A1
9
A1
A0
10
A0
A14
R/*W
*CE
27
20
(U2)
MC68B21
DCD
6 DSR
9
R
D7
D6
22
7
R
I
PPA7
PPA6
PPA5
10µF
6
PPA4
PPA3
PPA2
PPA1
PPA0
(C16)
10µF
Vcc
26
D7
27
D6
28
D5
29
D4
30
D3
31
D2
32
D1
33
D0
39
CA2
40
CA1
9
8
7
6
5
PA7
PA6
PA5
PA4
PA3
4
PA2
3
PA1
2
PA0
(R1)
330 Ω
100µF
(LED1)
(C2)
(C9)
0.1µF
0.1µF
A1
A0
*PIA1 ($A000)
E
R/*W
*RESET
19
CB2
18
CB1
CB2
17
PB7
16
PB6
15
PB5
14
PB4
13
PB3
12
PB2
11
PB1
10
PB0
PPB7
PPB6
PPB5
Vcc
(C1)
R/*W
*RAM ($0000)
Vcc
24
CS1
22
CS0
35
RS1
36
RS0
23
*CS2
25
E
21
R/*W
34
*RESET
Input/Output Bus
+5 VDC
Control Bus
(U8)
HM62256-LP15
(Bottom)
PD1
I
Address Bus (A0:A15)
29
(U10)
MN13811-Q
1
2
LVI
(Y1) 8.0 MHz
(C11)
22 pF
I
I
*RDIO
*PIA2
*PIA1
*EXTRA
*RAM
*RESET
EXTAL
(R2) 10 MΩ
1 9 *BOOT
1 8 *SPARE
1 7 *WRIO
16
15
14
13
I/O 1 2
O
7
8
A3
A2
A1
A0
39
RESET
XTAL
A14
A13
A12
A11
A10
(U5)
PAL16L8-12
1
I
O
2
I
I/O
3
I
I/O
4
I
I/O
5
I
I/O
6
I
I/O
2
A12
A12
2 3 A11
A11
2 1 A10
A10
24
A9
A9
25
A8
A8
3
A7
A7
4
A6
A6
5
A5
A5
A4
6
A4
7
A3
A3
8
A2
A2
9
A1
A1
10
A0
A0
Vcc
(RP1)
4.7 kΩ
30
A9
A8
A7
A6
A5
A4
A15
(U7)
27C64-250
Vcc
*RESET
24
25
3
4
5
6
7
8
A2
9
A1
10
A0
Vpp
*PGM
22
2
A12
2 3 A11
2 1 A10
E
R/*W
38
PC7
37
PC6
36
PC5
35
PB4
34
PC3
33
PC2
32
PC1
31
PC0
PD3/MOSI
PD2/MISO
PD1/TxD
42
PD0/RxD
9
6
5
2
*OE
C
11
26
AS
27
E
28
R/*W
19
16
15
12
Data Bus (D0:D7)
Vcc
(U6)
27C64-250
19
A12
O7
18
D6
A11
O6
17
D5
A10
O5
D4
16
A9
O4
D3
15
A8
O3
D2
13
A7
O2
12
D1
A6
O1
11
D0
A5
O0
A4
Vcc
A3
D7
CB1
PPB4
PPB3
PPB2
PPB1
PPB0
37
Appendix 4 - Wire Wrapping Labels
CA2
CA1
PPA7
PPA6
5
25
PPA5
50
PPA4
48
PPA3
PPA2
MC68HC11A1P
PPA1
24
1
10
PPA0
45
CB2
CB1
21
PPB7
40
PPB6
MC68B21
15
PPB5
40
PPB4
20
PPB3
1
PPB2
PPB1
15
28
20
PPB0
35
E
R/*W
HM62256
RESET
14
XIRQ
1
25
IRQ
30
A1
A0
28
27C64
14
1
15
28
HEADER
15
27C64
D7
D6
14
1
30
D5
25
D4
D3
11
D2
20
PAL16L8
10
D1
1
35
D0
20
PIA2
11
74HC373
10
20
PA7
1
PA6
PA5
40
11
74HC245
10
PA4
20
PA3
1
PA2
15
PA1
PA0
9
8
MAX232
16
45
VRH
10
VRL
1
PE3
PE2
PE1
GND
50
PE0
PD5
+5V
PD4
PD3
PD2
5