1
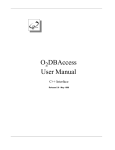
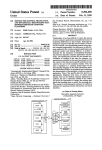
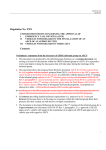
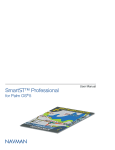
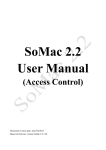
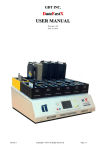
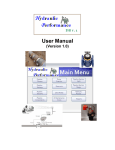
Pear Privacy 1.2 User Guide
_____________________________________________________________________________________________________________________________________________
Table of Contents
Introduction
•
Description
•
Features
•
System requirements
Installation
Program concepts
Interface
First launch
Entering the program
Using Mаin window
Using Password Generator
Using New/Edit/View Record window
Using Edit Templates window
Using New/Edit Template window
Using Edit Fields window
Using New Field window
Using Edit Field window
How to change the password
How to set an icon
How to add a note
Using Settings window
Interface settings
•
How to enable/disable tips for buttons
Security settings
•
Encryption mode
•
Freezing the password input for ten seconds because of three wrong attempts
•
How to lock the program for the time when device in Sleep mode
Checking database integrity
About window
Registration window
How to uninstall the program
Introduction
_____________________________________________________________________________________________________________________________________________
Description
You don't need to keep in memory dozens of passwords for credit cards, bank accounts, web accounts and
others any more, you can simply store them in your PDA using PearPrivacy. The only thing you have to memorize
now is the password for this application. PearPrivacy is the best way to keep your personal information safe. The
application uses safe and fast cryptography algorithm in combination with easy to use interface.
Features
•
•
•
•
•
•
•
•
•
•
•
•
Cryptography algorithm Blowfish
Hashing algorithm Sha-1
CBC (Cipher Block Chaining) support
All records are always codified and ordered
Password generator
Quick Search feature
Creating templates for different types of data
Each record can be bind with an icon or note
Unlimited amount of records, data templates, fields
Auto lock when the device goes to the sleep mode
Unique collection of icons
Useful and user friendly interface
System requirements
•
•
•
Supports all handhelds running Palm OS 4.0 or later.
Supports Hi-Res (320x320), Hi-Res Plus Portrait (320x480) and Landscape (480x320) mode displays.
Supports 1/2/4/8/16-bit displays.
Installation
_____________________________________________________________________________________________________________________________________________
If you have PearPrivacy 1.0 installed, you would only synchronize "PearPrivacy.prc" file to your device (be
careful, don’t install other files with .pdb extension because it will remove all data which you created using the previous
version of the program).
If you don’t have PearPrivacy 1.0 on your device you have to install version 1.1 with sample databases. For
this
purpose
synchronize
"PearPrivacy.prc",
"PearPrivacyTemplates.pdb",
"PearPrivacyFields.pdb",
"PearPrivacyData.pdb". Default password for the sample database is “1111”. Later you may change it to the other one.
Attention!!! Don’t delete
"PearPrivacyData.pdb".
or
replace
these
three
files
from
your
2
device:
"PearPrivacyTemplates.pdb",
"PearPrivacyFields.pdb",
Program concepts
_____________________________________________________________________________________________________________________________________________
PearPrivacy was created to keep your personal information safe. In general our program can help you to
save/edit/view your personal information like the passwords for the credit cards and web accounts, registration codes
for the programs, notes and all other information you want to keep beyond the reach of others.
Program based on two algorithms, the first one is a cryptography algorithm Blowfish and the second one is a
hashing algorithm Sha-1. PearPrivacy uses a special way for storing you data which makes impossible to get access
to it for unauthorized persons: floating size of the data fields in the database table, prohibition of saving not codified
data. Besides your data is decoded only when your need it to give faster performance.
PearPrivacy based on the basic principles of databases. Relations between the elements you can see below:
Description
My home OS
logon
Your data
record
OS Logon
Template23
Username
Passw ord
Dom ain
Field1
Database structure in the case of one record
Field23
Field35
Field14
Database structure in general case
So changing the template will cause changes in all the records of this template. For example we removed the field
“Domain” from the template “OS logon” as a result the field “Domain” was removed not only from the record “My home
OS logon” but also from all the records related to the template “OS logon”:
Removing the field “Domain” from
the template “OS logon”
Template: OS Logon
Field1:Description
Removing the field “Domain” will cause that it will be removed from all the
records which are related to the template “OS logon”
Record1: My Os Logon
RecordN: My Os Logon2
Description: My Os Logon
Description: My Os Logon2
Username: Somebody
Username: white
Password: 123456
Password: 435322
Field2:Username
Field3:Password
Field4:Domain
Let’s make an example of replacing the fields in the template “OS logon” (let’s replace the fields “username” and
“password”):
Replacing the fields
Template: OS Logon
Logon
Removing the field ‘Domain’ from the records which are related to the
template ‘OS logon’
Record1: My Os Logon
RecordN: My Os Logon2
Field1:Description
Description: My Os Logon
Description: My Os Logon2
Field2:Username
Password: Somebody
Password: white
Field3:Password
Username: 123456
Username: 435322
3
Interface _____________________________________________________________________________________________________________________________________________
The application was created for the fast and comfortable work. So let’s take a look at the main control elements.
ComboBox
Table header, using it, you can sort data in the columns
Sort flag
You can deselect records by pushing here
This column is used for showing the icon and selecting the records
the Button tip
Control Panel with the buttons
Quick Search feature
- this color means that the record was selected
First launch _____________________________________________________________________________________________________________________________________________
At the first launch you have to input the password, you may do it using Graffiti or key input. The best way for
creating a strong password is using symbols in uppercase and lowercase, numbers, special symbols. Such password
will be very safe and hard to break (for example: e_f4G!8g^t). Don’t create weak passwords (for example: the date of
your birth, your telephone number, the name of your pet and so on). The passwords like these ‘1111, 1234, qwerty,
asdf’ are easy to break too. The most strong password consists of random symbols of different types.
This window can be shown in two ways:
Number view
Symbol view
Then you have to confirm the password.
Attention! Minimum password length – 4 symbols.
Entering the program
_____________________________________________________________________________________________________________________________________________
Entering the program you see the information window which tells when the trial period will be finished. If the
trial period ends you will have to buy the application or exit. After program purchase this window will never appear
again.
When you enter the application you always have to input your password and then push “Enter”. For changing
the views you can use special buttons.
Number view
Symbol view
,
- to change the window views
- to erase the previous symbol
- to erase all symbols
- to hide the text
- to enter the application
- hint to remember the password
4
Using Mаin Window
_____________________________________________________________________________________________________________________________________________
At the top right corner you can see ComboBox, it shows the name of the active template, there is
a table with the records which belong to this template below.
If you want to edit the record, tap it and New/Edit/View record window will appear.
- to add a new record
- to delete the selected record (the group of the records)
- to hide the contents of the second field
- to lock program
- to find record
Note: you can find record using Quick search, simply input the previous symbols of the record name
To show the records of the another template or all records or to go to the Edit window of the templates you
have to use Combo Box at the top right corner of the window. After pushing it the popup list will appear, there you can
make a selection.
Main Form menu
Lock now – to go to the password input window
Password Generator – to go to the window for generating password
Exit – to exit the program
Select All – to select all strings
Clear Selection – to clear selection
Invert Selection – to invert selection
New record – to add a new record
Delete – to delete the record or the group of the selected records
Edit templates – to go to the Edit Templates window
Edit fields – to go to the Edit Fields window
Change password – to change the current password
Settings – to set security and interface settings
Recover DB integrity – to repair the errors in the databases
Registration – to go to the Registration window
About – to go to the application information window
Generating the passwords
_____________________________________________________________________________________________________________________________________________
This program includes the password generator, which can be launched during the process of editing
the record. Moreover you can use password generator in Main window.
Generated password
Password strength
Symbols which can be used in the generation process
Password length
5
Using New/Edit/View Record Window
_____________________________________________________________________________________________________________________________________________
After pushing the button Add record or tapping the record in the table of the Main window you will see the window for
viewing and editing the records. The window consists of the three parts, on the left side you can see the names of the
fields, on the right one you can see their contents, below – Control Panel.
At the top right corner you can see ComboBox, it shows the name of the active template. To choose
the another template, tap ComboBox and then select what you want from Popup list (all changes
you have made with the record will not be saved in this case).
When you tap one of the field you can edit it
The name of the field (not editable)
Contents of the field (editable)
Control Panel
Control Panel
Control Panel is the part of the main window where you can find control buttons.
Push
to save the changes and to return to the Main window
Push
to discard the changes and to return to the Main window
Push
to remove the current record
Push
to make the text of the current record invisible
Push
to generate the password for the selected field
Push
to edit the note
Push
to choose an icon
New/Edit/View Record Form menu
Generate Password – generating the password for the current field
Save&New – to save the current record or to create the new one
Save&Clone – to save or duplicate the current record
Delete – to delete the current record
Export to Memo – to export the current record into Мемо
Edit Template – to edit the template to which the current record belongs
Edit Note – to edit the record note
Select Icon – to select the icon for the record
Standard Palm OS Clipboard routines
Using Edit Templates Window
_____________________________________________________________________________________________________________________________________________
You can go to Edit Templates window using System Menu or ComboBox on the Main window.
6
You can use Edit Templates window for creating a new template, deleting the template or group of the templates
By tapping the table header you can sort the data in the field
Push
- to go back to the Main window
Push
- to add a new template
Push
- to delete the selected template (the group of the templates)
To edit the template, tap it in the table.
Default icon
The name of the template
Note: you can quickly find template using Quick search
Attention! Be attentive when you are deleting the template which has related data. You will be answered about deleting this data. If you push “Yes”
all related data will be completely removed.
Using New/Edit Template Window
_____________________________________________________________________________________________________________________________________________
To make editing/creating of the templates more comfortable, possibilities of fields editing are included in the form.
The name of the template
The list of all fields in which you can choose or edit the fields
The list of all fields of the current template
The column for selecting the records
Control buttons
Control Panel
New/Edit template window is a good way for creating the template of the document. In the table of the window you
can select the records, which you want to remove. Besides there is an opportunity of moving the fields of the template.
Tap the field, then you can move it up and down
It’s very simple to add or to delete the field
To choose the new field you should tap the old one. After that the popup window will appear in which
you can select the necessary field.
To add a new field you can use
To remove the selected field use
Note: you can quickly find field in Popup list using Quick search
7
(select the necessary field in the list)
Another way for creating/editing of the fields
There is a list of all available fields in the right table. You can change them, add new ones, delete
useless fields without using special form for fields editing.
To change the field you should tap it. After that the popup window will appear in which you can edit
name of the field.
To add a new field to the list you should tap
To delete the selected field(s) from the list, select the field(s) and then tap
To add the fields to the template select them in the list and then tap
To delete the fields from the current template select them in the list and then tap
Note: you can quickly find field in Popup list using Quick search
Attention! “Description” is the default field and you can’t delete or move it
Control Panel
Control Panel is the part of the main window where you can find control buttons.
Push
to save the changes and to return to the Edit Templates window
Push
to discard the changes and to return to the Edit Templates window
Push
to remove the current record
Push
to choose an icon
When you change the order of the fields in the template there are no changes in the related data. So we can get this
case:
Before the template change
After the template change
Attention! Edit the templates which has related data accurately.
Attention! If number of the fields in the template after editing became smaller so some data records related to this template were truncated.
Using Edit Fields Window
_____________________________________________________________________________________________________________________________________________
You can go to the Edit fields window using System Menu
You can use Edit Fields window for creating or removing the field or the group of the fields
Tapping the table header you can sort the field
- to go back to the Main window
- to add a new field
- to delete the selected field (the group of the fields)
To edit the template, tap it in the table.
Control Panel
Note: you can quickly find field using Quick search
Attention! You can’t remove the field if it is used in one of the templates. To remove the field you have to edit the template, which contains this
field.
Attention! “Description” is the default field and you can’t remove or change the name of it.
8
Using New Field Window
_____________________________________________________________________________________________________________________________________________
If you want to create a new field, push “Ok” in another case push “Cancel”
Attention! The name of the field is a unique value and you can’t create fields with the same names.
Using Edit Field Window
_____________________________________________________________________________________________________________________________________________
If you want to edit the field, push “Ok” in another case push “Cancel”
Attention! The name of the field is a unique value and you can’t create fields with the same names.
Attention! Be careful when you are changing the name of the field which used in the template structure because the changes will appear not only in
the template but also in the related data.
For example let’s rename “password” into “password2”:
Before renaming
After renaming
How to change the password
_____________________________________________________________________________________________________________________________________________
You can always change the password for access to PearPrivacy. You can do this using System Menu of the
Main window
You have to input the old password, then new one and then confirm it.
9
How to Set an Icon
_____________________________________________________________________________________________________________________________________________
You can select icon for the record using the special window. Simply choose the icon you want and then push it.
Ок – to save the chosen icon
Cancel – to cancel the choice
No icon – you don’t want to select any icon
How to add a Note
_____________________________________________________________________________________________________________________________________________
Ок – to save the text
Cancel – to return back to the previous window without save
Using Settings window
_____________________________________________________________________________________________________________________________________________
You can always change the settings of the application. You can go to the Settings window using System Menu
of the Main window.
Settings window consists of two parts: Interface and Security settings.
Interface settings
•
You can enable or disable tips for buttons using the element ‘Show buttons prompting’
Security settings
•
•
•
In the version 1.1 new cryptography mode CBC (Cipher Block Chaining) appeared. In contrast to ECB
(Electronic Code Book) mode, CBC provides much more protection. We recommend you to use this
mode.
As a default there is a 30 second password input freeze after every three wrong attempts to enter the
application. You can disable this option, check ‘30 sec pause after 3 unsuccessful attempts’
There is a default option of freezing the program when the ‘Power off’ mode is activated . To disable
this function uncheck «Lock on power off»
Checking database integrity
_____________________________________________________________________________________________________________________________________________
If you have problems in program functionality, the reason of them may be deleting of one of the program
databases. Tap the menu item Recover DB integrity.
About window
_____________________________________________________________________________________________________________________________________________
About window shows where you can buy the application. Product Homepage is also presented there. Tap the
Register button to open the Registration window where you can enter the registration code. You’ll receive the
registration code after you purchase the product.
10
Registration window
_____________________________________________________________________________________________________________________________________________
You can purchase the application here: http://www.pearmobile.com/.
Once you purchase PearPrivacy the registration code will be e-mailed to you. After you receive it you should enter it in
the Registration window. To open this window, you should tap 'Registration' in System Menu.
How to uninstall the program
_____________________________________________________________________________________________________________________________________________
To uninstall the program, delete it from the handheld using the standard system dialog as well.
Note! All minor updates are free of charge for registered customers!
Free usage of PearPrivacy is limited by 14 days.
You can purchase it here:
http://www.pearmobile.com/
Product Homepage:
http://www.pearmobile.com/
For support and suggestions of improving our products please write to: [email protected] or fill out our Request Form
http://www.pearmobile.com/support/
Copyright © 2006-2009 PearMobile Ltd. All rights reserved.
[email protected]
11