1
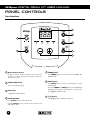
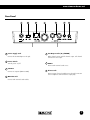
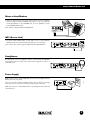
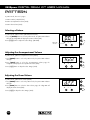
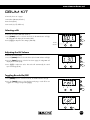
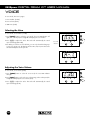
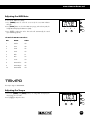
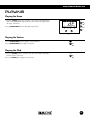
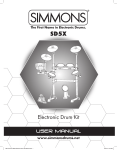
The First Name in Electronic Drums.
SD5Xpress
Electronic Drum Kit
user manual
www.simmonsdrums.net
Two (2) Year Limited Warranty
Subject to the limitations set forth below, Simmons® hereby represents and warrants that the components of this product shall
be free from defects in workmanship and materials, including implied warranties of merchantability or fitness for a particular
purpose, subject to normal use and service, for two (2) years to the original owner from the date of purchase.
Retailer and manufacturer shall not be liable for damages based upon inconvenience, loss of use of product, loss of time,
interrupted operation or commercial loss or any other incidental or consequential damages including but not limited to
lost profits, downtime, goodwill, damage to or replacement of equipment and property, and any costs of recovering,
reprogramming, or reproducing any program or data stored in equipment that is used with Simmons® products. This
guarantee gives you specific legal rights. You may have other legal rights which vary from state to state. Some states do
not allow limitations on how long an implied warranty lasts, so the above limitation may not apply to you.
Simmons
P.O. Box 5111
Thousand Oaks, CA 91359-5111
Customer Support
Monday - Friday 8:00 a.m.- 5:00 p.m. MST
(888)-621-4008.
All trademarks and registered trademarks mentioned herein are recognized as the property of their respective holders.
Made in China
FCC Statements
1. C
aution: Changes or modifications to this unit not expressly approved by the party responsible for compliance could void
the user’s authority to operate the equipment.
2. Note: This equipment has been tested and found to comply with the limits for a Class B digital device, pursuant to Part 15
of the FCC Rules. These limits are designed to provide reasonable protection against harmful interference in a residential
installation. This equipment generates, uses, and can radiate radio frequency energy and, if not installed and used in
accordance with the instructions, may cause harmful interference to radio communications. However, there is no
guarantee that interference will not occur in a particular installation. If this equipment does cause harmful interference to
radio or television reception, which can be determined by turning the equipment off and on, the user is encouraged to
try to correct the interference by one or more of the following measures:
•Reorient or relocate the receiving antenna.
•Increase the separation between the equipment and receiver.
•Connect the equipment into an outlet on a different circuit.
•Consult an experienced radio/TV technician for help.
1406-10159
www.simmonsdrums.net
Congratulations!
… on your purchase of Simmons’ SD5Xpress Electronic Drum Kit. To get the most enjoyment from this
kit, we recommend that you skim through this manual at least once, then refer back to it to learn more
about specific functions.
Taking Care of Your Digital Drum Kit
Location
• To avoid deformation, discoloration, or more serious damage, do not expose the unit to direct
sunlight, high temperature sources, or excessive humidity.
Power Supply
• Turn the power switch OFF when the SD5Xpress is not in use.
• The AC adapter should be unplugged from the AC outlet if the SD5Xpress is not to be used for an
extended period of time.
• Avoid plugging the AC adapter into an AC outlet that is also powering high-consumption appliances
such as electric heaters or televisions. Also avoid using multi plug adapters since these can reduce
sound quality, cause operation errors and result in possible damage.
• To avoid damage, turn OFF the SD5Xpress’s power switch and all related devices prior to
connecting or disconnecting cables.
Handling and Transport
• Never apply excessive force to controls, connectors, and other parts.
• Unplug cables by gripping the plug firmly. Do not pull on the cable.
• Disconnect all cables before moving the module.
• Physical shocks caused by dropping, bumping, or placing heavy objects on the module can result
in scratches and more serious damage.
Cleaning
• Clean the module with a dry, soft cloth.
• A slightly damp cloth may be used to remove stubborn grime and dirt.
• Never use cleaners such as alcohol or thinner.
• To avoid discoloration, do not place vinyl objects on top of module.
Electrical Interference
• The module contains digital circuitry and may cause interference if placed too close to radio or
television receivers. If this occurs, move the SD5Xpress further away from the affected equipment.
Service and Modification
• There are no user serviceable parts in the drum module.
• Do not attempt to open the drum module or make any change in the circuits or parts of the unit. This
would void the warranty.
3
The First Name in Electronic Drums.
SD5Xpress digital drum kit User manual
4
The First Name in Electronic Drums.
www.simmonsdrums.net
Table of Contents
Panel Controls
User Interface
Rear Panel
Connections
Pads and Pedal
Mixer or Amplification
MP3 (Aux in jack)
Headphones
Power Supply
MIDI and USB
Operation
Turning the Power On
Auto Power Off
Setting the Main Volume
Pattern
Selecting a Pattern
Adjusting the Accompaniment Volume
Adjusting the Drum Volume
Drum Kit
Selecting a Kit
Adjusting the Kit Volume
Toggling Reverb On/Off
Voice
Selecting the Voice
Adjusting the Voice Volume
Adjusting the MIDI Note
Tempo
Adjusting the Tempo
Click
Adjusting the Click Time Signature
Adjusting the Click Interval
Adjusting the Click Instrument
Adjusting the Click Volume
Playing
Playing the Demo
Playing the Pattern
Playing the Click
Appendices
Restoring factory Presets
Specifications
Preset Drum Kit List
Preset Pattern List
Preset Drum Instrument List
General MIDI Voice List
Percussion Set List
MIDI Implementation Chart
6
7
8
9
9
9
9
10
11
11
11
12
12
12
13
13
13
14
14
15
15
16
16
16
16
17
17
17
18
18
19
19
20
21
22
24
5
The First Name in Electronic Drums.
SD5Xpress digital drum kit User manual
PANEL CONTROLS
User Interface
3
SD5Xp
4
1
5
2
6
7
1 Master Volume Control
5 [MODE] Button
Control the volume of phone and line outputs. Turn knob
clockwise to increase the volume and counter-clockwise to
decrease the volume.
6 [PAGE] Button
2 [START/STOP] Button
Press [MODE] button to select the mode from PATTERN, KIT,
VOICE, CLICK.
Press [PAGE] button to browse the menu pages of current
selected mode.
Start or stop Pattern playing.
3 LED Display
3-digit LED and LED indicators.
7 [+]/[-] Button
4 [CLICK] BUTTON
Press [+]/[-] button to adjust the parameters.
Press [CLICK] button to start/stop the click.
Press both [MODE] and [PAGE] buttons, the 3-digit LED will
display the tempo page, it will display for 3 seconds, then
press [+]/[-] to adjust the value.
Hold the [CLICK] button 2 seconds to enter the demo mode
and play the demo.
6
The First Name in Electronic Drums.
www.simmonsdrums.net
Rear Panel
1
2
3
4
5
1 Power Supply Jack
Connect the 9V AC adaptor to this jack.
Turn the power on/off.
Connect to computer (MIDI via USB).
4 MIDI Out Jack
Right channel output and left channel output. Left channel
used as mono line output.
6 AUX In
3 USB Port
7
5 Line Output Jacks (R, L/MONO)
2 Power Switch
6
Connect with external sound source.
7 Phones Jack
Connect a pair of stereo headphones to this jack (connection
of the headphones will not mute the output jack).
Connect with external sound module.
7
The First Name in Electronic Drums.
SD5Xpress digital drum kit User manual
connections
CAUTION!
To prevent electric shock and damage to the device, make sure the power is switched
OFF on the sound module and all related devices before making any connection.
Pads and Pedal
Using the provided cables, connect the 1/8” jacks to the corresponding drum
pads, cymbal pads and 1/4” jack to kick pad. The pin connection will attach
to the serial port of the sound module. (See illustration.)
Note: The voice of the hi-hat pad is controlled by the hi-hat pedal. Similar to
a real drum kit, the hi-hat pad functions as an ‘open hi-hat’ when the pedal is
released. When the pedal is pressed down, it functions as a ‘closed hi-hat’.
Note: The striking area of cymbal pad (ride, crash or hi-hat) is near the edge
of the pad.
Cymbal Pad
Drum Module
To Crash
To Ride
From Drum
Module
To Hi-Hat
Drum Pad
To Tom 1
To Snare
To Tom 2
To Tom 3
Hi-Hat Pedal
To Hi-Hat
Control
To Kick
Bass Drum
8
The First Name in Electronic Drums.
www.simmonsdrums.net
Mixer or Amplification
1.When you want to listen to the voices send the drum to a mixer or amplifier.
Connect using the Output L/MONO and R jacks on the rear panel (for
monaural playback, use the L/MONO jack; for stereo playback, connect
both L/MONO and R jacks.)
2.The volume is adjusted with the VOLUME knob.
MP3 (Aux in Jack)
1.Use audio output of MP3 player, or other audio source, to connect with the
AUX IN jack on the rear panel. Play along with a pre-recorded track.
2.The volume of the external signal is adjusted with the VOLUME knob.
Headphones
An optional set of stereo headphones can be connected with the PHONES
jack located on the rear panel of the drum module. Adjust the volume to a
comfortable level.
Power Supply
Make sure the power is switched OFF and connect the power adaptor with the
DC IN jack on the rear panel.
Note: To protect the speakers, amplifier and the drum module from damage,
lower the volume to the minimum level before switching the power ON.
Make sure the power is switched OFF when connecting the drum module with
external devices.
9
The First Name in Electronic Drums.
SD5Xpress digital drum kit User manual
MIDI and USB
MIDI stands for Musical Instrument Digital Interface, this is a world-wide
standard communication interface that enables electronic musical instruments
and computers (of all brands) to communicate with each other so that
MIDI command and other data can pass between them. This exchange
of information makes it possible to create a system of MIDI instruments and
devices that offer greater versatility and control than is available with isolated
instruments. Whether you interface with computers, sequencers, expanders or
other controllers, your musical horizons will be greatly enhanced.
MIDI connection
MIDI OUT: This terminal transmits data from this instrument to other MIDI
devices.
USB connection
The USB connector allows you to connect the module directly to your computer.
It can be connected without driver installation under the Windows XP\Vista\
Windows 7 & MAC OSX environment.
The module will be recognized as ‘USB Audio device’ to receive and transmit
MIDI messages through a single USB cable, USB is used only for MIDI
messages (MIDI via USB).
Note: When the USB is connected to a computer, all MIDI messages will be
received and transmitted via USB.
10
The First Name in Electronic Drums.
www.simmonsdrums.net
OPERATION
Press [MODE] button to change between modes.
Press [PAGE] button to select the page of current mode. Press [+]/[-] button
to adjust the parameters.
Turning the Power On
After confirming all connections have been completed, lower the volume
(minimum volume level) before switching the power on.
VOLUME
Set the power switch to “ON” position to turn on the power. Display shows the
kit’s number and its indicator lights.
VOLUME
ON OFF
USB
ON OFF
USB
MIDI OUT
Auto Power Off
In order to save energy, we have designed the “Automatic Shutdown” function.
With this function, this product will shutdown automatically when you have left
it idle for more than 30 minutes.
If you don’t need this function, just press and hold the [START/STOP] button
then turn the drum on. You will also see the screen temporarily displaying
“PoF” for 3 seconds before entering the main menu which indicates that the
“Automatic shutdown” function is turned off.
PATTERN
KIT
VOICE
CLICK
PATTERN
KIT
VOICE
CLICK
MIDI OUT
Kit indicator
Kit indicator
Setting the Main Volume
VOLUME
While hitting a pad, gradually rotate the volume knob until a comfortable
volume level is reached.
VOLUME
11
The First Name in Electronic Drums.
SD5Xpress digital drum kit User manual
PATTERN
In pattern mode, there are 3 pages:
1.Pattern number (1-40, default 1).
2.Pattern accompaniment volume (0-32).
3.Pattern drum volume (0-32).
Selecting a Pattern
In pattern mode, pattern number (001-040, default 001):
CLICK
CLICK
1.Press the [MODE] button to select the pattern mode, the pattern LED indicator
will light, the 3-digit LED will display the pattern number (001).
2.Press[+]/[-] button to adjust the value. Range: (001-040).
MODE
MODE
CLICK
Pattern
Pattern LED
LED
indicator
indicator
Pattern LED
indicator
KIT
KIT
PATTERN
PATTERN
-
PATTERN
KIT
-
VOICE
VOICE
+
+
VOICE
CLICK
CLICK
PAGE TEMPO
PAGE TEMPO
MODE
CLICK
PAGE TEMPO
+
Adjusting the Accompaniment Volume
In pattern mode, pattern accompaniment volume (0-032):
CLICK
CLICK
1.Press [MODE] button to select the pattern mode, the pattern LED indicator
will light.
2.Press [PAGE] button to select the accompaniment volume page, the
3-digit LED will display the accompaniment volume (A22).
MODE
MODE
CLICK
PATTERN
PATTERN
-
PATTERN
3.Press [+]/[-] button to adjust the value. Range: (0-32).
KIT
KIT
KIT
-
VOICE
VOICE
+
+
VOICE
CLICK
CLICK
CLICK
PAGE TEMPO
PAGE TEMPO
MODE
PAGE TEMPO
+
Adjusting the Drum Volume
CLICK
CLICK
In pattern mode, pattern drum volume (0-032)
MODE
CLICK
MODE
1.Press [MODE] button to select the pattern mode, the pattern LED indicator
will light.
2.Press [PAGE] button to select the drum volume page, the 3-digit LED will
display the drum volume (d22).
PATTERN
PATTERN
-
PATTERN
-
3.Press [+]/[-] to adjust the value. Range: (0-32)
12
The First Name in Electronic Drums.
KIT
KIT
KIT
VOICE
VOICE
+
+
VOICE
+
CLICK
CLICK
CLICK
TEMPO
PAGE TEMPO
PAGE
MODE
PAGE TEMPO
www.simmonsdrums.net
drum kit
In kit mode, there are 3 pages:
1.Kit number (001-010, default 1).
2.Kit volume (0-32).
3.Kit reverb: (on/off, default on).
Selecting a Kit
CLICK
CLICK
CLICK
In kit mode, kit number (001-010, default 1).
1.Press [MODE] button to select the kit mode, the kit LED indicator will light,
the 3-digit LED will display the kit number (001).
2.Press [+]/[-] to adjust the value. Range: (001-010).
MODE
MODE
MODE
Kit LED
Kit
Kit LED
LED
indicator
indicator
indicator
PATTERN
PATTERN
PATTERN
KIT
KIT
KIT
-
VOICE
VOICE
VOICE
CLICK
CLICK
CLICK
PAGE TEMPO
PAGE TEMPO
PAGE TEMPO
+
+
+
Adjusting the Kit Volume
In kit mode, kit volume (0-32).
CLICK
CLICK
CLICK
1.Press the [MODE] button to select the kit mode, the kit LED indicator will light.
2.Press the [PAGE] button to select the kit volume page, the 3-digit LED will
display the kit volume (L30).
3.Press [+]/[-] to adjust the value. This value will automatically be saved
upon exit. Range: (0-32).
MODE
MODE
MODE
PATTERN
PATTERN
PATTERN
KIT
KIT
KIT
-
VOICE
VOICE
VOICE
CLICK
CLICK
CLICK
PAGE TEMPO
PAGE TEMPO
PAGE TEMPO
+
+
+
Toggling Reverb On/Off
1.Press [MODE] button to select the kit mode, the kit LED indicator will light.
CLICK
CLICK
CLICK
2.Press the [PAGE] button to select the kit reverb page, reverb effect can
toggled on or off by pressing button [+]/[-].
MODE
MODE
MODE
PATTERN
PATTERN
PATTERN
KIT
KIT
KIT
-
PATTERN
PATTERN
PATTERN
-
VOICE
VOICE
VOICE
CLICK
CLICK
CLICK
PAGE TEMPO
PAGE TEMPO
PAGE TEMPO
+
+
+
KIT
KIT
KIT
VOICE
VOICE
VOICE
CLICK
CLICK
CLICK
+
+
+
13
The First Name in Electronic Drums.
SD5Xpress digital drum kit User manual
voice
In voice mode, there are 3 pages:
1.Voice number: (1-108).
2.Voice volume: (0-32).
3.MIDI note: (0-99).
CLICK
MODE
Selecting the Voice
PATTERN
Voice LED
indicator
In voice mode, voice number: (1-108).
1.Press [MODE] button to select the voice mode, the voice LED indicator will
light, strike a drum pad, the 3-digit LED will display the voice number.
2.Press [+]/[-] to adjust the value. This value will automatically be saved
upon exit. Range: (001-108).
Note: When you select a voice for the hi-hit, you can only select the hi-hat group
voices, from groups 1-4. The display will show H-1, H-2, H-3, H-4. This value
will automatically be saved upon exit.
KIT
VOICE
CLICK
PAGE TEMPO
CLICK
-
+
MODE
PATTERN
Voice LED
indicator
KIT
-
PATTERN
CLICK
PAGE TEMPO
+
KIT
-
PATTERN
VOICE
VOICE
CLICK
+
KIT
-
VOICE
CLICK
+
Adjusting the Voice Volume
In voice mode, voice volume: (0-32).
CLICK
1.Press [MODE] button to select the voice mode, the voice LED indicator
will light.
2.Press [PAGE] button to select the voice volume page, strike a drum pad, the
3-digit LED will display the voice volume (L30).
3.Press [+]/[-] to adjust the value. This value will automatically be saved
upon exit. Range: (0-32).
MODE
PATTERN
KIT
VOICE
CLICK
PAGE TEMPO
CLICK
-
+
MODE
PATTERN
KIT
-
VOICE
CLICK
PAGE TEMPO
+
CLICK
MODE
PATTERN
KIT
-
VOICE
CLICK
PAGE TEMPO
CLICK
+
MODE
PATTERN
14
The First Name in Electronic Drums.
KIT
VOICE
+
CLICK
PAGE TEMPO
MODE
PATTERN
KIT
VOICE
CLICK
PAGE TEMPO
www.simmonsdrums.net
+
Adjusting the MIDI Note
In voice mode, MIDI note: (0-99).
CLICK
1.Press [MODE] button to select the voice mode, the voice LED indicator
will light.
2.Press [PAGE] button to select the MIDI note page, strike a drum pad, the
3-digit LED will display the MIDI note (n48).
3.Press [+]/[-] to adjust the value. This value will automatically be saved
upon exit. Range: (0-99).
MODE
PATTERN
KIT
-
VOICE
CLICK
PAGE TEMPO
+
The Default MIDI Note Numbers:
NO.
NAME
NOTE
1
Crash1
49
2
Tom1
48
3
Tom2
45
4
Tom3
43
5
Ride
51
6
Kick
36
7
Snare
38
8
Hi-Hat Close
42
9
Hi-Hat Open
46
10
Hi-Hat Pedal
44
tempo
The tempo range is 30-280 BPM.
Adjusting the Tempo
1.Press both [MODE] and [PAGE] buttons, the 3-digit LED will display the
tempo page for 3 seconds.
CLICK
MODE
2.Press [+]/[-] to adjust the value.
PATTERN
-
KIT
VOICE
CLICK
PAGE TEMPO
+
15
The First Name in Electronic Drums.
SD5Xpress digital drum kit User manual
click
In click mode, there are 4 pages:
1.Time signature: (1/4, 2/4, 3/4, 4/4, 5/4, 6/4, 7/4, 3/8, 6/8).
2.Interval: (1/4,1/8,1/12,1/16,1/24, default 1/4).
CLICK
3.Instrument: (1-5, default 1).
MODE
CLICK
4.Click volume: (0-32).
PATTERN
Click LED
indicator
Adjusting the Time Click Signature
-
PATTERN
In click mode, Time signature: (1/4, 2/4, 3/4, 4/4, 5/4, 6/4, 7/4, 3/8, 6/8).
Click LED
indicator
1.Press [MODE] button select the click mode, the click LED indicator will light.
2.Press [PAGE] button select the click time signature page, the 3-digit LED will
display the click time signature (4-4).
Click LED
indicator
3.Press [+]/[-] to adjust the value.
Range: (1/4, 2/4, 3/4, 4/4, 5/4, 6/4, 3/8, 6/8).
VOICE
KIT
VOICE
PATTERN
Click LED
indicator
KIT
-
PATTERN
+
CLICK
CLICK
CLICK
VOICE
KIT
VOICE
-
+
PAGE TEMPO
MODE
CLICK
+
KIT
PAGE TEMPO
MODE
CLICK
CLICK
PAGE TEMPO
MODE
PAGE TEMPO
+
Note: The click time signature will follow the pattern playing. It can not be edited.
CLICK
MODE
CLICK
Adjusting the Click Interval
PATTERN
In click mode, interval: (1/4, 1/8, 1/12, 1/16, 1/24, default 1/4).
1.Press [MODE] button to select the click mode, the click LED indicator will light.
2.Press [PAGE] button to select the click interval page, the 3-digit LED will
display the click interval (––4) .
3.Press the [+]/[-] button to adjust the value. Range: (––4 to –24).
-
PATTERN
KIT
VOICE
KIT
VOICE
PATTERN
-
PATTERN
VOICE
KIT
VOICE
+
PAGE TEMPO
MODE
CLICK
CLICK
PAGE TEMPO
MODE
CLICK
+
KIT
-
Adjusting the Click Instrument
+
CLICK
CLICK
CLICK
+
PAGE TEMPO
MODE
PAGE TEMPO
CLICK
In click mode, instrument: (1-5, default 1).
MODE
CLICK
1.Press [MODE] button to select the click mode, the click LED indicator will light.
2.Press [PAGE] button to select the click instrument page, the 3-digit LED will
display the click instrument (CL1).
3.Press [+]/[-] to adjust the value. Range: (CL1-CL5).
PATTERN
KIT
VOICE
CLICK
PAGE TEMPO
MODE
-
PATTERN
KIT
+
VOICE
CLICK
CLICK
PAGE TEMPO
PATTERN
MODE
CLICK
+
KIT
VOICE
CLICK
PAGE TEMPO
MODE
Adjusting the Click Volume
-
PATTERN
In click mode, click volume: (0-32).
1.Press [MODE] button to select the click mode, the click LED indicator will light.
2.Press [PAGE] button to select the click volume page, the 3-digit LED will
display the click volume (L24).
3.Press [+]/[-] to adjust the value. Range: (0-32)
KIT
-
+
VOICE
CLICK
PAGE TEMPO
CLICK
+
MODE
CLICK
PATTERN
KIT
VOICE
CLICK
PAGE TEMPO
MODE
-
PATTERN
KIT
+
VOICE
CLICK
CLICK
PAGE TEMPO
-
16
PATTERN
MODE
CLICK
+
KIT
VOICE
CLICK
PAGE TEMPO
MODE
The First Name in Electronic Drums.
-
PATTERN
KIT
+
VOICE
CLICK
PAGE TEMPO
www.simmonsdrums.net
playing
Playing the Demo
1.Hold the [CLICK] button for 2 seconds to enter demo mode and play the
demo. The 3-digit LED will display “dE”. The click indicator will light to follow
the tempo of the demo.
2.Press [START/STOP] button to play and stop the demo.
CLICKCLICK
MODEMODE
KIT
PATTERN
PATTERN
VOICEVOICE
CLICKCLICK
KIT
- -
TEMPO
TEMPO
PAGEPAGE
+ +
CLICKCLICK
Playing the Pattern
CLICK
1.Press [START/STOP] button to play the selected patterns.
MODE
2.Press [START/STOP] button again to stop play.
PATTERN
KIT
VOICE
-
Playing the Click
1.Press the [CLICK] button to start the click. The click indicator will light to
follow the tempo of the click.
CLICK
PAGE TEMPO
+
CLICK
2.Press the [CLICK] button again to stop the click.
17
The First Name in Electronic Drums.
SD5Xpress digital drum kit User manual
appendices
Restoring Factory Presets
Restoring the factory preset can be implemented by the following operations:
Turn on the power with both [+]/[-] pressed simultaneously.
This function will replace the current settings of the following parameters to their
default preset values:
Kit volume, voice number, voice volume and MIDI note.
Specifications
Drum Kit:
4 drum pads
3 cymbal pads
1 hi-hat control pedal
1 kick pad
Preset Drum Kits:
10 preset kits
Drum Instruments:
108
Preset Patterns:
40
Controls:
MIDI Out
Power Switch
USB
Phones
Start/Stop
Pattern
Kit
Voice
Click
Mode
Page
Demo
Tempo
Volume
+/-
Display:
LED Display
Connections:
Phones
Aux In
Output (R&L/MONO)
MIDI Out
USB
On/Off
Power Supply:
AC Adapter (
9V 500mA)
*Specifications may be changed or modified at any time without prior notice
18
The First Name in Electronic Drums.
www.simmonsdrums.net
Preset Drum Kit List
#
Name
#
Name
001 Acoustic
006 Jazz
002 Standard 1
007 Brush
003 Rock
008 Electronic
004 Standard 2
009 808
005 Funk
010 House
Preset Pattern List
#
Name
Tempo Kit
#
Name
Tempo Kit
001
Fusion1
103
1
022
Latin Jazz2
126
7
002
Electronic&Funk
116
9
023
Big Band2
152
6
003
Modern Pop
136
1
024
3/4 Jazz
120
7
004
Hiphop
110
9
025
Jazz
150
7
005
Latin Jazz1
130
7
026
6/8Ballad
96
3
006
Funk1
120
5
027
Pop Ballad
80
3
007
Big Band1
170
6
028
Pop Bossa
120
2
008
Funk2
112
1
029
16 Beat Pop
120
2
009
Pop Funk1
112
1
030
Pop Shuffle
86
2
010
Fusion2
112
1
031
Samba
236
1
011
Funk3
120
5
032
Mambo
126
2
012
Fusion3
108
1
033
Latin Rock
136
1
013
Fusion4
116
1
034
Latin Pop
126
2
014
Pop Funk2
106
5
035
Guitar Bossa
84
2
015
R&B
86
9
036
Country Blues
128
9
016
Drum n’Bass1
168
9
037
Rock
100
1
017
Break Beat
108
5
038
Reggae
78
1
018
Dance
130
9
039
60’s Rock
120
2
019
Drum n’Bass2
170
1
040
Blues
96
2
020
Latin Dance
126
5
Demo Funk
100
1
021
Swing
172
6
19
The First Name in Electronic Drums.
SD5Xpress digital drum kit User manual
Preset Drum Instrument List
KICK
001
002
003
004
005
006
007
008
009
010
011
012
013
014
Standard Kick 1
Standard Kick 2
Room Kick
Rock Kick 1
Rock Kick 2
Acoustic Kick
Hiphop Kick
Funk Kick
Jazz Kick 1
Jazz Kick 2
Electron Kick
808 kick
House Kick1
House Kick 2
SNARE
015
016
017
018
019
020
021
022
023
024
025
026
027
028
029
030
031
032
033
Classic Snare 1
Classic Snare Rim 1
Classic Snare 2
Classic Snare Rim 2
Room Snare 1
Room Snare 2
Acoustic Snare
Acoustic Snare Rim
Funk Band Snare
Funk Band Snare Rim
Camco Snare
Camco Snare Rim
Brush Snare
Brush Snare Rim
Electronic Snare 1
Electronic Snare 2
808 Snare
House Snare 1
House Snare 2
TOM
034
035
036
037
038
039
040
041
042
043
044
045
046
047
048
049
050
051
052
053
054
055
056
057
Classic Tom 1
Classic Tom 2
Classic Tom 3
Classic Tom 4
Classic Tom 5
Classic Tom 6
Camco Tom 1
Camco Tom 2
Camco Tom 3
Camco Tom 4
Camco Tom 5
Camco Tom 6
808 Tom 1
808 Tom 2
808 Tom 3
808 Tom 4
808 Tom 5
808 Tom 6
Electronic Tom 1
Electronic Tom 2
Electronic Tom 3
Electronic Tom 4
Electronic Tom 5
Electronic Tom 6
RIDE
058
059
060
061
Classic Ride
Classic Ride Bell
Rock Ride
808 Ride
CRASH
062
063
064
065
066
067
068
Standard Crash 1
Standard Crash 2
Rock Crash
Splash 1
Splash 2
Brush Crash
808 Crash
20
The First Name in Electronic Drums.
HI-HAT
069
070
071
072
073
074
075
076
077
078
079
080
Standard Hi-hat Open
Jazz Hi-hat Open
Electronic Hi-hat Open
808 Hi-hat Open
Standard Hi-hat Close
Jazz Hi-hat Close
Electronic Hi-hat Close
808 Hi-hat Close
Standard Hi-hat Pad
Jazz Hi-hat Pad
Electronic Hi-hat Pad
808 Hi-hat Pad
PERCUSSION
081
Bongo High
082
Low Bongo
083
Mute Hi Conga
084
Open Hi Conga
085
Low Conga
086
High Timbale
087
Low Timale
088
High Agogo
089
Low Agogo
090
Cabasa
091
Maracas
092
Short Whistle
093
Long Whistle
094
Short Guiro
095
Long Guiro
096
Claves
097
Hi Wood Block
098
Low Wood Block
099
Mute Cuica
100
Open Cuica
101
Mute Triangle
102
Open Triangle
103
Shaker
104
Jingle Bell
105
Belltree
106
Castanets
107
Mute Surdo
108
Open Surdo
www.simmonsdrums.net
General MIDI Voice List
ENSEMBLE
049
String Ensemble 1
050
String Ensemble 2
051
Synth Strings 1
052
Synth Strings 2
053
Choir “Aahs”
054
Voice “Oohs”
055
Synth Voice
056
Orchestra Hit
SYNTH PAD
089
Pad 1 (new age)
090
Pad 2 (warm)
091
Pad 3 (polysynth)
092
Pad 4 (choir)
093
Pad 5 (bowed)
094
Pad 6 (metallic)
095
Pad 7 (halo)
096
Pad 8 (sweep)
CHROMATIC PERCUSSION
009
Celesta
010
Glockenspiel
011
Music box
012
Vibraphone
013
Marimba
014
Xylophone
015
Tubular Bells
016
Dulcimer
BRASS
057
058
059
060
061
062
063
064
Trumpet
Trombone
Tuba
Muted Trumpet
French Horn
Brass Section
Synth Brass 1
Synth Brass 2
SYNTH EFFECT
097
FX 1 (rain)
098
FX 2 (soundtrack)
099
FX 3 (crystal)
100
FX 4 (atmosphere)
101
FX 5 (brightness)
102
FX 6 (goblins)
103
FX 7 (echoes)
104
FX 8 (sci-fi)
ORGAN
017
Drawbar Organ
018
Percussive Organ
019
Rock Organ
020
Church Organ
021
Reed Organ
022
Accordion
023
Harmonica
024
Tango Accordion
REED
065
066
067
068
069
070
071
072
Soprano Sax
Alto Sax
Tenor Sax
Baritone Sax
Oboe
English Horn
Bassoon
Clarinet
ETHNIC
105
Sitar
106
Banjo
107
Shamisen
108
Koto
109
Kalimba
110
Bagpipe
111
Fiddle
112
Shanai
GUITAR
025
Nylon Guitar
026
Steel Guitar
027
Jazz Guitar
028
Clean Guitar
029
Muted Guitar
030
Overdriven Guitar
031
Distortion Guitar
032
Guitar Harmonics
PIPE
073
074
075
076
077
078
079
080
Piccolo
Flute
Recorder
Pan Flute
Bottle Blow
Shakuhachi
Whistle
Ocarina
PERCUSSIVE
113
Tinkle Bell
114
Agogo
115
Steel Drums
116
Wood Block
117
Taiko Drum
118
Melodic Tom
119
Synth Drum
120
Reverse Cymbal
BASS
033
034
035
036
037
038
039
040
SYNTH LEAD
081
Lead 1 (square)
082
Lead 2 (sawtooth)
083
Lead 3 (caliope lead)
084
Lead 4 (chiff lead)
085
Lead 5 (charang)
086
Lead 6 (voice)
087
Lead 7 (fifths)
088
Lead 8 (bass + lead)
SOUND EFFECT
121
Guitar Fret Noise
122
Breath Noise
123
Seashore
124
Bird Tweet
125
Telephone Ring
126
Helicopter
127
Applause
128
Gunshot
PIANO
001
002
003
004
005
006
007
008
Acoustic Grand Piano
Bright Acoustic Piano
Electric Grand Piano
Honky-Tonk Piano
Electric Piano 1
Electric Piano 2
Harpsichord
Clavichord
Acoustic Bass
Finger Bass
Pick Bass
Fretless Bass
Slap Bass 1
Slap Bass 2
Synth Bass 1
Synth Bass 2
STRINGS
041
Violin
042
Viola
043
Cello
044
Contrabass
045
Tremolo Strings
046
Pizzicato Strings
047
Orchestral Harp
048
Timpani
21
The First Name in Electronic Drums.
SD5Xpress digital drum kit User manual
Percussion Set List
NET #
27-D#1
28-E1
29-F1
30-F#1
31-G1
32-G#1
33-A1
34-A#1
35-B1
36-C2
37-C#2
38-D2
39-D#2
40-E2
41-F2
42-F#2
43-G2
44-G#2
45-A2
46-A#2
47-B2
48-C3
49-C#3
50-D3
51-D#3
52-E3
53-F3
54-F#3
55-G3
56-G#3
57-A3
58-A#3
59-B3
60-C4
61-C#4
62-D4
63-D#4
64-E4
65-F4
66-F#4
67-G4
68-G#4
69-A4
70-A#4
71-B4
72-C5
73-C#5
74-D5
75-D#5
76-E5
77-F5
78-F#5
79-G5
80-G#5
81-A5
82-A#5
83-B5
84-C6
85-C#6
86-D6
87-D#6
Standard 1 (bank 0)
High Q
Slap
Scratch Push
Scratch Pull
Sticks
Square Click
Metronome Click
Metronome Bell
Acoustic Bass Drum
Standard 1 Bass Drum
Side Stick
Standard 1 Snare
Hand Clap
Standard 1 Snare Rim
Standard 1 Tom 6
Standard 1 Hi-hat Close
Standard 1 Tom 5
Standard 1 Hi-hat Pedal
Standard 1 Tom 4
Standard 1 Hi-hat Open
Standard 1 Tom 3
Standard 1 Tom 2
Standard 1 Crash 1
Standard 1 Tom 1
Standard 1 Ride
Chinese Cymbal 1
Ride Bell
Tambourine
Splash Cymbal
Standard 1 Cowbell
Standard 1 Crash 2
Vibra-slap
Ride Cymbal
Hi Bongo
Low Bongo
Mute Hi Conga
Open Hi Conga
Low Conga
High Timbale
Low Timbale
High Agogo
Low Agogo
Cabasa
Maracas
Short Whistle
Long Whistle
Short Guiro
Long Guiro
Claves
Hi Wood Block
Low Wood Block
Mute Cuica
Open Cuica
Mute Triangle
Open Triangle
Shaker
Jingle Bell
Bell Tree
Castanets
Mute Surdo
Open Surdo
Standard 2 (bank 4)
Room (bank 8)
Rock (bank 16)
Funk (bank 17)
D
D
D
D
D
D
D
D
D
D
D
D
D
D
D
D
D
D
D
D
D
D
D
D
D
D
D
D
D
D
D
D
D
Standard 2 Bass Drum
Room Bass Drum 1
Room Bass Drum 2
Rock Bass Drum 1
Rock Bass Drum 2
Funk Bass Drum 1
Funk Bass Drum 2
D
D
D
D
Standard 2 Snare
Room Snare
Rock Snare
Funk Snare
D
D
D
D
Standard 2 Snare Rim
Standard 2 Tom 6
Standard 2 Hi-hat Close
Standard 2 Tom 5
Standard 2 Hi-hat Pedal
Standard 2 Tom 4
Standard 2 Hi-hat Open
Standard 2 Tom 3
Standard 2 Tom 2
Standard 2 Crash 1
Standard 2 Tom 1
Standard 2 Ride
Room Snare Rim
Room Tom 6
Room Hi-hat Close
Room Tom 5
Room Hi-hat Pedal
Room Tom 4
Room Hi-hat Open
Room Tom 3
Room Tom 2
Room Crash 1
Room Tom 1
Room Ride
Rock Snare Rim
Rock Tom 6
Rock Hi-hat Close
Rock Tom 5
Rock Hi-hat Pedal
Rock Tom 4
Rock Hi-hat Open
Rock Tom 3
Rock Tom 2
Rock Crash 1
Rock Tom 1
Rock Ride
Funk Snare Rim
Funk Tom 6
Funk Hi-hat Close
Funk Tom 5
Funk Hi-hat Pedal
Funk Tom 4
Funk Hi-hat Open
Funk Tom 3
Funk Tom 2
Funk Crash 1
Funk Tom 1
Funk Ride
D
D
D
D
D
Room Ride Bell
Rock Ride Bell
D
D
D
D
D
D
Rock Splash Cymbal
Rock Cowbell
Rock Crash 2
D
Standard 2 Cowbell
Standard 2 Crash 2
Room Splash Cymbal
Room Cowbell
Room Crash 2
D
D
D
D
D
D
D
D
D
D
D
D
D
D
D
D
D
D
D
D
D
D
D
D
D
D
D
D
D
D
D
D
D
D
D
D
D
D
D
D
D
D
D
D
D
D
D
D
D
D
D
D
D
D
D
D
D
D
D
D
D
D
D
D
D
D
D
D
D
D
D
D
D
D
D
D
D
D
D
D
D
D
D
D
D
D
D
D
D
D
D
D
D
D
D
D
D
D
D
D
D
D
D
D
D
D
D
D
D
D
D
D
D
D
D
D
D
D
D
D
22
The First Name in Electronic Drums.
D
Funk Crash 2
www.simmonsdrums.net
Percussion Set List Cont.
NET #
27-D#1
28-E1
29-F1
30-F#1
31-G1
32-G#1
33-A1
34-A#1
35-B1
36-C2
37-C#2
38-D2
39-D#2
40-E2
41-F2
42-F#2
43-G2
44-G#2
45-A2
46-A#2
47-B2
48-C3
49-C#3
50-D3
51-D#3
52-E3
53-F3
54-F#3
55-G3
56-G#3
57-A3
58-A#3
59-B3
60-C4
61-C#4
62-D4
63-D#4
64-E4
65-F4
66-F#4
67-G4
68-G#4
69-A4
70-A#4
71-B4
72-C5
73-C#5
74-D5
75-D#5
76-E5
77-F5
78-F#5
79-G5
80-G#5
81-A5
82-A#5
83-B5
84-C6
85-C#6
86-D6
87-D#6
Electronic (bank 24)
808 (bank 25)
House (bank 28)
Jazz (bank 32)
Brush (bank 40)
D
D
D
D
D
D
D
D
D
D
D
D
D
D
D
D
D
D
D
D
D
D
D
D
D
D
D
D
D
D
D
D
D
D
D
D
D
D
D
D
Electronic Bass Drum 1
Electronic Bass Drum 2
808 Bass Drum 1
808 Bass Drum 2
House Bass Drum 1
House Bass Drum 2
Jazz Bass Drum 1
Jazz Bass Drum 2
Brush Bass Drum 1
Brush Bass Drum 2
D
D
D
D
D
Electronic Snare
808 Snare
Jazz Snare
Brush Snare
D
D
D
D
Electronic Snare Rim
Electronic Tom 6
Electronic Hi-hat Close
Electronic Tom 5
Electronic Hi-hat Pedal
Electronic Tom 4
Electronic Hi-hat Open
Electronic Tom 3
Electronic Tom 2
Jazz Snare Rim
Jazz Tom 6
Jazz Hi-hat Close
Jazz Tom 5
Jazz Hi-hat Pedal
Jazz Tom 4
Jazz Hi-hat Open
Jazz Tom 3
Jazz Tom 2
Brush Snare Rim
Brush Tom 6
D
D
Electronic Tom 1
808 Snare Rim
808 Tom 6
808 Hi-hat Close
808 Tom 5
808 Hi-hat Pedal
808 Tom 4
808 Hi-hat Open
808 Tom 3
808 Tom 2
808 Crash 1
808 Tom 1
House Snare
House Hand Clap
House Snare Rim
House Tom 6
House Hi-hat Close
House Tom 5
House Hi-hat Pedal
House Tom 4
House Hi-hat Open
House Tom 3
House Tom 2
House Tom 1
D
D
D
Jazz Tom 1
Jazz Ride
Brush Tom 3
Brush Tom 2
Brush Crash 1
Brush Tom 1
Brush Ride
D
D
D
D
D
D
D
D
D
D
D
D
D
D
D
D
D
D
D
D
D
D
D
D
D
D
808 Crash 2
D
Chinese Cymbal 2
Brush Crash 2
D
D
D
D
D
D
D
D
D
D
D
D
D
D
D
D
D
D
D
D
D
D
D
D
D
D
D
D
808 Mute Hi Conga
808 Open Hi Conga
808 Low Conga
D
D
D
D
D
D
D
D
D
D
D
D
D
D
D
D
D
D
D
D
D
D
D
D
D
D
D
D
<808 Maracas
D
D
D
D
D
D
D
D
D
D
D
D
D
D
D
D
D
D
D
D
D
D
D
D
808 Claves
D
D
D
D
D
D
D
D
D
D
D
D
D
D
D
D
D
D
D
D
D
D
D
D
D
D
D
D
D
D
D
D
D
D
D
D
D
D
D
D
D
D
D
D
D
D
D
D
D
D
D
D
D
D
D
D
D
D
D
D
D
D
D
D
D
D
Brush Tom 5
D
Brush Tom 4
D
23
The First Name in Electronic Drums.
SD5Xpress digital drum kit User manual
MIDI Implementation Chart
O: YES
X: NO
Function
Basic
Channel
Mode
Note Number
Velocity
After
Touch
Pitch Blend
Control
Change
Program Change
System Exclusive
System
Common
System
Real Time
Aux
Messages
Default
Changed
Default
Messages
Altered
True Voice
Transmitted
Recognized
10Ch
X
X
X
**************
0–127
**************
Note On
0 (99H, V=1–127)
Note Off
0 (9 9,V=0)
Key’s
X
Ch’s
X
X
0
X
1
X
5
X
6
X
7
X
10
X
11
X
64
X
65
X
66
X
67
X
80
X
81
X
91
X
93
X
120
X
121
X
123
X
X
X
:Song Position X
X
:Song Select
X
:Tune
:Clock
O
:Commands
O
:Local On/Off X
:All Notes Off X
:Active Sense O
X
:Reset
1-16Ch
X
X
X
**************
0–127
0–127
0–127
0–127
X
X
O
O
O
O
O
O
O
O
O
O
O
O
O
O
O
O
O
O
O
O
O
X
X
X
X
X
X
X
X
X
24
The First Name in Electronic Drums.
Remarks
Bank Select
Modulation
Portamento Time
Data Entry
Volume
Pan
Expression
Sustain Pedal
Portamento On/Off
Sostenuto Pedal
Soft Pedal
Reverb Program
Chorus Program
Reverb Level
Chorus Level
All Sound Off
Reset All Controllers
All Notes Off
Start/Stop