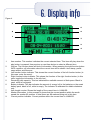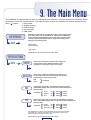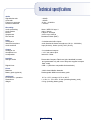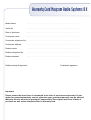
1
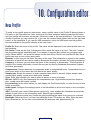
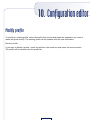
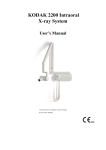
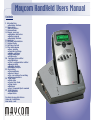
Maycom HandHeld Users Manual
Contents
1. Introduction
•Docking Station
2. Unpacking
•Accessories
3. Conventions
4. Power sources
•Alkaline batteries
•Battery pack
•Docking Station
5. Controls
6. Display information
7. Connections
8. Getting started
9. The main menu
•User profile
•System settings
•Audio settings
•Item manager
•USB mode
10. Configuration editor
•Installation
•Start configuratior editor
•New profile
•Modify profile
•Remove profile
11. Recording
•Preparations
•Record level
•Pre recording/recording
•Placing markers
12. Play back
•Item info
•Select an item
•Play back
•Markers
•Fast forward/fast rewind
13. USB transfer
•Installation
•Operation
Technical specifications
General Conditions
Warranty card
1. Introduction
Well known as an important industry innovator Maycom has achieved another major breakthrough in digital audio capture. With a highly appealing and stylish design, fully featured but
compact in size, the Maycom HandHeld offers rugged and reliable digital portable recording for
both professional and consumer usage. The HandHeld is very easy to operate, doesn't contain
difficult features and is mainly meant for making high quality recordings. The HandHeld can be
configured via the configuration editor for Windows, which makes it very easy and fast to
configure a Handheld recorder. The HandHeld is equipped with an internal microphone, but it is
also possible to connect one or two external sources like a CD-player, mixing console or your
own high quality microphone. The main features of the HandHeld recorder are: Recording,
Playback and USB file transfer between HandHeld and a computer.
•
•
•
•
•
•
•
•
Superb audio quality
MPEG-2 layer II and linear processing
Removable compact flash card media storage
Built-in high quality microphone
Illuminated LCD display
Operates on standard alkaline
Rechargeable smart battery pack system
Plug & Play USB computer connector
The Handheld recorder is based on the industry standard compact flash cards to store high quality, digital audio. The cards are robust, are able to operate in severe environmental conditions and
can be changed very quickly. Audio recording capacity depends on the size of flash card but
could be approximately 6 hours using a 320 MB flash card at 128 kb/sec.
Through its USB connection the handheld can be directly ported to your local or central PC
system for further editing of the various stored files.
Docking Station
The Docking Station is a fully equipped multifunctional portable and desktop device. It acts as the
recharger for the smart battery pack, but also provides (additional) loudspeaker functionality and
external interface options. It offers connections for two balanced XLR inputs (line or microphone),
a headphone and PC (through USB). Maximum portability is secured through the 12 volts DC
(100-240 VAC mains adapter) which automatically adapts to the local power system.
Page 2 of 26
2. Unpacking
Please unpack the HandHeld and check whether all the standard accessories have been
provided. Use the checklist below:
•
HandHeld recorder
•
4 alkaline batteries
•
CD-Rom with manual, configuration editor and drivers
•
Quickstart manual
•
Battery clip (red)
If this list is not complete please contact your dealer or the sales department of Maycom,
e-mail : [email protected].
Accessories
Besides the standard accessories the HandHeld can be supplied with optional accessories:
•
Rechargeable battery pack (charging via the Docking Station), with unique power level indicator
•
Carrying bag for HandHeld or both HandHeld and DockingStation
•
USB cable
•
Mono microphone or line cable
•
Stereo microphone or line cable
•
Tripod
•
Compact flash card
•
Docking Station
For more information or a quotation please contact your dealer or the sales department of Maycom
e-mail : [email protected] or visit www.maycom.nl.
Page 3 of 26
3. Conventions
Notations
The following notations are used to represent units of measure.
dB
Decibel
kbps
Kilobits per second
Hz
Hertz
kHz
KiloHertz
kg
Kilogram
kB
Kilobyte
MB
Megabyte
Page 4 of 26
4. Power sources
The HandHeld can be powered by three sources: alkaline batteries,
a rechargeable battery pack* and via the Docking Station*. The first
two are inserted on the back of the HandHeld. The picture below
shows the HandHeld with the back-cover already removed.
Figure 1
Alkaline batteries
When alkaline batteries are used, observe that the polarity of the cells match the polarity indicated on the sticker (3). Use four AAA-type or LR03-type alkaline cells only. The indicator is calibrated for alkaline batteries only, for all other types of batteries Maycom cannot guarantee proper
functionality.
Insert the compact flash card (1) first and lift up the lid (2). Insert the cells one by one between
the springs (4) and the lid (2). Never use partially empty and full cells together. Never leave the
cells inside the HandHeld when the recorder will not be used for a longer period. This prevents
the cells from running empty and leaking acid inside the HandHeld.
5 minutes before the batteries run empty the HandHeld will give a visible warning on the display
and a short beep in the headphone or loudspeaker. Longer warning beeps are given 3,2 and 1
minute before complete discharge. The last 10 seconds the HandHeld will beep continuously. If
at this point a recording still takes place the recorder will automatically stop and shut down.
Important!:
If the batteries are empty take care of proper disposal.
Battery pack
The second and more convenient power source is a rechargeable NiMH battery pack*. This pack
is equipped with a smart battery system that delivers the highest performance in operating time,
lifetime and reliability. The smart battery system also enables you to check the battery state of
charge even if the pack is not attached to the HandHeld or the Docking Station.
Page 5 of 26
4. Power sources
Figure 2
2
1
Press the button (1) and the four LED’s will indicate the state of charge of the battery pack (2).
Every LED represents 25% of full charge. If the last LED is flashing, this indicates that there is
between 0% and 1% energy left and the HandHeld will either not start on this pack or will shutdown after a few minutes. Besides on the battery pack itself the charge indicators are also visible
on the HandHeld display.
To insert a battery pack inside the HandHeld remove the back-cover. Make sure you have inserted a compact flash card first if you want to make a recording. Flip down the lid (2 in figure 1).
Insert the pack and press it against the springs until it clicks into place.
5 minutes before the pack runs empty the HandHeld gives a visible warning on the display and a
short beep in the headphone or loudspeaker. Longer warning beeps are given 3,2 and 1 minute
before complete discharge. The last 10 seconds the HandHeld will beep continuously. If at this
point a recording still takes place the recorder will automatically stop and shut down.
Important!:
The NiMH battery pack can only be recharged inside the Docking Station. Use Maycom equipment only for recharging the pack. See Docking Station manual.
If the temperature drops below 0º the performance of the NiMH battery pack can drop with 20%
of its full capacity.
Docking Station
The Docking Station* can also be used to power the HandHeld recorder. Via the Docking Station
it is even possible to connect the HandHeld to a mains adapter or cigarette lighter adapter. For
more information see the Docking Station manual.
* optional accessory
Page 6 of 26
5. Controls
This section shows all the various controls of the Handheld and describes their function.
1
2
1
2
3
4
3
4
5
5
6
6
7
7
11
12
13
8
6
8
9
10
9
10
11
12
13
Record indicator led
Power On/Off button
Switch on/off. The Handheld will boot up and
enter the standby mode. The power button is
only enabled when the HandHeld recorder is idle.
When pressing the power button in any other
functional mode (like menu, playback or recording), the HandHeld recorder ignores your
request and will continue with the current action.
Function button left
The function is shown in the display above
and will be activated by pressing once.
Up/down buttons
Control the menu and recording level by pres
sing up ( ) or down ( ).
Function button right
The function is shown in the display above
and will be activated by pressing once.
Volume control up/down
For headphone and internal speaker.
Marker button mode
1. Starts new recording and switches from
pre record to record mode.
2. Sets next marker during a recording.
Go to previous item
Skip to previous item. When pressed together
with button 7: go to previous marker in cur
rent marker item.
Fast rewind
Search for a certain part within the audio.
Play/pause button
Press once to playback the recording. Press
again to pause.
Go to next item
Skip to next item. When pressed together with
marker button 7: go to next marker in current
item.
Record switch
Slide up: activates pre-record mode.
Slide down: stops a recording.
Fast forward
Search for a certain part within the audio.
button 7: go to next marker in current item.
Page 7 of 26
Figure 4
6. Display info
5
6
8
9
1
7
2
4
3
1.
2.
3.
4.
5.
6.
7.
8.
9.
Item number. This number indicates the current selected item. This item will play when the
play button is pressed. Use previous or next item button to select a different item.
Info bar. The info bar shows all kind of information. When pressing the right function button
INFO repetitive, all information about the current item will be shown: time stamp, profile
name author and filename.
Left function button indicator. This shows the current function of the left function button (in
this case: enter the menu).
Right function button indicator. This shows the function of the right function button (in this
case: toggle the information in the info bar).
Remaining disk capacity. This bar indicates the available amount of disk space. Black is
used, white is free space.
Battery indicator. This bar indicates the amount of energy left in the batteries or the smart
battery pack. black is full, white is empty. The indicator is calibrated for alkaline batteries
only.
Item length counter. Shows the length of the current item in H:MM:SS.
Marker information. In this example it shows that the current position within the audio
equals the marker 02 position. In total there are 89 markers being set in this item.
Current position indicator. Current position within the current item in H:MM:SS.
Page 8 of 26
7. Connections
All connections for the HandHeld are easily located at the bottom of the HandHeld:
Figure 5
2
1
1.
2.
Stereo headphone connector, switches off the internal loudspeaker when a headphone
connector is inserted.
Multi I/O, for interfacing with external microphones and Docking Station. This connector is
coded and recognizes which cable is inserted and the HandHeld will automatically be
setup for this cable. This setup is done according this table:
Type of Cable
Profile Mode
Stereo
Mono
No Cable
Internal Microphone
L = Internal Microphone
R = Internal Microphone
Mono Cable
External Microphone or Line
L = Internal Microphone
R = ExternalMicrophone or Line
Stereo Cable
External Microphone or Line (Left channel)
L = External Microphone or Line
R = External Microphone or Line
Page 9 of 26
8. Getting started
This chapter helps you to quickly start a first recording with your HandHeld. More detailed information
you can find in the respective manual chapters.
1.
2.
3.
4.
5.
6.
7.
8.
9.
Open the back-cover and insert a compact flash card (figure 1).
Insert a power source, either a charged battery pack* or 4 alkaline batteries. Note the polarity
indicated on the sticker in the battery compartment and finally cover the batteries with the
battery clip. This prevents movement of the batteries.
Close the back-cover and switch on the HandHeld recorder by pressing the
button above
the display.
If applicable, connect any external accessories like a headphone or external microphone(s).
After the HandHeld has powered up, slide the red record switch in the upward position. The
HandHeld enters pre-recording mode and the red LED flashes. The display shows you input
peak level information, disk-, battery- and mode-status. When the input level is too low or high,
you should use the up/down buttons for adjustment.
Once you have set the required record level, press the marker button and the HandHeld starts
it’s actual recording. The actual recording is indicated by the continuous LED indicator, a large
dot and a running counter on the display.
During a recording it is possible to change the headphone / loudspeaker volume and the input
gain. By pressing the marker button you can add markers.
Slide back the red record switch to stop a recording. A new track is created.
To avoid accidental loss of data: The power button is only enabled when the HandHeld recor
der is idle. When pressing the power button in any other functional mode (like menu, playback
or recording), the HandHeld recorder ignores your request and will continue with the current
action.
* additional accessory
Page 10 of 26
9. The Main Menu
The HandHeld is equipped with an easy to understand menu structure. You have to press the left button below
the display to enter the various menu's. The main structure of the menu consists of 5 options activated by the
down ( ) button:
1. User profile
2. System settings
3. Audio settings
4. Item manager
5. USB mode
All profiles created with the configuration editor can be selected in this
menu. When there is no configuration file available the HandHeld will
create a default configuration file with several common profiles. When
selecting a profile the HandHeld will be configured according to the
settings in the selected profile.
USER PROFILE
ENTER
First profile
Second profile
......
Last profile
Press back to go to the previous menu level
SYSTEM SETTINGS
ENTER
CONTRAST
allows you to change the contrast of the display. The
contrast scope can be adjusted through a range
varying from -3 (low) up to a value of +3 (high).
BACKLIGHT
allows you to switch the backlight of the display on or
off. This option will overrule the setting in the selected
profile (until you select a new profile).
-ON
-OFF
DATE
to adjust the current date. The HandHeld is equipped with a
small backup battery and a real-time clock which will keep the
date up-to-date.
CHANGE
TIME
CHANGE
-YEAR
-MONTH
-DAY
up
up
up
down
down
down
-ENTER
-ENTER
-ENTER
allows you to adjust the current time. The HandHeld is equipped
with a small backup battery and a real-time clock which will keep the
time up-to-date.
CHANGE
-HOUR
up
-MINUTE up
-SECONDS up
down
down
down
-ENTER
-ENTER
-ENTER
The HandHeld uses an internal rechargeable battery for the real time clock and date.
This battery has an autonomy of 60 days and will charge within an hour from the
batteries, the pack or and external power source.
Press back to go to the previous menu level
Page 11 of 26
9. The Main Menu
AUDIO SETTINGS
ENTER
INPUT
allows you to change the type of source connected to the
external input(s). When you connect a microphone you
have to select the option “Mic”.
When connecting devices like CD-player or mixing console
you should select the option “Line”.
-MIC
-LINE
AGC
allows you to switch the Automatic Gain Control on or off.
When the AGC is active, when necessary the HandHeld will
automatically adjust the input level to achieve a high quality
recording.
-ON
-OFF
LIMITER
CHANGE
CHANGE
the limiter prevents an overload on the analogue
microphone inputs.
It will automatically switch off when line input is selected
-ON
-OFF
CHANGE
ITEM MANAGER
ENTER
DELETE
allows you to delete the currently selected item. Before the
HandHeld will delete the file it will ask you to confirm this
action.
-YES
-NO
CHANGE
USB MODE
ENTER
-(RE)CONNECT USB CABLE -DONE
-USB MODE ACTIVE
-STOP
Page 12 of 26
10. Configuration editor
The HandHeld is a versatile professional audio recorder capable of recording in many different
modes, with a number of input sources. To prevent the daily user from having to go through all
these rather technical details, Maycom introduced the profile. A profile is basically a configurable
preset that can be personalized. On the HandHeld it is possible to change only a few settings that
relate to the day to day settings. All other settings are entered via a profile, which is created by the
configuration editor. The configuration editor is a separate program that runs on a Windows PC.
The profile information is stored on the HandHeld via the USB cable or by placing the compact
flash card in a reader. It is possible to store 30 different profiles on a compact flash card. The user
can select up to 30 profiles by using the main menu of the HandHeld. If a HandHeld is used for
the first time, there are 6 factory defaults to choose from.
Installation of the configuration editor
To use the configuration editor you need a PC compatible computer running Windows95 (Not
USB), Windows98 (Not USB), Windows2000, Windows ME, or Windows NT (Not USB). To transfer
the profile information to the HandHeld you need either a USB port or a compact flash reader in
your computer. Next step is to install the configuration editor on your hard disk. Insert the CDROM. Use the start button in windows to invoke the run Command. By pressing the Browse button
select the CEsetup.exe file on the CD-ROM. Press OK and follow the instructions given by the
setup program.
Start the configuration editor
After the installation you can start the editor via windows, select: start, programs, Maycom,
HHConfEdit. This is the start up screen of the configuration editor.
Page 13 of 26
10. Configuration editor
Figure 6
The first important thing to do is to select the disk that is being used to store the profile data. This
can be either the HandHeld itself via USB (make sure that the HandHeld is attached and running
in USB mode) or a compact flash card reader (make sure that a disk is inserted in the reader).
It is now possible to create, remove and or edit profiles.
Page 14 of 26
10. Configuration editor
New Profile
To make a new profile press the new button, enter a profile name in the Profile ID box and enter a
File prefix in the File prefix box. After entering all the other preferred options press the OK button
and your profile will be stored on the disk. (becomes visible in the user profile box). The maximum
number of profiles you can create is 30. If you use the compact flash reader, take out the card and
insert it in the HandHeld. If you use the USB connection, leave the USB mode and the profiles
become available in the profile selector in the main menu.
Profile ID: Enter the name of the profile. This name will be displayed in the select profile menu on
the handheld.
File Prefix: These are the first 6 characters of the actual file name of an item. The next 2 characters are placed by the HandHeld itself. For example: if reporter Bert makes two recordings with
profile “Mono MPEG”, the actual file names on the disk will be: Bert01.wav and Bert02.wav. Each
profile can have its own or the same prefix.
Reporter: In this box you can enter the name of the user. This information is copied in the header
information of each file and can be used by Broadcast Automation Systems for further processing.
Company: In this box you can enter the name of the company or broadcaster. This information is
copied in the header information of each file and can be used by Broadcast Automation Systems
for further processing.
Compression: Choose between uncompressed audio or compressed audio. Compressed lets you
store more audio on the same disk with almost the same quality.
Sample rate: Equals the amount of audio samples taken within a second. Higher sample rates
equals higher quality, equals more disk space needed.
Mode: Enter here whether you want to make a stereo, or mono recording.
Bit rate: (MPEG only) this represends the compression ratio. High bitrates equals low compression, equals more disk space needed.
Pre-recording: In this menu option you can disable the Pre-Record buffer, or enter the size of this
buffer in seconds.
Audio input: Configure the analoge inputs of the HandHeld as a line level input or as a microphone input.
AGC: Automatic gain control (Microphone inputs only), when enabled the HandHeld automaticaly
adjusts its gain level on the incomming audio. Manual gain is disabled.
Limiter: (microphone inputs only) Limits the gain preventing the inputs from going into overload.
Backlight: Check this box if you want the backlight of the LCD always on. Note: when the backlight is switched on, the run time of the batteries will decrease with approxamitely 5%.
Page 15 of 26
10. Configuration editor
Modify profile
To modify an existing profile, select the profile from the list and make the adaptation you want to
make and press modify. The existing profile will be updated with the new information.
Remove profile
If you want to delete a profile , select the profile in the name box and press the remove button.
The profile will be deleted from the profile list.
Page 16 of 26
11. Recording
The HandHeld stores a recording as an item on a compact flash card, a non volatile random accessible
media. This means that you don’t have to “search for an empty spot” on the disk before making a new
recording. Also no rewind or fast forward is necessary to access a different item for playback; the
HandHeld does this automatically. The maximum number of items on a disk is 99 and the maximum number of markers per item is also 99. A new item number is given automatically when the HandHeld switches
from record to idle mode and is always the next number in line.
Making a recording on the HandHeld involves basically three steps:
•
Preparations: set up the recorder.
•
Record level: set the proper input level for this recording.
•
Recording: Make the actual recording.
Preparations
Before actual recording please check these basic requirements:
•
•
•
•
•
•
•
Is a compact flash card inserted?
Is a power source connected? See Chapter 4
Which input source(s) is/are connected and is/are it/they configured? See Chapter 7
Switch on the HandHeld recorder.
Does the power source contain enough energy? See Chapter 6
Does the card contain enough free space to make a new recording? See Chapter 6
Is the right profile selected? See Chapter 9
If all requirements are made the HandHeld is ready for making a new recording.
Record level
One last thing to be done before making an actual recording is the input gain adjustment. This can be
done in two ways:
•
Manual Gain Control
•
Automatic Gain Control
Page 17 of 26
11. Recording
This option can be changed in the configuration tool as well as in the HandHeld Main Menu. To check the
current gain level slide the record switch in the upward position. The display shows “pre-recording”, the
LED starts flashing and the peak level indicators represent the incoming audio level.
Manual Gain Control means that the user is able to change the recording level. Use the up button to
increase the audio level, use the down button to decrease the audio level. Make sure that at the end of the
peak meter the overload indicator does not appear and that your average level is around 2/3 of the total
Peakmeter scale.
Automatic Gain Control (AGC) means that the HandHeld does all the gain adjustments automatically all
input levels are recorded on the same average level. So weak audio is amplified, loud audio is tempered. It
does not prevent against possible overload of the microphone inputs, this is the function of the limiter.
Pre-Recording mode has a second function: the pre-record buffering. If enabled (in the current profile) the
HandHeld is capable of recording 2, 5, or 10 seconds in a loop buffer (visible on the display). Once you
start a recording the content of this buffer is copied in front of the recording. This mode is implemented to
prevent tight “in’s” or clipped opening words in hurried recording starts.
Pre-recording / recording
The recording mode can only be entered from pre-record mode ( see previous paragraph).
You can start the actual recording by pressing the MARK button above the record switch.
Figure 8
Page 18 of 26
11. Recording
The display shows the new item number (in this example 53) and the record dot followed by the length of
the item. At the same time the LED lights continuously.
Check the input level on the peak bar indicator during recording and adjust (if necessary) with the up ( )
or down ( ) button.
Other options available during recording are:
•
headphone volume up or down.
•
change the information in the info bar.
•
place marker.
The recording mode is stopped by sliding the red record switch downwards.
Placing markers
The HandHeld automatically places 2 markers in an item and 3 markers if the pre-recording buffer is enabled. One marker is placed at the beginning of an item and one is placed at the end of an item. The third
marker in pre-recording mode was placed at the moment the actual recording started. The user can also
place markers by pressing the marker button during recording or (at a later stage) during playback.
For further marker functions see chapter playback.
Page 19 of 26
12. Playback
A recorded item can be played back on the HandHeld via the internal loudspeaker, the headphone or the
Docking Station loudspeaker. The HandHeld does not need a profile for playback and all items recorded
with different profiles can be played without reconfiguring. During playback it is possible to adjust the headphone or speaker volume.
Item Info
By default the info bar in the display shows a time stamp (item creation time and date).
By pressing the function button INFO (5, Figure 3) once, the HandHeld shows the name of the profile used
to record this item.
By pressing INFO again, the HandHeld shows the reporter name.
By pressing INFO a third time, the file name is shown.
By pressing INFO a fourth time, time stamp again.
Selecting an item
The item shown on the display is the active item. To make another item active use the previous(8) or next
buttons(11). The items are shown sorted on recording date. The maximum number of items is 99.
Playback
To playback an item press the play/pause button (10). The active item will start to play. Press the
play/pause button (10) again to pause or stop playback. The HandHeld will stop automatically when the end
of an item is reached.
Page 20 of 26
12. Playback
Markers
The HandHeld recorder has the option to place markers in an item. Marker can be used to indicate a
certain part within an item or a means of dividing an item in several subsections.
The HandHeld automatically places 2 markers in a new item and 3 markers if the pre-recording buffer is
enabled. One marker is placed at the beginning of an item and one is placed at the end of an item. The
third marker in pre-recording mode is placed at the moment the actual recording started.
The user can also place markers by pressing the marker button during playback/idle or record mode.
To skip to a certain part or subsection within the audio press the previous and mark or the next and mark
buttons simultaneously during playback or idle mode. The HandHeld will resume playback at the selected
marker. Note the marker numbers in the marker area on the display.
To delete a marker, skip to the marker you want to delete in idle mode. The marker indicator will show in
the display indicating that a marker is selected. Press the marker button to delete the marker.
Fast forward and fast rewind
If no markers are used, it is possible to search for a certain part within the audio with the fast forward (13)
and fast rewind (9) buttons. They work in both idle and playback mode.
Page 21 of 26
13. USB data transfer
Installation
The HandHeld is capable of emulating it’s own storage media as a removable disk for a Windows PC. This
is done using the Mass Storage device class defined by the USB implementers forum and the matching
driver supplied by Microsoft in Windows ME and 2000. Mass Storage is by default not supported under
Windows 95, Windows 98 (SE)* or Windows NT. Windows ME or 2000 will recognize the HandHeld as a
standard USB disk device but will not recognize the exact type. Therefore you will need to point to the
installation media to install an information file (.inf), supplied on the CD-ROM.
1.
2.
3.
4.
5.
Power up the PC. Make sure you are logged in as administrator if you are using Windows 2000.
Insert the installation CD-ROM.
Power up the HandHeld and set it up in USB mode.
Connect it to the PC system using either the special HandHeld USB cable or the Docking Station
(supplied) standard USB cable.
The “Add New Hardware Wizard” will appear. Select “Automatic search”, select next or point the
wizard manually to the WinME / Win2000 directory on the CD-ROM and click next. Windows will
read the file and finishes the installation.
Important!:
This installation procedure only needs to be executed once, since your HandHeld will now be recognized
by Windows.
Operation
USB is part of the windows operating system and you do not need special software to connect the
HandHeld to the PC. If you install the driver once (see above) the HandHeld will be recognized as an
external removable disk. By using windows explorer you can access the items on the HandHeld Compact
Flash Disk. All commands valid for the explorer are also valid for the HandHeld, among them are CUT,
COPY, RENAME, PROPERTIES, SEND and OPEN. Besides the explorer it is also possible to access files
via the file open menu option in all programs that are capable of reading MPEG files, for example windows
media player. The PLAY and RECORD commands do not represent a playback or record on the HandHeld
but a playback or record on the audio board of the PC with the HandHeld as storage media.
To connect:
1.
Power up the PC.
2.
Power up the HandHeld and set it up in USB mode.
3.
Connect it to the PC system using either the special HandHeld USB cable or the Docking Station
supplied standard USB cable.
4.
Use windows explorer to check if the HandHeld is recognized by windows. The system will show up
in the disk map as a removable disk.
5.
The System is now ready for use.
Page 22 of 26
13. USB data transfer
Figure 9
Special notice:
• The order described above is critical if you use the USB cable. If you use the Docking Station the order
is less critical.
• If you use the USB cable the HandHeld is not powered by the USB master but by its own power
source. If you use the Docking Station the HandHeld is powered by the Docking Station, via the PC or
mains adaptor.
* will be available soon as download via www.maycom.nl
Page 23 of 26
Technical specifications
Audio
Signal/noise ratio
Cross talk
Frequency response
Harmonic distortion
> 80 dB
< 80 dB
20 Hz – 20.000Hz
< 0.005%
Recording
Audio processing
Audio modes
Bit rate
Sample rate
File formats
linear / MPEG-2 layer II
mono / stereo
8 kbps to 384 kbps
16 kHz up to 48 kHz
Broadcast Wave (BWF)
Input
Analogue in
Internal microphone
Audio switches
2 x balanced mic/line inputs
omni-directional electret microphone (20 Hz - 20.000Hz)
input (line/mic); limiter (on/off); AGC (on/off);
Output
Analogue out
Headphone out
Loudspeaker
2 x unbalanced outputs
1 x 3.5 mm stereo jack
internal 0.5 Watt
Interface
Storage media
Digital in/out
Removable Compact Flash card (the HandHeld is tested
and guaranteed only with use of Maycom supplied compact
flash cards)
USB 1.1 (Windows compatible disk emulation)
Power
Batteries
Battery pack (optional)
4 AAA-sized Alkaline batteries
Rechargeable NiMH smart battery pack
Additional
Environment operation:
Dimensions
Weight
0°C to +70°C, storage -25°C to +85°C
L x W x H = 178 x 64 x 30 mm (including battery pack)
0.3 kg (including battery pack)
Page 24 of 26
General Conditions of Warranty for Products Manufactured by Maycom Audio Systems BV.
Maycom Audio Systems B.V., hereinafter referred to as Maycom, provides a general warranty to products manufactured and delivered by Maycom and/or its official Distributors and Agents.
Some Maycom manufactured Products have a specific and separate warranty with terms and conditions applicable to that Product.
When a specific Maycom manufactured Product has a warranty it shall take precedence over this document. If the Product includes
hardware or software components manufactured by a third party, then the specific warranty of that third party component shall take
precedence over this Warranty. Products without a specific warranty shall conform to the terms of this Warranty.
All additions, alterations, and exceptions to and waivers of these General Conditions of Warranty must be in writing and approved by
Maycom.
This Warranty, including any approved alterations, shall be included as an integral part of the offer and the contract of sale.
Warranty Conditions
1. Maycom warrants that:
1.1 The hardware components meet the form, fit and function defined in the Maycom Product Specifications and operate error free
when used in accordance with the applicable technical manuals.
1.2 The software meets the form, fit and function defined in the Maycom Product Specifications and will operate error free when
used in accordance with the applicable user and technical manuals. Repairs to software can take place by replacing the Product
with a comparable Product or by providing a work around instructions on how to avoid or bypass the problem.
1.3 Products, when integrated, delivered and installed as a turn-key system by Maycom meets the form fit and function for the
Maycom System Specifications and operate error free when used in accordance with the applicable technical manuals. Repairs
to software can take place by replacing the Product with a comparable Product or by providing a work around instructions on
how to avoid or bypass the problem.
1.4 Not included in this warranty are the LCD-display module and the PC card removable storage media.
The manufactures’ warranties on the removable media, removable hard disks and flashcards are given.
2. Maycom liability under warranty shall not apply to damages due to normal wear and tear, improper use or handling, inadequate
maintenance, disregard of operating instructions, excessive load or stress, acts of nature, or any other cause not attributable to
Maycom. Except by express, prior agreement in writing, Maycom shall not be liable under warranty for damages to Maycom
Products due, or attributable to repairs or alterations made by the End User or any unauthorized third party technical service
organization; or the use of components or repair parts not specified or authorized by Maycom. Maycom will not be liable for any
indirect, special, incidental or consequential damages or the loss of data irrespective of whether Maycom has advance notice of
the possibility of such damages.
3. As promptly as possible upon receipt of the End User or Representative claim in writing, Maycom hereby undertakes, as it may
see fit and at its sole discretion, either to replace or repair any parts of its Products which are or have become ascertainable
defective or unserviceable due to poor materials, faulty design, or deficient manufacture. All parts replaced shall become the
property of Maycom.
4. This Warranty applies to the repair or replacement and re-commissioning, free of charge, of defective or unserviceable parts,
inclusive of the cost of transport, packing, and labor. All warranty action, including the shipment of repair parts must be approved
by Maycom in advance before being performed.
5. This Warranty will cover a period of one (1) year after date of invoice from the End User.
6. This Warranty expressly excludes transport damage; items such as batteries, cables, microphones, headsets, pouches, and
faults related to adjustment or readjustment of the Products by the End User or any other non authorized service organization.
8. This Warranty expressly excludes any liability by Maycom for consequential loss or damage on any grounds, such as
(but not limited to) the need to repeat work processes, penalties for late delivery, etc.
9. For goods and components manufactured by any third party, Maycom’ liability under warranty is expressly limited to the terms of
Warranty by the supplier of such goods and components.
10. Maycom shall not be required to provide services under warranty until and unless the End User has paid such part of the
purchase price as bears a reasonable relation to the value of the stated defect.
11. Place of performance for work under warranty shall be the nearest authorized service workshop or as otherwise designated by
Maycom, and for Products forming part of a fixed installation, it shall be the site of such installation. Maycom shall, at its sole
discretion decide the place of performance.
12. Maycom shall have the right to charge for services under warranty if the site of the product is other than where the product was
originally installed.
13. Warranty claims shall be in writing and include:
13.1 point of contact, shipping address, telephone, fax number, and email address of the End User
13.2 name, description, version or serial number of the faulty component, invoice of the Product and warranty start date.
13.3 description of the problem
13.4 other supporting data as necessary
14. Repair action under warranty will not occur unless a written claim is received and approved in advance by Maycom. Any repair
activity performed by the End User prior to Maycom approval is at the risk of the end user.
Page 25 of 26
Warranty Card Maycom Audio Systems B.V.
Model Name
: .................................................
Serial No.
: ................................................
Date of purchase
:.................................................
Customers name
: .................................................
Customers telephone No. : . . . . . . . . . . . . . . . . . . . . . . . . . . . . . . . . . . . . . . . . . . . . . . . . .
Customers address
: .................................................
Dealers name
: .................................................
Dealers telephone No.
:.................................................
Dealers address
:.................................................
Dealers stamp & signature :
Customers signature :
Important
Please ensure the above form is completed at the time of purchase and present it to the
dealer for guarantee/warranty service, otherwise your guarantee/warranty may be affected.
Warranty service will only be provided if supported by the original invoice as of date of
purchase as well as the completed filled in warranty card.