1
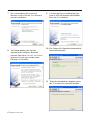
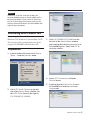
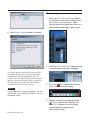
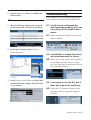
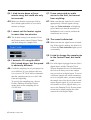
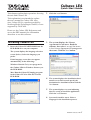
Cubase LE4
Quick Start Guide
This chapter explains basic operations for using
the unit with Cubase LE4.
2 Click the Install button.
This explanation is not intended to replace
the user’s manual for Cubase LE4. Also,
since Cubase LE4 is a product provided by
Steinberg Media Technologies GmbH, it is not
supported by TASCAM.
Please use the Cubase LE4 Help menu (and
access the PDF manuals) for information
about how to use this software.
Installing Cubase LE4
1 Insert the Cubase LE4 DVD-ROM into the
DVD-ROM drive on your computer.
The system displays the language selection
screen (below). Select the language you
prefer.
3 The system displays the License
Agreement for end users. Read the
contents, then select I accept the terms
in the License Agreement if you agree to
the terms. Click the Next button.
If this language screen does not appear
automatically, do the following:
Windows: Run the Setup.exe program in
the \Cubase LE4 for Windows directory on
the DVD-ROM.
Mac: Run the Cubase LE4.mpkg program
in the Cubase LE 4 for Mac OS X on the
DVD-ROM.
4 The system displays the installation destination screen. Browse and specify the
destination for installation, then click the
Next button.
5 The system displays a screen indicating
that it is ready to install the application.
Click the Install button.
6 Syncrosoft installer starts. Select a
language for the installation process.
TASCAM Cubase LE4
1
7 The system displays the Syncrosoft
Welcome screen. Click the Next button to
start the installation.
8 The system displays the License
9 A screen appears to confirm that you
want to close the Synchrosoft installer.
Press the Finish button.
10 The Cubase LE4 installer automatically
starts following this.
Agreement for end users. Read the
contents, then select I accept the license
agreement if you agree to the terms.
Click the Next button.
11 When the installation completes, press
the Finish button to close the installer.
2
TASCAM Cubase LE4
NOTE
Cubase LE 4 can be used for 30 days (or
launched 3000 times) in demo mode until it
becomes disabled. If you want to continue
to use it for a long time please refer to the
Getting Started Guide on the DVD-ROM and
register your program.
Recording with Cubase LE4
The settings in Cubase LE4 are the same in
Windows XP, Windows Vista and Mac OS X.
The screens in the example below are from
using a US-144MKII with Windows XP.
Preparation
3 Click US-122MKII/US-144MKII on the
left side of the Device Setup window
and confirm that the I/O ports are set to
US-144MKII ports. Then, click OK to
close the window.
1 Launch Cubase LE4 and select Device
Setup… from the Devices menu.
4 Select VST Connections from the
Devices menu.
5 Confirm that the Device Port is set to
2 Click VST Audio System on the left
US-144MKII on both the Input and
Output tabs.
side of the Device Setup window. Set
the ASIO Driver item on the right to
US-122MKII/US-144MKII.
TASCAM Cubase LE4
3
Recording
1 Click the Edit Channel Settings button
for the track you want to record to open
the Channel Setting window. Then,
specify the desired input bus in the Input
field located in the upper-right corner.
6 Select New Project from the File menu.
2 Click the REC FUNCTION button to turn
it on (the button indicator will light).
A window appears that allows you to select
a template for the new project. Choose the
template that you want and click the OK
button. Next, the Set Project Folder window
appears. Select the folder where you want to
save the project and click the OK button to
complete creation of a new project.
NOTE
3 Press the
(REC) button in the transport section to start recording.
If you choose the “Empty” template, use the
“Add Track” item from the “Project” menu to
add audio tracks.
4 When you finish recording, press the
(STOP) button, then click the REC
FUNCTION button to turn it off (the
button indicator will turn off).
Rewind if necessary.
4
TASCAM Cubase LE4
5 Repeat steps 1, 2, and 3 to overdub additional tracks.
Mixdown
1 Move the left and right locators to specify the region that you want to mix down.
Troubleshooting
This chapter answers frequently asked questions related to recording with Cubase LE4.
Q1. I think I have configured the
input settings properly, but I see
no activity on the audio track's
meter.
A1. Make sure that the Monitor button of the
track is enabled.
2 From the File menu, choose Export >
Audio Mixdown.
Q2. I would like to record two channels simultaneously in stereo.
A2. Before you record, choose Stereo track(s)
or add Audio track(s) as Stereo. In this
case, the track input is indicated as Stereo
in or something similar.
3 In the Export Audio Mixdown dialog box,
make the desired settings, then press the
Export button.
Q3. I am trying to use the EQ, but it
does not seem to do anything.
A3. Check the VST channel setting or other
settings to make sure that EQ bypass is
disabled.
TASCAM Cubase LE4
5
Q4. I tried to mix down a threeminute song, but could mix only
ten seconds.
Q7. I have connected an audio
source to the Unit, but cannot
hear anything.
A4. Make sure that the region specified by
A7. Make sure that the input level is raised
the left and right locators is set to three
minutes or longer.
appropriately. When a signal is being
input, the Gain indicator will light up
green. Make sure that the monitor (or
headphone) level is raised, and that the
connections are correct.
Q5. I cannot set the locator region
to more than ten minutes.
A5. The default setting is ten minutes. From
the Project menu, choose Project Setup
and then change the Length field.
Q8. The sound is distorted.
A8. Make sure that the signal is not overloading. If the signal is analog, the ideal level
is when the Gain indicator lights up red
occasionally.
Q6. I burned a CD using the WAV
file I mixed down, but the speed
is obviously different.
A6. Could the sampling rate of your project be
set to 48 kHz? If your ultimate objective
is to create a CD, TASCAM recommends
that the sampling rate be set to 44.1 kHz
from the beginning.
To specify the sampling rate, choose
Project Settings from the Project
menu, then set the sampling rate to
44.100 kHz.
6
TASCAM Cubase LE4
Q9. I tried to change the sample rate
in the Control Panel, but could
not.
A9. If a valid signal is plugged into the Unit’s
digital input, and the Sample Clock
Source menu has been set to Automatic,
the Unit will always run at the sample
rate received at its digital input. To run at
a different sample rate while continuing
to receive digital audio, you must change
the sample rate of the device that is sending the digital signal. If you do not need
to continue to receive digital audio, you
can set the Sample Clock Source menu
to Internal or simply unplug the cable
connected to the digital input.
Trademarks
• TASCAM is a registered trademark of
TEAC Corporation.
• Microsoft, Windows, Windows XP, and
Windows Vista are either registered
trademarks or trademarks of Microsoft
Corporation in the United States and/or
other countries.
• Macintosh, Mac OS and Mac OS X are
trademarks of Apple Inc., registered in the
U.S. and other countries.
• Cubase and VST are registered trademarks
of Steinberg Media Technologies GmbH.
ASIO is a trademark of Steinberg Media
Technologies GmbH.
• Other company names, product names and
logos in this document are the trademarks
or registered trademarks of their respective
owners.
TASCAM Cubase LE4
7
TEAC CORPORATION
Phone: +81-42-356-9143
D01022900B
1-47 Ochiai, Tama-shi, Tokyo 206-8530, Japan
Printed in China