1
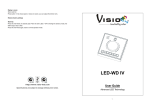
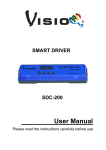
LED-WD VI-TX LED-WD VI-TX-WH LED-WD VI RTX User Guide Advanced LED Technology 1- Features Control one group of RGB/RGBD LEDs Touch screen panel Static colour selection, 3 fade and 3 chase modes (3 colour, 5 colour and 7 colour) Dimmer & Speed adjustable from 0-100% 12 scenes can be programmed 4 Tri-colour LED indicators Lock protection to avoid unintentional interference Wireless transmitter (LED-WD TX) and receiver(LED-WD VI-RX) Technical specifications Power supply: AC 100-240V 50/60Hz Dimension: 87 x 87 x 38mm Weight: 0.3kg Operation panel 1, ON/OFF button: To power the wall dimmer on and off 2, Function buttons: Up and down, left and right to scroll through the menu or value 3, Led indicator: to indicate which function page you are in when in Fade/Chase/bank browsing 4, LED display: show the function menu 5, Button S : Select function or confirm the operation 6, Number button : used for programming and play stored scene 7, Data terminal: Output DMX signal 8, Power input terminal: AC 100-240V/ 50~60Hz 2- Main function 3- ON/OFF Use this button to power the wall dimmer on and off, when the power indicator turns blue, the dimmer is switched on, when it is red, the dimmer is switched off. Colour mode Use the or press the buttons to scroll through the menu, till button and use the - or is shown on the display, then buttons to select a colour from . Without any operation after 30 seconds the wall dimmer will black out. Dimmer mode Use the or press the buttons to scroll through the menu, till button and use the - from or is shown on the display, then to select the value of brightness . Without any operation after 30 seconds the wall dimmer will black out. Fade mode or Use the press the buttons to scroll through the menu, till button and use the or is shown on the display, then buttons to select , or and the related Led indicator above the LED display will light up. Without any operation after 30 seconds the wall dimmer will black out. Chase mode Use the press the or buttons to scroll through the menu, till button and use the or is shown on the display, then buttons to select , or and the related Led indicator above the LED display will light up. Without any operation after 30 seconds the wall dimmer will black out. 4- Speed mode Use the or press the buttons to scroll through the menu, till button and use the - or is shown on the display, then buttons to select the speed from . Without any operation after 30 seconds the wall dimmer will black out. Programme mode (12 progammable operation modes) In this mode you can save up 12 of your own created scenes. To input your own settings or use the buttons to scroll through the menu, entering into any of the color, fade or chase modes. Select your desired scene, then press and hold the on the display, then press one of the will show store that scene and use the , or or , , button and the display , or buttons to select and buttons to select any one the banks to save your scene to. Each bank contains 4 pre-sets , , , and giving you a total of 12 scenes that can be programmed and stored. To use any one of your programmed scenes Use the press the or buttons to scroll through the menu, till button and press one of the , , is shown on the display and or buttons to play the stored scene. To select a different bank follow the above steps but after pressing the use the or Now press any of the buttons to select any one the banks , , or , button or . buttons to play the stored scene in the chosen bank. Note: The tri-colour LED indicators in the centre of the , , and effect so that you do not have to check you LED lighting all the time. 5- buttons will show the Lock mode Use the or to scroll through the menu, till is shown on the display, then press and hold the button and enter a 4 digit code using the , , and buttons. After selecting your 4 digit code the LED wall dimmer will blink and automatically lock it self so no unwanted users can mess with it. To unlock it, simply press and hold the re-enter your 4 digit code using the , , and button and buttons and the wall dimmer will blink to confirm it has been unlocked. Note: Incase you forget your code, the emergency code for unlocking the wall dimmer is 4444. Factory reset mode Press button, LED-WD VI-TX enters OFF status, the related LED indicator turns red, then hold and No. buttons 1 and 4 for 2 seconds, the LED-WD VI-TX will power on again, the related LED indicator will turn blue, and LED-WD VI-TX will enter normal operation status automatically, then factory reset succeeded . Connection & Installation Please wire and mount the controller as the diagram below: Wiring diagram Mounting diagram 6- Pairing the LED-‐WD TX and LED-‐WD RX together: Pair up LED-‐WD VI R and TX 1. Power off the LED-WD VI-TX, Press the set up button “1” on the LED-WD VI RX, the LED indicator “3” on the RF-DMX-TX will blink slowly. 2. Power on the LED-WD VI-TX, the LED indicator “3” will be blinking fast, which means LED-WD VI-TX pair up with LED-WD VI- RX was successful. 3. Press set up button “1” for about 5 seconds, the related LED indicator will blink slowly, press the button “1” again to cancel wireless control settings. Note: Max. 10 LED-‐WD VI-‐TX can be set pair with one LED-‐WD VI RX. 7- Wireless function How to set the mode of Wall Dimmer VI Receiver (LED-‐WD VI-‐RX) Mode Selection: (Dip #1=on) Dip Switch: To choose the mode you desired. Please refer to the following diagram to know how to set the DIP Switch: Mode 1 RGB & WHITE : (Dip #1=off, Dip #2=off) In this mode you can see Red, Green, Blue, and White on Tri-colour LED indicators. Mode 2 RGBD & NO WHITE : (Dip #1=on, Dip #2=off) In this mode you can see Red, Green, Blue without White on Tri-colour LED indicators. Mode 3 RGBD & WHITE: (Dip #1=off, Dip #2=on) In this mode you can see Red, Green, Blue, White on Tri-colour LED indicators. Mode 4 RGB & NO WHITE : (Dip #1=on, Dip #2=on) In this mode you can see Red, Green, Blue without White on Tri-colour LED indicators. 8- Update Software Download update file from our website; follow the user manual of VD-01 to update the fixture via VD-01 (not included),also you can follow the steps as below: A、 Before opening the upgrading window, please turn off the power of the LED-WD VI-TX first, then open the upgrading window B、Then click Fixture Firmware Upgrade on the upgrade window, you will see a new upgrade window C、Power up the LED-WD VI -TX at your hand Then click open order to open the upgrade file At this step, please check the Green LED indicator on VD-01, the LED indicator should be blinking at this moment, if it is not blinking then the upgrade will be failed. PLEASE NOTE THIS. D、single click Upgrade order, you will see the speed engine is running, At this step, please check the Green Signal LED indicator on smart wall dimmer and Green LED indicator on VD-01, when upgrading is going, both LED indicators are blinking, if each of them is not blinking then the upgrade will be failed. PLEASE NOTE THIS. E、After finishing the upgrade process, you will see the firmware upgrade finish window F. Exit the upgrade window, please reboot your LED-WD VI-TX to check out whether they are upgraded successfully. 9- 10 -