1
MODEL 6060 INSTRUCTION MANUAL
PAGE 8
NEUTRON AREA MONITOR
INSTRUMENTS
HEALTH PHYSICS
for the specific detector. This is accomplished by adjusting all the parameters until they are optimized
for this detector. Only when the detector is optimized can the counts per mrem be determined.
The normal procedure for testing the instrument is to adjust the high voltage while the gain and
discriminator are fixed at their operational values. Normal operation is with the gain set to 4 and the
discriminator set to 10 hex. The high voltage is adjusted in 10 hex increments from 200 hex to 3F0 hex
while the instrument is exposed to around 500 mrem/h of neutrons. Count the counts from the
detector for 10 seconds at each high voltage setting and note the counts. Plot the data in graphical
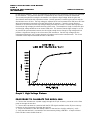
form and set high voltage just above the knee of the curve. The example on Graph 1 shows this plot
and the high voltage would be set at around 1300 volts. This assures that the high voltage is as low
as possible for environmental reasons, but also high enough that a change in high voltage will not
produce a significant change in the count rate of the instrument. Set this high voltage into the
instrument and expose it to a known doserate of neutrons and not the counts/mrem/h. This is the
calibration of the output of the 6060 and also of the 6014.
Graph 1 High Voltage Plateau
PROCEDURE TO CALIBRATE THE MODEL 6060
1. Connect the instrument to a power supply through the 15 pin accessory connector on the front
panel or through the test box.
2. Connect the instrument to a terminal with the RS-232 signals available on the 15 pin accessory
connector on the front panel of through the test box.
3. Turn the instrument on with the wakeup switch on the test box closed or with pins J and L .
4. Verify that the terminal is connected to the instrument by hitting <ENTER>. a couple of times.
Each time the screen should show an *.