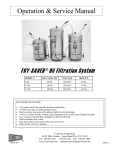
1
BELTS MUST BE PROPERLY ADJUSTED FOR BEST PERFORMANCE NOTE: DO NOT use these spring bolt nuts for any adjustment. They must always be positioned at full depth as shown. Adjust drive sheave assembly by tensioning screw for all belt tension adjustment. Belt Installation/Tensioning Check the tension of the belts according to the following steps: Step 1: Step 2: Step 3: Step 4: Step 5: 100 feet - Adjust tensioner 100 feet - Re-adjust tensioner 200 feet - Re-adjust tensioner 400 feet - Re-adjust tensioner Use Belt Tension Adjuster Only After first ½ hour of running time Check tension periodically.Adjust as needed. When starting a new tiller or tiller with a new set of replacement belts, the belt tension should be increased by several turns of the belt tension adjuster to allow for stretch and break-in. The belts that we supply with each unit are manufactured with multilayered reinforced cord, designed to take the twist and wrap around the pulley to provide maximum shiv contact. Other off-the-shelf brands have a cord structure with only a few large diameter reinforced cords that simply will not do the job. Northwest Tiller belts feature smaller and more numerous cords for better performance and longevity. NORTHWEST TILLERS WILL NOT GUARANTEE THE PERFORMANCE OF YOUR TILLER IF BELTS OTHER THAN OURS ARE USED. O&M - Operation & Maintenance To the Purchaser: This Manual contains valuable information about your NORTHWEST ROTARY TILLER. In this Manual you will find instructions and helpful suggestions for operating, attaching, adjusting, and assembling your new Rotary Tiller. Keep this Manual in a convenient place for quick and easy reference. Use it as a guide whenever questions arise. You have purchased a dependable, sturdy machine, but only by proper care and operation can you expect to receive the service and long life designed and built into it. We have endeavored to build a Rotary Tiller with the strength and durability to fit present day larger tractors and modern farming practices. At the same time we have tried to eliminate excessive weight to allow its use integrally hitched to most tractors. In any powered ground working implement such as this, some means must be provided to protect the tractor and implement gear train (shafts, bearings, gears, universal joints, etc.) as well as the cutting blades. We have found multiple "V" belt drive, incorporating the automatic belt tensioning idler system, the simplest, most "fool-proof" and effective answer to this problem. With just reasonable care these belts will give long life and still slip or stretch upon the tiller encountering large rocks, roots, etc., thereby protecting both tiller and tractor (See Page 5 and 6). Please Fill Out Below For Your Records. Serial # of this Tiller is: RB7934 ____________________________________ Model #: ________________________________________________ DD HC 168 SC SOD Date purchased: __________________________________________ 07/98 Northwest Tiller, Inc. O&M - i O&M - Operation & Maintenance WAR RANTY Northwest Tillers, Inc., warrants its products to be free of defects in workmanship and material for a period of 90 days from the date of delivery to initial user when given reasonable use under normal conditions. This warranty is limited to the repair or replacement, as the manufacturer shall elect upon inspection to have been defective in material or workmanship, but does not include any installation or transportation costs. This warranty shall not apply to any Northwest Tiller equipment, or part thereof which has been damaged in any accident, by fire, flood, or act of God. This warranty is likewise not extended to repairs on second hand machines, nor to Northwest products on which repairs or alterations have been made, or when other than Northwest Tiller equipment parts have been used, unless authorized in writing by the manufacturer. The manufacture reserves the right, at any time, to make changes in design, materials or specifications of its products, without therby becoming liable to make similar changes in units manufactured earlier. This warranty is in lieu of all other warranties covering Northwest products and no other warranties expressed or implied are made or authorized by the manufacturer. NORTHWEST TILLERS, INC. P.O. BOX 10932 YAKIMA, WASHINGTON 98909 U.S.A. Note: For this equipment to be covered by above warranty, the factory must have on file all information asked for in postcard attached to inside front page. Note: All warranty work must be authorized by factory representative. Northwest Tiller, Inc. O&M - ii O&M - Operation & Maintenance Attaching Tiller to Tractor CHECK DECALS CAREFULLY for greasing and adjustments DO NOT BACK UP THE TILLER when in working position, a bent Apron or Damage to belts may occur. Tiller fits either #1 or #2 Category tractor hitches with no extra parts. The Model "B" Tiller Hitch connects with either Category #1 or #2 linkage and the PTO Shaft Assembly fits most standard 3 point hitch tractors. Before operating in the field it is best to check the PTO shaft length in both the raised and lowered positions on integral hitch tractors so that it neither bottoms (32 1/2" overall) nor extends beyond 43" overall. The driveline fits together so that the yokes on the center sections are always in line. Should the assembly ever be changed or damaged, always check to be sure that this alignment is retained since out of alignment will cause pulsating of the drive line. Stabilizer bars on the tractor hitch are desirable. Always adjust top link so tiller frame is "level" when in working position. When first attaching to tractor, lift tiller carefully to determine that (1) PTO Universal Assembly does not strike frame; (2) telescoping shaft does not bottom. If either occurs, hydraulic lift adjustment on tractor must be set to reduce height of lift. To prevent damage to Gauge Wheels, Aprons, and Blades, be sure tractor hydraulic lift is set to drop slowly. When first operating tiller it is best to set the Gauge Wheels for shallower work than will be desired to allow for short "breaking in" period. To best determine depth of cut stop tractor but allow tiller to operated for a few moments, then raise and drive ahead. A clean "furrow" will appear, which may then be accurately measured. Northwest Tiller, Inc. O&M-iii O&M - Operation & Maintenance Assembly Bulletin No. 401 Assembled view of Northwest Rotary Tiller with Mesh Roller Assembled View of Northwest Rotary Tiller with Mesh Roller showing proper location of Apron Hold Down and Mesh Roller Clamps attached to the Rear Bar Support. Use Spring Position "A" for best down pressure on Full Width Aprons. Use Spring Position "B" for hte Narrow Crop Aprons. Northwest Tiller, Inc. O&M-1 O&M - Operation & Maintenance Model "RB" Tiller - Bedder Assembled View Assembly Bulletin No. 403 Factory does not furnish the furrower. Any standard wing type or flat furrower may be attached. When used with tractors with insufficient lift and transport stability the RB4088 or RB-4089 Hydraulic Lift Assist gauge wheels may be added. Use Spring Position 'A' for best down pressure on full width Aprons. Use Position 'B' for the Narrow Crop Aprons. For narrow bottom furrows (up to 9") use RB-4098 gauge wheels. For wider furrow bottoms use either RB-4070 or RB-4099 gauge wheels. Northwest Tiller, Inc. O&M-1.1 O&M - Operation & Maintenance Northwest Tiller, Inc. O&M-2 O&M - Operation & Maintenance Rotor & Blade Assembly For Regular "flat" blades See pages 3.2 & 3.3 for Saber or Stub Blades Figure 1 For convenience a 6' Rotary Tiller is shown above but instructions apply to other width Tillers except demension "B" which can be found on chart at end of instructions. This arrangement applies to Rotors R-50, RB-42-44, RB-62-64, D-150, and all welded rotors. Should it be necessary to re-assemble rotors and blades, the following instructions should be carefully followed to avoid confusion in attempting to achieve the proper blade and rotor spiral. We suggest that the Tiller be tipped on its "face" with the mast forward for easy handling. 1. Starting at the R.H. end and working from the rear of the Tiller, place 2-Blade Rotor Half in position on top of rotor shaft with hub pointing to left (See 1, Figure 1). Attach 4-Blade Rotor Half in position on under side of 3/4" carriage bolts placed down through the upper half. Tighten into place with vertical center of blade approx. 7" from inner face of housing (See Figure 1). NOTE: R-50 & D-150 Rotor Halves are identical, but the reference, bolts are placed downward as above. We should remind you to always place bolts downward through each upper Rotor Half for easy checking of relative Rotor position. 2. Rotate shaft 1/4 turn forward (top-edge of Rotor or Blade woudl turn away from you) and repeat instruction #1 except to locate per dimension shown in Figure 1. 3. For the remaining Rotors repeat instruction #2, that is turn Rotor Shaft ahead 1/4 turn and secure as described. On all other width Tillers, these center Rotors are spaced as above. 4. For the last Rotor repeat instructions #2 and #3 except face the hub to right (away from the housing) setting blade face approximately 7" from inner face of housing. It is best to strike rotor bolt heads with a heavy hammer and re-tighten securely in all rotors to avoid loosened bolts. (See #5 for change in blade arrangement for this Rotor). Northwest Tiller, Inc. O&M-3 O&M - Operation & Maintenance Rotor & Blade Assembly...Continued 5. Blades may either be assembled in rotors in advance or after rotors are placed as above. Remember that blades are attached to ALL rotors in the same position and sequence except the last rotor installed or the L.H. end rotor, with hub of rotor facing you as in picture (See figure 2). Place a R.H. blade in position 1, a L.H. blade in position 2, a R.H. blade in position 3, etc. On the last rotor or the left end rotor, simply reverse this procedure. (Place a L.H. blade in position 1, a R.H. blade in position 2, a L.H. blade in position 3, etc.) This assembly should give a "spiral" as shown. Figure 2 Remember: ALL rotor blade assemblies should appear alike (as shown in figure 2) EXCEPT L.H. rotor. Northwest Tiller, Inc. O&M-3.1 O&M - Operation & Maintenance Rotor & Blade Assembly For Saber and Stub Blades See pages 3 & 3.1 for Regular Flat Blades Figure 1 1. Starting with the L.H. Rotor Assembly A, Figure 1, with blades assembled as in figure 2, place a 2-Blade Rotor Half in position on top of shaft, hub of rotor to right and face of blade approximately 5" from inside of housing end. Insert 3/4" carriage bolts with heads up and attach 4-Blade Rotor Half with hub to right as shown. Tighten in place. 2. Rotate shaft 1/4 turn backward (top blades toward you). Again place a 2Blade rotor Half into position B, Figure 1, with hub to your right. NOTE: All Rotor Assemblies except A, have blades assembled as in figure 3. Place 3/4" carriage bolts as above. Attach 4-Blade Rotor Half, but with hub to your left. See Figure 3. Fasten in place with c-c of blades on the 2-Blade Rotor Halves approximately 7". 3. Again rotate rotor shaft 1/4 turn backwards. Place 2-Blade Rotor Half into position C. Complete assembly exactly as in #2, except space 2-Blade Rotor Halves at 12" c-c of blades. 4. For D, E, &F repeat #3, except fasten last assembly F with face of blade approximately 5" from inside of housing. Remember: Rotor Assembly A is arranged as in figure 2. All other rotors have the same blade arrangement as in Figure 3. Always measure spacing of only the 2 Blade Rotor Halves. For wider Tillers proceed as above with additional Rotor assemblies. Blade Assembly Blades may either be assembled in rotors in advance or after rotors are positioned as described. Blades for position A are assembled as in Figure 2, with L.H. blade at 1, a R.H. blade at 2, a L.H. blade at 3, etc. All other Rotor Assemblies have blades assembled as in Figure 3, with a L.H. blade in position 1, a R.H. blade at 2, etc. Northwest Tiller, Inc. O&M-3.2 O&M - Operation & Maintenance Spike Rotor & Blade Assembly Figure 1 All rotors are mounted in this manner - from left to right. 1. Starting with the L.H. Rotor Assembly A, with blades assembled as in figure 2, place a 4-Blade Rotor Half (RB-44) in position on top of the shaft (hub of rotor to right) and center of rotor approximately 3 1/ 4" from inside of housing end. Insert 3/4" carriage bolts with heads up and attach 2-Blade Rotor Half (RB-42) as shown in figure 1. Tighten into place. 2. Rotate shaft 1/2 turn backward (top blade toward you) and position 4-Blade Rotor Half (RB-44) B with blades assembled as in Figure 3. (Hub of rotor to the left). Insert 3/4" carriage bolts with hands up and attach 2-Blade Rotor Half (RB-42) OPPOSITE as shown in figure 1. Tighten into place 9 1/4" center to center of first Rotor. 3. Again rotate rotor shaft 1/2 turn backward and place 4-Blade Rotor Half (RB-44) C in the same maner as in #1 (blades included). NOTE: Space this rotor and all succeeding rotors 9 1/2" center to center. 4. Repeat #2 for D. Repeat this sequence until rotors are all mounted. The last rotor should mount approximately 3 1/4" from the RH end plate. NOTE: All rotors and blades in A, C, etc. are mounted as in Figure 2. All rotors and blades in B, D, etc. are mounted as in Figure 3. Always measure center to center of rotor halves on same side of shaft. Blades may be either assembled in rotors in advance, or after rotors are in position as described. NOTE: RH & LH blades are insignificant as long as blades in Figure 2 are mounted opposite blades in Figure 3. (Blades are not stamped for RH or LH.) Northwest Tiller, Inc. O&M-3.3 O&M - Operation & Maintenance Spike Rotor & Blade Assembly Figure 1 All rotors are mounted in this manner - from left to right. 1. Starting with the L.H. Rotor Assembly (above) with blades assembled as in figure 2, place a 4-Blade Rotor Half (RB-44) in position on top of the shaft (hub of rotor to the right). Position center of rotor approximately 6" from inside of housing end. Insert 3/4" carriage bolts with heads up and attach 2-Blade Rotor Half (RB-42) as shown in figure 1. Tighten into place. 2. Rotate shaft 1/4 turn backward (top blade toward you) and position 4-Blade Rotor Half (RB-44) B with blades assembled as in Figure 2 (Hub of rotor to the right). Insert 3/4" carriage bolts with hands up and attach 2-Blade Rotor Half (RB-42) as shown in figure 1. Tighten into place 12" from center to center of first rotor (see above). 3. Again rotate rotor shaft 1/4 turn backward and place 4-Blade Rotor Half (RB-44) in the same maner as in #1 (blades included). NOTE: Space this rotor and all succeeding rotors 12" center to center. 4. Repeat this sequence until rotors are all mounted. The last rotor should mount approximately 6" from the RH end plate (the hub of the last rotor must be reversed to the left). NOTE: All rotors and blades are mounted as shown in figure 2 except the last rotor. The blades are mounted the same on the last rotor, but the hub is reversed as explained in #4. RH and LH blades are insignificant as lont as the blades are mounted opposite each other as shown in figure 2. (Blades are not stamped RH or LH.) Always measure center to center of rotor halves on same side of shaft. Blades may be either assembled in rotors in advance, or after rotors are in position as described. Northwest Tiller, Inc. O&M-3.4 Bearing Collar to rear face of bearing Northwest Tiller, Inc. (1) Connect hitch to tractor draw bar. (2) Connect universal joint assembly after lubrication telescoping area. (3) Adjust height of frame at G until joint assembly is reasonably in line as shown. (4) If hydraulic cylinder is to be used, attach same to place of link C and retard to closed position. (5) Adjust turnbuckle D to bring tiller "level" with ground line as shown. If turnbuckle has insufficient travel, reposition bar H at E. (6) Before transporting tiller to the field, carefully turn tractor to right or left to determine maximum angle possible before reducing the dimension shorter. Approximately 24" are needed for the SRB4079, 28" for the SRB4081, 22" for the SRB4079 and 26" for the SRB4081. The universal joint assembly will bottom (see F, figure 2), and serious damage my result if forced further. NOTE: Disengage PTO on turn over 30O. We must EMPHASIZE that care must be used in makng turns (see #6). We cannot honor warrannty claims for any drive lines parts damaged by turning tractor at too great and angle. (7) If hydraulic cylinder is not used at C tiller may be transported by rolling on the blades similar to a disc harrow. This should not be done on paved or graveled roadways. (8) When in the field again retard hydraulic cylinder to full closed position and adjust guage wheels to attain desired tilling depth. This allows the operator to always return tiller to this working depth without guess work. (9) Recheck assembly for "levelness" with tiller position and "relevel" if necessary. The SRB4079 and SRB 4081 drawn hitches are shipped with one-half section of universal joint assembly, which is to be attached to the tiller. The complete assembly furnished with the tiller is used between tractor and drawn hitch. The draw bar must extend a minimum of 16" between center line of pin and the end of tractor PTO shaft B before connecting tractor to drawn hitch. If this can be extended up to 18" to 19" on SRB4079 & 20" on SRB4081 it will allow for a greater turning angle before "bottoming" (see F. figure 2). If tractor dimension B is approximately 20" then shaft bearing on hitch at E should be in front position. If tractor dimension B is approximately 16" then shaft bearing should be in center position as shown. Do not allow telescoping shaft to "Bottom" at (F) or extend beyond limit of 36" w/RB-4079 or 40" w/RB-4081 at (A). Assembly and Use of the Drawn Hitches For SRB4079 (5 Belt Tillers) & SRB4081 (6 Belt Tillers) O&M - Operation & Maintenance O&M-4 O&M - Operation & Maintenance Adjustment And Care of "V" Belt Drive A belt drive was chosen for this Rotary Tiller as the simplest and safest means to protect tiller blades, gears, etc., as well as tractor drive from shock and overloads. When in proper adjustment, belts will not slip except when overloaded. Do not over-tighten. Belt Adjustment NOTE: Do NOT use these spring bolt nuts for any adjustment. They must always be positioned at full depth as shown. Adjust drive sheave assembly by tensioning screw for all belt tension adjustment. When starting a new tiller or tiller with a new set of replacement belts, the belt tension should be increased by several turns of the belt tension adjuster to allow for stretch and break-in. (See above paragraph.) Re-check the belt tension indicator approximately every 10 to 15 minutes of tilling. This is especially important on wider tillers with the longer belts, which may stretch under load becoming too loose or may turn over. This may result in damaged belts. After two or three adjustments, belts are usually stretched to proper working length. When replacing belts the need not all have the same code numbers. (See Chart Below.) Belt Numbers Matching Limit 81 to 150 use up to 2 Code Numbers* 151 to 285 use up to 3 Code Numbers* * Code numbers must be consecutive. The longer codes representing the majority of belts in the set. The Idler System as used on the Northwest Rotary Tiller tends to keep a uniform fit around the sheaves even though belts tend to be somewhat different lengths. If a single belt becomes badly damaged, it should be cut away, or it may damage the balance of the set by breaking and becoming tangled between the belts and the idler assembly. The tiller may be operated with one less belt than a full set, UNLESS the tiller is operating to full capacity. However, it should no be necessary to intall a complete new set should one or more belts become damaged. In line with the above information on matched belts, simply add the necessary replacement either new or used and tighten to proper setting. 07/98 Northwest Tiller, Inc. O&M-5 O&M - Operation & Maintenance V-Belt Drive Trouble Shooting Checklist PROBLEM • Belts slip • Belts squeal • Rapid belt wear • Belts turn over CAUSE CORRECTION • • • • Insufficient tension. Overloaded tractor motor. Insufficient tension. Overloaded tractor motor. • • • Check tension setting. Reduce tiller working depth. See above. Some slippage is natural in heavy, rough, or rocky soils. This is no problem as long as belts do not become overheated. • • • • Excessive slippage. Worn idlers & sheaves. Belts turning over and so operated. Idler out of proper position because of improper post or bent or broken post bracket. • • • Check for proper tension. Do not overload. Keep tractor to full recommended speed. Check chart for proper post. Do not re-weld a broken post bracket, as it cannot be held to its proper shape. Belt damage during installation. Improper tension, particularly when encountering shock loads. Rusty sheave grooves and or sticky cover on new belts. Tiller not "level" with tractor causing excessive vibration of Tiller drive. Backing Tiller with blades touching ground. • • • • • • • • • • Check for proper tension. Roll belt or belts back into proper position and over-tighten belts to restretch. After afew hours operation readjust to proper tension. (See Adjustement and Care, Page 5) If this extra tension does not prevent belts turning over, reverse position in groove, that is revers ends or vertical positions. Check Tiller Assembly Check sheaves for bent flange or "excessive" eccentricity. Level Tiller • • • Apply proper tension. Install new belts properly. Keep shrouds in place. • • • • • Belt Breaks • • • Shock or heavy starting loads. Belt damaged during installation. Foreign objects in drive. Never use belt dressing. When installing new belts do not force or pry belts over sheaves. Reduce the drive center distance. If one belt is tighter or looser on top than balance when first intalled, you will finde that it will be the opposite on the bottom. As soon as it has been operated a few moments the tension will be equalized WARNING: Thru improper adjustment or severe overload the belt sheaves may get overheated due to excess slippage. When this occurs, do not stop tiller drive. Simply stop tractor travel and keep PTO engaged while allowing the belts and sheaves to cool down or charring of belts may result. DO NOT REVERSE TRACTOR WITH TILLER BLADES TOUCHING GROUND OR LOADING RAMP. DAMAGED BELTS MAY RESULT. 07/98 Northwest Tiller, Inc. O&M-6 O&M - Operation & Maintenance Trouble Shooting PROBLEM Tiller runs unevenly and seems to jump forward and up and down. CAUSE CORRECTION Cutting edge of blade reversed Blades in line instead of in spiral. PTO Universal Joints out of line. PTO Universal Joints not operating at same angle. Tractor traveling too fast over ground for speed of rotor which causes blades to take too large a "bite". See page 3. See page 3. See page 4. See page 4. Reduce tractor speed over ground but keep up motor speed by shifting to lower gear. Change V-Belt sheave. See page 8. NOTE: In most heavier soils it is not possible to use tractor with "free wheeling" type of transmission unless it is equipped with a selection of speed gears that bypass the "free wheeling action" since the tiller is usually pushing the tractor and if not held back to the proper ground speed, too large "bite" of the blades results. Tiller works to desired depth but does not cut off all weeds, etc. • Too fast ground speed or not proper size V-Belt sheaves. Blades set too far apart. • See page 8-12. • See page 3. Requires too much power. • • • Blades on backwards. Operating too great a depth for size of tractor. Slipping belts. Contrary to popular opinion, a slipping belt uses up more power producing a lower RPM than a tight belt holding the Tiller blade rotor up to proper speed. DO NOT TIGHTEN BELTS beyond instructions on Idler Decal. • See page 3. Tiller tends to "crab" to right or left. This may happen on the wider tillers in offset position on hilside or uneven ground, particularly if ground is hard or heavy • Keep guage wheels carrying full load. It may be necessary to move Guage Wheels to rear or sides, if front mounted. See page 5 • • Tractor is rolled or pushed ahead when Tiller touches the ground. It must be remembered that the action of the tiller's blades are much like the old spade lugs used on tracter wheels before the advent of the rubber tire. If the tractor was held back, the lugs dug up or "tilled" the soil. Likewise, if the Tiller is not "held back" it acts like a tractor and travels, using the blades for traction. • Have tractor in proper gear (slower ground speed) or if tires are skidding, set Tiller shallower. Tiller will not properly penetrate soil. • • See page 3 • • Change depth and/or ground speed. Check for proper sheave size. • • Belts slipping though properly adjusted. 07/98 Ground too dry and hard. (Remember that a tiller has approximately the same resistance to penetrating hard ground as a mouldboard plow). Blades on backwards. Guage Wheels improperly set. This may occur if tractor cannot keep up proper speed and starts "lugging". Northwest Tiller, Inc. O&M-7 O&M - Operation & Maintenance Sheave, Belt & Idler Post Chart Idler Post Sheave Diameters Belt Size 4 1000 PTO RPM No. Belts No. Belts Tiller Size 10 12 48" 10 12 22 81 F 60"- O 10 12 23 1/4 81 F K 60"- C 10 12 29 96 H B 60"- C 15 Center of Drive Shaft to L.H. End of Frame 'A' 540 PTO RPM 12- 12 60"- C 10 15 10 15 96 15 105 12 6 5 L E 105 72"- O 72"- O 5 27 1/4 C 10 5 A N N 72"- O 10 12 81 F K 72"- C 10 12 112 J D 72"- C 10 112 J D X 120 C S 120 C U B Y 15 72"- C 12- 12 72"- C 12 84"- O 10 84"- O 10 84"- O 84"- C 84"- C 84"- C 10 96"- O 10 96"- C 10 96"- C 10 15 43 1/2 128 15 41 1/2 128 10 120"- C 10 120"- C 10 120"- C 12 C S S E X X U C S D G D U S E U R U 118 G D 136 G D R S 15 45 1/2 136 E S S C 144 144 15 158 15 144 15- 15 158 15 120 15 12- 12 S 47 12 120"- C D S 15 12 10 J C 112 12 12 120"- C 07/98 A 15 108"- C 120"- C 112 15- 15 108"- C 108"- C 15 120 96"- C 108"- C A 12- 12 12 H 96 120 12 96"- O 96 15 12 10 84"- C 15 12 12 10 34 1/4 6 61 1/2 U D E C U V R V U V S 158 E 162 E C R V 162 U U 15 162 U V 15- 15 162 R R Northwest Tiller, Inc. O&M-8 O&M - Operation & Maintenance Sheave, Belt & Idler Post Chart Idler Post Sheave Diameters Belt Size Tiller Size 10 12 132"- C 10 12 173 12- 12 173 132"- C 132"- C 10 132"- C 132"- C 12 144"- C 12- 12 144"- C 12 144"- C 10 144"- C 156"- C 10 156"- C 10 12 168"- O 12- 12 168"- O 12 10 168"- C 168"- C 192"- C 10 204"- C 5 6 C V V G V 173 15- 15 173 15 173 V V 180 V V E V V V V 15 18 0 C 15 180 C 15- 15 195 V U 195 15 195 15 15 C C W V 195 W V 195 W W 195 V 210 C S 15 210 C 15- 15 210 15 225 15 225 T 15 225 T 15 240 T 240 T 15 240 T 12 15 240 T 12 15 225 T 12 15 285 T 15 12 204"- C 6 T 10 10 5 C 12 204"- C 4 210 10 192"- C No. Belts 12- 12 12 180"- C No. Belts 195 168"- C 180"- C 1000 PTO RPM 12 10 168"- C 540 PTO RPM 15 12 156"- C 168"- C 15 Center of Drive Shaft to L.H. End of Frame 'A' 12 84 1/2 C C T T T V V C T 216"- O 216"- C 228"- O 228"- C 240"- C 07/98 Northwest Tiller, Inc. O&M-9 O&M - Operation & Maintenance Vineyard Sheave, Belt & Idler Post Chart Idler Post Sheave Diameters Tiller Size 10 72" 10 72" 10 72" 10 12 15 4 5 81 K 12 81 12 10 No. Belts 12 72" 84" No. Belts A 12- 12 10 Belt Size 1000 PTO RPM 90 72" 84" 15 Center of Drive Shaft to L.H. End of Frame 'A' 540 PTO RPM F 12 90 B 84" 12- 12 90 B 84" 12 96 A 96 B 96 B 96 B 96" 10 96" 10 15 15 12 12- 12 96" 12 10 8 " 10 108" 10 12- 12 10 8 " 12 10 12 0 " 10 15 105 15 112 12 10 8 " 120" 15 12 96" 6 15 A 10 5 K 90 90" 6 E U N U U U 105 15 112 15 128 S 12 120" 12- 12 12 0 " 12 15 128 S 13 2 " 12 15 136 S 14 4 " 12 15 16 2 V 16 8 " 12 15 180 V 07/98 Northwest Tiller, Inc. O&M-10 O&M - Operation & Maintenance Sheave Combinations To change DRIVE or DRIVEN sheave From To (B) would move to the RIGHT approx. To change 15 12 1 3/4" To change 15 10 3 3/4" To change 15 8 1/2 5" To change 12 10 7' 8" To change 12 8 1/2 2 1/2" T change 10 8 1/2 1/2" Note: If larger sheaves are substituted for smaller sizes (B) would move to the left 07/98 Northwest Tiller, Inc. O&M-11 O&M - Operation & Maintenance Sheave Combinations Proper Motor Speed - In most conditions operate motor to give full 540 (or 1000) RPM at tractor PTO. If speed is reduced, particularly from overload, excessive belt slippage and pulsation will result. Before lifting tiller at end of field, it is best to either reduce motor speed or disengage tractor PTO. The integral hitch linkage on most tractors tends to raise the tiller in an arc instead of a "level" position, thereby causing considerably more angle to the front of the tractor PTO universal joint than to the rear of the tiller joint. This creates excessive vibration at full motor speed. Tractor Ground Speed - To determine the best ground speed to use, start tractor in low gear, then try second, etc. (See below). NOTE: It will take more horsepower at the higher ground speeds to produce a somewhat courser tilth. If a finer tilth is desired at the faster ground speed, a smaller driven sheave (on the 540 RPM drive) or a larger driving sheave (on the 1000 RPM drive) will be required. For fine seed beds, it may be desireable to use top speeds at slower ground speeds. PROPER SIZE SHEAVES FOR DIFFERENT BLADE ROTOR SPEEDS Drive Sheave Size Driven Sheave Size Produces Approx. RPM of Blade Rotor Shaft Recommended Max. Ground Speed for Average Tilling On Standard Drive Tillers used with 540 RPM PTO Speed "A" & "B" Drive Standard 12" 12" 15" 15" "B" Drive Standard 10" 12" 12" "C" Drive 15" Standard 15" 15" "C" Drive 10" Standard 12" 15" 15" "D" Drive (6-Belt) 10" Standard 12" 15" 15" 15" 10" 174 2 MPH Max. 12" 152 1 1/2 MPH Max. 12" 190 2 1/4 MPH Max. 10" 228 3 MPH Max. On Standard Drive Tillers used with 1000 RPM PTO Speed 12" 235 3 MPH Max. 12" 282 4 MPH Max. 10" 346 5 MPH Max. Heavy Duty Drive used with 540 RPM PTO Speed 15" 144 1 1/2 MPH Max. 12" 181 2 1/2 MPH Max. 10" 218 3 1/4 MPH Max. Heavy Duty Drive used with 1000 RPM PTO Speed* 15" 192 2 3/4 MPH Max. 15" 231 3 1/4 MPH Max. 15" 289 4 MPH Max. 12" 360 5 MPH Max. Extra Heavy Duty Drive 1000 RPM PTO Speed 15" 160 2 MPH Max. 15" 190 2 1/4 MPH Max. 15" 238 3 MPH Max. 12" 298 4 MPH Max. 10" 357 5 MPH Max. * On larger tractors the 1000 RPM PTO Speed is recommended if tractor is so equipped, since this greatly increases the efficiency of the "V" belt drive. 07/98 Northwest Tiller, Inc. O&M-12.1 O&M - Operation & Maintenance Blade Depth Variations ROTOR & "L" BLADE* ASSEMBLY RAD. A R-9A Inner Position 8 1/4" B R-9A Outer Position 9 5/8" C R-50 Inner Position 10" D R-50 Middle Position 11 1/4" E R-50 Outer Position 12 1/2" F D-150 Inner Position 11 3/4" G D-150 Middle Position 13" H D-150 Outer Position 14 1/4" I RB-42 & 44 or RB-62 & 64 Standard Position 11 1/2" J D-82 & 84 Standard Position 14 3/4" * Add 1 7/8" to all dimensions for Saber Blades. Note: Sabre Blades are mounted only on RB-62 & RB-64 rotors. ** Add 1 3/8" to all dimensions for Speed Spike Blades. These blades may be mounted on any type rotor. NOTE: Low profile housing - 14" radius maximum High clearance housing - 16 1/2" radius maximum 07/98 Northwest Tiller, Inc. O&M-12.2 O&M - Operation & Maintenance Gear Case "Wobble" Correction 1. Raise tiller to transport position. fig. A 2. Stop tractor motor and disengage tractor PTO. 3. Place Dial Indicator from endplate to outside of gearcase. It is important that the dial indicator is mounted in direct line with the center of the rotor shaft. See fig.A. 4. Grip drive belt by hand and rotate rotor shaft forward until dial indicator is at highest point. 5. Use torch with large tip to heat to yellowish red a strip between the first and second rotor. See fig.B. Heat between frame and first rotor as a last resort only. (This should be a small spot across the front face of the rotor shaft or across the corners.) Allow to cool and if necessary heat another spot 1 1/2" to 2" away and recheck. Repeat until dial indicator shows approximately .005 and .010 difference since this may be accepted as normal with no service problem resulting. fig. B Note: fig. C fig. D The Flat fig. E Northwest Tiller suggests the use of propane gas to heat shaft up. Propane Gas burns hotter and is less dangerous than other fuels. The heat should be hot and fast with as small a spot as possible to achieve the best results. See fig.C. On the flat the heated spot should be about the size and shape of a silver dollar. See fig.D. On the corner it should be diamond shaped, about 2" long and 1" deep. See fig.E. The Corner 1" 2" 07/98 Northwest Tiller, Inc. O&M-13 O&M - Operation & Maintenance Center Bearing A INSTRUCTIONS FOR ALIGNMENT D C B E With full sag in the rotor shaft (E), push bearing housing to a forward and up position and insert bolts at (C) and (D) (not necessarily on the holes shown in print) and tighten in place. Do not force bearing up. If holes do not match, use next lower position. Since, when tilling, the rotor shaft tends to stay in the down or sagging position, and has a tendency to "crawl" ahead in its effort to push the tractor, the location of the bearing as suggested should prevent excessive wear on the bearing. Tighten bearing sleeve to shaft after properly "centering" it with the outer hub. (Do not over tighten as breakage may occur.) We further suggest that if excessive wear should appear in any direction, a re-positioning of the flange (B) in upper support (A) should be done. This bearing is used not to hold the shaft in a normal position, but to contain it in as near its natural working position as possible to prevent "whipping" which otherwise might occur The 3/8" + clearance in these bearings is necessary to allow maximum freedom of shaft, and as a result, a slight "knocking" may occur which is harmless. 07/98 Northwest Tiller, Inc. O&M-14 O&M - Operation & Maintenance Center Bearing Adjustment If wear point is here, loosen the adjustment bolt [4] to move outer housing assembly up and toward the back. If wear point is here, loosen the adjustment bolt [4] to move outer housing assembly up and toward the front. UP 4 ▲ 4 ▲ ▲ FRONT OF TILLER BACK OF TILLER ▲ DOWN If wear point is here, loosen If wear point is here, loosen the adjustment bolt [4] to the adjustment bolt [4] to move outer housing assembly move outer housing assembly down and toward the front. down and toward the back. 07/98 Northwest Tiller, Inc. O&M-14.1 O&M - Operation & Maintenance Northwest Torque Tubes for all Gear Cases IMPORTANT The preload on item number 4 shown above is set at the factory. However, it is very important to periodically check the preload on item 4 and retighten as necessary to maintain preload on bearings in torque tube. Tightening is necessary when item number 4 can be moved by turning. Set Preload to 180 inch pounds. 07/98 Northwest Tiller, Inc. O&M-14.2 O&M - Operation & Maintenance Relative Position of Offset - Northwest Tillers to Center Line of Tractor 07/98 Northwest Tiller, Inc. O&M-15 O&M - Operation & Maintenance Dual Drive "D" Tiller Belt Adjustment Procedure A belt drive was chosen for this Rotary Tiller as the simplest and safest means to protect tiller blades, gears, etc., as well as tractor drive from shock and overloads. When in proper adjustment, belts will not slip except when overloaded. Do not over-tighten. Belt Adjustment NOTE: Do NOT use these spring bolt nuts for any adjustment. They must always be positioned at full depth as shown. Adjust drive sheave assembly by tensioning screw for all belt tension adjustment. When starting a new tiller or tiller with a new set of replacement belts, the belt tension should be increased by several turns of the belt tension adjuster to allow for stretch and break-in. (See above paragraph.) Re-check the belt tension indicator approximately every 10 to 15 minutes of tilling. This is especially important on wider tillers with the longer belts, which may stretch under load becoming too loose or may turn over. This may result in damaged belts. After two or three adjustments, belts are usually stretched to proper working length. Prior to 1991 (1) Loosen stabilizer arm at C. (2) Adjust RIGHT HAND belts to match indicator instructions - same as step 1. (3) Adjust SHORT belts at D - see below (4) Retighten stabilizer arm which was loosened in step 1. (5) Check both right hand belt stabilizer idlers to insure all belts ride evenly and freely in the grooved idlers. Adjust if necessary. C D 07/98 Northwest Tiller, Inc. O&M-16 O&M - Operation & Maintenance Belts - Dual Drive "D" Tillers Length No. Used Size Driven Drive Post 240" (20') 240" (20') 240" (20') 4 4 5 C-285 C-300 C-75* 12 12 15 15 15 15 DD-H DD-J 228" (19') 228" (19') 228" (19') 4 4 5 C-270 C-285 C-75* 12 12 15 15 15 15 DD-H DD-J 216" (18') 216" (18') 216" (18') 216" (18') 4 4 4 8 C-255 C-270 C-75* C-270/C-75* 12 12 DD-H DD-J 15 15 15 12 15 204" (17') 204" (17') 204" (17') 4 4 5 C-255 C-255 C-75* 12 12 15 15 15 15 DD-H DD-J 192" (16') 192" (16') 192" (16') 4 4 5 C-240 C-240 C-75* 12 12 15 15 15 15 DD-H DD-J 180" (15') 180" (15') 180" (15') 4 4 5 C-240 (RH Side) C-225 (LH Side) C-75* 12 12 15 15 15 15 DD-H DD-J 168" (14') 168" (14') 168" (14') 4 4 5 C-210 C-210 C-75* 12 12 15 15 15 15 DD-H DD-J * 1988 & earlier models - use C-60 belts, 12 Driven & 12 Drive 07/98 Northwest Tiller, Inc. O&M-17.1 O&M - Operation & Maintenance Belts - dual drive "D" Tillers - 6 Belt Drive System Length No. Used Size LH / RH Driven Drive Post LH / RH 240" (20') 6 RT-3285 / RT-3297 RB2615 RB2612 RB-123 / L-101 228" (19') 6 RT-3270 / RT-3285 RB2615 RB2612 RB-123 / L-101 216" (18') 6 RT-3255 / RT-3285 RB2615 RB2612 RB-123 / L-101 204" (17') 6 RT-3250 / RT-3270 RB2615 RB2612 RB-123 / L-101 192" (16') 6 RT-3240 / RT-3255 RB2615 RB2612 RB-123 / L-101 180" (15') 6 RT-3225 / RT-3250 RB2615 RB2612 RB-123 / L-101 168" (14') 6 RT-3210 / RT-3235 RB2615 RB2612 RB-123 / L-101 156" (13') 6 RT-3195 / RT-3210 RB2615 RB2612 RB-123 / L-101 144" (12') 6 RT-3180 / RT-3195 RB2615 RB2612 RB-123 / L-101 08/98 Northwest Tiller, Inc. O&M-17.2 Maintenance Northwest Tiller "D" Series Gear Case Lube and Maintenance 1. 2. 3. Recommended gear case oil is Texas Refinery Company #890 Gear Lube 85w/140. Or use a good quality "Grade 5" oil 85w/140. Keep top torque tube bearing reservoir filled with grease as it is the only means of lubricant to this bearing. A: Hold finger with pressure in on breater while filling reservoir until grease appears. Keep pinion nut snugged up to prevent hammering of bearings. Torque setting of pinion nut is 180 inch pounds. Check daily in your preventive maintenance program. Watch for oil leaks or moisture around gear case and main rotor shaft. Always be aware of different or strange noises. Change oil as needed. A: If gear case becomes extremely heated which may break down oil. B: When color of oil becomes black or smells burnt. We recommend gear case cooler on machines that run excessively hot due to: A: Depth of tiller being run B: Speeds of tiller C: Amount of horse power D: Soil conditions Recommended Seasonal inspection of torque tube bearings. A: Watch for wash boarding or unusual wear patterns on bearing or cone. 4. 5. 6. 7. 8. Grease Breather Vent Hold Pressure down while pumping grease. When filled Grease will appear here or underneath side of belt sheeve. Grease Zirk Gear Case Vent Oil Fill Spout Fill to Mark on Dip Stick Keep Wedge Nuts Tight 10/98 Northwest Tiller, Inc. Maintenance-1 Maintenance Northwest Tiller Lube Program Please take a few minutes to get to know your machine by reading your owner's manual. The information is valuable and will help your tiller last longer. Read the decals and learn where lubrication is required, how often you will need to lubricate and what kind of lubrication is needed. Lubricating Points 1. P.T.O. lubricating points 2. Center Drive Unit 3. Slap Idlers and Idlers 4. Gear Case Top Bearing 5. End Bearing 6. Dual Drive Center Bearing on Rotor Shaft 7. SD5000 Tension Unit Bearings and Shaft 8. Gear Case Oil Level 9. Guage Wheels or Mesh Roller Brackets 4hrs 2 places 4hrs 2 places 4hrs 1 place 4hrs 1 place 4hrs 1 place 4hrs 2 places 4hrs 4 places Daily as needed 4hrs 1 place L1. Grease Zirk Implement and Tractor L2. Grease will appear here when back bearing is filled full. Northwest Tiller, Inc. 10/98 Maintenance-2 Maintenance Northwest Tiller Lube Program L2. Grease Zirk Inside Hole L3. Grease will appear here when filled. L3. L3. Grease will appear here when filled. L4. & L8. Grease will appear from breather or up under bottom side of belt sheave L4. Gear case air vent Oil level and filler tube L5. 10/98 Grease zirk is inside the hole Northwest Tiller, Inc. L5. Maintenance-3 Maintenance Northwest Tiller Lube Program L6. L7. L7. L7. L7. L8. Gear case vent Oil level and filler tube 10/98 Northwest Tiller, Inc. Maintenance-4 Maintenance Belt Replacement "RB" & "D" Tiller 1. 2. 3. 4. 5. 6. 7. 8. 9. 10. 11. 12. 13. 14. 15. 16. 17. 18. 19. 20. 21. 22. 23. 24. Remove center drive guard by removing the four bolts on front side and slide guard to remove. Remove the Bolts from the gear case guard. Release the tension on the belts by loosening the nut and backing it off. Then loosen the tension rod. Move the center drive assembly by sliding it over toward the gear case. Remove the spring bolts and nuts from the idler unit. If the machine has slap idlers, remove the front bolt holding guards and grooved idler completely. Loosen rear bolt until there is enough room for belts to slide out. (If it is a new style, remove cotter pin in rear and remove the roll.) The complete belt system can now be removed. If possible place idler unit into a bench vise. Dissassemble idler unit by bending back lock tabs and remove the outer nuts. Remove lock tab and guard. Cut wire on the opposite side, loosen grooved idler bolt. Remove the bold from flat idler and remove flat idler from unit. Check condition of the grooved and flat idler. Replace belts and remount flat idler. Replace the rear bolt finger tight. Replace the guard and lock tab. Replace the idler nuts and tighten down (be sure that they go into holes in the guard as they are should nuts.) Tighten both nuts and bend over lock tabs. Tighten rear bolts and replace the wire between them. Replace idler unit onto the tiller. Replace springs and bolts that hold unit to the tiller. Place the belts onto the sheaves and reverse the procedure from removing them from the machine. Replace the guards. Tighten the spring bolt nuts until they bottom out. Re-tension belts and see manual for belt break in procedure. (Pages O&M 5-6) A Video on Belt Replacement is Available Upon Request. 10/98 Northwest Tiller, Inc. Maintenance-5 Maintenance Belt Replacement "RB" & "D" Tiller Suggested Tool List 1/2" Drive Ratchet 9/16" Shallow 1/2" Drive Socket 3/4" Shallow 1/2" Drive Socket 1/2" Combination Box Open End Wrench Wire Cutters 5/8" Cold Chisel 7/8" Deep Socket 1/2" Drive 1/2" Drive 1/2" Shallow Socket 1/2" Drive 10" Extension 5/8" Shallow 1/2" Drive Socket 15/16" Shallow 1/2" Drive Socket 1 1/8" Combination Box Open End Wrench Screw Driver (Flat Head) 5' Prybar 15/16" Deep Socket 1/2" Drive 4lb Hammer Belt.1 Remove the Center Drive Guard. Belt.2 Remove bolts (4) on front side. Belt.3 Slide from guard strap on back of tub. See Center Drive - exploded drawing on page C/1. 10/98 Northwest Tiller, Inc. Maintenance-6 Maintenance Belt Replacement "RB" & "D" Tiller Belt.4 Remove Gear Case Sheave Guard. There will be 5 or 6 bolts depending on the size of the gear case. Smaller units have only 5 bolts. Belt.5 Release the tension on the belts by loosening the jam nut and backing it off. Then loosen the tension rod. Tension Rod Jam Nut Belt.6 Move the Center Drive Assembly by sliding it over towards the gear case thus loosening belt tension. Belt.7 Remove Spring Bolts and Nuts. 10/98 Northwest Tiller, Inc. Maintenance-7 Maintenance Belt Replacement "RB" & "D" Tiller Belt.8 Remove Belts and Idler Assembly. Belt.9 Dis-Assemble the Idler Assembly. Fold Back Lock Tabs. Belt.10 Remove Nuts. Belt.11 Remove Lock Tab Strip. 10/98 Northwest Tiller, Inc. Maintenance-8 Maintenance Belt Replacement "RB" & "D" Tiller Belt.12 Remove Guard. Belt.13 Cut holding wire on rear bolts and remove the bolts. Belt.14 Remove Grooved Idler. Belt.15 Remove Flat Idler. 10/98 Northwest Tiller, Inc. Maintenance-9 Maintenance Belt Replacement "RB" & "D" Tiller Belt.16 Check Grooved Idler For Wear. Used - When worn the ridges become sharp and will cut the belts. New - Ridges are about 1/8" thick. Belt.17 Check Flat Idler For Wear. Used - May force belts to track improperly New - Smooth, no grooves. Belt.18 Remount Grooved Idler. Belt.19 Make sure all belt numbers are the same. Different numbers mean different lengths and all belts must be the same length. 10/98 Northwest Tiller, Inc. Maintenance-10 Maintenance Belt Replacement "RB" & "D" Tiller Belt.20 Put New Belts On Idler Assembly. Belt.21 Remount Flat Idler. Belt.22 Remount Guard. Set Idlers so guard will fit over bolt ends. Belt.23 Remount Lock Tab. 10/98 Northwest Tiller, Inc. Maintenance-11 Maintenance Belt Replacement "RB" & "D" Tiller Belt.24 Remount Nuts. End of shaft will be nearly flush with nut. Shoulder of nut seats thru lock tab. Secure nuts tightly. Belt.25 Tighten Back Bolts. Belt.26 Run retaining wire through holes (2 or 3 strands). Twist to prevent loosening. This keeps the bolts from backing out. Belt.27 Re-fold Lock Tabs. 10/98 Northwest Tiller, Inc. Maintenance-12 Maintenance Belt Replacement "RB" & "D" Tiller Belt.28 Make sure there is a slot on the underside of the Idler post. Look underneath or remove post to make sure slot is there. Belt.29 The slot should go up against the sidewall. In some cases you may want to grind a bolt so it will sit flush with the sidewall (on older units). This slot provides for belt adjustment. This is a new feature within the last five years. It helps provide better belt adjustment and longer belt life. Belt.30 Remount Idler Assembly - Spring Bolt Up. Northwest Tiller suggests that you insert the upper springbolt before mounting idler assembly to provide something to hold onto. This also makes it easier to install. Belt.31 Spring Bolt Tack Weld. 10/98 Northwest Tiller, Inc. Maintenance-13 Maintenance Belt Replacement "RB" & "D" Tiller Belt.32 Spring Bolt Down. Belt.33 There are rings on both the top side and the bottom side for the springs to sit in. Make sure springs rest in these rings. Belt.34 Place Belts On Center Drive Sheave. Always use Northwest Belts. Other off-the-shelf brands have a cord structure with only a few large diameter reinforced cords. Northwest Tiller Belts feature smaller and more numerous cords for better performance and longevity. They are designed to take the twist and wrap around the pulley to provide maximum contact. Belt.35 Tighten Spring Bolts till they bottom on the tack weld shown in Belt. 31. Make sure they are tightened evenly so one side does not get pulled up higher than the other. Back off each nut 1/2 turn. Your springs are now set. 10/98 Northwest Tiller, Inc. Maintenance-14 Maintenance Belt Replacement "RB" & "D" Tiller Belt.36 Tension Belts using belt tensioner. Belt.37 Testing Tension. There should be about 1/4" to 1/2" deflection. Belt.38 Lock Down Jam Nut on Tension rod. Belt.39 Remount Center Drive Guard. Hook the lip of the center drive guard over the lip of the guard strap so the center drive guard is held in position. 10/98 Northwest Tiller, Inc. Maintenance-15 Maintenance Belt Replacement "RB" & "D" Tiller Belt.40 Replace the bolts on Center Drive Guard. Belt.41 Remount Sheave Guard underneath the idler yoke. Belt.42 Place the corner bolts so they are facing inside. This will prevent them from catching on trees, shrubs, clothing, etc. The other bolts may be mounted however you prefer. On Smaller Gearcases there will be 5 bolts. On Larger Gearcases there will be 6 bolts. Belt.43 Checking Belt Ride. Run tiller, raise so blades are clear of ground. Belts should Track on centers of grooved Idler (As they run over Flat Idler). 10/98 Northwest Tiller, Inc. Maintenance-16 Maintenance Belt Replacement "RB" & "D" Tiller Belt.44 If running high side or low side of Grooved Idler loosen 1/2" Nut on idler post. Belt.45 Bump the idler assembly slightly, pivoting Idler Assembly right or left to center belts in Grooved Idler. Repeat process until belts are running true (center of Grooved Idler as they leave Idler Assembly). Belt.46 Retighten Post Bolt. New belts must be broken in as follows. Run tiller 100 feet and re-adjust the tension on the belts. Adjust tension to 10lb pressure. Under pressure they should drop as far as the bottom side of the next belt. Recheck running position of Belts leaving Grooved Idler. Repeat 5 times. Recheck belts every four hours. 10/98 Northwest Tiller, Inc. Maintenance-17 Maintenance End of Season Preventive Maintenance And Storage Proper end of season preventive maintenance and storage ensures longer implement life. Off-season Care 1. Lubricate all bearings 2. Loosen tension on belts. 3. Preventive maintenance steps: Check o for loose belts & nuts o gearcase pinion nut o belts and sheave wear o wedge bolts on gearcase o center drive bearings o PTO universals o for oil leaks or moisture spots o for worn, broken, or loose blades or rotors o mesh roller brackets and bearings 4. Place implement under cover or cover with a tarp. Remember your off-season is an excellent time to complete tiller repairs or gearcase repairs Before next season 1. 10/98 Retension belts and replace oil in gearcase if necessary. Northwest Tiller, Inc. Maintenance-18