1
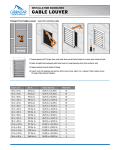
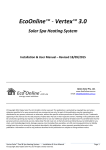
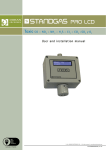
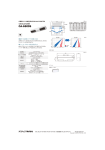
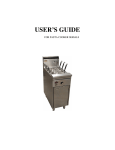
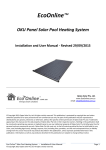
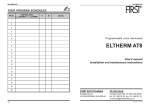
EcoOnline™ Solar Gable Mounted Fan Manual Installation Manual - Revised 26/01/2014 Optex Solar P/L www.EcoOnline.com.au email: [email protected] © Copyright 2012 Optex Solar Pty Ltd. All rights strictly reserved. This publication is protected by copyright law and unless otherwise specified is for your personal and non-commercial use only. No part of this publication may be reproduced or distributed by any process, electronic or otherwise, without the specific written permission of Optex Solar Pty Ltd. Trademarks appearing in this manual are the sole property of Optex Solar Pty Ltd or their respective owners. Nothing in this publication shall be construed as granting any express or implied license to use any intellectual property of Optex Solar Pty Ltd otherwise than for personal and non-commercial use only. Optex Solar Pty Ltd must not, to the full extent permitted by law, be held liable for any claim, cost (including legal costs), damage, expense, loss (including fines, penalties, set-offs and consequential loss) or liability arising from the use (or misuse) of any product described in this publication, unless expressly provided otherwise in this publication. Information as well as any products described in this publication are subject to change without notice. EcoOnline™ Solar Gable Fan -- Installation & User Manual © Copyright 2012 Optex Solar Pty Ltd. All rights strictly reserved. Page 1 Contents 1 Key Terms .................................................................................................................................................................. 3 2 Pre-Installation Suitability & Safety Checklist ........................................................................................................... 4 3 Warranties ................................................................................................................................................................ 5 4 Included Components ............................................................................................................................................... 5 5 Additional Components (supplied only upon request) ............................................................................................. 5 6 Tools Required .......................................................................................................................................................... 6 7 Extra Materials Required .......................................................................................................................................... 6 8 Safety When Working at Heights .............................................................................................................................. 6 9 Ladder Safety ............................................................................................................................................................ 7 10 Plan your installation. ........................................................................................................................................... 7 11 Choosing a Place to Install the Solar PV Panel and Gable Fan .............................................................................. 7 12 Optimal Solar Panel Orientation ........................................................................................................................... 7 13 Installing the Solar Panel ....................................................................................................................................... 8 14 Installing the Gable Fan......................................................................................................................................... 8 15 Adjusting the Activation Temperature................................................................................................................ 10 16 Trouble Shooting ................................................................................................................................................. 10 EcoOnline™ Solar Gable Fan -- Installation & User Manual © Copyright 2012 Optex Solar Pty Ltd. All rights strictly reserved. Page 2 1 Key Terms This manual was written to follow guidelines and recommendations given in: ‘HAZPAK’ produced by the work-cover authority Incolink Safety Handbook Please take the time to read the entire manual before starting any work. Particular attention should be given to text contained in the following key terms. Please note EcoOnline has a strong product safety policy; do not install products without reading safety guidelines in the manual. Please report any product safety issues or near misses to [email protected] no matter how trivial. Indicates a SAFETY issue that is likely to cause injury or death if the user does not follow the instructions. Indicates a SAFETY issue that may cause injury or death if the user does not follow the instructions. Indicates a SAFETY issue that may cause injury or property damage if the user does not follow the instructions. Refers to critically important information related to the correct functioning of the unit. Refers to useful information for the optimal operation of the unit. EcoOnline™ Solar Gable Fan -- Installation & User Manual © Copyright 2012 Optex Solar Pty Ltd. All rights strictly reserved. Page 3 2 Pre-Installation Suitability & Safety Checklist The following outlines mandatory suitability and safety requirements for installing an EcoOnline™ Solar Attic Fan. Please read carefully, if any of the following requirements cannot be meet this unit should NOT be installed. Due to the potential of falling from heights, we recommend that the installation of the unit on a roof should only be undertaken by a professional installer unless you are accustomed to and confident of performing the work safely. Warning: this unit is rated not for bush fire prone areas. When installing this unit air intake eave grills MUST be installed. Failure to do so could create negative pressures in the roof cavity and house which could interfere with proper fluing of carbon monoxide stemming from combustion heating appliances. With the 5 anchor points for the solar panel the unit should withstand particular strong winds, however for regions which experience exceptionally strong gale force winds we recommend a professional installer advise you on wind load issues. Building regulations vary from state to state and MUST override any instructions supplied in this manual. It is the responsibility of the purchaser/installer to check that installations comply with any relevant state laws and regulations. For metal roofs the unit requires the installation of about 4 eaves grills on the opposite side of each gable fan to aid air flow through your roof space. EcoOnline™ Solar Gable Fan -- Installation & User Manual © Copyright 2012 Optex Solar Pty Ltd. All rights strictly reserved. Page 4 3 Warranties EcoOnline™ offers the following Warranties on the solar attic fan: 2 year return to base Motor Warranty 2 year return to base Thermostat Warranty 20 year return to base solar PV panel Warranty See EcoOnline.com.au Terms and Conditions page for further details. 4 5 Included Components Single Panel Unit For Bi-Panels Unit ONLY For Bi-Panels Unit ONLY 1 × 10W or 20W Solar Fan 1 × 12m PVC wire with connector 1 × 10W or 20W Solar Panel with 1 × 12m PVC wire with connector 1 × Parallel connector Additional Components (supplied only upon request) Wind Proofing Struts Solar Roof Hooks 1 × Wind proofing struts + nut and bolt set (for cyclonic and high wind areas) 1 × 304 Stainless solar roof hook Dimensions: A = 47.5mm,B = 117.5mm,C = 60mm EcoOnline™ Solar Gable Fan -- Installation & User Manual © Copyright 2012 Optex Solar Pty Ltd. All rights strictly reserved. Page 5 6 Tools Required 7 Extra Materials Required 8 Hand powered drill with socket and drill bits Marking pen Industrial Ladder (with means to secure the ladder at the base and top) Silicon gun and sealant Solar panel mounting roof attachment points (not included). Outer louver/grill for gable opening (if not already installed). Eve grills (air inlets) Safety When Working at Heights WHEN WORKING AT HEIGHTS - SAFETY COMES FIRST. A person can easily fall off a ladder or roof and be seriously injured. For installations on a roof pitch greater than 22° and/or a double story house we strongly recommend a highly competent professional installer install your solar attic fan. The installer should always take the necessary safety precautions: Choose an appropriate day: cool, dry, calm and partly cloudy. Plan out your install: make sure you have all required components, tools and have plenty of allocated time. Only work at heights when you are well rested and alert. Never work alone, always work with at least one other person. Always use a safety harness or fall arrest system attached to appropriate roof anchor points. Wear clothes that fit well but that do not restrict movement. Use proper non-slip shoes. Use sunscreen. EcoOnline™ Solar Gable Fan -- Installation & User Manual © Copyright 2012 Optex Solar Pty Ltd. All rights strictly reserved. Page 6 9 Ladder Safety The chance of a falling from a ladder should never be underestimated. Use only solid industrial grade ladders in good repair that have been checked for faults. Note: even a small unexpected movement of the ladder, such as a small slip, can cause loss of balance and result in a fall. The ladder should be placed on solid ground and should ALWAYS be securely anchored at the base and secured at the top to prevent slipping. 10 Plan your installation. First and foremost always plan your installation. When working with power or hand tools always follow the safety instructions. Where appropriate wear the recommended personal protective equipment, such as gloves, safety glasses, respiratory and hearing projection. Make sure electrical cables are kept away from any water and from foreign objects which pose a potential cable severing or crushing hazard. When using glues, solvents or sealing agents make sure you know and seek the proper first aid in case of an accident. 11 Choosing a Place to Install the Solar PV Panel and Gable Fan When choosing an install orientation for your solar panel you should consider the following: The panel should be free from shading (this includes overhead cabling or TV antennas). The fan and solar panel need to be installed within the 12m cable length. 12 Optimal Solar Panel Orientation 12.1 Single Panel Unit The solar panel should be orientated so that peak power production coincides with the maximum temperatures in the daily diurnal cycle in summer (which typically peaks at between 2-3pm). Hence, the panel should be tilted at about at L - 10° (where L is your latitude) and tilted west toward the sun’s position at between 2-3pm. EcoOnline™ Solar Gable Fan -- Installation & User Manual © Copyright 2012 Optex Solar Pty Ltd. All rights strictly reserved. Page 7 12.2 Bi-Panel Unit Bi-panel units should have a first panel facing the 11am-12noon sun with the second panel facing the afternoon sun to create a broad power peak. It does not matter which panel faces the afternoon sun. Since the unit’s solar panel is adjustable it is recommend that the unit’s solar panel face the afternoon sun, while the second panel can be mounted flat on a north facing roof. 13 Installing the Solar Panel 1. Install your solar panel mounting attachment points. 2. Set the appropriate angle of the solar panel and install the wind proofing struts to create a 5 point anchor for the solar panel. 3. Tighten the wing nuts on the adjustable solar panel frame 4. On the roof, fix the solar panel mounting frame to your mounting attachment points. 5. Run lead into your roof cavity. 6. Silicon seal any water ingress areas. 14 Installing the Gable Fan 1. Measure and cut 400mm diameter hole between two studs in your gable (do not cut into studs). 2. Install outer louver/grill to cover the gable fan opening if not already installed. 3. Fix the unit to the studs with the flat base flange facing the outside (and motor facing inside your roof cavity) using screws provided. 4. Shroud or seal any air gaps between the unit’s base flange and the gable opening. 5. Route the cable to the fan and connect the unit (make sure the fan is free to spin before connecting). 6. Install the eve grills on the opposite side of your roof space to the gable fan to act as fresh air inlets. 14.1 Gable Unit Dimensions EcoOnline™ Solar Gable Fan -- Installation & User Manual © Copyright 2012 Optex Solar Pty Ltd. All rights strictly reserved. Page 8 When cutting the 400mm diameter hole for your gable fan, DO NOT CUT ANY STRUCTURAL MEMBERS OF THE HOUSE. For efficient air flow, any air gap between the unit’s base flange and the gable opening should be sealed up with extra shrouding or silicon. Eve grill should be installed on the opposite side of your roof space to the gable fan to act as fresh air inlets. Important: ALWAYS install the wind proofing aluminium side struts for strong wind areas to create 5 anchor points for the solar panel. Never run a 12-24V cable near or in the same compartment or conduit as other 240V cables due to the chance of mistaking the two cables at some later point in time during installation or servicing. EcoOnline™ Solar Gable Fan -- Installation & User Manual © Copyright 2012 Optex Solar Pty Ltd. All rights strictly reserved. Page 9 15 Adjusting the Activation Temperature The activation temperature of the fan can easily be adjusted using the existing (27°C) fixed temperature thermostat. For example if you require the unit to activate more often (i.e. a at lower roof cavity temperature) simply cut and extend the thermostat wire and situate the thermostat higher in your roof cavity. On the other hand situating the thermostat lower in your roof cavity will result in the thermostat sampling cooler air - in this case the unit will not come on as often. If a complete removal of the thermostat is required simply cut off the thermostat and join the two resulting wires (see figure below). Note: when extending/altering wiring, the extra wire should be double insulated dual core PVC cord with minimum copper area 0.75m2. All solder joins must be sealed using a good quality adhesive lined heat shrink. 16 Trouble Shooting Problem Unit in full sun and not working Cause Thermal switch prevents the unit from activating below 27°C EcoOnline™ Solar Gable Fan -- Installation & User Manual © Copyright 2012 Optex Solar Pty Ltd. All rights strictly reserved. Solution No fix required Page 10