1
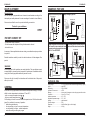
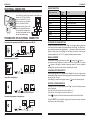
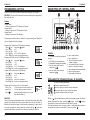
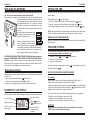
ELTHERM AT8
ELTHERM AT8
YOUR PROGRAM SCHEDULES
PROG.
HEATING LEVEL
, (HIGHER ) / , (LOWER)
H
M
DAY(S)
1
2
3
4
5
Programmable room thermostat
6
7
ELTHERM AT8
8
9
10
11
12
13
User's manual
Installation and maintenance instructions
14
15
16
17
18
19
20
12
FIRŠT ROTOTEHNIKA
PE VELENJE
Radegunda 54,
SI-3330 MOZIRJE, SLOVENIJA
Koroška cesta 56a, SI-3320 VELENJE
tel. 03 / 898 35 00, fax. 03 / 898 35 35
e-mail:[email protected]
PM7-0242-22.AT8-ang
ELTHERM AT8
ELTHERM AT8
DEAR CUSTOMER
EXAMPLES FOR USE
Congratulations
You have bought a programmable room thermostat, manufactured according to the
latest quality and safety standards. It is made according to the state of art and efficiently.
Example of control the rotary actuator
Example of leading the gas boiler
ELTHERM AT8
ELTHERM AT8
Thanks for your confidence
FIRŠT
MV 120/210
We are convinced that the use of our product will satisfy your needs to.
THE SET CONSIST OF:
Read the instructions carefully in order to be able to make use of all advantages of the
product.
ELTHERM
AT8
EMV 110/710
District heating control for hot water heating with
electric motor ball valve and room thermostat
ELTHERM AT8
BOILER
THERMOSTAT
In case any of above specified elements are missing or are defective require your dealer
to replace it.
Example of regulation of low temperature boiler
with domestic hot water treatment with room
thermostat and electric operated diverter valve
EMV 110..710s or ROTODIVERT
BOILER
THERMOSTAT
- Programmable room thermostat
- Two wall screws with inlet-piece for fixing the thermostat on the wall
- Instruction for use
EMV 110/820
! WARNING!
All examples listed in the instructions are merely indicative. The manufacturer accepts
no responsibility for incorrect hydraulic connection of machine part of installations should
comply with all safety regulations defined by law and the rules.
We reserve the right to modify the instructions and the technical data of the product
without prior notice.
GENERAL
ELTHERM AT8 is programmable room thermostat with temperature display. It has possibility to set two temperature levels between 5°C and 30°C:
- lower or economic temperature level ,
- higher or comfort temperature level , ;
On the display is shown the correct time and temperature level. With the slide switch
(page 5) is possible to choose way of operation:
- protection against freezing
- non-stop working on lower - economic temperature
- non-stop working on higher - comfort temperature
- automatic working according set program
2
EMV 110/701
RELE
Technical data
Supply voltage: .............................. 3 x 1.5V, LR6 (Expired time of batteries is approximately 2 years)
Output: ........................................... relay SPDT
Relay rating: ................................... 5(2)A, 250VAC
Hysteresis of thermostat: .............. ± 0.5K
Montage: ........................................ bottom part of thermostat on the wall, upper part with notches
Connection: .................................... 3 wire (3 x 0.75 mm2)
Ambient temperature: .................... 0°C - 50°C
Adjustable temperature range: ...... 5°C - 30°C
Housing: ......................................... plastic material
Protection degree: ......................... IP 20
Dimensions: .................................... 80x150x42mm (high x width x depth)
Weight ............................................ 0.25 kg
11
ELTHERM AT8
ELTHERM AT8
FACTORY SETTINGS
PROG.
1
2
3
4
Program
Program
Program
Program
,
HEATING LEVEL
(HIGHER ) / , (LOWER)
,
(Higher)
,
(Lower)
,
(Higher)
(Lower)
,
H
M
DAY(S)
06
22
07
23
00
00
00
00
Monday – Friday
Monday – Friday
Saturday, Sunday
Saturday, Sunday
switch 1: heating on higher level at 06:00 Monday thru Friday
switch 2: heating on lower level at 22:00 Monday thru Friday
switch 3: heating on higher level at 07:00 Saturday and Sunday
switch 4: heating on lower level at 23:00 Saturday and Sunday
Four programs switches need to be entered.
TROUBLESHOOTING
PROBLEM:
Days are flashing, pressing any key does
nothing except " " key turns output on
lower or higher temperature level.
Time of day was set while holding the
" " key down, but days are still flashing.
It is 10.00 and a program switch for
higher temperature level " , " at 8.00
was entered, but the output is on lower
level state " , ". Display shows the
" " and " " symbols.
A program for 8AM Monday thru Friday
was entered, but it will not accept it and
" " is flasing,
SOLUTION
Time of Day and Day of Week have not
been set. See “SETTING THE TIME”
Current day of week was not set while
holding down the key. See “SETTING
THE TIME”
After programming, the timer does not
“look back” to determine if it should be
on higher temperature level. Press the
" " key (temporary override) to turn the
output on higher level; "
and "
appears in display. The timer will
assume automatic operation at the next
programmed event.
The higher ( , )/ lower ( , ) level
switch was not entered as part of the
program.
" " or " " must be selected.
- slide switch is in position " "
- batteries are exploitated
At turning both knobs for setting
temperature you not hear switches of
relays
Display is beginning to fade or relay is not - batteries are exploitated. Expired time
switching
of batteries is approximately 2 years
10
Digital programmable timer makes possible to set heating regime for each day or group
of days. 20 program switches are available. The minimum setting of switching time is 1
minute. Digital programmable timer enables temporarily manual override of program
for switching between lower ( , ) and higher ( , ) temperature level. This manual
switching is active until next program switch.
Programmable room thermostat can be used for heating and cooling application with
suitable electrical connection.
Programmable room thermostat can control directly rotary actuator for mixing valve,
electric motor ball valve, circulation pump, burner, …
MONTAGE OF THERMOSTAT
Set the room thermostat on the wall with help of added screws
and model hools, which are drew on inside of packing cardboard.
It must be set 1.5m up from floor.
You must be careful where you montage the thermostat! Thermostat should be placed on neutral place in the room, that means
that distance must be between thermostat and all heating bodies
(radiators, fireplace, ...), airing openings (window, door,...) and
chimneys at least 1m. Be careful on direct influence of the sun!
In case of incorrect montage, the room sensor will not perceive
correct room temperature, and will because of temperature influence come to differences, which will have for consequence to
high or in most cases to low actual temperature in the room.
Gas boilers, stove, kitchen-range or chimney also warm up the
wall. So you must be careful on these elements when you fixing
the thermostat on the wall. The thermostat must have at least 1m
distance from these elements!
room thermostat
room thermostat
gas
boiler
room thermostat
chimney
room thermostat
gas
chimney
Examples of incorrect montage
3
ELTHERM AT8
ELECTRICAL CONNECTION
Unscrew the housing of connection cords and place the bottom of the thermostat on the
wall. Conduct of power supply connects on the middle connection cord (2). Signal for opening is on connection cord (1). Signal for closing is on connection
cord (3). Use wire 3x0.75m2.
Screw the housing back to his
place! (Housing serves as protection against high voltage and at
the same time separate low voltage part from high voltage).
POSSIBILITIES OF ELECTRICAL CONNECTION
Connection of electromotor ball valve EMV..110 or rotary actuator MV 120/..
ELTHERM AT8
DAY KEY SELECTION
PRESS »DAY« KEY
0 times
1 time
2 times
3 times
4 times
5 times
6 times
7 times
8 times
9 times
10 times
DISPLAY
SHOWS
1234567
123456
12345
67
1
2
3
4
5
6
7
DAYS
Every day
Monday-Saturday
Monday-Friday
Saturday and Sunday
Monday
Tuesday
Wednesday
Thursday
Friday
Saturday
Sunday
REVIEWING PROGRAM SWITCHES
To review the programs at any time, press “Prog.” key. Programs switches will appear
in the order they were entered with repeated presses of the “Prog.” key. After all programs have been reviewed, the blank display (--.--) will appear to allow entering another
program. Another press of the "Prog." key will display the number of free program
switches available, such as "Fr 16" if 4 program switches have been entered.
Connection of burner or pump
MANUAL OVERRIDE
TEMPORARY: While is selector switch in position " ", pressing the "
" key once
will reverse the output; higher level to lower level or lover to higher level. The symbol
"
" appears in the display to indicate a temporary override. At the next scheduled
switching time, automatic control resumes, eliminating the override.
CHANGING A PROGRAM SWITCH
Connection of cooling device
Select the program switch to be changed with the “Prog.” key. A new set of days may be
selected with the “Day” key just as in initial programming. Hour and minute can be changed
with the “h” and “m” keys.
Press “Prog.” to proceed to next program switch or " " key to store the new program.
DELETING A PROGRAM SWITCH
Connection of compressor or heating pump
To delete only one or a few programs: press “Prog.” key until the desired program
switch is displayed.
Press “m” key to 59 and press once more to blank out (--).
Press “h” key to 23 and press once more to blank out (--).
Press " " key, display will flash for several seconds and then enter the Run Mode.
Using the “RESET” key will delete ALL programs, the time of day, and day of the week
and program is set to factory settings.
4
9
ELTHERM AT8
PROGRAMMING SETTING
ELTHERM AT8
DESCRIPTION OF CONTROL PANEL
It is helpful to write out the program schedules before beginning. See last page !
IMPORTANT: The current time of day and day of week must be set prior to programming.
See "setting the time"
Example:
Program switch 1:
heating on higher level at 7:00 Monday thru Saturday
Program switch 2:
heating on lower level at 17:00 Monday thru Friday
Program switch 3:
heating on lower level at 19:00 Saturday
Three programs switches need to be entered. For program setting press "Prog." key
only once. Display shows factory settings:
Program switch 1 (higher level at 7:00 Monday thru Saturday)
Press "
" key
until symbol
appears
Press "h" key
to 07
Press "m" key
to 00
Press "day" key
to 1 2 3 4 5 6 is displayed
Press "Prog." key to enter to next program switch
Program switch 2 (lower level at 17:00 Monday thru Friday)
" key
until symbol
appears
Press "
Press "h" key
to 17
Press "m" key
to 00
Press "day" key
to 1 2 3 4 5 is displayed
Press "Prog." key to enter to next program switch
Program switch 3 (lower level at 19:00 Saturday)
" key
until symbol
appears
Press "
Press "h" key
to 19
Press "m" key
to 00
Press "day" key
until only 6 is displayed
Press "Prog." key to enter to next program switch
Program switch 4 is factory set. So you have to delete it.
Press “m” key
to :59 and press once more to blank out or
press “h” key
to 23 and press once more to blank out
display will flash for several sconds (--) and
Press " " key
then enter Run Mode (--)
IMPORTANT:
Timer is in the same state (temperature level), which was before program setting. New
program will be reflected on the next program switch (timer does not “look back” to
determine if it should be on higher or lower level after programming). If state of timer is
“. At the next
not accord to program then manually temporary override it with key “
scheduled switching time, automatic control resumes, eliminating the override.
8
LEGENDA :
1 LCD display for exact time and state of
program
2 LCD display for room temperature
3 Slide switch for choosing way of operating
4 Knob for setting higher (comfort)
temperature ( , )
5 Knob for setting lower (economic)
temperature ( , )
6 - key for setting minutes
7 - key for setting hours
8 key for the temporarily manual
override of program
9 key for setting the day of the week
10 reset key - erasing of all settings
11 key for switching in summer time and back
12 key for input the program
13 key for setting the exact time
Slide switch for choosing the way of operating
Four ways of operating are available:
Protection against freezing (8°C)
Non-stop working on lower (economic) temperature
Non-stop working on higher (comfort) temperature
Automatic working according set program
With key <
> (8) is possible temporary switch of working after program. This function
switches the program from lower - economic ( , ) to higher - comfort ( , ) temperature operation or reverse, and it's active until next switch in program.
That switching between lower - economic to higher - comfort temperature operation is
working after set program, the slide switch (3) must be in position “ ”!
5
ELTHERM AT8
ELTHERM AT8
REPLACING OF BATTERIES
SETTING THE TIME
Replacing of batteries is recommended before every beginning of the heating season. That's how you assure reliability of working of thermostat!
With screwdriver you separate room thermostat from support on the wall with pushing
the screwdriver into notch on bottom part of thermostat, lift
it with hand and take it off. In room thermostat are placed
three alkali batteries LR06 1.5V. In upper part is placed
one battery for weekly timer and thermometer. You must
put the new battery in the empty spot and then pull out the
used one.
In lower part there are two batteries for the
electronics of thermostat relay. You must
replace both batteries at time.
NOTE: If the “h” and “m” keys are held down longer than 2 seconds, the numbers will
advance rapidly.
Because of batteries working of thermostat is not depending of power supply (in
case of falling out the power supply the program is saved
in thermostat). Expired time of batteries is approximately 2
years, exploitation of batteries can be noticed when display in beginning to fade or relay is not switching.
AFTER REPLACING THE BATTERIES, TURN BOTH KNOBS (for higher and lower temperature) TO EXTREME RIGHT AND EXTREME LEFT AND TURN THEM IN ORIGINAL
POSITION. Turning of knobs is necessary for correct placing the exit of thermostat,
without erasing the set program from memory. Always use alkaline batteries LR06,
others can leak out and damage the electrical connections.
Temperature settings
Programmable room thermostat has possibility to set two temperature levels between
5°C and 30°C:
- Higher or comfort temperature level ( , ) with knob nr. 4
- Lower or economic temperature level ( , ) with knob nr. 5
Settings of lower and higher temperature are independent of each other.
ELEMENTS OF LCD DISPLAY
LCD incorporates a number of different elements to display various data and information.
Day of the week
Run mode symbol
Daylight time symbol
Higher ( , ) /lower
( , ) temperature level
Time of the day or
switching time
6
Manual override of
temperature level
operation
Press and hold the key " " during the following:
1. Press “h” to advance to the current hour (while holding down " " the key)
2. Press “m” to advance to the current minute (while holding down " " the key)
3. Press “Day” repeatedly to advance to current day (while holding down " " the key)
NOTE: If the days are flashing, it indicates the day of the week was not set when setting
the time. The timer cannot be programmed unless days of the week is entered.
MANUAL DAYLIGHT TIME CHANGEOVER
Each year, in the spring, press "±h" to advance the time an hour. In the fall, press "±h" to
set back an hour.
PROGRAM SETTINGS
The programmable weekly timer will accept up to 20 programs switches.
For every program switch is necessary to set
1.
2.
3.
Heating level: lower ( , ) or higher ( ,
Time of day (Hour and Minutes)
Single day or multiple days
) temperature level
A program is required for each higher-level event ( ,
each lower-level event ( , ).
), and a program is required for
NOTE: MULTIPLE EVENTS MAY BE PROGRAMMED.
For example,
Program switch 1 may turn the office heating on higher level at 08.00 Mon.-Fri.
Program 2 may turn the heating on lower level at 17.00 Mon.-Fri.
If someone is working late, they may press the override key "
" to turn the office heating
" again when they leave, the
on higher level. If they forget to press the override key "
heating will stay on higher level all night or all weekend.
To prevent this from occurring, additional program switches may be programmed.
- Program 3 can turn the heating on lower level at 18.00.
- Program 4 can turn the heating on lower level at 19.00.
- Program 5 can turn the heating on lower level at 20.00., etc.
IMPORTANT:
Before proceeding with setting the time and programming the unit, press the
“RESET” key to clear all data from the memory.
7