1
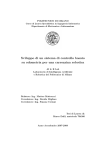
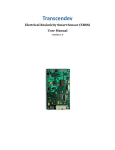
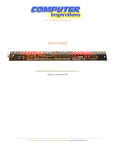
By Mick Gulovsen 17-May-2014 Ver. 3 Mick’s uMite PCB (MuP) Ver. 2 – Board Concept. Full hardware design for the MicroMite (uMite) project can be found here: http://geoffg.net/micromite.html The Mick uMite PCB (from here on called MuP) was originally designed for my own purposes as a final stage PCB after a project has been developed on a prototype, or bread/Vero board. Two great fully optioned uMite PCBs can be found on the `Back Shed Forums’ designed by WhiteWizard (44pin proto.) and Zonker (a 28pin proto.), both of these PCBs are well designed and have on-board USB to TTL interfaces to facilitate communication with a PC. Further information can be found in the forums located here: Zonker’s 28pin http://www.thebackshed.com/forum/forum_posts.asp?TID=6271&PN=1 WhiteWizard’s 44pin http://www.thebackshed.com/forum/forum_posts.asp?TID=6289&PN=8 MuP is `minimalist’ by design! After the hard work has been done I expect the uMite to be installed in some hidden, `out of the way’ cabinet merrily doing its job never to be disturbed again. There would be no need for a USB to TTL communication interface and I have designed it to be powered by a relatively cheap USB plug pack (wall wart) 1A 5Vdc input (3v3 is generated on-board), size and cost being my main goals. MuP is only 49.5mm x 43.2mm (1.95” x 1.70”). MuP Version 2 MuP Ver.2 has strayed a little bit from the `Minimalist ‘ perspective but I feel that the enhancements have made MuP Ver.2 a considerably better product. MuP Ver.2 is the same physical size as its predecessor, the differences from Ver.1 are covered in the next section. Version 2. Differences MuP Ver.1 was pretty popular but there were a couple of areas that needed to be addressed that enabled me to implement a few improvements to Mup. These include: 1. Pullups for the I2C lines Dat & Clk with link options (J10,J11) to enable or disable them. 2. The addition of a 1k resistor to enable 5V TTL level Tx(in) to be used, this can be jumpered out (J9) if 3v3 TTL Tx(in) is to be used. 3. Fixed a silk screen overlay error that had the Clk and Dat labels for I2C reversed. 4. Added a new header location (J12) to support WhiteWizard’s USB module. Sparkfun has a USB-TTL module that could be used here but it has only 4 pins (J12 is a 5 pin header) and is missing the 5V so cannot supply power to MuP V2. Further information can be found at: www.sparkfun.com 5. Added a Jumper (J13) to enable or disable 5V from the USB-TTL module inputs (J2 & J12). If MuP V2 is being supplied power through J3 AND a USB-TTL cable or adapter that has a 5V supply is connected, then J13 needs to be removed so that the two power sources will not `fight’ with each other. If 5V Power is required to be supplied via J2 or J12 then the jumper J13 will need to be installed. Schematic. NOTE! The `physical’ pin numbering shown In this schematic does not reflect the actual `physical’ pin numbering of the PIC32MX150F128B. Bill of Materials Ref. Type Description Comments C1 47uf 6v3 Tantalum SMD Low ESR Should be a Surface mount device C2 100nF 0.1" Monolithic C3 100nF 0.1" Monolithic C4 100nF 0.1" Monolithic C5 100nF 0.1" Monolithic J1 6pin Header Male J2 6pin Header Male J3 4pin Header Male J4 14pin Header Male or Female User choice Male or Female J5 14pin Header Male or Female User choice Male or Female J6 4pin Header Male J7 4pin Header Male J8 3pin Header Male J9 2pin Header Male J10 2pin Header Male J11 2pin Header Male J12 5pin Header Female J13 2pin Header Male LED1 Red 3mm 5V indicator LED2 Green 3mm 3v3 indicator R1 10k 0.25w 1/4 W 5% R2 560R 0.25w 1/4 W 5% R3 180R 0.25w 1/4 W 5% R4 100R 0.25w 1/4 W 5% R5 1k 0.25w 1/4 W 5% R6 10k 0.25w * 1/4 W 5% 10k for 100kHz I2C, 2k for 400kHz –R7 10k 0.25w * 1/4 W 5% 10k for 100kHz I2C, 2k for 400kHz U1 PIC32MX150F128B-I/SP Main CPU VR1 LD1117V33-TO220 3v3 Voltage Regulator ONLY one Vreg to be installed VR2 LM1117-SOT223 3v3 Voltage Regulator ONLY one Vreg to be installed VR3 MCP1702 3v3 Voltage Regulator ONLY one Vreg to be installed 28 Pin Micromite Connections (reprinted, with kind permission by Geoff Graham) The following diagram shows the possible functions of each I/O pin on the Micromite. Note that the physical pins on the chip and the pin numbers used in MMBasic are the same. This means that nine pins are not available in MMBasic as they are dedicated to functions such as power and ground. These pins are highlighted in grey in the diagram. RESET Wired to +V directly or via 10K resist DIGITAL | INT | ANALOG SPI OUT | DIGITAL | INT | ANALOG PWM 1A | DIGITAL | INT | ANALOG PWM 1B | DIGITAL | INT | ANALOG PWM 1C | DIGITAL | INT | ANALOG COM1: ENABLE | DIGITAL | INT | ANALOG GROUND COM2: TRANSMIT | INT | DIGITAL COM2: RECEIVE | INT | DIGITAL CONSOLE Tx (DATA OUT) CONSOLE Rx (DATA IN) POWER (+2.3 to +3.6V) SPI IN | 5V | DIGITAL 1 2 3 4 5 6 7 8 9 10 11 12 13 14 28 27 26 25 24 23 22 21 20 19 18 17 16 15 ANALOG POWER (+2.3 to +3.6V) ANALOG GROUND ANALOG | DIGITAL | PWM 2A ANALOG | DIGITAL | SPI CLOCK ANALOG | DIGITAL | PWM 2B ANALOG | DIGITAL DIGITAL | 5V | COM1: RECEIVE DIGITAL | 5V | COM1: TRANSMIT 47µF TANT CAPACITOR (+) GROUND DIGITAL | 5V | COUNT | I2C DATA DIGITAL | 5V | COUNT | I2C CLOCK DIGITAL | 5V | COUNT | WAKEUP | IR DIGITAL | 5V | COUNT The notation is as follows (the mnemonic in brackets is the mode used in the SETPIN command): ANALOG These pins can be used to measure voltage (AIN). DIGITAL Can be used for digital I/O such as digital input (DIN), digital output (DOUT) and open collector output (OOUT). INT Can be used to generate an interrupt (INTH, INTL and INTB). COUNT Can be used to measure frequency (FIN), period (PIN) or counting (CIN). 5V These pins can be connected to 5V circuits. All other I/O pins are strictly 3.3V maximum. COM xxx These are used for serial communications (see Appendix A) I2C xxx These are used for I 2C communications (see Appendix B) SPI xxx If SPI is enabled these pins will be used for SPI I/O (see Appendix D) PWM xxx PWM or SERVO output (see the PWM and SERVO commands) IR This can be used to receive signals from an infrared remote control (see the IR command) WAKEUP This pin can be used to wake the CPU from a sleep (see the CPU SLEEP command). Build Options. Power: MuP has provision for an on-board 3v3 Regulator so only needs to be supplied with 5Vdc, whilst I have allowed an option of 3 types of 3v3 Regulators for MuP, ONLY ONE should ever be installed otherwise they would work against each other and possibly oscillate affecting the quality of the 3v3 rail. If you wish, MuP can be powered via a USB-TTL adapter that has a 3v3 output, (or any other 3v3 source), however power draw `could’ be limited and I would recommend not fitting the LEDs to minimise current draw. This is NOT my preferred way to power MuP V2. If you intend to power the MuP via a 3v3 supply (eg. via a USB-TTL adapter), the voltage Regulator (Vr1, Vr2 or Vr3) should NOT be fitted. The intended locations to supply 5v input is via header J2 or J3. I recommend male header pins for J1, J2, J3, J6, J7, J8, J9, J10, J11 & J13 and a female header for J12. Headers J4 and J5 may be either male or female depending on your own preferences, as these are the connection points for the `outside world’ and will vary depending on the environment MuP is to be used in. Connections. J1 (ICSP) This is the ICSP header for connection to a PICKIT3 to program a new firmware into the Pic32. J2, J12 (Console Inputs) These are primarily to connect to a USB-TTL serial adapter but can also accept 3v3 (ONLY J2) and/or 5v POWER inputs. NOTE! Do NOT connect 3v3 from an external source if any of the Voltage Regs (VR1 - VR3) are fitted. WhiteWizard’s USB Module Plugs directly into J12 For more details see: J2 J12 http://micromite.org/shop/development-tools/usb-to-serial-module/ Generally, this is a 3 wire connection Tx, Rx & Gnd (if MuP is powered via J3) to an external USB to TTL adapter for communication with a PC but it may be convenient to use J2 or J12 as the entry point for the power supply as well. A classic example is when using a USB-Serial Cable similar to this unit available from DONTRONICS.COM http://www.dontronics-shop.com/ftdi-usb-to-serial-ttl-level-33v-converter-cable.html See APPENDIX A at the end of this document for more details on this cable. J2 and J12 may be used to supply 5V to the MuP, if no other supply is connected to J3, I have provided an isolation jumper (J13) to connect or disconnect the 5V supply from J2 and J12. J2 may also be used to supply 3v3 power (there is no connection for 3v3 on J12) but care should be taken that there are no other power sources and that none of the Vregs (VR1-3) are fitted, this is NOT my preferred option for powering the MuP. J3 (Power) This is primarily a power inlet (or outlet) port. NOTE! Do NOT connect 3v3 from an external source if any of the Voltage Regs. (VR1 - VR3) are fitted. J3 J4, J5 Pictures not shown but are direct connections to the adjacent pins of the Pic32mx150 chip with the one exception of J5 pin 6 (would equate to Pic pin 20) as Pic pin 20 is the +ve for the cap at C1 and should have no other connections to it, so this pin is connected to Gnd instead. These are the main connection points for interfacing to the `outside world’. Solder Male or Female headers to these position as suits your application. J6, J7, J8 These are designed for use with I2C devices. The left hand column (4 vertical pins) of J6 all connect to the Data for I2C communication. The right hand column (4 vertical pins) of J6 all connect to the Clock for I2C communication. The left hand column (4 vertical pins) of J7 all connect to 3v3 or 5V, depending on J8 setting. The right hand column (4 vertical pins) of J7 all connect Gnd. J8 is for a jumper to select if the left hand column of pins of J7 are 5V (link pin 1&2) or 3v3 (link pin 2&3). This allows up to four I2C devices to be easily connected to the MuP via a 4 pin header to pick up the Dat/Clk/Power/Gnd signals. Console Rx (in) J9 & R5 The TTL console Interface (J2) `Rx’ is connected to Pin 12 of the PIC32 chip. This pin is NOT 5V tolerant and needs a 1k Ohm resistor between J2 pin (Rx) and U1 pin 12. This enables a 5V TTL (USB to TTL serial) input to directly connect without risking the Pic32’s input circuitry. I have provided for this resistor (R5) and an associated Jumper block (J9). If you wish to use a USB to Serial adapter designed for 3v3 TTL levels Then J9 should have a jumper link fitted, if using a 5V TTL level input you will need to REMOVE the link on J9. I2C Pullups (R6,R7 & J10, J11) I have provided for the provision of pull-up resistors for the I 2C headers on the MuP, these would not normally be fitted if you are using Pin(17) or Pin(18) for other purposes as they may affect the performance of these pins. If you wish to use I 2C the Jumpers to enable these (J10 & J11) need to be installed, If not using I2C REMOVE the jumpers. If you do wish to use I 2C, Geoff suggests the following values for R6 & R7: 10KΩ for 100KHz or 2KΩ for 400 kHz APPENDIX A If you wish to use of the FTDI 3v3 cables similar to the ones available from DONTRONICS.COM http://www.dontronics-shop.com/ftdi-usb-to-serial-ttl-level-33v-converter-cable.html You will have to modify the pinout of the female header as shown below.. The Green (RTS) and Brown (CTS) wires may be simply cut off or taped back out of the way so that they don’t short with other connections. It is a very simple process to remove a wire from the plastic connector, simply use a sharp blade to gently lift the small plastic locking tab and pull the terminal out of the connector. To fit a terminal into another position simply push it in until it clicks.