1
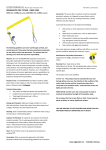
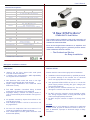
User’s Manual
General Descriptions:
Product Name
Model No.
Video System
Sensor
Pixel
Scanning
Starlight II-2nd Edition OSD Camera*
Bullet Camera
Dome Camera
NTSC System
Box Camera
PAL System
1/3 “ SONY Super HAD II CCD (440K Pixels)
with Customized DSP
811(H)x 508(V)
795(H)x 596(V)
2:1 Interlace 525 Lines / 60 Fields / 30 Frames
Internal, Line Lock
Sync. Mode
Horizontal Frequency
15.734kHz
15.625 kHz
Vertical Frequency
59.94Hz
50.00 Hz
Resolution
Color: 600TV Lines /650TV Lines
(B/W, Signal Enhancement)
Video Output
1.0Vp-p/75Ω Video,0.714Vp-p Composite, 0.286Vp-p
Burst Level
0.286Vp-p
S/N Ratio
50dB Min. (γ, Aperture, AGC Correct Off)
Minimum Illumination
0.00025 Lux at F1.2 (Sense Up Mode)
Sense Up
Max x256 times
Gamma Correction
0.45
AGC
+26dB Max.
DRC
On / Off
Eclipse
Lens
STARLIGHT II 2nd Edition
On / Off
Aspherical Auto Iris lens
Tamron ™ 2.8~10.5mm
( Also other lens available )
True Day & Night
NO
1/60(1/50)~1/120000 sec.
Communication
RS485, PELCO-D Protocol
Power Consumption
12Vdc or 24Vac (±10%) MAX
190mA
190mA
12V/24V or AC230V
130mA
Even at the toughest dark situations, it amplifies and
maximizes existing light to generate pictures where
other traditional cameras cannot.
-40℃~60℃
Storage Temperature
Operation Temperature
-10℃~50℃
Humidity Range
20%~90% RH
Weight
This camera series features super high resolution of
600 TV lines and can see in the dark with no distance
limitations without IR LEDs.
YES (Removable IR-Cut)
Electronical Shutter
Power Supply
“A New STAR Is Born”
750g
* Available with or without OSD.
900g
.... The Professional Choice
for Every Installation
400g
1
4
Starlight II -2nd Edition Camera
FEATURES:
●
●
●
●
INSTALLATION:
“State-of the Art” Sony Super HAD 440K pixels
CCD with Customized DSP
I VISION Light Compensation: WDR adjustability
for toughest back lit situations
IDN: Reduces video noise and snow in low light
situations coupled with the virtual 3D filter
Digital Image Stabilization and Advanced Noise
Reduction Circuitry
Please read this manual thoroughly before installation.
●
●
●
●
●
●
Full OSD operation Controlled Using on-board
pushbuttons or Remotely by keypad/DVR
Day/Night Setting: Camera can always remain in
color or automatically shift into B/W in low light conditions
●
●
●
●
●
●
No problem caused by objects that reflects or absorb IR light sources
Dual Voltage Operation: 12V DC or 24V AC to suit
any applications
DC Auto Iris Aspherical Lens 2.8~10.5mm F/1.2
(other lens available) for Bullet and Dome
IP67 Weatherproof marine grade aluminum case
and bracket (Bullet)
2
Installation should be performed by qualified personnel
To prevent damage to the camera, fire or electrical
shock use appropriate low voltage power cable.
Use approved REGULATED 24 volt AC or 12 volt DC
power supply without exciding the given voltage (see
camera specifications)
Do NOT point the camera to direct sun, The sun could
damage the camera even when not in use.
Do NOT mount the camera in areas exposed to radiation, strong magnetic fields, or strong electrical signals
without the appropriate precautions.
Do NOT drop the camera or subject it to strong vibrations.
NOTICE
The warranty is void if damage is caused by or attributed
to acts of God, physical or electrical misuse or abuse, repair, or alteration, improper or abnormal usage, or faulty
installation.
3
Users’ Manual
Starlight II-2nd Edition Camera—OSD Setting Instructions
External OSD Operation
-- Communication Setting of Keyboard and Camera:
The Camera has built-in Pelco-D/ Pelco-P Protocol. It can be
connected and controlled by the keypad.
Power Input
Video Output
RS485 Port
MENU
Mini Keyboard
How to connect:
Step 1:
Power up the camera and keypad, connect them through
RS485 port.
Caution: RS485 has Negative and Positive port, please connect properly. Otherwise the connection will be failed.
Step 2:
Select the same protocol, baud rate and camera ID in both
keypad/DVR and camera.
Shift+1: Select Protocol ( Pelco-D for this camera )
Shift+2: Select baud rate ( 9600 for this camera )
(Use LEFT/ RIGHT arrows to select optional items, ENTER
to confirm.)
Step 3:
After all the settings are done properly, the keypad shall be
able to control the camera.
Press MENU or combine CALL/F1+9+5+ENTER to enter the
OSD menu.
Press UP/DOWN/LEFT/RIGHT to select the menu item.
Rear OSD Operation – Joystick Control:
UP: OSD Option Upward
LEFT: OSD Option Leftward
ENTER: OSD Option Comfirm
RIGHT: OSD Option Rightward
DOWN: OSD Option Downward
DC
20
+...
1/50
MID
X32
OFF
MID
MID
WHITE BAL
WB MODE
RED CONT
BLUE CONT
PUSH AUTO
+….
+….
+….
+….
+….
+….
+….
AUTO
NOT USE
Press MENU to open the main menu. Use left
or right arrows to operate the submenu of each
item listed as the picture on left.
WHITE BAL
WB MODE : ATW1/ATW2/ AWC/ MANUAL /INDOOR/
OUTDOOR Optional
RED CONT : NOT USE (Accessible only in MANUAL mode)
BLUE CONT: NOT USE (Accessible only in MANUAL mode)
PUSH AUTO: NOT USE (Accessible only in AWC mode)
RETURN
ATW1
NOT USE
NOT USE
NOT USE
RETURN
DAY/NIGHT
D/N MODE
SENSOR IN
BURST
DAY/NIGHT
D/N MODE : AUTO /DAY/ NIGHT/ EXT
SENSOR IN : NOT USE/NC/NO
BURST
: NOT USE/ON/OFF
RETURN
AUTO
NOT USE
ON
RETURN
MOTION
DETECT MODE
DETECT AREA
SENSITIVITY
ALARM TIME
MOTION (This function is unavailable in this version)
DETECT MODE : ON/ OFF
DETECT AREA : Press left or right arrows to enter and draw the area
SENSITIVITY : Adjustable between 0 to 8
ALARM TIME : 1-60 SEC Optional
RETURN
OFF
+…
4
1 SEC
RETURN
PRIVACY
AREA
MASK
MODE
LEVEL
TOP
DOWN
LEFT
RIGHT
1
OFF
BW
0
34
54
20
40
PRIVACY
AREA : 1-24 Optional
MASK : ON/ OFF
MODE : BW/COLOR /MOSAIC
LEVEL : Adjustable from 0 to 15 when MASK ON
TOP : Area adjust to top
DOWN : Area adjust to down
LEFT : Area adjust to left
RIGHT : Area adjust to right
RETURN
RETURN
OPTION
TITLE
NEGA/POSI
SHARPNESS
MIRROR
ZOOM
PAN/TILT
PHASE
+…
POSI
7
NORMAL
OFF
OFF
0
RETURN
MENU OPERATION:
EXIT
EXPOSURE
LENS
: ELC/DC
BRIGHTNESS : Adjustable between 0 to 60
BACKLIGHT : ON/OFF
SHUTTER
: (Accessible only in DC mode of LENS)
AGC
: HIGH/MID/LOW/OFF Optional
SENSE UP
: OFF/×2/×4/×8/×16/×32/X64/X128/X256
Optional
ECL IPSE
: ON/OFF Optional
DNR
: HIGH/MID/LOW/OFF Opional
DRC
: HIGH/MID/LOW.OFF Optional
RETURN
RETURN
Camera ID: Press the CAM ID/F4 to enter the camera ID
and press ENTER to confirm after the ID is entered.
MENU
EXPOSURE
WHITE BAL
DAY/NIGHT
MOTION
PRIVACY
OPTION
DISPLAY
SYNC
INITIAL
EXPOSURE
LENS
BRIGHTNESS
BACKLIGHT
SHUTTER
AGC
SENSE UP
ECL IPSE
DNR
DRC
DISPLAY
TITLE
MOTLON DET
CAMERA ID
R
RETURN
OFF
OFF
0
OPTION
TITLE : Press left or right arrows to enter submenu
NEGA/POSI : NEGA / POSI Optional
SHARPNESS : 0-15 Adjustable
MIRROR
: NORMAL/ MIRROR/ VERTICAL/ ROTATE
ZOOM
: OFF/ ON, zoom level adjustable between 1-8
PAN/TILT
: ON/ OFF
PHASE
: Adjustable between 0-624
RETURN
DISPLAY
TITLE
: ON/ OFF
MOTION
: ON/ OFF
CAMERA ID : 0-255 Optional
RETURN
SYNC
AUTO
SYNC
INITIAL
NOT USE
INITIAL
EXIT
EXIT
AUTO/INT
NOT USE/USE