1
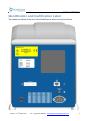
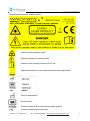
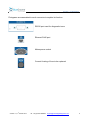
www.cambridgebluegnome.com ClearScan™ USER MANUAL For use with: ClearScan: 432401-PK ClearScan Auto: 432402-PK FOR RESEARCH USE ONLY Not for Use in Diagnostic Procedures BlueGnome • CPC4, Capital Park, Fulbourn, Cambridge, CB21 5XE, UK • tel: +44 (0)1223 885905 www.cambridgebluegnome.com • [email protected] ClearScan — USER MANUAL Contents USER MANUAL .................................................................................................................. 1 Identification and Certification Label .................................................................................... 4 Safety: important information ............................................................................................... 7 Laser safety...................................................................................................................... 7 High voltage ..................................................................................................................... 7 Moving parts ..................................................................................................................... 7 Safety system ................................................................................................................... 8 Use terms ............................................................................................................................ 9 The ClearScan series ........................................................................................................ 10 Installing the scanner ......................................................................................................... 11 List of packaged components......................................................................................... 11 Electrical communication connection ............................................................................. 11 Positioning the scanner .................................................................................................. 11 ClearScan network configuration ................................................................................... 12 Scanner check after installing the scanner ..................................................................... 13 Restoring factory settings ............................................................................................... 14 Meaning of visual and audio signals .............................................................................. 14 Operating the scanner ....................................................................................................... 16 Microscope slides ........................................................................................................... 16 Operating the ClearScan ................................................................................................ 17 Operating the ClearScan Auto ........................................................................................ 18 Operating the ClearScan software ..................................................................................... 20 Hardware requirements .................................................................................................. 20 Installation procedure ..................................................................................................... 21 Starting the ClearScan software ..................................................................................... 22 User workspace .......................................................................................................... 22 The software application main window ....................................................................... 23 Connecting the scanner .............................................................................................. 23 Toolbar icons explained .............................................................................................. 25 Scanner information ....................................................................................................... 29 Slide detection in the autoloader - ClearScan Auto ........................................................ 29 Scanning ............................................................................................................................ 31 Scanning in Auto mode .................................................................................................. 31 Scan parameters ............................................................................................................ 32 th Version 1.1, 4 March 2013 tel: +44 (0)1223 885905 • [email protected] 2 ClearScan — USER MANUAL Scanning in Manual mode .......................................................................................... 32 During the scan .............................................................................................................. 35 The scan image .......................................................................................................... 35 The histogram ............................................................................................................. 36 Image views and options ................................................................................................... 37 Open an existing image.................................................................................................. 37 About image ................................................................................................................... 37 Image display options..................................................................................................... 38 Image information........................................................................................................... 38 User preferences ............................................................................................................... 40 General settings ............................................................................................................. 40 Folders ........................................................................................................................... 42 Scanner self-tests and checks ........................................................................................... 43 Initialization checks ........................................................................................................ 43 Scan checks ................................................................................................................... 43 ClearScan slide check .................................................................................................... 43 Maintenance and Service .................................................................................................. 44 Fan filter replacement:.................................................................................................... 44 Troubleshooting ................................................................................................................. 45 FAQ: Technical data ........................................................................................................... 46 Embedded firmware ........................................................................................................... 48 Specifications..................................................................................................................... 49 Declaration of conformity ................................................................................................... 51 Software License agreement ............................................................................................. 53 th Version 1.1, 4 March 2013 tel: +44 (0)1223 885905 • [email protected] 3 ClearScan — USER MANUAL Identification and Certification Label Two labels are affixed at the rear of the ClearScan as show in the picture below. th Version 1.1, 4 March 2013 tel: +44 (0)1223 885905 • [email protected] 4 ClearScan — USER MANUAL The following information is also present: Attention laser radiation inside Attention dangerous voltage inside Attention read carefully instructions for use Separate collection for the electrical and electronic equipment Date of manufacture Serial number Scanner model (with or without Autoloader system) Version number of the instrument th Version 1.1, 4 March 2013 tel: +44 (0)1223 885905 • [email protected] 5 ClearScan — USER MANUAL Pictograms are associated to each connector to explain its function: RS232 port used for diagnostic issue Ethernet RJ45 port Mains power socket Current & rating of fuse to be replaced th Version 1.1, 4 March 2013 tel: +44 (0)1223 885905 • [email protected] 6 ClearScan — USER MANUAL Safety: important information Only qualified personnel who know and understand the safety warnings and precautions described in this document may be authorised to use the ClearScan scanner. Use for any purpose other than the purpose indicated in this manual exposes the user to serious hazards. Caution - use of controls or adjustments of procedures other than those specified herein may result in hazardous radiation exposure. The following safety precautions are compulsory and must be stringently observed at all times. Laser safety This device contains two laser sources. These laser sources are harmless when the equipment is used for its intended purpose. In all other cases, the laser sources may cause bodily injury. The technical specifications of the laser sources located in the machine are as follows: • • source1: visible wavelength 635nm, continuous wave, maximum output 15mW, divergence <1mrad, Class IIIb source2: visible wavelength 532nm, continuous wave, maximum output 15mW, divergence <1mrad, Class IIIb Do not attempt to gain access to the interior of the device. High voltage Some electronic assemblies in the device require high voltages (>1000V) to operate normally. These sources are harmless when the equipment is used for its intended purpose following the manufacturer’s instructions. In all other cases, high voltage may cause severe or fatal bodily injury. Do not attempt to gain access to the interior of the device. Moving parts The ClearScan contains moving parts. These parts are harmless when the equipment is used for its intended purpose following the manufacturer’s instructions. In all other cases, these parts may cause bodily injury. Do not attempt to gain access to the interior of the device. th Version 1.1, 4 March 2013 tel: +44 (0)1223 885905 • [email protected] 7 ClearScan — USER MANUAL Safety system The ClearScan has been designed to reduce all the above risks to zero when the equipment is used for its intended purpose and according to the supplied instructions. When using the ClearScan, the device housing and its mechanical shutter system protects you from all danger. Never attempt to open the housing – there are no user-serviceable parts inside. The user must call Technical Support if the machine exhibits any failure or malfunction. The housing must only be opened by qualified personnel appointed by BlueGnome. Once a slide is inserted into the ClearScan, a protective shutter obstructing the slide insertion port closes. If this shutter remains in the closed position for any reason whatsoever, preventing you from inserting a slide or removing a previously inserted slide, do not attempt to force it open: contact Technical Support immediately. Damage to this shutter may expose you to laser hazards. The ClearScan Auto, equipped with an autoloader system, requires the user to close a sliding door after inserting slides into the autoloader system. This door will be automatically locked during a scan. Do not attempt to force it open during a scan. Damage to this sliding door may expose you to laser hazards. If for any reason the door is still locked after scanning or if you are able to open the door during a scan, immediately switch off the machine and contact Technical Support. If a slide is broken inside the scanner or cannot be easily extracted, do not try and forcibly extract it, do not attempt to open the housing, contact Technical Support. If the scanner housing is damaged, do not use the equipment. Contact Technical Support. If any laser light is visible for any reason whatsoever, immediately switch off the machine and contact Technical Support. Warning, replace the fuse with a fuse of the same type: • T2AL, 250V, • Type: 5*20 mm • Breaking capacity: 150A Instructions to replace the fuse: • Disconnect power cable and switch off the scanner • Turn a 5.5 mm flat screwdriver from right to left inside the fuse holder to remove it • Replace the fuse and move back the fuse holder on the rear side of the scanner • Turn the screwdriver from left to right inside the fuse holder to lock it th Version 1.1, 4 March 2013 tel: +44 (0)1223 885905 • [email protected] 8 ClearScan — USER MANUAL Use terms The scanner is designed for use in research only. It is not designed or certified for use in the diagnosis of human or animal diseases. th Version 1.1, 4 March 2013 tel: +44 (0)1223 885905 • [email protected] 9 ClearScan — USER MANUAL The ClearScan series ClearScan includes two different models: ClearScan • model number: 432401-PK ClearScan is able to scan 24sure, 24sure+ and CytoChip Focus slides with a 10 µm pixel size and CytoChip Oligo slides with a 4 µm median scan setting ClearScan Auto • model number: 432402-PK ClearScan Auto is a ClearScan scanner incorporating a 24 slide autoloader. th Version 1.1, 4 March 2013 tel: +44 (0)1223 885905 • [email protected] 10 ClearScan — USER MANUAL Installing the scanner List of packaged components • scanner • mains power cable • ethernet crossover cable STP (Shielded Twisted Pair) • ClearScan user manual • software installation CD • ClearScan Test slide Electrical communication connection Before you connect the scanner to your electrical supply, please ensure that: • the wall socket is grounded, • your electrical supply follows these specifications: • Power supply: 100-240 V / 47-63 Hz • Plug fuse: 1A at 110V / 500mA at 220V • Electrical supply: circuit breaker able to switch at least in 40ms. NOTE: Without a grounded socket and/or if your electrical circuit does not comply with these specifications, the equipment may be damaged and the user's safety may not be ensured. Positioning the scanner The scanner must be located on a base or platform such that: • it is not subject to strong vibrations (not close to a centrifuge, vortex, etc.) • it is not exposed to direct sunlight • the housing does not come into any contact with chemicals (especially acetone) • it does not block scanner ventilation. It must allow 5 cm of space behind the rear panel of the scanner • it does not move the scanner while it is functioning. • it can support the weight of the scanner. Connect the scanner to a grounded mains outlet (110V or 220V) by using the mains power cable supplied. Switch on using the rocker switch at the rear of the machine. th Version 1.1, 4 March 2013 tel: +44 (0)1223 885905 • [email protected] 11 ClearScan — USER MANUAL ClearScan network configuration NOTE: Your scanner’s network settings should have been preconfigured prior to shipment according to instructions received by BlueGnome from your IT department. Please check with your IT department that they have provided this information. Before connecting the ClearScan to your company network your IT department should verify that the network settings are correct. This can be achieved using the scanner web interface as follows: 1. Use a computer with IP settings configured to allow it to communicate with the preconfigured scanner. 2. Connect the computer to the scanner using the supplied crossover Ethernet cable. 3. Open a web browser on the computer and browse to the URL http://<scannerIPaddress> . Replace <scannerIPaddress> with the IP address your IT department has allocated to the scanner. Note – if you have requested your scanner to receive its IP address via DHCP you can still browse to it using the default scanner IP address of 192.168.0.254. The browser should now display the scanner welcome page as shown below: th Version 1.1, 4 March 2013 tel: +44 (0)1223 885905 • [email protected] 12 ClearScan — USER MANUAL Click the « Network Settings » link to view the current network parameter configuration: Validate that the scanner is configured correctly. Troubleshooting scanner network connectivity: If you cannot browse to the scanner successfully check the following: 1. Computer IP address and netmask are correctly set for preconfigured scanner. 2. Confirm that the cable is actually a crossover cable. 3. Scanner should be powered on. 4. Try using the default scanner IP address (192.168.0.254). NOTE: If you plan to connect your scanner to your network then the crossover Ethernet cable should be replaced with a standard Ethernet cable, otherwise continue to use the crossover cable. Scanner check after installing the scanner This scanner check assesses fluorescence signal, image red/green shift, crosstalk and detection gain linearity. The scanner check takes 5 to 15 minutes, once it has finished a window displays the checked parameters and indicates whether the scanner has passed the checks. This checked list can be printed for your records and used to complete the ClearScan Check Protocol and the IQ/OQ Protocol. These checks will be performed by the BlueGnome support representative during scanner installation. - Once the scanner is switched on, and connected to a PC workstation, run the ClearScan software to connect to the scanner, allow the lasers to warm up th Version 1.1, 4 March 2013 tel: +44 (0)1223 885905 • [email protected] 13 ClearScan — USER MANUAL - Insert the delivered Test slide - Click on the « check scanner » button in the « Scanner » menu - The scanner will perform the checks and produce a report, see section Scanner checks and self-tests for more details Restoring factory settings If for any reason, the IP address is badly configured or forgotten, you can restore the machine's factory IP settings by holding down the reset button as shown in the illustration below while the scanner is powered up. Meaning of visual and audio signals Four LED pictograms on the front of the scanner and a buzzer keep the user informed about the scanner's status at all times. See below for the meaning of the pictograms: Meaning of icon power on connecting microarray read/present technical problem th Version 1.1, 4 March 2013 tel: +44 (0)1223 885905 • [email protected] 14 ClearScan — USER MANUAL Information displayed: status LED on flashing slowly flashing rapidly beep scanner on powering up (switching on power) end of power-up sequence (scanner ready to connect) short connecting connection sequence completed (scanner ready to take a slide) long disconnecting short slide inserted (scanner ready to read) reading reading completed (slide ready for removal) 3 short technical problem 3 long In the event of a technical problem, the scanner must be switched off and Technical Support contacted immediately. th Version 1.1, 4 March 2013 tel: +44 (0)1223 885905 • [email protected] 15 ClearScan — USER MANUAL Operating the scanner Microscope slides The ClearScan scanner is designed for use with BlueGnome’s microarray slides only [Only insert ISO 8037/1-compliant microscope slides into the device]. These slides are 25 to 26 mm wide, 75 to 76 mm long and 0.9 to 1.2 mm thick. Make sure these slides are not damaged (chipped edges, for instance). Take care with labels stuck on slides. They must not stick up from the slide or come unstuck. These precautions are of particular importance when using an autoloader system in association with ClearScan. Verify that there is no sticky material on the slide otherwise the slide may not be removed from the scanner. The total available scan area is shown below; the specific scan areas of BlueGnome slides are preconfigured in the scanner software. The slide is inserted in the direction indicated by the arrow: th Version 1.1, 4 March 2013 tel: +44 (0)1223 885905 • [email protected] 16 ClearScan — USER MANUAL Operating the ClearScan The ClearScan is simple to operate. The only direct user actions required (without using the software) are: • Powering up/switching off the scanner using the on/off button located on the instrument rear panel. When the scanner is powered up, it performs a sequence of self-tests and will indicate any malfunction via the Technical Problem LED. The test sequence lasts for approximately 30 seconds. When the sequence has completed, a short beep is emitted. If the Technical Problem LED is off, the scanner is ready for use. It is advisable to wait 10 minutes after the scanner has connected (as opposed to powered up) before use, so that the lasers have time to achieve thermal stability which improves laser performance and improves the lasers lifespan. • Placing a microscope slide in the insertion port located on the instrument front panel. The barcode and microarray spots must be on the same face of the slide, i.e. upwards, as shown in the previous illustration. th Version 1.1, 4 March 2013 tel: +44 (0)1223 885905 • [email protected] 17 ClearScan — USER MANUAL Two rails guide the slide in by gripping it by the edges. The insertion mechanism is designed not to damage the slide or the array spots deposited on it. Gently insert the slide until you feel resistance. The microarray presence detector identifies that a slide has been inserted and the microarray present LED comes on, indicating that the scanner is ready to read the sample. NOTE: Any other use of the scanner may be dangerous, or may harm the scanner. Do not attempt to loosen screws or insert any object other than slides complying with ISO standard 8037/1. Operating the ClearScan Auto The ClearScan Auto is simple to operate. The only direct user actions required (without using the software) are: • Powering up/switching off the scanner using the on/off button located on the instrument rear panel. When the scanner is powered up, it performs a sequence of self-tests and will indicate any malfunction via the Technical Problem LED. The test sequence lasts for approximately 30 seconds. When the sequence has completed, a short beep is emitted. If the Technical Problem LED is off, the scanner is ready for use. It is advisable to wait 10 minutes after the scanner has connected (as opposed to powered up) before use, so that the lasers have time to achieve thermal stability which improves laser performance and improves the lasers lifespan. • Slide down the door until fully opened. Insert slides horizontally in the loader slots numbered from 1 to 24. Gently push them until they reach the stop. th Version 1.1, 4 March 2013 tel: +44 (0)1223 885905 • [email protected] 18 ClearScan — USER MANUAL The barcode and microarray spots must be on the same face of each of the slides, i.e. upwards, as shown in the previous illustration. Gently slide the door up to close the autoloader system. The microarray presence detector detects that a slide has been inserted and the microarray present LED comes on, indicating that the scanner is ready to read the sample. During a scan the door is automatically locked. Do not attempt to force it open, you may harm the scanner. Wait for the end of the scans – see section Meaning of visual and audio signals before sliding down the door and removing the slides. Any other use of the scanner may be dangerous, or may harm the scanner. NOTE: Do not attempt to loosen screws or insert any object other than slides complying with ISO standard 8037/1 Be sure that inserted slides are pushed until the end stop Be sure that inserted slides are horizontal and not inserted on two different levels th Version 1.1, 4 March 2013 tel: +44 (0)1223 885905 • [email protected] 19 ClearScan — USER MANUAL Operating the ClearScan software The ClearScan software is required to control the ClearScan scanners and acquire the scan images for use in BlueFuse Multi. Features of the software include: • • • • • • run and control ClearScan scanners; ClearScan and ClearScan Auto display images in real time during acquisition control display parameters: zoom, image properties, contrast, balance save acquired images in 16-bit TIFF format together with all acquisition parameters (e.g. pixel size, laser output, etc) and JPEG format. display any 16/20-bit TIFF image manage multiple user accounts Hardware requirements A windows operating system computer (i.e.Windows 7) is required to operate the scanner. The memory requirements are relatively high as file sizes are large in high resolution mode, we therefore stipulate 4GB RAM. In standard configuration, the scanner communicates with the computer via a network adaptor. We therefore require two network adaptors: a dedicated network adaptor for the scanner with a fixed IP address (in the range of 192.168.0.[1-253]) and an additional adapter to network the PC. If you are not able to get your IT department to configure this, please ensure that you have administrator privileges so that we can configure it during installation. Alternatively, it is possible to connect the scanner directly to the network, in which case the IP address needs to be changed to one supplied by local IT support to satisfy the network requirements. Minimum Requirements: • • • • • Processor - Intel® Core™ i3-2120 Processor (3M Cache, 3.30 GHz) Microsoft Operating System - English Genuine Windows® 7 Professional (64Bit OS) Memory - 4GB (1X4GB) 1333 MHz DDR3 Non-ECC Hard Drive - 500GB 3.5inch Serial ATA (7.200 Rpm) Hard Drive Network Card - Additional Broadcom 5722 10/100/1000 Mbits BASE-TX network interface card For example Dell Optiplex 790 specifying Win7 64 bit OS and additional network adaptor. th Version 1.1, 4 March 2013 tel: +44 (0)1223 885905 • [email protected] 20 ClearScan — USER MANUAL Recommended Requirements: • • • • • Processor - One Intel® Xeon® W3503 (Dual Core, 2.40 GHz, 4MB Cache, 4.80 GT/s Intel® QPI) Operating System - English Genuine Windows® 7 Professional (64Bit OS) Memory - 4GB (2x2GB) 1333MHz DDR3 ECC UDIMM Hard Drive - 1TB 3.5inch Serial ATA (7.200 Rpm) Network Cards - Additional Broadcom 5722 10/100/1000 BASE-TX network interface card PCIe For example DELL Precision Fixed Workstation T3500 (Base), specifying Win7 64 bit OS and additional network adaptor. Installation procedure Place the software installation CD in the PC's CD-ROM drive and refer to the install.txt file for installation details. The current version of the ClearScan software may also be downloaded from www.cambridgebluegnome.com. th Version 1.1, 4 March 2013 tel: +44 (0)1223 885905 • [email protected] 21 ClearScan — USER MANUAL Starting the ClearScan software User workspace When the program starts, the following dialog box is displayed: When using the software for the first time, you need to create a user account by clicking on the «Create» button. NOTE: If this feature is irrelevant for your work environment, a single user mode is available which does not ask you to log on whenever the program is run. See section General settings Use the button «Start» to access the program from the workspace of the selected user. th Version 1.1, 4 March 2013 tel: +44 (0)1223 885905 • [email protected] 22 ClearScan — USER MANUAL The software application main window Once a user's workspace is selected, the user interface displays the Main Window on the monitor screen. Main menu: this menu provides access to all the software’s features Main toolbar: These icons control the scanner status and image display Connecting the scanner When first connecting to the scanner you will need to search for an available scanner. Click on the «search» icon situated either on the Toolbar or in the scanner tab from the Main menu. A window containing the available scanners is opened: th Version 1.1, 4 March 2013 tel: +44 (0)1223 885905 • [email protected] 23 ClearScan — USER MANUAL If you work with multiple scanners connected to the same computer they will all be listed, you can recognize a scanner by its IP address. If you do not know this address, you can use the «beep» icon to identify the scanner. Click on the icon to connect to the selected scanner. The «connect to the scanner» icon on the main toolbar connects to the scanner selected in the search scanner window or the scanner used in the last session as defined by its IP address. If you have previously connected to a scanner the scanner» icon will appear without having to locate a scanner. «connect to the The scanner user icons now become visible, and the main window changes to include an image display area. NOTE: To get optimal scanner performance the lasers have to warm-up for around 10 minutes after being connected to the ClearScan software prior to starting a scan. It is possible to continue with a preview scan if the lasers are not at optimal temperature, but not possible to continue with a high resolution scan. Use the «disconnect from the scanner» icon to disconnect the scanner, alternatively the scanner will automatically disconnect from the software after a set period of time, see General settings th Version 1.1, 4 March 2013 tel: +44 (0)1223 885905 • [email protected] 24 ClearScan — USER MANUAL Image toolbar: These icons control the scan settings and image zoom Image display area Navigation window Toolbar icons explained The toolbars are separated according to function; all functions can also be accessed from the main menu. File Select to open an existing image, or save the current image (save the current image as a .jpeg, or other image file types. This function is purely to save a picture and is not suitable for image analysis). th Version 1.1, 4 March 2013 tel: +44 (0)1223 885905 • [email protected] 25 ClearScan — USER MANUAL Image zoom toolbar ITEM ACTION zooms in on the entire image by 20% Zoom zooms out of the entire image by 20% Unzoom fits image width to the display window Page width fits the entire image into the display window Full image displays the image with a 100% zoom factor. One pixel on the screen corresponds to one image pixel. Real size returns you to the previous zoom Undo returns you to the zoom just cancelled Redo Reveals the view spot window – a floating version of image information that provides signal intensities on a pixel by pixel basis. View spots Register images th Version 1.1, 4 March 2013 Can register the two images. Should not be necessary, but can correct if the lasers have become slightly misaligned. tel: +44 (0)1223 885905 • [email protected] 26 ClearScan — USER MANUAL Scanner ITEM ACTION Connects the software to the scanner, the icon is removed when connected to a scanner. Connect Is revealed once connected to the scanner. Select to disconnect from the scanner. Disconnect Locate scanner Searches connections to find available scanner(s). This icon disappears once connected to a scanner. Scan parameters Opens scan parameters window. General tab defines the scan parameters: Manual mode – laser power and PMT gain or auto scanning mode. Slide tab shows preconfigured scan area. Preview Scan Scan Stop Provides a fast, low resolution scan of the whole slide area. Scans the preconfigured area at high resolution (10 or 4 µM median) Is revealed once scanning (preview/scan). Select to stop the current scan. With ClearScan Auto, the whole run of slides to be scanned will be stopped. Image tools Toggle between mouse in zoom mode and drag image/walk mode. Image display Select to display the preview image, the red (cy5) image, or the green (cy3) image or the combined cy5 and cy3 image respectively. th Version 1.1, 4 March 2013 tel: +44 (0)1223 885905 • [email protected] 27 ClearScan — USER MANUAL Window These icons select which window to view: ITEM ACTION Return to main image view histogram display navigation th Version 1.1, 4 March 2013 show/hide the histogram window that displays signal intensities for the images show/hide the display options window, allows brightness, contrast and balance of the image to be modified. show/hide the navigation window - shows the area of the slide currently viewed. tel: +44 (0)1223 885905 • [email protected] 28 ClearScan — USER MANUAL Scanner information To display the information about the scanner you are working on, click on the «about the scanner» option situated on the scanner tab of the main menu: Information on the connected scanner, including the version of the software currently used, is displayed. Slide detection in the autoloader - ClearScan Auto If your scanner has an autoloader system you can load your slides in the autoloader's holder and the ClearScan software will automatically detect the position in which the slides are loaded, slides needn’t be loaded in sequential order. Once the ClearScan Auto scanner is connected to the ClearScan software the auto-loader zone appears on the right hand side of the user interface. To detect slides and their location, click on «read loader» icon. Once slides have been detected, they can be selected or deselected for subsequent processes using the check box adjacent to the slide name, or by th «select all» or Version 1.1, 4 March 2013 «deselect all». tel: +44 (0)1223 885905 • [email protected] 29 ClearScan — USER MANUAL If the shutter of the auto loader is opened and closed again the will need to be selected again to re detect the slides. «read loader» icon It is possible to select a single slide for scanning by hovering the mouse over the slide name. Scan or preview icons will then be revealed: Once the slides are selected the scanning processes for the ClearScan Auto proceed in the same way as the ClearScan. NOTE: To enable scanning of your slides, you have to perform the detection step. Only once the slides are detected will the Previews and Scan icons become visible. th Version 1.1, 4 March 2013 tel: +44 (0)1223 885905 • [email protected] 30 ClearScan — USER MANUAL Scanning Upon insertion of the microarray slide, the barcode is automatically read. If it is not recognised, scanning will not proceed. If it is, the scanning parameters (scan areas, speed, resolution etc.) for that particular array will be applied. Barcodes on BlueGnome’s microarrays – 24sure, CytoChip Focus and CytoChip Oligo arrays will be automatically recognised. Scanning in Auto mode This is the default and recommended mode. Auto mode has been optimised for BlueGnome microarrays to give optimal results in terms of signal to noise and to give balanced red and green images with minimal saturation. «Scan» reads the slide, within the defined scan area using the currently defined scan settings. Once the scan icon is selected the «Select directory» window appears, here choose where you would like to save your scan images. Note that it is not necessary to write a file name as this will be automatically created by ClearScan using the barcode and the scan area location (_TOP, _BOTTOM) in the case of 24sure and Focus arrays or just «Barcode».tif for CytoChip Oligo arrays. The format of the file name created by the ClearScan software is compatible with BlueFuse Multi (16bit multi Tiff format). Images are saved automatically after the scan in the selected file directory. We recommend that this is on the hard disk rather than on the network. th Version 1.1, 4 March 2013 tel: +44 (0)1223 885905 • [email protected] 31 ClearScan — USER MANUAL NOTE: Folder permissions - If you use Windows and want to save your images or results in Windows folders named «My documents», «My images», you have to check first if those directories are “read only” (which is the default of these folders). ClearScan will check if directories are writable or not To modify read/write attributes of folders, right click on the folder, then click on «Properties» and in the «Attributes» area, uncheck the «read only» attribute. Click «Select directory» to start the scan. Click on the Stop icon if you wish to stop the current image acquisition sequence. Scan parameters Scan parameters: reveals the configuration window Selecting the «scan parameters» icon on the main toolbar or on the scan image reveals the configuration window in the information side pane. From here you can select Manual or Auto scanning modes. Scanning in Manual mode NOTE: It is recommended that Auto mode is used; Auto mode has been preconfigured for BlueGnome microarrays to give optimal results. In manual scanning mode it is possible to change the laser power and the PMT gain. To work within manual scanning mode, choose the «Manual» button on the scan configuration window. th Version 1.1, 4 March 2013 tel: +44 (0)1223 885905 • [email protected] 32 ClearScan — USER MANUAL Laser power and PMT gain can be defined manually here; alternatively the Auto settings can define these parameters automatically on a per slide basis. For more information about manual settings please refer to table below: ITEM DESCRIPTION Automatic scrolling Scrolls automatically down the image window during the scanning process. Detection gain Sets a value for the gain percentage for each color channel (wavelength). The default value is the value used in the last scan session. Change gain to avoid saturation. Laser power Two laser powers are available: «Low» = 5mW , «High» = 10mW laser power. th Version 1.1, 4 March 2013 tel: +44 (0)1223 885905 • [email protected] 33 ClearScan — USER MANUAL NOTE: Scan parameters can only be adjusted during or after the preview scan. Preview Scan A preview gives you a fast, comprehensive image of the microarray when using Manual mode. Use preview to adjust laser output and PMT gain to prevent saturation before initiating slide scanning. Click on «Preview» icon to begin the preview scan of the whole slide. The preview scan uses the following default parameters: pixel size: 40µm speed: 35 lines/s area of interest: whole slide th Version 1.1, 4 March 2013 tel: +44 (0)1223 885905 • [email protected] 34 ClearScan — USER MANUAL During the scan The scan image During the preview or main scan, the barcode will be scanned first and appear at the bottom of the user interface, the scanner will then proceed with the scan and the image can be viewed in realtime as the scan proceeds. The current status of the scanner, the scan resolution and the scan time remaining are also displayed at the bottom of the screen. scan resolution barcode current status time remaining Zoom in to a region of interest directly in the image window by using the mouse. Click and drag to select area to view and zoom in. Right click with the mouse reveals a context menu that also allows navigation around the image. th Version 1.1, 4 March 2013 tel: +44 (0)1223 885905 • [email protected] 35 ClearScan — USER MANUAL The histogram Click on the «histogram» icon on the main toolbar to display the histogram window. The histogram provides the user with the signal intensities for each fluorescent channel and you visualize the number of saturating pixels in each channel. Using the histogram you can assess whether the signals for each channel are well balanced, if scanning in manual mode laser intensity and PMT gain % can be modified in the scan parameters accordingly. When both channels are well balanced the plots should overlap, as shown below: The histogram displays pixels on a graph. The X axis represents pixel values (from 0 to 65535). The Y axis represents the number of pixels which are equal to the value given by X axis. On the left hand side of the graphic area, the scale parameter may be manually adjusted. To retrieve automatic scale, just check the box at the left of the scale. Log scale is available for each axis. You can also display the Y axis in percentage. Bin size may also be manually set. The lower the bin size is, the larger the number of dots will be displayed. Thus it is better to work with high bin size to speed up display. The saturation percentage is indicated for each of the wavelengths, the red value correspond to the percentage of saturated pixels on the red channel (635nm) while the green value indicates the percentage of saturated pixels on the green channel (532nm). The histogram window can be removed by clicking the selecting close. «histogram» icon again or In order to maximise the amount of information derived from the array, the red and green distributions should be as close as possible to each other and the distributions tail off with a minimal amount of saturation (around 0.05% saturated pixels) th Version 1.1, 4 March 2013 tel: +44 (0)1223 885905 • [email protected] 36 ClearScan — USER MANUAL Image views and options Open an existing image To open images go to the «File» tab on the Main Menu. Click on «open image» and search for the images you want to open. Alternatively, an image will automatically open if dragged into the main window. Once the image is opened, you can navigate through it by using the mouse. To change the mouse mode from zoom to drag image/walk mode use the icons on the «tools» window or right-click in the image display area. About image The «About image» option on the «Image» tab of the main menu displays the information contained in the TIFF images such as the serial number of the scanner that acquired the image, acquisition parameters, etc. as shown below: Image 1 and image 2 tabs contain the information of laser power and PMT gain percentage of each wavelengths; image 1 corresponding to red channel image (635 nm) while image 2 to green channel image (532nm). th Version 1.1, 4 March 2013 tel: +44 (0)1223 885905 • [email protected] 37 ClearScan — USER MANUAL Image display options Opens a window in the side pane where you can choose the image display options, displayed values are those used in the last ClearScan session. These options can be used to adjust image «brightness», «contrast» and to adjust the proportion of red or green in the ratio image by using «balance control». NOTE: Changing these options only affect the way an image is displayed: Display options have no effect on results or image data NOTE: When an image is acquired by a ClearScan scanner, pixel depth is 16 bits, resulting in pixel values range from 0 to 65535. However, the hardware limitations of standard graphics boards means that images are only displayed with an 8-bit pixel depth, meaning that on-screen pixel values range from 0 to 255. The software uses the 16-bit values for processing the images. 8-bit images are only used for display purposes. Image information Selecting the image information window on the side pane allows users to view the pixel intensity of selected areas of the scanned image. By hovering over the image with the mouse, a zoomed-in image of the selected feature, together with the signal intensity and the pixel coordinates are revealed: th Version 1.1, 4 March 2013 tel: +44 (0)1223 885905 • [email protected] 38 ClearScan — USER MANUAL Selecting attaches the image information window to the mouse so that the pixel intensities and coordinates can be viewed directly alongside the image. th Version 1.1, 4 March 2013 tel: +44 (0)1223 885905 • [email protected] 39 ClearScan — USER MANUAL User preferences Using the «Preferences» menu you can: Define the language and the appearance of ClearScan Choose a user as the account manager Choose a password to protect your account Click on the «Users» option to display the «Preferences» window. General settings Use this section to define different ClearScan options th Version 1.1, 4 March 2013 tel: +44 (0)1223 885905 • [email protected] 40 ClearScan — USER MANUAL Item Description Language You can choose between French and English versions of ClearScan. Do not show preventive messages Preventive messages are displayed when work or configuration has been created or modified without having been saved. You can choose to turn this off or on. Scanner In this panel you can define some parameters of the scanner connection including automatic disconnection. You can handle users’ accounts by choosing between «single-access user» and «multiaccess user». When «Multi-access user» is selected, each user must choose their own session when ClearScan starts from the user screen: The user window allows users to create and delete users’ accounts. Each user can protect their account by defining a password. To change a password, go to the Preference tab on the main menu, and then click on Password to reveal this box: NOTE: The password must consist of at least 6 characters. th Version 1.1, 4 March 2013 tel: +44 (0)1223 885905 • [email protected] 41 ClearScan — USER MANUAL Folders In this section you can define the default folders for image, results and work file storage: th Version 1.1, 4 March 2013 tel: +44 (0)1223 885905 • [email protected] 42 ClearScan — USER MANUAL Scanner self-tests and checks The scanner runs three levels of self-tests and checks. Initialization checks When the scanner is powered up, the LEDs light up as indicated in the section Meaning of visual and audio signals. Moving parts, detectors, laser power and the ethernet port are all checked. If an error is detected, three long beeps sound and the red LED indicating a technical problem lights up. If this happens, switch off the scanner immediately and contact Technical Support. Scan checks During slide scanning, laser power and the autofocus are checked constantly. The scanner will report if either of these controls did not function correctly, as this can produce errors. If such errors keep recurring, refer to the Troubleshooting section. ClearScan slide check You can also check the scanner more precisely if you so wish. Insert the ClearScan Test slide provided with your scanner and run a check from the Scanner->Check scanner menu in the ClearScan software. The fluorescence signal, image red/green shift, crosstalk and detection gain linearity are all checked. The fluorescence signal and red/green shift are compared to a reference value and to values obtained when the last check was run. A data integrity check is also performed. The scanner will indicate if any malfunction is detected. In this case, contact Technical Support. The slide supplied with your scanner is valid for one year. The software will no longer allow you to run checks with it beyond this date and you must procure a new one, test slides can be purchased through Innopsys http://www.innopsys.com/. The test slide must be stored in its box at room temperature and away from light when not being used. You are advised to check the scanner once a month or each time you move it. Only use the test slide with the scanner it was delivered with. th Version 1.1, 4 March 2013 tel: +44 (0)1223 885905 • [email protected] 43 ClearScan — USER MANUAL Maintenance and Service Fan filter replacement: For models equipped with a fan filter, it is necessary to replace the filter with a new one every year. In the event of failure to meet the deadline for replacement of the filter, the scanner warranty deed will be revoked. The customer has to order a new filter through their distributor. To replace the filter (see picture), remove the protection grid which is interlocked at the back of the scanner, remove the old filter, replace with the new filter and then interlock the protection grid by pressing each side. No other user maintenance is required. No other user service is allowed. If a problem occurs, please contact BlueGnome Technical Support or your distributor. th Version 1.1, 4 March 2013 tel: +44 (0)1223 885905 • [email protected] 44 ClearScan — USER MANUAL Troubleshooting Symptom Diagnosis • The image is dark or the measured signal is weak • • Make sure the detector gain is not too low (set to 100% to check) Make sure the laser power settings are not too low (set to high to check) Check the scanner using the BlueGnome-supplied slide (see Scanner self-tests and checks) The image is striped or the ClearScan software displays a « Focus was not stable during the scan » message • Contact Technical Support to try to resolve the problem. Otherwise, you can deactivate the autofocus. The image is distorted and spots are the wrong size • Check that the problem isn’t being caused by the direction in which the slide is inserted by turning it around 180° and then reinserting it. If the defects are also rotated 180°, the slide is causing the problem. Otherwise, contact Customer Support. There is a spot in the same place on all images, whatever slide you use. • • Contact Customer Support. Avoid using slides with liquids likely to run during scanning. th Version 1.1, 4 March 2013 tel: +44 (0)1223 885905 • [email protected] 45 ClearScan — USER MANUAL FAQ: Technical data What is the basic operating principle of the ClearScan? The ClearScan is a confocal fluorescence scanner. The imaging system consists of two laser sources that excite the chemifluorescent dyes (635nm and 532nm), two detection photomultipliers and very high-precision optical filters provide results with enhanced signal-to-noise ratios. Confocal means that fluorescence emitted from planes other than the plane on which the scanner's optical system is focussed is not measured, thus cancelling out all extraneous fluorescence: The ClearScan's autofocus system achieves excellent measurement reproducibility, irrespective of microscope slide quality. What types of chemifluorescent dyes can be used? CY3, CY5, Alexa647, Alexa 660, Alexa546, and Alexa555 dyes can be used. What are the wavelengths of the laser sources? Two laser sources are used, one with a wavelength of 635nm for CY5-type chemifluorescent dyes, and the second with a wavelength of 532nm for CY3-type chemifluorescent dyes. How stable are the laser sources? The laser sources are temperature and current-controlled to provide an extremely stable power output. Power fluctuation does not exceed 2% of power output. How long does it take for the laser sources to become stable? To achieve the most accurate results, you are advised to wait 10 minutes after the scanner has connected to the software. The lasers will have reached their stable nominal operating temperature during this period. Can I adjust laser power? Yes, the power of both lasers can be set at two different levels (high and low). Low power is useful to decrease the bleaching of the fluorophores and to increase the lifetime of lasers. High power is used to obtain the best sensitivity results when signal is low. th Version 1.1, 4 March 2013 tel: +44 (0)1223 885905 • [email protected] 46 ClearScan — USER MANUAL When are the lasers on and off? The lasers are on when the scanner connects and are off when it disconnects from the ClearScan software. To economize the lifetime of the lasers, it is advisable to disconnect the scanner when it is not being used for long periods of time. An automatic disconnection feature is available, the default setting is to disconnect the scanner following a 30 minute period of inactivity. How long does a read operation last? A read of a 24sure or CytoChip Focus slide with the following parameters lasts 4.5 minutes: • pixel size: 10µm • speed: 20 lines/s • read area: preconfigured array area Can I adjust the scanning speed? No, speed is preset for optimal results with CytoChip and 24sure arrays. Can I adjust pixel size? No, the pixel size is preconfigured for the BlueGnome slides that can be scanned, for a 24sure or CytoChip Focus scan the pixel size is 10 µm, for a CytoChip Oligo slides the pixel size is 4 µm median. What detection method is used? We use digital detection because it provides results with better signal-to-noise ratios due to very low background noise. Detection is performed by fast, extremely sensitive photomultipliers (PMT). Can I adjust detection gain? Yes, detection gain may be modified from 0% to 100%. The gain variation is linear allowing the user to adjust this setting very precisely. It may be useful to cancel out saturation or to equalize channels for instance. What is the accuracy of the mechanical positioning system? The scanner features a high-precision mechanical positioning system based on a patented realtime control loop. Absolute positioning is typically 10 µm over the entire slide with ClearScan. th Version 1.1, 4 March 2013 tel: +44 (0)1223 885905 • [email protected] 47 ClearScan — USER MANUAL Embedded firmware Source code of parts of the ClearScan embedded firmware This is the description for the source code of the parts of ClearScan firmware that fall under open source licenses GNU GPL v2.0. Parts of the firmware under GNU GPL v2.0 license are made available on demand at [email protected]. BlueGnome makes no warranties whatsoever either express or implied, including any warranties of merchantability or fitness for a particular purpose, regarding this software. BlueGnome offers no support for this software. The preceding does not affect your warranties and statutory rights regarding any BlueGnome product(s) you purchased. It only applies to this source code made available to you. All software listed below is under GNU GPL V2.0 open source license which is available at the following address: http://www.gnu.org/licenses/gpl-2.0.html u-boot 1.2.0 and modifications This software is used to initialise and to launch the system noyau linux DENX-ELDK based on kernel 2.4.25 and modifications This software is the kernel of the linux embedded operating system busybox 1.2.1 This software provides a fairly complete environment for any small or embedded system boa 0.94.14-0.5.rc21 This software is a http server eraseall 0.1.0 This software is used to erase flash memory th Version 1.1, 4 March 2013 tel: +44 (0)1223 885905 • [email protected] 48 ClearScan — USER MANUAL Specifications ClearScan ClearScan Auto Specifications Description Excitation wavelength 635 nm and 532 nm Compatible fluorophores Cy5, Alexa 647, Alexa 660 (635 nm) Cy3, Alexa 546, Alexa 555 (532 nm) Laser Power Adjustable (2 laser power available) PMT Gain Adjustable from 0 to 100% Autofocus Dynamic real time Detection Real confocal and high performances digital PMT Dynamic Range Over than 10 Sensitivity 0.05 fluor. / µm Uniformity Lower than 5% CV Sample All standard microscope slide Width: 25-26 mm Length: 75-76 mm Thickness: 0.9-1.2 mm Max. Scanning Area 22 x 74 mm Scan Speed 10 or 20 lines per second depending on array type Scanning Time 3.5 minutes with a scan area of 22x74mm with a 10µm pixel size for a 2 colour simultaneous acquisition. Barcode Codabar, code39, Iinterleaved 2 of 5, code93, code 2 of 5, iata code 2 of 5, matrix 2 of 5, code11, code128, telepen, upcA-E0-E1, eanJAN13/JAN8/UCC, msi, plessey, rss-14/limited/expanded, china post code, pdf417 Interface Ethernet Operating condition Temperature : From 19 °C to 26°C Humidity : 15 – 95% HR Altitude : 0 - 2000 m Optical resolution 2.7 µm (635 nm – spot diameter FWHM) Pixel Resolution 4 or 10 µm depending on array type th Version 1.1, 4 March 2013 4 2 tel: +44 (0)1223 885905 • [email protected] 49 ClearScan — USER MANUAL ClearScan Specifications Description Size 278 x 457 x 369 mm (W x D x H) Weight 15.5 Kg Power consumption 100-240 V 220 V 110 V Initialization 41 W 30 W Standby 30 W 20 W Connected 32 W 24 W Barcode reading 35 W 26 W 33 W 25 W 220 V 110 V Initialization 37 W 20 W Stand by 40 W 31 W Connected 35 W 27 W Barcode reading 35 W 26 W 33 W 25 W Scan ClearScan Auto Specifications Description Size 333 x 595 x 422 mm (W x D x H) Weight 27Kg Power consumption 100-240 V Scan th Version 1.1, 4 March 2013 tel: +44 (0)1223 885905 • [email protected] 50 ClearScan — USER MANUAL Declaration of conformity th Version 1.1, 4 March 2013 tel: +44 (0)1223 885905 • [email protected] 51 ClearScan — USER MANUAL Technical support BlueGnome, an Illumina company, CPC4, Capital Park Fulbourn, Cambridge CB21 5XE, UK Email: [email protected] +44 (0)1223 885905 Document history Version 1.0 1.1 Date th 18 April 2012 th 4 March 2013 th Version 1.1, 4 March 2013 Comment First publication of ClearScan user manual New logo added, computer hardware specs on p.20 included, updated to include details of the updated ClearScan software version 2.0 tel: +44 (0)1223 885905 • [email protected] 52 ClearScan — USER MANUAL Software License agreement IMPORTANT: PLEASE READ THE TERMS AND CONDITIONS OF THIS LICENSE AGREEMENT CAREFULLY BEFORE USING THE SOFTWARE. BLUEGNOME AND/OR ITS SUBSIDIARIES IS WILLING TO LICENSE THE SOFTWARE TO YOU AS THE INDIVIDUAL, THE COMPANY, OR THE LEGAL ENTITY THAT WILL BE UTILIZING THE SOFTWARE (REFERENCED BELOW AS “YOU” OR “YOUR”) ONLY ON THE CONDITION THAT YOU ACCEPT ALL OF THE TERMS OF THIS LICENSE AGREEMENT. THIS IS A LEGAL AND ENFORCEABLE CONTRACT BETWEEN YOU AND BLUEGNOME. BY OPENING THIS PACKAGE, BREAKING THE SEAL, CLICKING THE “ACCEPT” OR “YES” BUTTON OR OTHERWISE INDICATING ASSENT ELECTRONICALLY, OR LOADING THE SOFTWARE, YOU AGREE TO THE TERMS AND CONDITIONS OF THIS AGREEMENT. IF YOU DO NOT AGREE TO THESE TERMS AND CONDITIONS, CLICK THE “I DO NOT ACCEPT” OR “NO” BUTTON OR OTHERWISE INDICATE REFUSAL, MAKE NO FURTHER USE OF THE SOFTWARE, AND CONTACT BLUEGNOME CUSTOMER SERVICE FOR INFORMATION ON HOW TO OBTAIN A REFUND OF THE MONEY YOU PAID FOR THE SOFTWARE (LESS SHIPPING, HANDLING, AND ANY APPLICABLE TAXES) AT ANY TIME DURING THE SIXTY (60) DAY PERIOD FOLLOWING THE DATE OF PURCHASE. 1. License. The software and documentation that accompanies this license (collectively the “Software”) is the property of BlueGnome, or its licensors, and is protected by copyright law. While BlueGnome continues to own the Software, You will have certain rights to use the Software after Your acceptance of this license. This license governs any releases, revisions, or enhancements to the Software that BlueGnome may furnish to You. Except as may be modified by an BlueGnome license certificate, license coupon, or license key that accompanies, precedes, or follows this license, Your rights and obligations with respect to the use of this Software are as follows. You may: A. use one copy of the Software on or in conjunction with a single computer that is owned or leased by You. If a License Module accompanies, precedes, or follows this license, You may make the number of copies of the Software licensed to You by BlueGnome as provided in Your License Module. Your License Module shall constitute proof of Your right to make such copies; B. make one copy of the Software for archival purposes, or copy the Software onto the hard disk of Your computer and retain the original for archival purposes; C. use the Software for internal business purposes only and may not use the Software on behalf of a client or customer; D. after written notice to BlueGnome, transfer the Software on a permanent basis to another person or entity, provided that You retain no copies of the Software and the transferee agrees to the terms of this license; and E. use the Software in accordance with any additional permitted uses set forth below. th Version 1.1, 4 March 2013 tel: +44 (0)1223 885905 • [email protected] 53 ClearScan — USER MANUAL You may not: A. copy the printed documentation that accompanies the Software; B. sublicense, rent, or lease any portion of the Software; reverse engineer, decompile, disassemble, modify, translate, make any attempt to discover the source code of the Software, or create derivative works from the Software; C. use a previous version or copy of the Software after You have received and installed a disk replacement set or an upgraded version. Upon upgrading the Software, all copies of the prior version must be destroyed; D. use a later version of the Software than is provided herewith unless You have purchased upgrade insurance or have otherwise separately acquired the right to use such later version; E. use the Software in any manner not authorized by this license; nor F. use the Software in any manner that contradicts any additional restrictions set forth below. 2. Content Updates. You shall have the right to obtain Content Updates for any period for which You have purchased maintenance, except for those Content Updates that BlueGnome elects to make available by separate paid subscription, or for any period for which You have otherwise separately acquired the right to obtain Content Updates. BlueGnome reserves the right to designate specified Content Updates as requiring purchase of a separate subscription at any time and without notice to You; provided, however, that if You purchase maintenance hereunder that includes particular Content Updates on the date of purchase, You will not have to pay an additional fee to continue receiving such Content Updates through the term of such maintenance even if BlueGnome designates such Content Updates as requiring separate purchase. This License does not otherwise permit the licensee to obtain and use Content Updates. 3. Product Installation and Required Activation. There are technological measures in this Software that are designed to prevent unlicensed or illegal use of the Software. You agree that BlueGnome may use these measures to protect BlueGnome against software piracy. This License and the Software containing enforcement technology require activation key as further set forth in the documentation. The Software will operate for an infinite period of time prior to Software activation by You. During activation, You will provide Your unique product key accompanying the Software and computer configuration in the form of an USB key. If You do not complete the activation the Software will cease to function until activation is complete, which will restore Software functionality. 4. Sixty (60) Day Money Back Guarantee. If You are the original licensee of this copy of the Software and are not completely satisfied with it for any reason, please contact BlueGnome Customer Service for a refund of the money You paid for the Software (less shipping, handling, and any applicable taxes) at any time during the sixty (60) day period following the date of purchase. th Version 1.1, 4 March 2013 tel: +44 (0)1223 885905 • [email protected] 54 ClearScan — USER MANUAL 5. Limited Warranty. BlueGnome warrants that the media on which the Software is distributed will be free from defects for a period of sixty (60) days from the date of delivery of the Software to You. Your sole remedy in the event of a breach of this warranty will be that BlueGnome will, at its option, replace any defective media returned to BlueGnome within the warranty period or refund the money You paid for the Software. BlueGnome does not warrant that the Software will meet Your requirements or that operation of the Software will be uninterrupted or that the Software will be error-free. You acknowledge that the scientific and technical state-of-the-art when the Software was distributed did not enable all possible uses to be tested and verified, nor for the presence of possible defects to be detected. You shall be responsible for verifying, by any or all means, the product's suitability for its requirements, its good working order, and for ensuring that it shall not cause damage to either persons or properties. You acknowledge that the Software is supplied "as is" by BlueGnome without any other express or tacit warranty, and, in particular, without any warranty as to its commercial value, its secured, safe, innovative or relevant nature. Specifically, You do not warrant that the Software is free from any error, that it will operate without interruption, that it is compliant with its documentation, that it will be compatible with the Your own equipment and software configuration, nor that it will meet the Your requirements. BlueGnome does not either expressly or tacitly warrant that the Software does not infringe any third party intellectual property right relating to a patent, software or any other property right. Therefore, BlueGnome disclaims any and all liability towards You arising out of any or all proceedings for infringement that may be instituted in respect of the use of the Software. BlueGnome disclaims any and all liability as regards Your use of the name of the Software. No warranty is given as regards the existence of prior rights over the name of the Software or as regards the existence of a trademark. TO THE MAXIMUM EXTENT PERMITTED BY APPLICABLE LAW, THE ABOVE WARRANTY IS EXCLUSIVE AND IN LIEU OF ALL OTHER WARRANTIES, WHETHER EXPRESS OR IMPLIED, INCLUDING THE IMPLIED WARRANTIES OF MERCHANTABILITY, FITNESS FOR A PARTICULAR PURPOSE, AND NONINFRINGEMENT OF INTELLECTUAL PROPERTY RIGHTS. THIS WARRANTY GIVES YOU SPECIFIC LEGAL RIGHTS. YOU MAY HAVE OTHER RIGHTS, WHICH VARY FROM STATE TO STATE AND COUNTRY TO COUNTRY. 6. Disclaimer of Damages. SOME STATES AND COUNTRIES, INCLUDING MEMBER COUNTRIES OF THE EUROPEAN ECONOMIC AREA, DO NOT ALLOW THE LIMITATION OR EXCLUSION OF LIABILITY FOR INCIDENTAL OR CONSEQUENTIAL DAMAGES, SO THE BELOW LIMITATION OR EXCLUSION MAY NOT APPLY TO YOU. TO THE MAXIMUM EXTENT PERMITTED BY APPLICABLE LAW AND REGARDLESS OF WHETHER ANY REMEDY SET FORTH HEREIN FAILS OF ITS ESSENTIAL PURPOSE, IN NO EVENT WILL BLUEGNOME OR ITS LICENSORS BE LIABLE TO YOU FOR ANY SPECIAL, CONSEQUENTIAL, INDIRECT, OR SIMILAR DAMAGES, INCLUDING ANY LOST PROFITS OR LOST DATA ARISING OUT OF THE USE OR INABILITY TO USE THE SOFTWARE EVEN IF BLUEGNOME HAS BEEN ADVISED OF THE POSSIBILITY OF SUCH DAMAGES. IN NO CASE SHALL BLUEGNOME’S OR ITS LICENSORS’ LIABILITY EXCEED THE PURCHASE PRICE FOR THE SOFTWARE. The th Version 1.1, 4 March 2013 tel: +44 (0)1223 885905 • [email protected] 55 ClearScan — USER MANUAL disclaimers and limitations set forth above will apply regardless of whether You accept the Software. 7. General. This Agreement and any related License Module is the entire agreement between You and BlueGnome relating to the Software and: (i) supersedes all prior or contemporaneous oral or written communications, proposals, and representations with respect to its subject matter; and (ii) prevails over any conflicting or additional terms of any quote, order, acknowledgement, or similar communications between the parties. This Agreement shall terminate upon Your breach of any term contained herein and You shall cease use of and destroy all copies of the Software. The disclaimers of warranties and damages and limitations on liability shall survive termination. ClearScan software uses F2D-SAFIR software. F2D-SAFIR software was created by INRA and INRIA / IRISA Rennes ©2008 Some parts of ClearScan software are based on the Open source software programs listed below. Each included Open source software program is displayed followed by the license he refers to. Note that the terms “software” and “program” refer to the corresponding Open source software program. iText Version 2.1.4 subject to Mozilla Public License 1.1 JAI: Java Advanced Imaging – Version 1.1 subject to Binary Code License Agreement Jcommon Version 1.0.10 subject to GNU LESSER GENERAL PUBLIC LICENSE JFreeChart Version 1.0.6 subject to GNU LESSER GENERAL PUBLIC LICENSE jh Version 2.0.3 subject to GNU General Public License jhall Version 2.0.3 subject to GNU General Public License jhbasic Version 2.0.3 subject to GNU General Public License jsearch subject to GNU General Public License l2fprod-common-all Version 7.3 subject to Apache Public License 2.0 laf subject to Apache Public License org.apache.commons.logging Version 1.0.4 subject to Apache Public License 2.0 PDFRenderer subject to GNU LESSER GENERAL PUBLIC LICENSE th Version 1.1, 4 March 2013 tel: +44 (0)1223 885905 • [email protected] 56