1
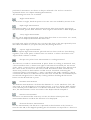
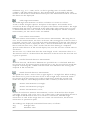
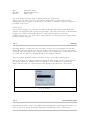
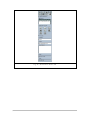
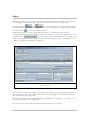
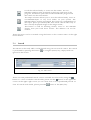
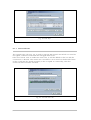
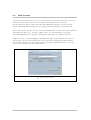
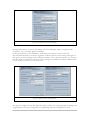
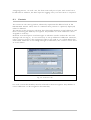
® JiveX Web-enabled solutions for medical imagecommunication and processing JiveX DICOM Viewer User Manual Version: 4.5 As of 2012-07-04 VISUS Technology Transfer GmbH Universitätsstr. 136 D-44799 Bochum Germany Phone: Fax: E-Mail: +49 (0) 234 93693 0 +49 (0) 234 93693 199 [email protected] Internet: http://www.visus.com JiveX ® is a class 2b product within the scope of directive 93/42/EEC. JiveX ® has Section 510(k) clearance under the following number: K053183 © Copyright VISUS Technology Transfer GmbH, Germany -- www.visus.com JiveX ® is an internationally registered trademark. All rights, including those of translation, reserved. No part of this book may be reprinted or reproduced or utilized in any form by any electronic, mechanical, or other means, now known or hereafter invented, including photocopying and recording, or in any information storage or retrieval system, without permission from VISUS Technology Transfer GmbH. The author and publisher have taken care in the preparation of this document, but do not issue any expressed or implied warranty of any kind and assume no responsibility for errors or omissions. No liability is assumed for incidental or consequential damages in connection with or arising out of the use of the information or programs contained herein. Many of the designations used by manufacturers and sellers to distinguish their products are claimed as trademarks. Where those designations appear in this text and VISUS Technology Transfer GmbH was aware of a trademark claim, the designations have been printed in initial caps or all caps. This product includes software developed by L2FProd.com (http://www.L2FProd.com/). Table of contents 1 Introduction 5 2 DICOM Viewer 6 3 Menu Bar 7 3.1 The "File" Menu 7 3.2 The "View" Menu 9 3.3 The "Extras" Menu 9 3.4 The '?' Menu 9 4 Viewing Section 11 4.1 Pictorial index 12 4.2 The Viewport 15 4.3 Scouts and Scanlines 17 4.3.1 Scanline Display Accuracy 18 4.4 View Cutlines 18 4.5 Series Position Synchronization 20 4.6 Slice Position and Orientation Alignment 20 4.7 Status Bar 21 5 Compare Mode 21 6 The Viewing Section Toolbar 23 1.1 Processing Functions 24 1.1.1 Application Mode 24 1.1.2 Image Locking 24 1.1.3 Selecting an Image 25 1.1.4 Selecting a Viewing Section 27 1.1.5 Windowing 27 1.1.6 Zoom Functions 32 1.2 Image Display 33 1.3 Filter 34 1.4 1.3.1 Magnifying Glass 36 1.3.2 Rotating / Flipping / Inverting / Reset 37 1.3.3 Reset 38 Image Orientation 39 1.4.1 Altering the Presentation Matrix 39 1.4.2 Panning 40 1.5 Cine 41 1.6 Image Annotations 44 1.6.1 Drawing Annotations 44 1.6.2 Manipulating Annotations 45 1.6.3 Deleting Annotations 46 1.6.4 Calculation Functions 46 1.6.5 Shutters 49 JiveX DICOM Viewer 4.5 3 User Manual 1.6.6 7 Presentation States 49 DICOM Mail 52 Inbox 53 7.1 8 Search 54 Configuration 55 8.1 55 Encryption 8.1.1 SSL-Certificates 56 8.2 Mail Account 57 8.3 Contacts 59 8.4 Service Configuration 60 9 DICOM Calibration 61 10 Image Size Calibration 61 11 Unlock Full Version 62 A Keyboard Shortcuts 63 B Safety Regulations 66 C Index 67 D Glossary 68 JiveX DICOM Viewer 4.5 4 User Manual 1 Introduction JiveX DICOM Viewer is an application for the visualization and processing of images, based on the latest Java technologies and developed especially for physicians. DICOM files can be opened and edited directly from a storage medium (e.g. a hard disk, a network directory or a CD-ROM). Files with the file suffix .dcm, .dc, .dicom and .dicomzip are recognized as DICOM files. JiveX DICOM Viewer automatically starts and displays such images with a simple double click. Various standardized processing functions assure flexible image manipulations, e. g. grayscale windowing, various zooming functions and the Cinefunction for animation. Additionally, the JiveX DICOM Viewer provides a special functionality to display two image series in compare mode. This parallel display of images in their own display area makes the comparison a lot easier. JiveX DICOM Viewer can also perform a software calibration for normal color monitors in order to display monochrome images in calibrated form in accordance with the DICOM standard. Like all JiveX systems, the JiveX DICOM Viewer is implemented in 100% pure Java to guarantee maximal platform independence. Therefore it is available with the same user interface and functionality on almost all operating systems. JiveX DICOM Viewer is also available as a free Personal Edition for non-commercial use. This version is, however, limited in its functions and can only be used for a limited period of time. The Personal Edition can be downloaded from the VISUS website http://www.visus.com/. You are not allowed to use the software for diagnosis or patient treatment! JiveX DICOM Viewer 4.5 5 User Manual 2 DICOM Viewer The user interface provides a menu bar at the top, a toolbar on the right side and one or more viewing sections in the center. The function panel (Toolbar) makes available the most important functions for the processing of images. Each viewing section offers a clearly arranged display of a certain number of images (e. g. a series of images). It consists of a pictorial index, a navigation panel and a viewport. At the bottom of the user interface there is a status bar. The pictorial index contains all loaded images of a viewing section in a miniaturized form (thumbnails). The navigation panel contains functions for navigation inside the viewing section. The status bar shows information about the current display. Fig. 1: JiveX DICOM Viewer with four viewing sections with four images each JiveX DICOM Viewer 4.5 6 User Manual 3 Menu Bar The menu bar provides items for general functions such as loading images from the file system. In addition, it regulates certain program settings (e. g. the selection of a language). 3.1 The "File" Menu The "File" menu contains the following functions: Open If JiveX DICOM Viewer is set to Single Mode, you can select one (or several) images or alternatively choose a directory. In the "File" menu, please click the menu item "Open" by using the left mouse button. A dialog box opens (Fig. 2) from which single images as well as directories can be selected. When selecting a directory, all images contained are loaded and displayed. Any existing subdirectories are ignored. Fig. 2: "Open File" Dialog Open Presentation State This menu item opens a DICOM Presentation State. If a loaded Presentation State refers to loaded images, they are applied to them. If more than one Presentation State is loaded, you can manage (enable, disable etc.) them via the function JiveX DICOM Viewer 4.5 7 User Manual panel ("Presentation State"-tab). Save Presentation State This menu item saves a DICOM Presentation State for loaded images including their manipulations, like, e.g. windowing, displayed areas, drawn annotations. Please note: This function is only available in the full version. Export This function enables converting displayed images into the graphic formats JPEG, BMP, PNG and PNM and their storage in the local file system. JPEG and PNG can easily be inserted into a web site and displayed afterwards. The following settings are available in the export dialog: You can either export the DICOM image in its original size and with the justapplied windowing, or just the visible part of the selected viewing section with all the associated annotations. You can resize the image to be exported. For exporting as a JPEG, you can choose between three different image quality levels. Fig. 3: "Export" Dialog If exporting a matrix or series, the image number is automatically appended to the file name. If e.g. a series of 42 images is exported to JPEGs using the filename "TestSeries", files named from "TestSeries_0001.jpg" to "TestSeries_0042.jpg" are generated. While the export runs, a progress bar indicates the export status. Please note: The Export function is only available in the full version. JiveX DICOM Viewer 4.5 8 User Manual Print This menu item prints either the selected image, matrix or the complete series on a laser printer or paper printer. Quit With this menu item, the JiveX DICOM Viewer is quit. 3.2 The "View" Menu The "View" menu makes available the following functions: Reset This function sets the JiveX DICOM Viewer back in the starting state. Swap Viewer This feature allows you to switch between standard mode and comparison mode. Language This feature gives you the choice of selecting one of several languages. It is possible to switch frequently between the available languages. Full screen This function hides the title bar. DICOM Info A DICOM image contains the image information in addition to other attributes, such as the demographics of the patient. Selecting this menu entry, all the attributes contained in an image can be displayed. 3.3 The "Extras" Menu The "Extras" menu contains the following item: Load DICOM Dump This function displays all DICOM information to any DICOM file (see DICOM Info). Please note: This menu item is only available in the full version. 3.4 The '?' Menu The '?' menu contains the following items: Import license key JiveX DICOM Viewer 4.5 9 User Manual Via a file dialog you can open the VISUS license key file (*.vlk). Then the blocked features of the demo version will be activated. Manual The JiveX DICOM Viewer manual is opened with the Adobe Acrobat Reader. About The "About" dialog provides product and system information. JiveX DICOM Viewer 4.5 10 User Manual 4 Viewing Section A viewing section is a clearly arranged display of a certain number of images (e.g. a series of images). It consists of a pictorial index, a navigation panel and a status bar (Fig. 4). Additionally, there are viewports which display either a single image or a matrix of images (see section "Altering the image matrix"). The pictorial index contains all loaded images as thumbnails. The status bar provides you with information about the current display. JiveX can display simultaneously several viewing sections. Thus you can easily compare series or images. Fig. 4: Viewing Section The active viewport is marked with a green frame. You can select a viewport by simply clicking on it. If a viewport displays a matrix of images, the selected image has a cyan frame. There can only be one selected viewport or matrix element at a time. JiveX DICOM Viewer 4.5 11 User Manual 4.1 Pictorial index The Pictorial index displays a miniaturized overview of every image loaded in the viewing section (Fig. 5). These miniaturized images are ordered by image number derived from their DICOM information. The studies of a patient are sorted by the study date with the newest study on top. By loading studies of more than one patient, the patients are separated with its studies sorted by date. If such a miniaturized image is clicked on with the left mouse button, it is displayed in a previously selected viewport. This viewport is then marked with a green frame. When you click the left mouse button on such a thumbnail, the image with subsequent images are also displayed, provided the viewport shows a matrix. Otherwise, only the clicked image is displayed (see section "Changing the Image matrix"). JiveX DICOM Viewer 4.5 12 User Manual Fig. 5: Pictorial index When the mouse pointer moves over a certain image of a viewport, the corresponding image in the pictorial index is marked with a white frame (Fig. 5). Also, you can drag and drop images from the pictorial index into the image viewport with a pressed mouse button. If a viewing section is linked to other viewing sections, the link state will be kept (you can disable this behavior in the Review Client). A right mouse click on the pictorial index brings up a context menu which allows toggling the current series sort order or removing the series or the complete study from the viewer. Please note that the following information only applies to the Review Client, Diagnostic Client and Demonstration Client: The pictorial index can show green check markers within a thumbnail image. This indicates that a series including its pixel data is completely loaded due to an activated new and "optimized loading mechanism" (Fig. 6: Pictorial index with green checked series). If the green check markers are missing, only image information is loaded and pixel data is requested later on demand. JiveX DICOM Viewer 4.5 13 User Manual Fig. 6: Pictorial index with green checked series JiveX DICOM Viewer 4.5 14 User Manual 4.2 The Viewport The viewport displays images. While moving the mouse pointer over an image, the corresponding thumbnail in the pictorial index is marked with a gray frame. The upper red box in the top right corner allows locking an image (see section "Locking Image"). Locked images cannot be manipulated and are excluded from all following operations. This is of particular interest if you want to use the "Series" application mode in which image manipulations are applied to all images displayed in the viewing section, except for the locked ones (see section "Application Mode"). Additionally, the JiveX Review Client and the JiveX DICOM Viewer Light provide a second red box which allows marking images as key images. The lower red box can be used to chain-link series. When chaining two or more series, these can be panned, zoomed, flipped or rotated and navigated simultaneously. However, the 'Windowing' function is excluded from this chainlinking option. Patient information can be displayed in the viewport's top left corner (see section "Navigation Panel"). In the middle of the right border a ruler can be displayed and orientation letters can be shown on the left and right hand side. Additionally, the consecutive image number of each series image can be displayed. Clicking the right mouse button on the viewport only opens a context menu if you have not clicked on the brink of an annotation. This menu (Fehler! Verweisquelle konnte nicht gefunden werden.) allows the following operations: Display one of the loaded series within the viewing section. If studies are loaded, series are displayed in a submenu. Mouse action: The action for the left mouse button can be toggled (pan, window, zoom or navigate). Image information: Viewer specific annotations such as patient information, a ruler, orientation letters, JiveX image number, Window Level Zoom and user defined DICOM tags can be switched on or off. Paste / Paste to all images: A copied annotation can be pasted to the current image or to all images of the current series. Scanline icom / View Cutlines / View Locator: Change the scout icon or show cutlines or a locator image. Copy to clipboard Export: Export the current image / matrix / series as JPEG, BMP, PNG, TIFF or PNM. Print: Print the current image / matrix / series. The bottommost menu item will switch the compare mode on or off depending on the current mode. Series Matrix: Selection of the series matrix (Compare mode=2x1, Single series mode=1x1, predefined matrices). JiveX DICOM Viewer 4.5 15 User Manual Original Size: Zoom to original size or to maximize the images in their viewports. Sort ascending / Sort descending: Reverse series sort order. Restricted sync. scrolling: Synchronous scrolling according to image position and orientation. Split series: Splitting series is only available for CT and MR series. Windowing: Choose a predefined window setting. JiveX DICOM Viewer 4.5 16 User Manual 4.3 Scouts and Scanlines For better orientation within a slice stack, a scout (overview image) with scanlines can be displayed within the image viewport, provided that the series has such a scout. Initially, the scout image must be displayed in the image viewport. To set the displayed image as scout, please select the context menu item Scanline icon, View as Scout. Fig. 7: Context menu The scout is then displayed in the bottom right hand corner of each image viewport and serves as reference image for the examined area. A series matching the scout image can be added to the image viewport. Within the scout, the position of the currently displayed image slice is marked with a yellow scanline. JiveX DICOM Viewer 4.5 17 User Manual The scout view can be disabled or enabled by selecting the appropriate menu item from the context menu (Scanline icon, Scanline enabled). 4.3.1 Scanline Display Accuracy To show a meaningful scanline, the scout image plane and the displayed image plane should preferably be right angled to each other. By default, if the angle between the scout image and the displayed image is less than 40 degrees, i.e. the images are almost perpendicular to each other, then the scanline will be hidden. Optionally, scanlines can be configured to be displayed for smaller enclosed angles. For cutting angles which are smaller than 15 degrees, i.e. nearly parallel images, the calculation of the scanline position will be numerically inaccurate. Therefore, in this case, the scanline is dashed. In addition, a yellow warning triangle is displayed in the upper right hand corner of the scout image. Fig. 8: Warning symbol indicating inaccurate scanline position 4.4 View Cutlines For better orientation, cutlines can be activated via the context menu. This feature is especially helpful for a simultaneous view of multiple series as the cutline of the selected image is displayed in each image together with the image number of the selected image (if possible). Since the cutline for intersecting, but almost parallel image planes has a small explanatory significance, it will disappear when the intersection angle of the image planes is less than 40 degrees. JiveX DICOM Viewer 4.5 18 User Manual Fig. 9: Cutlines JiveX DICOM Viewer 4.5 19 User Manual 4.5 Series Position Synchronization In slice stacks (e.g. MRI or CT series) it is possible to display each series synchronized by position in patient coordinate system. If you hold the button [3] while at the same time moving the mouse cursor, slices are synchronized according to the mouse cursor position. Automatically, corresponding images in other layers will be displayed. The green line indicates the cutline of the image in which the mouse cursor is positioned. The green crosshair indicates the position of the patient's coordinate under the mouse cursor in other images. If the mouse position is outside of a slice stack volume, then the crosshair disappears and a notice is displayed in the image viewport. Abb. 1: Synchronized image series For this kind of synchronization it is essential that each image includes information about image position, image orientation, and pixel spacing. 4.6 JiveX DICOM Viewer 4.5 Slice Position and Orientation Alignment 20 User Manual By pressing the [Q] key other series are aligned to the slice position of the currently focused series. This will show the same anatomical region to enable direct image comparison. However, only those series are aligned, which have a similar orientation of the image plane. Thus, for example when you press [Q] is an axial slice, only those series showing also axial slices are aligned. The orientation is considered similar if the image planes are at an angle of less than 15 degrees to each other. When aligning oblique MPR series of similar orientation, the orientation will be aligned in addition the slice position. This will result in a most similar representation. VRT series of similar orientation are aligned only in orientation, as a slice position does not exist here. The shortcut [Shift] + [Q] is similar to the function of [Q], however the alignment of Oblique MPR and VRT series always takes place, regardless of the similarity of orientation. 4.7 Status Bar The status bar provides useful information: On the left hand side, the up-to-date progress of image loading is shown. In the next field, the mouse cursor coordinates in the image are displayed (depending on the current zoom and panning of the image). Next, the pixel value of the current mouse cursor position follows. For CT images this is indicated in Hounsfield units and brightness value (for gray value images only). The icon to the right shows the current action of the left mouse button on the image (panning, windowing, and image navigation). The text itself contains information about the current function. While processing gray level windowing, the status bar contains the appropriate values for window center and window width. Fig. 10: Status Bar 5 Compare Mode The "Compare Mode" of JiveX DICOM Viewer allows the parallel display of image series, each in a separate viewing section. Via the function panel you can choose a JiveX DICOM Viewer 4.5 21 User Manual series matrix to layout your series. Within a viewing section you can also choose an arbitrary image matrix. JiveX DICOM Viewer 4.5 22 User Manual 6 The Viewing Section Toolbar The viewing section toolbar is right of the image display and is organized in tabbed panels which provide various controlling and image manipulation functions (Fig. 11). After a tab is selected, its color is lightened. Grayscale windowing is only one example of the functions contained in the "General Functions" tab panel. Opening the tab panel "Cine" allows you to perform a film-like display of all images of a viewing section (Cine-loop). The tab panel "Annotations" provides features to create and manipulate graphical and textual annotations. The different functions are organized in function groups. Each group has its own frame with a small clickable triangle in the upper left corner. If this triangle is clicked with the left mouse button, it opens or closes a function group (Fig. 11: Viewing Section Toolbar). If the triangle points up, the function group is open and provides a range of features to use. If the triangle points down, the function group is closed making it impossible to select a function from within this group. Fig. 11: Viewing Section Toolbar JiveX DICOM Viewer 4.5 23 User Manual 1.1 Processing Functions The range of available functions displayed within the function panel, depends on the used Client (e.g. Review Client or Diagnostic Client): While the JiveX Review Client provides a basic set of features (General functions, Cine-Mode, Annotations, Presentation States, Key Image Administration), the JiveX Diagnostic Client provides additional features like ECG, RT Administration, MIP/MPR Reconstructions. 1.1.1 Application Mode The application mode defines whether image manipulations, e.g. grayscale windowing or zoom, are applied to single images or to complete series. Fig. 12: "Apply to" Function Group The following application modes are available: Image Manipulations are applied to the image previously selected. The selected image is marked with a green frame. Series Manipulations are applied to all images of a series except the locked ones. In "Compare Mode", manipulations are applied only to the series of the currently selected viewing section. Please remember that geometric and textual annotations (see chapter "Image Annotations"), Calculations (see chapter "Calculation Functions") and Shutters (see chapter "Shutters") are always applied to the actual image. In this case, the selected application mode will be ignored. 1.1.2 Image Locking For locking an image, each viewport has a small red box in the upper right corner (Fig. 13). This box can be activated and deactivated with a mouse click. JiveX DICOM Viewer 4.5 24 User Manual If an image is locked (marked with a yellow lock symbol), it will be excluded from all manipulations applied hereafter until the lock is deactivated. Fig. 13: Activated lock 1.1.3 Selecting an Image An image is selected by clicking into the viewport which displays the image. The viewport is then marked with a green frame. In the pictorial index the corresponding image is marked with a fine white frame (Fig. 14). While moving the cursor over an image in the viewport, the corresponding image in the pictorial index gets framed with a thicker white line. JiveX DICOM Viewer 4.5 25 User Manual Fig. 14: First image is selected in Viewport JiveX DICOM Viewer 4.5 26 User Manual 1.1.4 Selecting a Viewing Section If JiveX is running in "Compare Mode", more than one viewing section is available. One of the viewing sections is selected automatically when an image has been chosen. 1.1.5 Windowing JiveX provides various options for using the windowing function. The easiest way is to use the left mouse button. By keeping it pressed and, at the same time, moving the mouse vertically, the grayscale window's center can be changed. By moving the mouse horizontally, the grayscale window's width is altered. The corresponding values are displayed in the status panel. For color images, the windowing corresponds to a brightness / contrast adjustment. The viewing section toolbar also supplies you with a function group for windowing (Fig. 15). Window CenterInput Box Window WidthInput Box Standard Window Presets Window Sliders Pseudo color Fig. 15: Function Group "Grayscale Windowing" The desired window width and center can be entered into the two input boxes. After confirming the entry by pressing the return key, new values are applied to the display. Predefined sets can be selected by clicking on the button "Standard Window Presets". Standard Window Presets A mouse click on the "Standard Window Presets" button opens a context menu as shown in the figure below: JiveX DICOM Viewer 4.5 27 User Manual Fig. 16: Context menu "Standard Window Presets" In the lower area (below the line) of the context menu, pre-defined window settings can be selected via a mouse click and applied directly to the images. In the upper range of the context menu, the "Window method" and "Window shape" can be chosen: Window method There are three ways to perform the windowing: Fig. 17: Context menu "Window method" Absolute windowing The option "Absolute windowing" applies the set window value (set via mouse click or entering fields) to all images in a series. Relative offset windowing By this setting, a percentage change of the window values is calculated relative to the entire gray scale value and applied to all images of the series. This is helpful, when MRI scans within a series were taken with differing window values. For CT examinations, this function is not available (the choice is grayed out or disabled). If this option is selected, the windowing is first changed via the mouse or the input fields. Then the relative offset windowing is applied to all images in the series. Percental windowing This window method is only available for nuclear medicine image data (modalities NM, PT, and ST) and is the default setting for this type of image data. Windowing changes made for one image are applied to other images of the series by setting the current percentage values for the upper and lower window value for all images in the series. Window shape There are four forms of windowing, which can be selected via mouse click: JiveX DICOM Viewer 4.5 28 User Manual Fig. 18: Context menu "Window shape" Linear windowing The window shape "Linear" selects a linear windowing. This is the default for most image data. The window values are mapped along a linear ramp; the values increase uniformly. Fig. 19: Window shape "Linear" Sigmoid windowing The sigmoid function has the effect that gray values from the middle range of a window are highlighted stronger than gray values in the outer regions of a window. The contrast is increased in the central part of the gray scale window. Fig. 20: Window shape "Sigmoid" Logarithmic windowing With the logarithmic windowing function, all pixel values in the dark gray scale area will be emphasized. The contrast in darker gray values is higher. JiveX DICOM Viewer 4.5 29 User Manual Fig. 21: Window shape "Logarithmic" Inverse logarithmic windowing With the inverse logarithmic windowing function, all pixel values in the bright gray scale area will be emphasized. The contrast in bright gray values is higher. Fig. 22: Window shape "Inverse logarithmic" Window Sliders Windowing can also be altered with the window slider when the corresponding button is clicked (Fig. 23). Window Slider Window Width Window Slider Window Center Fig. 23: Grayscale Window Sliders Also you can access the window presets via context menu of the images: JiveX DICOM Viewer 4.5 30 User Manual Fig. 24: Context menu with window presets Windowing for nuclear medicine images For nuclear medicine image series (modalities NM, PT, and ST), the window will be displayed in the image information overlay as "Upper" and "Lower" window level instead of "Width" and "Center" window level. Following the gray level indications, the share of the image gray scale is given in percent and appears in parentheses. Fig. 25: Upper und lower window levels and percentage Nuclear medicine images automatically contain computed percentage window presets. The standard windows are defined in steps of 10%, covering a range of values from 10% to 100%, based on the gray level amount. The standard windows can be selected with the window presets in the function panel. Alternatively they can be traversed with the shortcut [b]. JiveX DICOM Viewer 4.5 31 User Manual Fig. 26: Percentage window presets After clicking the "pseudo color" selection button , the following window opens: Fig. 27: Pseudo color selection Having applied the normal window settings and a pseudo color, the selected image or series (depending on the "Apply to" selection) appears in pseudo color applying the normal window settings. 1.1.6 Zoom Functions Another function group within the viewing section toolbar provides further options for altering the image size. These options are as follows: JiveX DICOM Viewer 4.5 32 User Manual • An absolute magnification factor can be entered into the input box. • Images can dynamically be zoomed in or out by using the slider. • The icon "1:1" displays the image in its original size, i.e. one pixel of the DICOM image corresponds to one pixel on the monitor. • JiveX can auto-calculate the image size in order to optimize its fit in the viewport. To do so click on the icon "Fit to Viewport". Original size Fit to draw area Magnifying glass zoom ROI zoom Absolute magnification factor Fig. 28: "Zoom" Function Group By clicking on the icon ROI Zoom (Region Of Interest) (Fig. 28: "Zoom" Function Group), any area of the image can be selected and scaled up using the mouse. First, activate the icon "ROI Zoom" with a mouse click. Then position the mouse pointer on the image and select/mark the desired area; keep the left mouse button pressed while moving the mouse. A yellow rectangle appears which marks the selected area. As soon as you release the mouse button, the selected image area is adapted to the current viewport size and displayed in maximal zoom. To change the zoom factor press the [Z] - key whilst dragging the image into the viewport with the mouse. With the "Adjust ruler" - checkbox you can adjust the rulers of all visible images, so that all images are scaled equally. If one of the images is then zoomed in/out, all images are adjusted accordingly in this particular size. Please note that images without given pixel sizes are excluded from this ruler adjustment. 1.2 Image Display For images displayed inside the viewer, there is an option to choose between two different types of display methods. These can be applied to either a single image or to series. The two display options are as follows: Interpolation - When zooming, missing pixel values are interpolated from adjacent pixels. This results in a 'smoother' image impression. Unfiltered - When zooming, missing pixel values are replicated from adjacent pixels. JiveX DICOM Viewer 4.5 33 User Manual Fig. 29: "Image Display" Function Group 1.3 Filter Images can be filtered by using an operation called "Sharpen" which can be found within the "Filter" function group. The Mammography Client additionally provides the CLAHE filter (CLAHE - contrast limited adaptive histogram equalization). These filter types are applied either to series or single images inside the viewer: Sharpen - Edges within images are emphasized. Major differences in brightness are called edges. The sharpening gives a 'sharper' image impression. CLAHE - The contrast is enhanced while local conditions of an image area are respected. Fig. 30: "Filter" Function Group; Mammography Client to the right At first, please choose an image area with image structures whose edges are to be highlighted. Then zoom closely into this image area. Press the button right next to the Sharpen key to show the sharpen sliders (Fig. 30: "Filter" Function Group; Mammography Client to the right). The parameters of sharpening can be controlled (Fig. 31: Sharpen Sliders). The effect of the settings can be immediately assessed on the zoomed image area. Once the sharpen sliders are modified, the sharpening function will be automatically switched on. The sharpen slider "Radius" adjusts the sharpening radius which is indicated in pixel. With a small radius, only very small structures with steep edges are highlighted; with a larger radius, bigger structures with shallow edges will also be highlighted. The larger the selected radius is, the wider becomes the surrounding of contrast amplification arising at the edges. If a radius is too large, it causes a so called "halo JiveX DICOM Viewer 4.5 34 User Manual artifact" near the edges. Therefore, the radius should be adjusted as small as possible so that the desired structure is still highlighted. The sharpen slider "Amount" adjusts the strength of sharpening, i.e. the magnitude with which edges within the image are highlighted. A small value of the amount of sharpening causes only a minimal change while larger values produce strong highlighted edges. To adjust optimal sharpening parameters, use an initially high "Amount" value, for example "0.8". Then slowly increase the "Radius" value, starting from a small account and running up until the desired structures are highlighted in the picture. Finally, if necessary, reduce the sharpening "Amount" until the desired image impression is reached. Fig. 31: Sharpen Sliders If a particular image area needs a contrast enhancement, then please zoom into this area and press the button right next to the "CLAHE" option (see Fig. 30, on the right) to show the "CLAHE" intensity slider (see Fig. 32). The intensity of "CLAHE" filtering can be controlled interactively so that the effects can immediately be assessed within the zoomed image area. Once the intensity slider is modified the "CLAHE" filter will automatically be switched on. When choosing a small intensity, the outcome of the contrast enhancement is minimal. By increasing the intensity, the contrast is raised stronger accordingly. JiveX DICOM Viewer 4.5 35 User Manual Fig. 32: CLAHE Intensity Slider 1.3.1 Magnifying Glass The "magnifying glass" option allows to magnify sections of the underlying DICOM image - without loosing the orientation in the image. The magnifying glass can be moved over the image by using the mouse. To move the selected area or to resize it, simply drag the mouse inside the "resize box" in the bottom right hand corner of the magnifying glass area. JiveX DICOM Viewer 4.5 36 User Manual Underlying DICOM image Display of window (width and center) and the zoom factor of the magnifying glass Resize-Box Fig. 33: Magnifying Glass The window settings and the zoom factor of the magnifying glass also can be changed. For changing window settings (width and center), you may press the [W] key while moving the mouse with a pressed left mouse key. To change the zoom factor you may press the [Z] key while moving the mouse with a pressed left mouse key. In both cases the mouse pointer must be positioned inside the magnifying glass area. The figure above illustrates the magnifying glass on a DICOM image with a different window setting and a greater zoom factor. lens button inside the The magnifying glass can be activated either with the function panel or with a pressed [M] key while clicking on an image. If the magnifying glass function is no longer wanted, simply click beside the lens window to close it. 1.3.2 Rotating / Flipping / Inverting / Reset The viewing section toolbar provides tools for further manipulation of the image display (Fig. 34). Images can be reset, inverted, rotated in 90° steps (both anticlockwise and clockwise) and flipped vertically as well as horizontally. JiveX DICOM Viewer 4.5 37 User Manual Rotate left Reset Flip h orizontally Invert Flip vertically Rotate right Fig. 34: "General" Function Group 1.3.3 Reset With the Reset function you can reset a single image or a whole series to thet state when the image was loaded, depending on the setting "Functions apply to". You can also specify in a popup window which facet of an image manipulation will be reset. To get to this popup window, hold the left mouse button on the reset button for a short time. There you will see several rows with all the facets you can reset separately, like a window, a rotation or a pan. A hooked checkbox means this facet will reset when clicking on the reset button. The Review Client will save the selection of facets for the reset inside the user profile and restore it with the next login. Right to the name of each facet you will find a small "reset" button to reset immediately a single facet of image manipulation. The tab panel will lead you to common facets or MPR/VRT specific facets. Fig. 35: Popup window of the Reset button JiveX DICOM Viewer 4.5 38 User Manual 1.4 Image Orientation If the displayed image contains orientation information, this information is displayed at the edges and in the middle, using a capital letter; it adapts to rotation and flip operations. The following letters are used: A P L R H F - Anterior Posterior Left Right Head Foot The context menu "Annotations" / "Image Orientation" shows or hides the letters. 1.4.1 Altering the Presentation Matrix This function group alters either the series matrix to view multiple series or the image matrix for multiple images of one series (Fig. 36). The number of rows and columns can be entered into the two input boxes of each matrix area. The input is confirmed by pressing the return key. By clicking on the icon "Image Matrix Presets" or "Series Matrix Presents" a predefined matrix like 1x1, 2x1, 1x2, 2x2, 2x3, 3x3 etc. can be selected. Fig. 36: "Matrix" Function Group By double-clicking on the image, the selected image is opened in full screen mode. With JiveX Review Client you can choose the matrix of the full screen mode via hanging protocols. The selected image is displayed in maximal zoom. Another double-click restores the previous matrix setting. JiveX DICOM Viewer 4.5 39 User Manual 1.4.2 Panning Images can be moved around within the viewport. To do so, please position the mouse within the viewport, select the "Mouse action" ►" Panning" via context menu and press and hold the left mouse button while moving it. Alternatively, press the [P] key while dragging the image with the mouse. The mouse pointer turns into a hand. Release the mouse button to stop dragging the image. You can also hold down the mouse wheel like a button and pan the image by moving the mouse. Abb. 2: Context menu for the Mouse action "Panning" JiveX DICOM Viewer 4.5 40 User Manual 1.5 Cine Additionally, the program contains a "Cine" function. All images loaded into a viewing section can be viewed like a movie. The playback speed of this application can be adjusted. It is possible to play either forwards or backwards. As soon as the last (first) image is reached, the playback can be repeated in a loop. Fig. 37: "Cine" Tab The playback is started by pressing the "Play" button. Accordingly, click on the "Stop" button to stop it. 1 The slider allows you to adjust the playback speed . If the image data contains a default frame rate for playback, then it is used as a default value for the speed slider. You can reset the default playback speed by pressing the "Default" button. 1 The maximum speed depends on your computer hardware. JiveX DICOM Viewer 4.5 41 User Manual The actual playback speed is displayed above the slider during playback. With the slider the desired value is specified; the actual speed may be lower in case of slow hardware. In this case the playback speed will be displayed in red. The checkbox "Loop" controls whether the playback is repeated in a loop when reaching the last (first) image or if it is stopped. The checkboxes "Forwards" resp. "Backwards" control whether the playback runs forwards or backwards. In case both of these checkboxes are selected, the playback first runs forwards once and then backwards once. Please make sure that at least one of the two checkboxes is selected. The checkbox "Autoplay multifr.(multiframe)" controls whether multiframe images automatically start playing while navigating with the image navigation buttons on this cine tabbed pane or if multiframe images are played with the optional navigation buttons blended in on the full screen toolbar (if visible). By selecting the checkbox "Multiframe cycling" several multiframes will be played within a series imitating one large movie sequence. You no longer need to select single multiframes to play them individually. If normal DICOM images are included in the series (non-multiframes), then they are skipped. The checkbox "Multiframe cycling" is only enabled with focused multiframe images. If the checkbox "Same Speed" is selected, playback speed changes apply to all multiframe images, so that they all play at the same speed. Otherwise the playback speed can be adjusted for each multiframe image separately. The checkbox "Show ECG" shows an ECG curve (see Figure 2) included in the image data. It is played in sync with the images. The checkbox "Show ECG" is only enabled if the image data contains ECG data (e.g. XA dataset). It is possible to play more than one image stack at once. Within the "Multi-Cine" section, there are three options available to select images to be played: Play focused The default setting plays the focused image. Play linked Plays all linked images. Play visible Plays all images currently visible. JiveX DICOM Viewer 4.5 42 User Manual Fig. 38: ECG display By moving the "Position" slider, you can show a certain image of the image sequence. By specifying start and end point in the input fields "Position", you can restrict the playback to a part of the series. You can, for example, skip an overview image at the beginning of the series. You can navigate through the image stack using the buttons underneath the "Image" indicator. If a DICOM multiframe dataset has been loaded (e.g. ultrasound, cardiology), then the navigation is performed using the buttons below the "Sequence" indicator. The button functions are, from left to right, as follows: first image (frame), previous image (frame), next image (frame), last image (frame). JiveX DICOM Viewer 4.5 43 User Manual 1.6 Image Annotations There is a set of drawing tools for image annotations available. The tools are organized on a specific tab panel within the viewing section toolbar of the viewer. Fig. 39: Overview "Annotations" 1.6.1 Drawing Annotations After choosing the color from the color range, please press the button of the desired graphic annotation type (Fig. 40) and click on the image to select the first coordinate (locate a point within the image). Then click on further designated coordinate(s). Alternatively, the annotation can be drawn by dragging the mouse while holding down the left mouse button. JiveX DICOM Viewer 4.5 44 User Manual When drawing freehand annotations, dragging with the left mouse button down will draw a freehand curve, while mouse clicks will draw polylines. A final double click finishes the annotation. Circle Closed freehand annotation Rectangle Circle with center point Arrow Text with anchor point Circle over 3 points Text annotation Ellipse Fill annotation Line Open freehand annotation Fig. 40: Types of Annotation A dialog box is opened when creating a textual annotation. Please enter your annotation text into the text field of this dialog box. Further characteristics like text position and color and the creation of an anchor point can be defined here. After confirming the entry, the position of the text is determined by the first mouse click, the anchor point is set with a second click. If you press the [C]-key while creating an annotation, the mouse cursor will be hidden to allow accurate positioning of points/lines/objects. Drawing an annotation can be cancelled at any time by pressing the [ESC] button. 1.6.2 Manipulating Annotations Existing annotations can be altered. For this purpose, first select the annotation by clicking inside the annotation, or on the line for line-style annotations. If several annotations exist at the same mouse position, one of them is selected initially. Further annotations can be selected by clicking at the same mouse position repeatedly until the desired annotation is selected. JiveX DICOM Viewer 4.5 45 User Manual You can move the selected annotation by pressing the left mouse button inside the annotation (on the line for line-style annotations) and dragging the mouse while holding down the mouse button. You can change the size or shape of the annotation by pressing the left mouse button on a handle (small white square) of the annotation and dragging the mouse while holding down the mouse button. According to the current mouse position the mouse cursor changes its shape and indicates whether the annotation can be moved or changed by pressing the mouse button at this mouse position. Hint: For very small annotations it can be very difficult or even impossible to move the annotation without preliminary zooming, as the handles obscure the annotation. In such a case the annotation can only be changed; moving is impossible. Please hold down the [Ctrl]-key while dragging the annotation with the left mouse button. This will move the annotation, ignoring the handles. If you press the [C]-key while changing or moving an annotation, the mouse cursor will be hidden to allow accurate positioning. If an annotation has been selected, a context menu can be opened with the right mouse button. From this context menu a property dialog can be opened. The position of the annotation can be altered in relation to other annotations and it is also possible to delete the selected annotation or all annotations in the image. The property dialog of a graphical annotation allows you to subsequently alter the annotation color. Unfilled closed annotations can be filled and vice versa. Annotation positions can also be converted from "image relative" into "display relative", which means, that they are not shifted together with the image anymore. If you are creating textual annotations, a dialog box similar to the initial property dialog appears. Here, the text can be corrected, its position can be altered and the anchor point can be switched off. Additionally, the color can be changed and switched from "image relative" to "display relative". For altering the order of overlapping or filled in annotations, please use the context menu to shift annotations from the screen background to the foreground. By default, either the text of a textual annotation or its anchor point can be moved. If you press the [Ctrl]-key during the move you can move the whole textual annotation. 1.6.3 Deleting Annotations An annotation can be deleted via its context menu. To delete all image annotations, please select "Remove All" in the context menu of any annotation of the image. 1.6.4 Calculation Functions Within the image, distances and angles can be displayed and a statistical evaluation of the pixels (minimum, maximum, average, and standard deviation) can be JiveX DICOM Viewer 4.5 46 User Manual performed. Annotations are drawn in the pre-selected color and are created as explained above (see chapter Drawing Annotations). The following functions are available: Angle measurement To calculate an angle, the three points of its two arms are marked by mouse clicks. Open angle measurement Furthermore there is an Open angle measurement: After pressing the appropriate function button, please draw two lines. Their angle of intersection is then displayed. 3-way angle measurement For the 3-way angle measurement, please draw three lines in succession. As a result, two angles are displayed between the three lines. For both open angle calculations you can move the lines or the text separately from the whole annotation if you press the [Ctrl]-key during the move. 4-point angle measurement For the 4-point angle measurement, please draw four lines (each two lines belong together). The center points of these lines are used for a cutline calculation. The angle of both cutlines is shown. Chiropractic pelvic bone measurement according Gonstead This function is used for measurement of pelvic bones according to Gonstead. First, a horizontal base line is drawn from right to left femoral head with just two mouse clicks. Then, a vertical line is calculated at right angle to the base line. Please click the canter of the sacrum to fix the vertical line. The software then automatically draws lines parallel to the baseline and the vertical line while indicating the calculated values. Following this, a point is marked in the pubic symphysis, which calculates the distance to the vertical line. The lines and the dot can individually be moved and realigned. This is done by clicking and then holding the left mouse button on the desired line or point. Diameter measurement The diameter measurement calculates the diameter of a circle. With one click, the start point is set. By dragging or moving the mouse, a circle is drawn. With another click, the end point of the circle is set and the measured value (diameter) is shown. Also, the measurement can be activated via the keyboard with numpad-9. Distance measurement Distances are measured the same way as lines are drawn. Please press the measurement button und draw the distance to be displayed. Charrière distance measurement For this measurement, the distance is specified in the Charrière scale, known as French scale (FR) in the English-speaking world. Charrière corresponds to a third of a JiveX DICOM Viewer 4.5 47 User Manual millimetre (e.g., 3 fr = 1mm) and is a scale for grading sizes of sounds, tubules, catheters, and other tubular devices. This measurement is performed in the same manner as the distance measurement: Please press the measurement button and draw the distance to be displayed. Cobb angle measurement The Cobb angle measurement is used for evaluation of curves in scoliosis. A line is drawn along the superior end plate of the superior end vertebra and a second line drawn along the inferior end plate of the inferior end vertebra. The angle between these two lines is measured as the Cobb angle. The starting point of a line is determined with one click; another click defines the endpoint. For the complete measurement, just four mouse clicks are needed. Line relation measurement The line relation measurement is used for stenosis measurement, indicating the CTratio. For the measurement, two lines are drawn: The starting point of the first line is fixed with a mouse click, a second click marks the endpoint of the line. The distance between the two points is displayed. Then, a third click determines the start point of the second line (line ratio); with a fourth-click the line drawing is completed. Apart from the distance of the second display line, now the CT-ratio and the stenosis are shown. The CT-ratio can, if both lines have the same length, reach a maximum value of "1". The stenosis value is calculated from the deviation of the second to the first line and is given in percent. Parallel line with distance measurement With this function, the distance between two parallel lines is calculated. With the first mouse click, the starting point of the first line is set; she second click marks the endpoint. Following this, a third and final fourth-click determine the starting and endpoint of the second line. Plumb line with distance measurement The plumb line draws a vertical line at right angles to a straight line. When reading the distance of a point on the vertical line to the straight line is measured. With a first mouse click the starting point of the straight line is fixed; the second click marks the endpoint. Then the perpendicular line is fixed by a third mouse click. Statistic measurements (rectangle) Statistic measurements (polygon) Statistic measurements (circle) Statistical evaluations (Statistic measurements) can be calculated for three shapes (rectangle, polygon, and circle). First, one of the forms is selected and then shown in the image at the desired location. For statistical calculations, DICOM image information is used. If the image does not contain size information, the distance information is specified in pixel. The readings are displayed in Hounsfield units (HU) as follows: Avg Average value Min Minimum value JiveX DICOM Viewer 4.5 48 User Manual Max Std. Dev Median Maximum value Standard Deviation Mean value The area of the selected range is displayed in mm 2 and pixels. Again, you can alter the color (selected via Properties) as well as the position subsequently by using the context menu. Of course, a deletion of the calculations is possible at any time. Please note: In projection images (e.g. with the modalities CR, DX, MG and XA) the displayed objects are magnified due to physical principles. The size information in the DICOM images can relate to the imager plane or can be based upon an estimated magnification factor. For this reason, measurements on the projection images can be prone to measuring error. 1.6.5 Shutters By using shutters, image structures outside a chosen area are blanked out with the effect that only the chosen area will be visible and displayed in a shape previously selected. The surrounded area is suppressed by color (white, grey or black) provided in a selective list which is displayed above the "Shapes" buttons. There are three different shapes available: circles, rectangles and polygons. Please note that, according to DICOM standards, each shape can only be used once per image. However, different types of shutters can be combined in one image. With a second click on a shutter button the shutter type selection can be reset. Fig. 41: Shutter 1.6.6 Presentation States DICOM Presentation States are independent DICOM files containing information on how a particular image should be displayed (windowing values, annotations). JiveX DICOM Viewer 4.5 49 User Manual The advantage of using presentation states is that you can always revert back to the original image as the underlying pixel data is not modified but rather displayed differently. Using Presentation States ensures that DICOM images are represented in the same way on different computers. Thus, a second diagnosing physician can reproduce the same image view including all visual specifications defined by a Presentation State. With JiveX DICOM Viewer Light it is possible to read and change Presentation States, but they cannot be stored. The JiveX DICOM Viewer only allows storage of Presentation States. The tab "Presentation States" provides a range of functions for managing loaded DICOM Presentation States. The functions are as follows: • Order of Presentation States can be altered • Selected Presentation States can be switched on/off • Multiple loaded DICOM Presentation States can be switched on/off all at once • Presentation State displayed in the viewer can be deleted • DICOM Dump of a Presentation State is available for display • Annotations of multiple Presentation States which include identical image data, can be merged by ticking the checkbox "Merge annots". Loaded Presentation States indicated in the list can be enabled/disabled by a double click. For a selected Presentation State, additional information (name of editor, description, date and time) is available. JiveX DICOM Viewer 4.5 50 User Manual Fig. 42: "Presentation States" tab JiveX DICOM Viewer 4.5 51 User Manual 7 DICOM Mail To use the DICOM-Mail functionalities described below, a "JiveX DICOM Mail Viewer" licence is required. After importing the corresponding license the above described JiveX DICOM Viewer will be extended by the DICOM-Mail functionalities through an addition graphical user interface. DICOM-Mail describes the exchange of DICOM objects using an E-Mail standard protocol based on the recommendations of the consortium of information 2 technology (@GIT) for DICOM Mail. Based upon the "DICOM MIME Type" (see DICOM Suppl. 54 of the DICOM 3.0 Standard), this recommendation describes additional encrypting mechanisms and the 3 use of acknowledgements. The encryption is done using the Open PGP standard. The JiveX DICOM Mail Viewer is restricted to receive DICOM Mail messages and send an acknowledgement to the sender. Furthermore, it stores the image data locally, for example on the hard drive. The image data are managed by an inbox. It is not possible to send any kind of DICOM object using this viewer. The received DICOM objects can be exported as DICOM objects. In this way, received image data is also available to other programs. The intended purpose of this medical device is the provision of image and diagnostic data for evaluation, distribution and quality assurance. 2 http://www.tele-x-standard.de/ 3 RFC 2440 JiveX DICOM Viewer 4.5 52 User Manual Inbox The inbox shows an overview of all received DICOM mail messages. It does not list all messages individually, but combines the data contained on study level. and you can change the view between the Inbox Using the button and the viewer. For displaying images from a patient CD in an image viewer, please use the button next to the [Images] button. Receiving messages can be done automatically or on demand. This must be configured within the configuration menu. To receive a message on demand you can . The messages will be downloaded as package. Only use the button when a package has been completely downloaded and decoded, a refreshed list of studies is presented on the user interface. Fig. 43: Inbox The inbox provides three tables: The table in the upper part of the program shows a list of studies. In the lower left table, the series belonging to the selected study in the table above, are indicated. If there is any kind of none DICOM data included in the message, e.g. result text, it is presented in the lower right table. For each of the three tables the following functions are available: JiveX DICOM Viewer 4.5 53 User Manual Loads the selected study or series into the viewer. For nonDICOM-compliant files displayed in the lower right part of the program, this button opens the standard Windows ® program and the viewer for the selected file. The "Export" button allows you to save the selected study, series or non-DICOM-object to any local folder on your system. The DICOM objects remain unchanged. This function is independent of the export option provided by the "File" menu (which refers only to the currently displayed image in the image viewer). This button is used for deleting studies, series or non DICOM objects from your hard drive forever. The deletion can not be undone. These functions can be activated using the button or the context menu of the right mouse button. 7.1 Search The entries in the study table can be filtered using various search criteria. The search is performed by pressing the button ignored in the search. or using the [Enter] key; empty fields are Fig. 44: Inbox filter There are some predefined search criteria available for selection by using the button in the upper left button. To close or hide the search fields, please use the corner. In the upper right corner you can chose from a list of predefined periods. To clear all search mask fields, please press the JiveX DICOM Viewer 4.5 54 button or the [ESC] key. User Manual 8 Configuration The configuration of DICOM Mail is similar to the configuration of any common email client. In addition, some specific settings are required. The configuration screen can be found within the menu "Extras" -> "DICOM-Mail settings". First, please define the folder to use for saving received emails locally. The predefined value is the "data" folder in the installation directory. Depending on your operating system and user rights, this might be adapted as the DICOM Mail Viewer user needs special read and write permissions for this directory. 8.1 Encryption DICOM-Mail uses a compatible Open-PGP encryption to secure the transmitted data. The administration and generation of the keys can be done with every program that 4 is compatible to Open-PGP. For example, GnuPG is one of the most widely used open-source programs that can be used for generating, importing and querying keys of the server. The keys are stored in two files These keys are stored within two different files: one file keeps the private key, the other one keeps the official key. Furthermore, it is possible to use pre-generated or already existing key files. DSA/ElGamal keys have to be supported by every OpenPGP compatible encryption software. The key administration is fully integrated into the program interface (Fig. 45). The tab "PGP Keys" within the DICOM-Mail configuration dialog shows all known keys. The user interface provides the option to create new keys, import keys or to export private and public keys. At least you are also allowed to delete keys. 4 http://www.gnupg.org/ JiveX DICOM Viewer 4.5 55 User Manual Fig. 45: PGP keys 8.1.1 SSL-Certificates The "Certificates" tab (Fig. 46) is used to manage SSL-Certificates which are used for encrypted communication with the managed mail server. If the mail server uses an unknown certificate, it will be added to this list and the connection is aborted. The certificate is marked as not trusted. In the detailed view of the certificate this needs manually to be accepted as trustworthy, after the certificate data has been checked. Fig. 46: "Certificates" tab JiveX DICOM Viewer 4.5 56 User Manual 8.2 Mail Account A mail account defines the access to a mail server. Via the tab "Accounts" you can administer your own e-mail accounts within the administration console. For this purpose, please select the item "DICOM-Mail settings" from the "Extras" menu. A DICOM-Mail Configuration dialog opens providing the "Accounts" tab. An account serves for the receipt of e-mail DICOM data as well as for the dispatch of administrative data (e.g., receipts, public keys). For any existing account the "DicomMailSCPService" checks incoming new messages in a defined interval. Single accounts can be managed by double-clicking on the respective list line or, alternatively, by first clicking on the list line and then pressing the [Edit] button. An already selected account is deleted by clicking the [Delete] button. To set up a new account, please use the [New] button. Fig. 47: "Accounts" tab JiveX DICOM Viewer 4.5 57 User Manual Fig. 48: General "Account Settings" Having selected an account, the dialog "Account Settings" opens. Using the tab "General", you can make general settings. In the drop-down list for PGP keys, all known private keys can be selected. The selected PGP key is used for signature and encryption of incoming messages. If the option "Load messages from unknown sender" is not selected, the list of contacts will be used as "white list" which causes messages of unknown senders (address that is not in the contact list) to be removed. Fig. 49: Mail server configuration The previous figure shows the separate input screens for setting up the incoming and outgoing mail server by using the corresponding tabs "Incoming Server" and JiveX DICOM Viewer 4.5 58 User Manual "Outgoing Server". In each case, the host name and port of your mail server has to be defined. In addition, the data input for logging onto your mail server is required. 8.3 Contacts The "Contacts" tab (see fig. below) effectively represents the address book of the DICOM Mail Viewer. Here, data of communication partners is captured, displayed, edited or deleted. The entries in the "Contacts" tab show the relationship between e-mail addresses and those concerning the PGP key encryption. Any number of e-mail addresses can be assigned to each key. With the activated option "Load messages of unknown sender" within the "Account Settings" tab (see Fig. 6), it is not necessary to set up additional addresses. However, if this option is inactive, the configured contacts are used as a so called "White list" with sender addresses on incoming messages. Furthermore, the contacts can be used as search filters. Fig. 50: "Contacts" tab For each contact the PGP key must be selected for data encryption. Any number of e-mail addresses can be assigned to this PGP key: JiveX DICOM Viewer 4.5 59 User Manual Fig. 51: Configuration of "Contact Data" 8.4 Service Configuration By default, newly received DICOM-Mail messages are checked only manually. This can be automated with the tab "Service Settings" which provides the following three configurations: Receive messages manually Read every…Minutes (Interval demand) Read at time (Fixed time) Using the option "Manual demand", messages are only requested manually. An automated server request in a defined interval can be configured by using the second option. The third option is used for setting a fixed time for every day to check the mailbox for the presence of new messages. Receiving messages manually is possible at any time, regardless of configured automatisms. JiveX DICOM Viewer 4.5 60 User Manual 9 DICOM Calibration 5 It is possible to calibrate a display of monochrome images according to the DICOM standard. In order to achieve a calibrated display on color monitors equipped with a standard graphic card it is necessary to access the characteristic curve of the monitor (calibration). In the menu item "Extras" you will find the menu item "Calibration". Then, the menu item "Open calibration file" in the "File" menu enables you to select the file which contains the monitor's characteristic curve. After that JiveX corrects the screen display in order to display the calibrated monochrome images. Also, the ambient light can be changed. This curve can be created with the VeriLUM Software by IMAGE Smiths, Inc. (USA). The file "CC0_nc0dat" in the main directory of VeriLUM Software contains the characteristic curve which can be accessed by JiveX. Additionally, the characteristic curve can also be imported from a text file with exactly 256 lines. Every line has to contain exactly one brightness entry (Double). 10 Image Size Calibration The size of the images can belatedly be adjusted, if the pixel size (pixel spacing) is not included in the DICOM data set. For this purpose, you have to create a distance measurement between two points whose distance is known. Then you can choose the menu item "calibrate pixel size" of the annotation context menu (mouse right click on this distance measurement) and enter the (correct) distance. Calibrated images will be marked with a warning symbol! Please note: Incorrect calibrated images will cause wrong distances and size measurements of all other annotations. Also, the area of the statistics measurements shows incorrect values! 5 Calibration in accordance with the DICOM standard is defined only for monochrome images. There is no defined possibility to calibrate color pictures and, thus, also no defined standardized display on the screen. JiveX DICOM Viewer 4.5 61 User Manual 11 Unlock Full Version To unlock the full version of JiveX DICOM Viewer you have to import a license key file using the menu item "import license key" from the "?" menu. After the import, all features of JiveX DICOM Viewer are accessible. By importing the license key file you accept the licensing conditions for JiveX DICOM Viewer and the general terms and conditions of VISUS Technology Transfer GmbH. For complete details of the imported license key file please see the "About" dialog and select the "license" tab. For more information and updates, please visit our website (www.visus.com). JiveX DICOM Viewer 4.5 62 User Manual A Keyboard Shortcuts For easier operation, there are keyboard shortcuts for most frequently used functions of the study manager. Keyboard Shortcut Function [Ctrl] + 1 Switches to a 1x1 Matrix. [Ctrl] + 2 Switches to a 2x1 Matrix. [Ctrl] + 3 Switches to a 1x2 Matrix. [Ctrl] + 4 Switches to a 2x2 Matrix. [Ctrl] + 5 Switches to a 5x5 Matrix. [Ctrl] + 6 Switches to a 2x3 Matrix. [Ctrl] + 7 Switches to a 3x2 Matrix. [Ctrl] + 9 Switches to a 3x3 Matrix. [Ctrl] + P Paper print (matrix) [Ctrl] + [Shift] + F Shows / hides function bar. [Ctrl] + [Shift] + T Shows / hides preview tree. [Alt] + [Cursor Up] Zooms / enlarges image. [Alt] + [Cursor Down] Zooms out image. [Alt] + 1 Original size. [Alt] + 2 Fits image to view panel size. [F2] Slows down Cine mode. [F3] Speeds up Cine mode. [F4] Starts and stops Cine mode. [Alt] + W Draws a circle annotation. [Alt] + R Draws a statistical circle annotation. [Alt] + C Displays cutlines. [Cursor up] Displays the previous image matrix. [Cursor down] Displays the next image matrix. [Ctrl] + [Cursor up] Displays the previous image row. [Ctrl] + [Cursor down] Displays the next image row. [F5] Displays the frame of a multiframed image. [F6] Displays the previous frame of a multiframed image. [F7] Displays the next frame of a multiframed image. [F8] Displays the last frame of a multiframed image. [Del] Deletes a selected annotation. [Ctrl] + [Del] Clears the focused Viewing Section. JiveX DICOM Viewer 4.5 63 User Manual [Ctrl] + [Shift] + [Del] Clears all Viewing Sections. [I] Inverts image(s). [G] Views / hides user-defined annotations. [C] Hides the mouse cursor while creating an annotation. [H] Views / hides painted annotations. [L] Views / hides image locator. [Q] Equalizes the matching image planes of a study. [V] Browses the images' VOI LUTs. [T] Switches the linking for all series on or off. [3] Equalizes all image planes of a study of all three directions. The mouse position is used for equalization. [Pause] Views all images of the current series in an adapted matrix. [Del] Deletes a selected annotation. [Pause] Views all images of the current series in an adapted matrix. [*] (num key pad) Resets images. To override the currently selected default left mouse button action in the image viewer, please use the following keyboard shortcuts: Keyboard Shortcut Function W Windowing R ROI-Zooming Z Zooming P Panning D Distance measurement N Navigates through series. S (or N+S) Synchronous navigation (index-based). E (or N+E) Synchronous navigation (distance-based). M Magnifies [Ctrl] + le. mousebtn. Moves parts of annotations (like measurements). [Shift] + le. mousebtn. Changes image sequence manually (drag'n'drop). [Shift] + ri. mousebtn. Equalize image plane on crossing a viewing section border. The mouse buttons can be used for multiple actions: Keyboard Shortcut Function Le. mousebtn As configured, optional: pan, window, zoom, navigate. Ri. mousebtn + mouse move Image navigation, on multiframed images: frame navigation. JiveX DICOM Viewer 4.5 64 User Manual Ri. mousebtn (click) Shows context menu. Mouse wheel rotation Image navigation, on multiframed images: image navigation. Pressed mouse wheel + Pan mouse move Pressed mouse wheel + Zoom mouse wheel rotation Ri. mousebtn + mouse wheel rotation Series navigation. Pressed le. mousebtn + short ri. Mousebtn click Toggle left mouse button action. JiveX DICOM Viewer 4.5 65 User Manual B Safety Regulations All legal and regulatory requirements applicable to the place of installation must be taken into account by the operator! JiveX DICOM Viewer 4.5 66 User Manual C Index A Tastaturkürzel ............................ 64 Multiframe ................................... 42 Administration .............................. 24 Annotations 23, 24, 39, 44, 45, 46, 47, 50 O Orientation ............................. 20, 39 B BMP......................................... 8, 15 P Panning .................................. 40, 64 C Calculation ..............................24, Cine................... 5, 23, 24, 41, 42, Compare mode ............................. Context menu ......... 17, 28, 29, 31, Pictorial index ................... 12, 13, PNG ......................................... 8, PNM ......................................... 8, Presentation State . 7, 8, 24, 49, 50, Presets .............................. 27, 28, 46 63 15 40 14 15 15 51 39 D DICOM 1, 5, 6, 7, 8, 9, 10, 12, 15, 21, 33, 36, 37, 42, 43, 48, 49, 50, 52, 53, 54, 55, 57, 59, 60, 61, 62 Distances ..................................... 47 R G Grayscale windowing .................... 23 Shutters .................................. 24, 49 Reset .................................. 9, 37, 38 ROI Zoom .................................... 33 S Shortcuts ...................................... 63 T Toolbar ..................................... 6, 23 J Java ............................................... 5 V JPEG ........................................ 8, 15 Viewer ..... 1, 5, 6, 7, 9, 10, 15, 21, 50, 52, 55, 59, 62 Viewport ........................... 15, 26, 33 K Keyboard Shortcuts ....................... 63 M Z Zoom ..................... 15, 16, 32, 33, 65 Matrix ............................... 15, 39, 63 Keyboard Shortcuts ..................... 63 JiveX DICOM Viewer 4.5 67 User Manual D Glossary • Cine The image viewer's cinematic display mode • CS JiveX Communication Server • DICOM Digital Imaging and Communication in Medicine - A standard for medical images • Folder A container similar to a file folder, in which studies can be stored. Each folder has an owner and is, by default, accessible only by this owner. A folder can be made available to other JiveX users via a release mechanism. • Grayscale windowing Alternates brightness and contrast of an image. • GUI Graphical User Interface • Image Matrix A viewport displays either a single image or a matrix of images. • Intended Purpose 'Intended purpose' means the use for which the device is intended according to the data supplied by the manufacturer on the labelling, in the instructions and/or in promotional materials. • Java A platform independent programming language • HIS Hospital Information System. • Pictorial Index The pictorial index contains all loaded images as thumbnails. • Profile Contains customized or user specified settings. • ROI Region Of Interest • SCU Service Class User - User of a DICOM Communication Service • SCP Service Class Provider - Provider of a DICOM Communication Service • Study Manager The study manager provides functions for image searches and requests. • Viewport The viewport is the display area for images. JiveX DICOM Viewer 4.5 68 User Manual