1
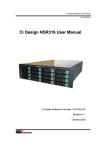
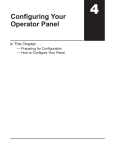
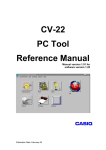
BBC-SD-PRO
USER MANUAL
This guide will illustrate the steps needed to install and use BBC-SD-Pro (referred to as BBC-SD-Pro), the
software configuration environment for the BBC-SD BACnet Touch-Screen display. Please review this
guide in its entirety prior to installing the software onto your computer.
INTRODUCTION
BBC-SD-Pro is a PC-based configuration environment used to setup and configure operational
parameters of the BBC-SD. Through the use of this software product, users can define key data from
connected BACnet MS/TP units which will be displayed on the screen for monitor and modification, as
needed and required by the end-user. Once all configuration parameters have been defined, a
configuration file is then generated (saved) and transported to the BBC-SD through the use of it’s local SDcard socket.
Figure 1 - BBC-SD-Pro
SYSTEM REQUIREMENTS
The following information provides specific details regarding PC system requirements required to install
and use BBC-SD-Pro:
.
Operating System: Windows XP Home/Pro with SP2 (32-bit); Windows Vista (32-bit); Windows 7 (32bit or 64-bit); Windows 8 (32-bit or 64-bit).
.
Additional Software: Microsoft.NET Framework v3.5 or greater - operating system dependent.
.
Disk Space: 10MB for system file (additional disk space required for configuration files)
.
Additional Hardware/Utilities: USB Port for Software Copy Protection Key, Class 1 SD Card and
Card Reader for local file transport to/from BBC-SD.
BBC-SD-Pro User Manual
1
USER MANUAL
INSTALLING SD-PRO
1. Insert the BBC-SD-Pro CD into the CD drive on your computer. The Setup Wizard should start
automatically. If you have downloaded the program from www.bacnetcontrol.com, double-click the
executable installation file. You will be greeted by the welcome screen. To continue, click Next.
Figure 2 -Setup Wizard Welcome
2. The Setup wizard will allow you to choose components. By default, all options are checked. You may
optionally un-check the Start Menu shortcut and Desktop shortcut. Click Next to continue.
Figure 3 - Choosing Components
2
BBC-SD-Pro User Manual
USER MANUAL
3. You can choose the destination folder where BBC-SD-Pro will be installed to. By default, the program
will install to C:\Program Files(x86)\American Auto-Matrix\SD-Pro. If you wish to change the install
directory, click Browse... and select the desired path. Click Install to continue the installation process.
Figure 4 - Choose Installation Location
4. The wizard will copy all of the necessary files required to run BBC-SD-Pro, as well as configure other
elements of your computer to correctly run the process.
Figure 5 - Installing BBC-SD-Pro
BBC-SD-Pro User Manual
3
USER MANUAL
5. When complete, the following screen will appear, providing a notification that the wizard has successfully installed the program. To exit the Setup Wizard, click Finish.
Figure 6 - Setup Wizard Complete
4
BBC-SD-Pro User Manual
USER MANUAL
STARTING
AND
USING BBC-SD-PRO
To start BBC-SD-Pro, perform the following steps:
1. Insert the USB Software Copy Protection key into an available USB port on your computer.
2. Navigate to Windows Start>Programs>American Auto-Matrix and select the BBC-SD-Pro icon listing
from the program menu.
MENU BAR OPERATIONS
BBC-SD-Pro provides a basic menu bar consisting of a File drop-down menu and a Help drop-down menu.
Table 1-1 and Table 1-2 provide a quick reference for each operation feature available through the
respective drop-down menus.
Table 1-1 - File Menu Operations
File Menu Option
Shortcut Keys
Operation
New
CTRL + N
Creates a new, blank configuration file template.
Open
CTRL + O
Provides the capability to load an existing
configuration file saved on the local PC or a
removable storage drive.
Save
CTRL + S
Allows the user to save changes to a
configuration currently opened for editing.
Save As
Allows the user to save a configuration currently
opened for editing, but also permits the user to
choose the destination of where the configuration
file is saved to.
Exit
Closes and terminates the BBC-SD-Pro program.
Table 1-2 - Help Menu Operations
Help Menu Option
Shortcut Keys
About
Operation
Provides information about the program name
and revision and any copyright information
associated to it.
THE NAVIGATION BAR
The layout of BBC-SD-Pro provides easy navigation and usage of programming various aspects of the
BBC-SD. Within the engineering environment, there are five configuration areas which are reviewed in this
manual. Navigation to each configuration area is performed by clicking on the navigation bar, located at
the bottom of the BBC-SD-Pro window. The configuration areas include:
.
Data Slot Configuration
.
Home Screen Configuration
.
Data Screen Configuration
.
Schedules
.
Extended Setup
BBC-SD-Pro User Manual
5
USER MANUAL
DATA SLOT CONFIGURATION
The Data Slot Configuration section provides the ability to setup and define referenced
object properties within the BBC-SD. The Data Slot Configuration area provides a datagrid
view of defined points from the BACnet MS/TP that will be displayed by the BBC-SD during
operator interaction. A maximum of 150 object properties can be defined for display on the
BBC-SD through the Home Screen or Data Screens. Slots are defined in a “one at a time”
manner. As each slot is added, a slot number is defined in the application.
Figure 7 - Data Slot Configuration
ADDING
A
SLOT
To add a slot, either right-click in the slot configuration area and select New from the shortcut menu, or
click the plus button located on the top right hand side of the Slot Configuration window.
Figure 8 - Adding a Slot
DEFINING
A
SLOT
A new slot with a slot number will be added to the form. From this point, you will then be required to specify
field information regarding the object property you wish to reference in the BBC-SD. While most field
information is required, a few parameters are optional. Table 1-3 provides a complete description of each
field, its usage, and whether or not a value is required.
6
BBC-SD-Pro User Manual
USER MANUAL
Table 1-3 Data Slot Fields
Field
Notes
Required
?
Slot Number
Defines the slot number of the referenced object property. The first slot typically
starts with the number 1 and works in an incremental fashion. If an
intermediate slot is deleted, the slot number is as well - thereby not affecting
other slots or data screen configurations.
Yes
Unit ID
Defines the MAC Address of the BACnet MS/TP device you are addressing.
This value can be of a range from 0 - 254, where 0 -127 is commonly reserved
for MS/TP master units, and 128-254 is commonly reserved for MS/TP slave
units.
Yes
The Local selection allows users to create an Analog or Binary Value object
within the BBC-SD for extended building automation applications. A maximum
of 32 Analog Values and 32 Binary Values may be defined.
Vendor Type
Provides a vendor type definition for the manufacturer of the BACnet device
you are working with. Each vendor may have a library of static devices that
contain specific object and property information referenced in XML files as part
of this program. XML File Usage is described later in this section
No
Unit Type
Provides a unit type (model) definition for the BACnet device you are working
with. Each vendor may have specific object and property information
referenced in XML files as part of this program. XML File Usage is described
later in this section
No
Object
Defines the BACnet Object Type you wish to address. Standard Objects are
available from the combo-box. If you wish to define a proprietary object, simply
type the BACnet Identifier number into the combo box.
Yes
Object
Instance
Defines the instance number of the referenced BACnet object.
Yes
Property
Defines the property of the referenced BACnet object. For any object defined,
all standard properties are available for selection from the drop-down menu. If
you wish to define a proprietary property, simply type the BACnet identifier
number into the combo box.
Yes
Priority for
Writing
If the referenced BACnet Object Property you have defined is commandable
through Priority Array, you may select a specific priority for override conditions.
If the object is writable, set this value to None Used.
Varies by
defined
object
Name
Provides a short descriptive name for the BACnet object property referenced.
This short name will display on the left area of the slot line when viewing
multiple points in a group fashion. A maximum of 24 characters can be entered/
displayed by BBC-SD.
Yes
Description
Provides a long description for the BACnet object property referenced. This
long description can be used to provide a description of the value’s functionality
or meaning. A maximum 150 characters can be entered/displayed by BBCSD.
No
BBC-SD-Pro User Manual
7
USER MANUAL
Table 1-3 Data Slot Fields
Field
Notes
Required
?
Units
Provides the ability to display an engineering unit next to the point value when
displayed on BBC-SD. A maximum of 5 characters can be entered/displayed
by BBC-SD.
No
Password
Level
Defines the minimum required login level that an operator must have in order to
gain value edit access. A value of 0 allows all users to gain value edit access. A
value of 4 will disable value editing of the point from BBC-SD
Yes
Focus Bit
Focus Bit is assigned a value for situations where a specific bit position of a
bitstring needs to be referenced. Additionally, this field is also set for situations
when a text overlay for a logical 0 or 1 value is required.
No
Text Overlay
Type
Defines the method of text overlay used for enumerated types of data (such as
UNSIGNED, SIGNED, BOOLEAN, or ENUMERATION). This field is read-only,
but defined clicking the Edit button listed in the Text Overlays field.
No
Text Overlay
Provides an editor to define text overlays for bit-based data as well as
enumerations. For enumerated type data, up to a maximum of 8 overlays can
be entered and displayed by the BBC-SD.
No
DELETING
A
SLOT
To delete a slot, perform the following steps:
1. Select the slot you wish to delete by performing a single mouse click on the left edge of the data grid
as displayed in Figure 9. Note that multiple slots can be selected by holding the single mouse click and
moving your mouse up or down to select multiple rows above or below the selected slot.
Figure 9 - Deleting a Slot
2. Right-click the area of the indented datagrid to invoke the shortcut menu. Select Delete from the
shortcut menu. Alternatively, you can also select the minus icon from the top right side of the Data Slot
Configuration window to perform the same action.
8
BBC-SD-Pro User Manual
USER MANUAL
DATA SCREEN CONFIGURATION
The Data Screen Configuration section provides access to setup and define data screens
within the BBC-SD. A maximum of 50 screens, each with 15 lines of definable data can be
stored within the BBC-SD. Each line of a data screen can be programmed to display an
object property configured as a slot, provide a link to another defined data screen or home
screen, or simply display blank links for cosmetic purposes or organizational group
structuring.
Figure 10 - Data Screen Configuration
Each line of a data screen has a type and value associated to it. The type defines the data element you
wish to display on the line (whether it be a slot, screen link or blank line). If you have selected a slot, the
value associate combo box will index all referenced slots in the Slot Configuration area. If you have
selected a screen link, additional screens you have configured within the Data Screen Configuration area
will display in the combo box. For blank lines, the value drop down will be set to a hard coded value of zero
(0).
To define each screen, a series of left and right arrows for navigating between each screen definition is
located below Line 15’s setup area. An additional set of left and right arrows with a line in front/behind
allows quick navigation to the beginning or end of data screen configuration (Screen 1 and Screen 50,
respectively).
BBC-SD-Pro User Manual
9
USER MANUAL
HOME SCREEN CONFIGURATION
The Home Screen Configuration section provides access to setup and define the Home
Screen within the BBC-SD. The Home Screen is the first screen with live data or links
displayed upon start-up, and is also the screen displayed when a user touches the Home
button. Each line of the home screen can be programmed to display a configured slot, or
provide a link to a configured data screen (refer to next section on how to create and define data screens),
or simply display blank lines for organizational group structuring. The design of the Home Screen is static
and provides 5 configurable lines.
The Home Screen provides a configurable title displayed at the top of the screen. This can be used to
define the site name, building, or environment in which the BBC-SD has been installed. A maximum of 24
printable characters can be entered for display.
Figure 11 - Home Screen Configuration
10
BBC-SD-Pro User Manual
USER MANUAL
SCHEDULES CONFIGURATION
The Schedules Configuration section provides access to setup and define the ability to
read and write BACnet Schedule and BACnet Calendar objects information. BBC-SD
will support a maximum of 16 definitions - providing support for a total of 16 Schedules
and 16 Calendars.
DEFINING SCHEDULE INFORMATION
When defining information in a Schedule definition, the user can choose to address both a Schedule object
and Calendar object by entering the correct object instance number for each. In the event that an instance
number is not entered (field is left blank), display icons on BBC-SD used to view property information from
corresponding object properties will not be displayed during runtime. This functionality accommodates
devices that may only support one of the two object types.
Figure 12 - Schedules Configuration
Similar to a data slot, each Schedule definition can be assigned a required password level to modify,
allowing schedules to be adjusted by operators with the correct privilege levels.
BBC-SD-Pro User Manual
11
USER MANUAL
EXTENDED SETUP CONFIGURATION
The Extended Setup section provides a method to define specific device related configuration parameters
for BBC-SD. Extended Setup is intended to be used in situations where a user may wish to program
device parameters of the BBC-SD in an offline and local manner, rather that through the touch-screen user
interface. Additionally, Extended Setup can also be used in situations where multiple BBC-SD units will be
configured to display the same data slots, screen, and schedules; but operate using different MS/TP
network configuration parameters (such as MAC Address, Device Instance, etc.).
Figure 13 - Extended Setup Configuration
Prior to saving a file and applying it to BBC-SD, users can choose whether or not they wish to download
the extended setup of the configuration file by placing a checkmark in the Use Extended Setup field,
located at the top left corner of the configuration panel. Upon applying the configuration to the BBC-SD,
the unit will reboot and resume operation using the defined parameters.
Table 1-4
Field
12
Notes
Unit ID
Specifies the MS/TP MAC Address for the BBC-SD.
Configurable between 0 and 127.
Device Instance
Specifies the BACnet Device Instance for the BBC-SD.
Configurable between 0 and 4,134,302
Max Master ID
Specifies the value for Device;max-master. This value
should be set to the highest MAC Address that exists
on the local MS/TP network. Configurable between 1
and 127.
BBC-SD-Pro User Manual
USER MANUAL
Table 1-4
Field
Notes
Max Transaction Frames
Specifies the value for Device;max-info-frames. This
value is set by default to 5 and is considered the
optimal setting for most network installations.
Configurable between 2 and 10.
Login Level for Slot Info
Display
Specifies the minimum login level that allows operators
to view detailed information regarding a slot through
the BBC-SD.
Volume
Defines the volume output for audible clicks made
when a valid touch occurs on the BBC-SD.
Configurable between 0 and 11.
Polling Aggressiveness
Defines the aggressiveness of data refresh for the
BBC-SD. The value can be set as low as 1 or as high
as 10. The higher the value, the faster data is polled by
the BBC-SD.
Idle Screen
Defines the numerical data screen displayed by the
BBC-SD during idle times when no activity occurs at
the touch-screen interface. The idle screen may also
be changed during run time by a BACnet device writing
to Analog Value, Instance 100.
Alarm Logging Mode
Defines how alarms encountered by the BBC-SD are
handled. Choices are either to Log Alarm Notifications,
Log Alarm Summaries, Log Both, or Log None.
Enable Screen Dimming
Defines whether or not screen dimming is enabled, as
well as the inactivity time that must elapse before
dimming occurs.
Clock Display Mode
Defines time to be displayed in either standard or
military format.
Date Display Mode
Defines date to be displayed in either MM-DD-YY or
DD-MM-YY format.
Boot-up Time Server Address
Defines a MAC Address of a BACnet MS/TP devices
used by the BBC-SD to obtain local time and date
information.
Boot-up Time Server Device
Instance
Defines the Device Instance for the MAC Address of
the BACnet MS/TP device used by the BBC-SD to
obtain local time and date information.
CONFIGURING OPERATORS
Operators are also configured in the Extended Setup area.
The BBC-SD supports a maximum of 8 defined operators, each with their own configurable login password
and assignable privilege level that can be used to invoke write capabilities to points, as well as access
advanced areas of the BBC-SD touch-screen user interface. Operator passwords can be assigned any
value from 0 to 99999. A login level can also be configured for each operator, where 1 is the lowest level
and 3 is the highest level. A login level of zero disables a user from logon capabilities.
BBC-SD-Pro User Manual
13
USER MANUAL
Figure 14 - Operator Configuration
14
BBC-SD-Pro User Manual
USER MANUAL
APPLYING
A
CONFIGURATION FILE
Applying a configuration file to the BBC-SD can be done through either BACnet File Services or through
local transfer methods using a Secure Digital (SD) card. While the process for using BACnet File Services
may vary depending on the software vendor, the method for SD Card transfer is discussed in this
document.
APPLYING
VIA
SECURE DIGITAL (SD) CARD
A BBC-SD configuration file can be downloaded to a BBC-SD hardware by transferring the saved BBC-SD
configuration file from your computer to a SD-card. Once transferred to the SD-card, the file can then be
loaded locally at BBC-SD through use of its on-board SD card socket and touch-screen display. Tools
requires to do this process include:
.
Torx Screw Drive - Size T-10
.
SD Memory Card - at least 4MB in size.
.
SD Card Reader - to transfer files from computer to SD card.
First, you must transfer the configuration file from your computer to the SD card. In order for BBC-SD to
accept a configuration file from the SD card, the file must be named BBC-SD.lej, which is the default name
BBC-SD-Pro will attempt to save with.
NOTICE
The configuration file copied to the SD card must be
named BBC-SD.lej. If a file with a different name
exists on the SD card, the BBC-SD will not be able
to load it into its memory for runtime.
To load the configuration file to BBC-SD, perform the following steps:
1. Carefully remove the housing cover of the BBC-SD.
BBC-SD-Pro User Manual
15
USER MANUAL
2. Locate the on-board SD card socket. It is located behind the bottom right corner of the display screen,
as shown in Figure 15. Insert the SD card into the socket. The card socket uses a spring-loading
mechanism to hold the card, therefore, a click noise will occur when the card is pushed up into the
socket.
Figure 15 - Loading an SD Card into BBC-SD
3. Place the housing cover back onto the BBC-SD.
4. With BBC-SD powered, login as an operator with Level 3 Permissions.
NOTICE
If you are configuring the BBC-SD for the very first
time, use the default Level 3 operator password of
11111.
5. From the Main Menu, press Configure.
Figure 16 - Main Menu - Press Configure
16
BBC-SD-Pro User Manual
USER MANUAL
6. From the Configure Menu, press SD/MMC Card Operations.
Figure 17 - Configure Menu - Press SD/MMC Card Operations
7. From the SD/MMC Card Operations Menu, press Slot File Operations.
Figure 18 - SD/MMC Card Operations Menu - Press Slot File Operations
BBC-SD-Pro User Manual
17
USER MANUAL
8. From the Slot File Operations Menu, press SD Card -> Display.
Figure 19 - Slot File Operations - Press SD Card -> Display
9. Wait for the on-screen confirmation that BBC-SD has received the new setup file info. After the confirmation the BBC-SD will reboot.
10. Remove SD card from unit, if desired.
18
BBC-SD-Pro User Manual
USER MANUAL
WORKING
WITH
CUSTOM XML FILES
As mentioned earlier in Slot Configuration, BBC-SD-Pro’s functionality provides extended capabilities in
defining controller profiles for third-party devices that contain proprietary objects and properties. While
numeric entry of proprietary objects and properties will always work, XML files can be used to add text
interpretations of custom third-party features addressed through such use. All XML files used to reference
BACnet objects and properties are located in the XML directory of the installed path for BBC-SD-Pro
(commonly C:\Program Files\American Auto-Matrix\SD-Pro). The following table provides a brief
description of default files loaded during installation.
Table 1-5 Default XML Files Installed
File Name
Purpose
BACnetVendors.xml
References current BACnet vendors and
manufacturers registered with ASHRAE as of
February 1, 2008.
BACStandardObjectProperties.xml
References currently published BACnet
Standard Objects and Properties, as of
February 1, 2008.
CREATING CUSTOM XML FILES
To create a custom XML file for a target third-party BACnet device, you must first know the BACnet vendor
ID of the manufacturer’s device you are working with. The vendor ID can be found in the
BACnetVendors.xml file by viewing the information with a text editor. For example, if you wish to reference
a device by Honeywell®, the BACnet vendor ID is 17.
Figure 20 - BACnetVendors.XML File
BBC-SD-Pro User Manual
19
USER MANUAL
Once you have obtained the vendor ID, you may then proceed to create an XML file for the vendor, based
on the format of the XML files. To link the vendor ID with the Vendor Type drop-down, the XML file must be
named in a format beginning with the vendor ID, followed by a hyphen and a description of the unit. For
example, if you are working with a VAV type device from Honeywell, you could name the file 17HoneywellVAV.xml.
The format of the XML file must be kept consistent through design and creation. There are multiple areas
that should be paid attention to when designing your file. Below is an example.
<?xml version="1.0"?>
<ProprietaryInformation>
<controller ModelName="VAVController">
<Objtype ID="0" name="analog-input" proprietary="0">
<properties instancerangestart="0" instancerangestop="0">
<property name="SensorType" id="15000" datatype="2" access="RW" />
<property name="InputOffset" id="15001" datatype="4" access="RW />
<property name="AlarmApplication" id="15002" datatype="2" access="RW />
</properties>
<properties instancerangestart="1" instancerangestop="1">
<property name="SensorType" id="15000" datatype="2" access="RW" />
<property name="InputOffset" id="15001" datatype="4" access="RW />
<property name="AlarmApplication" id="15002" datatype="2" access="RW />
</properties>
<properties instancerangestart="2" instancerangestop="2">
<property name="SensorType" id="15000" datatype="2" access="RW" />
<property name="InputOffset" id="15001" datatype="4" access="RW />
<property name="AlarmApplication" id="15002" datatype="2" access="RW />
</properties>
</Objtype>
<Objtype ID="157" name="SomeObject" proprietary="1">
<properties instancerangestart="1" instancerangestop="1">
<property name="Function1" id="15700" datatype="4" access="RW" />
<property name="Function2" id="15701" datatype="4" access="RW" />
<property name="Function3" id="15702" datatype="4" access="RW" />
<property name="Function4" id="15703" datatype="4" access="RW" />
</properties>
Once you have finished creating your XML file, copy and paste it to the XML directory. The next time BBCSD-Pro is started, and the vendor has been selected, the file name should become available for selection
in the Unit Type combo-box.
20
BBC-SD-Pro User Manual
BBC-SD-PRO END USER LICENSE AGREEMENT
END
BBC-SD-PRO
USER LICENSE AGREEMENT
American Auto-Matrix
One Technology Lane
Export, PA 15632
IMPORTANT: THIS END USER LICENSE AGREEMENT (“EULA”) IS A LEGAL DOCUMENT BETWEEN YOU
(PURCAHSER) AND AMERICAN AUTO-MATRIX (“AAM”). IT IS IMPORTANT THAT YOU READ THIS DOCUMENT
BEFORE USING “SOFTWARE” (BBC-SD-PRO) AND ANY ACCOMPANYING DOCUMENTATION, INCLUDING
WITHOUT LIMITATION PRINTED MATERIALS, ‘ONLINE’, OR ELECTRONIC DOCUMENTATION (“DOCUMENTATION”). BY SIGNING THIS DOCUMENT AND INSTALLING, OR OTHERWISE USING THE SOFTWARE, YOU
AGREE TO BE BOUND BY THE TERMS OF THIS SOFTWARE LICENSE AGREEMENT INCLUDING WITHOUT
LIMITATION THE WARRANTY DISCLAIMERS, LIMITATION OF LIABILITY AND TERMINATION PROVISIONS BELOW, WHETHER OR NOT YOU DECIDE TO PURCHASE THE SOFTWARE. IF YOU DO NOT AGREE WITH THE
TERMS OF THIS EULA, DO NOT INSTALL, COPY OR USE THE SOFTWARE.
1.
Software License.
(a) License Grant: The Software is licensed, not sold. AAM grants to you a non-transferable and nonexclusive right to use the copy of the Software provided with this EULA for a specific period of time.
(b) Copies and Backups: You may make one backup and one archival copy of the Software, provided
your backup and archival copies are not installed or used on any computer and further provided that
all such copies shall bear the original and unmodified copyright, patent and other intellectual property
markings that appear on or in the Software. You agree that you may not copy the written materials
accompanying the Software. Modifying, translating, renting, copying, distributing, transferring or assigning all or part of the Software, or any rights granted hereunder, to any other persons and removing
any proprietary notices, labels or marks from the Software is strictly prohibited. Furthermore, you
hereby agree not to create derivative works based on this Software. You may permanently transfer
all of your rights under this EULA, provided you retain no copies, you transfer all of the Software and
USB copy protection key, and the recipient agrees to the terms of this EULA. If the Software is an
upgrade, any transfer must include all prior versions of the Software.
(c) USB Copy Protection Key: A USB copy protection key is required to run the full version of the software and generate configuration files for the purpose of downloading. The USB Copy Protection Key
carries a 120-day warranty, valid from the date of shipment. You will receive a USB copy protection
key with the software. A replacement USB copy protection key will be issued in the event of a nonrecoverable failure of the original USB key during the warranty period. You must provide your software provider with the Site Name and Serial Number of the original purchased software and a purchase order for the original purchase amount. Should a USB copy protection key be lost or stolen,
purchaser will be required to purchase a new copy of the software.
(d) Product Updates: The software product and USB copy protection key you have obtained are specific
to the revision of software purchased. AAM may or may not at its sole discretion provide future updates, bug fixes, or upgrades of capability associated with this product. Alternatively, AAM may provide future software capabilities which are covered by this EULA if also licensed with this attached
USB copy protection key.
2.
Copyright. You acknowledge that no title to the intellectual property in the Software is transferred to you. You
further acknowledge that title and full ownership rights to the Software will remain the exclusive property of
AAM and/or its suppliers, and you will not acquire any rights to the Software, except the license expressly set
forth above. All copies of the Software will contain the same proprietary notices as contained in or on the Software.
3.
Reverse Engineering. You agree that you will not attempt, and if you employ employees or engage contractors, you will use your best efforts to prevent your employees and contractors from attempting to reverse compile, reverse engineer, modify, translate or disassemble the Software in whole or in part. Any failure to comply
with the above or any other terms and conditions contained herein will result in the automatic termination of
this license and the reversion of the rights granted hereunder to AAM.
4.
Disclaimer of Warranty. THE SOFTWARE IS PROVIDED “AS IS” WITHOUT WARRANTY OF ANY KIND
BEYOND THAT WARRANTY SPECIFICALLY EXPRESSED IN YOUR PRICE LIST OR POLICY GUIDE. TO
THE MAXIMUM EXTENT PERMITTED BY APPLICABLE LAW, AAM AND ITS SUPPLIERS DISCLAIM ALL
WARRANTIES WITH REGARD TO THE SOFTWARE, EITHER EXPRESS OR IMPLIED, INCLUDING BUT
NOT LIMITED TO, THE WARRANTY OF NON-INFRINGEMENT OF THIRD PARTY RIGHTS, THE WARRANTY OF YEAR 2000 COMPLIANCE, AND THE IMPLIED WARRANTIES OF MERCHANTABILITY AND
FITNESS FOR A PARTICULAR PURPOSE. THE ENTIRE RISK AS TO THE QUALITY AND PERFORMANCE OF THE SOFTWARE IS WITH YOU. NEITHER AAM NOR ITS SUPPLIERS WARRANT THAT THE
BBC-SD-Pro User Manual
23
END USER LICENSE AGREEMENT
FUNCTIONS CONTAINED IN THE SOFTWARE WILL MEET YOUR REQUIREMENTS OR THAT THE OPERATION OF THE SOFTWARE WILL BE UNINTERRUPTED OR ERROR-FREE.
5.
Limitation of Liability. AAM’S ENTIRE LIABILITY AND YOUR SOLE AND EXCLUSIVE REMEDY UNDER
THIS EULA SHALL NOT EXCEED THE ORIGINAL PURCHASE PRICE OF THE SOFTWARE. TO THE MAXIMUM EXTENT PERMITTED BY APPLICABLE LAW, IN NO EVENT SHALL AAM OR ITS SUPPLIERS BE
LIABLE TO YOU FOR ANY CONSEQUENTIAL, SPECIAL, INCIDENTAL OR INDIRECT DAMAGES FOR
PERSONAL INJURY, LOSS OF BUSINESS PROFITS, BUSINESS INTERRUPTION, LOSS OF BUSINESS
INFORMATION/DATA, OR ANY OTHER PECUNIARY LOSS OF ANY KIND ARISING OUT OF THE USE OR
INABILITY TO USE THE SOFTWARE, EVEN IF AAM OR ITS SUPPLIER HAS BEEN ADVISED OF THE
POSSIBILITY OF SUCH DAMAGES. IN NO EVENT SHALL AAM OR ITS SUPPLIERS BE LIABLE FOR ANY
CLAIM BY A THIRD PARTY.
6.
State/Jurisdiction Laws. SOME STATES/JURISDICTIONS DO NOT ALLOW THE EXCLUSION OF IMPLIED WARRANTIES OR LIMITATIONS ON HOW LONG AN IMPLIED WARRANTY MAY LAST, OR THE
EXCLUSION OR LIMITATION OF INCIDENTAL OR CONSEQUENTIAL DAMAGES, SO SUCH LIMITIATIONS OR EXCLUSIONS MAY NOT APPLY TO YOU. THIS LIMITED WARRANTY GIVES YOU SPECIFIC
RIGHTS, AND YOU MAY ALSO HAVE OTHER RIGHTS, WHICH VARY FROM STATE/JURISDICTION TO
STATE/JURISDICTION.
7.
Export Laws. This EULA involves products and/or technical data that may be controlled under the United
States Export Administration Regulations and may be subject to the approval of the United States Department
of Commerce prior to export. Any export, directly or indirectly, in contravention of the United States Export Administration Regulations, or any other applicable law, regulation or order, is prohibited.
8.
Governing Law. This EULA will be governed by the laws of the State of Pennsylvania, United States of America, excluding its conflict of law provisions.
9.
Severability. If any provision of this EULA shall be held to be invalid, illegal or unenforceable, the validity, legality and enforceability of the remaining provisions hereof shall not in any way be affected or impaired.
10. No Waiver. No waiver of any breach of any provision of this EULA shall constitute a waiver of any prior, concurrent or subsequent breach of the same or any other provisions hereof, and no waiver shall be effective unless made in writing and signed by an authorized representative of the waiving party.
SOFTWARE WARRANTY POLICY
1.
2.
3.
The warranty period starts on the date of shipment from American Auto-Matrix. Your dated sales or delivery
receipt, showing the date of shipment of the product, is your proof of the purchase date.
Software returned within 20 days, in its original tamper-proof packaging, will be charged a 15% stocking fee. After
21 days, any software product will not be eligible for return credit.
Software product with the tamper-proof seal broken will not be eligible for credit.
USB COPY PROTECTION REPLACEMENT POLICY
1.
2.
24
Should a USB copy protection key become damaged or non-functional, contact your software provider for
procedures and pricing on retaining a replacement key.
Should a USB copy protection key be lost, the Purchaser will be required to purchase a new copy of the software.
BBC-SD-Pro User Manual