1
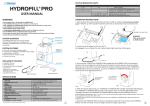
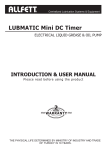
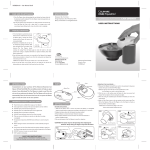
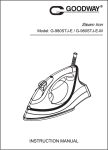
HYDROFILL ATO PUMP System Owner’s Manual 1 CONTENTS TABLE OF CONTENTS Important Safety Instructions 3-4 Parts—Exploded View & Identification HydroFill—ATO Pump System 5 Introduction HydroFill ATO Pump System Specifications 6 7 Getting Started Unpacking & Inspection 8 Choosing a Location for ATO Pump 9 Acrylic Bracket/Return Pipe Assembly 10 Mounting Return Pipe on Framed Tanks 11 Plumbing ATO Pump System 12-13 Powering up ATO Pump 14 Notes 15 Warranty Information 16 Owner’s Product Information 17 2 To guard against injury, basic safety precautions should be observed including the following: READ ALL SAFETY INSTRUCTIONS BEFORE USE. WARNING To avoid electric shock, special care should be taken since water is employed in the use of aquarium equipment. For each of the following situations, do not attempt to repair yourself. Return the appliance to an authorized service facility for service or discard the appliance. If the appliance falls into water, DO NOT reach for it! First unplug it and then retrieve it. If the electrical components of the appliance gets wet, unplug the appliance immediately. Carefully examine the appliance after installation. It should not be plugged in if there is water on parts not intended to be wet. Do not operate any appliance if it has a damaged cord or plug, or if it is malfunctioning or if it is dropped or damaged in any manner. To avoid the possibility of the appliance plug or receptacle getting wet, position aquarium to one side of a wall mounted receptacle to prevent water from dripping onto the receptacle plug. A “Drip Loop” should be arranged by the user for EACH cord connecting an aquarium appliance to a receptacle. The “Drip Loop” is that part of the cord below the level of the receptacle or the connector if an extension cord Drip Loop is used. This “Drip Loop” prevents water travelling along the cord and coming in contact with the receptacle. If the plug or the receptacle do get wet DO NOT unplug the cord. Disconnect the fuse to the circuit breaker that supplies power to the appliance. Then unplug and examine for the presence of water in the receptacle. Close supervision is necessary when any appliance is used by or near children. To avoid injury, do not contact moving parts or hot parts such as heaters, reflectors, lamps bulbs and etc. Always unplug an appliance from the outlet when not in use, before putting on or taking off parts, and before cleaning. Never yank the cord to pull plug from outlet. Grasp the plug and pull to disconnect. 3 IMPORTANT SAFETY INSTRUCTIONS WARNING IMPORTANT SAFETY INSTRUCTIONS Do not use an appliance for other than intended use. The use of attachments not recommended or sold by the appliance manufacturer may case an unsafe condition. Do not install or store the appliance where it will be exposed to the weather or to temperatures below freezing. Make sure an appliance mounted on a tank is securely installed before operating it. Read and observe all the important notices on the appliance. This appliance has a polarized plug (one blade is wider than the other). As a safety feature, this plug will fit in a polarized outlet only one way. If the plug does not fit fully in the outlet, reverse the plug. If it still does not fit, contact a qualified electrician. Never use with an extension cord unless plug can be fully inserted. Do not attempt to defeat this safety feature. This appliance is intended FOR HOUSEHOLD USE ONLY. If an extension cord is necessary, a cord with a proper rating should be used. 4 PARTS Exploded View # Description Item Code 1 HydroFill Pump—Mounting Bracket 750201 2 HydroFill Pump—Back Casing 750202 3 HydroFill Pump—Diaphragm Pump 750203 4 HydroFill Pump—Front Casing 750204 5 HydroFill Pump—Driver Female Receptacle 750205 6 HydroFill Pump—12V Driver 750206 7 HydroFill Pump—Inlet Spacer 750207 8 HydroFill Pump—Inlet Spacer Coupling 750208 9 HydroFill Pump—Silicone Hose 750209 10 HydroFill Pump—Return Pipe Bracket Mounting Screw (1) 750210 11 HydroFill Pump—Acrylic Bracket 750211 12 HydroFill Pump—Return Pipe 750212 5 ATO PUMP SYSTEM HydroFill INTRODUCTION AUQA Gadgets are a new line of fresh & clever tools that aid in your daily chores for your aquarium. Innovative design and simplicity are the core ingredients to save you time and frustration. AUQA Gadgets series include SMART products that encompass maintenance, filtration, feeding, and organization to streamline your husbandry needs without the hassle. Pair your auto top off with the industry's first low voltage air lift pump specifically designed for ATO controllers. The HydroFill ATO Pump System eliminates the guess work, and comes complete with a lift pump, acrylic bracket with return pipe, 10 feet of silicone tubing, 3 hose clamps, and an optional hanging mount. Model #7502 Engineered for high performance, this external positive displacement diaphragm pump, outputs up to 15 gallons per hour and max 5 feet of head. This self-priming pump is equipped with a built-in check valve to safeguard against back siphoning. The HydroFill diaphragm pump is the smart alternative when compared to submersible pumps, diaphragm pumps offer the benefit of safely running dry and are thermally protected against heat build-up. Versatile design offers 3 options for pump placement: hang-on, cabinet mount, or simply place on noise dampening rubber feet. 6 INTRODUCTION 2.75” 1.49” 2.52” 5.59” 6.89” 3.38” Features: Pump: Positive Displacement Diaphragm Pump Self-Priming Built-in Check valve Dry Run Protection Return Kit: Thermally Protected 10 feet of silicone tubing Low Voltage (3) Hose clamps 1/4" barb fitting Acrylic mounting bracket Up to 15 Gallons Per Hour Return pipe Pump mounting bracket SPECS MODEL Dimensions Voltage/ Power Consumption Flow Rate Hose Diameter 7502 3.38”x 2.52”x 5.59” 12V / 10W Up to 15 GPH 1/4” 7 Unpacking and Inspection Please inspect your new HydroFill ATO Pump System and confirm all parts are included before assembly. Immediately report if there is any damage or missing parts to [email protected] ATO PUMP SYSTEM Your HydroFill ATO Pump System purchase should include: HydroFill INTRODUCTION HydroFill ATO PUMP System Acrylic Bracket/ Return Pipe & (1) Mounting Screw 10ft of Silicone Tubing Pump 3— Hose Clamps Inlet Spacer and Inlet Spacer Coupling Mounting Bracket 2-Non Tapered Screws 2-Tapered Wood Screws 8 There are many options for the pump location. It is recommended to keep the total distance from Reservoir to Pump to Return Pipe no more than 10 ft. MOUNTING OPTIONS FOR ATO PUMP Hang-on Aquarium or Sump Use the 2—non tapered screws to attach Mounting Bracket to ATO Pump Hang the pump on the Aquarium/Sump Cabinet Mount Use the 2 tapered wood screws to attach Mounting Bracket & ATO Pump to Cabinet Stand Alone Place on noise dampening rubber feet 9 GETTING STARTED CHOOSING A LOCATION FOR ATO PUMP GETTING STARTED ACRYLIC RETURN BRACKET & RETURN PIPE ASSEMBLY For Rimless Aquariums / Sumps Insert the Return Pipe through the Acrylic Bracket. Secure into place so the return pipe does not move. Place the Return Pipe Bracket Assembly on your rimless aquarium/ sump. NOTE—It is recommended to tighten screw on bracket after you have attached the tubing. See Plumbing ATO Pump. (pg 12-13) 10 Remove return pipe from Acrylic Bracket and hang directly over aquarium frame. Inside Aquarium 11 GETTING STARTED For Framed Aquariums GETTING STARTED PLUMBING ATO PUMP SYSTEM The ATO Pump System comes with 10ft of Silicone Tubing. Pre-measure the following: 1 RETURN PIPE 2 3 ATO PUMP RESERVIOR 1 2 3 1 Plumbing Hose onto Return Pipe Male End of Return Pipe Hose Clamp Silicone Tubing Slip the included Silicone Tubing on the Male end of the Black Return Pipe Secure Tubing to Pipe by tightening hose clamp over the silicone tubing NOTE: Measure the Silicone Tubing from Return Pipe to the ATO Pump and cut to size 12 Plumbing Hose onto ATO Pump 2 RETURN PIPE Silicone Tubing Hose Clamp Hose Clamp Male End Mark “OUT” 3 RESERVIOR ATO PUMP Silicone Tubing Male End Mark “IN” Slip the hose coming from return pipe to Male end of pump pipe mark “OUT” Secure Tubing to Pipe by locking the hose clamp over the silicone tubing. Slip the remaining tubing on the Male end of pump pipe marked “IN” Secure Tubing to Male end of pump by locking the hose clamp over the silicone tubing Plumbing Hose onto Inlet Spacer. * Creates space for unimpeded suction from reservoir. Silicone Tubing Inlet Spacer Coupling Slip the hose coming from return pipe to the inlet spacer coupling Attach the inlet spacer coupling to the inlet spacer Measure hose and cut so inlet spacer reaches the bottom of your reservoir. Inlet Spacer 13 GETTING STARTED PLUMBING ATO PUMP SYSTEM GETTING STARTED Powering up ATO Pump NOTE: Before powering up ATO pump make sure all plumbing connections are secure. Make sure the return pipe is securely attached to the Aquarium/Sump. 1. Plug male prong from 12V Driver to ATO Pump 2. Plug the ATO Pump Driver into the ATO Controller or approved household power outlet 1 2 14 NOTES 15 LIMITED WARRANTY WARRANTY INFORMATION LIMITED 2 YEAR WARRANTY— HydroFill—ATO Pump System This HydroFill ATO PUMP System has a 2 YEAR limited warranty. The HydroFill ATO PUMP System is warranted to the original purchaser against defective material and workmanship for 2 YEAR from the date of original purchase. This warranty is valid only under the following conditions: additions, modifications, or changes made to the product by the purchaser and not by the manufacturer shall void this warranty. Damages brought on by abuse, misapplication, or mishandling also voids this warranty. This warranty is limited to the repair or replacement of the product at the discretion of the manufacturer. This warranty does not cover personal injury, property loss, including livestock or damage (direct, incidental, or consequential) arising out of use of this product. This warranty gives you specific rights and you may also have other rights, which may vary from state to state. The Product Registration Card must be filled out completely and returned within (14) days from the date of purchase. Failure to do so will void this warranty. A proof of purchase from an authorized dealer must be provided when making a warranty claim. For Warranty Claim please contact our Customer Care Department. A RMA # must be issued before sending any product back to Innovative Marine. Products sent back to Innovative Marine without a RMA# will be not be accepted. Service on products will not extend the original warranty period. Email: [email protected] 16 OWNER’S PRODUCT INFORMATION PRODUCT INFORMATION MODEL # HYDROFILL PUMP SERIAL # DATE OF PURCHASE Please keep your receipt in a safe place to ensure you have this information. 17 WWW.INNOVATIVE-MARINE.COM A Division of 18