1
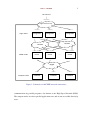
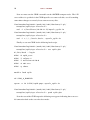
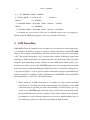
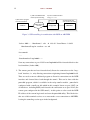
Using RSIP Networking with Parallel Applications
on ARCHER Phase 2
Iain Bethune, EPCC
[email protected]
Version 1.0, April 7, 2015
2
RSIP on ARCHER
1
Introduction
When ARCHER Phase 2 was brought online in November 2014 the main change was an
expansion of the system from 16 to 26 cabinets, bringing the total number of compute
nodes to 4920, with a peak performance of 2.55 PFLOP/s. In addition, a few software
changes were also made that are less widely known. One of these was the introduction of
Realm-Specific Internet Protocol (RSIP) nodes. This white paper explains what RSIP is,
how it has been configured on ARCHER, and shows two case study applications of what
it can be used for.
2
RSIP Overview
2.1
ARCHER Network Architecture
In order to understand the use of RSIP on ARCHER, it is helpful to understand some
basic computer networking terms and concepts, as well as the current networking configuration of ARCHER Phase 2. A brief glossary of relevant terms in the context of TCP/IP
(Transmission Control Protocol/Internet Protocol) networking is included in Appendix
A.
As shown in Figure 1, there are three principal types of nodes, which are connected
via several different networks. For simplicity, we ignore the post-processing/serial nodes,
RDF Data Transfer Nodes (DTN), and non-user-accessible nodes such as I/O servers. The
login nodes, which is where your interactive shell session will run upon login to ARCHER
over SSH, are connected only to the external internet and to the MOM nodes. There are
actually two networks, labelled ‘bond0.2’ and ‘bond0.5’, which are separate VLANs over
the same hardware. These are sometimes referred to as the ‘external’ network in Cray
documentation. The MOM nodes are where PBS batch scripts are executed, and where
parallel jobs are launched from (via the aprun command). Users only have shell access on
the MOM nodes when running an interactive batch job (see [1], section 5.4.8 for details).
The MOM nodes have network connectivity with the compute nodes via the ‘ipogif0’
network (IP over Gemini) i.e. using the high-performance network used for inter-node
3
RSIP on ARCHER
The$Internet$
192.62.216.43$
login.archer.ac.uk$
Login$nodes$
192.62.216.42$
192.62.216.43$
eslogin001$
eslogin002$
10.60.0.51$
10.10.50.1$
10.60.0.52$
192.62.216.49$
…$
eslogin008$
10.10.50.2$
10.60.0.58$
bond0.2$
bond0.5$
MOM$nodes$
10.10.50.8$
10.60.0.72$ 10.10.50.61$
10.60.0.73$ 10.10.50.62$
mom1$
mom2$
10.128.6.14$
10.128.1.200$
10.60.0.76$ 10.10.50.65$
…$
mom5$
10.128.4.206$
$
ipogif0$
10.128.0.2$
Compute$nodes$
nid00001$
10.128.8.4$
…$
nid02035$
10.28.19.166$
…$
nid04991$
Figure 1: Schematic of ARCHER network connectivity
communication by parallel programs, also known as the High Speed Network (HSN).
The compute nodes are where parallel applications run, and are not accessible directly by
users.
4
RSIP on ARCHER
2.2
RSIP Functionality
On ARCHER Phase 2, two compute nodes have been repurposed as RSIP servers. These
servers are connected to the ‘bond0.5’ network, and allow IP traffic to be routed from the
compute nodes through to the login nodes. In this mode of operation the compute nodes
are referred to as RSIP clients. IP socket connections can be made transparently over
RSIP, with the restriction that the connection is made from the RSIP client to the target
IP on the external network, not vice-versa. Once the connection is made data may be
transferred in both directions as normal but the connection must be established between
a client socket on a compute node and server socket on a login node.
Currently the RSIP implementation on ARCHER has not been configured to allow
domain name lookups to resolve to IP addresses that are available via RSIP, so at present
the target compute node must be referred to by IP rather than by domain name. We have
provided a script that will give the IP address for a login node, suitable for use with RSIP.
To access it, load the rsip-tools module, and run my_rsip_ip. For example:
ibethune@eslogin007 :∼> module load rsip -tools
ibethune@eslogin007 :∼> my_rsip_ip
10.60.0.57
The ability to communicate between a running parallel job on the ARCHER compute
nodes and another process on the login nodes enables several different types of application, such as visualisation, and interaction with running jobs (computational steering).
RSIP also enables the use of software that require connection at runtime to a license server
(once RSIP DNS is enabled, see Section 5 for details). Examples of these applications
are shown in the following sections.
Please note: running computationality intensive applications on the login nodes is
discouraged, as these are shared by all users. Such applications may be automatically
terminated. It is however, better than running directly on the MOM nodes without using
RSIP. It may be possible to run the non-parallel part of the application on a local machine
(see Section 4), or if user interaction is not required, on an additional compute node.
These are the preferred modes of execution if they are suitable for a given application.
RSIP on ARCHER
3
5
Using RSIP
3.1
Basic network connectivity using RSIP
To illustrate the use of RSIP, we use a pair of simple client and server programs, available
from [2]. These programs are included in the rsip-tools module and can be useful to
help diagnose connectivity problems. The server is run as follows:
ibethune@eslogin006 :∼> server 1234
This opens a server socket on port 1234 and waits for an incoming connection. The
port number is arbitrary, and can be anything above 1024 that is not currently in use.
Trying to open a socket on a port that is already in use will result in an error. The client
is then run as:
ibethune@eslogin007 :∼> client eslogin006 1234
Note that the client is running on a different login node, and has been instructed to
connect to port 1234 on eslogin006. The client then prompts for a short message, which
is sent to the server. The server prints the message it receives, sends an acknowledgement
back to the client, and both progams exit:
ibethune@eslogin007 :∼> client eslogin006 1234
Please enter the message : Hello , World!
I got your message
ibethune@eslogin006 :∼> server 1234
Here is the message : Hello , World!
At this point, all we have done is communicated between two login nodes. However,
it is easy to run the client on a compute node using a PBS script:
ibethune@eslogin006 :/ work/z01/z01/ibethune > cat test.pbs
#!/ bin/bash --login
#PBS -N rsip_test
#PBS -l select =1
6
RSIP on ARCHER
#PBS -l walltime =0:5:0
#PBS -A z01 -cse
#PBS -q short
cd $PBS_O_WORKDIR
module load rsip -tools
aprun -n 1 client 10.60.0.57 1234 < < < " Message "
ibethune@eslogin006 :/ work/z01/z01/ibethune > qsub test.pbs
2770732. sdb
Here the client will be run on a compute node (since it is launched with aprun), and
will connect back to the server running on login node eslogin007 via RSIP. The IP
address was determined using the my_rsip_ip tool, before starting the server:
ibethune@eslogin007 :∼> my_rsip_ip
10.60.0.57
ibethune@eslogin007 :∼> server 1234
Here is the message : Message
3.2
Interactive Visualisation with ParaView
ParaView [3][4], is an open-source program for data analysis and visualisation developed
by Kitware and Los Alamos National Laboratory. At time of writing, ParaView version
4.1.0 is installed on ARCHER and is available to all users as a module. ParaView is designed to take advantage of distributed memory architectures to perform data processing
and rendering in parallel (using MPI), and it provides a GUI which can be coupled to the
parallel rendering server over TCP/IP, as well as a Python scripting interface for batch visualisation tasks. Several of the connectivity options between the GUI and the rendering
server were discussed in [5], and here we show how the ‘reverse-connection’ method can
RSIP on ARCHER
7
be employed on ARCHER using RSIP.
To launch the ParaView GUI on a login node do:
ibethune@eslogin003 :/ work/z01/z01/ibethune >
module load paraview
ibethune@eslogin003 :/ work/z01/z01/ibethune > paraview &
Once the GUI has started, prepare to receive a connection from the ParaView server
by choosing “Connect...” from the “File” menu. Click “Add Server”, fill out the details
as shown in Figure 2 and click “Configure”. Next, select “Manual” as the startup type
and click “Save”. Finally, select the server you have just configured and click “Connect”.
ParaView will now sit waiting for the server to connect. To start the server, use a batch
script like the following:
Figure 2: ParaView GUI connection settings
8
RSIP on ARCHER
ibethune@eslogin003 :/ work/z01/z01/ibethune > my_rsip_ip
10.60.0.53
ibethune@eslogin003 :/ work/z01/z01/ibethune > cat paraview .pbs
#!/ bin/bash --login
#PBS -N pv_test
#PBS -l select =1
#PBS -l walltime =0:20:0
#PBS -A z01 -cse
#PBS -q short
cd $PBS_O_WORKDIR
aprun -n 24 / work/y07/y07/ paraview /Offscreen -ParaView -4.1/
bin/ pvserver --mpi --use -offscreen - rendering
-- reverse - connection --server -port =11111
--client -host =10.60.0.53
ibethune@eslogin003 :/ work/z01/z01/ibethune >
qsub paraview .pbs
The client-host option should be the RSIP address of the login node where you
launched the paraview GUI. As shown, this can be obtained by the my_rsip_ip tool.
Once the batch job starts up, the parallel rendering server will connect back to the GUI
over RSIP and subsequent visualisation tasks commanded by the GUI will execute in
parallel on ARCHER.
3.3
Path Integral Molecular Dynamics with i-PI and CP2K
i-PI [6][7] is a Python interface for running Path Integral Molecular Dynamics calculations. The program consists of a Python server which computes the Path Integral nuclear
dynamics and is interfaced to another program to provide forces and energies for each
RSIP on ARCHER
9
configuration of particles. Typically, the external program would be an electronic structure program such as CP2K, Quantum Espresso or FHI-aims, which are computationally
expensive and require execution on a parallel HPC system. The connection between the
server and client (parallel) program is via a TCP/IP socket connection initiated from the
client back to the Python server, and thus can take advantage of RSIP on ARCHER. We
illustrate how this can be done using the CP2K example calculation included with the i-PI
distribution.
Firstly, the i-PI code and examples must be obtained, and the RSIP IP address of the
current login node obtained:
ibethune@eslogin001 :∼> cd / work/z01/z01/ ibethune
ibethune@eslogin001 :/ work/z01/z01/ibethune >
git clone https :// github .com/i-pi/i-pi.git
...
ibethune@eslogin001 :/ work/z01/z01/ibethune >
cd i-pi/ examples /cp2k/npt - classical
ibethune@eslogin001 :/ work/z01/z01/ ibethune /i-pi/
examples /cp2k/npt -classical > my_rsip_ip
10.60.0.56
We edit the i-PI input file to open a server socket on the RSIP interface, and start the
server:
ibethune@eslogin001 :/ work/z01/z01/ ibethune /i-pi/
examples /cp2k/npt -classical >
sed -i s/ localhost /10.60.0.56/ nptcls_ipi .xml
ibethune@eslogin001 :/ work/z01/z01/ ibethune /i-pi/
examples /cp2k/npt -classical >
../../../i-pi nptcls_ipi .xml
...
Created inet socket with address 10.60.0.56 and port number 22340
@SOCKET : Starting the polling thread main loop.
10
RSIP on ARCHER
Now we must start the CP2K executable on the ARCHER compute nodes. The i-PI
server address is specified via the CP2K input file so we must edit this, as well as making
some minor changes to correctly locate some necessary files:
ibethune@eslogin001 :/ work/z01/z01/ ibethune /i-pi/
examples /cp2k/npt -classical >
sed -i s/ localhost /10.60.0.56/ nptcls_cp2k .in
ibethune@eslogin001 :/ work/z01/z01/ ibethune /i-pi/
examples /cp2k/npt -classical >
sed -i s ,\.\./ basis ,basis , nptcls_cp2k .in
Finally we can run CP2K via the following batch script:
ibethune@eslogin001 :/ work/z01/z01/ ibethune /i-pi/
examples /cp2k/npt -classical > cat cp2k.pbs
#!/ bin/bash --login
#PBS -N cp2k_test
#PBS -l select =1
#PBS -l walltime =0:20:0
#PBS -A z01 -cse
#PBS -q short
module load cp2k
cd $PBS_O_WORKDIR
aprun -n 24 $CP2K/cp2k.popt nptcls_cp2k .in
ibethune@eslogin001 :/ work/z01/z01/ ibethune /i-pi/
examples /cp2k/npt -classical > qsub cp2k.pbs
Near the start of the CP2K output the following text appears indicating that a successful connection back to the server has been made:
RSIP on ARCHER
11
@ i-PI DRIVER BEING LOADED
@ INPUT DATA : 10.60.0.56
READS
22340 F
12 STATUS
@ DRIVER MODE : Message from server : STATUS
READS
12 POSDATA
@ DRIVER MODE : Message from server : POSDATA
In addition, the server process will write to standard output as the job progresses.
Finally, when the CP2K job completes, the server will shut itself down.
4
SSH Tunnelling
While RSIP allows the compute nodes to connect to server processes on the login nodes,
it is sometimes desirable to connect to a process running somewhere outwith ARCHER
entirely. For example, with ParaView, the GUI could be run on the user’s local laptop
or PC. This avoids the interface ‘lag’ associated with a remote X-Windows application
running over SSH, and the GUI can benefit from native 3D acceleration. This is possible
using the ‘port forwarding’ feature available in most SSH clients which enables connections received by a port on the ARCHER login nodes to be transparently forwarded
back to the user’s workstation through the SSH connection. A schematic of this process
is presented in Figure 3, and we present detailed instructions using the OpenSSH client,
which is typically used on Mac or Linux. Windows users with PuTTY refer to the PuTTY
documentation [8], section 4.25 “The Tunnels panel”.
1. When setting up an SSH connection, it is possible to set up a tunnel such that
connections to a specified port on the remote machine are forwarded over the SSH
connection back to specified port on the local machine. To tunnel from a port (e.g.
12345) on an ARCHER login node back to port 23456 on the local machine using
the OpenSSH client, the syntax is as follows. Note in this example we use different
port numbers to clearly illustrate which ports are used on which machine, but it is
also perfectly possible to use the same port number in both locations.
12
RSIP on ARCHER
1)$SSH$onto$ARCHER$with$
remote$port$forwarding$
2)$Listen$on$RSIP$Interface$
using$portfwd
3)$Start$Server$program$
on$local$workstaPon
Local$PC$
10.60.0.52$
login.archer$
.ac.uk$
eslogin002$
4)$Start$parallel$job$
and$connect$over$RSIP
nid02035$
Figure 3: SSH tunnelling in combination with RSIP on ARCHER
Iains -MBP:∼ ibethune$ ssh -R 12345: localhost :23456
ibethune@login . archer .ac.uk
...
Password :
...
ibethune@eslogin006 :∼>
Now any connections to port 12345 on eslogin006 will be forwarded back to the
local machine (Iains-MBP).
2. The remote port that we have forwarded only listens for connections on the ‘loopback’ interface, i.e. only allowing connections originating from eslogin006 itself.
Thus we need to run an additional program to listen for connections on the RSIP
interface and forward these back through the tunnel. This can be done with the
portfwd program, which is available in the rsip-tools module. portfwd is
configured with a small text file which in this example listens on port 34567 (on
all interfaces, including RSIP) and forwards the connection on to port 12345 (the
remote port configured in the SSH tunnel). At this point we also record the RSIP
IP address of the current login node and start the portfwd utility. This blocks further use of this terminal session, so we must make a new connection to ARCHER,
leaving the tunneling session open in the background.
RSIP on ARCHER
13
ibethune@eslogin006 :∼> module load rsip -tools
ibethune@eslogin006 :∼> my_rsip_ip
10.60.0.56
ibethune@eslogin006 :∼> cat conf.txt
tcp { 34567 { = > 127.0.0.1:12345 } }
ibethune@eslogin006 :∼> portfwd -c conf.txt -g
3. Now we can start the server process on the local machine. We will listen for connections on local port 23456, which in effect is the remote port 34567 on eslogin006,
forwarded back down the SSH tunnel.
Iains -MBP:∼ ibethune$ ./ server 23456
4. Finally, in a new SSH session (no tunneling configuration needed here), we can
start a job on the ARCHER compute nodes, which will connect back to our local
server through RSIP and the SSH tunnel:
ibethune@eslogin003 :∼> cat test.pbs
#!/ bin/bash --login
#PBS -N rsip_test
#PBS -l select =1
#PBS -l walltime =0:5:0
#PBS -A z01 -cse
#PBS -q short
module load rsip -tools
cd $PBS_O_WORKDIR
aprun -n 1 client 10.60.0.56 34567 < < < " Message from ARCHER "
Once the parallel job runs, the server running on the local workstation receives the
message successfully and exits:
14
RSIP on ARCHER
Iains -MBP:∼ ibethune$ ./ server 23456
Here is the message : Message from ARCHER
Iains -MBP:∼ ibethune$
5. When tunnelling is no longer needed, the portfwd tool can be killed with Ctrl-C,
followed by exit to log out of ARCHER as normal. The SSH tunnel is automatically closed when you log out of the SSH session where the tunnel was configured.
5
The Future
Later in 2015 (dates to be confirmed), a configuration change is planned which will allow
compute nodes to resolve the addresses of login nodes over RSIP using DNS. This will
avoid the need for using the my_rsip_ip tool, instead the eslogin00x names could be
used directly. This change will also enable additional use cases which rely on DNS notably, applications which use license servers to determine at runtime if the application
can be run. These include both the Cray and Intel compilers, and so applications which
use on-the-fly compilation for code generation/auto-tuning will now be able to use these
as well as the GNU compilers, which work at present.
We would be interested to hear of other applications which make use of RSIP on
ARCHER. Please notify the author by email ([email protected]) with questions, suggestions for improvement, and further case study examples.
RSIP on ARCHER
A
15
Glossary of networking terminology
• Network: A network consists of a set of nodes, or networked devices, which are
connected together via some communication medium to allow the nodes to exchange data. Typical communication media would be copper cabling (e.g. Ethernet), but in general networks can exist over fibre optics, or wireless (WiFi).
• Node: A device attached to a network, typically a single computer. Nodes may be
attached to multiple different networks via separate interfaces.
• Interface: The point by which a node is attached to a network. Each interface on
a node has a unique name. An interface might be a physical Network card with
a cable socket, but it is also possible that multiple virtual interfaces can share the
same physical connection.
• VLAN: A Virtual Local Area Network, where a physical network is partitioned
such that communication is only possible between specific subsets of nodes in
the network. Each node in the (physical) network may have an interface onto the
VLAN.
• IP Address: In a TCP/IP network, each interface is identified by a unique address.
Using the IP version 4 (IPv4) notation, these are a sequence of 4 integers ranging
from 0 to 255 e.g. 193.62.216.49. Since a node may have multiple interfaces, a
node can have multiple IP addresses, each on a different network.
• Domain Name: A shorthand to refer to a node in a network, which is translated
into an IP address by the Domain Name System (DNS). Referring to nodes by domain name is preferred since it avoids having to remember numeric IP address, and
allows flexibility in that the IP address of a node on a network may be changed
while retaining the same domain name. Domain names can be fully qualified e.g.
login.archer.ac.uk, which allows an IP address to be determined from anywhere on the public internet, or simply a name referring to an IP address on the
local network e.g. eslogin001.
16
RSIP on ARCHER
• Socket: TCP/IP allows not only for communications to be addressed to a particular
node (by domain name or IP address), but to a particular software process running
on that node. The socket (or port) is a software abstraction of an end-point for
communication. In TCP/IP all communication takes place between a pair of sockets which have made a socket connection. In order to make a socket connection,
firstly a server socket must be created, which has a unique port number. Port numbers may range between 0 and 65535, with the restriction that ports <1025 may
only be used by a privileged (root) user, and only a single socket can ‘bind’ to a
particular port number at one time. Once a server socket is created, it waits or listens for incoming connection requests. A client socket represents the other end of a
connection. When a program creates a client socket, it specifies a particular server
socket (IP address and port number), and if that socket exists on the network and
is accepting connections, a socket connection is made between the pair. Once a
connection exists, bi-directional communication is possible, irrespective of which
socket is the client and server.
References
[1] ARCHER User Guide. http://www.archer.ac.uk/documentation/user-guide/.
[2] Robert Ingalls. Sockets Tutorial.
http://www.cs.rpi.edu/∼moorthy/Courses/os98/
Pgms/socket.html.
[3] Utkarsh Ayachit. The ParaView Guide: A Parallel Visualization Application. 2015.
ISBN 978-1930934306.
[4] Paraview. http://www.paraview.org.
[5] Iain Bethune. Parallel Visualisation on HPCx. http://www.hpcx.ac.uk/research/hpc/
technical reports/HPCxTR0803.pdf, 2008.
[6] Michele Ceriotti, Joshua More, and David E. Manolopoulos. i-PI: A Python interface for ab initio path integral molecular dynamics simulations.
Computer
17
RSIP on ARCHER
Physics Communications, 185(3):1019 – 1026, 2014.
ISSN 0010-4655.
URL
http://dx.doi.org/10.1016/j.cpc.2013.10.027.
[7] A Python wrapper for (ab initio) (path integrals) molecular dynamics. https://github.
com/i-pi/i-pi.
[8] PuTTY User Manual. http://the.earth.li/∼sgtatham/putty/latest/htmldoc/.