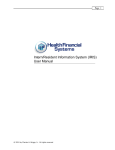
1
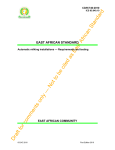
1.
WELCOME
Thank you for using VaDia Viewer; BioControl’s PC-program for analyzing and reporting the
data that is logged with VaDia.
BioControl (www.biocontrol.no) provides technology for biology with focus on hi-tech
products for the livestock industry. We already do this for more than 20 years now and have
gained great competence and skills in this specialized area.
The name VaDia is short for ‘Vacuum Diagnostics’ and illustrates the value of this hi-tech
instrument for technicians, advisors and other professionals in the dairy industry that want to
understand and manage udder health and milk quality problems.
VaDia and VaDia Viewer have been developed by BioControl in close cooperation with the
International Dairy Federation (www.fil-idf.org) and Tine, the Norwegian dairy farmers
cooperative (www.tine.no).
We have designed VaDia and VaDIa Viewer to be the precision instrument that enables you
to get better understanding of the basic milking, give better milking advice and achieve better
udder health and milk quality results.
Manual to start-up and use VaDia hardware
This manual explains how to work with the PC-program VaDia Viewer which is designed for
viewing, analyzing and report making of the data that is logged with VaDia.
Please refer to the VaDia Startup Guide that is supplied with your VaDia for instructions how
to work with VaDia hardware.
VaDia Viewer User Manual v1.0 draft
1/14
www.biocontrol.no/vadia
Contents
1. WELCOME........................................................................................................................ 1
2. PRODUCT DESCRIPTION ............................................................................................... 3
3. INSTALL VADIA VIEWER................................................................................................. 3
4. WORK WITH VADIA VIEWER .......................................................................................... 4
4.1.
4.2.
4.3.
4.4.
4.5.
4.6.
4.7.
4.8.
5.
REGISTRATION ............................................................................................................. 11
5.1.
6.
Select language ........................................................................................................................6
Setup VaDia Viewer .................................................................................................................6
Make a new assignment ...........................................................................................................6
Find an existing assignment .....................................................................................................7
Display data ..............................................................................................................................7
Analyze data .............................................................................................................................8
Make report.............................................................................................................................10
Load VaDia data .....................................................................................................................11
Activate VaDia Viewer ............................................................................................................12
VADIA VIEWER CALCULATION METHODS AND ALGORITHMS ................................ 13
6.1.
6.1.1.
6.1.2.
6.1.3.
Assesment of VaDia vacuum records from individual animal milkings ..................................13
General ...................................................................................................................................13
Determining boundaries .........................................................................................................13
Results ....................................................................................................................................14
! This manual is for VaDia Viewer version 1.0.0 Beta2.
VaDia Viewer User Manual v1.0 draft
2/14
www.biocontrol.no/vadia
2.
PRODUCT DESCRIPTION
VaDia logs the vacuum during milking at four points in the milking cluster. VaDia Viewer is
the PC program for viewing the logged data, analyzing it and making summary reports.
To understand and work with VaDia Viewer, some basic knowledge of VaDia is necessary.
Therefore first read the manual ‘VaDia Startup Guide’ that is supplied with the VaDia and is
also available on the VaDia Viewer CD (can also be downloaded from our website Section
Community/VaDia/Documentation).
http://www.biocontrol.no/index.php?root=comm&branch=vadia&leaf=manuals
3.
INSTALL VADIA VIEWER
Look for the program ‘InstallVaDiaViewer.exe’ on the CD that has been supplied with your
VaDia or download the latest version from our website (Section Community/VaDia/Software):
http://www.biocontrol.no/index.php?root=comm&branch=vadia&leaf=soft
Run it, Windows will ask if this program can make changes to this computer, click ‘Yes’. Then
the following screens will show.
Click ‘Start’, progress bar will show and various programs and components are installed.
When the progress bar reaches 100%, following wil show.
Click ‘Yes’. A command-box may show on your screen for short period. When that is closed,
the drivers are installed. Then the following will show.
VaDia Viewer User Manual v1.0 draft
3/14
www.biocontrol.no/vadia
VaDia Viewer is based on Microsoft Access. This requires that the license free MS Access
Runtime must be installed on your computer. Don’t change any of the default setting, just
click as mentioned in this manual. Click ‘Yes’ in above screen.
After that following will show:
Select ‘Add or remove features’, click ‘Continue’.Then below screen will show, click
‘Continue’
and
Click ‘Exit’ in the last screen. VaDia Viewer is now installed. A shortcut ot VaDia Viewer is
also on your desktop.
4.
WORK WITH VADIA VIEWER
VaDia Viewer offers three functionalities:
• Display data
• Analyze data
• Report making
This chapter is based on VaDia vacuum data already being loaded on your PC (vd5-file).
See the manual ‘VaDia Startup Guide’ to load this data from VaDia onto your computer.
VaDia Viewer User Manual v1.0 draft
4/14
www.biocontrol.no/vadia
Start VaDia Viewer by double clicking the VaDia Viewer icon on your desktop.
In many cases the following Access Security Notice will show.
Ignore this, click ‘Open’
The first time that you run VaDia Viewer the activation screens will appear until you have
activated VaDia Viewer. Refer to chapter 5 for activation.
When activation is complete, these activation screens will not show anymore.
The VaDia startup screen is as follows:
3
4
5
6
7
1
2
VaDia Viewer User Manual v1.0 draft
5/14
www.biocontrol.no/vadia
4.1. Select language
Select language with (1). Default language is English. When you change the language the
following screen will show:
Click ‘Yes’. The next screens will now be in the selected language (current screen is not
refreshed).
4.2. Setup VaDia Viewer
Click ‘Setup’ (2), following screen will show:
The information entered in ‘CompanyName’ etc. will be printed on the reports that are made.
The field ‘ID’ is automatically incremented. This allows more than 1 person working with
VaDia Viewer on the same PC.
The field ‘IndividualGraphSpanMinutes’ is set to 10. Leave it like that.
The field ‘GraphGenerateWaitSeconds’ is set to 5. Leave it like that.
4.3. Make a new assignment
VaDia Viewer works with assignments, i.e. a ‘diagnostics job’, e.g. farmer Jones, date
181011, morning milking. All the recorded data, analysis and reports relate back to this same
raw data and assignment.
Click ‘Assignment’ (3) to make an Assignment, following screen will show.
Enter Customer and Consultant details. Then click ‘New assignment’, screen below will
show. Enter MissionID (AssignmentID) and ‘OK’.
VaDia Viewer User Manual v1.0 draft
6/14
www.biocontrol.no/vadia
Now click ‘New series’, select MUV (Milking Unit Vacuum) from menu (Other not available at
this moment). Following will show:
Click ‘OK’. A new Assignment now has been created (screen below), notice that this
Assignment is also shown in the left column.
In the left area you can later select stored Assignments for further work or processing.
Now click ‘Find vac. file’. Select the vd5-file that you have created and stored onto your
computer (see VaDia Startup Guide how to do this).
When all data for this assignment has been entered, the screen will look like below. Click
‘Save and close’, VaDia Viewer will now jump back to the startup screen again.
4.4. Find an existing assignment
In the left column of VaDia Viewer you can select stored Assignments for further work or
processing:
4.5. Display data
After selecting the assignment (4.4) you can display the linked data by clicking (4).
VaDia Viewer User Manual v1.0 draft
7/14
www.biocontrol.no/vadia
A graph like below will show the individual milkings (picture of course depends on stored
vacuum data). In this picture 7 cow milkings are displayed.
Most buttons/functions will explain itself, quick summary:
X: time, Y: vacuum.
Zoom : click ‘zoom’, put the cursor on a position and drag the mouse point while holding the
left mouse key. A dotted line will occur: this area will be zoomed in. You can zoom as deep
as you want.
When zooming an interference pattern may be displayed like below. This is caused by the
interference of the computer’s display resolution and the VaDia Viewer program. The raw
data is not like this. If you zoom in deeper this interference will disappear.
Disturbing channels can be disabled, such as pulsation (here Chan 1). The right picture
shows better the Short Milk Tube (Chan 2) and both Mouth Piece Chambers (Chan 3 and 4).
Pan: drag the display window to left or right.
Note how detailed you can view the pulsation characteristics or liner slips:
x2 and x5: zoom-out with factor 2 or factor 5
FullXY and FullY will be clear.
Copy: copies the graph to your clipboard for use in other applications (e.g. Word, for making
own reports).
Close: jumps to startup screen.
4.6. Analyze data
After selecting the assignment (4.4) you can analyze the data by clicking (5) (MUV is Milking
Unit Vacuum).
Following will show (picture of course depends on stored vacuum data):
VaDia Viewer User Manual v1.0 draft
8/14
www.biocontrol.no/vadia
First: define the channels (circle above). SMT = Short Milk Tube, SPT = Short Pulsation
Tube, MPC = Mouth Piece Chamber.
Then drag the mouse pointer over the milking that you want to analyze. One cow milking
only! A small dotted line will occur where the mouse has dragged.
Be patient when you release the mouse, there is a few seconds of silence before VaDia
Viewer indicates that it is processing!
After a few seconds a graph like below will show:
Analysis of the individual cow milkings is done by clicking ‘Split’, which splits the milking into
four milking phases. After a few seconds a screen like below will show, often also with
message ‘Automatic boundaries determination not complete’.
These boundaries are automatically calculated according to the methods and algorithms as
explained in chapter 6. This chapter also explains definition of the four milking phases.
If necessary (when above message shows) the boundaries can be moved manually by
selecting with the mouse and then moving to the right position.
VaDia Viewer User Manual v1.0 draft
9/14
www.biocontrol.no/vadia
Click ‘OK’ to close the message, move the boundaries to the right position and enter the cow
nr. in the field ‘Animal ID’.
Then click ‘Assess’. Be patient! Here also no feedback that it is crunching. After a few
seconds the following will show:
Note that when the borders are not set correctly the assesment is not done.
The definition and explanation of all calculated phases and data can be found in chapter 6.
Click ‘Save and close’ to store this graph with results, the stored ‘summary data’ is displayed
in the line under the graph (circle in picture below), now the other milkings can be analyzed.
When the relevant milkings have been analyzed, click ‘close’ to go back to the startup
screen.
4.7. Make report
When the analysis has been done (4.6), a report of the selected assignment (4.4) can be
made by clicking ‘Report’ (6).
Two reports can be made:
Main report: lists all ‘summary data’.
Individual milkings report: lists the details of the individual milkings.
VaDia Viewer User Manual v1.0 draft
10/14
www.biocontrol.no/vadia
The reports are generated as pdf-file. Below examples are self-explanatory.
The calculation methods and algorithms of the milking phases and listed data can be found
in chapter 6 of this manual.
Main report
Individual milkings report
4.8. Load VaDia data
Click ‘VaDia Manager’ (7) to start VaDia Manager. How to work with VaDia Manager is
explained in the VaDia Startup Guide that is supplied with the VaDia.
5.
!
REGISTRATION
VaDia Viewer is protected by a license key. You can work with VaDia Viewer within a 30 day
trial period after installing VaDia Viewer on your computer. To activate VaDia Viewer your PC
has to be online.
Part of the registration procedure is that your contact details need to be entered. This is
necessary for BioControl to inform you about important updates and relevant upgrades.
BioControl will only use this email address to send information about VaDia and VaDia
Viewer.
Your personal license key and password are printed on the VaDia Viewer CD. This is a
personal license for runtime use of VaDia Viewer on one computer only. Make sure you store
this CD somewhere safe so that you can find it again, also make a copy of this license data
and store it in a safe place. You need this license key and password again when re-installing
VaDia Viewer onto another PC (e.g. in case you get a new PC).
VaDia Viewer User Manual v1.0 draft
11/14
www.biocontrol.no/vadia
5.1. Activate VaDia Viewer
The first time that you run VaDia Viewer the following screens will show-up until you have
activated VaDia Viewer:
!
Activation can only be done when the PC is online, so only do this when you are online.
VaDia Viewer can be used in a 30 days ‘trial period’, so you can select this option if you want
to work with VaDia Viewer until you activate and register.
Make sure you activate within 30 days, otherwise VaDia Viewer will stop working!
If you click ‘Activate VaDia Viewer’, the following screens will show. Enter the requested
data.
The last screen will show when registration was successful. Click ‘Continue’, VaDia Viewer is
now activated and can be used.
VaDia Viewer User Manual v1.0 draft
12/14
www.biocontrol.no/vadia
6.
VADIA VIEWER CALCULATION METHODS AND ALGORITHMS
This content may change because of new theories and calculations. The latest version of this
document can be found on our website. Please click:
http://www.biocontrol.no/index.php?root=comm&branch=vadia&leaf=manuals
6.1. Assesment of VaDia vacuum records from individual animal milkings
6.1.1. General
To analyse the vacuum in the milking unit, individual milkings have to be split into
various phases. For the purpose of this program four phases are used, see figure 1.
The peak-flow period includes the period with gradually decreasing milk flow (if
present), contrary to some other systems for analysing milkings.
In VaDia Viewer and analysing software there are possibilities for manual selection
of the boundaries, and there is an automatic function to “split” the milking into
phases. The automatic function must be regarded to be of assistance for the manual
adjustment. Results from the automatic splitting must always be checked before
assessing vacuum conditions.
Let-down (LD)
Start
milking
Peak-flow (PF)
Start peak flow
period
Overmilking (OM)
Start overmilking
Take-off (TO)
Start take-off
End
milking
Figure 1. Phases and boundaries delimiting the phases.
6.1.2. Determining boundaries
• Start Milking
This is the moment when the teatcup is attached to the teat.
Automatic detection
The moment when SMT vacuum rises above 25 kPa.
• Start peak flow period
This is the end of the period when the teatcup is establishing a stationary position
on the teat, and milk flow is established. It is also the start of a period with
relatively stable conditions and a relatively stable milk flow.
Automatic detection
Is based on the common mechanism that vacuum level declines when milk flow
increase. The average SMT vacuum in 10 seconds periods after attachment is
monitored. When the average vacuum from one period to the next declines less
than 0,15 kPa, the midpoint of the first (of the two) periods is indicated as start of
peak flow period. The first 20 seconds period is excluded from the calculations,
so there will be a minimum value of 25 seconds.
• Start overmilking
Overmilking of the relevant teat can be detected by means of MPC vacuum.
When the teat gets empty, there will ordinarily be a shift in the MPC vacuum
level, or a marked change in the MPC vacuum fluctuations, or both.
Automatic detection
is based on an increase in MPC vacuum variation. When the current variation is
equal to or above 1,3 times the preceding running average variation, start of
overmilking is denoted. Current and running average variation is calculated every
two seconds. Variation is the difference between maximum and minimum per two
seconds. New running average is 0,7 times the old running average plus 0,3
times the current variation.
VaDia Viewer User Manual v1.0 draft
13/14
www.biocontrol.no/vadia
• Start take-off
is the moment when teatcup detachment is initiated. It can be seen on the SMT
vacuum as the start of a rapid decline towards zero, or it may be a shift in
vacuum in some types of equipment.
Automatic detection
The program loops through all datapoints after start peak flow period and finds
maximum vacuum. Then the program loops through backwards from the end of
milking until the SMT vacuum is less than 5 kPa below maximum vacuum. This
datapoint denotes the start of take-off.
• End of milking
Is when the SMT vacuum falls below a set value.
Automatic detection
The program loops through all datapoints after start of peak flow period. The first
datapoint with SMT vacuum below 5 kPa denotes the End milking.
6.1.3. Results
• Machine on Time
Time in minutes and seconds from Start milking till End milking
• Overmilking
Time in minutes and seconds in the Overmilking period
• SMT vacuum
Average vacuum in kPa of all datapoints of the short milk tube vacuum channel,
given for various phases of milking:
o Total – from Start milking till End milking
o PFperiod – in the Peak-Flow period
o Overmilking – in the Overmilking period
• MPC vacuum in Peak-Flow period
Average vacuum in kPa of all datapoints of the mouthpiece chamber in the PeakFlow period.
• Cyclic vacuum fluctuations
This value is assessed for ten pulsation cycles 60 seconds after the start of the
Peak-Flow period. Average, maximum and minimum vacuum in each of the ten
cycles are calculated. Finally the averages of the ten individual values are
formed. Results are presented as fluctuations Above (maximum) or Below
(minimum) the average vacuum.
• Irregular vacuum fluctuations
An irregular vacuum fluctuation is a rapid drop of a certain magnitude in SMT
vacuum. A vacuum change of 56 kPa/second and a magnitude of 14 kPa is set
as limits to qualify for an event of Irregular vacuum fluctuations. Results are given
in events of Irregular fluctuations per milking.
References:
[email protected]
www.biocontrol.no/vadia
VaDia Viewer User Manual v1.0 draft
14/14
www.biocontrol.no/vadia