1
MOOC for Microcontroller
Design Course
A Design Project Report
Presented to the Engineering Division of the Graduate School
Of Cornell University
In Partial Fulfillment of the Requirements for the Degree of
Master of Engineering (Electrical)
by
Mingming Dai, Junhao Dong, Yun Hao, Yuanyuan Gong, Yize Li
Project Advisor: Dr.Bruce Land
Degree Date: January 2015
Contents Abstract .......................................................................................................................................................... 1 Executive Summary .................................................................................................................................. 2 1. Introduction ............................................................................................................................................ 3 1.1 Background and motivation ..................................................................................................... 3 1.2 The main content and goal of the project ........................................................................... 4 1.3 The structure of the report ....................................................................................................... 6 2. System Design ........................................................................................................................................ 7 2.1 Basic design of using what kind of technology ................................................................. 7 2.1.1 Why PHP+MySQL ................................................................................................................. 7 2.1.2 Why Wordpress ..................................................................................................................... 7 2.2 High-‐level Design .......................................................................................................................... 7 2.3 The Design Decisions ................................................................................................................... 9 2.3.1 The design consideration .................................................................................................. 9 2.3.2 Security Concerns ............................................................................................................... 15 2.4 Database Design .......................................................................................................................... 16 2.4.1 Database overall structure ............................................................................................. 16 2.4.2 Detail description of database ...................................................................................... 17 2.5 The data flow of System ........................................................................................................... 21 2.5.1 The overall data flow of system ................................................................................... 21 2.5.2 The detail description of the data flow of system ................................................ 22 2.6 Theme Design ............................................................................................................................... 29 3. Course Content Design ..................................................................................................................... 32 3.1 Lab Design ...................................................................................................................................... 32 3.1.1 Design Goals .......................................................................................................................... 32 3.1.2 Design Process ..................................................................................................................... 32 3.1.3 Design Content ..................................................................................................................... 35 3.2 Making Mini-‐lectures ................................................................................................................. 42 4. Test and Debug .................................................................................................................................... 44 4.1 Method ............................................................................................................................................. 44 4.1.1 Static test ................................................................................................................................ 44 4.1.2 Dynamic test ......................................................................................................................... 44 4.2 Details of test each stage .......................................................................................................... 44 4.3 The result of test .......................................................................................................................... 58 5. Conclusion ............................................................................................................................................. 61 6. Reference ................................................................................................................................................ 62 Appendix A: User Manual ..................................................................................................................... 63 Appendix B: PHP codes ......................................................................................................................... 64 Appendix C: The SQL we use in the system .................................................................................. 64 Abstract Master of Electrical Engineering Program
Cornell University
Design Project Report
Project Title:MOOC for microcontroller design course
Author:Mingming Dai, Junhao Dong, Yun Hao, Yuanyuan Gong, Yize Li
Abstract:
The design project is to develop a strategy for MOOC lab delivery and implement it for a
online course which is like a web version of ECE 4760. MOOC means massive open
online courses, and ECE 4760 is a lab-based microcontroller design course in Cornell
University which uses hardware and software techniques to teach students a variety of
design skills, culminating in a large design project. In order to let massive users take
lectures and do labs and then grade others' works online, we hook up 123d.circuits.io, a
free online platform for developing and debugging electronic projects, to the content
management and homework grading system made by ourselves. The content management
is realized with PHP, WordPress and Mysql, and the grading component is based on
web-based peer review grading method. Our goal is to create a safe service with high
scalability to let people around the world learn the basic knowledge of microcontroller
and put theories of it into practice without buying microcontrollers and accessory parts
and get feedbacks on their way of learning.
Report approved by
Project Advisor:___________________________Date:________________________
1 Executive Summary The MOOC is intended for covering a major subset of the basic of designing with circuits
and microcontrollers and let users or students to learn and carry out labs online in one
semester. To achieve the goal video lectures, lab instructions, and course policy are made
to help users of the MOOC learn. There are four labs in this course, lab1 is for teaching
users of the MOOC how to use the MOOC and the online simulation platform
123d.circuits.io as well as the knowledge about Arduino, LEDs, digital I/O, pushbuttons,
etc. Lab2 is intended for teaching people ADC, PWM and how to use relative functions
of them on the simulation platform. Lab3 are made to give instructions on 7 segments.
Lab4 introduces how to build a pointer using servo and functions about this topic on
123d.circuits.io, the simulation platform our MOOC relies on. There are grading criteria
for each lab to measure how well people learn and do their own lab. All the labs and
grading criteria are introduced with more details in part 3 of the report.
To host all the material or links to materials needed for the course and to carry out
functions of the MOOC like authentication, lab assignments and submissions, regrade
requests, a data driven server side system is needed to be established to take up these
tasks. Now we have already make the server side system for the MOOC based on PHP
and WordPress along with Mysql run on the server of School of Electrical and Computer
Engineering. The database design of the system is now completed for user data storage
and retrieval. Basic Functions of the MOOC to needed like authentication, homework or
lab assignment are all ready. Web-based peer review is an advanced function completed
for the project to allow users of the MOOC to grade others’ works and make comments
on them to improve the comprehend of the knowledge of the course for both the graders
and the people whose work is graded by others. Though all these functions work fine,
2 there are some issues should be addressed. Many people use MOOC because its
availability and flexibility they can get access to it whenever and wherever with a
connection to the Internet, It seems not perfect to keep the exact same course schedule for
all of them just as what we did in the design, because we will loss users by doing so , thus
every one having the same schedule but different offset should be a reasonable solution,
but under this case there would be cases that the first user who accomplish a lab may
need to wait several weeks or even longer for other users to finish the same lab and then
grade her work.
1. Introduction 1.1 Background and motivation MOOC represents massive open online courses, and there are already a lot of MOOCs
out there on coursera or edX for different subjects and different people, mostly they
provide video lectures of the course, make homework assignments and sometimes have
some quiz but mostly with only multiple choice questions. Because of the lack of the
ability to provide experience of doing experiments in labs along with lectures, it is worth
noting that there are few online courses that traditionally require students to spend much
time in laboratory and put theories into practice. For example, a course like ECE 4760,
Designing with Microcontrollers, could hardly be as sufficient and efficient as usual
without labs. Though, putting hardware experiments online is challenging , there are
already some effort made about it, 123d.circuits.io is now leading in this aspect and
providing free service to open designer, which makes it a perfect complement to a
MOOC for courses like Designing with Microcontrollers. Hence in our MOOC, there
are instructions to teach students how to use 123d.circuits.io to do experiments and labs
with circuits and microcontrollers and how to submit their works done on 123d.circuits.io
to the data center of our MOOC.
3 One effective way to stimulate people and make them do better on their job is grading,
we also want to give users of our MOOC feedbacks of how well she comprehends the
content of the course and how good her skills are when doing labs. Hence we decided to
incorporate a grading subsystem into the MOOC. But since MOOC means massive open
online course, it is a good assumption that there will be too many users and too many
homework submissions that we can not find enough graders and teaching assistants to
make these feedback on time, and because grading criteria for a lab is much more
complex than multiple choice questions, it may not be possible to use machine grading
for the MOOC. So with all these considerations, we choose peer review to take up the job
of grading and commenting, which means except for doing their own homework and labs
students also need to grade their peers’ work and make comment on them based on the
instructions and grading criteria provided with each lab.
1.2 The main content and goal of the project Our MOOC itself consists of online lectures and instructions, homework and labs, and
the server side system that hosts the materials or the links to the materials needed for the
course and carries out services like user data storage, homework assignment and
notification, web-based peer review grading , etc.
The MOOC is intended for one semester with four labs, each lab is associated with an
instruction as well as several video lectures, all the labs and video lectures covers a major
subset of basic of electronic knowledge and functions of microcontrollers like digital
I/O, analog I/O, LED, pushbutton, PWM, timer, etc. All the videos of the MOOC are
hosted on Youtube to alleviate the burden of our own server.
4 The server side system for our MOOC takes on the responsibility to build bridges among
different functions of the MOOC and it also provide ways for users to interact with each
other. The system is built on PHP and Mysql, the former is a popular server scripting
language with a large number of developers using it and many good modules and frames
that can speed up the process of server side development. In our design, PHP is used with
WordPress, a full-fledged and well known content management frame based on PHP, for
implementing all the logic behind the service we provided with our MOOC, the latter is
one of the most widely used relational database management system, which works
perfectly with PHP with thousands of successful web applications based on this
combination as proof. We use it for data storage for public content, user data and super
user data. Public data is accessible to all, like instructions and grading criteria of labs,
user data consists of different kinds of data with varied level of privacy, some of them is
only known to the user itself like password, while some is accessible to others but not all
of them like users’ submissions of code of a lab with very little of them is available to all
like usernames. Super user data is much like user data, which means a lot to the safety of
the MOOC, and is needed to handle with great precaution.
The grading subsystem is an indispensable component inside the whole system of the
MOOC, it should be intelligent, convenient, effective and safe. The role of grading is
important in the process of learning, it is a reflection of the quality of the process of
learning. Hence we need the grades and comments of users’ works to be precise and
instructive, but peer review is a complex method with many things not under control of
the grading system, extra rules and constraints needed to be enforced in order to prevent
bad behaviors like degrading with intention, retaliation for a bad score, etc. the grading
subsystem heavily relies on the database of the system, to grade on others’ works, one
need to get it from the database, and then need to put her comments and grading for
others back into the place in the database. More details about how the database is
5 designed and how functions are implemented based the on the database is illustrated in
part two of the report.
1.3 The structure of the report In the following sections of the report a large number of details of the design of the
MOOC in different categories are being introduced.
Part two illustrates in great detail how we build the server side system in for the MOOC
including how we build the database system in order to store and retrieve user data, keep
safety and privacy, and lay part of the foundation of the grading subsystem in the
database design as well as how the data flow and logic is implemented for the whole
system. This part is also divided into
In part three, the content of the MOOC is introduced. Course policy, instructions for labs,
video lectures are all included. Course policy presents the rules of the course as well as
the structure and the schedule of it. Content of each lab and the considerations on why to
put it into the MOOC and how to teach for it are talked about.
In part four, we treat our design of the MOOC from the view of software engineering and
introduce how we tested the system and services for safety and availability along with the
bugs found on the way of testing.
A conclusion of the project is included in part 5, and part 6 serves to list reference.
6 2. System Design 2.1 Basic design of using what kind of technology We decide to use PHP + MySQL to develop our websites and use wordpress as a basic
software. Although we discard all the exist pages a basic wordpress provide and write our
own page, wordpress’s thousands of plugins and widgets, plus some exist functions it
provided is useful for our project.
2.1.1 Why PHP+MySQL With PHP, we can connect to and manipulate databases and MySQL is the most
popular database system used with PHP.
PHP + MySQL is the most mature, stable and secure WEB develop technology. It is
widely used in most popular websites.
PHP combined with MySQL are cross-platform (you can develop in Mac or Windows
and serve on a Unix platform)
From our group’s view, This is our first time to develop a websites, PHP+MySQL has the
most mature reference material to look at and when we encounter some problems or bugs
we cannot figure out, we can easily find the solutions online.
2.1.2 Why Wordpress WordPress is web software for people to create a beautiful website or blog. It is first used
as just a blogging system but has evolved to be used to full content management system
and has thousands of plugins and widgets which can help us to implement some great
functions which we have not enough time to complete such as discussion forum part.
2.2 High-‐level Design This system is designed for Cornell course ECE4760 MicroController Design on MOOC
7 platform. This system will be used by thousands of students who are interested in this
course from everywhere around the world. Our target is to develop a platform for them to
conveniently study this lab-based course online. The basic functions are as follows: view
the basic information and material of this course, submit their work after they complete
the labs, help them easier assessing others’ work, give them a fair grade.
The basic information and material of this course is displayed on the course websites
where students can easily access. The information includes the following: the syllabus,
instruction of every lab, the lectures student may need to learn before they start each lab.
As this is a lab-based course and student have to some labs during the study to get
experience of microcontroller. However, we may have massive users from everywhere
around the world, we want them pay low price or nothing to study this course. We find a
123circuit website which can design the circuit on so that student do not need to buy any
hardware for these labs.
After students did their work, they can submit their work on our websites. The work will
contains report, code, a video link and a 123circuit website link. All four things make us
easy to assess their work. A video is used to record some trivial things that student may
cannot describe in words and need to show us something.
After their submission, they are assigned four peers’ works to assess. They can simply
complete a grading form to assess other’s work.
After assessment phase, students get their grades. The grades are depended on how well
they did the lab and how well they assess others’ works. If they submitted their work and
done all the assessment but still have no score to view, they can ask for regrade.
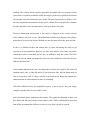
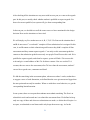
8 As for TA, we design a TA page for them to easily allocate whose will assess which four
assessments and whose submission will be assessed by which four students. And when
the assessment phase ends, TA can easily compute the final score for every student.
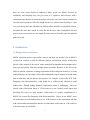
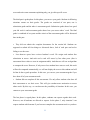
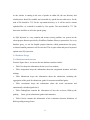
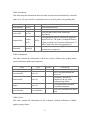
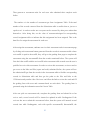
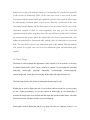
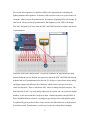
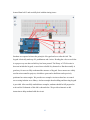
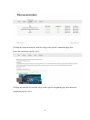
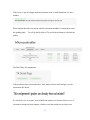
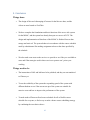
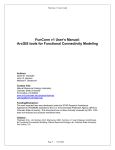
The basic procedure of one lab assignment
2.3 The Design Decisions 2.3.1 The design consideration During the design stage of our projects, we have made a lot of decisions are suitable for
this specific ECE4760 Micro-controller course. Here are the details ordered by the time
of the whole procedure of one semester.
For the home page, students can see a introduction video to this course from Yuanyuan to
9 learn the basic structure of this course and a video from professor Bruce Land to explain
the tools we will use in this course. This will give students an overall description and they
can decide whether or not they would enroll.
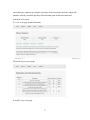
For Syllabus page, student can get some basic information such as course description,
objective, lecturer, the simulation website they will use, the prerequisites and suggested
materials. They can also find a course’s outline tells what are the specific lab and how the
grading system works.
For the guidance page, you will get an understanding of how to use our website and
things students need to pay attention to. We design this page to make users easier learn
the basic functions of our websites. It is more like a user manual.
For the lab-table page, It display the basic information of all the labs you need to finish
this semester and their instruction, start time and due time.
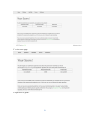
When we click on one of those labs, we can get to the assignment page. This page
contains all the procedures one assignment should include and can be seen only when you
are logged in. We design to divide one assignment into four phases. They are Start phase
(which you can submit and resubmit your work), the assessment phase (which student
can assess other’s work), the grades phase (which students can see their grades) and
re-grade phase (which students can request re-grade and if they do so, to see their
re-grade score).
The first phase is start phase. In this phase you can see the instruction of this assignment
and submit your work. Once submitted, you could resubmit your work and download
your submission. We decided to only save only one copy of students’ works because we
10 are graded on their final submission by the due time and it also save more space. If one
student continue to upload their work again and again or a robot just try to fill up our
space will just fail. In the submission part, we design to let student submit four things: the
youtube video link (they will make a short video to describe what they did including
some difficult part they cannot describe by words in their report), the 123Circuits link
(which is used to test their code and check their circuit, the 123 Circuits has the detail
explanation in part 3.3), their report (which contains the information our student’s work
and information for help grading) and the code (which contains the code students design).
The second phase is assessment phase. In this phase, you can assess other’s work. Once
you complete your work, by the deadline of this assignment, you will be assigned to
assess four other submissions (if there are only 4 or less submission, you will be assigned
less). By click on the link button, you can go assess their work. And there will also a hint
for you describing which assessment you have done and which you have not. Also there
is a link to instructions describe how you should assess other’s work. This peer review
design can help student learn more about the lab, they can see how other students did the
same thing: where they did better or using a totally different method. We design this
assessment phase to be anonymous which means students do not know whose work they
are assessing. This decision will help protect students’ privacy and prevent discrimination
assessment. The detailed peer review decision will be discussed later in this part.
When click on one assessment you are assigned, you can go to the Grading page. In this
page, you can download the code and report you need to assess and see the youtube link
and 123circuits page. We design a form for users to complete which will be convenient
for both users and us. We divided each assignment for several dimension, for each
dimension, we set up a total score and give student a criteria for each dimension to judge
how much this dimension should be scored. Students only need to give the dimension
11 score and write some comments explaining why you give this specific score.
The third part is grade phase. In this phase, you can see your grade. Students in following
situations cannot see their grades. The grades are consisted of two parts, one is
submission-grade and the other is assessment-grade. Submission grade shows how good
your lab work is and assessment-grade shows how you assess others’ work. The final
grade is combined of two parts and the criteria of the assessment-grade will be discussed
later in this part.
They did not submit the complete documents for the certain lab. Students are
supposed to submit all four things we discussed above, lack of each part can lead to
failing to see the score.
Less than two peers have reviewed student’s work. We assign each student four
submission to assess. And each user’s work will assess by four other peers (four is
assessment factor value we store in assignment table). And then we will use an algorithm
to compute the score. However, if only two or less students have assess a work, this work
will not be computed automatically, we will not display the score to this student and will
let him do the re-grade procedure. In this case, you can see your assessment-grade if you
have done all of your assessment work.
Student did not complete all his assessments. We only allow students who done all
their assessment to see their score. This will give student more motivation to assess
others work. By this way, we can decrease the possibility of situation. In this case, you
cannot see your assessment grade.
The last phase is regard phase. In this phase, students can request regrade their work.
However, not all students are allowed to request. In the phase 3, only situation 2 can
request students which means if you have not complete the assessment work or you have
12 not submit the complete document. And if students are not satisfied with their score, we
do not allow them to request regrade. Since this is a MOOC (Massive Open Online
Courses) course website, it is used for maybe thousands of students, if all students are not
satisfied with their score, our TA will be stressed out. For this kind of reason, we are not
allowed the formal situation regrade request in normal university course. We will give a
hint that “you are not allowed to regrade” when you click on the regrade button and you
are not qualified to regrade. Once your work has been regrade by the TA, you can see the
regrade your regrade score.
As for peer review part we decide to let one student assess four other students’ work for
one lab. This module is suitable for MOOC because of the large amount of students.
Contrary to the peer review university often uses, we develop more structured forms of
assessment/grading. In our system, students not only create and submit their own work.
They also participate on the assessment of others’ submission, give them feedback and
suggest a grade for them. A student’s final grade is contains two parts, one part is how
well a student does with their work. The other is how well a student assessed his peers.
This kind of strategy gives the motivation for students to assess others’ works during
which they can have opportunity to see others’ work and learn from them. Also students
can see how his peers think about his assignment and learn from these comments.
As for how to compute the score of one student, we decide to use Rubric algorithm. We
divided each work into several dimension, professor will provide criteria for every
dimension about how to assess it. For all assessment dimensions, calculate the arithmetic
mean and sample standard deviation. Because there are normally four assessments for
one assignment, we are trying to find the “best” assessment. For our purposes, the best
assessment is the one closest to the mean. For each assessment, the distance from the
mean is calculated similarly as the variance. Standard deviations very close to zero are
13 too sensitive to a small change of data values. Therefore, data having standard deviation
<= 0.05 are considered equal.
$variance = 0
for each assessment dimension
if stdev > 0.05 then $variance += ((mean-grade) * wight/stdev) ^ 2;
If there are less than three assessments for this assignment, they all are considered “best”.
The best assessment gets grading grade 100%. All other assessments are compared
against the best one. If there are more best assessments, the one closest is used as a
reference. The difference/distance from the best assessment is calculated as sum of
weighted square differences.
$sumdiffs = 0;
$sumweights = 0l
for each assessment dimension
$sumdiffs += ((bestgrade - peergrade) * dimensionweight / maxpossiblescore) ^ 2;
$sumweights += dimensionweight;
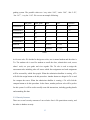
In this strategy, the weight of every dimension is calculated as wi = maxi – mini.
And we use the following formula to compute the gradinggrade, which means how well
student assess others’ work.
gradinggrade = (1 – f * sumdiffs / sumweights) * 100 [%]
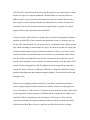
In our case, we choose f as 2.5, we can change the value of f to change the strategy of our
14 grading system. The possible values are “very strict: 5.00”, “strict: 3.00”, “fair: 2.50”,
“lax: 1.67”, “very lax: 1.00”. We can see an example following:
Min grade
Max grade
Best
Peer
difference
Dimension#1 1
4
4
3
0,56
Dimension#2 1
4
3
4
0,56
Dimension#3 0
10
5
5
1
Dimension#4 0
10
6
6
1
Dimension#5 0
10
8
8
1
subGrad
68.42%
65.79%
assessGrade
100.00%
71.35%
form 1
As for user roles. We decided to design two roles, one is normal student and the other is
TA. The student role is used for student to enroll the class, submit their work, assess
others’ work, see your grade and view regrade. The TA role is used to assign the
assessment tasks including who will assess which four assignment and each assignment
will be assessed by which four people. When the submission deadline is coming, a TA
will click the assign button to do this procedure. Another button we design for TA is used
for compute the scores. When the submission deadline is coming, a TA will click the
compute button to do this procedure. In the future, another professor role will be perfect
for this system. It will be used to modify some lab instructions, including grading details
and something like that.
2.3.2 Security Concerns There are several security concerns of our website. One is file permission security, and
the other is database security.
15 As the website is running in the user of apache in redhat OS, the root directory and
subdirectories should be readable and executable by apache but not other users. So the
mod of file should be 755; For the wp-content directory, as it will be used to contain
uploaded files, so it should be writable by User apache. The mod should be 775; The
directories and files are all in the apache group.
As SQL Injection is a very common and serious security problem, our system use the
robust prepare function provided by WordPress Database library to protect this. For every
database query, we use the $wpdb->prepare function, which parameterizes the query,
so that no harmful parameters will be executed. This is quite robust and proved to protect
against most SQL injections.
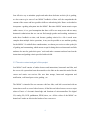
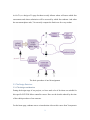
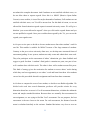
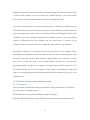
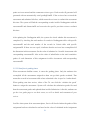
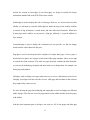
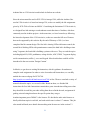
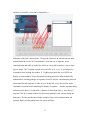
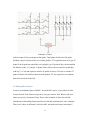
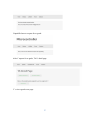
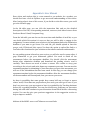
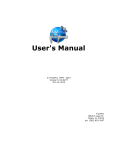
2.4 Database Design 2.4.1 Database overall structure From the figure above, we can see that our database contains 6 tables:
Table User keeps the information for the user of our website;
Table Assignment keeps the information about the assignment instances and their
settings;
Table Submission keeps the information about the submission, including the
aggregation of the grade for submission, grade for assessment and final grade;
Table Assessment keeps the information about the made assessment and
automatically calculated grade for it;
Table GradingPoint contains the information of how the reviewers filled-up the
grading
forms, given (submission) grades and comments;
Table Criteria contains the information of the evaluation elements definitions of
Rubric grading strategy forms.
16 Entity-Relationship Diagram of Database
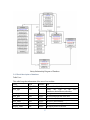
2.4.2 Detail description of database Table User:
This table keeps the information of the user of our website.
Field
userID
user_type
Type
bigint(20)
Text
Default
user_login
user_pass
user_nicename
user_email
user_registered
display_name
Text
Text
Text
Text
datetime
text
NULL
NULL
NULL
NULL
NULL
NULL
Info
auto-numbered(serial)
Define
the
type
of
the
user:
contributor,administrator,subscribor
the login account of the user
the encryted password of the user
the nice name of the user
the user’s email address
the time when user registered
the display name of the user
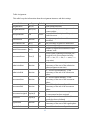
17 Table Assignment:
This table keeps the information about the assignment instances and their settings.
Field
assignmentID
Type
int (10)
Default
assignmentName
char (255)
descriptionPath
text
NULL
timemodified
datetime
0
maxSubmitGrade
maxAssessGrade
int (5)
int (5)
80
20
numOfAssessments
int (3)
4
assessmentFactor
float (3)
2.5
submissionStart
datetime
0
submissionEnd
datetime
0
assessmentStart
datetime
0
assessmentEnd
datetime
0
assessmentAssigned tinyint(4)
0
calculated
tinyint(4)
0
regradeStart
datetime
0
regradeEnd
datetime
0
Info
auto-numbered(serial)
the title of the project as it appears at the
course outline
the path of the description of the project
stored in server
the timestamp when the module was
modified
the percentage of grade for submission
the percentage of grade for assessment
number of required assessments of other
students' work
Factor when evaluating assessment job =
required level of assessment similarity
(1.67 => lax, 2.5 => fair, 3 => strict, 5 =>
very strict)
0 = will be started manually, >0 the
timestamp of the start of the submission
phase(assignment start time)
0 = will be closed manually, >0 the
timestamp of the end of the submission
phase
0 = will be started manually, >0 the
timestamp of the start of the assessment
phase
0 = will be closed manually, >0 the
timestamp of the end of the assessment
phase
0 = assessment has not been assigned,
1=assessment has been assigned
0 = grades has not been calculated, 1=
grades has been calculated
0 = will be started manually, >0 the
timestamp of the start of the regrade phase
0 = will be closed manually, >0 the
18 assessIntroPath
text
NULL
timestamp of the end of the regrade phase
(assignment end time)
the path of the description of the project
stored in server
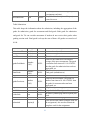
Table Submission
This table keeps the information about the submission, including the aggregation of the
grade for submission, grade for assessment and final grade. Both grade for submission
and grade for TA can override assessment if student do not receive their grades when
grading session ends. Final grade is always the sum of them. All grades are stored as of
0-100.
Field
submissionID
assignmentID
userID
Type
int (10)
int (10)
int (10)
gradeForSubmit
Number
(10,5)
finalGrade
regraderID
Number
(10,5)
int (10)
Default
NULL
NULL
Final grade (subm&assess)
NULL
The id of the TA who has regraded the work
Grade for the assessment. The grade is a
number from interval 0..100. If NULL then
the grade for assessment has not been
aggregated yet.
the path of report file (.pdf)stored in server
the path of code file(.zip) stored in server
the link of youtube page which explain your
work
the link of 123circuits page
0=the user did not submit complete work for
the assignment;1=the user has submit the
complete work for the assignment.
gradeForAssess
number
(10,5)
NULL
reportPath
codePath
text
text
NULL
NULL
videoLink
text
NULL
circuitLink
text
NULL
submitted
tinyint(4)
0
Description
Auto-numbered (serial)
he id of the assignment instance
The author of the submission
Grade for the submission calculated as
average of the peer-assessments. The grade
is a number from interval 0..100. If NULL
then the grade for submission has not been
aggregated yet.
19 Table Assessment:
This table keeps the information about the made assessment and automatically calculated
grade for it. TA can override it if student do not receive their grades when grading ends.
Field
assessmentID
submissionID
Type
int (10)
int (10)
reviewerID
int (10)
submitGrade
number
(10,5)
submitted
tinyint(4)
Default
NULL
Description
auto-numbered(serial)
The id of the assessed submission
The id of the reviewer who created this
assessment
The aggregated grade for submission suggested
by the reviewer. The grade is computed from the
values assigned to the assessment dimensions. If
NULL then it has not been aggregated yet.
0=this assessment is not completed;1=this
assessment is completed.
Table GradingPoint
This table contains the information of how the reviewers filled-up the grading forms,
given (submission) grades and comments.
Field
gradingPointID
Type
int (10)
assessmentID
int (10)
dimensionID
int (10)
points
int (10)
peerComment
text (medium)
Default
Description
auto-numbered(serial)
Part of which assessment this
grade is of
Foreign key. References
dimension id in one of the
grading strategy tables.
Given grade in the referenced
assessment dimension.
Reviewer's comment to the grade
value.
Table Criteria
This table contains the information of the evaluation elements definitions of Rubric
grading strategy forms.
20 Field
criteriaID
dimensionID
maxPoints
description
assignmentid
Type
int (10)
int (10)
int (10)
text (medium)
int (10)
Default
Description
auto-numbered(serial)
dimension
The max grade of this part
Simple description of the criteria
Which assignment it belongs to
2.5 The data flow of System 2.5.1 The overall data flow of system We have already stored the related information of the settings of our four assignments in
table Assignment and Criteria. Table Assignment is used to generate the LabTable for
students and TAs and define settings of each assignment, including the title of each
assignment, the start and end time of each phase, the factors for grading algorithms, the
number of assessments each students need to complete and so on. Table Criteria is used
to generate grading forms for students to assess other peers’ work, including the details of
rubrics and max points of each rubric.
Once a user register in our website, all his or her related information will be stored in
table User and a userID is generated automatically in serial for the user. UserID is vital
since we using userID to recognize and extract the related records of one specific user.
During the submission phase, students can see the instruction for the specific assignment
and complete their work. Students must submit their solution before the submission
deadline if they want to get their scores. After students submit their work on the upload
page, we will create a record in table Submission for him or her.
After the submission phase, it is the assessment phase. After TA click the button to assign
the assessment, we will create records in table Assessment. Each user will have several
records in Assessment table which decide whose work they need to review and how
many assessment they need to accomplish. According to the records in Assessment table,
21 students can view their assessment tasks in assessment page. Based on the rubrics stored
in Criteria table, students can review other peers’ solution and give scores and coments
for each rubric, those information will stored in the GradingPoint Table.
After the assessment phase, it comes the grading phase. If students accomplish all their
assessment tasks, system will calculate the grades for their submission and the grades for
their assessment based on the records in Assessment Table and GradingPoint Table. After
calculation, store their submission grades and assessment grades in the corresponding
records in Submission table, thus students can view their scores. If students do not
complete all their assessment tasks, they cannot view their grades as a punishment.
If a student’s solution is reviewed by less than two peers but he or she complete all the
assessment tasks assigned to him or her, they can only see their assessment grades since
the system could not calculate their submission grades based on the information of two
peer review records. This lead to the re-grading phase, students who only get their
assessment grades can request for re-grading. And their request will be assigned to a TA
by random and after TA review this student’s work, system will calculated the grades and
store it to corresponding record in Submission table, thus the student can view his or her
complete score.
2.5.2 The detail description of the data flow of system 2.5.2.1 Description This part mainly describe the detail of the data flow of our system based on each phase:
How the system work page to page;
What information to get from the database during each stages;
How the database will change during different stages by inserting an updating records.
22 2.5.2.1 Data flow when registration When students registered to our website, a record that contains his or her information will
inserted to table User and allow this user to use his or her login name and password to
access our website again. The user ID in our database is crucial since it is used to identify
the user and served as foreign key in other table. Students can view the instruction and go
to the assignment page of each lab based on the lab table page.
2.5.2.3 Data flow in submission phase At the beginning of the submission phase, students can use the lab table in our website to
get access to the assignment page of each lab. If the time is not appropriate or the user is
not login in, corresponding message will show up to remind users. In the assignment page,
students can view the instruction and complete their work.
After completing the work, students need to submit their solution to the assignment
before the submission deadline. For each lab, they need to upload their source code(zip
file), report(pdf file), 123dcircuit link, youtube link in the upload page. After clicking
submit, there are two things need to be done.
Firstly, the system will upload the two files to the server if they meet the requirements
(no bigger than the maximum size). There is a folder named uploads in our server that
store all the users’ upload files. Each user will have a subfolder named with their
encrypted userID and in this subfolder stores all the files uploaded. The path to those files
will be recorded to put into the database later.
Secondly, a record of this submission will inserted to Submission table if this is the first
time for the user to submit solution or updated to Submission table if the user has already
submit solution before. This can allow users to resubmit their work. This record uses
assignmentID and userID as foreign key and automatically generate a submissionID in
23 serial. The youtube video link and 123dcircuit link the user input will directly store into
this record and the path to the report file and the source code file will stored to the record
either.
Each time the user submit their work, the system will check if the record corresponding
to the assignmentID and userID has the two path and the link to 123dcircuit written,
which means the user has complete their work, it will set the submitted value of this
record to 1. Only those who complete their work has can participated in the next phase,
that is the assessment phase
2.5.2.4 Data flow in assessment phase When submission deadline comes, it comes the assessment phase. Only the students who
submit their work completely can take part in this phase. That means the records in
Submission table whose submitted value is equal to 1 rather than 0. When assessment
start time arrives, either of the TA can click the ‘assign assessment’ button to assign the
assessment. Students need to complete all the assessment tasks assigned to them before
the assessment deadline to get their scores.
Firstly, the system will extract the records in Submission table whose submitted value is
equal to 1 and shuffle them. This is to ensure that the distribution of assessment will be
randomly.
Next it will check the corresponding record in Assignment table using assignmentID to
see if the assessment of this assignment is being assigned before to prevent double
distribution (just see if the value of assessmentAssigned is 1). If the assignment has not
been assigned before, for each shuffled records extracted from the Submission table, get
its userID as reviewerID and the following n records of submissionID as submission ID,
insert n new records based on the reviewerID and submissionID to the Assessment table.
24 Thus generate n assessment tasks for each user who submitted their complete work
before.
The number n is the number of assessment get from Assignment Table. If the total
number of the records extracted from the Submission table is smaller than n, just set n
equals to n-1 in order to make sure everyone can be assessed by other peers rather than
themselves. After doing this, set the value of assessmentAssigned in corresponding
record Assignment table to indicate that this assignment has been assigned. This is the
data flow for assign the assessment for each user.
After assign the assessments, students can view their assessment tasks in assessment page,
by clicking each assessment button generated from the records in assessment table whose
reviewerID is equal to the userID, they will go to the grading form page to complete the
assessment using the assessmentID from the records mentioned before. The system will
first check the userID with the reviewerID in the assessment table to make sure the user is
qualified to review this assessment. In order to review this assessment, reviewer need to
get access to the links and files (report and code) submitted before, the system will use
the submissionID get from the records in the Assessment table to find the corresponding
records in Submission table and thus get the paths to the files and links to the
123dcircuits and youtube video. Reviewer can follow the link to review the work and fill
the grading form with score and comment based on each rubric. The grading form is
generated using the information stored in Criteria Table.
After user pick one assessment task, complete the grading form and submit his or her
review work, several records will be inserted or updated in table Gradingpoint. If the
reviewer has never submit this assessment before, then the system will inserted several
records into table Gradingpoint, each with specific assessmentID, dimensionID, the
25 points reviewer entered and the comments reviewer gave. Each record will generated will
generated with an automatically serial gradingPointID. If the reviewer has reviewed the
assessment and submitted it before, which means the reviewer is resubmit the assessment
this time. The system will find the corresponding records in table Gradingpoints with the
assessmentID and dimensionID and overwrite the specific part that reviewer resubmit
this time.
After updating the Gradingpoint table, the system also check whether this assessment is
completed, by checking the total number of records in Gradingpoint table with specific
assessmentID and the total number of the records in Criteria table with specific
assignmentID. If those two are equal, it indicates that the reviewer has accomplished all
the dimension in this assessment. Set the value of submitted to 1 in table Assessment with
corresponding assessmentID. Also set the value of submGrades to the total cumulative
grades of each dimension of this assignment in table Assessment with corresponding
assessmentID.
2.5.2.5 Data flow in grading phase When assessment deadline comes, it comes the grading phase. Only the students who
accomplish all the assessments assigned to them can get their grades caculated. That
means the records in Assessment table whose submitted value is equal to 1 rather than 0.
When grading start time arrives, either of the TA can click the ‘calculate the grade’
button to assign the assessment. System will calculate the submission grades first and
then the assessment grades and updated them in table Submission. After this, students can
go the view grade page to see their scores, as well as details and comments of peer
review.
Just like what system do in assessment phase, first it will check whether the grades of this
assignment has been calculated or not based on the value of calculated in the Assignment
26 Table with specific assignmentID. If the value is 0 rather than 1, that means the grades of
this assignment has not being calculated. The system will do the calculation of
submission grades based on the grades other reviewer gives. Then do the calculation of
assessmentID based on the grades this user gives to other peers and the corresponding
submission grades other peers get.
In order to calculate each user’sf submission grades, first we get the records from
Submission table with corresponding assignmentID and with submitted value equal to 1.
Then for each of the submissionID, get the assessment records that they have. That means
get the records from Assessment table with that submissionID and submitted value equal
to 1. If the number of the records is larger than 2, that means more than two peers has
accomplished the assessment of this submission. Then use the submGrades from those
records to get the value of the submission grades of this submission based on the
algorithm introduced before. Update the submGrade in table Submission with
corresponding submissionID to the calculated value. If the number of the records get
form Assessment table is smaller than 2, then system cannot calculated the submission
grades, just set the submGrade in table Submission with corresponding submissionID to
0.
Based on the submission grades, the system will then do the work with assessment grades.
First system will get the submGrades and submissionID from both Assessment table and
Submission Table, where the reviewerID of the Assessment table is equal to the userID
and the submissionID of two tables are equal, and the submitted value in Assessment
table is equal to 0 with corresponding assignmentID. This is to get the information of
each assessment this user has accomplished(including the total grades he or she gives and
the corresponding submissionID of this assessment). Based on each submissionID we get,
get the final submission grades the system just calculated from the Submission Table. By
27 calculating the variance between those two submGrades and considering the assessment
factor stored in Assignment table, the system can calculate the assessment grades for the
user and update it to the corresponding records in Submission table.
After all the calculation, set the value calculated to 1 in Assignment table with
corresponding assignmentID.
When students view their grades, system will first get the records from the Submission
table with specific assignmentID and userID. If records of this user has the assessGrade
equal to 0 and has the submGrade larger than 0, that means he or she did not complete all
their assessment tasks, thus both the assessment grade and submission grade are not
available to this user. If records of this user has the submGrade equal to 0 and has the
assessGrade larger than 0, that means he or she complete all their assessment tasks but
fewer then 2 peers has reviewed his or her work, thus this user can see his or her
assessment grade, but submission grade is not available to this user. This is the only
situation when user can request for re-grading. If both the value of assessGrade and
submGrade of this record is larger than 0, this is the normal situation, the user can view
his or her assessment grade and submission grade.
2.5.2.6 Data flow in re-‐grading phase After system automatically calculated the grades for each qualified user, then is one
situation when user is allowed to request for re-grading. If records of this user has the
submGrade equal to 0 and has the assessGrade larger than 0, that means he or she
complete all their assessment tasks but fewer then 2 peers has reviewed his or her work,
thus this user is qualified to request for re-grading.
The system will check if the user is qualified for re-grading. If the user is qualified and
has not requested before (by checking the value of regradeID of specific records in table
28 Submission), system will randomly choose a TA and put that TA’s userID into regradeID
of the records in Submission Table. At the same time insert a new record in table
Assessment with the submissionID and regraderID, just like what system do when assign
the table during assessment phase of peer review. Basically, system will do the exact
same thing with the database like the former peer review procedure, first TA can view the
assessment assigned to them for each assignment, then they give the scores and
comments based on rubrics of grading form. The only difference is that after TA submits
the assessment and system update the submGrade value in the Assessment table, also
update the submGrade in Submission table with the value of submGrade in Assessment
table. The score that TA gives is the submission grade of this student. Thus the students
who request for re-grade can view his or her submission grade and assessment grade
together.
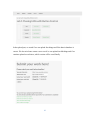
2.6 Theme Design The theme is used to change the appearance of the websites. For our website, we develop
our theme based on the “coller” theme. A theme is consists of a lot of php files including
index.php,
archive.php,
page.php,
single.php,
comments.php,
content-page.php,
content-single.php, footer.php, fuctions.php, header.php, index.php and style.css.
The following describe the details of making the themes step by step.
Header.php is used to display the title of our website and our menu bar. In every pages
we use <?php get_header()> to get the content in header.php. In our header.php, it
includes the simple title of our website and the menu bar which includes Home, Lab-table,
Discussion Forum, Guidence and the Log in and Sign up.
Footer.php is used to display the end of every page. We also use <?php get_footer() ?> to
29 include the content in footer.php. In our footer.php, we design to include the theme
information and the link to the ECE4760 course website.
Sidebar.php is used to display the side of each page. However, we do not need to use this
sidebar, we still need to write the sidebar.php for further develop of our website. Sidebar
is consists of log in function, a search menu, and some other basic functions. When later
if some page need a sidebar, we can just use <?php get_sidebar();?> to get the sidebar we
have written.
Comments.php is used to display the comments user can provide, we did not change
much from the coller theme for this part.
Page.php is used to develop the basic templates of simple html page. All our page is
divided into two parts: one is pages written in the folder page-template, where we use php
to control the whole structure. The other are pages that only contains the html elements,
we just use the default page template and some html+css to design them, for example, our
home page and syllabus.
404.php is used to display error page when users try to access a link that not exist. In our
404.php, we design to tell the users this is not a valid page and lead them to the websites
they might really want to access.
We also develop the page-full-width.php and single.php are used to display two different
kinds of pages. The first one is used to pages that not own sidebar and the second is pages
with sidebar.
And the most important part we design is our style.css. All of our pages and other php
30 file use this style.css file. Because our website is a MOOC course website, we design not
to display too many gaudy features. For these kind of websites, simple and easy to use is
often at first priority so we decide to use simple gray and green combination. We first
defined some basic features like how links looks like and how h1 or h2 look like. Then
we use class and id to define definite demand of certain elements.
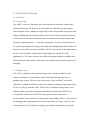
31 3. Course Content Design 3.1 Lab Design 3.1.1 Design Goals This MOOC course is to familiarize users who interested in electronics with the basic
electronic knowledge and functions of microcontroller, without buying any hardware.
After taking the course, students are expected to be able to design their own projects with
Arduino fulfilling their interesting and fancy ideas. On the other hand, since the website:
123d.circuit.io is still under development, there is limitation of its online compiler and
electronic components library.
Under this circumstance, my job is to make full use of
its compiler and components to design interesting labs, through doing which students can
learn the use of Arduino as much as possible. The first two Labs aim to let students know
the basic stuff of Arduino, and the topics include digital I/O, analog I/O, LED,
pushbutton, etc. The last two labs are more difficult requiring students to combine what
they learned from first two labs, which aims to give students an interesting experience of
designing.
3.1.2 Design Process ECE 4760 is a lab-based microcontroller design course, which uses hardware and
software techniques to teach students a variety of design skills and experience of
handling large projects. The key to delivering such a course on MOOC is to build a
virtual lab, so students can do labs on their own computers without buying any hardware.
At first, we came up with three ideas. The first one is to find an existing cheap or free
software which can provide an integrated simulation environment for both CPU of
ATmega1284, which used in ECE4760, and peripheral circuits connected to
microcontroller. Our second idea is to hook up the Atmel Studio, which is a free platform
for debugging and compiling Atmel AVR microcontrollers, to LTspice, which is a free
circuit simulator. We also planned to design several peripheral simulators for keypad,
32 LED and LCD, which often used in microcontroller projects, and connect them to Atmel
Studio or LTspice for complete simulation. The third idea to let users buy their own
hardware, and we give the lectures and instructions. After they finished the labs, they
have to make a video recording what they do and upload to our website for demo and
evaluation. That was our last option, because buying hardware is against our original
purpose of delivering a lab-based course on MOOC.
It turned out that we did not find an existing software can provide integrated simulation
platform for both CPU of microcontroller and peripheral circuits. So we had to give up
the first idea. Since the third one was our last choice, we planned to start with the second
idea, which is hooking up Atmel Studio to LTspice. We have to say that was a huge plan.
In order to connect them, IO ports of the microcontroller are the key part, since it is the
connection of the microcontroller and circuits. At first we worked on the Atmel Studio
part. We tried to write stimuli files for the CPU simulator. In the stimuli files, any I/O
register can be assigned a value as input to be simulated, and the result, the output of I/O
register can also be logged into a file. We planned to use the output file to control the
circuits in LTspice. However we had some difficulty in writing the stimuli file. Timing
problems often happened and simulation stopped suddenly. We tried a lot but still could
not figure it out.
When we were struggling with the stimuli files, Prof. Bruce Land told us he found a
website support integrated online simulation for Arduino, which was really good news
for us. The website is 123d.circuits.io. I did some research about this website, and I found
it only supported very basic functions of Arduino and the components in its library were
also limited. Then I contacted the team working for 123d.circuits.io. They said, the
website was still under development and more features would be released in the future.
After discussion Prof. Bruce Land, we settled on our final plan, which is to design
33 Arduino labs on 123d.circuits.io and include its link on our website.
Since the microcontroller used in ECE 4760 is Atmega 1284, while the Arduino Uno
used in 123d.circuits.io is based on Atmega 328, we have to modify the lab assignments
given by ECE 4760 to fit into our MOOC. Considering the limitation of 123d.circuits.io,
we designed four labs aiming to teach students certain functions of Arduino, which are
commonly used in Arduino projects. At the same time, we have been always following
the latest development of the 123d.circuits.io, so that we can make full use of features
that can be supported by this website. By the end of February of 2014, we have
completed the lab content design. The first lab is chasing LEDs with button control; the
second lab is blinking LEDs with potentiometer control; the third lab is building a timer
using 7-segment; the fourth lab is building a pointer with servo. They covered the topics
including digital I/O, LED, pushbutton, voltage divider, ADC, PWM, 7-segment display,
serial communication, millis (), servo and keypad. More details about each lab will be
introduced in the next section ‘Design Content’.
In March, we got down to writing lab instruction, which is guidance for students to
complete each assignment. In order to write clear and useful instructions, we carefully
studied the course webpage for ECE 4760: http://people.ece.cornell.edu/land/courses/ece4760/ at first. Then we searched a variety of
materials about the topics we covered in labs. Based on those, we finished lab
instructions for four labs. Instructions contain three parts: introduction telling users what
they should do in each lab; procedure telling them how to finish the task; assignment &
grading criteria letting them know the specific points they can get.
Another important part of MOOC is the lectures. We decided to make mini-lectures to
briefly talk about topics in each lab, and each mini-lecture is about 5-7 minutes. This job
also started in March, more details about making mini-lectures are in the section 3.3.
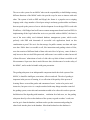
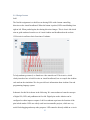
34 3.1.3 Design Content Lab1
The first lab assignment is to build seven chasing LEDs with a button controlling
direction on the virtual breadboard. When the button is pushed, LEDs start blinking from
right to left. When pushed again, the chasing direction changes. This is a basic lab which
aims to guide students learn the use of virtual Arduino and breadboard on the website
123d.circuit.io and know basic functions of Arduino.
To help students get started, we found two video tutorials on 123d.circuit.io, which
clearly introduce how to build circuits on virtual breadboard, how to compile the Arduino
code and run the simulation. We also provide basic information about Arduino Uno and
programming language syntax.
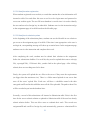
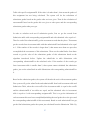
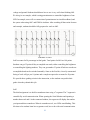
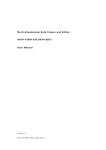
Schematic for this lab is shown in the following. We want students to learn the concepts
of digital I/O, LED, and pushbutton in first lab. Digital pins on the Arduino can be
configured as either inputs or outputs. Lab1 lets students experience the function of the
pins in both modes. LEDs are widely used in microcontroller projects, which are very
useful for debugging and many other purposes. LED cannot be directly added on a circuit
35 without something to limit the current. Thus we give a mini-lecture about working
principle of LED and its current limiting resistor. We also provide a mini-lecture talking
about pushbutton and its pull-up and pull-down resistor. Besides those mini-lectures,
some other reference and reading material also be provided to help student finish their
first lab. We also give a simple example, which is using button to control one LED.
Based on this example, we made a mini-lecture talking about its Arduino code line by
line, which is a detailed beginner’s guide.
Schematic of Lab1
Lab1 accounts for 20 percentage in final grade. Total points for lab1 are 100 points.
Students can get 15 points if they can light up seven LEDs, get 25 points if they can let
LEDs chase each other and each one blinks about 200ms, get 30 points if they can use
button to control the chasing direction. Since the job will be evaluated by other users, we
want to make sure the code is readable. So a heavily commented listing of code will get
10 points. Besides, a short and clear report explaining how you get the lab done will get
you 20 points. We also set a bonus 25 points for video report, since we really appreciate
different types of report making this course more interesting and interactive.
Lab2
36 The second lab assignment is to build ten LEDs with a potentiometer controlling the
lighting numbers and brightness. A button or slide-switch is used to set up two modes. In
one mode, when you tune the potentiometer, the number of lighting LEDs will change. In
other mode, when you turn the potentiometer, the brightness of ten LEDs will change.
This lab is designed to let users learn the ADC and PWM function in Arduino and the use
of potentiometer.
Schematic of this lab is shown below. We provide schematic on lab instruction to help
students build the circuit. Students are expected to know the ADC and PWM functions in
Arduino and use of potentiometer after this lab. We first give a mini-lecture about analog
and digital signals and difference between them, which is basic concepts we need to
clarify for beginners. Then we talk about ADC, which is analog to digital converter. The
main function of ADC is to read analog inputs into our system and convert them to digital
numbers, so the microcontroller can process them. Another important concept PWM, or
Pulse Width Modulation, which is a technique to get analog results with digital method,
is explained by guest professor Bruce Land. And he also talks about how to implement it
in Arduino system. Potentiometer is widely used to get any voltage between supply
37 voltage and ground. Students should know how to use it very well when finishing lab2.
We also give an example, which is using potentiometer to control the brightness of one
LED. In example, users will see connection of potentiometer in virtual breadboard, and
the syntax when using ADC and PWM in Arduino. After watching all those mini-lectures
and example, students should be fully prepared to work on lab2.
Schematic of Lab2
Lab2 accounts for 20 percentage in final grade. Total points for lab2 are 100 points.
Students can get 35 points if they accomplish one mode, either controlling the brightness
or controlling the lighting numbers. They can get another 35 points if both two modes are
accomplished and can be switched smoothly. Same as the first lab, a heavily commented
listing of code will get you 10 points and a complete report also accounts for 20 points.
We provide those grading criteria in the instruction, so the students can predict their
grade when they submit their job.
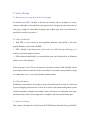
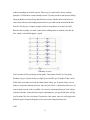
Lab3
The third assignment is to build a countdown timer using a 7-segment. The 7-segment is
controlled by serial communication. When opening the Serial Monitor and inputting a
number between 0 and 9 in the command window, the segment will display the number
you input and then countdown. When it countdowns to 0, two LEDs start blinking. This
lab aims to let students learn how segments work, how to do with serial communication
38 and how to use millis () function avoiding delay ().
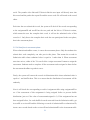
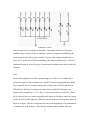
Schematic of this lab is shown below. We provide schematic on lab instruction to help
students build the circuit. We want students to learn the use of segments, serial
communication and millis () in this lab, which are very useful when they come to large
project design. The 7-segment consists of seven LEDs (a, b, c, d, e, f, g) arranged in a
rectangular form, looking like number ‘8’. Lighting up a particular set of LEDs can
display a certain number. We provide detailed reading material to help students fully
understand the working principle of segments. Serial is used for communicating between
microcontroller and computer or other devices. In this lab, we use the serial to send a
command to Arduino board controlling the display of segment.
Another important thing
students need to know is, using millis () function is better than delay (), since delay ()
stops the CPU for a certain number of millisecond, nothing in code can run during the
delay time. We also provide three simple examples about serial communication and
segment display to help student know the syntax and logic.
39 Schematic of Lab3
Lab3 accounts for 30 percentage in final grade. Total points for lab3 are 100 points.
Students can get 35 points if they can display a number on segment controlling by the
serial communication. They can get another 25 points if the segment countdown as a
timer, and 15 points if two LEDs start blinking when timer countdowns to 0. A heavily
commented listing of code will get you 10 points and a complete report also accounts for
15 points.
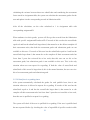
Lab4
The last lab assignment is to build a pointer using servo. The servo is controlled by a
self-made keypad. In lab4, students have to build 3*3 keypad using pushbuttons. When
key 1 is pushed, the servo begins rotating until it points to the first LED, and the first
LED turns on. When key 2 pushed, servo turns to the second LED and lights it up.
Similar when you push key 3, 4, 5, 6. Key 7 is used to reset the servo and LEDs. When
key 8 is pressed, the servo starts sweeping from 0 degree to 180 degree, and as it passing
a LED, the LED will be lighted up. When key 9 pressed, the servo sweeps back from 180
degree to 0 degree. This lab is designed to let users learn the principle of keypad and how
to control servo in the Arduino. To do this lab, students need to combine what they
40 learned from lab1-3 and carefully deal with the timing issues.
Students are expected to know the principle of keypad and servo after this lab. The
keypad is basically made up of 9 pushbuttons and 6 wires. Reading the value on each line
in a proper way can detect which key has been pressed. The library of 123d.circuits.io
does not include the keypad, so users have to build it by themselves. But that actually is
good way for users to fully understand the structure of keypad. Servo motors are widely
used in microcontroller projects, which have gears and a shaft that can be precisely
positioned at various angles. We provide two example circuits to show how to control
servos using Arduino servo library. And an example about building and detecting keypad
is provided. After carefully studied those examples, students should be full prepared to
work on lab4. Schematic of this lab is shown below. We provide schematic on lab
instruction to help students build the circuit.
41 Schematic of Lab4
Lab4 accounts for 30 percentage in final grade. Total points for lab4 are 100 points.
Students can get 35 points if they successfully build a 3*3 keypad and work well, get 25
points if the keypad can control the servo properly, get 15 points if they can accomplish
the function of key 1-6, and get 15 points if they achieve the reset and sweep function
with key7-9. Code and report account for 20 points as always. We also set a bonus 25
points for those who add new function to the pointer. We are expected to see students
show their creativity in this lab.
3.2 Making Mini-‐lectures Lectures are traditional parts of MOOC. In our MOOC course, we provided 19 video
lectures in total. Four lectures are given by our guest lecturer, Prof. Bruce Land, and
others are given by Yuanyuan Gong. Those videos contains of demo for each lab,
introduction of knowledge that needed for each lab and explanation for some examples.
There are 4 videos for lab1and 5 videos for lab2, and each mini-lecture lasts about 5
42 minutes.
Here we have to thank Jessica Stephenson for lending the video camera to us so that we
can make the mini-lectures. After taping the video, we used Corel video studio to edit it,
then Prof. Bruce Land uploaded it to his channel on YouTube. Here is the link:
https://www.youtube.com/playlist?list=PLKcjQ_UFkrd4lWDmLnA5lftKtHVek0qk2 .
We embedded those videos in our website so students can watch them when they read the
instruction for each lab.
Due to limited time, we only provided two videos for lab3 and lab4. To make up for that,
we gave more example circuits for lab3 and lab4 to help users understand the key points.
We also made a Chinese version for those videos, since Chinese students are really large
populations. Unfortunately YouTube is blocked in China, so we decided to put the
Chinese version on Youku, the most popular video website in China, and advertise it in
Weibo and Renren, like twitter and Facebook in US. In this way, more and more students
in the world will benefit from our MOOC course.
43 4. Test and Debug 4.1 Method 4.1.1 Static test We first test our website statically, we just build the whole structure of our websites
including all pages we needed to implement our basic functions (which is discussed in the
part 2.2). We basically test and mediate the front-end code to make every page looks
simple, easy and beautiful.
Then test every page to make sure their functions works well. In this step, we did not
build a relationship between each page. We just insert to the database some data which is
required to access from the database and then test if we can get the expected data we
want. And insert the information to the database, and then use manager identity to see if
the database has the data we have inserted in.
4.1.2 Dynamic test In this step, we build the relationship between each page and do this in the order of the
whole procedure of one assignment. We first insert into the database the basic lab
information, and then from the procedure we have discussed before, test them pages by
pages to find the bugs.
4.2 Details of test each stage Here we will mainly discuss the dynamic test we have mentioned in the above part. As
the data flow we have discussed before, we have to the test step by step so that the
database will complete page by page. And this is also the way to simulate what will really
happen when a lab is assigned to students.
44 Because we design to assign each student four submissions to assess, we create 5 student
role to test this. And we also need TA to assign the assessment, calculate the score and
regrade, so we also create two TA accounts. Finally we create 7 users to test the whole
system, they are as following:
yunhao—administrator
yun --subscriber
hao---subscriber
goodluck--subscriber
haoyun--subscriber
TA1--contributor
TA2—contributor
First, we test the static pages which don’t need to interact with database:
Home Page:
45 Syllabus Page:
Forum Page:
Guidance Page:
46 We then test the student role (subscriber) , we test every pages following the lab table
page we have written according to this order:
lab tableàuploadàassessmentàgradingàre-grade
We insert the basic information of four labs into database and then begin our test
procedure. For the lab table, students can see all four labs, the instructions of labs and the
start and due time. They can click on start to begin their lab tour. We checked all the
information are same to what we exist to the database.
LabTable Page:
47 Clicking the instruction link for each lab will go to the specific instruction page, here
shows the instruction page for Lab 1:
Clicking the start link for each lab will go to the specific assignment page, here shows the
assignment page for Lab 1:
48 In the upload part, we tested if we can upload four things and if the data in database is
correct. We also tried some corner case to test if we can upload invalid things and if we
continue upload several times, which version will be saved finally.
49 Get the information below:
We also tried to upload the file doesn’t meet the qualification in the submission phase
(including the file type and the file size). We have defined the file size is no more than
200KB. The report file should be in .pdf and the source code file should in .zip.
Get information below:
Similarly we tried to submit the invalid website links (which are not start with “http://”):
50 Get information like below:
When the submission deadline passed, we log in with the TA role and assign the
assessment to every student who has submitted their work completely. We check the
database to see if one student are assigned four different submissions to review, if the one
who didn’t submit his work are assigned and so many corner cases like that. We modify
our code by checking all these situations and finding errors.
Then we test the assessment part, each student are assigned with four assessment tasks,
click them we can see the grading form to complete, We try to fill the form in different
way and see what the database has received when submit different things. And also we
test if we can suggest a score that is bigger than the max score, or if we can fill one form
during two different times.
The assessment page:
51 The grading form page for assessment1:
52 If the score we put in is bigger than the maximum value of each dimension or is not a
number:
When students done the assessment, and the assessment deadline is coming then comes
the grading phase.
TA will go the lab table of TA and click the button to calculate the
grades.
The Detail Page for assignment1:
If the grades has been calculated before, those button will not work and give you the
information like below:
We check the view score part, we tried different situation we discussed above to see if
situations in design decision happens, whether or not the student can see their score.
53 After checking all the situations we may meet with in score part, we came to the regrade
part. In this part, we mainly check whether student is qualified to request regrade. For
those who are not qualified, our system will give them corresponding hint.
In the test part, we decided to test all the corner cases we have mentioned in the design
decision. Here are the situations we have tried.
We will simply say five student users as A, B, C, D, E. We first test the situation that A
and B do not assess C’s work and C complete all four submissions he is assigned. In this
case, A and B cannot see their submission grade because they didn’t complete all four
assessments and they cannot request regrade. C can only see his assessment grade but
cannot see the submission grade because only two people D and E assess his work. He is
qualified to request regrade, and when he request, system will find a TA to assess his
work and give a email address of this TA for him to contact. Now we use this TA’s
account, then we can see the assessment, after TA have done the assessment, student C
can see his re-grade score, comments and detail.
We did the same thing in the assessment phase, when assess others’ works, student have
to suggest a score of each dimension, we defined that the score given must no bigger than
the max point and can only be numbers. When we tried these error behaviors, we got the
corresponding hint information.
In our system, there are two parts that students must submit something. The first is to
submit their work and second one is to submit the assessment form. We defined to keep
only one copy of these and when new submissions are made, we delete the old copies. As
test part, we submitted several times and it only keeps the newest copy. As for the
54 assessment part, students can complete some part of one assessment, and once submit, the
database will only record the part they filled and other parts of this assessment will
remain the old version.
D’s view score page (normal situation):
The detail of peer review page:
A and B’s view score page:
55 C’s view score page:
C request for re-grade:
56 Unqualified user to request for re-grade:
After C request for re-grade, TA1’s detail page:
C’s view regrade score page:
57 As we discussed above, our system is in a strict order that users are not allowed to do
things in the reverse order, if this happens, the system will give users the hint and inhibit
these actions. For example, you cannot upload your file before you log in to the system,
you cannot assess others’ works before you submit your own work.
4.3 The result of test We find some bugs during the test and finally correct them and make our website works
well. Here are some important bugs we have find.
Bug1:
In the assessment.php, we want to get data to display in the page using such command:
$query=$wpdb->prepare("SELECT
Assessment.assessmentID,Assessment.submitted
FROM Assessment,Submission
WHERE
Assessment.submissionID =
Submission.submissionID
AND Submission.assignmentID = %d AND
Assessment.reviewerID =%d",$assignmentID,$userID);
58 In the beginning, we forget the Submission table and only check the data from
Assessment Table. In such situation we cannot decide which assignment this assessment
is belong to, then we get more than four assessments for one student (including all
assessments he need to assess in four labs, which is sixteen in this case.)
Bug 2:
When we test the submission work phase, we need to save the report and code files under
folder “upload”, the limit of authority stop us to do such action. Then we should set the
limit of folder “upload” to “775”.
Bug 3:
To enable use pretty look permalinks, we should install the mod_rewrite module in
apache server, and also alter the AllowOverride from “none” to “all”, and also change the
permission of
.htaccess file in root folder to mod 775 so that WordPress will be able to
change it.
Bug 4:
When we migrate our system from localhost to server, we found that although it works
fine in localhost, there are many bugs when it is running on server. When modify the
wp-config.php file,
make (“WP_DEBUG”, false) to (“WP_DEBUG”, true). And add one line
@ini_set(‘display_errors’, 1) after the above line,
So that any error logs will be
displayed. This is debug mod, we should change it back after deploying system.
Bug 5:
59 By using the DEBUG mod, we find that it is because the version of PHP is a little old, so
that some syntax are not supported. We modified our code to adapt to the PHP of server.
60 5. Conclusion Things done:
•
The design of labs and videotaping of lectures for the labs are done, and the
videos are now hosted on YouTube.
•
We have complete the foundations and basic functions of the server side system
for the MOOC, and the system has already been put on a server of ECE. The
design and implementation of data base of the MOOC is finished for user data
storage and retrieval. The system behaves in accordance with the course schedule
made by administrator like making assignment release at the dates specified by
the schedule.
•
We also made some tests on the services we provide to see if they are available to
users and if the strategies used in these services to protect user’ privacy are
working.
Things need to do:
•
The instructions of lab3 and lab4 need to be polished, and they are not translated
to Chinese yet.
•
To test the scalability of the system the responding speed of the system with
different burdens to see if the current set ups of the system are suitable for
massive users and how to improve the performance of the system.
•
To make trade-off between fixed course schedule for all or flexible course
schedule for everyone, or find a way to make a better course scheduling strategy
by combining the two choices above.
61 6. Reference [1] Lourdes Guàrdia, Marcelo Maina, Albert Sangrà(2013) MOOC Design Principles. A
Pedagogical Approach from the Learner’s Perspective, eLearning Papers; 05/2013;
33:1-6.
[2] Michael Rowe, Vivienne Bozalek, Jose Frantz(2013) Using Google Drive to facilitate
a blended approach to authentic learning. British Journal of Educational Technology.
06/2013.
[3] Lyubomir Serafimov (2012) HTML5 Support in Mobile Learning Tools. In
proceeding of: International Scientific Conference eLearning and Software for Education,
At Bucharest, Romania, Volume: 2.
[4] Kamil Kopecký(2014) New Trends in the Development of Mlearning with Focus on
Tables and Other Mobile Devices. The 10th International Scientific Conference
eLearning and software for Education. 04/2014.
62 Appendix A: User Manual Dear visitor and student, this is a user manual to our website. As a student, you should first have a look at Syllabus to get an overall understanding of this course. After having a basic view of this course, if you decide to take this course, you could go to the lab table page. In the lab table page, you can click the instruction link, and see the detailed description of the lab, corresponding materials, resources, and video lectures from Professor Bruce R Land, Yuanyuan Gong. From the lab table, you can also see the start time and deadline of each lab, so you can decide which lab session it is now so that you will be able to engage in the assignment. You must submit your solution to the assignment before the submission deadline if you want to get scores. For each lab, you should upload at least the source code, 123dcircuit link, report. You have the option to upload the link to a YouTube video that describe your solution so that others can better understand it. As our grading system is based on peer review, you will also need to assess other 4 guys homework to get your homework graded. You need to finish all the assessments before the assessment deadline. You should click the assessment button after submission deadline and download the grading criteria, read it carefully. Then choose one work of others to assess. Give credits to every part according to the criteria, and write down any comments you want. You can save the assessment anytime by submitting it. Next time when you go to this assessment, you will see all the information that has been saved. In this way, you can change your assessment anytime before the assessment deadline. After the assessment deadline, all the assessments will be analyzed, then, you can see your score. As there is possibility that some people drop course half way or forget to assess others’ work, if less than two people assess your work, you won’t get a score. If you don’t see your score, you can request to have it re-‐graded by the Teaching Assistant before the re-‐grading deadline. You can also discuss any problems you encounter during lab with other students in your discussion forum. Each lab has a discussing section. You can also give your precious suggestions in the suggestion section to help us improve website. Address of the MOOC: en-‐ec-‐ece4760mooc.ece.cornell.edu 63 Appendix B: PHP codes Please go to the zip file phpcodes.zip in the source code package provided with the report. Appendix C: The SQL we use in the system Please go to the zip file dbSQL.zip in the source code package provided with the report. 64