1
Quick User Guide
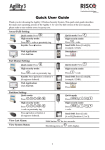
Thank you for choosing the Agility 3 Wireless Security System. This quick start guide describes
the main user operating actions of the Agility 3. To view the full version of the user manual,
please refer to our website www.riscogroup.com.
Away (Full) Arming:
.
Quick mode: Press
.
Quick mode: Press
High security mode:
High security mode:
+ code or proximity tag.
Press
Keyfob: Pressbutton.
+ code.
Press
Send SMS: Enter [Code][A],
(example, 1234A).
Web Application:
Click Full Arm.
Smartphone :
.
Press
Stay (Home) Arming:
.
Quick mode: Press
.
Quick mode: Press
High security mode:
High security mode:
Press
Press
+ code or proximity tag.
+ code.
Keyfob: Press button or button 4
(if installer defined).
Send SMS: Enter [Code][H],
(example, 1234H).
Web Application:
Click Part Arm.
Smartphone:
.
Press
Partition Arming:
Quick mode:
Press
/
/
Quick mode:
>
/
Press
.
/
/
>
/
High security mode:
High security mode:
/
/
>
/
Press
+ code or proximity tag.
Press
+ code.
Press button or button 4
(if installer defined).
Send SMS: Enter [Code]
[A or H] [Partition 1,2 or 3].
View Last Alarm:
Hold button
View System Status:
Short/long press on
1
/
/
for two seconds.
: LCD display.
>
/
.
System Disarming:
.
Quick mode: Press
Press
followed by code or
proximity tag.
High security mode:
> Code.
Press
Press the button.
Send SMS: Enter [Code][D]
(example 1234D).
Web Application:
Enter user code and click Disarm.
Smartphone:
Press
.
Partition Disarming:
Press
/
/
proximity tag.
>
Quick mode:
> code or
Press
/
/
>
.
High security mode:
Press
Press the button. All partitions
assigned to the button will be
disarmed.
Duress Disarming:
Press
Quick Zones Bypass
Press
/
/
>
> code.
Send SMS: Enter [Code][D]
[Partition 1,2 or 3]
(example 1234D1).
followed by duress code.
> [Code]
[Zone No.]
[Define]
.
Panic Alarm:
Press both
and
simultaneously.
Press both
and
simultaneously.
keys
keys
Press the small blank button (if
installer defined).
Fire Alarm:
Press
simultaneously for 2 seconds.
Emergency/Medical Alarm:
Press
simultaneously for 2 seconds.
Define Follow-Me:
Press
System Chime On/Off:
Press the button
Output Control
Press button
> [Code]
for 2 seconds.
/
2
[Follow Me]
/
for 2 seconds.
[Define]
.
LED Indicators:
Power LED (Green)
On: Power OK.
Rapid Flash: AC trouble.
Slow Flash: Low battery
trouble.
Arm/Alarm LED (Red)
On: System armed.
Rapid Flash: Alarm.
Slow Flash: System in Exit
Delay.
Trouble LED (Orange)
Rapid Flash: Trouble.
Off: No trouble.
Stay LED (Red)
On: System armed at STAY.
Off: System disarmed.
Ready LED (Green)
On: System ready.
Off: Open zones.
Slow Flash: Ready to arm
with open entry/exit zone.
Sound Indicators:
Intrusion alarm:
Continues rapid beeping.
Fire alarm:
Staggered rapid beeping.
Exit delay:
Slow buzzer beeps until the Exit Delay time period expires.
Entry delay:
Slow buzzer beeps until the Entry Delay time period expires.
Confirm operation:
A one-second tone.
Reject operation:
Three rapid error beeps.
Arm/Disarm squawk:
1 siren chirp: System armed,
2 siren chirps: System is disarmed,
4 siren chirps: System disarmed after an alarm.
Edit User Codes:
1.Press
and enter your code.
2. Scroll to the option Codes/Tags and press
3.Scroll to User Codes/Tags and press
.
.
4.Select the option New/Change and press
.
5. Scroll to select the User Index number to which you want to assign a user code and press.
6. Enter and re-enter the new code followed by
.
7. Repeat the above steps for additional codes.
Assign Proximity Tag:
1. Follow steps 1-3 of the Edit User Code above.
2. Scroll to Proximity Tags and press
.
3. Select the option New/Change and press
.
4. Scroll to the User Index number to which you want to assign a tag and press
.
5. Within 10 seconds, hold the proximity tag at a distance of 1 to 2 cm from the keypad’s keys.
6. Repeat the above steps for additional codes.
3
SMS Control Commands (not available during Cloud mode)
Full Arm: [Code][A] (example 1234A)
Un-bypass Zone: [Code][UB][Zone No.]
Home Arm: [Code][H] (example 1234H)
Activate Output: [Code][UOON][UO No]
Full Disarm: [Code][D] (example 1234D)
Deactivate Output: [Code][UOOFF][UO No]
Partition Arm: [Code][A][Partition No.]
Get system status: [Code][ST]
Partition Disarm: [Code][D][Partition No.]
Get last alarm memory: [Code][AL]
Bypass Zone: [Code][B][Zone No.]
Get SIM credit level: [Code][CR]
Telephone Control Commands (not available during Cloud mode)
Receiving a call:
Acknowledgment menu:
1. Pick up the phone.
2. Say “Hello” or press [#]. You
will hear an event announcement
message.
3. Acknowledge the event (See
Acknowledgment menu).
Acknowledge message: Press [1]
Acknowledge and stop all dialing: Press [2] [User code] [#]
Access Operations menu: Press [3] [User code] [#]
Listen and Talk: Press [6] [User code]
Repeat the event message: Press [#]
Repeat the Acknowledgment menu: Press [*]
Register to RISCO Cloud
Registering to RISCO Cloud enables you to monitor, control and configure your Agility 3 system
from any location.
1. Go to www.riscocloud.com/register.
2. Fill in your first name and last name.
3. Enter your email address as Login Name (required for 1st time activation).
4. Define password (minimum of 6 characters and at least one digit) and confirm.
5. Enter in the 15 digits Panel ID as it appear on the sticker located on the side of the panel or as
printed on the postcard that arrived with the panel.
6. Complete registration form and press the Register Button.
7. To complete registration open the email message received on the email account you defined as
Login Name.
Login to RISCO Cloud
1. Go to www.riscocloud.com.
2. Enter User Name and Password (same as supplied during the registration process).
3. Enter Passcode (Agility User Code).
4. Click the Enter button.
iRISCO – RISCO’s Smartphone Application
Homeowners can now enjoy the iRISCO Smartphone app for smart and easy control of their Agility
3 system from any location.
Download the iRISCO app from the Apple App store or Android Play Store.
© RISCO Group 08/2012
5IN1868
4