1
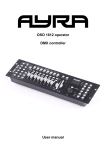
SRC-264 Controller
User Manual
Table of Contents
Features-----------------------------------------------------------------------------3
Safety Information----------------------------------------------------------------3
Panel Overview--------------------------------------------------------------------4
Operation Instruction-------------------------------------------------------------6
1. Program Editing------------------------------------------------------------------------------------------6
2. Revise Scene----------------------------------------------------------------------------------------------6
3. Scene Copy------------------------------------------------------------------------------------------------7
4. Delete Scene----------------------------------------------------------------------------------------------7
5. Delete all Scene------------------------------------------------------------------------------------------7
6. Bank Copy------------------------------------------------------------------------------------------------8
7. Copy Bank to Chase-------------------------------------------------------------------------------------8
8. Copy Scene to Chase------------------------------------------------------------------------------------9
9. Insert Scene to Chase------------------------------------------------------------------------------------9
10. Delete Scene in Chase----------------------------------------------------------------------------------10
11. Delete Chase---------------------------------------------------------------------------------------------10
12. Delete all Chase-----------------------------------------------------------------------------------------10
13. Assign ----------------------------------------------------------------------------------------------------11
14. Reverse---------------------------------------------------------------------------------------------------11
15. Fade time/ Assign time - -------------------------------------------------------------------------------12
16. Delete a Scanner of DMX Channels -----------------------------------------------------------------12
17. Clear all DMX Channels-------------------------------------------------------------------------------13
18. Reverse Assign or Reverse-----------------------------------------------------------------------------13
19. Run Bank manually-------------------------------------------------------------------------------------13
20. Run Chase manually------------------------------------------------------------------------------------13
21. Auto Run ------------------------------------------------------------------------------------------------14
22. Via Auto Run--------------------------------------------------------------------------------------------14
23. Run Bank via Sound Active---------------------------------------------------------------------------14
24. Run Chase via Sound Active -------------------------------------------------------------------------15
25. Midi Setting --------------------------------------------------------------------------------------------15
26. Midi Activated Program ------------------------------------------------------------------------------15
27. Data Delivery between Consoles --------------------------------------------------------------------15
2
Features
Thank you for purchasing this product. Using this console, different light effect can be created to
your desire. Its features include:
DMX 512 console with 192 basic channels
12 scanners, each scanner with 16 channels
16 channel divided into Page A and B, each page with 8 channels
12 chase, each chase with 240 steps.
Manual, Sound Active, and Auto mode
Via Auto, all fade or X/Y axis fade selectable, and speed adjustable
For every scanner, Reverse and Assign available
Via manual and program-editing, press “Fine”, and the relative LED indicator flash. That is the 16
bit assign value. If not, that is the 8 bit assign value.
Midi activated Bank, Chase, Sound Active on/off, Auto on/off, and Blackout on/off.
Data delivery between consoles
LED digi screen display and LED indicator
DMX phase switch selectable
Safety Information
Please read the following instruction carefully and thoroughly. If there is any problem about the
operation, please contact the nearest dealer or Neo-Neon directly.
Not for home use.
Always keep clean. Do not drop any inflammable or oily liquids, water or other corruptive objects
on the surface or inside of the unit.
If any liquid is spilled on or inside, please disconnect the power supply immediately.
Ensure mains power input DC 1000mA
Do not operate the unit when the ambient temperature is over 40°C
Do not try to repair the unit without the guidance of the qualified technician. Or you can contact
the nearest dealer.
No spared component is provided. If needed, please contact the factory directly.
Do not dismantle or modify the unit.
3
Panel Overview
Part1
Part2
4
Button Explanation
Scanner button
This button is to activate Scanner mode.
Scene button
This button is to activate Scene mode.
Chase button
This button is to activate Chase mode.
Prog button
This button is to begin the program editing.
Midi button
This button is to activate the midi mode.
Mic/Rec button
This button is to activate audio and record mode.
Auto/Del button
This button is to activate Auto mode and delete scenes, steps or chases in Recording mode.
Tap/Disp button
This button is to show the current activity or function state.
Bank
This button is to raise the bank or step.
Bank
This button is to lower the bank or step.
Mode and Fine buttons
The 2 buttons are to activate the Assign and Reverse mode.
Assign indicator
This button is to indicate the assign state.
Reverse indicator
This button is to indicate the Reverse state.
Pan indicator
Pan is for axis X.
Tilt indicator
Tilt is for axis Y.
Part3
1.Digi Display Screen
Blackout indicator
00
Step indicator
Prog indicator
00:00
Audio trigger
Auto trigger
5
Operation Instruction
1. Program Editing
A. Press the button for 2 seconds until the relative indicator flashes.
Prog
Scanner
B. Choose one or more scanners as you like to be edited.
Page
C. Select A or B page.
Regu
D. Slide the regulator for brightness, and the display screen will show the value.
Bank
or
Bank
E. Select the bank.
F. Press and hold the button still.
Mid/Rec
G. Press the relative scene, and all the LED indicator flash.
Scene
H. Repeat the B—G until all the programs are finished.
Prog
I. Press the button for 3 seconds to quit, and the relative LED indicator lights out.
2. Revise Scene
Prog
A. Press the button for 2 seconds until the relative indicator flashes.
Bank
or
Scanner
C. Select the scanner.
Regu
Bank
B. Select the bank where the scene to be edited belongs.
D. Slide the regulator of the scene for brightness, and the screen shows the value.
6
Mid/Rec
E. Press and hold the button still.
Scene
F. Press the relative scene, and the LED indicator flashes.
3. Scene Copy
Bank
Scene
Bank
Mid/Rec
Scene
or
Bank
A. Select the bank where the scene to be copied belongs.
B. Select the scene to be copied.
or
Bank
C. Select the bank where the scene will be copied to.
D. Press and hold the button still.
E. Press the bank’s scene button.
4. Delete Scene
Prog
Bank
Auto/Del
Scene
A. Press the button for 2 seconds until the relative indicator flashes.
or
Bank
B. Select the bank where the scene to be deleted belongs.
C. Press and hold the button still.
D. Press the scene to be deleted, and all the LED flash, meaning the scene deleted.
Note:
7
5. Delete all Scenes
A. Shut out the power supply.
Prog
and Bank
power on.
B. Press and hold both button at the same time, and turn the
6. Bank Copy
A. Prog
Bank
A. Press the button for 2 seconds until the relative indicator flashes.
Or Bank
B. Select the bank to be copied.
Midi/Rec
Bank
Mic
Midi/Rec
Or
Bank
C. Select the bank copied to.
D. Press and hold the button still.
E. Press the button, and all the LED indicator flash.
7. Copy Bank to Chase
Prog
A. Press the button for 2 seconds until the relative indicator flashes.
Chase
B. Press the relative chase to be copied to.
Bank
Mic
Midi/Rec
Or
Bank
C. Select the copied bank.
D. Press and hold the button.
E. Press the button, and all the LED indicators flash.
8
8. Copy Scene to Chase ( Add a scene at the end of the steps)
Prog
A. Press the button for 2 seconds until the relative indicator flashes.
Chase
B. Press the relative chase.
Bank
Scene
Midi/Rec
Bank
Or
C. Select the chase where the scene to be copied belongs.
D. Press and hold the relative scene.
E. Press the button, and all the LED indicator flash.
9. Insert Scene to Chase
Prog
A. Press the button for 2 seconds until the relative indicator flashes.
Chase
B. Press the relative chase, and the screen shows the chase state.
Top
Bank
Midi/Rec
Top
Bank
scene
Midi/Rec
C. Press the button, and the screen shows how many steps the chase includes.
Or Bank
D. Select the step before which the scene will be inserted to.
Eg: If before step 5, please choose C004.
If before step 6, please choose C005.
E. Press the button. If you have chosen C005 before, the screen displays C006.
F. Press the button, and the screen displays Bank and Scene.
Bank
Or
G. Select the bank where the scene will be inserted.
H. Select the scene to be inserted.
I.
Press the button, and all the LED indicator flash.
9
10. Delete Scene in Chase
Prog
A. Press the button for 2 seconds until the relative indicator flashes.
Chase
B. Select the chase where the scene to be deleted belongs.
Top
Bank
Or
Auto/Del
Bank
Select the step to be deleted.
Press the button, and all the LED screen flash.
11. Delete Chase
Prog
A. Press the button for 2 seconds until the relative indicator flashes.
Chase
B. Select the chase to be deleted.
Auto/Del
C. Press and hold the button still.
Chase
D. Press the relative chase, and all the LED indicator flash.
12. Delete all Chase
A. Shut out the power supply.
Auto/Del
And Bank
B. Press and hold both buttons at the same time and turn on the power supply.
10
13. Assign Regulator Slider( X and Y axis)
Prog
A. Press the button for 2 seconds until the relative indicator flashes.
Mode
B. Press the button.
Fine
C. Press both buttons at one go, and the assign indicator flash.
Scanner
Bank
D. Select the scanners to be edited. ( One or more scanners at one time)
Bank
Or
E. Select X or Y axis. ( In the screen, P for X, T for Y)
Page
F. Select Page A or B.
Mode
G. Press and hold the button still.
Scene
H. Press the scene button. In this way, the scene’s X or Y is reversed.
Mode
And
Fine
I. Press both button to quit.
14.Reverse ( X and Y axis)
Prog
A. Press the button for 2 seconds until the relative indicator flashes.
Mode
B. Press the button.
Fine
C. Press both buttons at one go, and the assign indicator flash.
Scanner
D. Select the scanners to be edited. ( One or more scanners at one time)
11
Bank
Bank
Or
E. Select X or Y axis. ( In the screen, P for X, T for Y)
Page
F. Select Page A or B.
Mode
G. Press and hold the button still.
Scene
Mode
H. Press the scene button to finish the X or Y assign. All the LED indicators
will flash and the screen will show the X or Y value.
And
Fine
I. Press both buttons twice to quit.
15. Fade time / Assign Fade time ( X or Y axis Fade)
Mode
A. Press and hold the button.
Top
B. Press the button, and the screen will show as follow:
ALL : Fade for all channels
ONLY : Fade for X or Y axis
16. Delete a Scanner of DMX Channels
Prog
Scanner
Mode
Mode
Auto/Del
A. Press the button for 2 seconds until the relative indicator flashes.
B. Select the Scanners to be deleted of Assign or Reverse
Or
Fine
C. Press both buttons to select deleting Reverse or Assign.
D. Press and hold the button still.
E. Press the button, and all LED indicators flash.
12
17. Clear all DMX Channels
A.
B.
Shut out the power supply.
Auto/Del
And
Mode
Press and hold both buttons at the same time and
turn on the power.
In this way, all DMX Channels are deleted.
18. Review Assign or Reverse
Mode
Fine
and
A. Press both buttons once at the same time to review Assign
B. Press both buttons twice at the same time to review Reverse.
C. Scanner
Press the button to review Scanner.
19.Run Bank manually
Auto/Del
Bank
Scene
A. Press the button.
Or
Bank
B. Select the bank.
C. Select the scene to run.
20. Run Chase manually
Prog
A. Press the button for 2 seconds until the relative indicator flashes.
Chase
B. Select the relative Chase.
Top
Bank
C. Press the button.
Or
Bank
D. Press the buttons to see the Chase.
13
21. Auto Run
Auto/Del
A. Press the button into Auto.
1.
Chase
B. Select one or more chases. First pressed, first runs.
2.
Bank
Bank
or
C. If without pressing any chase, the system will automatically
run the Bank. Press Up/Down to select the bank.
22. Via Auto Run
A. Speed
Or
Move the Speed Slider to adjust the internal time between each step.
Top
Press the button twice. The internal time between two presses is the internal
time between each step
B.
Fade
Move the Fade slider to adjust the fade time.
C.
Scanner
Press any scanner and move the scene slider. In this way, the scene value is
locked .
23. Run Bank via Sound Active
Mic
Bank
Fade
A. Select Sound Active, and the Music LED indicator flashes.
Or
Bank
B. Select Bank to be run via Sound Active.
C. Move the Fade slider to adjust the fade time.
14
24. Run Chase via Sound Active
A. Select Sound Active, and the Music LED indicator flash.
Mic
Chase
B. Select one or more chases to be run via Sound Active.
Fade
C. Move the Fade slider to adjust the fade time.
25. Midi Setting
Midi/Rec
Bank
Midi/Rec
A. Press the button into MIDI setting.
Or
Bank
B. Select the value of 1-16 channels.
C. Press the button for 3 seconds to quit.
26. Midi activated program( 16 MIDI Channels, 128 notes)
Note
Function
1~8
8 Scene
9~38
30 Bank
39~50
12 Chase
51
Auto
52
Sound Active
53
Blackout
27. Data Delivery between Consoles
A. Edit the console’s program.
B. Connect the DMX out of the edited console and the DMX in of the unedited console with the
DMX cable. Move the DMX phase switch to the same position.
C. For the edited console, Press and hold Scanner2, Scanner, ready to send the data.
D. For the unedited console, Press and hold the S3, and Scene1 at the same time, then turn on
the power. The LED digit screen reads “ r EA d” Scanner2, Scanner3, and Scene3 at the
same time, then turn on the power. The LED digit screen reads “r EA d”, ready to receive the
data.
E. When all the above are ready, press Scene7 and Scene8 to begin the data-delivery. At this
time, if the target console receives the data, the LED digit screen reads “ RECE” and the
delivery progress.
F. When all the data is sent, the screen reads “END”.
G. Use only after the restart.
15