1
NSE
North Star Horizon Z80 Computer Emulator.
Copyright (1995-2013) Jack Strangio and Others
This software is released under the General Public License, Version 2.
19th November 2013
North Star Emulator User's Guide
Page 1
North Star Emulator User's Guide
Page 2
TABLE OF CONTENTS
0.TABLE OF CONTENTS
0.0 Table of Contents
0.1 Images and printouts
3
4
1. INTRODUCTORY INFORMATION
1.1
1.2
1.3
1.4
1.5
1.6
1.7
1.8
Overview
Attributions for Others' Code in NSE
Thanks
See Also ...
Floppy Disks and a Hard Disk Supplied with NSE
Screen Views
NSE Command-Line Startup Options
Startup examples
5
5
6
6
6
7
12
12
1.9
1.9
1.10
1.11
1.12
CONFIGURATION FILES
Location of Configuration Files
Precedence of Configuration Files
Global Configuration File
User Configuration Files
13
13
13
13
14
2. THE CONTROL CONSOLE
2.1
Help
15
2.2
2.2
2.3
2.4
2.5
2.6
INPUT-OUTPUT CONTROL
attach
detach
aread
caps
delay
16
16
16
16
16
2.7 DISK MANAGEMENT
2.7 mount
2.8 umount
2.9 NSE DEVELOPMENT
2.9 memory
2.10 debug
2.11 log
2.12 screenlog
2.13 break
2.14 trap
2.15
2.15
2.16
2.17
2.18
2.19
17
17
ASSISTANCE
NSE PROGRAM FLOW
go
reset
quit
interrupt
! (break out to unix shell)
18
18
19
20
20
20
20
21
21
21
21
21
3. HELPER PROGRAMS
3.1
3.1
3.2
3.3
3.4
3.5
3.6
3.7
3.8
NSE Tools
mkhd - makes hard disk image files
nshdls – list files on hard-disk image
nshdbm – bitmap: shows files directory and also disk-space usage
nshdcp – copy files from hard-disk-image to unix
unskew-hd-image - unrolls interleaved hard-disk sectors
nsfilecalc – calculate filesizes expressed as 'blocks'
nsfd2u - transfers files from floppy-disk images to unix
u2nsfd - transfers files from unix to floppy-disk image
North Star Emulator User's Guide
22
22
23
23
23
24
24
25
25
Page 3
3.9 compact - defragments floppy-disk image files
3.10 nsfdls - lists floppy-disk image file directory
3.11 mkfs.ns - creates floppy-disk image files
3.12 ni & li - manipulate .nsdosrc configuration files
3.13 jdz80 - disassembles Z80 binary files
25
25
26
26
26
3.14
3.14
3.15
3.16
3.17
3.18
3.19
26
26
27
27
27
27
27
OTHER TOOLS
cpmtools - set of CP/M file utilities for unix systems
hdos2u - copy a file from HDOS to unix filesystem
u2hdos - copy a file from the unix filesystem to HDOS
cpm2unix - copy a file from hard drive CP/M disk to unix
unix2cpm - copy a file from unix filesystem to hard drive CP/M disk
screenlog - copy of all NSE output
4. VARIOUS THINGS
4.1
4.2
4.3
4.4
4.5
4.6
Other files Required
Compiling Libraries Required
Various Useful Manuals
Bugs
TODOs
Author & Support
28
28
28
28
28
28
5. INSTALLATION AND INITIAL SETUP OF HDOS AND CP/M : SESSION PRINTOUT
29
NSE APPENDICES
APPENDIX A. HOW TO ENABLE NSDOS AND CP/M TO USE
THE SECOND HARD DRIVE ON HD5X CONTROLLER
35
APPENDIX B. REPLACE THE COMMAND-LINE UNDERLINE IN HDOS 2.2.0 WITH A BACKSPACE
37
APPENDIX C. NORTH STAR HARD-DISK DATA FORMAT
38
APPENDIX D. NSE HARD-DISK IMAGE FILE STRUCTURE
40
APPENDIX E. SUBDIRECTORIES AND OLD OPERATING SYSTEMS LIKE NSDOS AND CP/M
41
CPZ EMULATOR
Overview
CPZ-48000 Files on the I.C.M. Master Disk
43
44
IMAGES AND PRINTOUTS
Fig 1.
HDOS Running in 25x80 Character Screen Format
8
Fig 2.
CP/M Splash Screen with XDIR Output
9
Fig 3.
Amber-screen Control Console with 'help' and 'mount' Output
15
Fig 4.
Word Star Running in High and Wide Screen Format
10
Fig 5.
HDOS Running in High Screen Format
11
North Star Emulator User's Guide
Page 4
1. INTRODUCTORY INFORMATION
1.1 Overview
NSE emulates the late 1970s to early 1980s North Star Horizon Z80 Computer.
NSE uses disk-image files which may contain any of North Star Computers' Disk Operating
Systems of the period: North Star DOS (NSDOS), CP/M, UCSD Pascal, etc.
The original North Star Horizon in 1978 possessed a single-density floppy-disk-controller
which used a single side of a 5-inch, 35-track, hard-sectored floppy disk with ten 256-byte
sectors per track giving 88K of storage.
Later models used a double-density-controller which could access both sides of the disk and
used 512-byte sectors giving 350K of storage. The double-density controller was not able to
boot from a single-density disk but was able to read from and write on it.
Later again, hard-disk capability was added to the North Star Horizon.
NSE is constructed from two modules. The first module contains the 64K of RAM, a Z80
microprocessor emulator, and a display screen. There is also a monitor which emulates the
operator's interaction with the hardware, such as inserting or removing floppy disks, and
organizing the interaction between the host linux machine and the virtual Z80 machine. This
first module is installed as a system library (or .dll) called libemu8bit_z80 and can be called by
NSE or any other Z80-based emulator software, such as CPZ or CCS.
The second module consists of the North Star Horizon-specific components, such as the data
and control ports of the serial and parallel I/O, the single and double-density floppy-disk
controllers with their boot PROMS, and the fixed-disk controllers
A second Z80 CP/M emulator is included, called CPZ. This emulator is a virtual ICM CPZ-48000
single-board-computer. It uses disk-images which are virtual 8" disks, both single-density,
single-sided and double-density, double-sided. This emulator also uses the same shared library,
libemu8bit_z80, and is practically identical in usages and appearance as NSE.
1.2 ATTRIBUTIONS FOR OTHERS' CODE in NSE
NSE's Z80 emulation code pretty much comes from yaze, a CP/M emulator written by Frank
Cringle. North Star specific amendments such as memory-mapped floppy-disk I/O, and a few
other additions such as Mode 2 interrupt code were made by Jack Strangio.
NSE's Z80 disassembly code comes from Marat Fayzullin's 1999 DAsm code with some local
alterations.
The rest of NSE cannot be blamed on anyone else but myself.
Jack Strangio, September 2013
North Star Emulator User's Guide
Page 5
1.3 THANKS
I have only the greatest appreciation for all those who have helped me in my rather
idiosyncratic quest to write an emulator of the North Star Horizon. The Horizon was my first
computer which took more than 40 hours to build during the course of several weeks in late
1978. The thousands of solder-joints literally burnt-out a new soldering iron. It says a lot for the
quality of the instruction manual that most of the time I really had no idea what each step did
but at the end (once my half-dozen wiring mistakes were fixed) I had assembled a computer
which worked perfectly.
I'd like to mention a few of the people who have generously helped me:
Dave Dunfield, who gave me a lot of help in many different areas. Often, just the fact that a
disk-image worked on his HORIZON.COM emulator and not on my NSE emulator showed me
that I had to find yet one more bug. He also had quite a few North Star floppy disk-image files.
The Late Don Maslin, who got me started on the double-density floppy work by transferring a
lot of data from my old 10-sectored disks to disk-image files.
Martin Brown, who helped me along the way with scanning
without which I was more clueless than usual.
old
Disk-Controller manuals,
Howard Harte , whose regard for old computers means he has taken the trouble to maintain
lots of North Star Manuals:
http://www.hartetechnologies.com/manuals/Northstar/
Bitsavers.org. (http://www.bitsavers.org/bits/NorthStar/). Thanks to them, there are still quite a
few disk-image files around for the North Star Horizon.
Allison Parent, for indicating where I could get hold of information regarding the HD5X
controller board.
1.4 SEE ALSO ...
The horizon.com emulator for MSDOS by Dave Dunfield at Dave's Old Computers Website
(http://www.classiccmp.org/dunfield/index.htm).
Dave also has lots of stuff regarding the North Star Horizon and other old 8-bit computers from
the 70's and 80's.
1.5 FLOPPY DISKS AND A HARD DISK SUPPLIED WITH NSE
Several floppy disks are supplied with NSE to get you up and going quickly. They are stored in
the 'disks' subdirectory. These archive disks have been renamed to allow their uses to be
self-explanatory. The original names are also given here.
HDCPM01.NSI
(was D03B01.NSI)
HDOS22BOOT.NSI (was D04B01.NSI)
HDOS22REC.NSI (was D07B01.NSI)
North Star CP/M Boot Disk for Hard Disks
North Star HDOS 2.2 Boot Disk
North Star HDOS 2.2 Inital Recovery Disk
Two hard-disks are also supplied as samples. They are SG5A-type hard disks storing 5
Megabytes, They have been pre-formatted and 'recovered'. On them are 5 CP/M virtual disks:
CPMA, CPMB, CPMC, CPMD and CPME. When NSE is booted with the CP/M Boot Disk, it will take
you to the A: directory on the first hard-disk on startup.
North Star Emulator User's Guide
Page 6
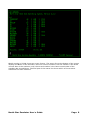
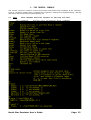
1.6 SCREEN VIEWS
(Note: Most of the screen images included in the User Guide do not render well on LCD screens. They look
better in hard-copy.)
NSE is ncurses-based. When NSE starts it will look for a minimum console 25x80. Smaller
screens will cause the program to abort with an error message.
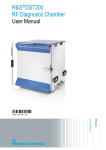
(Fig 1, Page 8: HDOS running in 25x80 screen format.)
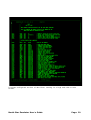
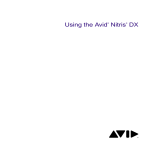
(Fig. 2, Page 9: CP/M Splash Screen with XDIR output)
NSE looks like a typical "green-screen" terminal of the 70's-80's period, in particular it will
default to be a terminal which acts very similar to Televideo 925/ Soroc 120/ ADM3A terminals.
When you hit the default interrupt key (Shift-F3), you will be shown the "control console"
terminal. This will display as an "amber screen" terminal.
(Fig 3, Page 15: Monitor output from 'help' and 'mount).
To get back to the running emulator, type in the "go" command when you have finished with
the control console.
If you are using a GUI, an xterm even larger than 25x80 can be used. Personally, I usually use
xterms of 64x140 characters.
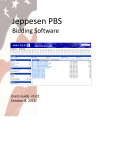
(Fig 4, Page 10: WordStar running in high and wide screen format.)
(Fig 5, Page 11: HDOS running in high screen format)
North Star Emulator User's Guide
Page 7
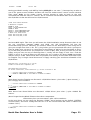
HDOS running in 25x80 character screen format. The status line at the bottom of the screen
displays the Name of the emulator, then two version numbers: the first number is the latest
commit date of the emulator code, the second number is the latest commit date of the
emu8bit_z80 shared-library. The final part of the status line shows which of the terminal
emulators has been selected.
North Star Emulator User's Guide
Page 8
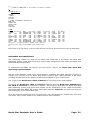
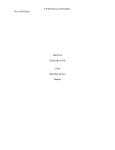
NSE splash screen followed by CP/M running in a high screen format.
North Star Emulator User's Guide
Page 9
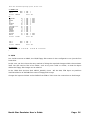
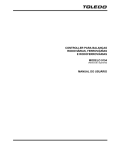
A custom-configured version of Word Star running in a high and wide screen
format.
North Star Emulator User's Guide
Page 10
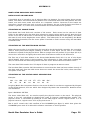
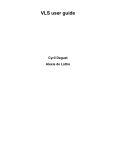
HDOS running in a high screen format.
North Star Emulator User's Guide
Page 11
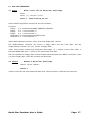
1.7 NSE COMMAND-LINE START-UP OPTIONS
nse [-s] [-b floppy-disk-image-to-boot-from ] [-c config-file] -w -h
-b <disk-image-to-boot>
Overrides the disk-image boot file named in the config-file.
-c <config-file>
Use an alternate config-file instead of the .nsdosrc file, the ~/.nsdosrc file or the'global'
/etc/nse.conf file.
-s
Use the single-density controller.
Note that the North Star single-density controller was not able to boot double-density disks and
vice-versa. You must use the -s option if you are going to boot from a single-density
disk-image.
-w
Attempt to use a display width of 132 characters if the terminal is wide enough.
-h
Attempt to use a display height of 55 characters if the terminal is high enough.
1.8 NSE COMMAND-LINE STARTUP EXAMPLES:
nse -s -c nsdos.zzz -b nsdos51s.nsi
Start NSE using the single-density controller, booting from the nsdos51s.nsi disk-image
file and using the nsdos.zzz configuration file.
nse -b nsdos52q.nsi
Start NSE using the double-density controller, booting from the nsdos52q.nsi disk-image
file and using one of the default configuration files.
nse
Start NSE using the double-density controller, booting from the disk-image specified in the
default configuration file.
My personal start-up script is '/usr/local/bin/horizon' which runs a wide and high terminal
showing 55 lines of 132 characters.
#!/bin/bash
#jvs script
# runs 'high and wide' NSE machine
mkdir -p /home/jvs/tmp/horizon 2> /dev/null
cd /home/jvs/tmp/horizon
xterm -geometry 140x64 \
-title "North Star Horizon Emulator" \
-e '/usr/local/bin/nse -w -h -c /home/jvs/.nsdosrc'
North Star Emulator User's Guide
Page 12
1.9 CONFIGURATION FILES
1.9 LOCATION OF CONFIGURATION FILES:
/etc/nse.conf
The system wide configuration file.
~/.nsdosrc
A user's default configuration file.
You can also use .nsdosrc as a program configuration file in the current working directory.
$PWD/.nsdosrc
1.10 PRECEDENCE OF CONFIGURATION FILES
NSE will look for a '.nsdosrc' file first in the current-working-directory. If it isn't found there it will
look for it in the user's $HOME directory. It it still hasn't found a configuration file, it will look for
the global configuration file '/etc/nse.conf'. The configuration file is a set of control console
commands placed in a file at a pre-specified location. Generally, the most useful and specific
file is the '.nsdosrc' file placed in the current working directory or in the user's home directory.
Because NSE depends on having certain information available at startup, less-specific files can
be useful to make sure that the minimum required parameters are available if the
working-directory or home-directory .nsdosrc files are non-existent.
For instance, a minimum global configuration file (/etc/nse.conf) could supply only the value of
the interrupt key or maybe do the opposite in that it could remove the need for any
user-level .nsdosrc files at all if it was properly set up to supply all relevant NSE information for
all users.
1.11 GLOBAL CONFIGURATION FILE: /etc/nse.conf
A minimum system wide configuration file example:
#global config file for Northstar Horizon Computer emulator
# ( nse )
# lines beginning with '#' are commented out
#
#set CAPSLOCK on (NSDOS uses Upper case)
caps on
#Leave control console environment, begin execution of emulator
go
North Star Emulator User's Guide
Page 13
1.12 USER CONFIGURATION FILES: .nsdosrc
A more complex user-level configuration file in the current-working-directory. This is a copy of a
real file:
### NSE Configuration File ###
#
# Debug Level - log DEV stuff
debug 4
#
log xlog
# Attach output devices
attach s2o /tmp/printout
attach plo /tmp/parlout
#==== interrupt is ` key
interrupt 60
caps on
delay off
# NorthStar floppies
mount 1 disks/hdcpm1.nsi
#mount 1 disks/jhd501.nsi
#mount 1 disks/D04B01.NSI
#mount 2 disks/D07B01.NSI
# North Star hard drives
mount 102 disks/SG5A-2.NHD
mount 101 disks/SG5A-1.NHD
# Begin emulation
go
North Star Emulator User's Guide
Page 14
2. THE CONTROL CONSOLE
The control console is used to do the nuts-n-bolts stuff behind the workings of the emulator,
such as 'inserting' floppy disks, changing the CapsLock, altering the keyboard delay, altering
which key will be used as the interrupt-key, etc.
2.1
help
Show commands and brief synopsis of how they are used.
help <command>
displays more information about <command
North Star Emulator User's Guide
Page 15
2.2 NSE CONTROL CONSOLE INPUT-OUTPUT CONTROL
2.2 attach
Attach I/O device to a unix file.
attach <iodev> <file>
attach s2o /tmp/printout
Without arguments, attach lists the current attachments.
With arguments, attach attaches <iodev> to the <unix file>, where <iodev> is one of s2i,
s2o, pli, plo. These are the North Star Horizon I/O interfaces where s2i = serial2-in, s2o =
serial2-out, pli = parallel-in, plo = parallel-out.
2.3 detach
Detach I/O device from file.
detach <iodev>
detach s2o
detach closes the unix file attached to <iodev>. See attach
2.4 aread
Read in an ASCII unix file instead of keying in
from the keyboard.
the
characters
aread <text file>
aread /tmp/program1
The
linefeed
character
(0A H) is converted to a carriage-return character (0D H)
automatically. Note that aread can supply 'keyboard' input faster than a lot of programs (e.g.
Word Star) can handle gracefully.
2.5 caps
Toggle 'Capslock' On/Off.
caps [on | off]
caps
When NSE starts, the capslock is 'Off'. NSDOS requires the capslock to be toggled on. This can
be achieved either by the actual CAPSLOCK key or by the use of this command. I usually put
the 'caps on' line in the configuration file.
2.6 delay
Toggle a delay into the Hard-Drive Controller subsystem.
delay [on | off]
delay
The delay in the hard-drive subsystem will slow down the operation of the emulator. It is
generally only used in a very few required places when the emulator outruns the user. e.g.
when the system is looking for a ';' character to signal the need to edit CP/M Connections on
the hard-drive and the emulator gets to the following prompt before the user can react.
The HDC delay should almost always be set to 'off'.
North Star Emulator User's Guide
Page 16
2.7 NSE DISK MANAGEMENT
2.7 mount
Mount a unix file as North Star disk image.
mount
mount [-r] <drive> <file>
mount 1
/home/fred/cpm_22.nsi
mount without arguments merely lists the mount tables.
$>mount
Floppy
Floppy
Floppy
Floppy
Hard Disk
Hard Disk
1 is </u/1/northstar/WRK_CPMBOOT_DRI.NSI>
2 is ** not mounted. **
3 is ** not mounted. **
4 is ** not mounted. **
1 is </u/1/northstar/30mb101.nhd>
2 is ** not mounted. **
mount with arguments mounts <file> as N* DOS floppy disk <drive>.
The double-density controller can mount 4 floppy disks and two hard disks, but the
single-density controller can only mount 3 floppy disks.
<file> must contain a North Star filesystem disk-image. If '-r' option is used, then <file> is
mounted READ-ONLY. The '-r' option is not active with hard disks.
The unit numbers for floppy disks and hard disks follow the North Star HDOS convention. Units
1 to 4 are floppy disks, units 101 and 102 are hard disks.
2.8 umount
Unmount a North Star disk-image.
umount <drive number>
umount 2
umount closes the file associated with disk drive <drive number> and frees the resources.
North Star Emulator User's Guide
Page 17
2.9 NSE DEVELOPMENT ASSISTANCE
2.9 memory
Manipulate memory in the North Star Horizon virtual machine.
This subsystem has usage similar to CP/M 'DDT' or MSDOS 'DEBUG'
Commands:
Upper or lower case commands are accepted
<xxx> is required parameter
[xxx] is optional parameter
C <start address> <finish address> <start of compared block>
c 1a00 2000 2a00
Compare two equal-length blocks of memory. Only the bytes which are different will be
displayed with location and values.
D [start address] [finish address]
d 0 12FF
Display the block of memory selected, showing bytes as hexadecimal and ASCII. If no start and
end address specified, the command will continue for 100 H bytes from where it ended last.
E <start address>
E 2CFF
Examine/change values at memory locations. The operation is stopped when no new value is
entered, just a plain 'enter'.
F <start address> <finish address> <fill byte>
f 1000 2000 55
Fill a block of memory with byte-value specified by <fill byte>.
H <value> <value>
h 1267 abcd
Hex arithmetic results of the addition of two values and the subtraction of the second value
from the first value.
L [load address]
l 2a00
Load the file (previously specified by the 'N' command) into memory. If a load-address is not
specified the file will be loaded into location 0000 H.
M <source start address> <source end> <destination>
M 4d00 5000 6d00
Move the block of memory specified by the block's start and end into memory beginning at the
destination address.
N <file name>
N xtest.bin.bas
Change active file-name which specifies which unix file will be used for 'load' and 'write'
operations.
North Star Emulator User's Guide
Page 18
Q
Quit from the memory subsystem back to the emulator's control console.
S <start address> <end address> "string"
S 0100 4fff "North Star"
Search for string delimited by quotes (") within memory block specified.
S <start address> <end address>
S 0100 4FFF 38.4F.4D.60
byte.byte...
Search for a list of bytes specified in hex. and joined by dots.
W [number of bytes in hex]
w 5c00
Write to the disk file previously specified by the 'N' command. Write the number of bytes
specified.
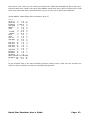
2.10 debug
Set Debug Level.
debug [<hex level>]
debug c3
debug with a decimal numeric argument sets the debug level silently to the level specified. ( 0
= no debugging logged ). debug Level is Set to C3H, using the bit-map values specified here:
Hexadecimal debug bit-values:
Bit
Bit
Bit
Bit
1
2
3
4
1
2
4
8
|
|
|
|
Bit
Bit
Bit
Bit
5
6
7
8
10
20
40
80
Thus debug level C3 is (bit 8) + (bit 7) + (bit 2) + (bit 1)
debug
debug with no argument displays the current bit-mapped level of debug logging to the log file,
displays the current settings, then asks for a selection
$> debug
1:
2:
3:
4:
5:
6:
7:
8:
Registers/Disassembly Display
Motherboard I/O Display
Development Info Display
Floppy Controllers Display
Trap Function Display
Hard Disk Controller Display
Unix BIOS Emulation
Progress/Configuration Info
Select Toggle (or X to exit)
(01H):
(02H):
(04H):
(08H):
(10H):
(20H):
(40H):
(80H):
ON
ON
OFF
OFF
OFF
OFF
ON
ON
:
All output is sent to the log file ( See 'log' below ).
North Star Emulator User's Guide
Page 19
2.11 log
log the debug information to unix disk file.
log
<file>
log xlog
sends debugging output to the specified unix file.
Take care, because the quantity of information sent to the log file can reach the maximum
size (2 Gig in 32-bit systems, whole disk in 64-bit systems) within a fairly short time.
Unless you're doing development on the North Star Emulator itself, it probably will not be
useful to use any debugging or logging at all.
2.12 screenlog
log the screen output to unix disk file.
screenlog
<file>
screenlog screen-out
sends all output to the specified unix file. This can be handy if output scrolls off the top of the
screen before you can read it.
2.13 break
Set a breakpoint address to stop the emulator and return to the
control console prompt.
break <4-hex_digit address>
break 0a5c
2.14 trap
Set a trap address to stop the emulator, perform a user-specified
unix operation, return to the emulator and continue.
trap <4-hex_digit address>
trap 2a00
A dummy function is included in the emulator source (trap.c) which merely prints the trap
address and the register values. The trap function could be used to access parts of the host
unix system or perform any other required operation.
North Star Emulator User's Guide
Page 20
2.15 PROGRAM FLOW CONTROL
2.15 go
[new address]
Start or continue North Star Horizon code execution.
2.16 reset
Reset. Does a Cold Boot of North Star Disk System
2.17 quit
Terminate NSE. Stop running, close files, close windows.
2.18 interrupt
Set a user-selected 'interrupt' key.
interrupt <interrupt ascii value>
interrupt 1B
The value is written as two hexadecimal characters, thus '1b' is the ESCAPE key or '60' is the
BACKTICK key.
This interrupt key is additional to the built-in key combination Shift-F3, which is always active.
2.19 !
Break out to unix shell.
! [<unix shell command>]
! ls /tmp
NOTE: With this command, especially when using ! without argument, NSE will continue
running, it has not stopped. But it will 'disappear' into the 'background'.
! without any argument will appear to drop you back to the original unix shell you started from.
You can perform any actions. This will continue until you exit the command-line shell in the
usual unix ways; by entering Control-D or the 'exit' command at the shell prompt.
! followed by a unix command as its argument will drop you into the shell, perform the
command, then wait for you to hit the 'ENTER' key, when you will be returned to the control
console prompt.
North Star Emulator User's Guide
Page 21
3. HELPER PROGRAMS
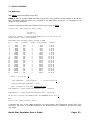
3.1 NSE tools
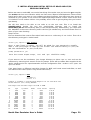
3.1 mkhd (make hard-disk-image file)
mkhd is used to produce NSE hard-disk image files. The smallest of the images of the North
Star 'standard' hard-disk types (as included in the HD5XTEST program) is 5 megabytes, the
largest is 30 megabytes.
A typical example session with mkhd is shown (user input in bold):
nullius [jvs] /home/jvs/wrk/nse [dev*] > mkhd
=== mkhd ===
Version 2.4
Prepares a "Standard" 5-inch Hard-Disk Imagefile for use with North Star
Horizon Emulator (nse) running HD5XDOS.
Disk-image sizes available range from 5 MB to 30MB.
No.
Type
1
2
3
4
5
6
7
8
9
10
11
12
13
14
15
16
17
18
19
20
21
SG5A
TN5A
MS5B
RD5B
SG5B
TN5B
CM10E
MS10E
CM15C
SG15C
RD15C
TN15C
MS15D
MS15E
CM20E
MS20E
RD20E
MS30D
CM30E
MS30E
RD30E
Cylinders
153
153
306
306
306
306
612
612
306
306
306
306
480
459
612
612
612
459
612
612
612
Heads
Total Sectors
4
4
2
2
2
2
2
2
6
6
6
6
4
4
4
4
4
8
6
6
6
9792
9792
9792
9792
9792
9792
19584
19584
29376
29376
29376
29376
30720
29376
39168
39168
39168
58752
58752
58752
58752
Capacity
4.90
4.90
4.90
4.90
4.90
4.90
9.79
9.79
14.69
14.69
14.69
14.69
15.36
14.69
19.58
19.58
19.58
29.38
29.38
29.38
29.38
M
M
M
M
M
M
M
M
M
M
M
M
M
M
M
M
M
M
M
M
M
Select ( '0' to exit) : 2
Type: TN5A disk:
4.90 M capacity.
creating disk-image type TN5A,
---- Is that correct? Y
4.90 M.
Enter file name for this disk: testdisk-1.nhd
Disk ImageFile:
/home/jvs/wrk/nse/testdisk-1.nhd
Disk ImageFile: '/home/jvs/wrk/nse/testdisk-1.nhd'
requested.
created OK.
Do you want to include the SYSTEM account and TRANSIENT file? (Y/n) y
Done.
nullius [jvs] /home/jvs/wrk/nse [dev*] >
I suggest the use of the .NHD extension for these North Star Hard-Disk Image files. This
extension, like most, is probably already in use elsewhere but is unlikely to be confused with
our usage.
North Star Emulator User's Guide
Page 22
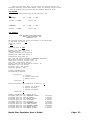
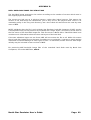
3.2 nshdls (nshd list directory)
nshdls
<North Star hard-disk-image>
nshdls disks/SG5A-1.NHD
nshdls displays lots of information from the file-entries in the North Star Hard Disk index.
Because the position of the file-entries depends on a hash function, the directories always
seem jumbled – this was a trade-off way back in the days of slow hard-disks.
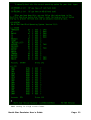
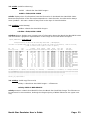
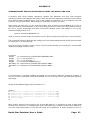
3.3 nshdbm (nshd bitmap)
nshdbm <North Star hard-disk-image>
nshdbm disks/SG5A-1.NHD
nshdbm gives a slightly more compact set of information about the North Star Hard Disk index
and also shows a graphical representation of the usage of the hard disk's file-space.
/tmp/nse_120805/disks > nshdbm SG5A-1.NHD
Bitmap and Directory for North Star Hard Disk Image "SG5A-1.NHD"
(4.896 Megabytes)
Total DIBs = 612 (maximum usable = 602, as also uses 1 DIB for System Track, 8 DIBs for File-Directory, 1 DIB for Test Track)
[ 1 DIB is 16 sectors unless a power-of-2 factor is applied ]
Dir
Dir
File
FileSize
Bytes dib/dib
ndib0
ndib0
File Type
File Type
Offset Type Accnt -- Name -- Attr Sectors Blocks inLast Num/Sects Address Img_Offset Type Data
Description
_______________________________________________________________________________________________________________________________
011A00 1
0001 CPMA
80
1562 3124
200
6 64
0020
00040000
7
0001.00 CP/M Virtual Disk File
012000 1
0001 TRANSIENT
80
24
48
200
4 16
0003
00006000
1
1F00.00 Executable, TypeData=GO
012A00 1
0001 CPMB
80
1562 3124
200
6 64
0084
00108000
7
0001.00 CP/M Virtual Disk File
013400 1
0001 DT
80
2
4
200
4 16
0005
0000A000
1
5000.01 Executable, TypeData=GO
014400 1
0001 BACKUP
80
31
62
200
4 16
0006
0000C000
1
2600.00 Executable, TypeData=GO
016E00 1
0001 CLEAN
80
9
18
200
4 16
0013
00026000
2
0010.00 HBASIC program
017000 1
0001 CK
80
2
4
200
4 16
0010
00020000
1
5000.01 Executable, TypeData=GO
017020 1
0001 CO
80
4
8
200
4 16
0011
00022000
1
5000.01 Executable, TypeData=GO
017400 1
0001 RECMAIN
80
15
30
200
4 16
0012
00024000
2
001D.00 HBASIC program
01A600 1
0001 RECOVERS
80
24
48
200
4 16
0014
00028000
2
002E.00 HBASIC program
01C400 1
0001 RECEXP
80
3
6
200
4 16
0016
0002C000
2
0003.00 HBASIC program
01CC00 1
0001 BAKEXP
80
3
6
200
4 16
0017
0002E000
2
0005.00 HBASIC program
01DE00 1
0000 SYSTEM
01
0
0
000
0
1
0000
00000000
0
0000.00 ACCOUNT directory entry
01DE20 1
0001 CPMWORK
80
47
94
200
4 16
0001
00002000
6
0000.00 CP/M Workfile
01E400 1
0001 RECOVER
80
31
62
200
4 16
001A
00034000
1
2600.00 Executable, TypeData=GO
01EC00 1
0001 HBASIC
80
32
64
200
4 16
001C
00038000
1
2600.00 Executable, TypeData=GO
01F200 1
0001 BACKUPS
80
24
48
200
4 16
0018
00030000
2
0030.00 HBASIC program
128 DIBs per line. 'S' = System, 'D' = Directory, 'X' = TestTrack, '.' = Unallocated, 'o' = Allocated, 'U' = Multiple Allocation
SoooooooDDDDDDDDoooooooooooooooooooooooooooooooooooooooooooooooooooooooooooooooooooooooooooooooooooooooooooooooooooooooooooooooo
oooooooooooooooooooooooooooooooooooooooooooooooooooooooooooooooooooooooooooooooooooooooooooooooooooooooo........................
................................................................................................................................
................................................................................................................................
...................................................................................................X
nullius [jvs] /tmp/nse/disks >
3.4 nshdcp (nshd copy file to unix)
nshdcp <North Star hard-disk-image> <Filename>
nshdcp SG5A-1.NHD HBASIC
nshdcp extracts a North Star HDOS file from the North Star Hard Disk image. The filename to
be extracted is case-sensitive, although the huge majority of HDOS filenames are upper-case
only.
North Star Emulator User's Guide
Page 23
3.5 unskew-hd-image
unskew-hdimage <North Star Hard Disk Image> <unskewed image file>
OR
unskew-hd-image <unskewed image file> <North Star Hard Disk Image>
unskew-hd-image SG5A-1.NHD image-plain-a
unskew-hd-image can be dangerous to your hard-disk image-files. Be careful! It will be
used mainly if you are trying to resurrect portions of files which have been lost by removing the
interleaving of the sectors and giving a flat file with everything in correct order.
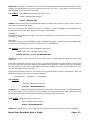
3.6 nsfilecalc (calculate filesizes in terms of NSDOS 256-byte 'blocks')
nsfilecalc
nullius [jvs] /tmp/nse/disks > nsfilecalc
North Star DOS/HDOS File-Size Calculator
copyright 2012 Jack Strangio
A North Star Floppy Disk file is restricted to a maximum length of 66
tracks on a DQ disk, or 660 sectors, 1320 blocks, 330 kilobytes.
A North Star Hard-Disk file is made from 'hunks' containing multiple
sectors. These 'hunks' were originally so-named by North Star, but later
this name was changed to 'DIBs'.
Each DIB ('Data Incremental Block', similar to 'clusters', 'extents', etc.
in other operating systems) contains a multiple of 16 sectors. There can be
a maximum of 128 DIBs per file.
Since this could really restrict the maximum size of a file, a power-of-2
factor can be applied to 16 giving 16, 32, 64, 128, or even up to 256 sectors
per DIB. Consequently, it becomes possible to produce a file which can go up
to the maximum allowable file-size on a hard-disk: 65,535 blocks, 32,768
sectors or 16.384 megabytes.
Each file contains its own internal DIB-directory, which takes up the first
sector of the file itself. Keep this 'loss' of the first file sector in
mind when creating your files on the hard-disk. The Hard-Disk Directory (or
Index) merely tells HDOS where the file's first sector with its
DIB-directory is located upon the hard-drive.
Bytes
North Star Blocks (256-byte)
Hard-Disk Sectors (512-byte)
North Star DIBs ('clusters','extents')
Kilobytes (1024 bytes)
Megabytes (1000x1024 bytes)
(1)
(2)
(3)
(4)
(5)
(6)
Select Units: ('0' to quit) 6
Enter Value wanted : 3
File is:
3072000 bytes, 12000 blocks, 6000 sectors, 94 DIBs, allocation factor = 4, 3000.0 KB
HDOS Command Line:
****
CR FILENAME[[,ACCOUNT],DISK_UNIT]
That size of file has unused sectors in the last DIB.
12000
4
****
If all sectors of the last DIB were to be included, the file's size would then become:
3079680 bytes, 12030 blocks, 6015 sectors, 94 DIBs, allocation factor = 4, 3007.5 KB
HDOS Command Line:
CR FILENAME[[,ACCOUNT],DISK_UNIT]
12030
4
nullius [jvs] /tmp/nse/disks >
North Star Emulator User's Guide
Page 24
nsfilecalc will notify you whether the file-size you have requested will not completely fill a DIB.
If there is unused space left in the allocated disk area you may, if you want, increase the size
requested up to the end of the last DIB.
3.7 nsfd2u (copy NSDOS file from floppy-disk to unix)
nsfd2u <NSDOS disk-image>
nsfd2u
D04B01.NSI
nsfd2u reads the files off a double-density North Star DOS disk image file and creates copies of
those files in the unix file space.
The unix filenames will have the format of <Name of File>_<FileType>[_Go-Address]. The
Go-address will only be used with a file of Type 1 (executable).
example 1.
The M5700 executable file is Type 1 and has a Go-Address of 5700 H; this has a unix file name
of M5700_1_5700
example 2.
The BASIC program called OTHELLO is Type 2 (BASIC Program) and not being a executable Type
1 will have no Go-Address; this has a unix file name of OTHELLO_2
3.8 u2nsfd (copy file from unix to NSDOS floppy-disk)
u2nsfd <unix file> <NSDOS disk-image>
u2nsfd M5700_1_5700
MYDOSDISK.NSI
u2nsfd will copy a file from the unix file space onto a double-density North Star DOS disk
image file.
If the above filename format (as in nsfd2u ) is used for the North Star DOS filename in the unix
file space, then the file will be added to the NSDOS disk directory complete with Type attributes
and Go-Address if applicable. If the NSDOS directory already has a file of the same name, the
new file will replace the earlier file.
If the above filename format is not used, the file-type defaults to Type 0 (undefined). This can
then be altered using the TY command in NSDOS:
TY <filename> <File-Type> [Go-Address]
3.9 compact
compact <NSDOS disk-image>
compact
MYDOSDISK.NSI
compact will 'compact' a North Star DOS disk image file. It will act similar to a defragmenting
of the disk-image file by moving all files towards the beginning of the disk, eliminating any
unused space between the files where previously deleted files once were.
3.10 nsfdls (NS floppy-disk list directory)
nsfdls <NSDOS disk-image>
nsfdls
MYDOSDISK.NSI
nsfdls lists the directory of the floppy-disk image file in the same format as the LI in NSDOS.
North Star Emulator User's Guide
Page 25
3.11 mkfs.ns
mkfs.ns [-s] <disk-image filename>
mkfs.ns
-s
MYSSSDDISK.NSI
mkfs.ns creates an empty North Star DOS formatted floppy-disk image. It can produce either
single-sided, single-density disk-images (88K) or double-sided, double-density disk-images
(350K). The default size is 350K, if you use the '-s' option an 88K disk-image is produced. The
first 8 characters of the filename are used as the disk-label.
3.12 ni & li
ni and li are small unix scripts for manipulating the .nsdosrc configuration file in the user's
current-working-directory.
ni is used for editing the .nsdosrc file, it will use whatever text-editor is set in the user's
environment. li is used to list the current .nsdosrc file
3.13 jdz80 (Z80 disassembler)
jdz80 is a slightly improved version of Marat Fayzullin's 1999 DAsm, in which relative jump
destination addresses are calculated and displayed rather than just displaying the relative jump
offsets.
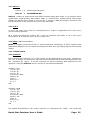
3.14 OTHER TOOLS
3.14 cpmtools
Life is simpler with cpmtools-2.7 (or later) which can be obtained from most linux repositories.
This set of utilities can be used to copy files directly between North Star CP/M disk-images and
the unix/linux file space. It will be necessary to add the following disk definitions to the
cpmtools config-file diskdefs which is usually at /etc/cpmtools/diskdefs.
diskdef nsfd
seclen 512
tracks 70
sectrk 10
blocksize 2048
maxdir 64
skew 5
boottrk 2
os 2.2
end
diskdef nshd4
seclen 512
tracks 512
sectrk 16
blocksize 4096
maxdir 256
skew 0
boottrk 0
os 2.2
end
The added disk-definitions will enable cpmtools to understand the
North Star Emulator User's Guide
North
Star CP/M disk
Page 26
formats, both the floppy-disk images and the larger CP/M Virtual Disk Images on the hard disk.
(Note that you will need to copy the hard-disk CP/M Virtual Disk image-file off from the hard
disk image-file by using the nshdcp program before you can start to use the cpmtools with it.)
The utilities in cpmtools include:
cpmls
cpmcp
cpmrm
mkfs.cpm
3.15
list files in the North Star CP/M disk-image
copy files to and from the North Star CP/M disk-image
delete files from the North Star CP/M disk image
prepare stub disk for CP/M. In my experience, this does not work properly.
Instead, use mkfs.ns to produce an NSDOS disk then FORMAT it for CP/M.
hdos2u (File in HDOS)
hdos2u is a HDOS utility to copy a file on a North Star Hard Disk to the unix filesystem while
running HDOS. All unix filenames will be considered all lower-case, HDOS filenames will be
considered upper-case.
3.16
u2hdos (File in HDOS)
u2hdos is a HDOS utility to copy a file on the unix filesystem to a North Star Hard Disk while
running HDOS. All unix filenames will be converted to lower-case, HDOS filenames considered
upper case.
3.17
cpm2unix (File in CP/M)
cpm2unix is a CP/M utility to copy a file on a North Star Hard Disk CP/M virtual-disk image to
the unix filesystem while running CP/M. All unix filenames will be considered all lower-case,
HDOS filenames will be considered upper-case.
3.18
unix2cpm (File in CP/M)
unix2cpm is a CP/M utility to copy a file on the unix filesystem to a North Star Hard Disk CP/M
virtual-disk image while running CP/M. All unix filenames will be converted to lower-case, CP/M
filenames considered upper case.
3.19 screenlog
screenlog is not a tool as such but a record of NSE's output.
North Star Emulator User's Guide
Page 27
4 VARIOUS.
4.1 OTHER FILES REQUIRED
Various floppy-disk image files:
These are available from various sources. Most of them have a .nsi extension.
4.2 COMPILING LIBRARIES REQUIRED
The linux libraries required are libpthread, libncurses and libpanel. Some linux distros include
libpanel with ncurses.
4.3 VARIOUS USEFUL MANUALS
Most of the manuals are available from http://www.hartetechnologies.com/manuals/Northstar/
or from http://itelsoft.com.au.
Probably the most useful are:
North
North
North
North
North
North
North
Star
Star
Star
Star
Star
Star
Star
DOS Rev 5
BASIC Version 6
Horizon Emulator (NSE) User Guide (this manual)
Hard Disk Operating System Manual
CPM 2.2 Manual
CPM 2.2 Preface to the Addendum
CPM 2.2 Addendum
These are all included in the 'documentation' directory
4.4 BUGS
I feel I have got most bugs out which makes NSE very usable. (After all, it's my usual
day-to-day CP/M system.) But there are still a few to go, apart from the things that could be
done to make NSE not quite so rough-edged. Please inform me of any that you discover. Email
me at: [email protected]
4.5 TODOs
Choice of a third or fourth terminal other than the TV-925 and the Lear-Siegler ADM-3A.
More realistic emulation of Parallel I/O.
4.6 AUTHOR and SUPPORT
Jack Strangio <[email protected]>
Website: http://itelsoft.com.au
North Star Emulator User's Guide
Page 28
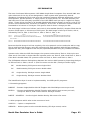
5. INSTALLATION AND INITIAL SETUP OF HDOS AND CP/M.
SESSION PRINTOUTS
Before we start to make NSE, we need a few things. First make sure you have the gcc compiler,
also make and then some libraries which are libncurses, libpanel and libpthread. These will be
found easily when you start up your software package manager. Just make sure they show as
installed on your system. If not, select the required packages and hit 'install'. Most of this stuff
is included in most modern distros. You probably won't need to get anything that you haven't
got already.
You will also need to be able to run sudo or as the root user. This is to install the
emu8bit_z80.h header file into the /usr/includes directory and to install the
libemu8bit_z80.so shared library (DLL) in the /usr/lib directory. Alternatively, you could alter
the Makefiles in the source directory and in the emu_lib subdirectory and locate these files in a
place of your own choosing.
Compilation.
First we download the source-files tarball and extract to a directory of our choice. Then cd to
that directory and type in 'make install':
nullius [jvs] /tmp/nse > make install
After a some lines of output, you will be asked for your password to enable
sudo's root-privileges so that you can install the shared library to /usr/lib
and the executables to /usr/local/bin.
[sudo] password for jvs:
Once the screen output stops, 'nse' and 'cpz' should be ready.
If you want to use the emulators, just change directory to either 'cpz' or 'nse' and run the
emulators by entering their names at the CLI prompt. There will be usable disks supplied in the
'disks' subdirectories for experimentation and the configuration files '.nsdosrc' and '.cpzrc' set
up to use those.
If we want larger or different hard-drive images for NSE, we'll need some hard-disks, so we'll
run mkhd once or twice (but it's only shown once here).
nullius [jvs] /tmp/nse > mkhd
=== mkhd ===
Version 2.4
Prepares a "Standard" 5-inch Hard-Disk Imagefile for use with North Star
Horizon Emulator (nse) running HD5XDOS.
Disk-image sizes available range from 5 MB to 30MB.
No.
1
2
3
4
5
6
7
8
9
10
11
12
13
14
Type
SG5A
TN5A
MS5B
RD5B
SG5B
TN5B
CM10E
MS10E
CM15C
SG15C
RD15C
TN15C
MS15D
MS15E
Cylinders
153
153
306
306
306
306
612
612
306
306
306
306
480
459
Heads
4
4
2
2
2
2
2
2
6
6
6
6
4
4
Total Sectors
9792
9792
9792
9792
9792
9792
19584
19584
29376
29376
29376
29376
30720
29376
North Star Emulator User's Guide
Capacity
4.90
4.90
4.90
4.90
4.90
4.90
9.79
9.79
14.69
14.69
14.69
14.69
15.36
14.69
M
M
M
M
M
M
M
M
M
M
M
M
M
M
Page 29
15
16
17
18
19
20
21
CM20E
MS20E
RD20E
MS30D
CM30E
MS30E
RD30E
612
612
612
459
612
612
612
4
4
4
8
6
6
6
39168
39168
39168
58752
58752
58752
58752
19.58
19.58
19.58
29.38
29.38
29.38
29.38
M
M
M
M
M
M
M
Select ( '0' to exit) : 1
Type: SG5A disk:
4.90 M capacity.
creating disk-image type SG5A,
---- Is that correct? Y
4.90 M.
Enter file name for this disk: hard_disk_1.nhd
Disk ImageFile:
/tmp/nse_120805/hard_disk_1.nhd
Disk ImageFile: '/tmp/nse_120805/hard_disk_1.nhd'
requested.
created OK.
Do you want to include the SYSTEM account and TRANSIENT file? (Y/n) y
Done.
OK. Now using a text editor of some kind prepare a config file called '.nsdosrc'. It doesn't have
to be fancy, as long as it tells NSE where to find its HDOS floppies or hard disks. One is supplied
with the source files. It should look something like this:
#
.nsdosrc - nse startup configuration file
#==== interrupt is ` key
interrupt 60
caps on
delay off
attach s2o /tmp/out_serial2
attach plo /tmp/out_parallel
# NorthStar floppies
##### N* CP/M
#mount 1 disks/HDCPM01.NSI
##### N* HDOS
mount 1 disks/HDOS22BOOT.NSI
mount 2 disks/HDOS22REC.NSI
# North Star hard drives
mount 101 hard_disk_1.nhd
mount 102 hard_disk_2.nhd
go
Now we're ready to run NSE with our own disks for the first time. Type into your terminal or
xterm the command './nse'
You should now have a black screen and a '+' prompt. Enter
then 'GO TOTREC,1”
'GO HD5XDOS' and
HDOS Initial Boot Procedure
This floppy disk supplied from North Star contains two different HDOS
operating systems: one for 5 inch hard disks and one for the HD-18 hard disk.
The names of these files are HD5XDOS and HD18DOS, respectively.
To manually boot into the correct operating system for your disk, type:
GO HD5XDOS,1 <cr>
or
GO HD18DOS,1 <cr>
(If you have a 5 inch hard disk)
(If you have an HD-18 hard disk)
North Star Emulator User's Guide
Page 30
After you have done this, you can follow the instructions in the
Hard Disk Operating System User Manual, under the heading Initial System
Startup to prepare the hard disk and an automatic bootstrap disk.
+GO HD5XDOS
North Star Hard Disk Operating System, Version 2.2.0
=ML
TRANSIENT
Account:
48
SYSTEM
TRANSIENT
Account:
1
WUD
1
1F00
Drive: 101
48
SYSTEM
1
WUD
1
1F00
Drive: 102
=GO TOTREC,1
TOTAL RECOVER FROM FLOPPY DISKS
NORTH STAR COMPUTERS, INC.
VERSION 1.1.0
This program erases all files and accounts on the hard disk.
Is this what you want?: Y
YES or NO, please
: YES
Hard disk drive # :101
Reading skip table from sector 2
Skip count given
= 0
Creating directory at sector 128
Reading disk label from sector 0
Constructing disk label as:
Auto load and execute pathname = TRANSIENT,SYSTEM,101
Major disk structure revision level = 1
Minor disk structure revision level = 0
Disk size = 9776 usable sectors
Sectors reserved for destructive testing = 16
DIB (Hunk) size = 16 sectors
Directory size = 128 sectors
Directory address = 128
................................
Creating SYSTEM account
Initialization complete
Listing to :
1. Terminal
2. Printer (Device #1)
3. Other printer
Selection : 1
Recover directory from floppy disk in drive # : 2
1. Recover all accounts
2. Specify accounts
3. Specify exceptions
Selection : 1
Assuming SYSTEM
Allocated space
Allocated space
Allocated space
Allocated space
Allocated space
Allocated space
Allocated space
Allocated space
Allocated space
Allocated space
account already there
for file TRANSIENT,SYSTEM :
for file DT,SYSTEM :
for file BACKUP,SYSTEM :
for file CK,SYSTEM :
for file CO,SYSTEM :
for file RECMAIN,SYSTEM :
for file CLEAN,SYSTEM :
for file RECOVERS,SYSTEM :
for file RECEXP,SYSTEM :
for file BAKEXP,SYSTEM :
North Star Emulator User's Guide
48 blocks
4 blocks
62 blocks
4 blocks
8 blocks
30 blocks
18 blocks
48 blocks
6 blocks
6 blocks
Page 31
Allocated space for file BACKUPS,SYSTEM :
Allocated space for file RECOVER,SYSTEM :
Allocated space for file HBASIC,SYSTEM :
48 blocks
62 blocks
64 blocks
.............
13 files found on the recover list
Recovered
48 blocks to file TRANSIENT,SYSTEM
Recovered
4 blocks to file DT,SYSTEM
Recovered
62 blocks to file BACKUP,SYSTEM
Recovered
4 blocks to file CK,SYSTEM
Recovered
8 blocks to file CO,SYSTEM
Recovered
30 blocks to file RECMAIN,SYSTEM
Recovered
18 blocks to file CLEAN,SYSTEM
Recovered
48 blocks to file RECOVERS,SYSTEM
Recovered
6 blocks to file RECEXP,SYSTEM
Recovered
6 blocks to file BAKEXP,SYSTEM
Recovered
48 blocks to file BACKUPS,SYSTEM
Recovered
62 blocks to file RECOVER,SYSTEM
Recovered
64 blocks to file HBASIC,SYSTEM
You may remove the disk from drive 2
File recovery completed. Thank you for waiting.
North Star Hard Disk Operating System, Version 2.2.0
=ML
TRANSIENT
DT
BACKUP
CK
CO
RECMAIN
CLEAN
RECOVERS
RECEXP
BAKEXP
BACKUPS
RECOVER
HBASIC
Account:
48
4
62
4
8
30
18
48
6
6
48
62
64
SYSTEM
TRANSIENT
Account:
1
1
1
1
1
1
1
1
1
1
1
1
1
WUD
WUD
WUD
WUD
WUD
WUD
WUD
WUD
WUD
WUD
WUD
WUD
WUD
1
1
1
1
1
2
2
2
2
2
2
1
1
*COMPLETED*
*COMPLETED*
*COMPLETED*
*COMPLETED*
*COMPLETED*
*COMPLETED*
*COMPLETED*
*COMPLETED*
*COMPLETED*
*COMPLETED*
*COMPLETED*
*COMPLETED*
*COMPLETED*
1F00
5000
2600
5000
5000
2600
2600
Drive: 101
48
1
SYSTEM
WUD
1
1F00
Drive: 102
Right. Now we have two hard-drives up and running. Now, let's make a CPM Virtual disk file.
This one 'CPMA' will be 3MB (12030 256-byte blocks) in size, and we're going to put it on our
second hard drive (unit 102). Since this size file is much larger than a file we can make with an
allocation factor of one, we need to make our allocation factor '4'. The helper program
nsfilecalc does all the working out for us.
=CR CPMA,102 12030 4
That's done. Let's have a look, and there's the new large file on hard-drive 2.
=ML
TRANSIENT
DT
BACKUP
CK
CO
RECMAIN
CLEAN
RECOVERS
RECEXP
BAKEXP
BACKUPS
RECOVER
HBASIC
Account:
CPMA
TRANSIENT
48
4
62
4
8
30
18
48
6
6
48
62
64
1
1
1
1
1
1
1
1
1
1
1
1
1
SYSTEM
WUD
WUD
WUD
WUD
WUD
WUD
WUD
WUD
WUD
WUD
WUD
WUD
WUD
1
1
1
1
1
2
2
2
2
2
2
1
1
1F00
5000
2600
5000
5000
2600
2600
Drive: 101
12030
48
4
1
WUD
WUD
0
1
1F00
North Star Emulator User's Guide
Page 32
Account:
SYSTEM
Drive: 102
Having got HDOS running, quit NSE by hitting Shift_F3 or our own (`) interrupt key to take us
out of the green-screen emulator window and into the amber-screen control console window.
Then enter 'quit' at the amber control console prompt to take us back to the unix
command-line. Now we edit our '.nsdosrc' file to comment out the HDOS disks and uncomment
the CP/M disk so that we will boot into CP/M instead.
<some lines above deleted>
# NorthStar floppies
##### N* CP/M
mount 1 disks/HDCPM01.NSI
##### N* HDOS
#mount 1 disks/HDOS22BOOT.NSI
#mount 2 disks/HDOS22REC.NSI
# North Star hard drives
mount 101 hard_disk_1.nhd
mount 102 hard_disk_2.nhd
go
And start NSE again. This time you will enter the CP/M installation setup. Because there is not
yet any connection between HDOS and CP/M, you will immediately fall into the
connection-setup process. Normally you need to switch on the disk-delay in the config file to
give you enough time time to hit the (;) key before you are presented with the A> prompt on
boot-up. Make sure you put in a connection for the floppy as well as for the hard-disk A: drive,
or you will find yourself at an A> prompt but no files to play with, as they are still only on the
floppy and you have no way of reaching them. I usually set the floppy in unit 1 as I: and the
floppy in unit 2 as J: but do what you feel works for you. I tend to use large (30MB) hard disks
with as many 2-3 MB CP/M virtual disks as possible, but leaving at least two drive-letters free
for floppies: say 14 large virtual drives and 2 floppy reaching your maximum allowable of 16
CP/M drives.
64K CP/M vers 2.2 Horizon rev 1.2.0 HQ
Product of North Star Computers,Inc.
Hard Disk Boot In-Process
To review connections, enter Semicolon (;) within a second or two
----- Current Connections in WorkFile: CPMWORK
----- ENTER A CONNECTION or T=To HDOS or S=SAVE or X=EXIT?
I:,1
Note above how the floppies are allocated: <CP/M drive letter> plus colon (:) plus comma (,)
plus <floppy drive number>
----- Current Connections in WorkFile: CPMWORK
I:,1
----- ENTER A CONNECTION or T=To HDOS or S=SAVE or X=EXIT?
A:CPMA,102
Note above how Virtual Disks are allocated: <CP/M drive> plus colon (:) plus <HDOS file
name>.
(Don't forget that the HDOS filename has three components:
<filename> plus <account name> plus <drive number>.
In the case above, we are using the filename “CPMA”, we're leaving out the default “SYSTEM”
account name, and we're noting that the file is on the second hard disk which is HDOS unit
number “102”).
----- Current Connections in WorkFile: CPMWORK
A:CPMA,102
North Star Emulator User's Guide
Page 33
I:,1
----- ENTER A CONNECTION or T=To HDOS or S=SAVE or X=EXIT?
S
A>I:PIP A:=I:*.*
COPYING -CPMD01
ASM.COM
CAT.COM
[ some filenames omitted ]
WSML.COM
WSMSGS.OVR
WSOVLY1.OVR
WSU.COM
XSUB.COM
A>CAT
Name
Ext Bytes
Name
Ext Bytes
Name
Ext Bytes
Name
Ext Bytes
-CPMD01
0K ! DIRDUMP ASM
20K ! HDOFF
COM
4K ! USER
ASM
8K
ASM
COM
8K ! DIRDUMP COM
4K ! LOAD
COM
4K ! USER64T ASM
8K
CAT
COM
4K ! DUMP
ASM
8K ! MBASIC COM
24K ! WS
COM
16K
COLDBOOTCOM
4K ! DUMP
COM
4K ! ONECOPY COM
4K ! WSML
COM
16K
COPY
COM
4K ! ED
COM
8K ! PIP
COM
8K ! WSMSGS OVR
28K
CPM64T COM
16K ! FORMAT COM
4K ! STAT
COM
8K ! WSOVLY1 OVR
36K
CPMGEN COM
16K ! HD05BOOTCOM
32K ! SUBMIT COM
4K ! WSU
COM
16K
DDT
COM
8K ! HD18BOOTCOM
32K ! SYSGEN COM
4K ! XSUB
COM
4K
32 File(s), occupying 364K of 2996K total capacity
223 directory entries and 2632K bytes remain on A:
A>
From here on in the future, you can boot directly into the A: drive and have tools to work with.
NECESSARY DOCUMENTATION
The underlying system for CP/M on the North Star Hard Disk is the North Star Hard Disk
Operating System. CP/M disks are merely virtual disks composed of files within the North Star
Hard Disk Operating System.
To understand the HDOS file system you will need a copy of the North Star Hard Disk
Operating System Manual.
You will most probably need some documentation regarding the CP/M Operating System to
refresh your memory, and for those who weren't familiar with CP/M previously it will seem
relatively familiar due to the ubiquity of Microsoft's MSDOS in more recent years
Get a copy of the North Star CP/M 2.2 Manual for the usage of the CP/M utilities.
A copy of the North Star CP/M 2.2 Preface together with the North Star Addendum to
the CP/M 2.2 Preface is necessary to explain the usage of CP/M with the North Star Hard
Disk Operating System and gives more details on the preparation of the CP/M Virtual Disks
within the North Star HDOS file system. The helper program nsfilecalc can help in working out
the parameters of the Virtual Disk files.
All of the manuals mentioned here can be found in the 'documentation' subdirectory. Also they
are online. They can be found on my website and on other websites.
North Star Emulator User's Guide
Page 34
APPENDIX A.
HOW TO ENABLE NSDOS AND CP/M TO USE THE SECOND HARD DRIVE ON HD5X
CONTROLLER
NOTE: The two North Star boot disks supplied with NSE have been adjusted so that the
second hard drive is already configured in. This may not be the case with other boot disks.
1. NSDOS
I discovered that the 'NSDOS for HARD-DISK version 2.20' master disk (archive disk :
D04B01.NSI) is configured by default to use only the first hard-disk. Then by logging the path of
the flow in the hard-drive initialisation code I saw that an incorrect port-number for the second
hard-drive was being used. (0xFF in place of 0x70).
I found that to use two hard-drive units, we need to enable use of second hard-drive by
replacing an 0xFF byte at 0504H in memory by 0x70 (base port for second hard-drive in
controller). If we load HD5XDOS into memory at 5000H then the relevant byte to alter is at
5404H.
Bytes 0503H & 0504H then become 60H & 70H. We also need to 'restore' the second hard-drive
using the TOTREC software.
I did intend to remove that set of SYSTEM-account software on the second hard-drive, but it
wasn't worth the effort. (Disk space is cheap). And besides, the mkhd program can install the
SYSTEM account and the TRANSIENT program for you.
Sample session:
North Star Hard Disk Operating System, Version 2.2.0
=ML
TRANSIENT
DT
BACKUP
CK
CO
RECMAIN
CLEAN
<RECOVER.LIST>
RECOVERS
RECEXP
BAKEXP
CPMWORK
BACKUPS
RECOVER
HBASIC
Account:
48
4
62
4
8
30
18
56
48
6
6
94
48
62
64
SYSTEM
1
1
1
1
1
1
1
1
1
1
1
1
1
1
1
WUD
WUD
WUD
WUD
WUD
WUD
WUD
WUD
WUD
WUD
WUD
WUD
WUD
WUD
WUD
1
1
1
1
1
2
2
3
2
2
2
6
2
1
1
1F00
5000
2600
5000
5000
2600
2600
Drive: 101
=LI HDUNIT2,102
Type: 125
Drive: 102
=DH 0500-050F
0500 C3 24 05 60
Sector:
2
Hard Disk Drive Not Found
FF 00 00 00
28 00 03 00
01 00 08 07
FF 00 00 00
28 00 03 00
01 00 08 00
=LF HD5XDOS,1 5000
=DH 5400-540F
5400 C3 24 05 60
=DS 5404
5404 FF= 70
=SF HD5XDOS,1 5000
=
(Reboot here)
North Star Emulator User's Guide
Page 35
North Star Hard Disk Operating System, Version 2.2.0
=LI HDUNIT2,102
CPM-A:
CPM-B:
Account:
48
4
62
4
8
30
18
56
48
6
6
94
48
62
64
=DH 0500-050F
0500 C3 24 05 60
7
7
1
1
1
1
1
1
1
1
1
1
1
1
1
1
1
WUD
WUD
WUD
WUD
WUD
WUD
WUD
WUD
WUD
WUD
WUD
WUD
WUD
WUD
WUD
1
1
1
1
1
2
2
3
2
2
2
6
2
1
1
1F00
5000
2600
5000
5000
2600
2600
Drive: 101
4096
4096
HDUNIT2
WUD
WUD
Drive: 102
SYSTEM
CPM-A:
CPM-B:
Account:
4
4
HDUNIT2
=ML
TRANSIENT
DT
BACKUP
CK
CO
RECMAIN
CLEAN
<RECOVER.LIST>
RECOVERS
RECEXP
BAKEXP
CPMWORK
BACKUPS
RECOVER
HBASIC
Account:
4096
4096
4
4
WUD
WUD
7
7
Drive: 102
70 00 00 00
28 00 03 00
01 00 08 07
=
2: CP/M
In a similar manner to HDOS, the CP/M floppy disk master is also configured to use just the first
hard-drive.
In this case, we don't have the easy method of doing the required changes within the emulator
itself. You will need to find a hex editor, such as my own 'uddt' or similar, so that the bytes
within the floppy disk-image can be altered.
In the CP/M disk (archive disk: N2212_64.NSI), there will be 60H, FFH bytes at positions
1AC03H and also at 20F08H from start of floppy-disk image.
Change the bytes at 1AC04 and at 20F09 from FFH to 70H. Save the new values to disk-image.
North Star Emulator User's Guide
Page 36
APPENDIX B.
REPLACE THE COMMAND-LINE UNDERLINE IN HDOS 2.2.0 WITH A BACKSPACE
In the days of the Teletype, we made do with a back-arrow or underline instead of the
destructive backspace which we are more comfortable with nowadays. It's a bit of a shock to
the system when we have to go back to the 'bad old days' of the command-line underline.
METHOD ONE
Change the define in the nse.h file so that the variable WANT_DESTRUCTIVE_BACKSPACE is set
to TRUE. This is the default for NSE.
METHOD TWO
This patch will change both the backspace and the underline to the destructive backspace, if
you want to fix just the underline then only adjust the byte at XX1B H. If you only want the
backspace to be fixed then just change the byte at XX1F H, as shown below.
Using a hex editor, load the D04B01.NSI floppy-disk file.
Change the two bytes at 3E1B H and at 3E1F H to point to the Control-H code at 3E5F H by
changing the value of the byte at 3E1B H to 43 H and the value of the byte at 3E1F H to 3F H.
ALTERNATE METHOD 2
Boot into NSDOS using the D04B01.NSI floppy-disk image file. Then follow as shown in the
session below: ( user input in bold )
+GO HD5XDOS
North Star Hard Disk Operating System, Version 2.2.0
=LF HD5XDOS,1 5000
=DH 7410-741F
7410 C1 24 E6 7F
FE 40 28 5A
FE 5F 28 CD
FE 7F 28 C9
=DS 741B
741B CD= 43
=DS 741F
741F C9= 3F
=SF HD5XDOS,1 5000
=
DO SIMILAR FOR THE 'TRANSIENT' PROGRAM ON THE HARD-DISK
Load the TRANSIENT file into RAM at 6F00 H :
'LF TRANSIENT 6F00'.
Alter the bytes required as in Alternate Method 2. They will be in the same locations.
(NOTE: Some versions of the TRANSIENT file will have the positions at 751B H and at 751F H.)
'SF TRANSIENT 6F00' back into its usual place on the disk.
North Star Emulator User's Guide
Page 37
APPENDIX C.
NORTH STAR HARD-DISK DATA FORMAT
DATA LAYOUT ON HARD DISK.
A hard-disk drive is actually a set of spinning disks (or platters). For each platter there are two
heads, one above and one below the platter. Thus a hard-disk drive with two platters has four
heads, and each head reads and writes on a separate 'surface'. Because all the heads are
moved as a single unit from track to track on the platters, the set of tracks being read from is
called a 'cylinder', so, in this case, there would be four tracks within each cylinder.
STRUCTURE OF SINGLE TRACK
Each North Star hard disk track consists of 16 sectors. Each sector has its own set of data
fields. As the platter spins the disk-drive electronics supply pulses which specify when the first
sector of the set of 16 sectors is reached by the read/write head (the index pulse), and when
the start of each sector begins(the sector pulse). The index pulse is not retained by the North
Star Hard-Disk Controller, but the sector pulse is latched on and is turned off by the Hard-Disk
Controller itself.
STRUCTURE OF THE WRITTEN DISK SECTOR
When the sector-pulse is received from the hard-drive by the hard-disk controller, the controller
waits a short period then begins sending a stream of zero bytes (00 H). This is to cushion
variations in speed of the physical drive. After a enough time has passed, a Sync Byte (01 H) is
sent to the hard drive to signify the actual start of the data to write on the disk sector.
The first set of real data written is the Sector-Label Header field, this is a set of nine bytes
which identify which sector is being written. This information is later used when reading the
disk, to ensure that the data being read is from the sector desired and not another sector.
The next data field contains the 512-bytes of data or program we want to store.
The last data field contains CRC information to ensure that the data has been written cleanly. If
the data read back from the disk-sector does not match the store CRC value, there has been
corruption of the data.
STRUCTURE OF THE SECTOR-LABEL HEADER FIELD
Example:
PHY
05
CYL
0C
HED
83
LSl
BD
LSh
04
STl
B0
STh
04
CRC
09
CRC~
F6
In typical North Star Computers fashion, the sector ID label is not that as suggested by Shugart
in the ST506 protocol, but one which was designed by North Star themselves. However there
are similarities.
Byte 1:PHYSICAL SECTOR
The lower 4 bits (Bits 0-3) are used to specify the physical sector on the track. The physical
sector is the one calculated by skewing the reads to improve reading/writing speeds. The
physical sector is calculated by adding 8 to the ODD logical sectors: logical sector 1 is at
physical sector 9, logical sector 15 is at physical sector 7.
Bits 4 and 5 contain the 2-bit overflow of the CYLINDER byte (Byte 2) which then gives the
CYLINDER byte a total of 10 bits which allows a maximum of 1024 cylinders
North Star Emulator User's Guide
Page 38
Byte 2:CYLINDER
This byte plus the extra 2 bits specified in Byte 1 allow 1024 cylinders.
Byte 3:Surface (Head Number)
The lower 3 bits are used to specify which head is selected.
The high bit (Bit 7) may used to specify whether the sector is write-protected or not.
Bytes 4 - 5:
LOGICAL SECTOR NUMBER
These bytes contain the logical sector-number on the hard-drive. This number may differ from
the physical sector number because of the skewing described above.
Bytes 6 - 7:
SHIFTED TRACK NUMBER
These bytes contain the logical sector-number on the drive modulo 16. This can be thought of
as either the disk-address of sector 0 on the track, or the 12 bits of the track number shifted up
4 bits. This supplies the physical sector address quite simply by adding the PHYSICAL sector in
Byte 1 to this up-shifted track number.
example: ( In hex numbers as it makes it easier to see.)
Logical sector : 04BD H
Track Number : 004B H
Shifted Track : 04B0 H
PHYSICAL
:
05 H
Physical Sector: 04B5 H
Byte 8:CRC SUM
This byte contains the lower 8 bits of the total obtained by adding all 7 previous bytes.
Byte 9:CRC BYTE COMPLEMENT
This byte contains the complemented CRC byte. ( The sum of Byte 8 and Byte 9 is always FF H)
FURTHER EXAMPLE:
PHY
25
CYL
52
HED
80
Physical Sector: 5
LSl
CD
LSh
DE
STl
C0
STh
DE
CRC
40
CRC~
BF
(From Bits 0-3 of PHY)
Cylinder
: 52 H (From CYL) + 0200 H (From Bits 4 & 5 of PHY) = 0252 H = 594 (Dec.)
Head
: 0
(From Bits 0-2) of HED
Logical Sector : DECD H
= 57037 (Dec.)
Physical Sector: 5 (From PHY) + DEC0 H (From Shifted Track) = DEC5 H = 57029 (Dec.)
CRC
: 25 H + 52 H + 80 H + CD H + DE H + C0 H + DE H = 440 H = 40H
CRC~
: 40 H complemented = BF H ( or BF H + 40 H = FF H)
North Star Emulator User's Guide
Page 39
APPENDIX D.
NSE's HARD-DISK IMAGE FILE STRUCTURE
The hard-disk image structure's size varies according to the number of sectors which were in
the original physical hard disk.
The sectors are laid out as in physical sectors, rather than logical sectors. This means the
sectors in the disk-image are interleaved, just as they are on the physical disk. There is an
unskewing utility in the nse_tools directory, but I don't think this would ever be used by most
users of NSE.
NOTE: Validation that the file is truly a North Star Emulator hard-disk image as of NSE, version
0.54 depends solely on the presence of the North Star 'magic' bytes ( 00 H, FF H) at the start of
the first sector of the hard disk image-file. This first sector is North Star's "Hard Disk Label" and
contains much information about the size and layout of the hard disk.
If the two validation bytes are not found, NSE will not mount the file at all. While this means
that a hard disk image file may become unusable very occasionally, it serves to guard against
unwanted accidental damage to other types of files. If warranted, further tests for disk image
validity may be included in later versions of NSE.
For producing NSE hard-disk image files of the 'standard' hard disks used by North Star
Computers, see under NSE Tools, mkhd.
North Star Emulator User's Guide
Page 40
APPENDIX E.
SUBDIRECTORIES AND OLD OPERATING SYSTEMS LIKE NSDOS AND CP/M
A problem with using modern operating systems like Windows and Unix with primitive
operating systems like NSDOS and CP/M is that the primitive operating systems know nothing
at all about modern subdirectories, and so are unable to read them. As a consequence we are
forced to using Virtual Disks which those old operating systems can read.
That is why you will get a 'I can't read this floppy' type of disk-error from NSDOS if you try to
read files directly from Windows or Unix. How do you mount or read them? You need to move a
file into a virtual disk-image and then mount that desired virtual disk-image in one of the
emulated floppy-drives as in:
mount 4 /home/jvs/dl/DBase2.nsi
while in control console mode (the amber-screen). Don't forget that unix/Linux is case-sensitive.
The command assumes that the disk-image you have downloaded the disk-image from the web
(or wherever) is in /home/jvs/dl.
If you then enter just plain 'mount' at the control console-prompt you should get a mount-table
display something similar to this:
$>mount
Floppy
Floppy
Floppy
Floppy
Hard Disk
Hard Disk
$>
1 is </tmp/nse-64_120205/disks/HDCPM01.NSI>
2 is ** not mounted. **
3 is ** not mounted. **
4 is </home/jvs/dl/DBase2.nsi>
1 is </tmp/nse-64_120205/disks/SG5A-1.NHD>
2 is </tmp/nse-64_120205/disks/SG5A-2.NHD>
A second point to consider: NSDOS and CP/M are two entirely different operating systems. If
you try to read a CP/M disk image with NSDOS (or vice-versa) you won't get what you might be
expecting:
[Using CP/M. NSDOS floppy disk mounted in G:]
A>DIR G:
G: ^^^^^^^^
G: ^^^^^^^^
G: ^^^^^^^^
G: ^^^^^^^^
G: ^^^^^^^^
A>
^^^ :
^^^ :
^^^ :
^^^ :
^^^@
^^^^^^^^
^^^^^^^^
^^^^^^^^
^^^^^^^^
^^^
^^^
^^^
^^^
:
:
:
:
^^^^^^^^
^^^^^^^^
^^^^^^^^
^^^^^^^^
^^^
^^^
^^^
^^^
:
:
:
:
^^^^^^^^
^^^^^^^^
^^^^^^^^
^^^^^^^^
^^^@
^^^@
^^^@
^^^@
Here CP/M is looking at the area on the virtual disk where it is expecting to find a valid CP/M
file-directory. However, on a NSDOS disk, that CP/M directory is nowhere to be found. Whatever
is at the expected position on the disk will show up as gibberish. A similar problem occurs in
North Star Emulator User's Guide
Page 41
the reverse case, when you are looking at a North Star CP/M disk with NSDOS. But in this case,
because North Star CP/M came later than NSDOS, North Star were able to format their CP/M
disks such that valid data is produced when you try to use LI on a North Star CP/M disk.
[Using NSDOS. CP/M floppy disk mounted on drive 2]
+LI 2
CP/M 2.2
0
0 D
0
QUAD.CAP
0
0 D 112
DISKETTE
0 1400 D
0
CPM FROM
0
0 D
0
NORTH *
0
0 D
0
STAR
0
0 D
0
-------0
0 D
0
-SYSTEM4
32 D
6
-TRACKS4
32 D
6
BIOS
4
8 D
6
USER
8
2 D
6
CPM CCP
9
8 D
6
CPM BDOS 13
14 D
6
-------0
0 D
0
DIR.SEC1 20
2 D
3
DIR.SEC2 25
2 D
3
DIR.SEC3 21
2 D
3
DIR.SEC4 26
2 D
3
-------0
0 D
0
CPM DATA
0
0 D
7
DATASEC1 22
2 D
7
DATASEC2 27
2 D
7
DATASEC3 23
2 D
7
PRESS RETURN TO CONTINUE
DATASEC4 284 135 S 46
....
135
0 S 32
+
To get a better idea of the two operating systems' idiosyncracies, grab the user manuals for
each one from a website and have a rummage though them.
North Star Emulator User's Guide
Page 42
CPZ EMULATOR
The Inter Continental Microsystems' CPZ-48000 single-board computer from around 1982 was
quite advanced for its day. It was designed as a base system with 'personality boards'
(daughter-circuitboards) which took over the interfaces between different peripherals, such as
serial printers, parallel printers, 5" floppy drives, 8" floppy drives, etc. The CPZ emulator can
deal with most of the everyday operation of the CPZ-48000 and runs up to 4 eight-inch floppy
drives. These drives simulate an 8" double-sided double-density floppy. On track 0, side 0, the
sectors are formatted to be 26 sectors of 128 byes, all the rest of the tracks on both sides are
formatted to 16 sectors of 512 bytes. This gives a total of about 1.2megs per disk.
The disk image is laid out as follows: each track is allocated 8K (16x512), whether filled with 26
sectors of 128 bytes, or 16 sectors of 512 bytes. The disk-image is built up of Track0, side 0;
followed by Track 0, Side 1; then Track 1, Side 0; Track 1, Side 1, etc.
Track 0:
Track 1:
Side 0
SSSSSSSSSSSSSSSSSSSSSSSSSS
DD DD DD DD DD DD DD DD DD DD DD DD DD DD DD DD
Side 1
DD DD DD DD DD DD DD DD DD DD DD DD DD DD DD DD
DD DD DD DD DD DD DD DD DD DD DD DD DD DD DD DD
Tracks Omitted ........
Track 75:
Track 76:
DD DD DD DD DD DD DD DD DD DD DD DD DD DD DD DD
DD DD DD DD DD DD DD DD DD DD DD DD DD DD DD DD
DD DD DD DD DD DD DD DD DD DD DD DD DD DD DD DD
DD DD DD DD DD DD DD DD DD DD DD DD DD DD DD DD
Because the disk-image is laid out regularly, the unix cpmtools can be used quite well to copy
files to and from disk-images, using the cpmtools disk_defs supplied with the two emulators.
Append the disk_defs supplied to the file /etc/cpmtools/diskdefs using any suitable text editor.
System tracks: With the CPZ disk-images, the system tracks take up Track 0, Side 0 plus one
other track. If the disk is single-sided the systems tracks are Track 0, Side 0 and Track 1, Side 0.
If the disk is double-sided, the systems tracks are Track 0, Side 0 and Track 0, Side 1.
The CPZ-48000 software distinguishes between the various disk formats by inspecting the byte
at 7EH on Track 0, Side 0, Sector 1. (The first sector on the disk.) The byte values signify:
DE
double-density 512-byte sectors single-sided
DC
double-density 512-byte sectors double-sided
E5
single-density 128-byte sectors single-sided
E7
single-density 128-byte sectors double-sided
The identification byte is used or implemented by the CPZ-specific programs:
1. Formatting programs:
DSKFMT - Formats single/double-sided 8" floppies with 26x128-byte sectors per track
FMT512 - Formats single/double-sided 8" floppies with 16x512-byte sectors per track,
except for Track 0, Side 0 which has 26 128-byte sectors.
DSKTST & DSKT512 - checks single & double-density disk sectors for errors.
2. Other programs which write at the raw-sector level:
COPY512 - Copies a complete disk.
SGEN512 - Writes system tracks to double-density (512-byte sector) tracks.
North Star Emulator User's Guide
Page 43
CPZ CP/M Master disk Files
Note that some of these will not work or will work differently when using the CPZ emulator.
From CPZ-48000 System Disk Explanatory Pages written September 15 1982:
Disk File Explanation
9-15-82
This document describes the contents of your CP/M system disk.
1.
ASM.COM - This is the normal CP/M assembler. It only assembles 8080 code.
2.
BASIC.COM - This is a public domain basic written by Gordon Eubanks for his Thesis.
This Basic is UNSUPPORTED.
3.
BOOT.ASM - This is your secondary bootstrap source file used to load your CP/M 2.2
deblocked operating system. You will use this file any time you need to make any
changes in your bios file and when you rebuild your operating system tracks. See the
User's Guide provided.
4.
CHA-BAUD - This program allows you to change the baud rate of the A channel I/O
port. The default baud rate for Channel A = 9600 Baud when the system is first brought
up. CHA-BAUD will allow you to change it.
5.
CONVERT.COM - This program is used to convert lower case letters to upper case letters
in the label field and instruction field before using the ZASM.COM assembler. This
program will check the balance of quoted strings and if an imbalance is found, will mark
the source file with a @ character. Program syntax is as follows:
CONVERT [filename.ext] <cr>
6.
COPY512.ASM and COPY512.COM - This program copies single-sided or double-sided
deblocked 512-byte double-density disks for backup. This program checks the target
disk to see if it matches the source disk before the copy operation takes place. If the
two disks do not match, then an error message is given and the program restarts at the
beginning. Improper disk means source disk is double-sided 512 byte, target disk is a
single-sided disk, for example.
7.
DDT.COM - This your CP/M Dynamic Debugger Program. This program does not support
Z80 instructions.
8.
DISKDEF.LIB - Library file for generating disk definition tables as explained in the
Alteration Guide.
9
DSKFMT.ASM and DSKFMT.COM - This program formats disks in single-density IBM 3740
standard, or double-sided, single-density.
10.
DSKT512.ASM and DSKT512.COM - This program checks 512-byte diskettes for errors.
This is a read-only disktest program.
11.
DSKTST.ASM and DSKTST.COM - This program checks single-density diskettes for errors.
This is a read-only disktest program.
12.
DUMP.ASM and DUMP.COM - Example program supplied by Digital Research.
13.
ED.COM - This is your CP/M context editor.
North Star Emulator User's Guide
Page 44
14.
EXTRACT.COM - This program allows you to list source code from a .PRN file by using a
Starting and Ending label in your program. This saves you from having to list your
whole file just to get at a small area if you need to debug. Syntax is as follows:
EXTRACT [filename] <first label> <second label> <cr>
where:
filename = name of file with extension .PRN assumed
first label
= starting label
second label = ending label
15.
FMT512.ASM and FMT512.COM - This program formats diskettes in either single-sided
or double-sided 512-byte x 16 sectors. Track 0, Side 0 is always single-density 128-byte
sectors for single-sided or double-sided disks.
16.
GUESS.COM - This is a small computer game written in assembly language.
17.
IOEQU.LIB - This file is used in conjunction with TURBO.ASM during assembly time.
18.
LOAD.COM - Used to load .HEX files into .COM files for running in CP/M's TPA space.
19.
MOVCPM.COM - This file is used to create a system image file which is used to rebuild
your CP/M operating system. Do not destroy this file, as it is the only file which allows
you to change your system memory size. See the CP/M User's Guide for further
instructions.
20.
NEWMAC.LIB - This is a collection of MACRO's which are used in some of the support
programs provided on this diskette.
21.
PIP.COM - This the CP/M interchange program.
22.
RUN.COM - This is the runtime package used with the BASIC.COM program. This
program is likewise NOT suported.
23.
SETTIME.COM - Program used to set the 'REAL TIME CLOCK' date and time. This
program is used with the auto start feature of CP/M if you set the AUTOTIM
equate true in the BIOS file. ** CPZ will NOT change the system clock **
24.
SGEN512.ASM and SGEN512.COM - This program is used to place your CP/M
operating system onto the first two tracks of your diskette. This file will check to
see if you are trying to place the wrong system type onto the wrong diskette type.
You can not place a double-sided operating system onto a single-sided diskette. This
program is only used to place systems onto 512-byte diskettes. It will not work with
single-density disks. (See SYSGEN.COM)
25.
SKEW.LIB - This is another MACRO file used with some of the support programs
provided on this diskette.
26.
STAT.COM - This is your CP/M status program.
27.
STRIP.COM - This program will tear down a .PRN file back into an .ASM file. It is mainly
provided so that in the event that you should lose a source file, but you have the .PRN
file, you can reasonably recover back to your source file level. This package does not
remove everything, such as macro expansions, but at least it may be of some help.
Syntax is as follows:
STRIP [filename1] [filename2] <cr>
where .PRN is assumed for filename1,
and .ASM is assumed for filename2.
28.
SUBMIT.COM - Your CP/M submit program.
29.
SYSGEN.COM - Your CP/M sysgen program. This file only works on single-density
diskettes.
North Star Emulator User's Guide
Page 45
30
TIME.COM - This program is used to display the date and time at the console. Options
include:
TIME<cr> to display the date and time and return to CP/M.
TIME P <cr> causes the date and time to display until any key is pushed to abort.
31.
TURBO.ASM - This your BIOS file for CP/M 2.2 for use with the Intercontinental Micro
Systems Corp. CPU board. See the User's Guide for more details.
32.
TURBO.LIB - This file contains the macros for generating a BIOS which uses extended
memory as a Memory Disk. See the User's guide for more details.
33.
WORM.ASM and WORM.COM - This program is an M1 memory check program used
to check memory for proper operation.
34.
XDIR.COM - This program displays a sorted disk directory with file sizes displayed in
kilobytes.
35.
XSUB.COM - This your CP/M extended submit program.
36.
Z80.LIB - This is a macro file containing Z80 instructions for use with Digital
Research's MAC macro assembler.
37.
ZASM.COM - This a Z80 assembler used to assemble most of the support programs.
The syntax for this assembler closely follows that of the CP/M assembler with some
exceptions as noted in the ZASM users guide.
North Star Emulator User's Guide
Page 46