1
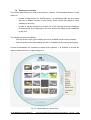
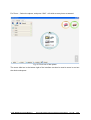
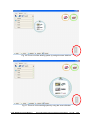
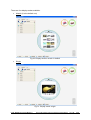
Trends Research ENabler for Design Specifications FP6-IST-2005-27916 Deliverable Security Classification Leading partner Issue Date Version Authors Approved by Date D 6.3 PU ROBOTIKER 18/11/08 1 Aranzazu Bereciartua, Angel López Carole Bouchard 18/11/08 D6.3. Final interface and user manual for final software This document describes the user interface of the final prototype and how to use it. Acronym List of participants Coordinator organization E-mail contact person Project Website Project Type Contract number Start Date Duration © TRENDS SERAM PERTIMM INRIA ROBOTIKER CRF (FIAT) SB (STILE BERTONE) UNIVLEEDS (UNIVERSITY OF LEEDS) CU (CARDIFF UNIVERSITY) SERAM SOCIETE D'ETUDES ET DE RECHERCHES DE L'ECOLE NATIONALE SUPERIEURE D'ARTS ET METIERS [email protected] www.TRENDSproject.org STREP (Specific Targeted Research Project) FP6-IST-27916 1 January 2006 36 months 2008 TRENDS Consortium Members. D6.3. Final interface and user manual for final software 18.11.08 1/63 0. INDEX 1. 2. 3. 4. 5. 6. 7. 8. 9. 10. 11. 12. 13. 14. © GENERAL INTRODUCTION...............................................................................................3 1.1 WORK PACKAGE 6 OBJECTIVES: USER INTERFACE DEVELOPMENT ........................3 1.2 DESCRIPTION OF WORK TASK T6.2......................................................................4 1.3 STRUCTURE OF THE REPORT ..............................................................................5 OVERVIEW OF PROTOTYPE 3 ..........................................................................................7 USER INTERFACE DEVELOPMENT ENVIRONMENT .............................................................9 PROCEDURE FOR EXECUTION .......................................................................................10 DESCRIPTION OF THE INTERFACE AND AVAILABLE FUNCTIONALITY .................................10 WORKING PROCEDURE: SEARCH FUNCTIONALITY ..........................................................14 6.1 RANDOM SEARCH .............................................................................................17 6.2 SEARCH BY TEXT QUERY ...................................................................................18 6.3 SEARCH BY IMAGE ............................................................................................21 6.4 TUNING (RELEVANCE FEEDBACK) ......................................................................24 6.5 MIXED SEARCH BY TEXT AND IMAGE ..................................................................26 WORKING PROCEDURE: GENERAL AVAILABLE FUNCTIONALITY ........................................28 7.1 HANDLING OF AN IMAGE ....................................................................................28 7.2 HANDLING OF A SPHERE ...................................................................................31 7.3 DISPLAY FUNCTIONALITIES ................................................................................35 7.4 STORAGE OF IMAGES IN FOLDERS .....................................................................38 7.5 SLIDESHOW ......................................................................................................40 7.6 HISTORY ..........................................................................................................41 WORKING PROCEDURE: STATISTICS .............................................................................43 8.1 TEXT STATISTICS ..............................................................................................43 8.2 IMAGE STATISTICS ............................................................................................46 WORKING PROCEDURE: MAPPING ................................................................................49 WORKING PROCEDURE: PALLETS ................................................................................53 WORKING PROCEDURE: GROUPS ................................................................................57 CONCLUSION ..............................................................................................................60 LIST OF FIGURES AND TABLES ......................................................................................61 GLOSSARY...............................................................................................................63 2008 TRENDS Consortium Members. D6.3. Final interface and user manual for final software 18.11.08 2/63 1. GENERAL INTRODUCTION This report corresponds to the deliverable of WP6, D6.3: User interface description and user manual of final prototype. 1.1 WORK PACKAGE 6 OBJECTIVES: USER INTERFACE DEVELOPMENT The objective of WP6 is to elaborate the user interface for the complete system. This interface is a collection of different interfaces that present different functionalities, such as the mixed image and text search, pallets generation, ambience boards’ generation, mapping, and clustering. The WP6 is fully related to WP1 and WP2, which constitute the input for this WP. WP1 gathers the requirements of the users regarding the functionalities of the system. The WP2 gathers the system technical layout and the integration of the elements developed in the other WPs, interface included. The output of WP6 will be evaluated by the end users in WP7. WP6 is split up into three tasks: T6.1. Interface development of prototype 2: the interface of prototype 2 is developed. Prototype 2 is the first interactive software whose aim is to evaluate the first version of the interface and its functionalities. It is constituted by the user interface (an executable that works on the user's computer) and two servers: the text search engine and the image search engine. The prototype 2 is available with the following functionalities of search: - random search - search by image sample - search by relevance feedback - search by text T6.2. Interface development of prototype 3. The prototype 3 represents the almost final version of the TRENDS system, and will contain the following elements: © - the new highly innovative user interface. - the mixed text and image search component - the relevance feedback final component - the grabbing component - the clustering and mapping functionalities 2008 TRENDS Consortium Members. D6.3. Final interface and user manual for final software 18.11.08 3/63 - the harmony generation component - the statistics - the lifestyle - the history - the display modes and slideshow functionality At the moment of writing this version of the deliverable D6.3, the following functionalities are available: - the new highly innovative user interface (and related functionalities) - the mixed text and image search component - the relevance feedback final component - the text statistics functionality - the image statistics functionality - the history - the display modes and slideshow functionality - the mapping functionality - the pallets functionality - the groups functionality T6.3. Final software tuning: The final software is the prototype 3 with the improvements detected by the users. This deliverable D6.3 is the output of the T6.3, and its aim is to describe the user interface of TRENDS prototype. 1.2 DESCRIPTION OF WORK TASK T6.3 This report is related to the task T6.3. Final software tuning. After the T2.1 and the definition of a procedure for the identification of the (T2.2), the definition of a procedure for the mono-sector mappings, ambiences, pallets definition and statistics module (T2.3), the T2.4, the definition of the system infrastructure (2.5), the prototype 2 was developed by month 18, for the first tests with the end users in order to achieve the final TRENDS software. The functionalities gathered in T1.4 have been translated into options available from the interface. The first version of the graphic interface is D2.4. © 2008 TRENDS Consortium Members. D6.3. Final interface and user manual for final software 18.11.08 4/63 The interface of prototype 2 was developed in T6.1. Prototype 2 was the first interactive software coming from the design of the interface in ppt format. In this first interactive version, the priority was to create a tool that allowed validating the main functionalities of the software, and to verify that the integration among the different software modules was possible. It was fully achieved. The prototype 2 was evaluated along the different and periodic test sessions with the end users. This lead to the identification of a series of weak points, related to both dimensions, this is, the quality of retrieved results and the functionalities performance and the interface itself. As output and according to the users’ proposals, a new interface was designed that would gather all the improved elements. This is the new interface of prototype 3 that has been developed in T6.2. During T6.3 the software has been improved, it is more robust and manages to control from possible errors. The resulting deliverable D6.3 is headlined User Interface description and User Manual of Final Prototype. This deliverable describes the user interface; it explains the procedure for installation and execution of the software, the functionalities for search and the general available functionalities at this stage of the project. 1.3 STRUCTURE OF THE REPORT The following document D6.3 will be organised into the following parts: 1. General introduction. 2. Overview of prototype 3: the purpose and main features of the prototype are described as long as the elements that are integrated, the communication protocols and integration steps. 3. User interface development environment: the programming tools used for the development of the user interface are enumerated. 4. Procedure for execution: it describes the steps for running the interface 5. Description of the interface and available functionality: the interface is described. 6. Working procedure: search functionality: it is explained how to use the search functionality of the prototype. 7. Working procedure: general available functionality: it is explained how to use the options and functions available in the interface. 8. Working procedure: statistics: it is explained how to use the statistics functionality, being the input text or image. 9. Working procedure: mapping: it is explained how to proceed with mapping functionality. 10. Working procedure: pallets: it is explained how to proceed with pallets functionality. © 2008 TRENDS Consortium Members. D6.3. Final interface and user manual for final software 18.11.08 5/63 11. Working Procedure: groups: It is explained how to proceed with groups functionality. 12. Conclusions. 13. List of figures and tables. The understanding of the sections by all partners is of great importance because they constitute the reference of the user interface of prototype and the working procedure. The evaluation of the quality of the retrieved results and ergonomics specifications depends deeply on the understanding of the available functionalities. © 2008 TRENDS Consortium Members. D6.3. Final interface and user manual for final software 18.11.08 6/63 2. OVERVIEW OF TRENDS PROTOTYPE Final prototype is the improved software after the prototype 3 development (first interactive version of the software) and its evaluation by the end users. Some of the existing differences between prototype 2 and prototype 3 are exposed next: - it contains the improved database (the second version of the database contained about 500.000 images while this new version contains about 1.900.000 images, which is four times bigger). - It is not necessary to change the resolution of the screen to 1280 x 1024 as in prototype 2. The interface auto sizes. - It is not necessary to change the font’s size to big fonts (120 ppp). The interface auto sizes. - The interaction with the interface is faster than in prototype 2. The feedback provided by the system to the user has been encouraged. - The general aspect of the interface of prototype 3 has changed according to the tests and feedback retrieved by the end users during the different test sessions. - The general functionality of the interface for the handling of data and results is wider than in prototype 2. Many options are possible that will make it easier the search, the display and the storage of the retrieved images. Final Prototype is constituted by the user interface (a light executable, 1.7 MB that runs in the user's computer) and two servers: the text search engine (TSE) and the image search engine (ISE); the Request Management Server (RMS) that addresses the queries to the proper server and gathers the results coming from both of them is placed physically in the TSE server. The prototype is available with the following functionalities of search: random search, search by image sample, search by relevance feedback, search by text and search by mixed text and image, display modes, statistics, pallets, groups, mapping and history. Semantic developments such as ontology tags and pertimizers are present in the text search engine but still not visible from the user interface. The basis of the communications protocols and formats for the exchanges between the modules are defined to match the requirements of the functionalities implemented. The general functionalities available in the user interface for handling of data and results are wider than in the previous version. This is also a big advantage. In this prototype, the database index is built by steps integrating indexation from Pertimm, images validation from INRIA and ontology tags from CU but there is not automated process © 2008 TRENDS Consortium Members. D6.3. Final interface and user manual for final software 18.11.08 7/63 to link these actions. This prototype has been implemented with two distant servers, the image search engine located at INRIA and the text search engine located at PERTIMM. A copy of the database stands on both servers which is acceptable as this prototype has no update functionality for the database. Only the user interface stands on the client machine. The user interface is independent from the servers. It communicates with the servers by means of XML files. XML protocol is used for data exchange. The communication protocol has been defined among the servers and the interface: - XML for the query (by text, by image, random, by mixed text and image) - XML for the advanced options of search (suggestions, ontologies, pertimmizers) - XML for the retrieval of results - XML for the tuning (old “relevance feedback”) - XML for mapping - XML for pallets - XML for clustering - XML for text and image statistics - HTTP POST for delivery of XML files with the requests and responses It has been necessary to perform the integration with every server: © Integration with Image Search Engine ISE (INRIA, Robotiker). It was verified that: o the user interface sends a request to the ISE o the ISE receives that request o the ISE verifies the format of the request is correct o the ISE sends back the response to the UI o the UI receives the response o the UI verifies the format of the response is correct o the UI shows the images retrieved in the planned workspace Integration with Text Search Engine TSE (PERTIMM, Robotiker). It was verified that: o the user interface sends a request to the TSE o the TSE receives that request o the TSE verifies the format of the request is correct o the TSE sends back the response to the UI o the UI receives the response o the UI verifies the format of the response is correct o the UI shows the images retrieved in the planned workspace 2008 TRENDS Consortium Members. D6.3. Final interface and user manual for final software 18.11.08 8/63 For further details in the system architecture, it would be better to refer to D2.5 and Metadel3, where all the modules, links and aims of every module and links are fully specified. 3. USER INTERFACE DEVELOPMENT ENVIRONMENT The user interface of prototype 3, and therefore final prototype, has been developed with the integration of the following technologies: Windows Presentation Foundation (WPF). WPF is a graphical subsystem in .NET Framework 3.0 (formerly called WinFX) and is directly related to logical part XAML. The development environments are Microsoft Visual Studio 2008, Microsoft Expression Blend and C#. C# is an object-oriented programming language developed and standardised by Microsoft as part of its platform .NET, which was later approved as a standard by the ECMA and ISO. It syntaxes results from C/C++ and uses the model of objects of platform .NET. C# is a programming language designed to generate programs over this platform. There are several compilers for C# language, among all Microsoft Visual C# is the unquestionable IDE (Integrated Development Environment). In prototype 3, Microsoft Visual Studio version 2008 has been used over .NET 3.5. Microsoft Expression Blend is the new professional design tool that allows using a wide library of existing graphical elements and creating customised controls with a variety of effects according to the user’s creativity. It can be easily integrated into Visual Studio environment to incorporate functionality to the graphical element. The reasons that lead the developer team to the use of these tools were the following ones: - The fact that it is C/C++ based guarantees the fast response and interaction with the user - Microsoft Expression Blend presents graphic libraries wide enough for the building of the advance interface. It provides with professional finish. - C# was used for the development of the communication protocols and other functions of prototype 2 that are kept in this version. © - It allows importing DLL for algorithm execution - It allows generating installation kits easily transportable to the users’ computers. 2008 TRENDS Consortium Members. D6.3. Final interface and user manual for final software 18.11.08 9/63 4. PROCEDURE FOR EXECUTION It is necessary to follow these steps before running the application: - .NET Framework 3.5 installed - Copy the files in the desired directory. o Trends.exe o Trends.exe.config o xml directory with its subfolders (you will find there the xml generated for history, requests, responses and feedbacks, and the xmlNumber file for indexing the files) o file cvirte.dll must be copied in C:/Windows/System32 o folder “cvirte” with its subfolders “bin” and “fonts” must be copied in C:/Windows/Sytem32 o - file “mapping_DEF.dll” in the directory of the project Launch executable Trends.exe The configuration file contains the following elements: Results per request (number of retrieved results every request), FSE IP and Port (IP address and port to access the Fusion Search Engine in Pertimm), Timeout (waiting time for responses), ROOT_MIRROR (where a copy of the images of databases is accessible), ROOT_THUMBNAIL (where the thumbnails of database are); ROOT_XML (where the files with metadata are placed), directories of personal and collaborative sphere. 5. DESCRIPTION OF THE INTERFACE AND AVAILABLE FUNCTIONALITY Once the user launches the executable, the general view of the user interface appears: © 2008 TRENDS Consortium Members. D6.3. Final interface and user manual for final software 18.11.08 10/63 Fig. 1: General user interface of TRENDS prototype The user finds different options in the menu bar: - Search images: it gathers the search related functionalities - Pallets: it represents the harmony component generation functionality (colours and textures). Not available yet. - Groups: it represents the interface for clustering images. Only simulation is available. - Mapping: it represents the interface for the generation of the proposed 2 axis representation of the images contained in the selected sphere according to their associated semantic adjectives. Only simulation is available. - Statistics: it contains the interface for the clustering by text or by colours in every sector depending on the user’s requirements. Only statistics by text is available. - Lifestyle: it represents the information about the sources of the database. Only simulation is available. The user finds two spheres in the upper right corner of the user interface: - Personal sphere: to store the images the user has found and is interested in for his personal use. - Collaborative sphere: to store the images the user has found and wants to share with the colleagues. The prototype is available with the following functionalities of search: © - random search - search by image sample - tuning (old “relevance feedback”) 2008 TRENDS Consortium Members. D6.3. Final interface and user manual for final software 18.11.08 11/63 - search by text - search by mixed text and image sample The general functionalities available are: - Drag and drop an image for the query by image or to store it in “Personal Sphere” or “Collaborative Sphere” - Contextual menu of a sphere: minimize, maximize and restore; group, ungroup, mapping; slideshow, display mode, set directory (personal and collective) and close. - Contextual menu of an image: cut, copy, delete, go to web source, set as favourite, print, save as, search with, refresh and properties. - Properties of every image: name, size, date, web source, sector and semantic description. - Storage of selected images in personal and collective’s sphere (in the interface) that means real directories in the user computer. - History of the searches in the session maintained after the user has exited the application. - History of the searches in every session, being possible to load the previous parameters of the search. - Handling and movement of spheres over the workspace. The display functionalities are: - mosaic - single - big and small - messy All these functionalities will be thoroughly explained in next sections. It was proposed an innovative way of displaying the results, by spheres. The information shown there is: © 2008 TRENDS Consortium Members. D6.3. Final interface and user manual for final software 18.11.08 12/63 Number of total images available Options: Displayed results Minimize Maximize Restore Close Zoom of the images Page shown over the total number of available pages Scrolling the results of the shown page Fig. 2. Sphere for the visualization of the retrieved results The following elements are identified: Displayed results: the results retrieved by the search engines are ordered by ranking according to the parameters of the search. Those fitting better the criteria are higher ranked and retrieved first. Number of displayed images of the total available: once a search is launched, the system identifies how many results are available. They are ranked. In the sphere only a certain number is displayed. Next page of images: The following 96 images are displayed. Display options: it is possible to visualize the results in a different manner. o Mosaic (by default): in row / column. o Single: only one image is displayed in front every time, while the others remain below in small size. o Big and small: proportional distribution where big and small images are displayed symmetrically. o © Messy: disorganized way of visualizing the images, with a certain angle. 2008 TRENDS Consortium Members. D6.3. Final interface and user manual for final software 18.11.08 13/63 These functionalities of the interface and others are better to be described along with the prototype working way. It will be thoroughly detailed in next sections. 6. WORKING PROCEDURE: SEARCH FUNCTIONALITY In this prototype, it is possible to carry out the following searches: - random search - search by text (default and except options) - search by image sample - search by mixed text and image sample - tuning (old “relevance feedback”) In this version of prototype, it is not possible to use personal images stored in the computer, so, for image search it is mandatory to carry out previously a shuffle search. This way, several images will be retrieved and one of them will be used as sample image. In later versions of the prototype, it will be possible to upload local images or sketches to the search engine. In next figure, the interface for search functionality is shown: © 2008 TRENDS Consortium Members. D6.3. Final interface and user manual for final software 18.11.08 14/63 Fig.3. Interface for advanced search functionality © 2008 TRENDS Consortium Members. D6.3. Final interface and user manual for final software 18.11.08 15/63 As it can be appreciated, the following elements appear on the left: Simple search: only search by text or random search (no keywords) over all sectors can be done. The system retrieves any images without considering keywords, images or any other parameter. It is a highly inspirational procedure. Fig.4. Example of simple search (by text or random) Keywords: it allows introducing the keywords for the search by text. Although at this moment only keywords are possible to be inserted in the user interface of prototype, there is the possibility of using complementary information: o Suggested words: as long as the user is writing, the closer words appear when 4 characters have been typed. For instance, “fashion” will be proposed if the user types “fash”. o Associated words: proposed words to disambiguate by context, if any. This is linked to the term “pertimmizers”. They are proposed every time a user types a keyword. When the user selects any of them, this complementary pertimizers is added to the query. The final version of suggested and associated words was available in the version of prototype 3 delivered in October 2008 (M34). Image: it is the place to drag and drop the selected images for the search, coming either from the personal or collective sphere (not available in this version), from previous results or from random search. Tuning: this is the old named “Relevance Feedback” whose aim is to refine the search, this is, the system can learn from the information provided by the user. He can classify © 2008 TRENDS Consortium Members. D6.3. Final interface and user manual for final software 18.11.08 16/63 the images as “good” or “bad” depending on his expectancies. At least, one positive image has to be selected. This way, the system can learn what the user is looking for and what is not useful. In this iteration, the system tries to fit better with the user’s objectives. Sectors: users have the possibility of choosing the sectors they want to explore. The database of the TRENDS system is organized according to these sectors (identified in T2.2). This way, focused search is possible. By default, all sectors are active. The user can select them one by one by clicking on it, activate all (click ‘All’) or deactivate all (click ‘None’). Nevertheless, it is important to take into account that no search can be done if there is no sector selected. The version 3 of database contains 25 sectors. Options: in order to tune the search, it is possible to select the category in size of the image, being possible to choose among three options: small, medium, large. Search: once the parameters are defined, it is needed to click “Search”. After a few iterations the user can carry out with tuning or others. It is needed to click “red cross” to start a new one, this indicates the end of search. The parameters of the search can be cleared by clicking in the black circle. 6.1 RANDOM SEARCH The following actions have to be carried out: - Click Search (neither keywords or images are added) - All sectors are selected by default Fig. 5: Random search Once it has been performed, the initial retrieved results will be shown in the interface: © 2008 TRENDS Consortium Members. D6.3. Final interface and user manual for final software 18.11.08 17/63 Fig. 6: Retrieved results in a random search The sphere with the results retrieved by random search will be displayed alone in the workspace, every image can be moved to personal or collective spheres. As it has been explained in the previous section, the images can be zoomed in or out by means of the scroll bar on the left; in the bottom the number of the current page can be shown over the total of available pages. The user can move forward or backward easily. The scroll bar on the bottom allows displaying the rest of the results available of the current page. On the left, the different options for handling the sphere are available, it can be minimized, maximised, restored and closed. The zoom in the sphere can be applied by using the mouse wheel, the mouse being over it. 6.2 SEARCH BY TEXT QUERY The search by text can be launched from Simple or Advanced search panels and requires the following actions: From Simple search: - © Insert the desired keywords. It is possible to insert as many keywords as wanted: 2008 TRENDS Consortium Members. D6.3. Final interface and user manual for final software 18.11.08 18/63 Fig. 7: Search by text from the “Simple” panel From Advanced search: - Click under “Keywords”, insert as many keywords as wanted. - Sectors selections (as many as wanted, “All” is possible and “None” for reset) Fig. 8: Search by text from the “Advanced” panel © 2008 TRENDS Consortium Members. D6.3. Final interface and user manual for final software 18.11.08 19/63 In both “Simple” and “Advanced” search the system proposes some suggestions when the user types a word. The suggestion is proposed whenever 4 or more letters are typed. A list of the available indexed words is displayed to the user. The word is selected with “enter” or double clicking over it from the list. Fig. 9: Search by text with the suggested words proposed when “hous” has been typed The results for a query by text are retrieved when “search” is pressed. © 2008 TRENDS Consortium Members. D6.3. Final interface and user manual for final software 18.11.08 20/63 Fig.10. Results of a search by text The interface manages properly the available functionalities every time. For instance, when a search by text is launched, “tuning” cannot be unfolded at the same time. In the same way, when tuning is selected no other panel can be unfolded but “sectors”. 6.3 SEARCH BY IMAGE It can be carried out when an image is available by any means. In the version of prototype, the only way of obtaining an initial image is by previous search or stored In personal or collaborative spheres. It is possible to drag and drop any result image as sample for a query. To make a query by image sample, it is needed to click on Advanced Search tab: © 2008 TRENDS Consortium Members. D6.3. Final interface and user manual for final software 18.11.08 21/63 Fig. 11: Advanced search menu The user should click on Image and eventually in Sectors to select them. The following interface appears: Fig.12. Search by image sample, drag and drop of a previously retrieved image © 2008 TRENDS Consortium Members. D6.3. Final interface and user manual for final software 18.11.08 22/63 - Search Æ Advanced Search Æ - Sectors selections (as many as wanted, “All” is by default and “None” for reset) - Select the image by clicking it, drag and drop the sample image in the “images” frame or using its contextual menu and select “search with”. As it can be shown in the picture, the user can change the image sample. Just right-click and select “Delete” - Select the descriptors by means of which the search will be done. By default, all the descriptors are selected. It is necessary to click on them to deselect. The available descriptors are: - o Colour: images with similarities by colour are searched o Shape: images with similarities by shape are searched o Texture: images with similarities by texture are searched Click Search After this action, the retrieved results appear in the sphere: Fig. 13: Retrieved results of a query by image sample As it has been indicated before, it is possible to click “end of search” (red cross in search window), in case the user wants to manage the images in the workspace. If he prefers, the © 2008 TRENDS Consortium Members. D6.3. Final interface and user manual for final software 18.11.08 23/63 user can go on with another search by image or tuning, as many times as desired. Prototype 3 only admits one image as input sample every query. This version of prototype does not admit images that are not present in the database, this is, images stored previously in the user computer, sketches or modified images. It will be available in later versions of the prototype. 6.4 TUNING (RELEVANCE FEEDBACK) Once a query by image is done, it is possible to tune the results by means of “Tuning” option. When “Tuning” is open, the “Image” window is closed, since conceptually both of them cannot be performed at the same time. The user will indicate to the system which results are useful or which are useless according to their expectations. For that, it is necessary to drag and drop the images in the proper place in the interface. The interface is as follows: Fig. 14: Positive examples in Tuning functionality According to the user’s approach, initially a positive box is opened. The user should drag and drop all the images that fulfilled his expectations inside. © 2008 TRENDS Consortium Members. D6.3. Final interface and user manual for final software 18.11.08 24/63 Fig. 15: Positive examples added to the box in Tuning functionality In the case the user wants to indicate the images that do not fit at all with his expectations, he must click on “more”. A negative box will appear where to drag and drop the not fitting images. Fig. 16: Negative examples added to the box in Tuning functionality © 2008 TRENDS Consortium Members. D6.3. Final interface and user manual for final software 18.11.08 25/63 After this selection, the user must click on “search”. The sphere with the tuned results will appear in a new sphere: Fig. 17: Results retrieved after tuning 6.5 MIXED SEARCH BY TEXT AND IMAGE The final version of prototype 2 already included this functionality. It consists of the possibility of launching searches combining both queries, this is, keywords and image samples. The interface delivers the whole query to the Request Management Server (RMS), that distributes the query to the proper search engine, the keywords will go to the Text Search Engine (TSE) and the image sample will go to the Image Search Engine (ISE). Once both retrieve the best matching results, the MTISC merges the results provided in a newly ranked list according to a fusion algorithm specifically designed. What the user can see in the interface are the results ranked after this fusion. In the next figure, it can be appreciated how both queries are inserted. © 2008 TRENDS Consortium Members. D6.3. Final interface and user manual for final software 18.11.08 26/63 Fig. 18. Introducing keywords and image sample in a mixed search In this version of the prototype and as it was generated in prototype 2, a log file is generated after every search. In this “LogFile.txt” the information about the search is available: actions, times and possible errors are there registered. This information is really useful for the obtaining of quantitative results, such as the response time, the number of errors, the queries nature, etc. © 2008 TRENDS Consortium Members. D6.3. Final interface and user manual for final software 18.11.08 27/63 7. WORKING PROCEDURE: GENERAL AVAILABLE FUNCTIONALITY 7.1 HANDLING OF AN IMAGE Once the results are retrieved, the user has the choice to carry out the following actions: • Context menu for every image, by selecting it and right-click: Fig.19. Context menu of every image The options available for every image (context menu by right clicking) are: - Cut: the selected image is cut - Copy: the selected image is copied - Delete: the selected image is deleted - Go to web source: the user can directly open the web where the image comes from - Set as favourite: it is stored as a favourite image (not available in this first version) - Print: the image is printed if any available printer (not available in this first version) - Save as: the image can be saved and renamed - Search with: the search by image is launched and that image becomes the sample query - © Refresh: the image url is accessed again to reload the image 2008 TRENDS Consortium Members. D6.3. Final interface and user manual for final software 18.11.08 28/63 - Properties: the following information is shown: name, size, date, web source, sector and semantic description o Name: how the image file is named o Size: its dimension in Kbytes o Date: if available, EXIF date o Web source: source where the image was grabbed o Sector: sector in the database where the image is stored o Semantic description: the semantic adjectives are described (semantic adjectives only available after a text query) Fig.20. Information about the properties of every image • Zoom + and zoom – for an image: Use the scroll bar on the left to zoom in and out the images: © 2008 TRENDS Consortium Members. D6.3. Final interface and user manual for final software 18.11.08 29/63 Fig. 21. Zoom in of the images in a sphere Fig. 22. Zoom out of the images in a sphere © 2008 TRENDS Consortium Members. D6.3. Final interface and user manual for final software 18.11.08 30/63 7.2 HANDLING OF A SPHERE The results retrieved by every search are stored in a sphere. The information shown in every sphere is: - number of total results. For shuffle search, it is established 400; but any search will have a different number of total results. These results are ranked by score similarity to the query. - number of results visualized. By default, 96 of the retrieved results are displayed in mosaic mode, but it depends on the zoom and on the display mode established by the user. The following actions are possible: - Click the arrow on the right to display the rest of available results in the next page - Click the arrow on the left to display the rest of available results in the previous page Several functionalities are available to handle these spheres. It is possible to access the sphere contextual menu by right clicking on it: Fig. 23. Sphere with its context menu © 2008 TRENDS Consortium Members. D6.3. Final interface and user manual for final software 18.11.08 31/63 The available options are: - Minimize: the sphere is minimized and it is placed in the bottom-left area of the interface - Maximize: the sphere is maximized and it is placed in the centre of the interface - Restore: after being hidden, it recovers its initial look and position - Slideshow: the images contained in the sphere will be displayed in slides - Display mode: the images contained in the sphere can be displayed in four different ways, this is, mosaic (by default), big and small, single and messy. This will be visually described in next section. - Set directory (only for personal and collective spheres): the directory for storage of the images in the user’s computer can be set (first access to the executable) or modified (later access) - • Close: this sphere and its results are removed Zoom + and zoom – of a sphere: Wheel up and down with the mouse once a sphere is selected. Fig. 24. Zoom in of the sphere © 2008 TRENDS Consortium Members. D6.3. Final interface and user manual for final software 18.11.08 32/63 For Zoom - ; Select the sphere, and press “Shift” + left click as many times as wanted. Fig. 25. Zoom out of the sphere The zoom slide bar in the bottom right of the interface can also be used to zoom in and out the whole workspace: © 2008 TRENDS Consortium Members. D6.3. Final interface and user manual for final software 18.11.08 33/63 Fig. 26. Zoom out of the working space by using the zoom slide bar Fig. 27. Zoom in of the working space by using the zoom slide bar © 2008 TRENDS Consortium Members. D6.3. Final interface and user manual for final software 18.11.08 34/63 • The name of the sphere can be modified: Fig.28. A sphere is named 7.3 DISPLAY FUNCTIONALITIES It is possible to display the retrieved results in different ways. Right click over a sphere to make the context menu appear and select “Display mode”: Fig.29. Display possibilities accessed by the context menu of a sphere © 2008 TRENDS Consortium Members. D6.3. Final interface and user manual for final software 18.11.08 35/63 There are four display modes available: • Mosaic (it is the default one) Fig.30. Display modes: mosaic is default • Single Fig.31. Display mode: single © 2008 TRENDS Consortium Members. D6.3. Final interface and user manual for final software 18.11.08 36/63 • Big and small Fig.32. Display mode: big and small • Messy Fig.33. Display mode: messy © 2008 TRENDS Consortium Members. D6.3. Final interface and user manual for final software 18.11.08 37/63 7.4 STORAGE OF IMAGES IN FOLDERS This is a new functionality not available in prototype 2. The possibility of storing the interesting images found in the retrieval process in an ordered way and managed by the user has been requested from the beginning of the project by the designers. Here it is. Every image retrieved by the search engines can be moved to the personal or collective sphere. Now, and differently from the final version of prototype 2, the personal and collective spheres are linked with real directories on the user computer. In this way, “drag&drop” an image into one of these two folders is similar to the fact of copying an image into a specific directory. The user can even select this directory by clicking on “Set directory” in the context menu of the personal and collective sphere, as it is shown in next figure. Fig.34. Set directory in the personal sphere to store images Fig.35. Browsing in the PC to set directory of the personal sphere © 2008 TRENDS Consortium Members. D6.3. Final interface and user manual for final software 18.11.08 38/63 This directory can be changed as many times as required. Moreover, it is possible to classify the images into as many subfolders as desired. For that, it is needed to double click on every folder that is contained in the personal or collective spheres. It can be handled in the same way as the rest of spheres, and even removed, if desired by the user. This way, the user can store and order the images in the way he prefers for his personal use (personal sphere) or to share with his colleagues (collective sphere). The directories and folders can be really generated by the user by means of Windows options. Fig.36. Sub spheres in the personal sphere for storage It is possible to hide all the subfolders in the interface, for that, it is needed to click on the “Ungroup” option of the context menu and the main sphere will appear. © 2008 TRENDS Consortium Members. D6.3. Final interface and user manual for final software 18.11.08 39/63 Fig.37. Way of hiding the sub spheres in the personal sphere for storage 7.5 SLIDESHOW It is possible to visualize the results available in a sphere in a slideshow. This functionality is accessed by the context menu of the sphere or by double clicking in one image retrieved in results sphere. Whenever the user clicks of “slideshow” the sequential display of the images appears. The user can modify the delay in seconds between the images. Fig.38. Slideshow © 2008 TRENDS Consortium Members. D6.3. Final interface and user manual for final software 18.11.08 40/63 The user can move to previous and next image with the two arrows buttons. He can move forward automatically using the “play” button, and configure the delay time among the images. 7.6 HISTORY This functionality is also new and was not available in prototype 2. It was requested by the users that expressed the desire of having a way of tracking their searches. Every time the user wants to store the whole workspace, this is, “the scene”, he has to right click on the workspace to make the related context menu option appear. Fig.39. Save the scene for history purposes. Every trace of the history can be removed if it is not desired to keep it there. The user has to right click on the specific element and select the “delete” option. © 2008 TRENDS Consortium Members. D6.3. Final interface and user manual for final software 18.11.08 41/63 Fig.40. History: how to delete a scene previously stored. All the information contained is saved properly with the date and time of storage. To recover that information the user has to double click on the desire stored scene. Fig.41. History: a scene is recovered. © 2008 TRENDS Consortium Members. D6.3. Final interface and user manual for final software 18.11.08 42/63 8. WORKING PROCEDURE: STATISTICS Two different types of statistics can be requested: text statistics and image statistics. At this stage of the prototype, only text statistics is available but image statistics is coming soon. 8.1 TEXT STATISTICS To launch Statistics functionality, it is necessary to launch the application and click on statistics button in the menu bar: Fig.42. How to launch statistics functionality The following panel appears: © 2008 TRENDS Consortium Members. D6.3. Final interface and user manual for final software 18.11.08 43/63 Fig. 43. General interface for statistics The user may want to know how a group of keywords is distributed over the different sectors. For that, he has to type the desired keywords into the text box and click “Show”. The percentage of these existing keywords distributed among the different sectors is displayed in two graphical ways: bars and circle graphic. The user can switch the display mode by clicking on the bottom left icon buttons. The result of a text statistics is shown in the following figures. © 2008 TRENDS Consortium Members. D6.3. Final interface and user manual for final software 18.11.08 44/63 Fig. 44. Text statistics in circle display mode. Fig. 45. Text statistics in bars display mode. © 2008 TRENDS Consortium Members. D6.3. Final interface and user manual for final software 18.11.08 45/63 Both graphics give a feedback to the user when passing the mouse over every bar or piece of circle. The numerical value is retrieved back. Fig. 46. Feedback retrieved by the graphic to the user. 8.2 IMAGE STATISTICS In the same way, the user can know the percentage of images similar to an image query distributed all over the sectors. It can be displayed in the same two graphics types after entering an image sample. © 2008 TRENDS Consortium Members. D6.3. Final interface and user manual for final software 18.11.08 46/63 Fig. 47. Image statistics in circle display mode. Fig. 48. Image statistics in bars display mode. © 2008 TRENDS Consortium Members. D6.3. Final interface and user manual for final software 18.11.08 47/63 If the user finds it useful, this output graphic (for text or image statistics) can be stored as an image in the personal or collective sphere. It is only needed to drag&drop it to the proper sphere (personal or collective). In the following screenshot, it can be appreciated how the graphic is saved. Fig. 49. Statistics graphic is stored in personal sphere. © 2008 TRENDS Consortium Members. D6.3. Final interface and user manual for final software 18.11.08 48/63 9. WORKING PROCEDURE: MAPPING Appealing and very new functionality of TRENDS system is mapping. The aim of mapping is to show the images classified according to their semantic adjectives. In the moment of storing the images into the database, they were tagged with some adjectives. This is used in mapping functionality. A constraint is that mapping can only be performed after a text query. So, the sequence for execution is as follows. First a search query must be launched. Fig. 50. Text search previous to mapping request Then, when the results sphere has been launched, mapping button must be pressed. © 2008 TRENDS Consortium Members. D6.3. Final interface and user manual for final software 18.11.08 49/63 Fig. 51. Mapping function is launched after the results of a text query appear. After this action, the mapping panel appears with the images distributed along the axes according to the retrieved semantic information of every image from the server. The mapping panel presents the following elements, which are explained next. Fig. 52. Different elements of mapping panel © 2008 TRENDS Consortium Members. D6.3. Final interface and user manual for final software 18.11.08 50/63 The shown adjectives in the axis are the ones that appear more frequently in the list of retrieved images. They are the principal adjectives. Anyway, the whole set of available adjectives can be displayed, and the axis can be changed. Once the axes are changed, the position of every image in the panel is updated, since the coordinate system is different. The sequence is shown next. Fig. 53. Possible adjectives to be selected in one axis Once “luxury” has been selected, and after a little while, the new position of the images is updated, as it is shown in the following screenshot. © 2008 TRENDS Consortium Members. D6.3. Final interface and user manual for final software 18.11.08 51/63 Fig. 54. New position of the images in the coordinate system. The number of displayed images can be changed by moving the slide bar. © 2008 TRENDS Consortium Members. D6.3. Final interface and user manual for final software 18.11.08 52/63 10. WORKING PROCEDURE: PALLETS A new functionality is pallets generation. This is a very useful functionality for the designers. Pallets consist of the extraction of pairs of colours and textures from a set of selected images. This can be very useful to identify which are the predominant colours and textures in a specific search’s results. To launch pallets, it is necessary to have a sphere with some results coming from a search, so we can start with a search query, and then, select “Pallets”: Fig.55. Pallets function can be launched after a results’ sphere is available. Once we have some images back, it can be launched by clicking Pallets in the bottom bar. The following panel appears where the selected images (not more than 15) can be “drag & drop” to launch pallets. These images cannot be from the personal or collective spheres, but coming from the database. © 2008 TRENDS Consortium Members. D6.3. Final interface and user manual for final software 18.11.08 53/63 Fig. 56: Temporary panel where to drag& drop the selected images. Once the selection is done, it is necessary to click on “Show”. After this, the results will appear in the following interface: © 2008 TRENDS Consortium Members. D6.3. Final interface and user manual for final software 18.11.08 54/63 Fig. 57: Output results from the pallets action. The elements that we can appreciate in this interface are: - 10 pairs of colours, this is the harmony colours, which more frequently appear in the selected images. - 5 textures, which more frequently appear in the selected images. This resulting panel can be saved as a BMP image in the personal or collective sphere. The user has to drag&drop the resulting panel and move it till the desired personal or collective sphere. © 2008 TRENDS Consortium Members. D6.3. Final interface and user manual for final software 18.11.08 55/63 Fig. 58: Pallets: the results of colours and textures are saved in personal sphere. © 2008 TRENDS Consortium Members. D6.3. Final interface and user manual for final software 18.11.08 56/63 11. WORKING PROCEDURE: GROUPS In this version of prototype, clustering functionality appears for the first time. This functionality allows classifying the input images into different groups, according to several criteria the Image Search Engine applies. It is necessary to have at least 96 results to apply the clustering. Lower number of results makes it impossible to apply proper criteria for separation. So, first it is needed to launch a query. Fig. 59: Grouping functionality can be launched after a results sphere is available. Once a sphere containing more than 96 results is available, “Groups” can be launched by clicking in the button menu. © 2008 TRENDS Consortium Members. D6.3. Final interface and user manual for final software 18.11.08 57/63 Fig. 60: Groups: How to launch the clustering After a few seconds, the different groups the images have been classified into appear. The number of different groups is automatically calculated by the server and depends on the input images. A list of images is in inside each group. The user can validate whether there are common criteria for the classification. © 2008 TRENDS Consortium Members. D6.3. Final interface and user manual for final software 18.11.08 58/63 Fig. 61: Groups: the different clusters the images have been classified. Every group can be maximised, minimised and treated as any other sphere. The user can hide the groups by accessing to the context menu of the sphere. This is, the user has to right click on the sphere and select “Ungroup”. © 2008 TRENDS Consortium Members. D6.3. Final interface and user manual for final software 18.11.08 59/63 12. CONCLUSION The interface of prototype and the working procedure has been described. The prototype is available with the following functionalities: - random search - search by image sample - tuning (old “relevance feedback”) - search by text - search by mixed text and image - text and image statistics - mapping - pallets - groups The importance of this prototype lies on the fact that it will allow to receive the feedback from the users after the tests. It will be possible: - to test the new user interface and ergonomics elements - to evaluate the quality of the new grabbed database with the new sectors distribution - to evaluate the performance of the improved text search engine and accuracy of retrieved images - to evaluate the performance of the improved image search engine and accuracy of retrieved images - to evaluate the performance of the improved mixed text and image search and accuracy of retrieved images - to identify possible improvements for final TRENDS software The integration of the different servers under the user interface running in the client’s side was carried out and validated in prototype 2. The communication protocols and overall architecture of the system is totally kept in the prototype 3 in relation to prototype 2. The improvement has been done inside every identified module. © 2008 TRENDS Consortium Members. D6.3. Final interface and user manual for final software 18.11.08 60/63 13. LIST OF FIGURES AND TABLES List of figures Fig. 1: General user interface of TRENDS prototype 3..………………………………………….9 Fig. 2: Sphere for the visualization of the retrieved results………………………………....…..11 Fig. 3: Interface for the advanced search functionality……………………………...…………..13 Fig. 4: Example of simple search (by text or random)…………………………………………..14 Fig. 5: Random search …………………………………………………………………………..…15 Fig. 6: Retrieved results in a random search…………………………………………………..…16 Fig. 7: Search by text from the "Simple" panel………………………………………………...…17 Fig. 8: Search by text from the "Advanced" panel…………………………………………..…...18 Fig. 9: Search by text with the suggested words proposed when "hous" has been typed…..18 Fig. 10: Results of a search by text……………………………………………………………….19 Fig. 11: Advanced search menu…………………………………………………………………...20 Fig. 12: Search by image sample, drag and drop of a previously retrieved image…………..20 Fig. 13: Retrieved results of a query by image sample…………………………...…………….21 Fig. 14: Positive examples in Tuning functionality……………………………………………….22 Fig. 15: Positive examples added to the box in tuning functionality…………………………...23 Fig. 16: Negative examples added to the box in tuning functionality………………………….23 Fig. 17: Results retrieved after tuning…………………………………………………………..…24 Fig. 18: Introducing keywords and image sample in a mixed search………………………….25 Fig. 19: Context menu of every image…………………………………………………………….26 Fig. 20: Information about the properties of every image………………………………...…..…27 Fig. 21: Zoom in of the images in a sphere………………………………………………………28 Fig. 22: Zoom out of the images in a sphere……………………………………………………..28 Fig. 23: Sphere with its context menu……………………………………………………………..29 Fig. 24: Zoom in of the sphere……………………………………………………………...…...…30 Fig. 25: Zoom out of the sphere…………………………………………………………...……….31 Fig. 26: Zoom out of the working space by using the zoom slide bar…………………….…...32 Fig. 27: Zoom in of the working space by using the zoom slide bar……………………..…….32 Fig. 28: An sphere is named………………………………………………………………………..33 Fig. 29: Display possibilities accessed by the context menu of a sphere……………………..33 Fig. 30: Display modes: mosaic is default…………………………………………………...……34 Fig. 31: Display mode: single …………………………………………………….………………..34 Fig. 32: Display mode: big and small…………………………………………...…………………35 Fig. 33: Display mode: messy ……………………………………………………………………..35 Fig. 34: Set directory in the personal sphere to store images……………………………….….36 Fig. 35: Browsing in the PC to set directory of the personal sphere ………………..……...…36 Fig. 36: Sub spheres in the personal sphere for storage………………………………………..37 Fig. 37: Way of hiding the sub spheres in the personal sphere for storage…………………..38 Fig. 38: Slideshow………………………………………………………………………………..….38 Fig. 39: Save the scene for history purposes…………………………………………………….39 Fig. 40: History: how to delete a scene previously stored………………………………………40 Fig. 41: History: a scene is recovered……………………………………………………………..40 Fig. 42: How to launch statistics functionality…………………………………………………….41 Fig. 43: General interface for statistics……………………………………………………………42 Fig. 44: Text statistics in circle display mode…………………………………………………….43 Fig. 45: Text statistics in bars display mode……………………………………………………..43 Fig. 46: Feedback retrieved by the graphic to the user…………………………………………44 Fig. 47. Image statistics in circle display mode……………………………………………….….46 Fig. 48. Image statistics in bars display mode……………………………………………………46 Fig. 49. Statistics graphic is stored in personal sphere………………………………………….47 © 2008 TRENDS Consortium Members. D6.3. Final interface and user manual for final software 18.11.08 61/63 Fig. 50. Text search previous to mapping request……………………………………………….48 Fig. 51. Mapping function is launched after the results of a text query appear……………….49 Fig. 52. Different elements of mapping panel…………………………………………………….49 Fig. 53. Possible adjectives to be selected in one axis………………………………………….50 Fig. 54. New position of the images in the coordinate system………………………………….51 Fig.55: Pallets function can be launched after a results’ sphere is available…………………53 Fig. 56: Temporary panel where to drag& drop the selected images………………………….54 Fig. 57: Output results from the pallets action……………………………………………………55 Fig. 58: Pallets: the results of colours and textures are saved in personal sphere ………….56 Fig. 59: Grouping functionality can be launched after a results sphere is available……….…57 Fig. 60: Groups: How to launch the clustering……………………………………………………58 Fig. 61: Groups: the different clusters the images have been classified………………………59 © 2008 TRENDS Consortium Members. D6.3. Final interface and user manual for final software 18.11.08 62/63 14. GLOSSARY Client A client is a piece of software that accesses services from another piece of software (a server), often remotely over a computer network connection. Cooccurrences Expressions frequently found with the query. HTTP Acronym for “Hyper Text Transfer Protocol”. Protocol used by the web, it allows hyperlinks to work for every object of the web. Ontology Ontologies are representations of knowledge via concept networks, often hierarchical trees. Relevance feedback One of the methods used in CBIR to deal with semantic gap. It uses machine learning techniques to infer from the interactive information provided by the user what is the target class of images. Relevance feedback is also used as an interactive browsing method and for the mass annotation of large quantities of images. Sectors of influence Sectors of influence are all the industrial, artistic or natural sectors that are used for the transfer of some formal and functional attributes into the reference sector. For instance the biomorphism is a key sector of influence for car design. Semantic adjectives Semantic adjectives are specific words frequently used by the corporation of designers in order to describe visual low level features according to feelings or emotions in front of a specific visual stimulus. They often use metaphoric references in other sectors. For example the front face of a sport vehicle can be described as aggressive like a snake face. Semantic mapping The semantic mapping is a planar representation of a set of models in a reference sector, according to two reference axis limited by semantic adjectives and their antonyms. The semantic mapping gives a semantic description of the different models in the 2D space. Server A server is a software or a computer that provides services to other softwares or computers, often remotely over a computer network connection. TCP/IP The TCP/IP protocol is a communication protocol widely used for transmitting messages and data between clients and servers. It is the protocol used for Internet data transmissions. XML XML stands for eXtensible Markup Language. It is a World Wide Web Consortium recommended markup language that supports a wide variety of applications. It is made of XML tags, organized in a hierarchical tree and written in a specific format. © 2008 TRENDS Consortium Members. D6.3. Final interface and user manual for final software 18.11.08 63/63