1
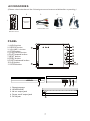
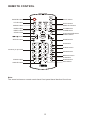
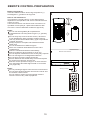
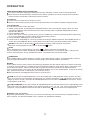
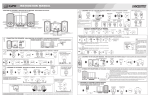
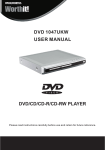
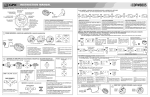
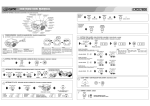
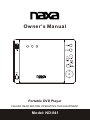
Owner’s Manual
ND-841
Portable DVD Player
PLEASE READ BEFORE OPERATING THIS EQUIPMENT
Model: ND-841
The lightning flash with arrowhead symbol
within an equilateral triangle is intended to alert
the user to the presence of uninsulated
dangerous voltage within the product`s
enclosure that may be of sufficient magnitude to
constitute a risk of electric shock to persons.
CAUTION: TO REDUCE THE RISK OF ELECTRIC SHOCK, DO NOT
REMOVE COVER (OR BACK). NO USER-SERVICEABLE
PARTS INSIDE. REFER SERVICING TO QUALIFIED
SERVICE PERSONNEL.
The exclamation point within an equilateral
triangle is intended to alert the user to the
presence of important operating and
maintenance(servicing) instructions in the
literature accompanying the appliance.
DANGER:
Invisible and hazardous laser radiation when
open and interlock failed or defeated. Avoid
direct exposure to beam.
CAUTION:
THIS DIGITAL VIDEO DISC PLAYER EMPLOYS A
LASER SYSTEM.
TO ENSURE PROPER USE OF THIS PRODUCT.
PLEASE READ THIS OWNER`S MANUAL CAREFULLY
AND RETAIN FOR FUTURE REFERENCE. SHOULD
THE UNIT REQUIRE MAINTENANCE, CONTACT AN
AUTHORIZED SERVICE LOCATION-SEE SERVICE
PROCEDURE.
USE CONTROLS, ADJUSTMENTS OR THE
PERFORMANCE OF PROCEDURES OTHER THAN
THOSE SPECIFIED HEREIN MAY RESULT IN
HAZARDOUS RADIATION EXPOSURE.
TO PREVENT DIRECT EXPOSURE TO LASER BEAM,
DO NOT TRY TO OPEN THE ENCLOSURE. VISIBLE
LASER RADIATION MAY BE PRESENT WHEN THE
ENCLOSURE IS OPENED. DO NOT STARE INTO BEAM.
FCC NOTICE:
This equipment has been tested and found to comply
with the limits for a Class B digital device, pursuant to
part 15 of the FCC Rules. These limits are designed to
provide reasonable protection against harmful
interference in a residential installation. This equipment
generates, uses and can radiate radio frequency energy
and, if not Installed and used in accordance with the
instructions, may cause harmful interference to radio
communications.
However, there is no guarantee that interference will not
occur in a particular installation. If this equipment does
cause harmful interference to radio or television
reception, which can be determined by turning the
equipment off and on, the user is encouraged to try to
correct the interference by one or more of the following
measures:
Reorient or relocate the receiving antenna.
Increase the separation between the equipment and
receiver.
Connect the equipment into an outlet on a circuit
different from that to which the receiver is connected.
Consult the dealer or an experienced radio/TV
technician for help.
WARNING:
TO REDUCE THE RISK OF FIRE OR ELECTRIC
SHOCK, DO NOT EXPOSE THIS PRODUCT TO RAIN
OR MOISTURE.
WARNING:
TO REDUCE THE RISK OF FIRE OR ELECTRIC
SHOCK, AND ANNOYING INTERFERENCE, USE THE
RECOMMENDED ACCESSORIES ONLY.
FCC WARNING:
To assure continued compliance, follow the attached
installation instructions and use only shielded cables
when connecting to other devices. Modifications not
authorized by the manufacturer may void user`s authority
to operate this device.
SURGE PROTECTORS:
It is recommended to use a surge protector for AC
connection. Lightning and power surges ARE NOT
covered under warranty for this product.
WARNING
USE UNDER SUPERVISION OF AN ADULT DUE TO LONG CORD
This unit has a long cord or other long cord that can easily be tripped on or pulled on, causing injury, Please make sure
it is arranged so it will not drape over a tabletop, etc. Where it can be pulled on by children or tripped over accidentally.
EXERCISE CAUTION AS UNIT HAS SHARP POINTS.
Manufactured under license from Dolby Laboratories.
Dolby and the double-D symbol are trademarks of Dolby Laboratories.
1
IMPORTANT SAFETY INSTRUCTIONS
Before using the unit, be sure to read all operating instructions carefully. Please note that these
are general precautions and may not pertain to your unit. For example, this unit may not have the capability to be connected to
an outdoor antenna.
1) Read these instructions.
All the safety and operating instructions should be read before the product is operated.
2) Keep these instructions.
The safety and operating instructions should be retained for future reference.
3) Heed all warnings.
All warnings on the product and in the operating instructions should be adhered to.
4) Follow all instructions.
All operating and use instructions should be followed.
5) Do not use this apparatus near water.
Do not use this product near water and moisture, for example: near a bathtub, washbowl, kitchen sink or laundry tub; in a
wet basement; or near a swimming pool.
6) Clean only with dry cloth.
Unplug this product from the wall outlet before cleaning. Do not use liquid cleaners or aerosol cleaners. Use a dry cloth for
cleaning.
7) Do not block any ventilation openings. Install in accordance with the manufacturer's instructions.
Slots and openings in the cabinet and in the back or bottom are provided for ventilation, to ensure reliable operation of the
product and to protect it from overheating. These openings must not be blocked or covered. The openings should never be
blocked by placing the product on a bed, sofa, rug or other similar surface. This product should never be placed near or over
a radiator or heat source. This product should not be placed in a built-in installation such as a bookcase or rack unless proper
ventilation is provided or the manufacturer's instructions have been adhered to.
8) Do not install near any heat sources such as radiators, heat registers, stoves, or other
apparatus(including amplifiers) that produce heat.
9) Do not defeat the safety purpose of the polarized or grounding-type plug. A polarized plug has two blades with one
wider than the other. A grounding type plug has two blades and a third grounding prong. The wide blade or the third
prong are provided for your safety. If the provided plug does not fit into your outlet, consult an electrician for
replacement of the obsolete outlet.
10)Protect the power cord from being walked on or pinched particularly at plugs, convenience receptacles, and the
point where they exit from the apparatus.
11)Only use attachments/accessories specified by the manufacturer.
12)Use only with the cart, stand, tripod, bracket, or table specified by the manufacturer, or sold
with the apparatus. When a cart is used, use caution when moving the cart/apparatus combination to avoid injury
from tip-over.
An appliance and cart combination should be moved with care.
Quick stop, excessive force and uneven surfaces may cause the
appliance and cart combination to overturn.
13) Unplug this apparatus during lightning storms or when unused for long periods of time.
To protect your product from a lightning storm, or when it is left unattended and unused for long periods of time, unplug it
from the wall outlet and disconnect the antenna or cable system. This will prevent damage to the product due to lightning
and power-line surges.
14) Refer all servicing to qualified service personnel. Servicing is required when the apparatus has been damaged in
any way, such as power-supply cord or plug is damaged, liquid has been spilled or objects have fallen into the
apparatus, the apparatus has been exposed to rain or moisture does not operate normally, or has been dropped.
15) Power source
This product should be operated only from the type of power source indicated on the marking label. If you are not sure of
the type of power supply to your home, consult your appliance dealer or local power company. For products intended to
operate from battery power, or other source, refer to the operation instructions.
16) Power lines
An outside antenna system should not be located in the vicinity of overhead power lines or other electric light or power
circuits, or where it can fall into such power lines or circuits. When installing an outside antenna system, extreme care
should be taken to keep from touching such power lines or circuits as contact with them might be fatal.
2
17) Overloading
Do not overload wall outlets and extension cords as this can result in a risk of fire or electric shock.
18) Object and liquid entry
Never push objects of any kind into they product through openings as they may touch dangerous voltage points or short out
parts that could result in fire or electric shock. Never spill or spray any type of liquid on the product.
19) Outdoor antenna grounding
If an outside antenna is connected to the product, be sure the antenna system is grounded so as to Provide some protection
against voltage surges and built up static charges. Section 810 of the National Electric Code ANSI/NFPA 70 provides information with respect to proper to grounding of the mast and supporting structure, grounding of the lead-in wire to an antenna
discharge product, size of grounding conductors, location of antenna-discharge product, connection to grounding electrodes
and requirements for the grounding electrodes.
20 ) Service
Do not attempt to service this product yourself as opening or removing covers may expose you to dangerous voltage or
other hazards . Refer all servicing to qualified service personnel .
21 ) Replacement parts
When replacement parts are required , be sure the service technician uses replacement parts specified by the manufacturer
or those that have the same characteristics as the original parts . Unauthorized substitutions may result in fire or electric
shock or other hazards .
22 ) Safety check
Upon completion of any service or repairs to this product , ask the service technician to perform safety checks to determine
that the product is in proper operation condition .
23 ) Wall or ceiling mounting
The product should be mounted to a wall or ceiling only as recommended by the manufacturer .
24 ) Damage requiring service
Unplug this product from the wall outlet and refer service to qualified service personnel under the following conditions .
a ) When the power - supply cord or plug is damaged .
b ) If liquid has been spilled or objects have fallen into the product .
c ) If the product has been exposed to rain or water .
d ) If the product does not operate normally by following the operating instructions . Adjust only those controls that are
covered by the operating instructions , as an adjustment of other controls may result in damage and will and require
extensive work by a qualified technician to restore in the product to its normal operation .
e ) If the product has been dropped or the cabinet has been damaged .
F ) when the product exhibits a distinct change in performance - this indicates a need for service .
25 ) Note to CATV system installer
This reminder is provided to call the CATV system installer ' s attention to Article 820 - 40 of the NEC that provides guidelines
for proper grounding and , in particular , specifies that the cable ground shall be connected to the grounding system of the
building , as close to the point of cable entry as practical .
3
TO OBTAIN A CLEAR PICTURE:
NOTES ON HANDLING:
The DVD player is a high technology, precision device,
If the optical pick-up lens and disc drive parts are
dirty or worn down, the picture quality becomes poor. To
obtain a clear picture, we recommend regular inspection
and maintenance (cleaning or parts replacement) every
1,000 hours of use depending on the operating
environment. For details, contact your nearest dealer.
When shipping the DVD player, always use the
original shipping carton and packing materials.
For maximum protection, repack the unit as it
was originally packed at the factory.
Do not use volatile liquids, such as insect spray,
near the DVD player. Do not leave rubber
or plastic products in contact with the DVD player
for a long time. They will leave marks on the finish.
NOTES ON MOISTURE CONDENSATION:
Moisture condensation damages the DVD player.
Please read the following carefully.
Moisture condensation occurs, for example, when you
pour a cold drink into a glass on a warm day. Drops of
water form on the outside of the glass. In the same way,
moisture may condense on the optical pick-up lens
inside this unit, one of the most crucial internal parts
of the DVD player.
The top and rear panels of the DVD player
may become warm after a long period of use.
This is normal and not a malfunction.
When the DVD player is not in use, be sure
to remove the disc and turn off the power.
If you do not use the DVD player for a long period,
the unit may not function properly in the future.
Turn on and use the DVD player occasionally.
Moisture condensation occurs during the
following cases:
When you bring the DVD player directly from a cold
place to a warm place.
NOTES ON LOCATING THE DVD PLAYER:
When you place this DVD player near a TV, radio
or VCR, the playback picture may become poor
and the sound may be distorted. In this case, move
the DVD player away from the TV, radio or VCR.
When you use the DVD player in a room where you
just turned on the heater, or a place where the cold
wind from the air conditioner directly hits the unit.
ln summer, when you use the DVD player in a hot and
humid place just after you moved the unit from an air
conditioned room.
NOTES ON CLEANING:
Use a soft, dry cloth for cleaning
For stubborn dirt, soak the cloth in a weak
detergent solution, wring well and wipe. Use a
dry cloth to wipe it dry. Do not use any type
of solvent, such as thinner and benzene, as they
may damage the surface of the DVD player.
When you use the DVD player in a humid place.
Do not use the DVD player when moisture
condensation may occur.
lf you use the DVD player in such a situation,
it may damage discs and internal parts. Remove
the disc, connect the power cord of the DVD player
to the wall outlet, turn on the DVD player and leave it
ON for two or three hours. After two or three hours,
the DVD player will have warmed up and evaporated
any moisture. Keep the DVD player connected to
the wall outlet and moisture condensation will
seldom occur.
If you use a chemical-saturated cloth to clean
the unit, follow that product's instructions.
Warning: Cleaning and adjustment of lenses and /or
other components of playback mechanism should be
performed by a qualified service technician.
4
Please read the user manual carefully before connection or operation
TABLE OF CONTENT
1-4
5
6
6
7
8
9
10
11
11
11
11
11
11
11
11
11
12
12
12
12
12
12
12
13
14-15
16
17
18
5
FEATURES
DVD - A completely new dimension in video entertainment
Subtitles may be displayed in one of a maximum of 32 languages available (multi-subtitles
DVD only).
Audio soundtrack can be heard in up to 8 languages (multi-languages DVD only).
Multi-angle function allows you to choose the viewing angles of scene
(for DVD with multiple camera angles only).
Other convenient features
A full function remote control provides quick access to DVD functions.
Compatible with PAL DVD and NTSC DVD
This player can play discs recorded in either PAL or NTSC system.
Compatible with CD besides DVD, CD-R
This player could play various discs such as DVD, CD (8cm/12cm discs).
Placement
The internal parts may be seriously damaged if the unit is placed in areas of:
Direct sunlight or heating radiators or closed automobiles;
High temperature (over 35 C) or high humidity (over 90%)
Excessive dust;
Strong magnetic or static electricity;
Vibration, impact or where the surface is tilted.
Non-use Periods
Turn off the power when the unit is not used.
Disconnected the AC/DC Adaptor form the wall outlet when the unit is idle for a long period of time.
No fingers or other objects inside
Touching internal parts of this unit is dangerous, and may cause serious damage to the unit and
even human injury.
Do not try to disassemble this unit.
Do not put any other object on the disc tray.
Keep away from water and magnets
Keep the unit away from flower vases, tubs, sinks, etc. If liquids are spilled into the unit, serious
damage may occur.
Never place magnetic objects such as speakers near the unit.
Stacking
Place the unit in a horizontal position and do not place anything heavy on it.
Do not put the unit on amplifiers or other equipment.
Condensation
Moisture may form on the lens under the following conditions:
In a steamy or very humid room.
Immediately after a heater is turned on.
If moisture forms inside this unit, it may not operate properly. In this case, turn on the power and
wait for about 1 hour to evaporate it.
Interference for the TV broadcast
Depending on the reception condition of the TV, interference may appear on the TV screen while
you are watching a TV broadcast and the unit is turned on, This is not a malfunction of the unit of
the TV. Just ensure that the unit is turned off when you watch a TV broadcast.
6
ACCESSORIES
(Please check whether all the following accessories are available after unpacking.)
2
1
4
3
5
Instruction
Manual
Video/Audio cord
Adaptor
Car Adaptor
Remote control
PANEL
1. AUDIO button
2. REPEAT button
3. VOLUME-/+ button
4. STOP button
5. PLAY/PAUSE button
6. FAST forward button
7.NEXT button
8.PREV button
9.FAST backward button
10.A-B button
11.OPEN button
1
10
2
3
4
5
6
8
11
ND-841
1
1.
2.
3.
4.
5.
Remote sensor
HEADPHONE
AV out output jack
Power on off output jack
DC IN jack
4
5
7
3
2
7
9
REMOTE CONTROL
POWER button
MUTE button
TITLE button
GOTO button
SUBTITLE button
MENU button
PREV button
NEXT button
STOP button
F.FWD button
F.BWD button
PLAY/PAUESE button
ENTER button
button
SETUP button
MODE button
P/N button
AUDIO button
Number (0-9) button
ZOOM button
REPEAT button
A-B button
PROG button
SLOW button
OSD button
ANGLE button
Note:
The same buttons on remote control and front panel have identical functions.
8
BASIC CONNECTION
Ensure that the power switch of this unit and
other equipment to be connected is turned off
before making connection.
Read the instructions before connecting
other equipment.
Ensure that you observe the colour-coding
when connecting audio and video cords.
A
1
To AV input jacks on TV
3
A: Connecting to a stereo TV set
1. TV set (optional)
2. DVD/CD player
3. AV connection cable (included)
For the best picture quality, recommend
connect the TV via S-Video jack if the TV
have (S-Video connection cable not included).
2
B
1
5
B: Connection to monophonic TV
1. TV set (optional)
2. DVD/CD player
3.AV connection cable (included)
4.Connect the Audio Right jack (Red) to
the Audio In jack on the TV only.
5.Connected to the Video input jack on TV
4
3
2
C
1
2
C: Connection to audio equipment
1. Audio player (optional)
2. TV set (optional)
3. DVD/CD players
4. Connect the the Video jack (Yellow)
to the Video input jack on the TV.
5.Connect the Audio jacks (Red & White)
to the Audio input jacks on the Audio Player.
4
3
9
5
REMOTE CONTROL PREPARATION
Battery Installation
Insert the batteries while observing the positive (+)
and Negative (-) polarities as Figure A.
Service life of batteries
The batteries normally last for a year although this
depends on the operation and on how often the remote
control is used.
If the remote control unit fails to work even when it is
operated near the player, replace the batteries with
new ones. Use size AAA UM-4 batteries (2 pieces).
Notes:
Do not use rechargeable (Ni-Cd) batteries.
Install batteries correctly observing the (+/-) polarity
signs.
Do not drop, step on the remote control, otherwise
it may damage the parts or lead to malfunctioning.
Use only the recommended battery type or equivalent
(voltage and size).
Always replace a complete set of batteries at the
same time.
Do not mix batteries of different types.
Never mix new and used batteries in the same
compartment.
Remove exhausted batteries immediately.
Remove batteries when product is not in use.
Do not dispose of batteries in fire as they may explode.
Do not recharge non-rechargeable batteries.
Do not short circuit the supply terminals.
Ensure batteries are stored away from metal objects
as contact may cause a short circuit.
Remote control operation range is no more than 5 m
from and within about 60 degree wide in front of the
unit (Figure B).
Notes:
Do not point bright lights to the remote control sensor.
Do not place objects between the remote control and
the remote control sensor.
Do not use this remote control together with the
remote control of any other equipment.
10
Remoto control sensor
Among 5 meters
30
30
OPERATION
PREPARATION BEFORE PLAYING DISC
The option of display language catalogue is preset to English. Please refer to Setup operation
Most functions are operated by remote control. Either operation of remote control of front panel is
effective when their buttons indicate the same function.
Preparation
Turn the TV on and select AV as the TV input.
Switch on the related system power if the player has been connected to amplifier equipment etc.
PLAY/PAUSE
1. Connect AC power cord to AC outlet.
2. Switch on the power, the displayed LOADING indicates the normal power supply. (Note: the disc
information appears after several seconds if there has disc after LOADING displayed otherwise
appears NO DISC).
3. Press OPEN/CLOSE.
4. Place a disc (8cm or 12cm) onto the tray. (For one-sided disc, position it with printed title side facing
up. For two-sided disc, position side to be playback facing down).
5. Press OPEN/CLOSE again to close disc tray.
6. Press PLAY to playback disc. You may operate according to MENU indication after MENU shows on
screen then press ENTER button to play back. Some discs may play automatically after loaded.
PAUSE: Press the PLAY/PAUSE button while in the Play mode to pause the picture.
To resume normal playback, press the PLAY/PAUSE button.
STOP
Press STOP button to stop playing (TV show “
” ). When play back is stopped the
unit records the point where STOP was pressed (resume function). Press PLAY again, and play will
resume from this point. Press STOP button twice, resume function will be cancelled.
PREV/NEXT
Press PREV button or NEXT button on remote control when playing a disc, a chapter (DVD) or a track
(CD) is skipped backward or forward correspondingly each time the button is pressed.
FB/FF
Press FB/FF button on the remote control during playback, the disc will be played in a status of forward
or reverse correspondingly. Forward or Reverse speed is relatively slow at first. When press again, the
speed becomes faster. The more times that you press the buttons, the faster the Fast forward or
reverse speed will be. There are 5 levels of speed available: X2, X4, X8, X16and X32. To return to normal
play, press PLAY button on the player or the remote control.
Note: Some discs including MP3 disc have no such function.
ZOOM: Press the SLOW/ZOOM button once during Normal or Still playback modes, and the unit will
zoom x2. Press once more and the unit will zoom x4. Use the Navigation ( , , , ) buttons to move the
image on the TV screen. Press the SLOW/ZOOM button once more to cancel the zoom function. This is
not available on all discs.
SLOW FORWARD: Press and hold the SLOW/ZOOM button to activate Slow motion. Repeatedly press
and hold to move the DVD forward in slow motion speeds of 1/2, 1/4,1/8, 1/16, 1/32 and resume normal
playback. The sound will be muted. Press the PLAY/PAUSE button to resume normal playback.
Number (0-9,10+) button
By pressing the Number (0-9) button, you can access directly to the desired track or chapters while a
disc is played. For track or chapter over 10, press 10+ and then 0-9 button.
11
OPERATION
MUTE
Press MUTE button during play, the player shows
again to cancel MUTE.
and there is no audio output (silence), press
OSD
Press OSD button during play to show the disc s relevant information on TV screen(such as playing
time, chapter number, playback status).
A-B REPEAT
Press A-B button during playback at the point where repeat play is to commence (a) then press again
at the point where repeat play is to be concluded (B). Repeat playback between point (A) and point (b)
starts. Press A-B button once more where TV screen appears REP OFF to return to normal play.
REPEAT
Press the repeat key to choose repeat play chapter or title (DVD) and play single audio or full disc
(VCD, CD, MP3).
Note: Some VCD do not have repeat function with PBC ON state.
ANGLE
Press ANGLE continuously during playback DVD disc to toggle the disc between available angles
recorded on the disc if the disc has multi-angle function.
AUDIO
Press AUDIO button during playback to toggle between available audio language recorded on the
disc if the disc has this multi-language.
Note: Press AUDIO button could toggle available audio language soundtracks.
PROGRAM
Press PROG button, the program playback screen appears on the TV monitor, 20 tracks
or chapters can be programm ed. Use
button on the remote control to select your
preferred track (CD/VCD) or title and chapter (DVD), then press ENTER button to confirm.
Use CLEAR button to amend false or unsatisfied settings. You can only press the PLAY button on
the remote control to start playing after you finish the program setting. Press the PROG button
directly to return to normal play mode. In this case, the program is not confirmed.
“
: SELECT
: PLAY ” shown on screen is only used for indication, no function for cursor.
SETUP:
For the details, please refer to the introduction of menu setup.
12
SETUP
SETUP
Once the initial settings have been completed, the player can always be operated under the same
conditions (especially with DVD discs). The settings will be retained in the memory until the
settings are changed.
Operation
1. In stop mode, Press the SETUP button to enter setup manu as follows, you can setup Language,
Screen, Custom.
A
B
C
Language Setup
OSD
Menu
Audio
Subtitle
2. Press and
to choose the desired section you want to set and press the ENTER button to
enter submenu or press SETUP button to leave the setup screen. Follows are the language setup
screen for your reference where you can set OSD menu, DVD menu, Audio Language and
Subtitle Language.
A
B
C
Language Setup
OSD
Menu
Audio
Subtitle
English
French
German
Spanish
13
REFERENCE
Menu, Submenu and Options
MENU
SUBMENU
OSD
MENU
LANGUAGE
Audio
Subtitle
Encoding
OPTIONS
DESCRIPTION
English
English On Screen Display
French
French On Screen Display
German
German On Screen Display
Spanish
Spanish On Screen Display
English On Screen Display
English
French On Screen Display
French
German On Screen Display
German
Spanish On Screen Display
Spanish
others
English On Screen Display
English
French On Screen Display
French
German On Screen Display
German
Spanish On Screen Display
Spanish
others
English
English On Screen Display
French
French On Screen Display
German
German On Screen Display
Spanish
Spanish On Screen Display
others
Off
Western European
Central European
14
REFERENCE
MENU
SUBMENU
OPTIONS
TV Type
4:3 PS
4:3 LB
16:9
Set TV screen at 4:3 Pan Scan
Set TV screen at 4:3 Letter Box
Set TV screen at 16:9
On
Off
Set screen saver to ON or OFF.
Screen Saver
NTSC
SCREEN
Output signal at NTSC format, select it when you
are using a NTSC TV.
(Note: the TV system in USA, Canada and Mexico is NTSC)
TV System
Audio Setup
DESCRIPTION
PAL
Output signal at PAL format, select it if you are
using a PAL TV.
AUTO
Output the original recording signals on the disc.
Select it if you are using a Muti-system TV.
Video output
CVBS
CVBS output
Brightness
Normal
Bright
Soft
Set to normal, bright, or soft as desire.
Contrast
-3
-2
-1
0
+1
+2
+3
Lo/Ro
Lt/Rt
Down mix
Style
CUSTOM
Set the contrast level as desire
Left only/Right only
Left total/Right total
Style 1
Style 2
Style 3
Style 4
Change the background colour of OSD
Angle Mark
On
Off
Set the Angle mark to ON or OFF
Default
Read
Return to factory setup
15
TROUBLESHOOTING GUIDE
EMIC
CH
A-B
AL
A-B
A-B
Use a soft, clean cloth moistened
with plain, luke-warm water to
clean the exterior of the unit.
1.
2.
3.
4.
5.
Calypso Collection
Emerald Mist Collection
B:i-2 Collection
Soft Metallics
Outdoor Collection
6.
7.
8.
9.
10.
Karaoke
Media Center
Roommates
Home & Go
Walkarounds
Never use solvents such as
benzene or other strong chemical
cleaners since these could
damage the unit's finish.
It is important that no liquid
reaches the inside of the unit.
Remove the disc from the case by holding it at the edges while pressing
the center hole lightly.
Do not touch the shiny surface of the disc or bend the disc.
Place the disc into the tray with the label facing up.
A dirty disc may not play correctly. If a disc becomes dirty, wipe it with a
soft cloth in a straight line from center to edge.
Avoid exposure to direct sun light, temperature extremes, and
moisture.
CAUTION: Do not use any solvent (eg: record sprays, thinner, benzene, etc.) to
clean a disc.
Disc is inserted but
Disc is inserted upsidetracks are not displayed. down.
Insert disc correctly (label
up).
Disc is dirty.
Wipe clean with soft cloth.
Disc is scratched.
Use a new disc.
Disc is seriously warped. Use a new disc
Moisture has formed
inside the Disc deck.
Certains sections of the Disc is dirty.
disc are not played
Disc is scratched.
normally.
Forget password
If you forget the
password
Take out the disc and
leave the DVD player open
for about an hour to dry it
Wipe clean with soft Cloth.
Skip over scratched
sections; otherwise,
replace the disc.
If you forget the password,
please use 9922 to preset
a new password as page 14.
Special Note
When placing your unit on a lacquered or natural finish, protect your furniture
with a cloth or other protective material.
16
1
14
17
18