1
t & & & {r & & * t t o
r;& &&atc&,&e&&&&& &&
a *&,x*;a t&&&&&&&&t *&
a
&& &&
LED Projector
USER'S MANUAL
&e e&
CONTENTS
Please read this specihcation carefully before use the projector and keep
reference.The specifications are subject to change without any notice.
CONTENTS
SAFETY PRECAUIONS.
...............02
1.
ADruSTMENT OF THE PICTURE.
......06
......07
This equipment has been tested and found to comply with the limits for a Class A
digital device, pursuant to Part 15 of the FCC Rules. These limits are designed to
provide reasonable protection against harmful interference when the equipment is
operated in a commercial environment. This equipment generates, uses, and can
radiate radio frequency energy, if not installed and used in accordance with the
instruction manual, may cause harmful interference to radio communications.
Operation of this equipment in a residential area is likely to cause harmful
interference in which case the user will be required to correct the interference at
04
FUNCTION KEY
ADVANCEI' OPERATIONS.
on for future
SAFETY PRECAUTIONS:
SPECIFICATION.
REARVIEWOFIMUTSIGNAL.......
REMOTE CONTROL....
it
his own expense.
2.
This is a Class A product. In a domestic environment, this product may cause
radio interference in which case the user may be required to take adequate
.............08
measures.
fX l,
Do not gaze forward the lens when the machine is working. It will
damage your eyes, especially for children.
CHANNEL SUB-MENU
.. . . .. .. ..
....08
4.
PICTURE SUB-MENU
5.
The lighting flash and arrowhead wihin the kiangle is a warming sign
A
alerting you ofdangerous voltage inside the product.
A
To remind the user of important operating and maintenance instructions
attached.
To reduce the possibility of the fire, electric shock or damage of the product, do
not expose the machine to rain and damp no objects filled with liquids. Do not
open the cover
ofthe product because ofthe risk ofelectric shock. Repair work
must be undertaken by qualified personnel.
7.
APPENDIX
TROUBLE SHOOTING
MAINTENANCE
PRODUCT SPECIFACATION............
PACKAGE CONTENTS
8.
9.
10.
If
the unit is moved from a cold to warm environment condensation may develop
on the lens laser. To ensure correct operation sw'itch the unit offand leave it for
one hour before using.
Do not use damaged or loose plug to avoid electricity shock or fire.
It is not allowed to touch the high-heat lamp area at the rear of the machine.
About the remote control battery: The remote control battery should be foxed
correctly, or it will damage the remote control. Keep the remote control out of the
reach ofchildren.
The LED projector integrates high-performance optical projection and a user-friendly design to
deliver high reliability and ease ofuse.
SPECIFICATION
BASIC OPERATION
Display Technology
5.8'LCD display
Resolution
1280*768
Focus changing
Hand control
LED Light Source
150W
Aspect Ratio
4:3116:9
Projector Way
Front / Rear / ceiling mount
Brightness
2500 Lumens
Contrast Ratio
3000: I
Color
Full real color (1.67 million)
LED life
30000Hours
Source Input
VGA/USBx2(SD)A4MC/AV/HDMIX2/TV/S -VIDEO
Adjustment of the pict"ure
Source Output
Mini stereo audio output
l)
Speaker
5.0w/ 80*2
the most clear condition (middle of the image area), which is the best focus position of the lens.
TV Compatibility
Global system
The picture size is subject to the distance between the projector and the screen. You can adjust
Menu Language
Chinese / English
the distance to acquire the suitable picture size.
Keystone Correction
+15'
3) Projection angle can be adjusted by the adjustable foot or projector ceiling mount.
Power Supply
ACll0-240V /50-60H2
projector deviated from the vertical angle ofprojection center more than 15 degrees, adjustable
Noise
Less than 40db
Picture Size
37-200inch
Power Consumption
180W in working / 0.3W in Standby mode
Operating Temperature
0c^40c
Operating Humidity
<80Yo
Start Time
About 3 seconds
Size
320*268*105mm
NetWeight
3.6kg
knage formats
(JPG/BMP/PNG)
Music formats
(MP3AVMAA{4A)
Video formats
(MPEG/RMVBA4OV/I4JPEG/DrVX/RM)
Text
(rxr)
formats
Turn on / off
l)
Make sure shat all the connections including cables, power cord are properly connected.
2) Take offthe lens lid
3) Tum on the power switch
.,1
4) Use the POWER button on remote control or the operation panel to open or shutdown the
I
machine; Use the MODE button on the remote control or the operation panel to select the input
signal.
Rotating FOCUS and observing the pixel on the screen carefully, when the image achieve
If
keystone correction to correct the screen knob.
4) Focus on the projection screen, you can rotate the projector lens until the picture is clear.
the
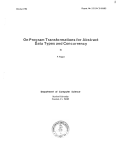
Function of the keys
The function ofpanel key ofB-100
POWER: turn on /
PC/AV:
off
t,
switch the mode of TV, video, S-Video, component, computer, high-definition,
multimedia.
.
MENU: System function
keys
Displaying all functions and sub-menus
A V: channels increasingidecreasing
key
In menu mode, the upper and lower selection
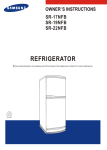
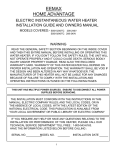
Remote Control Overview
ADVANCED OPERATIONS
.1'
.Z
47
Function Setting
3l
Press the "P. MODE" to enterthe source selection, use
the'4" / uV,
buttonto selectTV,AV,
S-Video, component, computer, VGA, HDMI, USB. Use "MEN(J" tci the corresponding signal
1s.
2q
function.
,21,
,4)
.22
:5.
il
23,
i4:
0
,-L
,l
2d
.81
L
Select Source button
27.
j0l
11,
12:
2e,.
29'
,1.11
l:
l3o:
'14)
i31
,1!,
!?
161
33
H
FLIP: Flip image
2. power: turn on /
Sub-menu
off
Press "MENU" button to enter the menu settings, use the
3: 0-9 number keys: In TV mode, press this key to switch channels
4. FB/r'F
Lr I n v " button to select the
channel, picture, sound, time, option.
Use"
5.ZOOM
n
{
" ," ,
"buttonstoadjustthecorrespondingparameters,pressthebuttonyou
can exit the TV menu settings.
6.
AV,?C: Source Selection
8126:
YOL: Volume increase/ decrease
Channelsub-menu
7/9: Right direction: Enter the menu, move the cursor right to change the parameters of the
projector; In signal source, it's a confirm key.
manual Tuning, program edit.
24.16:914:3: In main interface to switch the output mode.
20. Recall: Retum to the previous option
23.Stop: Work in the USB,
Press to exit the current playback
22.Play lPa:use: work in the USB, press to pause the current playback, again to cancel pause.
20.Next option: Work in the USB, press to select the next program
21. Next:
(In the TV mode to display the
Work in the USB, move the cursorto the next
7
menu) In this sub-menu
can be set to auto Tuning,
AIV
Option sub-menu
Picture sub-menu
In this menu you can set the menu language, reset, blue screen, flip.
In this sub-menu to adjust the picture mode, contrast, brightness, color, sharpness, tint, color
temperature, aspect ratio, noise reduction and screen.
USB menu
Press "Source" button to enter USB multimedia options (Figure)
Sound submenu
In this submenu, you can set sound mode.
u
enter the next menu; Press "
I
I">
" to select different types of documents; Press "OK" to
" to stop playing, retum to the main menu interface.
Time sub-menu
In this sub-menu to set the clock, sleep timer
In this menu, press "
to select different types of documents; Press "OK" to
enter the next menu
l0
In this menu, press " A " / " V " or
I{
tt
7
r
}
" to select different types of documents; press
"OK" button to enter fuIl-screen playback interface; press
" I
" to stop playlng, retum to the
APPENDIX
Trouble shooting
THE PROJECTIORDOES NOTTURN ON
main menu interface.
Possible cause
Solution
Plug socket tightly and make sure the socket is
TV Connection
AC power socket is not properly
connected with power supply.
Before searching, please choice a local television of good color formats and sound formats,
such as: color system PAL, NTSC, SECAM. Or set the color system to Auto, the machine
features a color system of automatic recognition. Sound System has
there is no correct choice
DK, I, BG, M and so on. If
ofcolor and sound formats, it may be no color, no sound.
PC Gonnection
Switch on the power.
Attempting to turn the projector on again
Wait until the cooling down process
durine the coolins Drocess
completed.
NOPICTURE
Possible cause
Solution
The video source is not tumed on or
Turn the video source on and check that the
connected correctly.
signal cable is connected correctly.
The projector is not correctly connected
When the projector used as a computer monitor, make sure the computer's display resolution is
set to adapt the resolution of the machine (the best resolution: 800
screen
will
x 600, 60 Hz), otherwise the
show "beyond the display range"
Please set the input signal port into computer signal port
Do not bind the power cables and computer cables together, otherwise it will appear noise or
interference on the image.
If there is dissatisfaction with
screen, you can use the automatically in menu function to adjust
the image. (In PC mode)
has
to the input source device.
Check the connection
The input signal has not been correctly
Select the correct input signal
selected.
key on the proiector or remote control.
The lens cao is still attached to the lens.
Remove the lens cap.
with the source
BLURRED IMAGE
Possible cause
The projector lens
Solution
is not
correctly
Adjust the focus of the lens using the focus
focused.
adiuster.
The projector and the screen are not
Adjust the projection angle and direction
alisned properly.
well as the heieht ofthe unit ifnecessarv.
The lens cap is still attached to the lens.
Remove the lens cap.
as
REMOTE CONTROL DOES NOTWORK
Possible cause
Solution
The batterv is out of oower
Replace the battery with a new one.
There is an obstacle between the remote
conkol and the proiector.
You are too far away from the projector.
1l
Remove the obstacle.
Stand within
proiector.
t2
6
meters (19.5 feet)
of
the
Maintenance
PRODUCT SPECIFACATION
Care ofthe projector
Your projector needs little maintenance. The only thing you need to do a regular basis is to keep
Item No.
Bl00(HD)
Image Technology
5.8'LED
Resolution
1280*768
Brightness(Lumens)
2soo
the lens clean.
Cleaning the lens
Clean the lens whenever you notice dirt or dust on the surface.
Contrast ratio
Use a canister of compressed air to remove dust.
If
there is dirt or smears, use lens-cleaning paper or a soft cloth with lens cleaner and gently
3000:
I
LED Light
l50w
Maximum size
200 inch
wipe the lens surface.
Package contents
Never rub the lens with abrasive materials.
Cleaning the projector case
Please confirm the below items attached
Before you clean the case, tum the projector offand unplug the power cord.
To remove dirt or dust, wipe the case with the cleaning cloth.
To remove stubbom dirt or stains, moisten a soft cloth with water and a neutral PH detergent.
Never use wax, alcohol, benzene, thinner or other chemical detergents. These can damage the
case
If you
(The supplied accessories
Projector--*
Lens cover----
Storing the projector
if
any Shortage or damage,
please contact the sales agent or distributor
will be
suitable
for your region, and may differ from hose
illustrated. )
.Then wipe the case.
to the packing,
Remote
control---
---------
lset
lpcs
lpcs
need to store the projector for an extended time, please follow the instructions below:
Make sure the temperature and humidity of the storage area was within the recommended range
for the projector.
Retract the adjuster feet.
Remove the batteries from the control.
Pack the projector in its original or equivalent.
Transporting the projector
It is recommended that you ship the projector with its original packing or equivalent.
When you carry the projector yourself, please use the original box or provided soft carry case.
13
t4
1.
Press "MENU" button
selectthe " itE
Select
"*+iEE
to enter the menu settings, use the
(option)"
"
<" / " )"button
.
(Oso t-anguage)'; , press "OK ", enter the sub:options.
Select the desired language
to