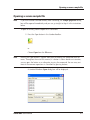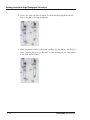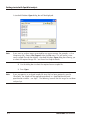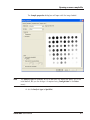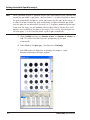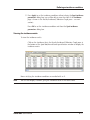
1
GeneTools
Getting Started
Although all possible care has been taken in the preparation of this publication,
Synoptics Limited accepts no liability for any inaccuracies that may be found.
Synoptics Limited reserves the right to make changes without notice both to this
publication and to the product that it describes.
No part of this publication may be reproduced, stored in a retrieval system or
transmitted in any form or by any means electronic, mechanical, photocopying,
recording or otherwise without the prior permission of the copyright owner.
Version 08-1d.1.SynGene
© Synoptics Limited 2000–2008
Synoptics Ltd
Beacon House, Nuffield Road
Cambridge, CB4 1TF, UK
Tel: +44 (0)1223 727100
Fax: +44 (0)1223 727101
Email: [email protected]
Internet: www.synoptics.co.uk
Table of Contents
Introduction
1–1
Analysis techniques . . . . . . . . . . . . . . . . . . . . . . . . . . . . . . . 1–1
Starting up GeneTools . . . . . . . . . . . . . . . . . . . . . . . . . . . . . . 1–2
Note on file formats . . . . . . . . . . . . . . . . . . . . . . . . . . . . . . . 1–2
Getting started with Gel analysis
2–1
Setting up GeneTools for getting started . . . . . . . . . . . . . . . . . . . . . . 2–1
Opening a secure sample file . . . . . . . . . . . . . . . . . . . . . . . . . . 2–3
Saving a secure sample file . . . . . . . . . . . . . . . . . . . . . . . . . . . 2–7
Using Gel windows . . . . . . . . . . . . . . . . . . . . . . . . . . . . . . . 2–8
Image pane . . . . . . . . . . . . . . . . . . . . . . . . . . . . . . . . 2–9
Track Label pane . . . . . . . . . . . . . . . . . . . . . . . . . . . . . . 2–9
Description pane . . . . . . . . . . . . . . . . . . . . . . . . . . . . . 2–10
Profile pane . . . . . . . . . . . . . . . . . . . . . . . . . . . . . . . 2–10
Peak Value pane . . . . . . . . . . . . . . . . . . . . . . . . . . . . . 2–10
Graphics pane . . . . . . . . . . . . . . . . . . . . . . . . . . . . . . 2–10
Results pane . . . . . . . . . . . . . . . . . . . . . . . . . . . . . . . 2–11
Determining molecular weights . . . . . . . . . . . . . . . . . . . . . . . . . 2–11
Working with results . . . . . . . . . . . . . . . . . . . . . . . . . . . . . . 2–14
Printing Gel results . . . . . . . . . . . . . . . . . . . . . . . . . . . . 2–15
Measuring quantities . . . . . . . . . . . . . . . . . . . . . . . . . . . . . . 2–16
Matching peaks on different tracks. . . . . . . . . . . . . . . . . . . . . . . . 2–17
Next steps . . . . . . . . . . . . . . . . . . . . . . . . . . . . . . . . . . 2–18
Getting started with High Throughput Gel analysis
3–1
Setting up GeneTools for getting started . . . . . . . . . . . . . . . . . . . . . . 3–1
Opening a secure sample file . . . . . . . . . . . . . . . . . . . . . . . . . . 3–3
Adjusting the track frame grid over the tracks . . . . . . . . . . . . . . . . . . . 3–8
Changing the width, height and angle of all track frames together. . . . . . . . . . 3–10
Changing the position, width, height and angle of an individual track frame . . . . . 3–15
GeneTools User Manual
Contents-1
Contents
Locking the tracks to analyze the High Throughput
Analyzing High Throughput Gel samples . . . . .
Manual matching . . . . . . . . . . . . .
Next steps . . . . . . . . . . . . . . . . . .
Gel
. .
. .
. .
sample .
. . . .
. . . .
. . . .
Getting started with Colony counting
.
.
.
.
.
.
.
.
.
.
.
.
.
.
.
.
.
.
.
.
.
.
.
.
.
.
.
.
.
.
.
.
.
.
.
.
.
.
.
.
3–17
3–18
3–19
3–19
4–1
Opening a secure sample file . . . . . . . . . . . . . . . . . . . . . . . . . . 4–1
Saving a secure sample file. . . . . . . . . . . . . . . . . . . . . . . . . . . . 4–4
Using Colony counting windows . . . . . . . . . . . . . . . . . . . . . . . . . 4–5
Setting the area in which colonies are counted . . . . . . . . . . . . . . . . 4–6
Defining an exclude region . . . . . . . . . . . . . . . . . . . . . . . . . 4–7
Changing the shape of an exclude region . . . . . . . . . . . . . . . . . . . 4–9
Deleting exclude regions . . . . . . . . . . . . . . . . . . . . . . . . . . 4–11
Setting the parameters used to detect colonies . . . . . . . . . . . . . . . . . . 4–12
Viewing Colony counting results . . . . . . . . . . . . . . . . . . . . . . . . . 4–13
Defining the colony class boundary . . . . . . . . . . . . . . . . . . . . . 4–14
Adding and removing colonies manually . . . . . . . . . . . . . . . . . . . . . 4–15
Printing Colony counting results . . . . . . . . . . . . . . . . . . . . . . . . . 4–17
Next steps . . . . . . . . . . . . . . . . . . . . . . . . . . . . . . . . . . 4–18
Getting started with Manual band quantification
5–1
Opening a secure sample file . . . . . . . . . . . . . . . . . . . . . . . . . . 5–1
Placing boxes on the sample . . . . . . . . . . . . . . . . . . . . . . . . . . . 5–5
Placing a rectangular box on the sample . . . . . . . . . . . . . . . . . . . 5–5
Placing a free hand box on the sample . . . . . . . . . . . . . . . . . . . . 5–7
Adjusting the position of a box. . . . . . . . . . . . . . . . . . . . . . . . 5–9
Adjusting the size and shape of boxes . . . . . . . . . . . . . . . . . . . . 5–9
Removing a box from a Manual band quantification sample . . . . . . . . . . 5–11
Showing or hiding identification labels on the boxes . . . . . . . . . . . . . 5–11
Saving a secure sample file . . . . . . . . . . . . . . . . . . . . . . . . . . . 5–12
Assigning quantities to boxes . . . . . . . . . . . . . . . . . . . . . . . . . . 5–12
Applying background correction to results . . . . . . . . . . . . . . . . . . . . 5–14
Viewing Manual band quantification results. . . . . . . . . . . . . . . . . . . . 5–15
Defining an incidence condition. . . . . . . . . . . . . . . . . . . . . . . . . 5–16
Viewing the incidence matrix . . . . . . . . . . . . . . . . . . . . . . . . 5–17
Printing Manual band quantification results . . . . . . . . . . . . . . . . . . . . 5–18
Next steps . . . . . . . . . . . . . . . . . . . . . . . . . . . . . . . . . . 5–19
Contents-2
GeneTools User Manual
Contents
Getting started with Spot blot analysis
6–1
Opening a secure sample file . . . . . . . . . . . . . . . . . . . . . . . . . . 6–1
Saving a secure sample file. . . . . . . . . . . . . . . . . . . . . . . . . . . . 6–5
Assigning quantities to spot frames . . . . . . . . . . . . . . . . . . . . . . . . 6–6
Applying background correction to results . . . . . . . . . . . . . . . . . . . . . 6–7
Viewing Spot blot results. . . . . . . . . . . . . . . . . . . . . . . . . . . . . 6–8
Defining an incidence condition. . . . . . . . . . . . . . . . . . . . . . . . . 6–10
Viewing the incidence matrix . . . . . . . . . . . . . . . . . . . . . . . . 6–11
Printing Spot blot results . . . . . . . . . . . . . . . . . . . . . . . . . . . . 6–12
Next steps . . . . . . . . . . . . . . . . . . . . . . . . . . . . . . . . . . 6–13
GeneTools User Manual
Contents-3
Contents
Contents-4
GeneTools User Manual
Introduction
This manual shows you how to get started with GeneTools. However, you will probably
find that the few simple procedures it describes will cover nearly all you need to know
to use GeneTools in most circumstances.
For example, GeneTools provides many configuration options allowing you to control
the way it works, but you are unlikely to need to change these settings very often, if at
all, since the default settings will cope with most situations. If you do change the
settings, you can save them as the defaults to be used for new images.
GeneTools also provides a range of tools to give you fine control in carrying out
procedures manually or for editing the results of its automatic operations. However, you
will probably only need to use them very occasionally, since the GeneTools automatic
tools are so powerful and sensitive that they will handle all but the most exceptional
situations.
Where appropriate, the manual will draw your attention to some of the features not
covered in detail here with references to sections in the on-line Help, where you can
find full instructions for how to carry out all GeneTools operations.
Analysis techniques
GeneTools supports Gel analysis, High Throughput Gel analysis, Colony counting,
Manual band quantification and Spot blot analysis. Each of these is covered separately
in the following chapters:
●
Getting started with Gel analysis – Chapter 2.
●
Getting started with High Throughput Gel analysis – Chapter 3.
●
Getting started with Colony counting – Chapter 4.
●
Getting started with Manual band quantification – Chapter 5.
●
Getting started with Spot blot analysis – Chapter 6.
GeneTools User Manual
1-1
Introduction
Starting up GeneTools
To start up GeneTools:
1 Click on the Start button in the Windows Task Bar and choose GeneTools
from the Programs®SynGene submenu.
Depending on options set in the program, the User name dialog box may be
displayed:
2 If you have entered a GeneTools user name previously, you will be able to
select it from the drop-down list box; otherwise enter your name.
The user name is printed in reports and is recorded in document histories to
keep track of who has created and changed files in GeneTools.
You can uncheck Show at program start if you don’t want the User name
dialog box displayed when the program starts – the user who was logged in
when the program was last closed will be logged in again automatically.
Note on file formats
GeneTools stores data in a secure file format – SynGene Gel document or .sgd file.
These files are also created by compatible acquisition programs, such as GeneSnap. The
secure file format ensures that your data cannot be tampered with, and that your results
are both traceable and reproducible.
However, you can also load other image files created by non-secure sources (such as
Tiff or bmp images generated by a scanner) into GeneTools for analysis. When you do
this, GeneTools copies the original image and saves it in a secure file – any changes you
then make to the original image will have no effect on the image in the secure file.
1-2
GeneTools User Manual
Getting started with Gel analysis
This chapter shows you how to get started using GeneTools for Gel analysis – see the
on-line Help for full details.
The chapter begins with a section explaining how to set up the program so that you can
work through the rest of the chapter.
Setting up GeneTools for getting started
This chapter assumes that GeneTools is configured to carry out operations automatically.
If you have just installed GeneTools this will be the case, as the automatic options are
on by default. However, if you are not using a new installation, some of the automatic
options may have been turned off, so you should make sure they are all turned on
before going any further.
GeneTools User Manual
2-1
Getting started with Gel analysis
To set up GeneTools for automatic operation:
1 Choose Configuration from the Extras menu to display the General page in
the Configuration dialog box:
2 Make sure that Auto match peaks, Auto locate tracks and Auto locate peaks
are selected.
3 Uncheck Auto import methods.
4 Press OK to confirm your changes and close the dialog box.
2-2
GeneTools User Manual
ten
G
rg
alysid
w
h
Opening a secure sample file
Opening a secure sample file
Note
If you have started GeneTools directly from GeneSnap, the Sample properties dialog
box will be opened immediately and you can go straight to Step 4 in the instructions
below.
To open an existing secure sample file in GeneTools:
1 Press the Open button in the Standard toolbar:
or
Choose Open from the File menu.
Note
Pressing the Open button is a quick alternative to choosing the command from the
menu. Throughout the rest of this manual, if a button is shown beside an instruction,
you can press the button as an alternative to using the command. You can carry out
most of the common operations in GeneTools by pressing buttons.
A standard Windows Open dialog box will be displayed:
GeneTools User Manual
2-3
Getting started with Gel analysis
Note
If you want to analyze images generated by non-secure sources (for example, a .tif or
.bmp image file), choose New (Import) from the File menu. This will create a new
secure sample file and then display a standard Windows Open dialog box allowing you
to select the required image file – see the on-line Help for details.
2 Use the dialog box to select the required secure Gel sample file.
3 Press Open.
Note
If you are opening an analyzed sample file (one that has been previously saved in
GeneTools), the sample will be opened immediately in a Gel window.
If you have set Auto import methods and you have selected a sample file as the source
for the settings to import, the Import method dialog box will open so that you can
choose which settings to import – see the on-line Help for details.
2-4
GeneTools User Manual
ten
G
rg
alysid
w
h
Opening a secure sample file
The Sample properties dialog box will open with the image loaded:
4 Check that the Analysis type is set to Gel (this is the default Analysis type
when you first install GeneTools, but you can choose a different default
Analysis type using Configuration in the Extras menu).
5 Press one of the Electrophoresis direction radio buttons to specify the
electrophoresis direction in the image (the default is Down).
Note
The red box on the image in the preview pane defines the area of interest – GeneTools
will only locate tracks within this area. By default, the area of interest includes most of
the image, so you should not need to adjust it. However, you can move or reshape the
area of interest if required, or define more than one area of interest – see the on-line
Help for details.
GeneTools User Manual
2-5
Getting started with Gel analysis
You shouldn’t need to change any of the other settings. In particular:
●
GeneTools automatically detects the Image type.
●
Unless you are opening a multi-layer sample, you should leave the
numbers of Columns and Rows set to 1 – see the on-line Help for
details if you want to define more than one area of interest.
●
You should leave Locate tracks automatically selected and Hint
unchecked – this means GeneTools will use fully automatic track location,
which is the recommended option as in nearly all cases it gives very
accurate results in the shortest time.
6 Press OK.
There will be a short pause while GeneTools first automatically locates the tracks on the
Gel image and then locates the peaks along each of the tracks.
The results will be displayed in a Gel window.
For more detailed instructions and related topics, see the following topics in the
How to® open, create, save any type of sample section of the on-line Help:
●
Opening a sample file
●
Creating a new secure sample file
●
Using the Browser
●
Acquiring an image to create a secure sample file.
See also the topics in the How to® work with Gel analysis samples®Setting the
integration parametes and background correction for tracks section of the on-line Help.
2-6
GeneTools User Manual
ten
G
rg
alysid
w
h
Saving a secure sample file
Saving a secure sample file
Once you have created the new secure sample file you should save it if you will need
to use it again. Saving the file saves all the track and peak positions and analysis results,
etc, with the image.
To save a secure sample with a new name:
1 Choose Save as from the File menu to display a standard Windows Save As
dialog box.
2 Use the dialog box to select a folder in which to save the sample.
3 Enter a File name for the sample.
4 Press Save to save the sample in the file.
To save a previously saved secure sample file using the same name:
Choose Save from the File menu. If the secure sample file has not been saved
previously, the Save As dialog box will be displayed so that you can enter a
name: see above.
GeneTools User Manual
2-7
Getting started with Gel analysis
Using Gel windows
Once you have opened a secure Gel sample file it will be displayed in a Gel window:
Image pane
Track Label
pane
Description
pane
Profile
pane
Peak Value
pane
Reset brightness
Image brightness
adjustment
Reset
contrast
Image contrast
adjustment
Reset
gamma
Gamma correction
adjustment
Graphics pane
Results pane
The following subsections give a quick overview of the different panes in the Gel
window – see the on-line Help for full details.
2-8
GeneTools User Manual
ten
G
rg
alysid
w
h
Using Gel windows
Image pane
The Image pane shows the image with the tracks and peak positions and bounds
overlaid on it. Note that the peak and bounds markers are curved (grimaced) to match
the data.
When you match the peaks between tracks, lines will be shown joining the matching
peaks.
You can choose whether to show each of these features using commands in the View
menu, and the color to use for them using Configuration in the Extras menu.
You can select a peak in the Image pane by clicking on it – this also selects the track.
You can right-click on a peak in the Image pane to display a menu for working with the
selected peak – most of the commands also appear on the Peak menu.
Track Label pane
The Track Label pane shows the number of each track and whether it has been:
●
disabled (the number is shown in gray),
●
selected as a molecular weight standard (MwS),
●
selected as a quantity standard (QuS),
●
selected as a molecular weight and quantity standard (MQS),
●
selected as a matching standard (MS) or
●
selected as the active matching standard (MS*).
The same track may be selected as a molecular weight and/or quantity standard and a
matching standard.
The picture shows a newly analyzed image, so none of these apply.
You can select a track in the Track label pane by clicking on it.
You can right-click on a track in the Track label pane to display a menu for working
with the selected track – most of the commands also appear on the Track menu.
GeneTools User Manual
2-9
Getting started with Gel analysis
Description pane
The Description pane shows a description of the selected track – use Description in the
Tracks menu to enter or edit the description.
Profile pane
The Profile pane shows the profile for the selected track.
The position and boundaries of each peak are shown on the profile.
If you choose to make one of the tracks a matching standard, its profile will be overlaid
on the profile for other tracks.
You can choose the colors used for any of these features using Configuration in the
Extras menu.
You can right-click on a peak in the Profile pane to display a menu for working with the
selected peak – most of the commands also appear on the Peak menu.
Peak Value pane
The Peak Value pane shows data for the peaks shown in the Profile pane.
The data shown depends on what is selected in the Graphics pane (shown in the
bottom left-hand corner of the Gel window):
●
molecular weights are shown if the molecular weight calibration curve is selected,
●
quantities are shown if the quantity calibration curve is selected,
●
peak positions are shown if the Dendrogram is selected.
Graphics pane
The Graphics pane can show:
●
the molecular weight calibration curve for the selected track
●
the quantity calibration curve for the selected track
●
the Dendrogram showing relationships between matched tracks.
The example picture shows a newly analyzed image, so all of these are blank.
2-10
GeneTools User Manual
ten
G
rg
alysid
w
h
Determining molecular weights
Results pane
The Results pane can show tables with:
●
Results for selected track
●
Results for all tracks
●
Matching comparisons (showing results for matched peaks)
●
Matching matrix (showing which peaks matched))
●
Similarity matrix (showing the matching between tracks).
Right-clicking on the Results pane displays a menu that allows you to choose what fields
are displayed in each of the first three tables listed above.
Determining molecular weights
In order to determine the molecular weights of peaks on the tracks, you must assign
molecular weights to known peaks on one or more ‘standard’ tracks.
GeneTools is supplied with a library of commonly used molecular weight standards. You
can use these as they are, edit them or add your own molecular weight standards. If
you have a track on the Gel corresponding to one of these standards, you can assign
the molecular weights from the standard in the library to the peaks in the track.
Alternatively, you can enter individual molecular weights and assign them to individual
peaks manually. The following instructions show you how to assign the molecular
weights from a standard in the library. See the cross-references listed at the end of this
section for more information about creating and editing Molecular Weight Libraries and
assigning molecular weights.
Note
You can also store quantity standards in Molecular Weight Libraries and use the
following procedure to assign quantities to peaks. However, you can also assign
quantities to individual peaks on any track – see Measuring quantities, page 2-16, for
details.
To assign molecular weights/quantities to the peaks on a standard track:
1 Click in the standard track to select it.
GeneTools User Manual
2-11
Getting started with Gel analysis
2 Click on the peak in the track corresponding to the first molecular weight in
the standard.
3 Choose MW/quantity standard from the Track menu (or the pop-up menu
displayed by right-clicking in the track label) to define the track as a molecular
weight standard and display the Assign molecular weight dialog box. It will
open at the From standard page:
Arrow buttons to select
the track peak
Standards drop-down list
Details of selected standard
4 Select the required molecular weight standard from the standards drop-down
list.
Note
Standards in the library may contain quantities as well as or instead of molecular
weights – the details box below the drop-down list shows the values contained in the
selected standard.
5 Check that the first standard shown in the standard details list corresponds to
the Selected peak. If it doesn’t, use the arrow buttons to select the peak that
does correspond to the first standard.
6 Press Assign from standard.
7 Press OK.
2-12
GeneTools User Manual
ten
G
rg
alysid
w
h
Determining molecular weights
Provided Molecular weight is selected in the View menu:
●
The assigned molecular weights will appear in the Peak Value pane next to the
relevant peak(s) in the Profile pane:
●
The peak markers for peaks on the standard track that have molecular weights
assigned to them will have a short marker drawn across them:
GeneTools User Manual
2-13
Getting started with Gel analysis
●
The MW calibration page in the Gel window’s Graphics pane will show the
calibration points and the selected calibration curve joining them.
The vertical axis shows molecular weight – the scale may be linear or logarithmic,
depending on the choice made using Configuration in the Extras menu. The horizontal
scale shows pixel position down the track.
The assigned molecular weights will also appear in the tables in the Results pane:
assigned molecular weights are shown in red; calculated molecular weights are shown
in black.
If you select another track, the molecular weights calculated for the peaks in that track
will be shown in the Peak Value pane and in the Results pane.
For more detailed instructions and related topics, see the How to ® work with Gel
analysis samples ® Determining molecular weights and quantities section in the on-line
Help.
Working with results
Once GeneTools has analyzed the Gel image, you can view the results tables in the
Results pane – click in the pane and choose Maximize pane from the View menu to
expand the pane to fill the window (or right-click in the pane and choose Maximize
pane from the pop-up menu); choose the command again to return to the normal view.
You can choose what information to show in the tables by right-clicking in the Results
pane and selecting the columns you want to display.
2-14
GeneTools User Manual
ten
G
rg
alysid
w
h
Working with results
Printing Gel results
To print a report showing Gel results:
1 Choose Report setup from the File menu to display the Report setup dialog
box:
Note
If the paper selected for the currently selected printer is less than 150 mm in either
dimension (for example if you are using a video printer), a simplified report containing
the image and some brief identification and image information will be printed. The
settings in the Report setup dialog box have no effect on the content of this simplified
report.
2 Check the boxes for the items you want to include in the report.
3 Press OK to close the dialog box.
4 Choose Print from the File menu to display the Print dialog box so that you
can choose print options – this is a standard Windows dialog box.
5 Choose the print options you require and press OK to print the report.
GeneTools User Manual
2-15
Getting started with Gel analysis
Note
See the How to ® work with Gel analysis samples ® Printing and exporting results ®
Printing reports - Gel Results topic in the on-line Help for further details.
You can also export results from the tables in the Results pane to Excel and Word, save
results in a comma separated values format file and copy a picture of the image to the
clipboard – see the on-line Help for details.
Measuring quantities
To calibrate the quantity measurements for the peaks, you must know the quantity
corresponding to at least one peak and then assign this quantity to the peak in
GeneTools.
Note
This section shows you how to assign quantities to individual peaks on tracks. You can
also assign quantities from standards stored in a Molecular Weight Library – see the
How to ® work with Gel analysis samples ® Determining molecular weights and
quantities section in the on-line Help for instructions and related topics.
To assign a calibration quantity to a peak:
1 Click on the required peak in the Image pane to select it.
2 Choose Assign quantity from the Peak menu (or the pop-up menu displayed
when you right-click on the peak) to display the Assign calibrated quantities
dialog box:
(The controls at the bottom of the dialog box are disabled if you choose to
use the same calibration for all tracks. This is the default; you can use
2-16
GeneTools User Manual
ten
G
rg
alysid
w
h
Matching peaks on different tracks
Quantity calibration in the Edit menu to allow separate calibrations for each
track.)
3 Enter the known quantity for the peak in the Calibrated quantity box.
4 Press OK.
The peak marker in the image pane will have a short line across it to show that it is a
quantity calibration standard.
The Graphics pane will show the quantity calibration curve derived from this calibration
point, and the Peak Value pane will show the quantities calculated from the calibration
curve. The Results pane will also show the calibrated quantity if you choose to display
the Quantity column in the tables (right-click in the Results pane and choose
Calibration quantity).
For more detailed instructions see the How to ® work with Gel analysis samples ®
Determining molecular weights and quantities section in the on-line Help.
Matching peaks on different tracks
Note
This section only applies if you have purchased the GeneTools Match software option.
GeneTools allows you to find peaks on other tracks that match the peaks on a standard
track.
To define a track as the active matching standard:
1 Click on the track in the Image pane to select it.
2 Choose Matching standard from the Track menu.
The track label will show MS* – the MS means it is a matching standard, the * means it
is the active matching standard (any previous active matching standard will now show
MS to show that it is still a matching standard but no longer the active matching
standard).
Provided Auto match peaks is set in the Configuration dialog box (you checked this at
the beginning of the Getting started sequence) and Peak matching is selected in the
GeneTools User Manual
2-17
Getting started with Gel analysis
View menu, match lines will be drawn on the image between the peaks on the
matching standard and any matching peaks on the other tracks.
For more detailed instructions and related topics, see the How to ® work with Gel
analysis samples ® Matching peaks on different tracks section in the on-line Help.
Next steps
This completes the Getting started with Gel analysis chapter. If you follow the
instructions given in this chapter, you should now be able to get started working
productively with GeneTools to analyze Gels.
As you will have noticed from the number of cross-references to the on-line Help for
further details, GeneTools offers many other features and refinements, but as long as
you are generally aware of what is available you can probably leave the details until you
need to use them.
2-18
GeneTools User Manual
Getting started with High
Throughput Gel analysis
This chapter shows you how to get started using GeneTools for High Throughput Gel
analysis: in particular, Madge and E-Gel analysis.
Note
For definiteness, the examples shown in this chapter are drawn mainly from a Madge
analysis. However, in nearly all cases you use exactly the same procedures for analysing
Madge and E-Gel samples, so all instructions should be taken as applying to both
analysis types; any exceptions will be stated explicitly.
The chapter begins with a section explaining how to set up the program so that you can
work through the rest of the chapter.
Setting up GeneTools for getting started
This chapter assumes that GeneTools is configured to carry out operations automatically.
If you have just installed GeneTools this will be the case, as the automatic options are
on by default. However, if you are not using a new installation, some of the automatic
options may have been turned off, so you should make sure they are all turned on
before going any further.
GeneTools User Manual
3-1
Getting started with High Throughput Gel analysis
To set up GeneTools for automatic operation:
1 Choose Configuration from the Extras menu to display the General page in
the Configuration dialog box:
2 Make sure that Auto match peaks and Auto locate peaks are selected.
Note
You cannot locate tracks automatically in a High Throughput Gel analysis so the setting
of Auto locate tracks has no effect.
3 If your main use of GeneTools will be to perform High Throughput Gel
analysis, you can choose High Throughput Gel from the Default analysis
drop-down list box – this means that High Throughput Gel will be selected
automatically as the sample type in the Sample properties dialog box when
you open or create a new unanalyzed sample file.
4 Uncheck Auto import methods.
3-2
GeneTools User Manual
ten
o
G
rd
p
h
g
alysiu
w
TH
Opening a secure sample file
Opening a secure sample file
Note
If you have started GeneTools directly from GeneSnap, the Sample properties dialog
box will be opened immediately and you can go straight to Step 4 in the instructions
below.
To open an existing secure sample file in GeneTools:
1 Press the Open button in the Standard toolbar:
or
Choose Open from the File menu.
Note
Pressing the Open button is a quick alternative to choosing the command from the
menu. Throughout the rest of this manual, if a button is shown beside an instruction,
you can press the button as an alternative to using the command. You can carry out
most of the common operations in GeneTools by pressing buttons.
A standard Windows Open dialog box will be displayed:
GeneTools User Manual
3-3
Getting started with High Throughput Gel analysis
Note
If you want to analyze images generated by non-secure sources (for example, a .tif or
.bmp image file), choose New (Import) from the File menu. This will create a new
secure sample file and then display a standard Windows Open dialog box allowing you
to select the required image file – see the on-line Help for details.
2 Use the dialog box to select the required secure High Throughput Gel sample
file.
3 Press Open.
Note
If you are opening an analyzed sample file (one that has been previously saved in
GeneTools), the sample will be opened immediately in a Gel window.
If you have set Auto import methods and you have selected a sample file as the source
for the settings to import, the Import method dialog box will open so that you can
choose which settings to import – see the on-line Help for details.
3-4
GeneTools User Manual
ten
o
G
rd
p
h
g
alysiu
w
TH
Opening a secure sample file
The Sample properties dialog box will open with the image loaded:
4 Set the Analysis type to High Throughput Gel.
5 Select the type of High Throughput Gel analysis you are using from the Gel
type drop-down list box. You can choose:
●
Madge 71.6 degree rotation
●
Madge 78.7 degree rotation
●
E-Gel 96.
6 If you are opening a 96-well sample:
Leave the Number of columns and Number of rows both set to 1 –
there will be a single area of interest shown by a red box on the image in
GeneTools User Manual
3-5
Getting started with High Throughput Gel analysis
the preview pane. See the next step for more about this box and how to
adjust it.
If you have a 192-well sample:
Set the Number of columns to 2 if the two sets of tracks are side-by-side;
set the Number of rows to 2 if the two sets of tracks are one above the
other. Two areas of interest, shown by two red boxes, will appear on the
image, either side by side or one above the other. See the next step for
more about these boxes and how to adjust them.
Note
The following instruction assumes there is a single area of interest. If you are working
with a 192-well sample, there will be two areas of interest, and you can apply the
instruction to each of them independently. In particular, the areas of interest can overlap
each other to allow for the fact that the areas of interest are rectangular while the tracks
on a Madge sample are arranged in a parallelogram.
7 The red box on the image in the preview pane shows the ‘area of interest’ on
the gel. For a High Throughput Gel sample, the area of interest defines the
initial position and size of a grid of 96 track frames, which you use to mark
out the areas of each of the 96 tracks.
Note
The rest of this instruction step shows you how to move and reshape an area of interest
in the preview pane so that the track frame grid will cover the tracks. However, there is
no need to take great care to do this accurately at this stage as you will be able to
reshape the track frame grid freely in the Gel window later – it will also be easier to do
it accurately then since you will be able to see the actual individual track frames.
To move an area of interest:
a Move the pointer inside the area of interest (avoid any drag handles).
b Press the mouse button and drag the area of interest to its new position.
To reshape an area of interest:
a Click in the area of inerest to make sure it is selected – small square drag
handles will appear at the corners and the middle of each side of the area
of interest box to show it is selected.
b Drag the handles to reshape the box as required.
3-6
GeneTools User Manual
ten
o
G
rd
p
h
g
alysiu
w
TH
Opening a secure sample file
8 Click on a radio button to specify the Electrophoresis direction.
Note
You shouldn’t need to change any of the other settings. In particular, GeneTools
automatically detects the Image type.
9 Press OK to confirm the settings you have made and close the dialog box.
GeneTools will open a new Gel window displaying the sample image with a grid of
track frames over it:
Note
You can place individual track frames on the image in addition to those in the grid of
frames – for example, you may want to do this for a molecular weight marker track.
You add individual tracks in the same way as for a Gel sample – see Placing individual
tracks on a sample in the How to ® work with Gel analysis samples ® Placing,
positioning and working with tracks section of the on-line Help.
See Using Gel windows, page 2-8, in the Getting Started with Gel analysis chapter for
information about Gel windows, including the different panes within them.
GeneTools User Manual
3-7
Getting started with High Throughput Gel analysis
For more detailed instructions and related topics, see the following topics in the
How to® open, create, save any type of sample section of the on-line Help:
●
Opening a sample file
●
Creating a new secure sample file
●
Using the Browser
●
Acquiring an image to create a secure sample file.
See also the topics in the How to® work with Gel analysis samples®Setting the
integration parametes and background correction for tracks section of the on-line Help
(the instructions apply to High Throughput Gel samples as well as to Gel samples).
Adjusting the track frame grid over the tracks
When the new Gel window opens the tracks will be unlocked so that you can adjust
the grid of track frames over the tracks on the image.
When the tracks are unlocked, there are yellow grid positioning handles at the top two
and the bottom left-hand (Madge) or right-hand (E-gel) corners. You use these to adjust
the shape of the grid as a whole. When you have done this, if required, you can adjust
the position of individual tracks to make sure each one covers its track on the image.
To reshape the grid of track frames:
1 Use the commands in the Zoom menu (or the Zoom buttons) to magnify the
image sufficiently to allow accurate positioning (but not so much that you lose
track of where you are).
2 Make sure Position all is selected in the Track menu – this will be the case
when a new Gel window is opened for a High Throughput Gel sample.
3-8
GeneTools User Manual
ten
o
G
rd
p
h
g
alysiu
w
TH
Adjusting the track frame grid over the tracks
3 Move the pointer over the yellow grid positioning handle at (for example) the
top left-hand corner:
The pointer changes to a four-way arrow to show that you can drag the
handle.
4 Press the mouse button and keep it pressed while you drag the handle so that
the top left-hand track frame is over the top-left hand track on the image –
while you drag the new (and old) positions of the track frames will be shown:
GeneTools User Manual
3-9
Getting started with High Throughput Gel analysis
5 Release the mouse button to drop the top left-hand track frame onto the
top-left hand track on the image:
6 Repeat steps 3–6 for the yellow grid positioning handles at the top right-hand
and bottom left-hand (Madge) or right-hand (E-gel) corners.
Each track frame in the grid should now lie over its corresponding track on the image –
the following sections shows you how to do some fine-tuning.
Changing the width, height and angle of all track frames
together
To change the width of all track frames in the grid together:
1 If Width individual is checked in the Track menu, choose it to leave
individual width mode.
2 Choose Width from the Track menu.
3-10
GeneTools User Manual
ten
o
G
rd
p
h
g
alysiu
w
TH
Changing the width, height and angle of all track frames together
3 Click in any track. The track will be highlighted and will have a drag box on
each corner:
4 Move the pointer over one of the drag boxes (it doesn’t matter which):
GeneTools User Manual
3-11
Getting started with High Throughput Gel analysis
5 Press and drag at right angles to the electrophoresis direction (for example,
sideways if the electrophoresis is up or down). As you are dragging the new
outlines of the tracks will be shown:
6 Release to set the new track width:
3-12
GeneTools User Manual
ten
o
G
rd
p
h
g
alysiu
w
TH
Changing the width, height and angle of all track frames together
To change the height and angle of all track frames in the grid together:
1 If Height individual is checked in the Track menu, choose it to leave
individual height mode.
2 Choose Move/tilt from the Track menu.
3 Click in any track. The track will be highlighted and will have a drag box at
the top and bottom:
GeneTools User Manual
3-13
Getting started with High Throughput Gel analysis
4 Move the pointer over the drag box you want to adjust:
5 Press and drag as required – you can drag in any direction to change the
height or angle of the track frames as required. As you are dragging, the new
outlines of the tracks will be shown:
3-14
GeneTools User Manual
ten
o
G
rd
p
h
g
alysiu
w
TH
Changing the position, width, height and angle of an individual track frame
6 Release to set the new track height/angle:
Changing the position, width, height and angle of an individual
track frame
To change the position of an individual track frame:
1 Choose Move/tilt from the Track menu.
GeneTools User Manual
3-15
Getting started with High Throughput Gel analysis
2 Click in the track you want to move. The track will be highlighted and will
have a drag box at the top and bottom.
3 Move the pointer into the track frame (avoiding the drag boxes), and drag the
frame (you can drag it in any direction). As you are dragging, the new outline
of the track will be shown:
3-16
GeneTools User Manual
ten
o
G
rd
p
h
g
alysiu
w
TH
Locking the tracks to analyze the High Throughput Gel sample
4 Release to drop the frame in its new position:
To change the width, height or angle of an individual track frame:
1 To adjust the height or angle of an individual track, if Height individual is
unchecked in the Track menu, choose it to set individual height mode.
To adjust the width of an individual track, if Width individual is unchecked in
the Track menu, choose it to set individual width mode.
2 Follow the appropriate instructions in the previous section from Step 2.
Note
You can also bend an individual track if required. You do this in the same way as for a
Gel sample – see Moving, tilting and bending a single track in the How to ® work with
Gel analysis samples ® Placing, positioning and working with tracks section of the
on-line Help.
Once you have adjusted the track frames so that they each lie over the corresponding
tracks, you are ready to analyze the High Throughput Gel sample.
Locking the tracks to analyze the High Throughput Gel sample
To lock the tracks on a High Throughput Gel sample:
Choose Lock all from the Track menu.
GeneTools User Manual
3-17
Getting started with High Throughput Gel analysis
The tracks will be locked and the image pane will switch automatically to banks of
tracks mode:
In banks of tracks mode, the image underneath each track frame is cut out, straightened
if it is not already a rectangle and displayed with the others in a horizontal bank (if you
defined two areas of interest, they will be displayed in two horizontal banks, with one
above the other). You can choose Align tracks in banks from the Track menu to switch
between banks of tracks and normal modes, if required.
Provided you selected Auto locate peaks in the Configuration dialog box, the peaks in
each track frame will have been located and marked on the image and in the profile
pane, and identified in the Peak value pane.
Analyzing High Throughput Gel samples
With the one exception described in the next section, you use exactly the same
techniques for analyzing High Throughput Gel samples as for Gel samples. See Getting
started with Gel analysis, Chapter 2, in this Getting started manual and the appropriate
sections of the Reference manual and on-line Help for details.
3-18
GeneTools User Manual
ten
o
G
rd
p
h
g
alysiu
w
TH
Next steps
Manual matching
You can use the Madge Manual Matching or E-Gel Manual Matching table in the
Results pane to assign a matching result manually to each of the tracks in a Madge or
E-Gel sample:
To change the matching result for a track:
1 Click in the track frame to select it.
Note
You can change the matching results at any time: the sample can be locked or
unlocked, and if unlocked, it can be in any track editing mode.
2 In the numeric keypad, press:
+
to assign a matching result of +1to the track
-
to assign a matching result of 0 to the track
*
to assign a matching result of -1 to the track (this is the default).
3 If required, press
vto tab to the next track to set its matching result.
Next steps
This completes the Getting started with High Throughput Gel analysis chapter. If you
follow the instructions given in this chapter, you should now be able to get started
working productively with GeneTools to analyze High Throughput Gel samples.
GeneTools offers many other features and refinements, but as long as you are generally
aware of what is available you can probably leave the details until you need to use
them.
GeneTools User Manual
3-19
Getting started with High Throughput Gel analysis
3-20
GeneTools User Manual
Getting started with Colony counting
This chapter shows you how to get started using GeneTools for Colony counting – see
the on-line Help for full details.
Opening a secure sample file
Note
If you have started GeneTools directly from GeneSnap, the Sample properties dialog
box will be opened immediately and you can go straight to Step 4 in the instructions
below.
To open an existing secure sample file in GeneTools:
1 Press the Open button in the Standard toolbar:
or
Choose Open from the File menu.
Note
Pressing the Open button is a quick alternative to choosing the command from the
menu. Throughout the rest of this manual, if a button is shown beside an instruction,
you can press the button as an alternative to using the command in the instruction. You
can carry out most of the common operations in GeneTools by pressing buttons.
GeneTools User Manual
4-1
Getting started with Colony counting
A standard Windows Open dialog box will be displayed:
Note
If you want to analyze images generated by non-secure sources (for example, a .tif or
.bmp image file), choose New (Import) from the File menu. This will create a new
secure sample file and then display a standard Windows Open dialog box allowing you
to select the required image file – see the on-line Help for details.
2 Use the dialog box to select the required secure Colony counting sample file.
3 Press Open.
Note
4-2
If you are opening an analyzed sample file (one that has been previously saved in
GeneTools), the sample will be opened immediately in a Colony counting window –
see Using Colony counting windows (page 4-5). The following assumes that the image
has not been analyzed yet.
GeneTools User Manual
ten
rG
lyid
u
o
g
as
w
C
ch
Opening a secure sample file
The Sample properties dialog box will open with the image loaded:
Note
The Analysis type will probably be set to Gel when the dialog box opens (this is the
initial default, but you can change it if required using Configuration in the Extras
menu).
4 Set the Analysis type to Colony (pour plate).
GeneTools automatically detects the Image type, but you can change it if you
want to – in particular, you will need to set Light and dark colonies manually
if required.
5 Press OK.
The results will be displayed in a Colony counting window – see Using Colony counting
windows (page 4-5).
GeneTools User Manual
4-3
Getting started with Colony counting
For more detailed instructions and related topics, see the following topics in the
How to® open, create, save any type of sample section of the on-line Help:
●
Opening a sample file
●
Creating a new secure sample file
●
Using the Browser
●
Acquiring an image to create a secure sample file
Saving a secure sample file
Once you have created the new secure sample file you should save it if you will need
to use it again. Saving the file saves the measurement frame position and analysis
results, etc with the image.
To save a secure sample with a new name:
1 Choose Save as from the File menu to display a standard Windows Save As
dialog box.
2 Use the dialog box to select a folder in which to save the sample.
3 Enter a File name for the sample.
4 Press Save to save the sample in the file.
To save a previously saved secure sample file using the same name:
Choose Save from the File menu. If the secure sample file has not been saved
previously, the Save As dialog box will be displayed so that you can enter a
name: see above.
4-4
GeneTools User Manual
ten
rG
lyid
u
o
g
as
w
C
ch
Using Colony counting windows
Using Colony counting windows
When you open a Colony (pour plate) sample, it is displayed in a Colony counting
window:
The Results box shows the number of colonies counted on the image. This process is
entirely automatic (you do not have to do anything to make GeneTools count the
colonies) but you can add or remove individual colonies manually if required.
For the automatic count, you can control the area in which the colonies are counted,
and set parameters controlling the way they are counted.
GeneTools User Manual
4-5
Getting started with Colony counting
You can also split the colonies into two classes defined by their image density. On the
image, the colonies in the darker class are marked with circles and the colonies in the
lighter class are marked with squares:
Setting the area in which colonies are counted
The Colony counting window displays a ‘frame’ over the image to define the area
within which the colonies are counted. The frame is drawn as an ellipse – you can
choose the color of the frame using Configuration in the Extras menu.
To move the frame on the image:
1 Click on the Adjust frame radio button in the Define frame box at the top
left-hand corner of the Colony counting window.
2 Move the pointer into the frame.
3 Press the mouse pointer and drag the frame to its new position. While you
are dragging, the pointer will change to a four-way arrow.
4 Drop the frame in its new position.
To reshape the frame on the image:
1 Click on the Adjust frame radio button in the Define frame box at the top
left-hand corner of the Colony counting window.
2 Click in the frame – pale blue drag handles appear at the corners and at the
middle of the sides of the rectangle enclosing the frame.
4-6
GeneTools User Manual
ten
rG
lyid
u
o
g
as
w
C
ch
Using Colony counting windows
3 Move the pointer over a drag handle. The pointer will change to a two-way
arrow showing the direction you can move the handle:
4 Drag the handle to reshape the frame – you will be able to see the new
shape of the frame as you drag the handle.
Defining an exclude region
Sometimes there may be artefacts in the image that you want to exclude from the
count. You can do this by defining an ‘exclude region’ – GeneTools will not search for
colonies in any exclude regions you have defined.
To define an exclude region:
1 Click on the Define exclude region radio button in the Define frame box at
the top left-hand corner of the Colony counting window.
GeneTools User Manual
4-7
Getting started with Colony counting
2 Move the pointer to the point in the image where you want to start drawing
the exclude region. The pointer will change to a pencil to show you can draw
an exclude region:
3 Press the mouse button and drag out the shape of the exclude region:
4-8
GeneTools User Manual
ten
rG
lyid
u
o
g
as
w
C
ch
Using Colony counting windows
4 When you have finished drawing the region, release the mouse button. The
region will be closed and shaded in to show that it is an exclude region:
Any colonies within the exclude region that were previously counted will now
be omitted.
5 Repeat Steps 2–4 to draw any other exclude regions you require.
Changing the shape of an exclude region
To edit an existing exclude region on a colony counting image:
1 Click on the Adjust exclude region(s) radio button in the Define frame box
at the top left-hand corner of the Colony counting window.
GeneTools User Manual
4-9
Getting started with Colony counting
2 Click in the exclude region that you want to adjust. Drag handles will appear
on the boundary of the exclude region at the points where it changes
direction:
3 Move the pointer over a drag handle. The pointer will change to a four-way
arrow showing that you can move the handle:
4-10
GeneTools User Manual
ten
rG
lyid
u
o
g
as
w
C
ch
Using Colony counting windows
4 Drag the handle to the new position and drop it:
Any colonies that were previously counted but are within the new exclude
region will now be omitted; any that are no longer within the exclude region
will now be counted.
5 Repeat Steps 3–4 to move any other drag handles as required.
Deleting exclude regions
To delete one or more existing exclude regions on a colony counting image:
1 Click on the Adjust exclude region(s) radio button in the Define frame box
at the top left-hand corner of the Colony counting window.
2 Click in the first exclude region that you want to delete. Drag handles will
appear on the boundary of the exclude region to show it is selected.
3 j-click on any other exclude regions that you want to delete.
Note
You can also select several exclude regions by dragging a rectangle on the image – any
exclude regions with areas within the rectangle will be selected.
4 Right-click in any of the selected exclude regions to pop up a menu.
5 Choose Delete selected exclude region.
GeneTools User Manual
4-11
Getting started with Colony counting
All the selected exclude regions will be deleted.
Setting the parameters used to detect colonies
GeneTools places markers on the colonies it has detected but these do not reflect their
size or shape. However, you can also display the actual areas of the image that are
detected as colonies. This can be particularly useful while you are adjusting the colony
detection parameters.
To view the size and shape of detected colonies:
Check the Show colony shapes check box at the bottom left-hand corner of
the Colony counting window.
When Show colony shapes is checked, the areas of the image where colonies have
been detected are colored – you can choose the color using Configuration in the
Extras menu.
To set the parameters used for counting the colonies on a plate:
1 Choose the Sensitivity setting in the Detection box that gives the best
discrimination between the colonies and the background. Generally, lower
contrast images need a higher Sensitivity setting.
2 Check Separate colonies to apply an automatic colony-separating algorithm
to separate merged colonies so that they are counted separately.
3 Press Set area limits to display the Colony counting area limits dialog box:
Note
You can press Apply to see the effect of any changes you make without closing the
dialog box.
4 In the Minimum colony area box, set the area (in pixels) of the smallest
colony that you want to include in the count.
4-12
GeneTools User Manual
ten
rG
lyid
u
o
g
as
w
C
ch
Viewing Colony counting results
5 In the Maximum colony area box, set the area (in pixels) of the largest
colony that you want to include in the count.
6 Press OK to confirm your settings and close the dialog box.
Viewing Colony counting results
The Results box in the Colony counting window is updated to show the colony count(s)
when you open the window, move or reshape the frame, define or edit exclude regions
or change the detection parameters:
The colonies are counted in two classes, which are defined by their image density.
For samples with either Light colonies or Dark colonies set in the Sample properties
dialog box, you can set the boundary between the two classes using the histogram in
the Results box – see Defining the colony class boundary below for details.
For samples with Light and dark colonies set in the Sample properties dialog box, the
two classes are the light colonies (colonies that are lighter than the background) and the
dark colonies (colonies that are darker than the background). You cannot change the
boundary between the light and dark colonies (it is defined by the background), so the
histogram does not appear in the Results box, but you can display the histogram in the
Histogram viewer – see the on-line Help for details.
GeneTools User Manual
4-13
Getting started with Colony counting
On the image, the colonies in the darker class are marked with circles and the colonies
in the lighter class are marked with squares:
For each class, the results table shows the number of colonies and the area they cover
as a percentage of the frame area.
Defining the colony class boundary
To define the colony class boundary for samples with light or dark (but not both)
colonies:
1 Move the pointer over the vertical cursor in the histogram in the Results box.
The pointer will change to a two-way arrow to show that you can drag the
cursor:
4-14
GeneTools User Manual
ten
rG
lyid
u
o
g
as
w
C
ch
Adding and removing colonies manually
2 Drag the cursor along the histogram. As you drag the cursor, the results in the
table will be updated:
and the colonies in the different classes will be marked by circles (darker
class) or squares (lighter class):
3 Adjust the position of the histogram cursor to get the correct division between
colony classes.
Adding and removing colonies manually
If required, you can add colonies to the count that have been missed by the automatic
count. Similarly, if debris has been incorrectly marked as a colony, you can remove it
from the count. If there are two classes of colonies, you can add or remove colonies
independently for each class.
To add a colony to a count:
1 Press the Add/remove colonies radio button in the Define frame box at the
top left-hand corner of the Colony counting window.
2 Press the Class 1 or Class 2 radio button in the Manual detection box to
choose which type of colony to add.
GeneTools User Manual
4-15
Getting started with Colony counting
3 Double-click at the point in the image where you want to add the colony.
4 Repeat Steps 2 and 3 for any other colonies you want to add.
A new colony mark will be added to the image with the shape for the chosen class.
Note
You can choose the color used for manually added colonies using the Colors page in
the Configuration dialog box, which is displayed by choosing Configuration from the
Extras menu – the same color is used for both classes.
The Count figures in the Results box will be increased appropriately as you add new
colonies.
The position of the frame does not affect manually added colonies – you can add
colonies outside the frame and if you move the frame any manually added colonies that
are no longer in the frame will still be counted. Manually added colonies are also
unaffected by any changes to the detection parameters or the position of the boundary
between colony classes.
To remove a colony from the count:
1 Press the Add/remove colonies radio button in the Define frame box at the
top left-hand corner of the Colony counting window.
2 Double-click in the colony marker.
The colony mark will be removed from the image and the relevant Count figure in the
Results box will be decreased by one.
You can remove automatically counted colonies and ones you have added manually.
However, if you remove an automatically counted colony, it will reappear if you cause
the automatic count to be redone by, for example, moving the frame, changing the
detection parameters or adjusting the boundary between colony classes.
4-16
GeneTools User Manual
ten
rG
lyid
u
o
g
as
w
C
ch
Printing Colony counting results
Printing Colony counting results
To print a report showing Colony counting results:
1 Choose Report setup from the File menu to display the Report setup dialog
box:
Note
If the paper selected for the currently selected printer is less than 150 mm in either
dimension (for example if you are using a video printer), a simplified report containing
the image and some brief identification and image information will be printed. The
settings in the Report setup dialog box have no effect on the content of this simplified
report.
2 Check the boxes for the items you want to include in the report – see the
on-line Help for details of the options.
3 Press OK to close the dialog box.
4 Choose Print from the File menu to display the Print dialog box so that you
can choose print options – this is a standard Windows dialog box.
5 Choose the print options you require and press OK to print the report.
You can also copy a picture of the image in the Image pane in the current window to
the clipboard – see the on-line Help for details.
GeneTools User Manual
4-17
Getting started with Colony counting
Next steps
This completes the Getting started with Colony counting chapter. If you follow the
instructions given in this chapter, you should now be able to work productively with
GeneTools to count the colonies on a pour plate.
As you will have noticed from the number of cross-references to the on-line Help for
further details, GeneTools offers many other features and refinements, but as long as
you are generally aware of what is available you can probably leave the details until you
need to use them.
4-18
GeneTools User Manual
Getting started with Manual band
quantification
This chapter shows you how to get started using GeneTools for Manual band
quantification – see the on-line Help for full details.
Opening a secure sample file
Note
If you have started GeneTools directly from GeneSnap, the Sample properties dialog
box will be opened immediately and you can go straight to Step 4 in the instructions
below.
To open an existing secure sample file containing a Manual band quantification image:
1 Press the Open button in the Standard toolbar
or
Choose Open from the File menu.
Note
Pressing the Open button is a quick alternative to choosing the command from the
menu. Throughout the rest of this manual, if a button is shown beside an instruction,
you can press the button as an alternative to using the command in the instruction. You
can carry out most of the common operations in GeneTools by pressing buttons.
GeneTools User Manual
5-1
Getting started with Manual band quantification
A standard Windows Open dialog box will be displayed:
Note
If you want to analyze images generated by non-secure sources (for example, a .tif or
.bmp image file), choose New (Import) from the File menu. This will create a new
secure sample file and then display a standard Windows Open dialog box allowing you
to select the required image file – see the on-line Help for details.
2 Use the dialog box to select the required secure sample file.
3 Press Open.
Note
5-2
If you are opening an analyzed sample file (one that has been previously saved in
GeneTools), the sample will be opened immediately in a Spot blot/Manual band
quantification window – see Step 5. The following assumes that the image has not been
analyzed yet.
GeneTools User Manual
ten
G
lrg
u
q
aid
cfb
o
s
w
M
h
Opening a secure sample file
The Sample properties dialog box will open with the image loaded:
Note
The Analysis type will probably be set to Gel when the dialog box opens (this is the
initial default, but you can change it if required using Configuration in the Extras
menu).
4 Set the Analysis type to Manual Band Quantification.
GeneTools User Manual
5-3
Getting started with Manual band quantification
5 Press OK to close the dialog box and display the sample in a Spot
blot/Manual band quantification window:
The Manual band quantification results table will be empty because you still have to
define the areas from which GeneTools will take the measurements. To do this you
place ‘boxes’ on the image.
For more detailed instructions and related topics, see the following topics in the
How to® open, create, save any type of sample section of the on-line Help:
5-4
●
Opening a sample file
●
Creating a new secure sample file
●
Using the Browser
●
Acquiring an image to create a secure sample file.
GeneTools User Manual
ten
G
lrg
u
q
aid
cfb
o
s
w
M
h
Placing boxes on the sample
Placing boxes on the sample
When GeneTools analyzes a Manual band quantification image it takes measurements
from defined areas on the sample called ‘boxes’. You can place rectangular and
irregular (free hand) boxes on the sample.
Placing a rectangular box on the sample
To place a rectangular box over a band on the sample:
1 If it isn’t already selected, choose Position any spot from the Spots menu to
unlock the sample for changing boxes.
2 If it isn’t already selected, choose Rectangle from the Spots menu.
3 Move the pointer to the position where you want to draw the top left-hand
corner of the box:
GeneTools User Manual
5-5
Getting started with Manual band quantification
4 Press the mouse button and drag to the bottom right-hand corner of the box:
5 Release the mouse button to place the new box on the sample. The box will
be drawn in the color for selected spot frames (you can use Configuration in
the Extras menu to set the color) and labeled with a number showing the
order in which the box was added. It will have drag handles at its corners and
at the middle of its sides so that you can adjust its shape – see Adjusting the
position of a box (page 5-9) and Adjusting the size of boxes (page 5-9) for
making further adjustments to boxes.
As soon as you have added the box, the measurement taken from it will be shown in
the Manual band quantification results table: see Viewing Manual band quantification
results (page 5-15) later in this chapter for further details.
5-6
GeneTools User Manual
ten
G
lrg
u
q
aid
cfb
o
s
w
M
h
Placing boxes on the sample
Adding a copy of a rectangular box
To add a rectangular box of the same size as another box (a default size if it is the first
box) on a Manual band quantification sample:
1 If it isn’t already selected, choose Position any spot from the Spots menu to
unlock the sample for changing boxes.
2 Select the box you want to copy.
3 Move to the point you want to place the center of the new box and
double-click.
A new box with the same size as the selected one will be added at the point you
double-clicked.
See the next two sections (Adjusting the position of a box and Adjusting the size of
boxes) for making further adjustments to the boxes.
Placing a free hand box on the sample
To draw a free hand box over a band on the sample:
1 If it isn’t already selected, choose Position any spot from the Spots menu to
unlock the sample for changing boxes.
2 If it isn’t already selected, choose Free hand from the Spots menu
3 Move the pointer to the position where you want to start drawing the free
hand box:
GeneTools User Manual
5-7
Getting started with Manual band quantification
4 Press the left-hand mouse button, and keeping it pressed, move the mouse to
draw the outline of the box:
The outline will be labeled with a number showing the order in which it has
been added.
5 When you have completed the outline, release the mouse button. The outline
will be closed and drag boxes placed where the outline changes direction:
As soon as you have added the box, the measurement taken from it will be shown in
the Manual band quantification results table: see Viewing Manual band quantification
results (page 5-15) later in this chapter for further details.
After it has been added, you can adjust the overall position (see next section), or shape
of the box (see next but one section).
5-8
GeneTools User Manual
ten
G
lrg
u
q
aid
cfb
o
s
w
M
h
Placing boxes on the sample
Adjusting the position of a box
To adjust the position of a box on a sample:
1 If it isn’t already selected, choose Position any spot from the Spots menu to
unlock the sample for changing box positions.
2 Click inside the box that you want to move to select it.
3 Drag the box to its new position (avoid dragging the drag handles).
Adjusting the size and shape of boxes
To adjust the size and shape of a box on a Manual band quantification sample:
1 If it isn’t already selected, choose Position any spot from the Spots menu to
unlock the sample for changing boxes.
2 Click in the box to select it.
For a rectangular box, drag handles will appear at the corners and in the
middle of the sides of the box:
GeneTools User Manual
5-9
Getting started with Manual band quantification
For a free hand box, drag handles will appear where the outline changes
direction:
3 Move the pointer over the drag handle that you want to adjust. The pointer
will change to a two-way arrow (rectangular box) or four-way arrow (free
hand box) showing the directions you can drag the handle:
4 Drag the handle:
5-10
GeneTools User Manual
ten
G
lrg
u
q
aid
cfb
o
s
w
M
h
Placing boxes on the sample
and drop it in its new position.
5 Repeat Steps 3 and 4 for any of the other handles you want to adjust.
Removing a box from a Manual band quantification sample
To remove a box from a sample:
1 If it isn’t already selected, choose Position any spot from the Spots menu to
unlock the sample for changing boxes.
2 Click in the box to select it.
3 Either:
Choose Delete from the Spots menu.
or
Press c.
After the box has been removed, the numbers labeling the remaining boxes will be
changed so that they are still consecutive.
To remove all the boxes from a sample:
1 If it isn’t already selected, choose Position any spot from the Spots menu to
unlock the sample for changing boxes.
2 Choose Delete all from the Spots menu.
Showing or hiding identification labels on the boxes
To show/hide identification labels on the boxes:
Choose Spot numbers from the View menu.
Spot numbers is checked in the View menu when the labels are shown.
GeneTools User Manual
5-11
Getting started with Manual band quantification
Saving a secure sample file
Once you have created the new secure sample file you should save it if you will need
to use it again. Saving the file saves all the box positions and analysis results, etc, with
the image.
To save a secure sample with a new name:
1 Choose Save as from the File menu to display a standard Windows Save As
dialog box.
2 Use the dialog box to select a folder in which to save the sample.
3 Enter a File name for the sample.
4 Press Save to save the sample in the file.
To save a previously saved secure sample file using the same name:
Choose Save from the File menu. If the secure sample file has not been saved
previously, the Save As dialog box will be displayed so that you can enter a
name: see above.
Assigning quantities to boxes
To assign a quantity to a box to calibrate quantity measurements for other boxes:
1 Click on the box for which you want to assign a quantity.
2 Choose Assign quantity from the Spots menu to display the Assign
calibrated quantity dialog box:
3 Enter the known quantity for the box in the Calibrated quantity box.
5-12
GeneTools User Manual
ten
G
lrg
u
q
aid
cfb
o
s
w
M
h
Assigning quantities to boxes
4 Press OK to close the dialog box and set the calibration.
After you have assigned a quantity to a box:
●
The calibrated box will be marked with a cross:
●
The Quantity calibration page in the Spot blot/Manual band quantification
window’s Results/Quantity calibration pane will show the calibration points and the
selected calibration curve joining them (see How to ® work with Spot blot analysis
samples ® Determining quantities ® Setting the quantity calibration method (Spot
blot/Manual band quantification) in the on-line Help for how to select the units and
the shape of the calibration curve. The example shows a quadratic calibration curve
– the equation of the curve is given in the Raw volume axis label):
●
The table on the Manual band quantification results page in the Spot blot/Manual
band quantification window’s Results/Quantity calibration pane will automatically
show a column giving the calibrated quantities for each spot (the quantity, or
quantities, you have assigned will be shown in red).
GeneTools User Manual
5-13
Getting started with Manual band quantification
Applying background correction to results
To apply or remove background correction to the raw volume measurements from the
image:
1 Choose Background correction from the Spots menu to display the
Background correction dialog box:
2 Choose None, for no background correction, or Automatic or Manual
background correction.
3 If you have selected None or Automatic, press OK to close the dialog box
and set the background correction method.
For Manual background correction, you need to specify areas in the image
from which the background readings should be taken – each box result is
then corrected by the reading from the background area nearest to it. See
How to ® work with Spot blot analysis samples ® Determining quantities ®
Applying background correction to spot blot/Manual band quantification results
in the on-line Help for details of how to apply Manual background
correction.
5-14
GeneTools User Manual
ten
G
lrg
u
q
aid
cfb
o
s
w
M
h
Viewing Manual band quantification results
Viewing Manual band quantification results
The Manual band quantification results are shown in the Manual band quantification
results page in the bottom pane of the Spot blot/Manual band quantification window:
To choose what parameters to show in the Results table:
1 Right-click on the table to display the Manual band quantification results
context menu:
2 Click on the required parameter in the list at the top of the menu to add it to
or remove it from the Results table.
GeneTools User Manual
5-15
Getting started with Manual band quantification
Note 1
The Results table for a Manual band quantification sample can only be displayed as a
one-dimensional table.
Note 2
The boxes can only be rectangular or a freehand shape, so the Radius column will
always be blank if you choose to display it.
Defining an incidence condition
GeneTools allows you to define a condition for a Manual band quantification (or Spot
blot) sample and display a matrix showing whether each box satisfies the condition.
To define an incidence condition:
1 Choose Spot incidence parameters from the Spots menu to display the Spot
incidence parameters dialog box:
2 Choose the parameter for which you want to set the incidence condition from
the Incidence type drop-down list box – you can choose Raw vol, % Total
raw vol, Pixel area or Quantity.
3 Choose the comparison operation to be used from the Incidence value range
drop-down list box – you can choose Greater than, Less than or Two-value
range.
If you choose Two-value range, an additional box will appear in the dialog
box so that you can enter two values – see the on-line help for details.
4 Enter the value(s) to be used for the comparison in the Incidence value (or
Upper Incidence value and Lower Incidence value) box(es).
5-16
GeneTools User Manual
ten
G
lrg
u
q
aid
cfb
o
s
w
M
h
Defining an incidence condition
Or:
a Click in a box on the image to select it.
b Press Get spot value to transfer the Incidence type value for the selected
spot to the incidence value box.
5 Press Apply to set the incidence condition without closing the Spot incidence
parameters dialog box (you will be able to view the effect if the Incidence
page is shown in the Results/Incidence/Calibration Graph pane – see next
section).
Press OK to set the incidence condition and close the Spot incidence
parameters dialog box.
Viewing the incidence matrix
To view the incidence results:
Click on the Incidence tab in the Results/Incidence/Calibration Graph pane at
the bottom of the Spot blot/Manual band quantification window to display the
incidence matrix:
Boxes satisfying the incidence condition are marked with an X.
Note
You can also display a column giving the incidence result in the results table.
GeneTools User Manual
5-17
Getting started with Manual band quantification
Printing Manual band quantification results
To print a report showing Manual band quantification results:
1 Choose Report setup from the File menu to display the Report setup dialog
box:
Note
If the paper selected for the currently selected printer is less than 150 mm in either
dimension (for example if you are using a video printer), a simplified report containing
the image and some brief identification and image information will be printed. The
settings in the Report setup dialog box have no effect on the content of this simplified
report.
2 Check the boxes for the items you want to include in the report – see the
on-line Help for details of the options.
3 Press OK to close the dialog box.
4 Choose Print from the File menu to display the Print dialog box so that you
can choose print options – this is a standard Windows dialog box.
5 Choose the print options you require and press OK to print the report.
You can also export results from the tables in the Results pane to Excel and Word, save
results in a comma separated values format file and copy a picture of the image in the
Image pane in the current window to the clipboard – see the on-line Help for details.
5-18
GeneTools User Manual
ten
G
lrg
u
q
aid
cfb
o
s
w
M
h
Next steps
Next steps
This completes the Getting started with Manual band quantification chapter. If you
follow the instructions given in this chapter, you should now be able to work
productively with GeneTools to carry out Manual band quantification.
As you will have noticed from the number of cross-references to the on-line Help for
further details, GeneTools offers many other features and refinements, but as long as
you are generally aware of what is available you can probably leave the details until you
need to use them.
GeneTools User Manual
5-19
Getting started with Manual band quantification
5-20
GeneTools User Manual
Getting started with Spot blot
analysis
This chapter shows you how to get started using GeneTools for Spot blot analysis – see
the on-line Help for full details.
Opening a secure sample file
Note
If you have started GeneTools directly from GeneSnap, the Sample properties dialog
box will be opened immediately and you can go straight to Step 4 in the instructions
below.
To open an existing secure sample file containing a Spot blot image:
1 Press the Open button in the Standard toolbar
or
Choose Open from the File menu.
Note
Pressing the Open button is a quick alternative to choosing the command from the
menu. Throughout the rest of this manual, if a button is shown beside an instruction,
you can press the button as an alternative to using the command in the instruction. You
can carry out most of the common operations in GeneTools by pressing buttons.
GeneTools User Manual
6-1
Getting started with Spot blot analysis
A standard Windows Open dialog box will be displayed:
Note
If you want to analyze images generated by non-secure sources (for example, a .tif or
.bmp image file), choose New (Import) from the File menu. This will create a new
secure sample file and then display a standard Windows Open dialog box allowing you
to select the required image file – see the on-line Help for details.
2 Use the dialog box to select the required secure sample file.
3 Press Open.
Note
6-2
If you are opening an analyzed sample file (one that has been previously saved in
GeneTools), the sample will be opened immediately in a Spot blot/Manual band
quantification window – see Step 7. The following assumes that the image has not been
analyzed yet.
GeneTools User Manual
ten
G
rg
d
p
alysio
Sw
h
b
Opening a secure sample file
The Sample properties dialog box will open with the image loaded:
Note
The Analysis type will probably be set to Gel when the dialog box opens (this is the
initial default, but you can change it if required using Configuration in the Extras
menu).
4 Set the Analysis type to Spot blot.
GeneTools User Manual
6-3
Getting started with Spot blot analysis
Note
When GeneTools analyzes a Spot blot image it takes measurements from a defined area
around the spot called a ‘spot frame’. You can choose: (1) to allow GeneTools to detect
the spots automatically and place a grid of spot frames over the spots on the image; (2)
to allow GeneTools to detect the spots automatically and place individual spot frames
over the spots that are detected on the image; or (3) to place a predefined grid of spot
frames over the image (you will probably need to adjust these by hand as their initial
positions are not related to the spots on the image). In this Getting Started chapter we
will take option (1) to let GeneTools locate a grid of spots automatically.
5 Check Gridded and leave the Number of rows and Number of columns set
to 0. This makes GeneTools locate the grid positions of the spots
automatically.
6 Select Circle as the Spot type – the alternative is Rectangle.
7 Press OK to close the dialog box and display the sample in a Spot
blot/Manual band quantification window:
6-4
GeneTools User Manual
ten
G
rg
d
p
alysio
Sw
h
b
Saving a secure sample file
A grid of spot frames will be shown on the image – see the How to ® work with Spot
blot analysis samples ® Adjusting the size and shape of spot frame section in the on-line
Help for how to move, resize and reshape the frames if necessary.
If you had not set Gridded, spot frames would be shown on the image where any spots
were detected – see the How to ® work with Spot blot analysis samples ® Adding and
removing spots section in the on-line Help for how to place spot frames on the image.
For more detailed instructions and related topics, see the following topics in the
How to® open, create, save any type of sample section of the on-line Help:
●
Opening a sample file
●
Creating a new secure sample file
●
Using the Browser
●
Acquiring an image to create a secure sample file.
Saving a secure sample file
Once you have created the new secure sample file you should save it if you will need
to use it again. Saving the file saves all the spot frame positions and analysis results, etc,
with the image.
To save a secure sample with a new name:
1 Choose Save as from the File menu to display a standard Windows Save As
dialog box.
2 Use the dialog box to select a folder in which to save the sample.
3 Enter a File name for the sample.
4 Press Save to save the sample in the file.
To save a previously saved secure sample file using the same name:
Choose Save from the File menu. If the secure sample file has not been saved
previously, the Save As dialog box will be displayed so that you can enter a
name: see above.
GeneTools User Manual
6-5
Getting started with Spot blot analysis
Assigning quantities to spot frames
To assign a quantity to a spot to calibrate quantity measurements for other spots:
1 Click on the spot frame for the spot to which you want to assign a quantity.
2 Choose Assign quantity from the Spots menu to display the Assign
calibrated quantity dialog box:
3 Enter the known quantity for the spot in the Calibrated quantity box.
4 Press OK to close the dialog box and set the calibration.
After you have assigned a quantity to a spot:
6-6
●
The calibrated spot will be marked with a cross:
●
The Quantity calibration page in the Spot blot/Manual band quantification
window’s Results/Quantity calibration pane will show the calibration points and the
selected calibration curve joining them (see How to ® work with Spot blot analysis
samples ® Determining quantities ® Setting the quantity calibration method (Spot
blot/Manual band quantification) in the on-line Help for how to select the units and
GeneTools User Manual
ten
G
rg
d
p
alysio
Sw
h
b
Applying background correction to results
shape of calibration curve. The example shows a quadratic calibration curve – the
equation of the curve is given in the Raw volume axis label):
●
The table on the Spot blot results page in the Spot blot/Manual band quantification
window’s Results/Quantity calibration pane will automatically show a column
showing the calibrated quantities for each spot (the quantity, or quantities, you have
assigned will be shown in red).
Applying background correction to results
To apply or remove background correction to the raw volume measurements from the
image:
1 Choose Background correction from the Spots menu to display the
Background correction dialog box:
2 Choose None, for no background correction, or Automatic or Manual
background correction.
3 If you have selected None or Automatic, press OK to close the dialog box
and set the background correction method.
GeneTools User Manual
6-7
Getting started with Spot blot analysis
For Manual background correction, you need to specify areas in the image
from which the background readings should be taken – each spot result is
then corrected by the reading from the background area nearest to it. See
How to ® work with Spot blot analysis samples ® Determining quantities ®
Applying background correction to spot blot/Manual band quantification results
in the on-line Help for details of how to apply Manual background
correction.
Viewing Spot blot results
The Spot blot results are shown in the Spot blot results page in the bottom pane of the
Spot blot/Manual band quantification window:
To choose what parameters to show in the Results table:
1 Right-click on the table to display the Spot blot results context menu:
2 Click on the required parameter in the list at the top of the menu to add it to
or remove it from the Results table.
6-8
GeneTools User Manual
ten
G
rg
d
p
alysio
Sw
h
b
Viewing Spot blot results
If the sample is Gridded (see page 6-4 earlier in this chapter), you can choose whether
to display the results in a one or two dimensional table.
To choose whether to display Spot blot results in a one or two dimensional table:
1 Click on the Spot blot results tab.
2 Right-click in the table to display the Spot blot/Manual band quantification
window Results pane context menu.
3 Choose Table 1D or Table 2D.
The selected command will become checked in the menu.
In a one-dimensional table, the results for the first row of spots are given first, then the
second row and so on (as in the example at the beginning of this section). In a
two-dimensional table, there is a separate row for each row in the grid and a group of
columns for each column:
You can also define a condition and view an incidence matrix showing which spots
satisfy the condition – see the on-line Help for details.
GeneTools User Manual
6-9
Getting started with Spot blot analysis
Defining an incidence condition
GeneTools allows you to define a condition for a Manual band quantification (or Spot
blot) sample and display a matrix showing whether each box satisfies the condition.
To define an incidence condition:
1 Choose Spot incidence parameters from the Spots menu to display the Spot
incidence parameters dialog box:
2 Choose the parameter for which you want to set the incidence condition from
the Incidence type drop-down list box – you can choose Raw vol, % Total
raw vol, Pixel area or Quantity.
3 Choose the comparison operation to be used from the Incidence value range
drop-down list box – you can choose Greater than, Less than or Two-value
range.
If you choose Two-value range, an additional box will appear in the dialog
box so that you can enter two values – see the on-line help for details.
4 Enter the value(s) to be used for the comparison in the Incidence value box.
Or:
a Click in a box on the image to select it.
b Press Get spot value to transfer the Incidence type value for the selected
spot to the incidence value box.
6-10
GeneTools User Manual
ten
G
rg
d
p
alysio
Sw
h
b
Defining an incidence condition
5 Press Apply to set the incidence condition without closing the Spot incidence
parameters dialog box (you will be able to view the effect if the Incidence
page is shown in the Results/Incidence/Calibration Graph pane – see next
section).
Press OK to set the incidence condition and close the Spot incidence
parameters dialog box.
Viewing the incidence matrix
To view the incidence results:
Click on the Incidence tab in the Results/Incidence/Calibration Graph pane at
the bottom of the Spot blot/Manual band quantification window to display the
incidence matrix:
Boxes satisfying the incidence condition are marked with an X.
Note
You can also display a column giving the incidence result in the results table.
GeneTools User Manual
6-11
Getting started with Spot blot analysis
Printing Spot blot results
To print a report showing Spot blot results:
1 Choose Report setup from the File menu to display the Report setup dialog
box:
Note
If the paper selected for the currently selected printer is less than 150 mm in either
dimension (for example if you are using a video printer), a simplified report containing
the image and some brief identification and image information will be printed. The
settings in the Report setup dialog box have no effect on the content of this simplified
report.
2 Check the boxes for the items you want to include in the report – see the
on-line help for details of the options.
3 Press OK to close the dialog box.
4 Choose Print from the File menu to display the Print dialog box so that you
can choose print options – this is a standard Windows dialog box.
5 Choose the print options you require and press OK to print the report.
You can also export results from the tables in the Results pane to Excel and Word, save
results in a comma separated values format file and copy a picture of an image to the
clipboard – see the on-line Help for details.
6-12
GeneTools User Manual
ten
G
rg
d
p
alysio
Sw
h
b
Next steps
Next steps
This completes the Getting started with Spot blot analysis chapter. If you follow the
instructions given in this chapter, you should now be able to work productively with
GeneTools to carry out Spot blot analysis.
As you will have noticed from the number of cross-references to the on-line Help for
further details, GeneTools offers many other features and refinements, but as long as
you are generally aware of what is available you can probably leave the details until you
need to use them.
GeneTools User Manual
6-13
Getting started with Spot blot analysis
6-14
GeneTools User Manual
Index
!
.bmp
.sgd
.tif
1-2
1-2
1-2
A
Add/remove colonies 4-15–4-16
Adjust exclude region(s)
4-9–4-12
area of colonies
4-12–4-13
area of interest
3-5–3-6
Assign molecular weight
2-12
Assign quantity
2-16, 5-12, 6-6
Auto import methods 2-1–2-2, 3-1–3-2
Auto locate peaks
2-1–2-2, 3-1–3-2
Auto locate tracks
2-1–2-2, 3-1–3-2
Auto match peaks
2-1–2-2, 2-17, 3-1–3-2
B
Background correction 5-14, 6-7–6-8
bmp images
1-2
box
adding a copy
5-7
adjusting the position
5-9
adjusting the size and shape
5-9–5-11
freehand 5-7–5-8
placing on a Manual band quantification sample
rectangular
5-5–5-7
removing 5-11
GeneTools User Manual
5-5–5-11
Index-1
Index
C
colony classes 4-13–4-16
Colony counting
4-1–4-18
adding and removing colonies manually
Colony counting area limits
4-12
Colony counting frame
moving
4-6
reshaping 4-6–4-7
Colony counting sample file
opening
4-1–4-4
saving
4-4
Colony counting window
4-5–4-18
colony detection
sensitivity 4-12–4-13
colony separation
4-12
colony shapes
showing
4-12
4-15–4-16
D
Define exclude region 4-7–4-9
Delete
5-11
Delete all
5-11
Delete selected exclude region 4-11–4-12
Description pane
2-10
E
E-Gel analysis
See High Throughput Gel analysis
Electrophoresis direction
2-5
exclude region for colony counting
adjusting 4-9–4-11
defining
4-7–4-9
deleting
4-11–4-12
Index-2
GeneTools User Manual
Index
F
file formats
1-2
G
Gel analysis
2-1–2-18
printing results
2-15–2-16
viewing results
2-14
Gel sample file
opening
2-3–2-6
saving
2-7
Gel window
2-8–2-11
GeneSnap
1-2–2-3, 3-3, 4-1, 5-1, 6-1
Graphics pane 2-10
Gridded Spot blot sample
6-4
H
Height individual
3-15–3-17
High Throughput Gel analysis 3-1–3-20
adjusting the angle of all track frames
adjusting the angle of one track frame
adjusting the height of all track frames
adjusting the height of one track frame
adjusting the position of one track frame
adjusting the track frame grid over the tracks
adjusting the width of all track frames
adjusting the width of one track frame
locking the tracks 3-17–3-18
High Throughput Gel sample file
opening
3-3–3-8
histogram
4-13–4-16
3-10–3-15
3-15–3-17
3-10–3-15
3-15–3-17
3-15–3-17
3-8–3-10
3-10–3-15
3-15–3-17
I
Image pane
2-9
incidence
5-16–5-17, 6-10–6-11
incidence matrix
5-17, 6-11
GeneTools User Manual
Index-3
Index
L
log in 1-2
M
Madge analysis
See High Throughput Gel analysis
Madge gel angle
3-5
Manual band quantification
5-1–5-20
Manual band quantification results
5-15–5-16
printing
5-18–5-20
Manual band quantification sample file
opening
5-1–5-4
saving
5-12
Matching coefficients 2-11
Matching comparisons 2-11
Matching matrix
2-11
matching peaks
2-17–2-18
Matching standard
2-17
Maximum colony area 4-13
Minimum colony area 4-12
molecular weights
assigning 2-11–2-14
determining
2-11–2-14
viewing
2-13
Move/tilt
3-15–3-17
MW calibration page
2-14
MW/quantity standard 2-12
N
New (Import) 2-4, 3-4, 4-2, 5-2
non-secure sources
1-2
O
Open 2-3–2-6, 3-3, 4-1–4-4, 5-1–5-4, 6-1–6-5
Index-4
GeneTools User Manual
Index
P
Peak matching 2-17–2-18
Peak Value pane
2-10
Print 2-15, 4-17–5-18, 6-12
printing
2-15–4-18, 5-18–5-20, 6-12–6-14
Profile pane
2-10
Q
Quantity calibration page
5-13, 6-6
quantity measurements
Gel analysis
2-16–2-17
Manual band quantification
5-12–5-13
Spot blot analysis 6-6–6-7
R
Report setup 2-15, 4-17–5-18, 6-12
results
Colony counting
4-5, 4-13–4-14, 4-17–4-18
Gel analysis
2-14–2-16
Manual band quantification
5-15–5-16
Spot blot analysis 6-7–6-9
Results for all tracks
2-11
Results for selected track
2-11
Results pane
2-11
S
Sample properties dialog box
2-4–2-5, 3-4–3-8, 4-2–4-4, 5-3, 6-3
Save 2-7, 4-4, 5-12, 6-5
Save as
2-7, 4-4, 5-12, 6-5
secure file format
1-2
secure sample file
opening
2-3–2-6, 3-3–3-8, 4-1–4-4, 5-1–5-4, 6-1–6-5
saving
2-7, 4-4, 5-12, 6-5
Sensitivity
colony detection
4-12–4-13
GeneTools User Manual
Index-5
Index
Separate colonies
4-12
Set area limits 4-12
sgd files
1-2
Show colony shapes
4-12
Spot blot analysis
6-1–6-14
Spot blot results
6-7
printing
6-12–6-14
viewing
6-8–6-9
Spot blot sample file
opening
6-1–6-5
saving
6-5
Spot incidence parameters
5-16–5-17, 6-10–6-11
Spot numbers 5-11
Spot type
6-4
SynGene Gel document
1-2
T
Table 1D
6-9
Table 2D
6-9
tiff images
1-2
Track Label pane
tracks
adjusting width
2-9
3-13
U
User name
1-2
W
Width
3-10
Width individual
Index-6
3-10, 3-13, 3-15–3-17
GeneTools User Manual