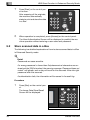
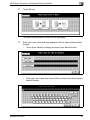
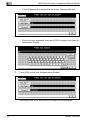
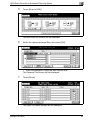
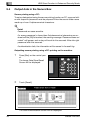
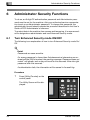
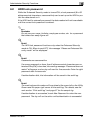
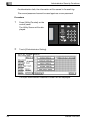
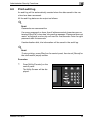
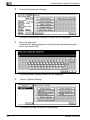
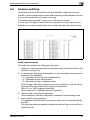
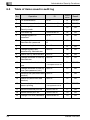
1
User’s Guide
Security
• Security Functions
• Enhanced Security Mode
• Protect and Delete Data After Use
• User Authentication in Enhanced Security Mode
• HDD Store Function in Enhanced Security Mode
• Administrator Security Functions
bizhub PRO 920
Security
User’s Guide
The Control Software version is as follows.
(This software consists of Image control program and Controller control program.)
Image control program (Image Control l1) version: 10-0000 or later
Controller control program (IP Control P) version: 10-0000 or later
About the Firmware version display function:
The bizhub PRO 920 Control Software (Image control program / Controller
control program) version mentioned above can be confirmed by using the
service representative (CE) service mode firmware version display function.
When you display the firmware version, the Image control program and Controller control program versions will be displayed as follows.
Image control program (Image Control l1) version:
2 digits + 4 zeros following the hyphen (Ex: 10-0000)
Controller control program (IP Control P) version:
2 digits + 4 zeros following the hyphen (Ex: 10-0000)
Please keep this in mind when checking the software version.
ACKNOWLEDGEMENTS:
- KONICA MINOLTA, KONICA MINOLTA Logo and the essentials of imaging are registered trademarks or trademarks of KONICA MINOLTA
HOLDINGS, INC.
- bizhub PRO is a registered trademark or trademark of KONICA MINOLTA
BUSINESS TECHNOLOGIES, INC.
Copyright © 2005 KONICA MINOLTA BUSINESS TECHNOLOGIES, Inc.
EXEMPTION
- No part of this manual may be used or duplicated without permission.
- Manufacturer and Sales Company will have no liability for any influences
caused by using the printing system and this User’s Guide.
- The information written in this User’s Guide is subject to change without
prior notice.
Composition of User’s Guide
This machine is provided with the following user’s guides as printed matters.
*bizhub PRO 920 User’s Guide - Copier
This guide describes an outline of the machine and copy operations.
Please refer to this guide for safety information, turning on/off the machine,
paper supply, dealing with machine trouble such as paper jam, and copy operation available on the machine.
* bizhub PRO 920 User’s Guide - POD Administrator’s Reference
This guide provides you with detailed information about the machine management and how to customize the machine according to your daily use.
Please refer to this guide for a setup and management of the machine including copy paper setting, tray setting, and a network setup.
* bizhub PRO 920 User’s Guide - Network Scanner
This guide describes the operation of the network scanner function equipped
for the machine as standard.
Please refer to this guide for full information on storing data (Scan to HDD,
Scan to E-Mail, Scan to FTP, Scan to SMB) or reading data.
* bizhub PRO 920 User’s Guide - Security <This book>
This guide describes the security functions.
Please refer to this guide for how to use the Enhanced Security mode, and
for detailed machine operation in Enhanced Security mode.
To operate safely, be sure to read “Section 1 Safety Information” in “bizhub
PRO 920 User’s Guide - Copier” before using the machine.
Contents
1
Security Functions ............................................................ 1
2
Enhanced Security Mode ................................................. 3
2.1
Description of Enhanced Security mode ............................................3
2.2
Data protected by Enhanced Security mode .....................................4
2.3
Display when Enhanced Security mode is ON ...................................5
3
Protect and Delete Data After Use .................................. 7
4
User Authentication in Enhanced Security Mode .......... 8
5
6
7
4.1
Description of user authentication .....................................................8
4.2
To register a new user .........................................................................9
4.3
To change a user data ........................................................................14
4.4
To delete a user ..................................................................................18
4.5
To change password by user ............................................................21
HDD Store Function in Enhanced Security Mode ........ 26
5.1
Store the data in a Box while Copying ..............................................26
5.2
Store scanned data in a Box ..............................................................30
5.3
Recall/Delete data in a Box ...............................................................35
5.4
Output data in the Secure Box ..........................................................40
Administrator Security Functions.................................. 44
6.1
Turn Enhanced Security mode ON/OFF ...........................................44
6.2
HDD lock password ............................................................................47
6.3
Print audit log ......................................................................................53
6.4
Analyze audit log ................................................................................57
6.5
Table of items saved in audit log ......................................................58
Index................................................................................. 61
Security Functions
1
1
Security Functions
The bizhub PRO 920 device has two security modes.
Normal mode
Use this mode if the machine is used by a single person and there is a low
possibility of illicit access and operations. This is the default mode when
shipped from the factory. To use regular mode, please see the use’s guide
for each individual machine.
Enhanced Security mode
Use this mode if the machine is connected to a local area network, or to external networks through a telephone line or other means. An Administrator
manages the device according to this user’s guide, so that users can have a
safe operating environment.
Your administrator is the only one who can turn the Enhanced Security mode
ON and OFF, and make other changes, and your service representative will
designate an administrator.
To turn the Enhanced Security mode ON, the service representative should
set a CE authentication password and Administrator password for the device.
If IC-203 is not installed, you cannot set the Enhanced Security Mode to ON.
The Enhanced Security mode cannot be turned ON when the Machine NIC
is activated. Please contact your service representative when using the Enhanced Security mode.
Enhanced Security mode is recommended to prevent data from being accessed or tampered with.
Environments in which Enhanced Security mode is recommended
-
The device is connected to an local network, the Internet through a firewall, or the external telephone line for maintenance.
The device is monitored by a telephone line or a network.
bizhub PRO 920
1
Security Functions
1
Creating a secure environment
For security, we recommend that supervisors and an administrator use Enhanced Security mode and establish an environment as follows.
- Where to set up the device
Set up the device in a place where only designated personnel can operate it.
- User training
The administrator must provide training and information to users to maintain the security of the device. Users should keep passwords set up by
the administrator, and a password that they set up on their own in a secure place.
The administrator is supposed to give the instructions for releasing the authentication function to a user when creating a Box for
that user, therefore the user should perform to release the authentication function when machine operation is completed.
-
-
-
2
Qualifications to be an administrator
A supervisor must select a reliable person who has adequate knowledge,
technical ability, and experience as an administrator, to whom to delegate administration of the device.
Guarantee of service representative (CE)
A supervisor or an administrator can use Enhanced Security mode after
confirming that a service contract was signed with the service representative (CE).
Clearly state in the service contract that the service representative will not
engage in any fraudulent actions.
Secure LAN
We recommend that you use an apparatus such as WEP code (802.11×)
to prevent tapping during communication when setting up a local area
network.
bizhub PRO 920
Enhanced Security Mode
2
Enhanced Security Mode
2.1
Description of Enhanced Security mode
2
The following items will have enhanced security.
- Protect and delete used data in memory and on the HDD
There are two kinds of image data that will be saved in memory and on
the HDD: AHA compressed data and uncompressed data (TIFF and PDF
formats). Memory and HDD areas containing the AHA compressed data
is freed up when data is deleted. However in normal mode data is not
completely deleted so it could be read through illicit means. In the Enhanced Security mode, data will be completely cleared before freeing up
image areas.
Regardless of the data type (compressed or uncompressed), the image
area in memory and on the HDD where the data has been saved will be
freed up after it is completely overwritten by the data disrelated to the image data.
- Enhanced password
The password is made up of 8 to 64 alphanumerical characters (case
sensitive).
If a wrong password is entered, attempts to re-try cannot be made for five
seconds.
- Machine NIC setting
When the Enhanced Security mode is ON, the Machine NIC cannot be
used.
- Access to the Box with a password
Set up a system that requires users to input an enhanced password as
described above, to save data or to print data saved in the Box on the
HDD.
If an enhanced password is set up as above, security will be improved
when saving scanned data in the Box. No one other than the machine
manager can delete the Box or Personal Folder in which scanned data is
saved, and changing the Box’s attributes requires authentication with the
enhanced password. In addition, authentication will be required to use
scanned data saved in the Box.
- External access prohibited
No access is allowed over telephone lines other than CS Remote Care.
- Create, save and analyze an audit log
A history of security function operations will be created and saved. Date
and time, information identifying the person who made the operation, details of the operation, and results of the operation will be saved, enabling
analysis of unauthorized access. This log will be overwritten if the audit
area is depleted.
bizhub PRO 920
3
Enhanced Security Mode
2
-
-
2.2
Administrator authentication
A service representative will set up an authentication data for an administrator.
The administrator must input a password to gain authorized access. Only
one authentication string can be registered per machine.
Administrator Setting mode
If the Administrator Setting mode has been entered by successful administrator authentication, the setting change of various machine functions
will be available on the machine.
Be sure to exit the Administrator Setting mode if you leave in front of the
machine while using the Administrator Setting mode.
Data protected by Enhanced Security mode
Data protected by Enhanced Security mode (for users) is as follows.
- Data saved in the Personal Folder (with a password)
The following data administered by the administrator will also receive enhanced protection.
- User data
- Data controlling the machine
Data that is not protected in Enhanced Security mode
When the machine is connected to PCs on a local network, passwords input
in PCs are not subject to Enhanced Security mode.
To turn Enhanced Security mode ON/OFF
The administrator can turn Enhanced Security mode ON/OFF.
If Enhanced Security mode is OFF, data can potentially be accessed, so be
careful.
If data is accessed in Enhanced Security mode, the administrator may not
notice until he/she analyzes the audit log. Be careful when the administrator
is absent for a long time.
4
bizhub PRO 920
Enhanced Security Mode
2.3
2
Display when Enhanced Security mode is ON
The Administrator can turn Enhanced Security mode ON/OFF.
!
Detail
To turn Enhanced Security mode ON/OFF, see Security Administrator
Operation on page 44.
When Enhanced Security mode is ON, the enhanced security icon [
appear on the Copy/Box/Scanner Basic Screens.
] will
Copy Basic Screen
Box Basic Screen
bizhub PRO 920
5
Enhanced Security Mode
2
Scanner Basic Screen
Check the Enhanced Security icon on each Basic Screen to see if Enhanced
Security mode is ON or OFF.
6
bizhub PRO 920
Protect and Delete Data After Use
3
3
Protect and Delete Data After Use
Data from each mode (copy / scan / printer) will be temporarily saved in
memory or on the HDD, and it will be deleted unless it is moved to a Box.
Data is compressed using a special method, so it cannot be decompressed
externally.
When deleting compressed data, a part of it will be destroyed or overwritten
to prevent decompression.
-
Data saved temporarily in memory will be overwritten by unavailable data
(NA) when the job is interrupted or ended.
Data saved in several areas of memory will be overwritten simultaneously.
Data in the Box will be overwritten when a delete order is issued.
If data is sent externally, it will be overwritten when the transmission is
complete.
If the administrator issues a delete order for each Box, it will be overwritten.
bizhub PRO 920
7
User Authentication in Enhanced Security Mode
4
4
User Authentication in Enhanced Security Mode
4.1
Description of user authentication
In Enhanced Security mode, setting up password conditions will be tougher
to improve security. The administrator should set up a user name and password required for user authentication, as this is an administrator operation.
User Name: 1 to 64 alphanumerical characters
Password: 8 to 64 alphanumerical characters (case sensitive)
If a wrong password is entered, attempts to re-try cannot be made for five
seconds.
2
Reminder
Do not use your name, birthday, employee number, etc. for a password
that others can easily figure out.
If a password set in normal mode is fewer than 8 characters or more than 64
characters, you cannot use it in Enhanced Security mode.
If this happens, contact the administrator to turn OFF Enhanced Security
mode, and set a new password following the above conditions.
Even after a successful access has been made, authentication with user
name and password will be required under the following conditions.
- The main power switch is turned off.
- The sub power switch is turned off.
- The [Access] on the control panel is pressed.
- The [Copy]/[Scan]/[Box] on the control panel is pressed, when the User/
Account Authentication Connect is turned on.
- The [Job List] on the touch panel is touched, when the User/Account Authentication Connect is turned on.
- The auto reset function operates.
8
bizhub PRO 920
User Authentication in Enhanced Security Mode
4
!
Detail
When a user accesses a Box for which a password has been set in the
HDD, all authentication operations with password will be saved in an audit log.
!
Detail
Initially, the user authentication is not available on the machine. To activate this function, the distribution number for each section should be
changed. For details, see the User's guide of POD Administrator's Reference.
4.2
To register a new user
Follow the procedure below to setup a new user name and password to be
required for user authentication in Enhanced Security mode.
!
Detail
Passwords are case sensitive.
If a wrong password or fewer than 8 alphanumerical characters are entered and the [OK] is touched, the warning message “Password does not
match” will appear, and no key will work for five seconds. Enter the right
password after five seconds.
If authentication fails, the information will be saved in the audit log.
Procedure
1
Press [Utility/Counter] on the
control panel.
The Utility Screen will be displayed.
bizhub PRO 920
9
User Authentication in Enhanced Security Mode
4
2
Touch [6 Administrator Setting].
The Input Administrator Password Screen will be displayed.
3
Enter the password.
Use the touch screen keypad to enter the 8-digit Administrator password, then touch [OK].
The Administrator Setting Screen will be displayed.
4
Touch [3 User Authentication/Account Track].
The User Authentication/Account Track Screen will be displayed.
10
bizhub PRO 920
User Authentication in Enhanced Security Mode
5
4
Touch [3 User Authentication Setting].
The User Authentication Setting Screen will be displayed.
6
Touch [New Register].
The New User Registration Screen will be displayed.
bizhub PRO 920
11
User Authentication in Enhanced Security Mode
4
7
Touch [User Number], [User Name], [Password], or [Account Name] to
display each subsequent screen, then make the desired setting.
–
12
To enter the User Number, touch [User Number] on the New User
Registration Screen. Use the screen keypad on the popup menu to
enter the desired user number. Touch [OK] to return to the New
User Registration Screen.
bizhub PRO 920
User Authentication in Enhanced Security Mode
4
–
To enter the User Name, touch [User Name] on the New User Registration Screen. Enter the desired user name from the screen keypad. Touch [OK] to return to the New User Registration Screen.
–
To enter the Password, touch [Password] on the New User Registration Screen. Enter the desired password from the screen keypad.
Touch [OK] to return to the New User Registration Screen.
–
To enter the account name, touch [Account Name] on the New User
Registration Screen. Touch the desired account name key to highlight it. Touch [OK] to return to the New User Registration Screen.
bizhub PRO 920
13
User Authentication in Enhanced Security Mode
4
8
Specify the usable function.
To prohibit a specific function, touch the key on the New User Registration Screen to release the highlight.
9
Touch [OK].
When settings are completed, touch [OK] on the New User Registration
Screen.
The User Authentication Setting Screen will be restored.
4.3
To change a user data
Follow the procedure below to change a user data (user name and password)
once registered.
!
Detail
Passwords are case sensitive.
If a wrong password or fewer than 8 alphanumerical characters are entered and the [OK] is touched, the warning message “Password does not
match” will appear, and no key will work for five seconds. Enter the right
password after five seconds.
The current password cannot be used again.
If authentication fails, the information will be saved in the audit log.
Procedure
1
Press [Utility/Counter] on the
control panel.
The Utility Screen will be displayed.
14
bizhub PRO 920
User Authentication in Enhanced Security Mode
2
4
Touch [6 Administrator Setting].
The Input Administrator Password Screen will be displayed.
3
Enter the password.
Use the touch screen keypad to enter the 8-digit Administrator password, then touch [OK].
The Administrator Setting Screen will be displayed.
4
Touch [3 User Authentication/Account Track].
The User Authentication/Account Track Screen will be displayed.
bizhub PRO 920
15
User Authentication in Enhanced Security Mode
4
5
Touch [3 User Authentication Setting].
The User Authentication Setting Screen will be displayed.
6
Touch the user name key to be changed.
The User Count Screen will be displayed.
7
Touch [Change].
The Change Registered User Data Screen will be displayed.
16
bizhub PRO 920
User Authentication in Enhanced Security Mode
8
4
Touch [User Name], [Password] or [Account Name] to display each
subsequent screen, then make the desired setting change.
–
To change the user name, touch [User Name] on the User Registration Screen. Enter the desired user name from the screen keypad.
Touch [OK] to return to the Change Registered User Data Screen.
–
To change the Password, touch [Password] on the User Registration Screen. Enter the desired password from the screen keypad.
Touch [OK] to return to the Change Registered User Data Screen.
bizhub PRO 920
17
User Authentication in Enhanced Security Mode
4
–
4.4
To change the account name, touch [Account Name] on the User
Registration Screen. Touch the desired section key to highlight it.
Touch [OK] to return to the Change Registered User Data Screen.
9
Specify the usable function.
To prohibit a specific function, touch the key on the Change Registration User Data Screen to release the highlight.
10
Touch [OK].
When settings are completed, touch [OK] on the Change Registered
User Data Screen.
The User Authentication Setting Screen will be restored.
To delete a user
Follow the procedure below to delete a user name, password, and also Personal Folder.
!
Detail
Passwords are case sensitive.
If a wrong password or fewer than 8 alphanumerical characters are entered and the [OK] is touched, the warning message “Password does not
match” will appear, and no key will work for five seconds. Enter the right
password after five seconds.
If authentication fails, the information will be saved in the audit log.
Procedure
1
Press [Utility/Counter] on the
control panel.
The Utility Screen will be displayed.
18
bizhub PRO 920
User Authentication in Enhanced Security Mode
2
4
Touch [6 Administrator Setting].
The Input Administrator Password Screen will be displayed.
3
Enter the password.
Use the touch screen keypad to enter the 8-digit Administrator password, then touch [OK].
The Administrator Setting Screen will be displayed.
4
Touch [3 User Authentication/Account Track].
The User Authentication/Account Track Screen will be displayed.
bizhub PRO 920
19
User Authentication in Enhanced Security Mode
4
5
Touch [3 User Authentication Setting].
The User Authentication Setting Screen will be displayed.
6
Touch the user name key to be deleted.
The User Count Screen will be displayed.
7
Touch [Delete].
The popup menu will be displayed to confirm that the selected user will
be deleted.
20
bizhub PRO 920
User Authentication in Enhanced Security Mode
8
4
Touch [Yes].
The selected user name and password will be deleted. Also the personal folder that belongs to the user will be deleted together.
4.5
To change password by user
General users can change the password that has already been set for user
authentication.
We recommend that a user himself/herself changes the password assigned
by the administrator for security.
!
Detail
Passwords are case sensitive.
If a wrong password or fewer than 8 alphanumerical characters are entered and the [OK] is touched, the warning message “Password does not
match” will appear, and no key will work for five seconds. Enter the right
password after five seconds.
If authentication fails, the information will be saved in the audit log.
2
Reminder
Do not use your name, birthday, employee number, etc. for a password
that others can easily figure out.
!
Detail
If password setup doesn’t proceed successfully, the information will be
saved in the audit log.
The password currently used cannot be entered as a new password.
bizhub PRO 920
21
User Authentication in Enhanced Security Mode
4
Procedure
1
Press [Utility/Counter] on the
control panel.
The Utility Screen will be displayed.
2
Touch [1 System Setting].
The System Setting Screen will be displayed.
3
Touch [7 Change User Password].
The User Authentication Screen will be displayed.
22
bizhub PRO 920
User Authentication in Enhanced Security Mode
4
4
Enter your user name.
–
Touch [User Name] to display the Input User Name Screen.
–
Enter your user name, then touch [OK] to return to the User Authentication Screen.
The entered name will be displayed on the screen.
5
Enter your current password.
–
bizhub PRO 920
Touch [Password] to display the Input User Password Screen.
23
User Authentication in Enhanced Security Mode
4
–
Enter your current password. The entered password will appear as
asterisks (********) on the screen. Then touch [OK].
The Change User Password Screen will be displayed.
6
24
Enter your new password.
–
Touch [New Password] to display the Input New Password Screen.
–
Enter your new password, then touch [OK].
bizhub PRO 920
User Authentication in Enhanced Security Mode
4
–
Touch [Check Input] to display the Re-input New Password Screen.
–
Enter your new password once more for confirmation, then touch
[OK].
The Change User Password Screen will be restored.
7
Touch [OK].
The System Setting Screen will be restored.
bizhub PRO 920
25
HDD Store Function in Enhanced Security Mode
5
5
HDD Store Function in Enhanced Security Mode
A Box built on the HDD is used to store the scanned data. To prevent the
data from being accessed or tampered with, we recommend using the Box
with a password specified.
Never fail to use the Enhanced Security mode when storing any secret document.
If the Enhanced Security mode is turned off temporarily for some reason, the
administrator should tell that to all users.
For details to store and output the scanned data in a Box, see the User’s
guide of Network Scanner.
5.1
Store the data in a Box while Copying
The following is a detailed explanation of how to store the data in a Box and
output in Enhanced Security mode for which a user name and password
have been set.
!
Detail
Passwords are case sensitive.
If a wrong password or fewer than 8 alphanumerical characters are entered and the [OK] is touched, the warning message “Password does not
match” will appear, and no key will work for five seconds. Enter the right
password after five seconds.
If authentication fails, the information will be saved in the audit log.
26
bizhub PRO 920
HDD Store Function in Enhanced Security Mode
5
Procedure
1
Enter your user name and user password on the User Authentication
Screen.
–
Touch [User Name] to display the Input User Name Screen.
–
Enter your user name, then touch [OK] to return to the User Authentication Screen.
–
Touch [Password] to display the Input User Password Screen.
bizhub PRO 920
27
HDD Store Function in Enhanced Security Mode
5
–
2
Enter your user passwor, then touch [OK] to return to the User Authentication Screen
Touch [OK] on the User Authentication Screen.
The Copy Basic Screen will be displayed.
3
Touch [Box] on the Copy Basic Screen.
The Store Box Selection Screen will be displayed.
28
bizhub PRO 920
HDD Store Function in Enhanced Security Mode
4
5
Select the desired personal Box, then touch [OK].
– Enter the password if selected Box requires one.
The Personel File Screen will be displayed.
5
Touch [Store].
The Input File Name Screen will be displayed.
6
Enter the file name, then touch [OK].
The Basic Screen will be restored.
bizhub PRO 920
29
HDD Store Function in Enhanced Security Mode
5
7
Press [Start] on the control panel to scan.
After scanning all the originals,
the machine automatically
starts to print and store the data
in a Box.
8
When operation is completed, press [Access] on the control panel.
The User Authentication Screen will be displayed to prohibit the machine operation without entering a user name and password.
5.2
Store scanned data in a Box
The following is a detailed explanation of how to store scanned data in a Box
in Enhanced Security mode.
!
Detail
Passwords are case sensitive.
If a wrong password or fewer than 8 alphanumerical characters are entered and the [OK] is touched, the warning message “Password does not
match” will appear, and no key will work for five seconds. Enter the right
password after five seconds.
If authentication fails, the information will be saved in the audit log.
Procedure
1
Press [Box] on the control panel.
The Image Data Store/Recall
Screen will be displayed.
30
bizhub PRO 920
HDD Store Function in Enhanced Security Mode
2
5
Touch [Store].
The User Authentication Screen will be displayed.
3
Enter your user name and user password on the User Authentication
Screen.
–
Touch [User Name] to display the Input User Name Screen.
–
Enter your user name, then touch [OK] to return to the User Authentication Screen.
bizhub PRO 920
31
HDD Store Function in Enhanced Security Mode
5
4
–
Touch [Password] to display the Input User Password Screen.
–
Enter your user password, then touch [OK] to return to the User Authentication Screen.
Touch [OK] on the User Authentication Screen.
The Image Data Store Site Selection Screen will be displayed.
32
bizhub PRO 920
HDD Store Function in Enhanced Security Mode
5
5
Touch [Scan to HDD].
The HDD Box List Screen will be displayed.
6
Select the desired personal Box, then touch [OK].
– Enter the password if selected Box requires one.
The Personal File Screen will be displayed.
7
Touch [Store].
The Input File Name Screen will be displayed.
bizhub PRO 920
33
HDD Store Function in Enhanced Security Mode
5
8
Enter the file name, then touch [OK].
The Box Basic Screen will be displayed.
9
Press [Start] on the control panel to scan and store the image
data.
The popup menu to confirm
whether to continue or close it
will be displayed.
10
Touch [Yes] or [No].
–
–
34
To continue to store the next image data, touch [Yes]. The Input File
Name Screen will be restored.
To close, touch [No]. The User Authentication Screen will be displayed.
bizhub PRO 920
HDD Store Function in Enhanced Security Mode
11
5
When operation is completed, press [Access] on the control panel.
The User Authentication Screen will be displayed to prohibit the machine operation without entering a user name and password.
5.3
Recall/Delete data in a Box
The following is a detailed explanation of how to recall or delete the data
stored in a Box.
!
Detail
Passwords are case sensitive.
If a wrong password or fewer than 8 alphanumerical characters are entered and the [OK] is touched, the warning message “Password does not
match” will appear, and no key will work for five seconds. Enter the right
password after five seconds.
If authentication fails, the information will be saved in the audit log.
Procedure
1
Press [Box] on the control panel.
The Image Data Store/Recall
Screen will be displayed.
2
Touch [Recall].
bizhub PRO 920
35
HDD Store Function in Enhanced Security Mode
5
The User Authentication Screen will be displayed.
3
36
Enter your user name and user password on the User Authentication
Screen.
–
Touch [User Name] to display the Input User Name Screen.
–
Enter your user name, then touch [OK] to return to the User Authentication Screen.
bizhub PRO 920
HDD Store Function in Enhanced Security Mode
4
5
–
Touch [Password] to display the Input User Password Screen.
–
Enter your user password, then touch [OK] to return to the User Authentication Screen.
Touch [OK] on the User Authentication Screen.
The Recall Box Selection Screen will be displayed.
bizhub PRO 920
37
HDD Store Function in Enhanced Security Mode
5
5
Select the desired personal Box.
Enter the password if selected Box requires one.
6
Touch [OK].
The Personal Box File Selection Screen will be displayed.
Proceed to step 7 if recalls the image data file.
Proceed to step 8 if deletes the image data file.
7
38
Recall the image data.
–
Touch the desired file key, then touch [>>>]. To output the image
data, touch [Wait Output], [Proof Output], or [Auto Output], as desired, and then touch [OK].
–
Enter the desired print quantity from touch panel keypad on the Input Print Quantity Screen.
bizhub PRO 920
HDD Store Function in Enhanced Security Mode
–
8
After outputting, the popup menu to confirm whether to continue or
close it will be displayed. To continue to recall the next image data,
touch [Yes]. The Personal Box File Selection Screen will be restored. To close, touch [No]. The Image Data Store/Recall Screen
will be displayed.
Delete the image data.
–
9
5
Touch the desired file key, then touch [File Delete]. The popup
menu to confirm will be displayed. Touch [Yes] to delete the selected file. Touch [No] to display the Image Data Store/Recall Screen.
When operation is completed, press [Access] on the control panel.
The User Authentication Screen will be displayed to prohibit the machine operation without entering a user name and password.
bizhub PRO 920
39
HDD Store Function in Enhanced Security Mode
5
5.4
Output data in the Secure Box
Secure printing using a PC:
To set up data output using the secure printing function on PC, a secure folder with a specific password must be prepared. Enter the secure folder name
made up of max. 8 alphanumerical characters.
!
Detail
Passwords are case sensitive.
If a wrong password or fewer than 8 alphanumerical characters are entered and the [OK] is touched, the warning message “Password does not
match” will appear, and no key will work for five seconds. Enter the right
password after five seconds.
If authentication fails, the information will be saved in the audit log.
Outputting secure printing using a PC: printing on the machine:
1
Press [Box] on the control panel.
The Image Data Store/Recall
Screen will be displayed.
2
Touch [Recall].
The User Authentication Screen will be displayed.
40
bizhub PRO 920
HDD Store Function in Enhanced Security Mode
3
5
Enter your user name and user password on the User Authentication
Screen.
–
Touch [User Name] to display the Input User Name Screen.
–
Enter your user name, then touch [OK] to return to the User Authentication Screen.
–
Touch [Password] to display the Input User Password Screen.
bizhub PRO 920
41
HDD Store Function in Enhanced Security Mode
5
–
4
Enter your user password, then touch [OK] to return to the User Authentication Screen.
Touch [OK] on the User Authentication Screen.
The Recall Box Selection Screen will be displayed.
42
5
Touch [Secure] to display the Secure Box List Screen.
6
Select the desired secure box.
7
Enter the secure password setup in secure printing.
bizhub PRO 920
HDD Store Function in Enhanced Security Mode
8
5
Touch [OK].
The Secure File List Screen will be displayed.
9
Select the desired secure file.
Touch the desired secure file key, then touch [>>>].
10
Secure printing will start.
Touch [Wait Output], [Proof Output], or [Auto Output], as desired.
bizhub PRO 920
43
Administrator Security Functions
6
6
Administrator Security Functions
To do so, an 8-digit CE authentication password and Administrator password must be set for the machine. Ask your authorized service representative to set up an Administrator password. To change this password, the
administrator himself should operate the procedure described in the User’s
Guide of POD Administrator’s reference.
To protect data in the machine from access and tampering, it is recommended to designate an administrator and use Enhanced Security mode.
6.1
Turn Enhanced Security mode ON/OFF
The following is an explanation of how to turn Enhanced Security mode On/
Off.
!
Detail
Passwords are case sensitive.
If a wrong password or fewer than 8 alphanumerical characters are entered and the [OK] is touched, the warning message “Password does not
match” will appear, and no key will work for five seconds. Enter the right
password after five seconds.
If authentication fails, the information will be saved in the audit log.
Procedure
1
Press [Utility/Counter] on the
control panel.
The Utility Screen will be displayed.
44
bizhub PRO 920
Administrator Security Functions
2
6
Touch [6 Administrator Setting].
The Input Administrator Password Screen will be displayed.
3
Enter the password.
Use the touch panel keypad to enter the 8-digit Administrator password, then touch [OK].
The Administrator Setting Screen will be displayed.
4
Touch [7 Security Setting].
The Security Setting Screen will be displayed.
bizhub PRO 920
45
Administrator Security Functions
6
5
Touch [3 Enhance Security Mode].
6
Turn Enhanced Security mode ON or OFF.
If you want to turn Enhanced Security mode ON, touch [On] to highlight
it. If you want to turn it OFF, touch [Off] to highlight it. Touch [OK].
The Restart Confirmation popup screen will appear.
7
Touch [Yes].
The machine will restart and the new setting will be activated.
46
bizhub PRO 920
Administrator Security Functions
6.2
6
HDD lock password
While the Enhanced Security mode is turned ON, a lock password (8 to 32
alphanumerical characters, case sensitive) can be set up on the HDD to protect the data stored on it.
If the HDD itself is externally accessed, the data readout will not be available
until the correct lock password is entered.
2
Reminder
Do not use your name, birthday, employee number, etc. for a password
that others can easily figure out.
!
Detail
The HDD lock password functions only when the Enhanced Security
mode is ON. When turned OFF, the message “Please set Enhanced Security mode” will be displayed.
!
Detail
Passwords are case sensitive.
If a wrong password or fewer than 8 alphanumerical characters are entered and the [OK] is touched, the warning message “Password does not
match” will appear, and no key will work for five seconds. Enter the right
password after five seconds.
If authentication fails, the information will be saved in the audit log.
!
Detail
The main body serial number will be printed at the upper left on the Utility
Screen and the upper right corner of the audit log. For details, see the
next section “Print audit log” and page 57 for the sample log.
If authentication is succeeded, touch New Password to enter the new
password. The key will not be active until authentication is succeeded.
bizhub PRO 920
47
Administrator Security Functions
6
If authentication fails, the information will be saved in the audit log.
The current password cannot be used again as a new password.
Procedure
1
Press [Utility/Counter] on the
control panel.
The Utility Screen will be displayed.
2
Touch [6 Administrator Setting].
The Input Administrator Password Screen will be displayed.
48
bizhub PRO 920
Administrator Security Functions
3
6
Enter the password.
Use the touch panel keypad to enter the 8-digit administrator password, then touch [OK].
The Administrator Setting Screen will be displayed.
4
Touch [7 Security Setting].
The Security Setting Screen will be displayed.
5
Touch [2 HDD Manage Setting].
The HDD Manage Setting Screen will be displayed.
bizhub PRO 920
49
Administrator Security Functions
6
6
Touch [3 HDD Lock Password Changing].
The HDD Lock Password Changing Screen will be displayed.
7
Enter current password.
Touch [Current Password] to display the Input Current Password
Screen.
–
Enter current password (The first password: 9-digit alphanumeric
serial number of the main body). The entered password will appear
as asterisks on the screen. Then, touch [OK].
The Change HDD Lock Password Screen will be restored.
50
bizhub PRO 920
Administrator Security Functions
8
6
Enter new password.
Touch [New Password] to display the Input New Password Screen.
–
Enter new password. The entered new password will appear as asterisks on the screen. Then, touch[OK].
–
Touch [Check Input] to display the Re-input New Password Screen.
bizhub PRO 920
51
Administrator Security Functions
6
–
Enter new password once more for confirmation, then touch [OK].
The Change HDD Lock Password Screen will be restored.
52
bizhub PRO 920
Administrator Security Functions
6.3
6
Print audit log
An audit log will be automatically created when the data saved in the machine have been accessed.
All the audit log data can be output as follows.
!
Detail
Passwords are case sensitive.
If a wrong password or fewer than 8 alphanumerical characters are entered and the [OK] is touched, the warning message “Password does not
match” will appear, and no key will work for five seconds. Enter the right
password after five seconds.
If authentication fails, the information will be saved in the audit log.
!
Detail
To stop printing, press [Stop] on the control panel, then touch [Cancel] on
the confirmation popup screen.
Procedure
1
Press [Utility/Counter] on the
control panel.
The Utility Screen will be displayed.
bizhub PRO 920
53
Administrator Security Functions
6
2
Touch [6 Administrator Setting].
The Input Administrator Password Screen will be displayed.
3
Enter the password.
Use the touch panel keypad to enter the 8-digit administrator password, then touch [OK].
The Administrator Setting Screen will be displayed.
4
Touch [1 System Setting].
The System Setting Screen will be displayed.
54
bizhub PRO 920
Administrator Security Functions
5
6
Touch [4 Print Management List].
The Print Management List Screen will be displayed.
6
Touch [5 Audit Log Report], then touch [COPY].
The Print Management List Screen will be displayed.
7
Press [Start] on the control panel.
bizhub PRO 920
55
Administrator Security Functions
6
8
56
Touch [Management List] to restore the Print Management List Screen.
bizhub PRO 920
Administrator Security Functions
6.4
6
Analyze audit log
Audit logs need to be analyzed by the administrator regularly (once per
month) or when unauthorized access and tampering of data saved in the machine in Enhanced Security mode is noticed.
The machine is supposed to store up to 750 logs per month.
If more than 750 logs are assumed to be stored in a month, carry out the
analysis in a shorter period before the unanalyzed logs reach that number.
Audit Log Information
The audit log contains the following information.
1. date/time: date and time when an operation was made that results in the
creation of a log entry.
2. id: the person who made the operation or who is subject to security protection can be specified.
“-1”: Operation by CE (service representative).
“-2”: Operation by the administrator.
“-3”: Operation by the unregistered user.
Other integer: Indicates subjects for security protection, and the following action IDs narrow down the subject for protection.
User ID (1 to 1000 numerical symbols)
Secure User ID (1 to 99999 numerical symbols)
3. action: Used to specify the operation.
Check details of operation that action indicates in the following table.
4. result: Result of an operation.
For password authentication, success or failure will be indicated as OK
and NG.
For operations without password authentication, all log entries will be indicated as OK.
bizhub PRO 920
57
Administrator Security Functions
6
6.5
Table of items saved in audit log
No.
58
Operation
ID
Stored
action
Result
1
CE authentication
CE ID
01
OK/NG
2
Administrator authentication
Administrator ID
02
OK/NG
3
Set/change Enhanced
Security mode
Administrator ID
03
OK
4
Print audit log
Administrator ID
04
OK
5
Change/register CE
password
CE ID
05
OK
6
Change/register
Administrator password
CE ID/ Administrator
ID
06
OK
7
Create user by Administrator
User ID
07
OK
8
Change/register user
password by Administrator
User ID
08
OK
9
Delete user by Administrator
User ID
09
OK
10
Change attributes of user by
Administrator
User ID
10
OK
11
Password authentication for
user
User ID
/ Unregistered user ID
11
OK/NG
12
Change attributes of user by
user (user password, etc.)
User ID
12
OK
13
Access to file (document data
readout)
User ID
13
OK
14
Delete file (document data
deletion)
User ID
14
OK
16
Password authentication for
secure printing
Secure user ID
/ Unregistered user ID
16
OK/NG
17
Access to secure print file
Secure user ID
17
OK
18
Delete secure print file
Secure user ID
18
OK
19
Change HDD lock password
Administrator ID
19
OK
bizhub PRO 920
Administrator Security Functions
6
The purpose of analyzing the audit log is to understand the following and implement countermeasures:
Whether or not data was accessed or tampered with
Subject of attack
Details of attack
Results of attack
Specify unauthorized actions: password authentication
If logs have NG as the result of password authentication (action: 01, 02, 11,
16), items protected by passwords may have been attacked.
- Failed password authentication (NG) log entries specify who made the
operation, and show if unauthorized actions were made when password
authentication failed.
- Even if password authentication succeeded (OK), it shows whether a legitimate user created the action. You need to check carefully when successful authentication occurs after series of failures especially during
times other than normal operating hours.
Specify unauthorized actions: actions other than password authentication under security
All operation results other than password authentication will be indicated as
successful (OK), so determine if there were any unauthorized actions by ID
and action.
- Since you cannot specify what was attacked only with an ID, you need to
see the action and the table on the previous page to determine whether
unauthorized actions were made on a personal box or secure box.
- Check the time, and see if the user who operated the specific subject
made any unauthorized actions.
( Example )
If a document saved in a box was printed using fraudulent authorization, the
following audit log entry will be created.
1. Password authentication for the box:
Action = 11
ID = Box that authentication was made
Result = OK/NG
2. Access to the document in the box:
Action = 13
ID = Box that authentication was made
Check the date and time the above operation occurred, and see if the operation on the document in the personal box or secure box was made by a legitimate box user.
bizhub PRO 920
59
6
Administrator Security Functions
Actions to take if unauthorized operations are found
- If it’s found that a password has been leaked after analyzing the audit log,
change the password immediately.
- It’s possible that a password may have been tampered with and legitimate users cannot access a box. The administrator must contact the
user to confirm the situation, and if that’s the case, the administrator
must change the password and delete the data saved in the box.
- If you cannot find documents that should be in a box or if you find a document with changed content, unauthorized actions may have occurred.
Similar countermeasures are needed.
60
bizhub PRO 920
Index
7
7
Index
A
Administrator Security Functions ..... 44
Audit log
Analyze ........................................ 57
Box .......................... 26, 30, 35, 40
Change a user data ..................... 14
Change password ....................... 21
Delete a user ............................... 18
Print ............................................. 53
E
Enhanced security mode
Administrator authentication ......... 4
Administrator setting mode ........... 4
Audit log ........................................ 3
Data protected .............................. 4
Enhanced password ..................... 3
Enhanced security icon ................. 5
Environments ................................ 1
HDD ............................................. 26
HDD lock password .................... 47
HDD store function ..................... 26
Normal mode ................................ 1
Protect and delete used data ....3, 7
Turn ON/OFF ................................. 4
O
Out put
Data in the Secure Box ............... 40
R
Recall/Delete
Data in a Box ............................... 35
Register a new user ...................... 9
S
Store
Data in a Box while copying ........ 26
Scanned data in a Box ................ 30
User authentication ....................... 8
bizhub PRO 920
61
1
Security Functions ............................................................ 1
2
Enhanced Security Mode ................................................. 3
2.1
Description of Enhanced Security mode ............................................3
2.2
Data protected by Enhanced Security mode .....................................4
2.3
Display when Enhanced Security mode is ON ...................................5
3
Protect and Delete Data After Use .................................. 7
4
User Authentication in Enhanced Security Mode .......... 8
5
6
4.1
Description of user authentication .....................................................8
4.2
To register a new user .........................................................................9
4.3
To change a user data ........................................................................14
4.4
To delete a user ..................................................................................18
4.5
To change password by user ............................................................21
HDD Store Function in Enhanced Security Mode ........ 26
5.1
Store the data in a Box while Copying ..............................................26
5.2
Store scanned data in a Box ..............................................................30
5.3
Recall/Delete data in a Box ...............................................................35
5.4
Output data in the Secure Box ..........................................................40
Administrator Security Functions.................................. 44
6.1
Turn Enhanced Security mode ON/OFF ...........................................44
6.2
HDD lock password ............................................................................47
6.3
Print audit log ......................................................................................53
6.4
Analyze audit log ................................................................................57
6.5
Table of items saved in audit log ......................................................58
7
Index .................................................................................61
A
Administrator Security Functions
44
Audit log
Analyze 57
Box 26, 30, 35, 40
Change a user data 14
Change password 21
Delete a user 18
Print 53
E
Enhanced security mode
Administrator authentication 4
Administrator setting mode 4
Audit log 3
Data protected 4
Enhanced password 3
Enhanced security icon 5
Environments 1
HDD 26
HDD lock password 47
HDD store function 26
Normal mode 1
Protect and delete used data 3,
Turn ON/OFF 4
O
Out put
Data in the Secure Box
40
R
Recall/Delete
Data in a Box 35
Register a new user
9
S
Store
Data in a Box while copying
Scanned data in a Box 30
User authentication 8
26
7
2005.7
57GN97070
2005