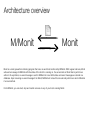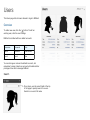
1
M/MONIT
User Manual
Version 3.5.1
Tildeslash Ltd.
Copyright © 2015 Tildeslash Ltd. All rights reserved.
No part of this publication may be reproduced, stored in a retrieval
system, or transmitted, in any form or by any means, mechanical,
electronic, photocopying, recording, or otherwise, without prior
written permission of Tildeslash Ltd., with the following exceptions:
Any person is hereby authorized to store documentation on a single
computer for personal use only and to print copies of
documentation for personal use provided that the documentation
contains the Tildeslash copyright notice. No part of this publication
may be reproduced or transmitted for commercial purposes, such
as selling copies of this publication or for providing paid for support
services.
Every effort has been made to ensure that the information in this
manual is accurate. Tildeslash is not responsible for printing or
clerical errors. Because Tildeslash frequently releases new versions
and updates to its applications and Internet sites, images shown in
this manual may be slightly different from what you see on your
screen.
Portions of the M/Monit Software utilize or include third party
software. Acknowledgements, licensing terms and disclaimers for
such material are distributed with the M/Monit Software, and your
use of such material is governed by their respective terms.
Contents:
Introducing M/Monit
7
M/Monit for Phone and Tablets
8
System requirements
9
Network communication requirements
10
Installation
11
Upgrading
12
Resources
13
Architecture overview
15
Configuration
16
Configuring M/Monit
M/Monit configuration files
How to change the port number M/Monit listen on?
How to setup M/Monit to use SSL?
How to setup M/Monit to use MySQL or PostgreSQL?
How to increase the login session timeout in M/Monit?
How to install the license key?
19
19
19
20
22
23
23
A First Look at M/Monit
24
Login to M/Monit
25
Dashboard
26
Host Status
Events in last 24-hours
Active errors and warnings
Status
26
27
28
29
Detailed host status
Service Details
Service actions
Host charts
Analytics Report
Analytics Query
Chart types
Chart buttons
Chart refresh
Scale and zooming
Tooltip and series highlighting Monit poll-cycle settings and data granularity or dots vs. lines
Data gaps
Hosts Uptime Report
Services Uptime Report
Events Report
Events Overview
Event details
Admin 30
30
31
31
32
32
33
35
36
36
37
38
38
40
42
43
43
44
45
Hosts
Edit host
46
47
Host Groups
50
Users
Overview
Create or edit user
Photo
Delete a user
51
51
52
52
52
Alerts
53
Rules
Conditions
Alert actions
Message settings
Mail servers
Jabber servers
How to prevent Monit from also sending alerts
Appendix A
server.xml
Directory and file names
<Server>
<Service>
<Connector>
<Engine>
<Host>
<Context>
<Realm>
<ErrorLogger>
<AccessLogger>
<Logger>
<License>
Appendix B Access Control
Security-Constraint
Authentication
Login-Config
CSRF-protection
M/Monit behind a proxy
53
54
55
57
58
59
60
62
62
62
62
62
63
65
66
68
69
71
71
73
73
74
74
74
78
78
82
83
Introducing M/Monit
M/Monit is a system for automatic management and pro-active monitoring of Information Technology Systems.
M/Monit can monitor and manage distributed computer systems, conduct automatic maintenance and repair
and execute meaningful causal actions in error situations.
M/Monit uses Monit as an agent and can manage and monitor
all your hosts and services. M/Monit can start a service if it
does not run, restart a service if it does not respond and
suspend a service if it uses too much resources.
Monitor system attributes such as CPU, Load, Memory, Disk
usage, Files, Directories and Filesystems for changes on all
your hosts. Conditional rules can be set and if a value goes
outside a defined scope, specific actions can be executed and
a notification sent.
Information is collected from the monitored systems and stored
in a database. Drill-down and filter functions exist to investigate
collected data. Status and events from each monitored system
are automatically updated and displayed in charts and tables.
Benefits
M/Monit is a turn-key solution and requires very little
configuration and no setup of third-party components.
Your computer systems will have a higher uptime as M/Monit
can handle error conditions automatically, often without the
need for human intervention.
M/Monit has a clean, simple and well designed user interface
which scales well, if you manage 2 hosts or 1000+ hosts.
Source code with complete build system is available. Parts of
the M/Monit system are also released as open-source code.
Cost-effective
A M/Monit license is a one-time payment and the license does
not expire.
The cost is minuscule compared to similar commercial systems
and only a fraction of the cost as to the work hours required to
setup and configure a comparable open-source system.
Technology
M/Monit is a modern, compact and scalable application server.
Thread-pools and a non-blocking, event driven i/o architecture
is used to ensure high performance. M/Monit runs on any
POSIX system and uses around 10 MB of RAM.
Database access is handled by a connection pool with support
for MySQL, PostgreSQL and SQLite.
M/Monit for Phone and Tablets
M/Monit works on iOS with Safari and on Android with the default Chrome browser. Just open the M/Monit URL in your browser. The
User Interface will automatically adjust to fit the available screen size, whether you use a phone or a tablet.
On iOS devices you can add M/Monit to your Home screen as a web-app so you can launch M/Monit by tapping its icon from the
Home screen. M/Monit will then start in a fullscreen mode and work like a native app.
The User Interface reacts to device rotation - some table columns may be hidden if the device is in portrait mode and displayed when
the device is rotated to landscape mode. The charts in the Analytics page are automatically scaled to fit the window.
System requirements
M/Monit requires Monit as an agent. The Monit software
must be version 5.2 or later and installed on all hosts
M/Monit should monitor. Prebuilt Monit binaries can be
downloaded from http://mmonit.com/monit/download/
M/Monit runs on any POSIX system and is currently tested
and available on Linux, FreeBSD, Solaris, Mac OS X and
OpenBSD.
Memory and Disk space. A minimum of 10 megabytes of
RAM is required and around 25 MB of free disk space. You
may need more RAM depending on how many processor
threads the M/Monit server is started with, the number of
login sessions that are used and the number of monitored
hosts and services.
CPU requirements. No special requirements. A low-end
system with a single x86 CPU should be able to provide
enough power to manage hundreds of Monit agents and
hundreds of M/Monit web-app users.
Accurate time keeping. M/Monit uses the time of day for
reporting and monitoring and it is recommended to
investigate if your system clock has the correct time and set
time synchronization facility (NTP) on your system.
Random Device. A random device is needed for creating
universal unique and cryptographically strong HTTP (and
SSL) Session identifiers. M/Monit will complain and exit if it
cannot find /dev/random or /dev/urandom on the
system.
M/Monit depends only on libc installed on all POSIX
systems.
M/Monit is distributed as a tar gzip archive with the following
content:
The mmonit program
The dynamic shared libraries used by the mmonit program
The SQLite Database
The M/Monit Web application
Scripts for upgrading previous versions
Source code and API documentation (SDK version)
Network communication requirements
M/Monit communicate with Monit agents on TCP port 2812. If
there is a NAT or PAT (port translation) between M/Monit and
Monit, you will need to setup host information in M/Monit so
M/Monit can connect to Monit over the network. This can be
specified in the admin/hosts page in M/Monit. Otherwise M/
Monit will use the host information it receive from Monit when
Monit automatically registered itself in M/Monit.
If communication from M/Monit to Monit agents is not
available, M/Monit will not be able to manage services on the
Monit Host, but M/Monit can still receive messages from the
Monit agents and display status, events and statistics.
M/Monit may need to connect to a SMTP and a Jabber
server to send alert notifications. M/Monit may also need to
communicate with a database server if it was configured to
use MySQL or PostgreSQL instead of the default embedded
SQLite database.
The M/Monit admin page displays a news feed from
https://mmonit.com/ Access to this feed is not required and if
M/Monit cannot fetch the feed it is not displayed.
If you need to setup firewall rules for M/Monit, the default set of rules will be:
Communication
Description
Monit agents and M/Monit Browser clients -> M/Monit : 8080/TCP
The M/Monit web-interface
M/Monit host -> Monit agents : 2812/TCP
The Monit agents
M/Monit host -> MySQL server : 3306/TCP
The MySQL Database server [optional]
M/Monit host -> PostgreSQL server : 5432/TCP
The PostgreSQL Database server [optional]
M/Monit host -> Jabber server : 5222/TCP or 5223/TCP
The XMPP/Jabber server [optional]
M/Monit host -> SMTP server : 25/TCP or 465/TCP or 587/TCP
The SMTP server(s) [optional]
M/Monit Browser clients -> https://mmonit.com/
The M/Monit news feed [optional]
Installation
It is very easy to install M/Monit. All you need to do is to download the tar gzip package from http://www.mmonit.com/download/ and
unpack the tar.gz file. After unpacking, you will have a new directory called mmonit-3.5.1.
Now that you have installed M/Monit, it’s time to launch it. Simply execute the mmonit program located in the bin directory. Then, point
your browser to the host where M/Monit is installed or localhost if it is running on the same machine as your browser, for example:
http://localhost:8080/ and login as user admin with password swordfish.
Once started, mmonit will run as a background process. To stop mmonit, use mmonit stop. To run mmonit in the foreground and in
diagnostic mode, start mmonit with the -id options. In diagnostic mode, mmonit will print errors and debug informations to the console.
Use CTRL+C to stop mmonit in this mode. To see all options for the program, use mmonit -h.
You can run mmonit as any UNIX user, although it is recommended (but not necessary) to create a standalone account to run mmonit
in production.
The directory doc/startup contains general startup scripts you can use to start mmonit at boot time on your system.
Upgrading
If you have an older M/Monit version you can upgrade to the latest using the upgrade program. This program takes one required
option which specifies the path to the previous M/Monit installation.
For example, to upgrade M/Monit 2.4 installed in /usr/local/ to the latest version: Download M/Monit for your OS and unpack the new
version in the same directory. Then stop the previous M/Monit version:
/usr/local/mmonit-2.4/bin/mmonit stop
Run the upgrade program and specify the path to the previous M/Monit version:
/usr/local/mmonit-3.5.1/upgrade/upgrade -p /usr/local/mmonit-2.4
Finally, start M/Monit 3.5.1:
/usr/local/mmonit-3.5.1/bin/mmonit
The upgrade program will:
Copy the configuration files (including license) to the new M/Monit installation
Copy the SQLite database to the new M/Monit installation (if SQLite backend is enabled)
Copy uploaded user images to the new M/Monit installation
Read the database location from the configuration file, server.xml, connect to the database, detect old schema version and
incrementally upgrade the schema using patch sets stored in the directory upgrade/schema
Resources
Website
M/Monit’s website has a lot of informations about M/Monit and
Monit. It provides up-to-date informations about the application,
including new and updated features, development news, and
tutorials. The website also sports a wiki with more informations
and user submitted content.
Mailing List
You can subscribe to M/Monit’s mailing list to be the first to
hear about new releases and important informations about
M/Monit. The mailing list is read-only with very low traffic.
Feedback and Bug Reporting
Though we invest a lot of time and hard work making sure
Monit and M/Monit are high-quality applications, bugs may still
sometimes find their way into the application.
Use the issue report schema at www.mmonit.com/contact/ to
let us know about any bugs or feature requests you have.
You can also contact us directly at [email protected]
Architecture overview
M/Monit
Monit
Monit is a small, powerful monitoring program that runs on each host monitored by M/Monit. With regular intervals, Monit
will send a message to M/Monit with the status of the host it is running on. If a service fails or Monit has to perform an
action to fix a problem, an event message is sent to M/Monit at once. Both status and event messages are stored in a
database. Upon receiving an event message from Monit, M/Monit will consult its rule-set and perform an alert notification
if a rule matched.
From M/Monit, you can start, stop and restart services on any of your hosts running Monit.
Configuration
Before we take a look at the M/Monit web-application let’s take a quick look at M/Monit and Monit configuration. As we mentioned
earlier, Monit must be configured in order to send event and status information to M/Monit. In the future we plan to add zero-conf
capabilities to M/Monit and Monit, but for now you will need to add a few lines to Monit’s configuration file. To learn more about Monit
and Monit configuration, please consult the documentation and configuration examples at Monit’s website.
To setup communication between Monit and M/Monit, add the following statements to the top of each Monit control file, monitrc:
1.
2.
3.
4.
5.
6.
set eventqueue basedir <path> [slots <number>]
set mmonit http://<user>:<password>@<host>:<port>/collector
set httpd port 2812
allow localhost
allow <M/Monit-host>
allow username:password
The set eventqueue statement in line 1 is optional, but recommended. It allows Monit to store event messages if connection to
M/Monit should temporarily be unavailable and retry delivery later. This way, no events will be lost. The slots option can be used to set
a limit on how many events can be stored so the queue will not grow without limits if M/Monit is not available. The size of a queued
message is small (ca. 200 bytes) so the space requirements for, let's say, 1000 queued events is only 200kB.
The set mmonit statement in line 2 specify the URL to be used by Monit for sending messages to M/Monit. The M/Monit URL is
protected, and a username and a password are required to post messages to M/Monit. You can use the username and password of
any valid user in M/Monit. For instance, the default user, “monit” with password “monit”. The host and port in the URL, specify
respectively the IP address of the machine running M/Monit and the port on which M/Monit is listening.
The set httpd statement starting on line 3 allow M/Monit to connect to Monit. Specify the IP-address or host name of the host running
M/Monit, this should be the same address as specified in the set mmonit statement mentioned above.
Finally, in line 6, specify Basic Authentication username and password M/Monit should use to login to Monit.
M/Monit
Monit
192.168.1.10:8080
192.168.1.101:2812
Assume we have the machines above where M/Monit runs on 192.168.1.10 and listen on port 8080. And Monit runs on 192.168.1.101
and listen on port 2812. You should then add the following to your monitrc configuration on 192.168.1.101:
set eventqueue basedir /var/monit/ slots 1000
set mmonit http://monit:[email protected]:8080/collector
set httpd port 2812
allow localhost
allow 192.168.1.10
allow admin:secret
For security reasons you can configure M/Monit and Monit to use SSL. In the example below we demonstrate how to setup the twoway communication between M/Monit and Monit to use SSL.
The only differences from the above example is that the set mmonit statement now uses https instead of http and M/Monit’s SSL port.
In addition we add SSL enable, pemfile and allowselfcertification to the set httpd statement to enable SSL in Monit. For more
information on how to setup Monit to use SSL please see the Monit wiki. How to setup M/Monit to use SSL will be addressed shortly.
set eventqueue basedir /var/monit/ slots 1000
set mmonit https://monit:[email protected]:8443/collector
set httpd port 2812 and use address 192.168.1.101
SSL enable
pemfile /path-to/monit.pem
allowselfcertification
allow 192.168.1.10
allow admin:secret
After you have changed Monit’s configuration, you will need to reload or restart Monit. Monit should now start sending messages to
M/Monit and automatically register itself, that is, create a host entry for itself in M/Monit’s database. At this point, you should be able to
see the Monit host in M/Monit’s web interface.
Monit ID
Each Monit instance is identified by a unique id, stored in the file, $HOME/.monit.id
on the host running Monit. $HOME is the home directory of the user running Monit.
This file is automatically created at startup by Monit if it does not exist. Care should
be taken not to delete or change this file as the ID is used to pair messages from
Monit with a host entry in M/Monit.
If you want to place the id-file in another location other than the default, move the id
file to its new location and add a set idfile statement in .monitrc to specify the new
location of the Monit id file.
Configuring M/Monit
Configuring M/Monit is usually not necessary, but you may want to change the port number M/Monit use if you already have a server
running on port 8080. In addition, you may want to setup M/Monit to use SSL or use another database other than the default built-in
SQLite database.
M/Monit configuration files
The configuration file for the M/Monit server can be found in the conf directory and is called server.xml. A detailed discussion about
server.xml and its directives can be found in the appendix. The other configuration file in the conf directory is web.xml. This file specify
mime-mappings for the application and need not be changed. The M/Monit web-application also use a web.xml configuration file in
docroot/WEB-INF/ This file should not be changed and comes preconfigured for the application.
How to change the port number M/Monit listen on?
Change the port attribute in the Connector element if you need M/Monit to listen on a port other than 8080. For example to setup
M/Monit to listen on port 8888 on all interfaces:
<Connector address="*" port="8888" processors="10" />
By default M/Monit binds to all network interfaces and can be reached via any address on the server it is running. If you need M/Monit
to only bind to a specific interface, change the address attribute in the Connector element. For example, to setup M/Monit to only bind
to 192.168.1.10 use:
<Connector address="192.168.1.10" port="8080" processors="10" />
How to setup M/Monit to use SSL?
Set the secure attribute in the Connector element or uncomment the SSL Connector in server.xml.
<Connector address="*" port="8443" processors="10" secure=”true”/>
Then specify the IP-address and the SSL certificate to be used for the default host:
<Host name="localhost" appBase="." address="192.168.1.10" certificate="conf/mmonit.pem" >
That is it. Just replace the IP-address in the example above with the IP-address of your own host. Restart mmonit and connect
securely using https://192.168.1.10:8443/ or https://yourhostname:8443/
M/Monit comes with a self-signed certificate in the conf directory called mmonit.pem which you can use for testing. In production you
should use your own certificate as the private key in mmonit.pem is no secret. Note that a self-signed certificate will generate a
warning in your browser, saying that the certificate is not trusted. This does not mean that the connection won’t be secure, just that
the browser cannot validate the identity of the certificate authority. In our case we can safely ignore this warning and click continue in
the browser.
If you already have a SSL certificate for your server and want to use this instead, simply replace the content of mmonit.pem with your
server private key, server certificate and the certificate of the Certificate Authority that signed the server certificate, in that order. You
must also change the name of the <Host> element in server.xml to match the Common Name in the certificate. For instance, we have
bought a SSL certificate for our server mmonit.com and in our case we use this configuration:
<Host name="mmonit.com" appBase="." address="62.109.39.247"
certificate="conf/mmonit.pem" >
The name attribute should be the DNS A-record name of the server and the address, the IP-address mmonit.com points to in DNS.
We must also remember to change the defaultHost attribute in the <Engine> element to our host name:
<Engine name="mmonit" defaultHost="mmonit.com" fileCache="10MB">
You can run M/Monit with both a SSL connector and a non-SSL connector. This is useful if you need M/Monit to listen on more
network interfaces. M/Monit can only use one interface with SSL because the certificate will only match one host name, while the non-
SSL connector can use all interfaces on your host. Connections from the outside could connect using SSL, while hosts behind your
firewall can connect via internal IP-addresses/interfaces using the non-SSL connector if you wish.
How to setup M/Monit to use MySQL or PostgreSQL?
M/Monit comes bundled and configured with SQLite as its database system. No extra setup is required. You may use MySQL,
MariaDB or PostgreSQL instead if you want. The migrate script in the db directory can move your SQLite data over to MySQL or
PostgreSQL.
Setting up M/Monit to use either MySQL or PostgreSQL is a simple two step process:
1.
Create the M/Monit database. The database schemas with recipes for creating the database can be found in the db directory in
the M/Monit home directory.
2.
Configure M/Monit; edit the M/Monit configuration file server.xml and replace the default SQLite Realm element with either this
one for MySQL:
<Realm url="mysql://mmonit:[email protected]:3306/mmonit"
minConnections="5"
maxConnections="25"
reapConnections="300" />
Or this one for PostgreSQL:
<Realm url="postgresql://mmonit:[email protected]:5432/mmonit"
minConnections="5"
maxConnections="25"
reapConnections="300" />
Change username, password, host and port number in the connection URL as required.
M/Monit is known to work out of the box with PostgreSQL 7.4 - 9.x, MySQL 5.x. and MariaDB 5.x
If you have a later database version and are experiencing problems, you can download and build the libzdb connection pool library
used by M/Monit with your database version. Simply replace the libzdb shared library in mmonit/lib/libzdb.x with your own built
version. Libzdb is our own open source library and can be downloaded from libzdb's website.
How to increase the login session timeout in M/Monit?
When you log in to the M/Monit web-application a new session is created. The login session will timeout if there has been no activity
for a specific time and users must log in again after a timeout. The session timeout value is specified in the <Context> element as
number of seconds in the sessionTimeout attribute. The default timeout is 30 minutes, that is, 1800 seconds. To increase this, for
instance to one hour, use sessionTimeout="3600".
If you click the “Keep me signed in” control in the login screen, a persistent session is created instead. This session will timeout after 3
months and will be stored in the M/Monit database. All sessions in current use will survive a mmonit server restart.
How to install the license key?
M/Monit comes with an evaluation license which will expire after 30 days. You can purchase a license online which does not expire.
The license key will be sent in an email. Replace the existing license element in server.xml with your new key and restart M/Monit. If
you go to the M/Monit admin page you can see more information about your license and how to contact us if you need support.
A First Look at M/Monit
Dashboard click the logo to
go directly to the dashboard
Logout from M/Monit
Navigation tabs
Access Dashboard,
Status, Reports and
Admin
Help
Drill-down menu
Use the drill-down
menu to drill down into
data displayed in the
table
Tables are used many places in M/Monit to display data. Click a column header to sort
rows in ascending or descending order. Move the mouse cursor over the table and the
active row under the cursor is marked in blue. To see entry details, click the row.
Login to M/Monit
After starting the mmonit program, point your Browser to
http://localhost:8080/
M/Monit comes pre-installed with two user accounts you
can use the first time to login:
User
Password
admin
swordfish
monit
monit
The admin user is a member of the administrator role and
has access to every page and functionality in the web-app.
The monit user is a regular user and cannot access the
admin pages nor manage services in the status page.
Enter admin and password swordfish and click the blue
login button. The Keep me signed in control can be used
for persistent login, if checked, a login session is created
with timeout set to 3 months and the session is also stored
in the database.
Dashboard
The dashboard is the first page you will see after login. This page provides a
quick overview of the status of all hosts monitored by M/Monit and events
coming in from the last 24 hours.
The first time you log in to M/Monit, the dashboard
will look like the screenshot to the left. Since no
Monit hosts have been registered, the pie chart will
be gray and the events chart will be empty.
Later, when Monit is setup and start to report in, this page is going to be useful for getting a quick status overview of all your hosts.
The charts refresh themselves automatically each 5 seconds.
Host Status
The Host Status pie chart display the status of all hosts registered in M/Monit and if all hosts and services are online, the pie chart
should be all green.
Here are the possible pie chart colors and their meaning:
Host is offline
Host with all services offline
Host with some services offline or in unmonitored state
Host with all services online
Ignored host
Inactive host
A click anywhere in the pie chart will open the Host Status page. From here you can drill-down on each individual host and see
detailed information about the host and its monitored services and also start, stop or restart services.
Events in last 24-hours
This chart plot events coming in from Monit over the last 24-hours. Events are plotted from right to left. That is, the most recent event
are plotted rightmost in the chart. This is a stacked bar chart and each bar represent an aggregate of events in a 10-minute time
frame. The chart plots the following colorful events:
green !
Success, a previous reported error was fixed
red!
Failure, a service failed
!
orange !
!
!
!
!
Changed, such events are sent when Monit start/stop, when an action
is performed, or when a service fire a change event. For instance if a
file checksum or a process pid changes.
If you hoover the mouse pointer over a plot-point, a popup window is
displayed with event information as indicated in the picture to the right.
Click on a plot-point to open the events log.
Active errors and warnings
A list of all active errors and warnings is displayed bellow the charts.
Monit will try to fix a problem when it arises, but issues that have not yet been fixed or cannot be fixed by Monit are listed here. In
many ways this list represents your To-Do list.
Should an issue be resolved later it is automatically dismissed from this list. You can also dismiss the issues in the list by clicking the
X in the upper right corner of the box. Dismissal is per user and does not affect the list of other users. You can always see the full list
of events (including dismissed and resolved events) in the Event Log.
Status
The Status page shows the status of each monitored host based on
periodic reports from Monit. The table auto-refresh itself each 5 seconds.
Update of new data also depends on how often Monit runs on each host.
I.e. the lower the poll-cycle you run Monit with, the closer the host's status
will be displayed in "real-time".
A status table row has the following columns:
The first column displays a LED representing the host’s error state:
Error. Either the host did not report in or all services are down
Warning. At least one service is down or in unmonitored mode.
OK. All services are up and running
Host is in Ignored or in Inactive state.
The Host column displays a descriptive name of the host. The name can be changed in the Admin-Hosts page.
The %Cpu and %Mem columns displays CPU and Memory usage respectively. The color of the bar depends on the column value:
green if less than 80%, orange if less than 95% and red if above 95%, grey if no data is available. To display the current value, hover
the mouse cursor over the bar.
The Status column displays the status of the services in textual form. Finally, the Events column displays the number of events
related to this host. Click the link in the events column to open the events log and see events for this host.
You can sort the table by clicking a column header. By default the table is sorted on the LED column which is useful to quickly see the
hosts with errors or warnings first. To see which hosts are under heavy load, sort the table by %Cpu or %Mem instead.
The drill-down menu above the table can be used to filter the table by LED, by host group or by hosts that match a name or a name
fragment. Click a table row to display detailed host status.
Detailed host status
This page displays detailed status of the host and its
monitored services.
Table data is based on the last report from Monit and
refreshed automatically. The refresh frequency is dependent
up on the Monit poll cycle settings and a low poll cycle
provides closer to real-time data than a longer poll cycle.
Service Details
If you hover the mouse cursor over a LED light (or tap the LED
on a touchscreen) a callout is displayed with detailed
informations about that service:
If the callout does not show, it means that Monit is either not
monitoring this service or the service is being initialized.
Service actions
Select a service by clicking a table row. Multiple rows can
be selected or you can select all rows by clicking the
[Select All] link. To unselect rows, press ESC.
Once a row has been selected you can use one of the
action buttons to start, stop, restart, monitor or unmonitor
services on this host.
Note: the start, stop and restart actions require that the
service has a start and a stop program registered in Monit.
M/Monit delegates execution of actions to Monit and waits
for up to 30 seconds on confirmation from Monit before
timing out the action. Actions that have been executed are
logged in the Events Report page.
Only admin users are allowed to perform an action on a service. If you are not an admin user, action buttons are not displayed.
Likewise, buttons are not displayed if the host is offline.
Service action requires a connection to Monit. The information required for connecting to Monit from M/Monit is automatically set by
Monit when it registers itself in M/Monit. In some cases, for instance, if there is a NAT or a proxy between Monit and M/Monit it might
be necessary to modify the configuration manually in the Admin/Host page.
Host charts
Click the chart button
to go to the analytics page and display real-time charts for the host.
Analytics Report
M/Monit collects key performance data from hosts and their
monitored services. From this page you can run queries and
investigate statistical data.
Charts with data from multiple hosts can be created so you can
compare indicators from various hosts in the same chart.
The legend table displays minimum and maximum values in
the given range as well as the change rate.
Trend prediction can be used to extrapolate future values
based on existing data.
Analytics Query
An analytics query is built by selecting chart types, hosts or
host groups and a time range. To draw the charts, press the
play button. To reset all menu choices and start over again
select the stop button.
Selected hosts are displayed in the same chart for easy
comparison - for example if you select the [space %] chart and
[all hosts], you can see all monitored filesystems in one chart.
You can then compare space usage across the whole selection
and identify underutilized or over-utilized filesystems.
The underlying JSON chart data sent from M/Monit to the
Browser can become quite large if you monitor many hosts
and/or services. If charts starts to become noticeable slow we
recommend that you select specific hosts or host groups
instead of generating charts for “all hosts”.
Chart types
The type of charts that are used depends on the selected time range and on the number of selected hosts. A variety of bar charts, pie
charts and line charts are used in different contexts.
The [last seconds] time range is special and shows the last collected data sample, at maximum one minute old. To see these “realtime” charts, Monit must run with a poll-cycle which is less than one minute, otherwise these charts will not be generated, except if
you happen to draw within the minute data was collected.
Some charts such as the [cpu %] chart will aggregate data if several hosts are selected and displayed in the same chart:
If a single host is selected, cpu usage is displayed as a stacked area chart with cpu usage broken down by user%, system% and
wait% values
If more hosts are selected, the chart instead display total cpu usage per host (the sum of user%, system%, wait%)
Datasets with zero values are not displayed in the charts.
Bar chart example: [seconds] range for multiple hosts
Stacked area chart example: [hour]+ ranges for single host
Line chart example: [hour]+ range for multiple hosts
Chart buttons
Search Use the search button to filter data in a chart and only show entries that match a search term. For example, if you have
Apache running on several hosts and want to compare cpu utilization, select the [process cpu %] chart and search for Apache.
Trend Use the trend button to display a trend line and predict the future! The method we use is either a linear or an exponential
extrapolation based on a best-fit. A trend line is a stippled line that projects forward in time by extending the selected time range twice.
For example, if [month] is selected, trend will show an estimate for next month. Note that predictions may be incorrect if data does not
follow a linear or an exponential trend. In general, a longer time range is more likely to produce a better estimate.
Legend The legend button displays the chart's legend in addition to minimum, maximum
and average values and the delta for the given range. The [seconds] range is an exception and
only display the current value since a minute is the lowest resolution.
Items can be removed from the chart by clicking the legend's color box. If a trend line is
displayed, the legend table will also contain estimated future values.
Chart refresh
The charts does not refresh automatically so you can work with the data without having them change underneath you.
Scale and zooming
Charts that show percentage, use an Y-axis from 0 to 100. If you hover the cursor over a percentage chart, the cursor changes into a
magnification glass. Click, and the chart "zoom in" by setting the highest Y-axis value equal to the chart's height. Click the chart again
to zoom out.
The following is a chart with default scale (Y axis represent % values from 0 to 100):
And here is the same chart with zoom:
Tooltip and series highlighting
If you tap or hover over a chart, a tooltip is displayed with a point-in-time value. If the legend table is displayed, the corresponding
legend will be highlighted as well.
Monit poll-cycle settings and data granularity or dots vs. lines
Monit send data samples to M/Monit at the end of each poll cycle. If Monit's poll-cycle is longer than 1 minute, charts with [hour] range
will show data points instead of a continuous line. The reason for this is that the [hour] charts draw with the lowest resolution or
precision, which is 1 minute. To show a continuous line, Monit must have a poll-cycle which is less then 1 minute (50sec max). The
next chart resolution is 15 minutes which is used for charts in the [day] range and as long as Monit's poll cycle is less than 15
minutes, charts in this range will display a continuous line. See the table below for chart precision and how data is aggregated.
Data gaps
If Monit stops sending status updates or if M/Monit is stopped, you might see gaps in the charts. Such gaps represents "no data
available".
Range
Precision
Last Seconds
Snapshot
Data compression
Last Hour
1 Minute
Data is collected and aggregated by M/Monit for best memory
and space use and display speed. Historical data is stored for
up to three years before being automatically deleted.
Last Day
15 Minutes
Last Week
2 Hours
The following table show how data is aggregated and the
precision used for the different ranges.
Last Month
12 Hours
Last Six Months
1 Day
Last Year
7 Days
Last Three Years
14 Days
Hosts Uptime Report
The overview report show uptime and downtime of all Hosts that are
monitored by M/Monit. Hosts with downtime include hosts that are
actually down, the network from M/Monit to the host is down or hosts
where Monit was not gracefully stopped.
If Monit does not send a status message within a specific time (3 Monit
poll cycles, by default) M/Monit will assume the host is down and raise a
status failed event. This event is associated with the "monit" service and
can be seen in the events log and in the status page as "No report from
Monit. Last report was...". When Monit start sending status messages
again, M/Monit will raise a status succeed event. This can be seen in the
events log as "Monit status report received successfully".
Host uptime is based on both succeeded and failed status events. Resolution
is in minutes and the combined downtime for a host must accumulate to at least
one minute for the host to appear with downtime in the table.
Selecting date range
Choosing 1D sets the range from midnight today until now. 1W sets the range from 7
days in the past until now, 1M is one month with blast from the past and so on. You can select custom range by clicking on the gear
icon.
Average uptime and downtime
The average uptime and downtime of all hosts are displayed in the overview table. Inactive or ignored hosts are not
included in the average unless they have downtime.
How uptime/downtime is calculated:
1. If a matching failed and succeeded status event are found within the selected date
range, the difference in time between the two events is counted as downtime.
2. For open ended failed status events, that is; failed events without a matching
succeed event, the downtime is counted as the difference between now and the
failed status event's timestamp.
3. If a host has not reported within the selected range, the host is assumed to be down if
and only if the host is active and its last updated timestamp is older than the selected
range's from-date. In this case the difference in time between now and the range’s
from-date is added to the host's downtime. I.e. the host is down the full range.
4. Inactive and ignored hosts are not included in the total average numbers unless they
have downtime. Their uptime/downtime is set to zero if they have no downtime within
the range. You can see inactive and ignored hosts in the table with a grey name.
Events
The events column show the number of status events for the host within the selected range. Clicking the number brings up the events
log with drill-down filters preset to only show events for the host within the selected range and sorted on date in ascending order.
Host filter
If you monitor more than 15 hosts, a host search field is
displayed at the top of the table. The search field can be
used to focus on selected hosts only. The table remains
filtered even if the date range changes. To reset, remove
all text in the search field.
Services Uptime Report
If you click a host entry in the Host uptime report, the service report is displayed
with uptime and downtime for services monitored by Monit on that host. As
with the Host report, the uptime is based on both succeeded and failed events.
Resolution is in minutes and the combined downtime for a service must
accumulate to at least one minute for the service to appear with downtime in
the table.
The uptime and downtime of services are calculated similar to the Host report;
1. If a matching failed and succeeded event is found within the selected range, the difference in time between the two events is
counted as service downtime.
2. For open ended failed events, that is; failed events without a matching
succeed event, the service downtime is counted as the difference between
now and the failed event's timestamp.
β
This report work around the fact that Monit does not maintain services (failed) state over a Monit restart/reload nor during
service un-monitoring. If the host stops sending status to M/Monit, the downtime is added to the Monit service only, as it is
unclear whether the host is completely down or if the network connection to M/Monit is down. This may add some inaccuracy
to the computed downtime, though in practice it should work well. However, because of these exceptions this report is a beta
and the numbers should be seen as more informative than authoritative.
Grayed out entries
1. If the Host is inactive or ignored all services in the table are grey.
2. Services that are in an unmonitored state are marked as grey. Their uptime/downtime is set to zero unless they have actual
downtime within the selected date range. Unmonitored services are not included in the total average numbers unless they have
downtime.
3. Services that once existed in your Monit control file (.monitrc) but since has been removed may show up if the selected range is
wide enough. These historical services are grayed out.
Events Report
Events Overview
The Events log can be used to
browse all events reported by Monit
and stored in M/Monit’s database.
The log is initially sorted on date in
descending order. I.e. the latest
events are listed first. Internally,
M/Monit buffer new events in an event
queue and flushes new events
to the log every 5 seconds.
Use the drill-down menu on the left to filter the log on various criteria. One useful criteria is date. For
instance, you can show events for a certain date or within a certain range by using the Date From and
Date Until calendar buttons.
Hint: If you click the month in the calendar you can quickly navigate by year or month.
If you enter a Host name in the search field, only events for that host are displayed. Furthermore, only
services for that host are displayed in the [All Services] drop-down, and [Service Group] will only display Service Groups, if any, for
the Host.
Values set in the drill-down menu are persistent across page loads. Use the Reset link to reset all drill-down values.
Click an event row to show details for the event.
If the Active Only switch is turned on, only active failed events are displayed. That is, failed events that do not have a corresponding
succeed event. This list is the same as the Active errors and warnings list displayed in the dashboard, except dismissed events in the
dashboard are also shown here. If the table is empty, then all is good, since it means that there are no unsolved failed events in the
system.
Event details
In addition to viewing a few more details you can
also add comments. Events with comments are
marked in the table with this icon
Comments can be used for tracking events
handling, explain the root cause of the problem,
consequences, solution and serve as knowledge
base.
Admin
The Admin function is split into several pages accessible from a
submenu.
Only users in the admin role have access to the admin pages.
The first page display system, support and contact information.
If M/Monit is used with an evaluation license, the expiration date
of the license is displayed in the Admin Overview page,
otherwise, your own license information is displayed, such as the
license serial number and the license owner. This information
should be provided when requesting support so we can prioritize
your request.
Delete events
By default, events are stored in the M/Monit database and never
deleted. This means that the events log will grow over time. It can
be useful to prune the events log to save space or if drill-down in
the events log is starting to become slow due to an abundance of
data. The Delete events option can be used to delete old events
now and automatic purge old events in the future.
Delete analytics
Analytics data (that is, data used to create charts in M/Monit) is
stored and aggregated in the M/Monit database for 3 years, after
which it is automatically deleted. If old analytics data is not useful
nor relevant, you can use this option to store analytics data for a
shorter time and thereby save space and possibly generate
charts faster.
Hosts
The hosts page lists all hosts registered in and
managed by M/Monit.
M/Monit will automatically create a new Host
entry on the first report from a new Monit host.
To make Monit start reporting to M/Monit, use the
set mmonit statement in your Monit configuration
file.
After Monit has registered itself in M/Monit you
can edit the Host by clicking its Host entry in the
table.
The “Find host..” search field above the Host
table can be used to quickly filter the table on a
host name.
Edit host
The Host Name field is a descriptive name which is used in
various places in M/Monit to refer to the Host.
The first time Monit reports in, a new Host entry is created
and the Host Name is set to the hostname reported by Monit.
If the hostname later is changed in DNS the host name will
automatically be updated in M/Monit after Monit is restarted
on the given host.
If you change the host name yourself, the Persistent
hostname switch is turned on and Monit will no longer
overwrite the host name automatically. This can be useful if
you want to use a descriptive name for the host, such as
"database server #1". To reenable automatic host name
updates, just turn off the Persistent hostname switch.
Monit ID
Each Monit instance is identified by a unique ID, by default
stored in the file $HOME/.monit.id on the host running Monit.
Where $HOME is the home directory of the user running
Monit. This file is automatically created on Monit startup if it
does not exist.
Care should be taken not to delete or change this file as the
ID is used to pair messages from Monit with a host entry in
M/Monit.
If you need to place the id-file in another location other than
the default, move the id file to its new location and add a set
idfile statement in the Monit configuration file, specifying
the new location of the Monit id-file.
A new host is automatically created in M/Monit by a status message from Monit if and only if the ID embedded in the message is new
and unique, otherwise M/Monit will use the ID to find the host in its database and update its status.
Host Status
A Host can be in one of three states:
Active When Monit starts, it activates itself automatically in M/Monit by sending a start event message. M/Monit expects periodic
status reports from the active hosts. If the host does not send a status report within a certain time frame it is marked as down and
an alert is generated by M/Monit.
Inactive If Monit was stopped normally, it automatically deactivates itself by sending a stop event message to M/Monit.
Ignored An Ignored state can be used to manually and temporarily suppress all events from Monit. For example, if you are going
to perform maintenance work on the host and you expect Monit to issue lots of alerts, set the Host in the Ignored state to ignore
the events sent by Monit for the duration of the work.
Network settings
The Monit Network Settings fields, specify how M/Monit should connect to Monit. This information is required if you want M/Monit to
manage services on the host. That is, if in the host’s status details page, a click on an action button should have an effect.
Monit username and password are credentials used for Monit authentication.
The address is either the IP-address or the hostname of the host running Monit. M/Monit will use this address to connect to Monit.
The address is read-only and managed by Monit. Dynamic changes (such as DHCP lease) will automatically update the host settings
in M/Monit.
Monit port number is the HTTP port the Monit agent is setup with (2812 by default). The port number is also read-only and
automatically updated by Monit.
Note: If the Monit Host is behind a NAT or a Proxy and M/Monit must
use a different IP-address and port number to reach Monit, click
[Override network settings] and specify the outbound IP-address, port
number and whether SSL should be used by M/Monit to reach Monit.
The override settings takes precedence and will be used instead of
Monit's reported values. If Monit's configuration is changed later, you
will have to update the override settings manually.
Connection status shows the connection status to Monit, using the
current network settings. The check is performed automatically when
this page opens, but you can also run the test manually by clicking the
Connection status link.
Acceptable report skew
Monit has to send a status update within a certain timeframe.
Acceptable report skew specifies the number of Monit cycles M/Monit will wait before reporting the
Host as down. The default value is 3 Monit poll cycles.
If Monit is setup with a short poll cycle, e.g. 5 seconds or if Monit is verifiably up, but for some reasons slow to
send reports it can be useful to increase the skew value to avoid getting false alerts because Monit did not report
in on time.
Host Groups
A Host Group is a collection of Hosts that can logically be
grouped together, for instance, by its role or by organizational
or geographical location.
In the Status, Analytics and Events pages you can drill-down
on Host Group to view data for a set of Hosts. You can also
create alert rules that apply to a Host Group.
To create a new host group, click the
group a name and click enter.
button. Give the
Click the row to expand the host group and display controls
for modifying or deleting a group.
To rename a group, simply click its name, the text will switch
to an input field. Click enter when done.
To delete a group, click the icon.
Select hosts from the list to the right and click the left arrow to add
hosts to the group.
Select hosts from the left list and click the right arrow to remove
hosts from the group.
To select more than one host in the list, hold down the ALT or ⌘ key
when selecting.
Users
The Users page lists all users allowed to login to M/Monit.
Overview
To add a new user, click the
button. To edit an
existing user, click the user’s image.
M/Monit is installed with two default accounts:
Username
Password
Role
admin
swordfish
Administrator
monit
monit
User
You can change or remove the default accounts, but
remember to keep at least one account with administrator
privileges to be able to manage M/Monit.
Search
On a phone, use the search field at the top
of the page to quickly search for a user.
Search is on user’s full name
Create or edit user
A username (uname) is required to be able to login to
M/Monit. The user name is immutable and once created
it may not be changed.
The password is stored in the database as a MD5
encrypted text string.
The other fields are optional, but contact informations can
come in handy if more people are using M/Monit.
It is recommended to fill in Email and GTalk/Jabber
information so you will be able to select the user from the
Alert page to receive alerts.
Enable [Administrator access] if this user should have
administrator privileges. This grants access to all pages
and functions in M/Monit. Users without administrator
privileges cannot access the Admin pages nor can they
perform any action on a Monit service in the host status
page (they cannot restart or stop services on the host).
Photo
To add or change the user's photo, click the image
box. This will open up a dialog from where you can upload
an image from your computer. Then, click save. On your
phone, click the image to take a photo or upload an existing
photo from your library
Delete a user
To delete the user, first click its entry in the overview page
and then click the delete button near the bottom of the page.
Alerts
Alert functionality is spread over four tabs:
Rules, setup alert notifications rules
Message settings, setup the sender’s email
address, content format and alert aggregation
Mail servers, setup SMTP server(s) for email alert
delivery
Jabber servers, setup an instant messaging server
for jabber/GTalk alert delivery
Rules
When an event message is received from Monit, M/Monit will check the event against a list of user defined rules and if a match is
found, the action defined for the rule is executed.
This page lists all rules defined in M/Monit. In the list, a switch is used to indicate if the Rule is active or not (the switch is blue when
active). M/Monit will only test incoming events against active rules, non-active rules are ignored.
The rule list can be perceived as a sieve, events are sifted through and only events that match a rule, produces an action.
Create or modify a rule
To add a new rule, click the
button. When the rule has been setup, click the Save button.
To edit an existing rule, click the rule row in the table. To change the name of the rule, click the name and edit it inline. Press Enter or
click outside when done. Remember to click the Update button when done.
Conditions
A Rule is specified as an IF-THEN
statement.
That is, IF a set of conditions are met
THEN perform one or more actions.
A rule evaluates to true if condition(s) matches the incoming event.
A condition is a tuple of [Host/Group, Service/Group, Event State and Event Type]. This can be read as: “If the event originated from a
certain host and for a certain service and with a specific event state and type, then the condition match”.
Whether the condition triggers or suppresses an action is decided by the any/none selector. If set to any (the default), then any
matching tuple triggers the action. If it is set to none, then the tuples serve as an exclusive list and any non-matching event will trigger
the action.
For instance, to get notified if a service fails and when the service comes back up again, create one condition row with [“Host”,
“Service”, Failed + Succeed, Any Event].
A row of [Any Host, Any Service, Any State, Any Event] is a "catch all" condition and will generate an alert for every event.
Contextualized drop-down menus
If you select Host first, then the Service sub-menu will only list Services for the selected Host. This makes it easy to setup an alert for
a specific service on the host.
The same is the case for Host Groups. If you select a Host Group in the first drop-down menu, then only Services and Service
Groups that are common for all hosts in the group are listed in the Service menu.
If you do not select host, but keep the “Any Host” value, then the Service menu will instead list all services registered in M/Monit
across all hosts.
If both a Host and a Service is selected, the Events menu will only list event types relevant for the selected service types.
Alert actions
What M/Monit should do when a rule evaluates to true is specified in one or more actions. M/Monit currently supports sending email,
Jabber/GTalk messages and execute a program or a script as an action.
• Email. The mail server M/Monit should use for sending email is specified in the admin Mail servers page. There are two ways to
specify email notification. Either by selecting a user registered in M/Monit or by specifying an email address directly. The [Send mail
to user] drop-down target menu contains all users in M/Monit. Disabled users in that list are those who do not have an email.
• Jabber/GTalk. The Jabber server M/Monit should use for sending Jabber messages is specified in the admin Jabber servers page.
There are two ways to specify Jabber notification. Either by selecting a user registered in M/Monit or by specifying a Jabber address
directly. The [Send instant message to user] drop-down target menu contains all users in M/Monit. Users with no GTalk or Jabber
address are disabled in that menu.
• Test. You can send a test Email or a Jabber message to selected users/addresses to verify that M/Monit can send an alert. Click
the ℹ︎ icon to the right of the input field. This will pop up a panel from where you can send a test message.
• Reminder. M/Monit will usually only send one alert if a service fails and not continue to send alerts as long as the service is in the
same error state. Sometimes, it can be useful to get a reminder if a service continue to stay in the same error state. Click the ℹ icon
to the right of the input field, a panel will popup from where you can setup the reminder alert.
• Program. The program M/Monit should execute is specified in the input field. The program is executed by M/Monit using /bin/sh.
You can therefor write a shell script directly into the input field or you can simply call an external program. If you want to test the
program first or if you need to set specific environment variables for the program, click the ℹ icon to the right of the input field. This
will pop up a panel where you can add environment variables as well as test and check that your program does not return any
errors when executed by M/Monit.
A set of environment variables is made available to the program at execution time, describing the event that occurred:
•
•
•
•
•
•
$MONIT_EVENT: !
$MONIT_SERVICE: !
$MONIT_DATE: !
$MONIT_HOST: !
$MONIT_ACTION: !
$MONIT_DESCRIPTION: !
A short string describing the event that occurred
The name of the service generating the event
The date and time the event occurred
The name of the Monit Host the event originated from
The name of the action which was performed by Monit
The description of the event condition. I.e. why the event was sent
Using the program action and a little bit of scripting, you can integrate M/Monit alerts with
almost any third-party notification system. The M/Monit wiki contains a few examples,
such as integrating M/Monit alerts with Pushover, Slack and Hipchat.
Message settings
Message content
Specify the Sender to be used in Email alerts sent from M/Monit (from: address). Use a name@domain format where domain exist in
DNS. Name can be any name and does not need to refer to a real user. Content format can be one of the following types:
★ Plaintext, A simple plain text message. Each event is described in a set of lines. Jabber messages are always sent in this
format
★ HTML, Events are formatted into a simple HTML table, one row per event
★ Multipart (default), The message will contain both alternatives: the plaintext and the HTML version. A mail client will display
either the HTML or the plaintext version based on its abilities and preferences
Maximum events per message can be set to limit the number and size of a message. If this limit is reached, the alert message will
just contain information about the events count and refer the user to M/Monit’s event log for more details.
Alert aggregation
M/Monit can aggregate alerts within a given interval before before sending a message. Trading immediate notification with
aggregation can be useful if you feel that you are receiving too many alerts. Instead of getting, for instance, 10 separate messages,
you will instead get one message with 10 alerts. If no aggregation is selected, M/Monit will send an alert message as soon as an
event is received.
Mail servers
Specify SMTP server(s) M/Monit should use
for alert notifications.
To add a new server, click the
fill in all fields.
button and
The entry is saved automatically when values
are filled. To edit an existing server, expand
its entry and modify the fields (changes are
saved automatically).
If [Enable SSL] is on, M/Monit will use
SMTPS, unless the mail server port number is
25 or 587 in which case STARTTLS is used
instead.
Automatic connection testing
Whenever a new mail server is added or information is updated, M/Monit will test and verify that a connection can be established to
the server and that the sender’s address (from Message settings) will be accepted. No message is sent during this test.
Message delivery
When sending an alert message, M/Monit will use the first SMTP server in the list and if not available, continue with the next and so
on, until the message is sent or all servers failed.
Jabber servers
Specify Jabber server(s) M/Monit
should use for alert notifications.
To add a new server, click the
button and fill in all fields.
The entry is saved automatically
when values are filled.
To edit an existing server, expand its
entry and modify the fields (changes
are saved automatically).
If you use GTalk, the server name should
be talk.google.com, the port number 5222, and the username and password should be your gmail.com address and password.
If the port number is 5223 M/Monit will connect using SSL/TLS otherwise it will switch to a secure connection and use STARTTLS if
required by the server. The default jabber port number is 5222 and if in doubt, use that number. The username (Jabber ID) and
password are required and identify the user who will send the alert message.
Note that the user you specify here should be different from the one you will use in your jabber client. Otherwise the jabber server will
think that you are sending messages to yourself and won't deliver the alert message to your client. We recommend using a dedicated
Jabber user for M/Monit.
Automatic connection testing
Whenever a new Jabber server is added or information is updated, M/Monit will test and verify that a connection can be established to
the server. No message is sent during this test.
Message delivery
When sending an alert message, M/Monit will use the first Jabber server in the list and if not available, continue with the next and so
on, until the message is sent or all servers failed.
How to prevent Monit from also sending alerts
If Monit has been setup to send alerts and you want M/Monit to take over alert responsibility (recommended) then here is a recipe for
how to prevent Monit from also sending alerts so you do not get alert duplicates. This will also simplify Monit’s configuration file.
1.
Remove any set mailserver, set mail-format and set alert statements from the Monit configuration file
2.
Likewise, remove any standalone set alert statements with recipients from the Monit configuration file
For instance if you have:
set mailserver...
set mail-format...
set alert...
check file monit with path "/usr/local/bin/monit"
if changed checksum then alert
alert [email protected]
Change this to:
check file monit with path "/usr/local/bin/monit"
if changed checksum then alert
Server room at night
Monit poll cycle started
alarm quietened
Appendix A
server.xml
The configuration file for M/Monit is server.xml and in this chapter we describe the configuration directives used in this file.
Directory and file names
If you specify a file that begin with "/" the server will use that absolute path. If the filename does not begin with "/", the value of the
M/Monit home directory is prepended. The M/Monit home value is automatically computed based on the location of the mmonit binary.
For instance if the mmonit binary is located in "/usr/local/mmonit/bin/mmonit" the mmonit home directory is "/usr/local/mmonit".
<Server>
The Server element represents the entire Container and is the single outermost element in the server.xml configuration file. Only one
Service elements may be nested inside a Server element
Attributes
Description
N/A
No attributes are defined for this element
<Service>
A Service element represents the combination of one or more Connector components that share a single Engine component for
processing incoming requests. The only components that may be nested inside a Service element are one or more Connector
elements, followed by exactly one Engine element.
Attributes
Description
N/A
No attributes are defined for this element
<Connector>
The Connector element represents a Connector component that supports the HTTP/1.1 protocol. It enables the M/Monit Servlet
Container to function as a stand-alone web server, in addition to its ability to execute servlets. A particular instance of this component
listens for connections on a specific TCP port number on the server. One or more such Connectors can be configured as part of a
single Service, each forwarding to the associated Engine to perform request processing and create the response.
At server startup, the Connector will create a pool of servlet request processing threads. The maximum number of threads in the
pool is specified by the attribute; processors. 10 processor threads are usually more than enough. If you change this, the number of
processor threads should probably not exceed 5 x number of CPU cores on the system. Increasing the number of processing threads
may or may not increase the throughput and speed of the server, in fact it may decrease the performance since more threads means
more overhead and context switching in the kernel.
Each incoming servlet request requires a thread for processing. Usually, only CPU bound operations are performed in the servlet
thread, while a separate Container thread handle i|/o bound operations for all servlet requests and responses. If more simultaneous
servlet requests are received than can be handled by the currently available thread pool, requests are queued up inside the
Connector, up to the systems maximum available descriptors and when a processor thread becomes available it will immediately start
to consume requests from the queue. Operating Systems allows normally anywhere from 128 to 1024 simultaneously open
descriptors per process. It is recommended to increase the limits of open file descriptors available to a process before mmonit is
started from the console. Use e.g. ulimit -n 1000 in the console before starting mmonit.
The attribute, processorTimeout sets the number of seconds a processor thread will wait for more work before timeout. The
Connector increase and reduce the number of processor threads available depending on the work load. The default timeout value is
30 seconds.
The attribute, connectionTimeout specify the number of seconds a Connector will wait, after accepting a connection, for the client to
send a HTTP request. The default value is 30 seconds.
The attributes, address and port, specify respectively the network interface M/Monit binds to and the port number M/Monit listen to for
incoming connections. Address may be specified as an IP address string, as a host name or you can use '*' to bind to all available
interfaces.
The attribute ipversion specify the IP-version the Connector should use. If not specified, IP-version 4 will be used. To support both
IPv4 and IPv6, specify two Connectors, one setting ipversion to 4 and the other setting ipversion to 6.
By default, a non-SSL HTTP/1.1 Connector is established on port 8080. You may also enable a SSL HTTP/1.1 Connector on port
8443 by uncommenting the second Connector entry in server.xml. To make a Connector secure and use SSL, set the secure attribute
to true - that's all. The Container will use TLS. SSLv2 or SSLv3 is never used. In addition, each virtual Host must specify a certificate
file to be used for that specific Host. It is possible to run the Container with both a secure Connector using SSL and a non-secure
Connector.
By default, DNS lookup is disabled and the Access Logger will log the IP address instead of the host name. You can enable DNS
lookup by setting the enableLookups attribute to "true", but notice that DNS lookups will have an adverse impact on performance if
you use an Access Logger.
Attributes
Description
enableLookups
Set to true if you want the AccessLogger to log the Host name from incoming clients connections.
Set to false to skip the DNS lookup and return the IP address in String form instead (thereby
improving performance). By default, DNS lookups are disabled.
redirectPort
If this Connector is supporting non-SSL requests, and a request is received for which a matching
<security-constraint> requires SSL transport, the Container will automatically redirect the request
to the SSL Connector port number specified here.
secure
Define if the Connector should use SSL for incoming client connection. If true, you should also set
the scheme to https otherwise. If selected you must also define the certificate file in the Host
element and the IP-address of the Host.
address
The address the Connector will accept connect requests to. If the address is not defined the
Connector will default to accepting connections on any/all local addresses
connectionTimeout
The number of seconds a Connector will wait, after accepting a connection, for client to send a
HTTP request. The default value is 30 seconds.
processors
The maximum number of request processing threads that will be used to serve HTTP requests.
The Connector create threads as needed and up to the configured number of processors. The
default value is 128 processor threads.
processorTimeout
Sets the number of seconds a processor thread will wait for more work before timeout. The
Connector increase and reduce the number of processor threads available depending on the work
load. Default value is 30 seconds.
Attributes
Description
port
The TCP port number on which a Connector will create a server socket and await incoming
connections. Your operating system will allow only one server application to listen to a particular
port number on a particular IP address. The default port is 8080.
ipversion
Specify the IP-version to be used by the Connector. Legal values are either 4 or 6. Unless
specified, IP-version 4 will be used.
contentLengthLimit
The maximum content length allowed for a Request. I.e. the maximum allowed value of the http
Content-Length header. If content is larger than this number, the server will return a 413 Request
entity too large error code. Default value is 50 MB. Value in bytes.
contentLengthBufferLimit
The size threshold limit in bytes after which uploaded content from a Request will be written to
disk instead of in-memory. Default value is 32 KB. Increasing this limit can speed up processing if
the server should handle frequent file uploads. Value in bytes.
proxyScheme
If this Connector is being used in a proxy configuration, configure this attribute to set the proxy
server scheme we should pretend request to this Connector is using. For example, you would set
this attribute to https if the proxy server is using https. The default value is http.
proxyName
If this Connector is being used in a proxy configuration, configure this attribute to specify the
server name to be returned for calls to request.getServerName(). See Proxy Support for more
information.
proxyPort
If this Connector is being used in a proxy configuration, configure this attribute to specify the
server port to be returned for calls to request.getServerPort(). See Proxy Support below for more
information.
<Engine>
The Engine element represents the entire request processing machinery associated with a particular Service. It receives and
processes all requests from one or more Connectors, and returns the completed response to the Connector for ultimate transmission
back to the client. Exactly one Engine element MUST be nested inside a Service element.
The Host defined in the defaultHost attribute is used to process Requests directed at Virtual Hosts not configured in this configuration
file. The default Host will also handle HTTP/1.0 based requests without a Host header.
The filecache attribute is used to set the file cache size for the Engine. The Engine cache static files in memory, to speed up
transmission. This is particular useful for secure SSL transmissions. The cache size attribute is set in megabytes (MB) and the default
size is 10MB. If the size is set to a value less than 1MB it is ignored and the maximum cache size set to 1MB. You can disabled the
cache by setting filecache to 0. Disabling the file cache is strongly advised against for production systems.
You can nest one or more Host elements inside the Engine element, each representing a different virtual host associated with this
server. At least one Host is required, and one of the nested Hosts MUST have a name that matches the name specified for the
defaultHost attribute, mentioned above.
You can also nest at most one instance of the following utility components inside an Engine element:
•
ErrorLogger - Configure an error logger that is used by the Server to dump error and warning messages.
•
Realm - Set the security realm database used to authenticate individual users and used by the M/Monit application.
Attributes
Description
name
The Engine name. Merely for documentation purpose.
defaultHost
The default host name, which identifies the Host that will process requests directed to host names on this
server, but which are not configured in this configuration file. This name MUST match the name attributes
of one of the Host elements nested immediately inside.
filecache
The file cache size for the Engine. Normally, the Engine cache "small" static files in memory to speed up
transmission and reserve the sendfile() OS "zero-copy" mechanism for transmitting larger files. In some
situations the "zero-copy" mechanism cannot be used, especially when files are transmitted over SSL. In
this case larger files are also cached to speed up transmission. The cache size attribute is set in MB and
the default size is 10Mb.
<Host>
The Host element represents a virtual host, which is an association of a network name for a server (such as "www.mycompany.com"
with the particular server on which the Servlet Container is running. This name must be registered in the Domain Name Service
(DNS) server that manages the Internet domain you belong to - contact your Network Administrator for more information.
In many cases, System Administrators will wish to associate more than one network name (such as www.mycompany.com and
company.com) with the same virtual host. This can be accomplished by using the alias attribute. You may add as many Host aliases
as you like, but note that a Host alias must also be a valid DNS name.
The appBase attribute defines the application root directory for the Host. This directory may contain web applications to be deployed
on this virtual host.
The certificate attribute is used to specify the SSL certificate file for the Host. Certificates must be in the PEM format and the file must
contain the following entries in this order: The Host certificate private key, the Host certificate and finally, unless this is a self-signed
certificate, the certificate of the authority that signed the Host certificate. When SSL is used, the Host IP-address is needed for the
server to know which Host to route the connection to and you must specify the IP-address of the Host by using the address attribute.
If you don't already have a SSL certificate you can create a self-signed certificate yourself using this OpenSSL command:
openssl req -new -newkey rsa:2048 -x509 -days 730 -nodes -out mmonit.pem -keyout mmonit.pem
You can nest one or more Context elements inside the Host element, each representing a different web application associated with
the virtual host.
You can also nest at most one instance of the following utility components by nesting a corresponding element inside your Host
element:
•
AccessLogger When you run a web server, one of the output files normally generated is an access log, which generates one
line of information for each request processed by the server, in a standard format.
•
Logger A Logger shared by all Contexts related to this virtual host. The Logger will process all log messages for a Host,
plus messages from Contexts and Servlets associated with the Host.
Attributes
Description
appBase
The Application Base directory for this virtual host. This is the pathname of a directory that may contain web
applications to be deployed on this virtual host. You may specify an absolute pathname for this directory, or
a pathname that is relative (to the mmonit home directory).
Attributes
Description
name
The network name of this virtual host, as registered in your Domain Name Service server. One of the Hosts
nested within an Engine MUST have a name that matches the defaultHost setting for that Engine. See the
Host Name Alias attribute below for information on how to assign more than one network name to the same
virtual host.
alias
An alias for the host. That is; a DNS C record. You can add more than one alias attribute, as long as the
Host alias represents a real DNS record.
certificate
Specify the SSL certificate file for the Host. Entries must be in the PEM format and must contain the
following entries in this order: The Host certificate private key, the Host certificate and finally, the certificate
of the authority that signed the Host certificate.
address
When SSL is used, the Host IP-address is needed for the Container to know which Host to route the
connection to.
<Context>
The Context element represents a web application, which is run within a particular virtual host. A web application is a collection of
servlets, html documents, images and other resources put in a directory structure with a standard layout.
The web application used to process each HTTP request is selected by the Container based on matching the longest possible prefix
of the Request URL against the context path of each defined Context. Once selected, that Context will select an appropriate servlet to
process the incoming request, according to the servlet mappings defined in the web application deployment descriptor file (which
MUST be located at /WEB-INF/web.xml within the web app's directory hierarchy).
You may define as many Context elements as you wish, nested within a Host element. Each such Context MUST have a unique
context path, which is defined by the path attribute. In addition, you can define a Context with a context path equal to a zero-length
string. This Context becomes the default web application for this virtual host, and is used to process all requests that do not match
any other Context's context path. If such a context is not defined in this configuration file, the Servlet Container will create a default
context with ROOT as the docBase directory.
Each Context utilize a Session Manager to manage HTTP sessions for the Context. The maxActiveSessions attribute specify the
maximum number of sessions that will be created for the Context. The manager expire idle sessions after sessionTimeout seconds. It
is possible to turn off sessions for a Context by setting the attribute maxActiveSessions to 0 or to a negative value. Note that sessions
are not enabled unless maxActiveSessions is defined and set to a positive value.
Attributes
Description
docBase
The Document Base (also known as the Context Root) directory for this web application. You may specify
an absolute pathname for this directory or a pathname that is relative to the appBase directory of the
owning Host.
path
The context path of this web application, which is matched against the beginning of each request URL to
select the appropriate web application for processing. All of the context paths within a particular Host
must be unique. If you specify a context path of an empty string (""), you are defining the default web
application for this Host, which will process all requests not assigned to other Contexts. M/Monit is setup
as the default application and must be assigned to “”.
reloadable
Set to true if you want the Servlet Container to monitor classes in WEB-INF/classes/ for changes, and
automatically reload the web application if a change is detected. This feature is very useful during
application development, but it requires runtime overhead and is not recommended for use on deployed
production applications.
sessionTimeout
The session timeout in seconds for this web application. The default value is 900 seconds (15 minutes)
saveSessions
Set to true if you want to enable persistent Sessions. I.e. Sessions are stored in the Realm database and
retained during application restart. The default value is false.
maxActiveSessions
The maximum number of active sessions that will be created by this Context. The default is 4096. If this
attribute is not used or the value is 0 or less the Context will not support sessions.
<Realm>
The Realm element specify the database to be used by M/Monit and the underlying security realm to authenticate individual users
and store HTTP sessions. If the Realm database is not defined, M/Monit will not start and abort its operation.
Connections from M/Monit to the Realm database is maintained by a database Connection Pool. The url attribute specify the
connection to the database server on a standard URL format. The format of the connection URL is defined as:
database://[user:password@][host][:port]/database[?[property1=value1][&property2=value2]...]
The property names, user and password are always recognized and specify how to login to the database. Other properties depends
on the database server in question. User name and password can alternatively be specified in the authentication part of the URL. If
port number is omitted, the default port number for the database server is used.
The optional attributes, minConnections and maxConnections, specify respectively, the minimum number of concurrent available
connection and the maximum number of database connections that can be created. The pool will dynamically increase and reduce
the number of active Connections in the pool between minConnections and maxConnections depending on the load. If not set,
minConnections is 5 and maxConnections is 20.
The attribute reapConnections specify if the Connection Pool should run a reaper thread, which will close and remove unused
Connections from the Pool. The value is sweep time in seconds. I.e. the reaper thread will sleep for reapConnections seconds,wake
up, clean up the pool if necessary and go back to sleep. If this attribute is not set, the Connection Pool will not start with a reaper
thread. It is highly recommended to activate a reaper thread for the connection pool so stale and excess connections automatically
are removed and closed.
The location of the default SQLite Realm database may be given as an absolute or relative path. If relative, the absolute path is
computed relative to M/Monit home. As mentioned above, instead of SQLite you may use MySQL or PostgreSQL as demonstrated in
the commented out Realms in server.xml.
A realm operates according to the following rules:
•
When a user attempts to access a protected resource for the first time, M/Monit will call the authenticate() method of this
Realm. Thus, any changes you have made to the database directly (new users, changed passwords or roles, etc.) will be
immediately reflected.
•
Once a user has been authenticated, the user (and his or her associated roles) are cached within the server for the duration
of the user's login. For FORM-based authentication, that means until the session times out or is invalidated; for BASIC
authentication, that means until the user closes their browser.
•
The information in the user database is controlled by the M/Monit admin/users/ page.
Only one Realm element should be defined per Server and the element is defined within an Engine element.
Attributes
Description
URL
The database to be used by M/Monit and the underlying security realm to authenticate individual users
and store HTTP sessions. Connections to the database is maintained by a Connection Pool.
minConnections
The minimum and initial number of concurrent available connections to the Realm database. The default
value is 5 connections.
maxConnections
The maximum number of connections to the Realm database.
reapConnections
Start the Realm Database Connection Pool with a reaper thread which will close and remove unused
Connections from the Pool. Value in seconds, inside the range [1..86400] sec
<ErrorLogger>
An ErrorLogger is used for logging debug and error messages (including stack tracebacks). The ErrorLogger does not buffer data but
writes directly to the log file. Each entry in the log file is prefixed with a timestamp. The ErrorLogger component is optionally and if it is
not defined the Server will write error messages to stderr.
Only one ErrorLogger element should be defined per Server and the element is defined within an Engine element.
Attributes
Description
directory
Absolute or relative pathname of a directory in which log files created by this Logger will be placed. If a
relative path is specified, it is interpreted as relative to M/Monit home.
fileName
The name of the log file the ErrorLogger will write to. The filename must not be prefixed with a path.
<AccessLogger>
The AccessLogger create log files in the same format as those created by standard web servers. These logs can later be analyzed by
log analysis tools to track page hit counts, user session activity, and so on. An AccessLogger is associated with a virtual host and will
record ALL requests processed by that Host.
The AccessLogger flush to the log file every 10 seconds or writes every 32Kb of log entries if this is reached sooner.
The log format used by an AccessLogger is the Common Log Format plus entries for Referer and User-Agent. An entry in the log file
may look like:
64.87.72.95 -
admin
[18/Oct/2013:01:10:21 +0200]
"GET /status/ HTTP/1.1"
200
3707
"http://localhost/"
-
The first field (64.87.72.95) is the hostname or IP address of the connecting machine. The second is a username from an ident
lookup. If no ident lookup was performed the '-' character is used. The third is the auth-username if authentication was performed. The
fourth is the timestamp for the request. The fifth the HTTP request sent to the server. The sixth field is the HTTP status code returned
in the response. The seventh field is the response-size, that is, the size of the response entity, not including HTTP headers. If no
entity was returned in the response the value is zero. The last two fields contains HTTP headers sent by the Browser. The field are
respectively the HTTP Referrer and the User-Agent. Note that the Browser may opt not to send any these HTTP headers in which
case the last two fields will have the value "-".
Attributes
Description
directory
Absolute or relative pathname of a directory in which log files created by this Logger will be placed. If a
relative path is specified, it is interpreted as relative to M/Monit home.
fileName
The name of the log file the AccessLogger will write to. The filename must NOT be prefixed with a path.
pattern
This attribute is reserved for future use and will be used to select a particular log format.
rotate
The rotate attribute may be used to rotate the log file (without having to restart the mmonit server). The
value is either "day", "week" or "month". If the value is "day" then on the first logged message after
midnight each day, the current log file will be closed and renamed with a postfix date and a new log file is
opened with the file name given in the fileName attribute. If the value is "week" then on the first logged
message after midnight each Saturday the log file is rotated. Likewise if the value is "month" then on the
first logged message in a new month the log file is rotated. The current log file, that is, the file the server
writes to is always the file given in the fileName attribute.
<Logger>
A Logger is associated with a Host, and Servlets registered within the Host Context can use a Logger for writing log messages to a
log file. M/Monit uses this log file to write application specific data.
Attributes
Description
directory
Absolute or relative pathname of a directory in which log files created by this Logger will be placed. If a
relative path is specified, it is interpreted as relative to mmonit home.
fileName
The name of the log file the Logger will write to. The filename must NOT be prefixed with a path.
timestamp
Set to true to cause all logged messages to be prefixed with a timestamp (the default). Set to false to skip
stamping.
<License>
M/Monit is a licensed product and comes with an evaluation license which will expire. If you have purchased a full license, replace the
License element in server.xml with your new key and restart M/Monit.
Attributes
Description
owner
The license owner. The owner is associated with the key and cannot be changed.
Appendix B
Access Control
M/Monit supports a subset of the Web Application deployment descriptor as it is defined in the Java Servlet Specification, version 2.4.
A Web Application deployment descriptor (web.xml) is used to define security constraints and other Web Application parameters. The
following web.xml descriptors are used in M/Monit:
docroot/WEB-INF/web.xml
docroot/collector/WEB-INF/web.xml
These files need not be changed and comes preconfigured. This appendix explains the configuration directives used to protect the M/
Monit web application resources. A protected resource may be a static file, servlets, Server Pages or a collection of files. To access a
protected resource a user must authenticate and supply credentials that match the security constraint for the protected resource. The
security mechanism is built into M/Monit and protecting a resource is a question of configuration.
Security-Constraint
Security constraints are used to protect access to web resources. A constraint specify the parts of a web application that are protected
and the security roles allowed to access the protected area. A constraint can also be used to limit access to clients from certain IP
addresses and require that SSL should be used.
A security constraint is specified in a web application's deployment descriptor with the security-constraint element and with the
following sub-elements: web-resource-collection, auth-constraint, ip-constraint and user-data-constraint.
<web-resource-collection>
The <web-resource-collection> element define the areas of a web application that are protected. URL-patterns are used to specify all
the URLs that are protected.
Several url-patterns may be specified inside a web-resource-collection. Each pattern must conform to one of the following types:
1. Explicit path. This pattern is used to protect one resource, for instance /secret/index.html or /secret/ (To protect sub-directories,
see the next type).
2. Path prefix, such as /secret/articles/* or /catalog/* These url-patterns begins with a / and ends with a /* and protect all resources
beginning with that prefix.
3. Extension, such as *.html, *.csp or *.zip. These patterns begins with a * and protect every file that ends with that extension.
The following example specify a web resource collection where all pages in the secret directory are protected from access.
<security-constraint>
<web-resource-collection>
<!-- Define the context-relative URL(s) to be protected -->
<url-pattern>/secret/*</url-pattern>
</web-resource-collection>
</security-constraint >
Access can also be denied for certain HTTP request methods, only. In the following example the HTTP POST method is protected
while access with other HTTP methods are allowed.
<security-constraint>
<web-resource-collection>
<url-pattern>/*</url-pattern>
<!-- If you list http methods, only those methods are protected -->
<http-method>POST</http-method>
</web-resource-collection>
</security-constraint >
<auth-constraint>
Users belongs to security roles and access control is performed against roles rather than users. The <auth-constraint> element
specify the user roles that are permitted access to a resource collection. The special reserved role name * is used to indicate all roles.
The following example define an auth-constraint where only users with the role admin are allowed access.
<security-constraint>
<web-resource-collection>
<url-pattern>/admin/*</url-pattern>
</web-resource-collection>
<auth-constraint>
<role-name>admin</role-name>
</auth-constraint>
</security-constraint>
<ip-constraint>
The <ip-constraint> element is used to specify that only clients with a certain ip address can access the resource collection. The
special * character can be used as a wild card in an ip-address string.
The following example allow access for localhost and clients from 80.69.226.* Clients from other ip-addresses will be denied access.
<security-constraint>
<web-resource-collection>
<url-pattern>/*</url-pattern>
</web-resource-collection>
<ip-constraint>
<ip-address>127.0.0.1</ip-address>
<ip-address>80.69.226.*</ip-address>
</ip-constraint>
</security-constraint>
<user-data-constraint>
The <user-data-constraint> element define how data should be protected during transfer between client and server, in the <transportguarantee> sub-element. Legal values for this element are NONE, INTEGRAL or CONFIDENTIAL. The values, INTEGRAL and
CONFIDENTIAL, require data to be transported over a secure connection, while NONE indicate no special requirements. In practice,
specifying a transport-guarantee of INTEGRAL or CONFIDENTIAL means that data will be transported over a TSL or SSL connection.
CONFIDENTIAL indicate that strong encryption should be used.
The following example configure a web resource collection where access to the directory /confidential/ must be done over TSL
(HTTPS).
<security-constraint>
<web-resource-collection>
<url-pattern>/confidential/*</url-pattern>
</web-resource-collection>
<user-data-constraint>
<transport-guarantee>CONFIDENTIAL</transport-guarantee>
</user-data-constraint>
</security-constraint>
If a secure <connector> is setup for M/Monit, then access to the directory /confidential/ over http will automatically be redirected to
https. If no secure <connector> is setup for M/Monit, trying to access /confidential/ over http will return a forbidden error page.
Authentication
Authentication is the process by which clients provide credentials that are verified by the server. If the credentials are accepted the
client is granted access. Generally, credentials are username and passwords but can also be client certificates (X509). Authentication
with username and password is conducted against a security realm database defined in server.xml in the <Realm> element. The user
database is maintained in M/Monit via admin/users.
Login-Config
The <login-config> element is used to configure how authentication should be performed. There can be only one login-config element
per web application. The following authentication methods are supported: HTTP Basic Authentication, Form Based Authentication and
HTTPS Client Authentication (currently not supported in M/Monit).
The <login-config> element consists of the following sub-elements: auth-method, realm-name and form-login-config. The auth-method
element specify the authentication method. Legal values for this element are one of BASIC, FORM or CLIENT-CERT. The realmname element indicate the realm name to be used for Basic Authentication and finally the form-login-config element specifies the
login and error page to be used with the form login authentication method.
HTTP Basic Authentication
Basic Authentication, described in RFC 2617, is a simple challenge-response
authentication mechanism defined at the HTTP protocol level. Using Basic
Authentication, the server will challenge a client when it tries to access a
protected web area by sending a 401 (Unauthorized) response to the client.
Upon receiving this response the client browser will open a dialog where the user
can enter a username and a password, such as the one shown here.
The browser sends the username and password (base64 encoded) to the server
in an HTTP Authorization header. The server authenticate the submitted
credentials against the security realm database and if accepted sends the requested page back to the client in a standard response.
(If the credentials are not accepted the server sends another 401 (Unauthorized) response message, prompting the browser to
display the login dialog again.)
Once authenticated, a browser will continue to send the Authorization header with every subsequent request. Thus, the concept of
logout does not exist with Basic Authentication and the only way to stop the browser from sending the information is to restart the
browser.
The following example configure a login-config element to use Basic Authentication. Notice that the realm-name is displayed in the
browser's login dialog. A browser may also use the realm name internally to decide which credentials to send.
<login-config>
<auth-method>BASIC</auth-method>
<realm-name>Example Protected Area</realm-name>
</login-config>
Form Based Authentication
The advantage of using Form Based Authentication over
Basic Authentication is that a custom login page can be used
to ask users for a username and a password. Another
advantage is that users can logout from a web area
protected by form based authentication.
The M/Monit login page is an example of a page which uses
Form Based Authentication.
The only requirements for a login page is that it must contain
fields for entering a username and a password. These fields must be named z_username and z_password, respectively and the form
action must be z_security_check. This example show how the login form could be coded in HTML:
<form method="POST" action="z_security_check">
<input type="text" name="z_username">
<input type="password" name="z_password">
<input type="submit" value="Login">
</form>
The following diagram illustrate the authentication process:
1. Upon access to a protected area the M/Monit server determines if the
client has been previously authenticated, if this is the case, the
requested page is sent back to the client.
Protected Area
1
Request
2. If the client has not been authenticated, the M/Monit server stores the original
request URL and displays a login page. The client posts a login form back to the
M/Monit server and the server attempts to authenticate the user credentials
embedded in the form. If authentication fails the server returns an error page. If
authentication succeeds, the server checks if the authenticated user belongs to a
security role that is authorized to access the requested page. If the user is
authorized the server redirects the request to the original stored request URL. If
the user is not authorized to access the requested page the M/Monit server will
send a 403 Forbidden response back to the client.
Requested Page
Authenticated?
2
Login Page
Authenticated
Authentication or authorization failed
Error Page
Form Based Authentication utilize HTTP session and clients must support cookies. If the session timeout or is invalidated, the user is
logged out and subsequent requests requires the user to re-authenticate.
To logout a user, a servlet can invalidate the session by calling the HttpSession_invalidate() method or a ServerPage can be used to
invalidate the session. This last alternative is used in M/Monit, and the ServerPage we use is docroot/login/logout.csp.
The following example configure a login-config element to use Form Based Authentication:
<login-config>
<auth-method>FORM</auth-method>
<form-login-config>
<form-login-page>
/login.html
</form-login-page>
<form-error-page>
/error.html
</form-error-page>
</form-login-config>
</login-config>
The form-login-page and form-error-page elements must contain a relative URL value starting with '/' and the path must be located
within the context document root. The URL path may refer to a servlet, a HTML page or a ServerPage.
HTTPS Client Authentication
This authentication method is a strong authentication mechanism and employ HTTPS client certificates to verify the authenticity of a
connecting client. Clients must posses a Public Key Certificate known by the server. The client must connect to the server over SSL
and the server ask the client to send its certificate. Upon receiving the certificate the server compares the certificate to a library of
existing certificates. Access is granted if the client certificate is in the library.
The following example configure a login-config element to use HTTPS client certificates Authentication:
<login-config>
<auth-method>CLIENT-CERT</auth-method>
</login-config>
This authentication method is currently not supported in M/Monit, but we are considering adding it together with LDAP authentication
in a later version.
Example
For an example of a web.xml document using a security constraint and a Form Based login method, see M/Monit’s own deployment
descriptor in docroot/WEB-INF/web.xml and for Basic Authentication, see docroot/collector/WEB-INF/web.xml.
CSRF-protection
Cross-Site Request Forgery (CSRF) is a type of attack that occurs when a malicious Web site, email, blog, instant message, or
program causes a user’s Web browser to perform an unwanted action on a trusted site for which the user is currently authenticated.
M/Monit protect against CSRF attacks by using a scheme called Double Submit Cookies. In short, this means that M/Monit requires
that the authenticated session cookie is submitted with the request as usual, but that the value is also repeated in either a request
parameter or in a HTTP header, of which an attacker cannot replicate as they cannot read the cookie. The M/Monit web-application is
automatically configured to perform CSRF-protection.
If you use M/Monit’s HTTP-API from your own program, CSRF might not be a concern. If this is the case, use the z_csrf_protection
parameter during login and set it to off in which case CSRF-protection will be turned off. Otherwise, you must read the CSRF-Token
from M/Monit’s session API and submit the token in a HTTP header or as a request parameter with each POST request to /admin/
Configuration
CSRF-protection is configured in web.xml in the <web-resource-collection> element. Protected URLs should be wrapped in a <csrfprotect> element. If you list http-methods, only those methods are CSRF-protected, otherwise all http methods will be protected. In
general, you will not need to protect GET requests unless they have side-effects, such as performing an action other than fetching a
resource. Here is an example of a security constraint element which uses CSRF-protection and where only the POST method is
protected.
<security-constraint>
"
<web-resource-collection>
"
"
<csrf-protect>
"
"
"
<url-pattern>/admin/*</url-pattern>
"
"
</csrf-protect>
"
"
<!-- If you list http methods, only those methods are protected -->
" <http-method>POST</http-method>
"
</web-resource-collection>
</security-constraint >
M/Monit behind a proxy
M/Monit can be used from behind a proxy server. Here is an example on how to configure the proxy in front of M/Monit. In this
example M/Monit listens on http://192.168.1.10:8080 and we configure a HTTP proxy so M/Monit is accessible via the sub-path
/mmonit/ That is, http://proxy.address/mmonit/
Apache with mod_proxy
<Location /mmonit/>
Order deny,allow
Allow from all
</Location>
ProxyPass /mmonit/ http://192.168.1.10:8080/ disablereuse=on
ProxyPassReverse /mmonit/ http://192.168.1.10:8080/
Nginx proxy
location /mmonit/ {
rewrite ^/mmonit/(.*) /$1 break;
proxy_pass http://192.168.1.10:8080;
proxy_redirect http://192.168.1.10:8080 /mmonit;
}
The above configuration tells Apache or Nginx to forward URLs of the form http://proxy.address/mmonit/* to M/Monit running on
192.168.1.10 and listening on port 8080.
When you are running M/Monit from behind a proxy server (or a web server that is configured to behave like a proxy server) you will
sometimes prefer the hostname and port number to reflect that specified in the original request, not the one on which M/Monit itself is
listening. This can be achieved by using the proxyName and proxyPort attributes in the <Connector> element.
Configure the <Connector> element in server.xml, with appropriate proxy settings, for example:
<Connector port="8080" ...
proxyName="proxy.address"
proxyPort="80"/>
this will cause M/Monit to think that all proxied requests were directed to proxy.address on port 80. This is particularly useful when
M/Monit performs redirects from the login page or other pages inside its web-app. Otherwise these redirects will contain the hostname
and port number of M/Monit. It is valid to omit the proxyName attribute from the <Connector> element. If you do so, the value used in
URLs emitted by M/Monit will be the host name on which M/Monit is running. In the example above, it would be localhost.
Another option is to use a sub-domain rather than a sub-path. In this case, access to M/Monit will go via an URL that looks like,
https://mmonit.proxy.address/ In this example, the HTTP proxy server will also be using https, but M/Monit will continue to use http.
This setup requires that the proxyScheme attribute in M/Monit’s Connector is set to https even though the Connector itself is using
http. The reason is that redirects from M/Monit must use the https scheme to match the proxy server’s scheme.
<Connector port="8080" ...
"
"
proxyScheme=”https”
proxyName="proxy.address"
proxyPort="443"/>
Apache configuration for https://mmonit.proxy.address rather than https://proxy.address/mmonit/ will be something like:
<VirtualHost *:443>
ServerName mmonit.proxy.address:443
ProxyPass / http://192.168.1.10:8080/
ProxyPassReverse / http://192.168.1.10:8080/
SSL & other config..
</VirtualHost>