1
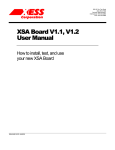
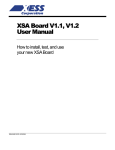
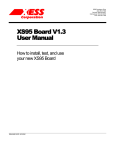
XSUSB Interface Board V1.0 User Manual How to install and use your new XSUSB Board RELEASE DATE: 9/28/2007 Copyright © 2007 by X Engineering Software Systems Corporation. All XS-prefix product designations are trademarks of XESS Corp. All XC-prefix product designations are trademarks of XILINX. All rights reserved. No part of this publication may be reproduced, stored in a retrieval system, or transmitted, in any form or by any means, electronic, mechanical, photocopying, recording, or otherwise, without the prior written permission of the publisher. Printed in the United States of America. XSUSB INTERFACE BOARD V1.0 USER MANUAL 1 Table of Contents Table of Contents .............................................................................................2 Preliminaries .....................................................................................................3 Getting Help!.................................................................................................3 Take Notice!!.................................................................................................3 Packing List ..................................................................................................3 Installation .........................................................................................................4 Installing the XSTOOLS Utilities and Documentation ................................4 Setting the Jumpers on Your XSUSB Board..............................................4 Connecting the XSUSB Board to Your XSA or XSB Board ......................5 Connecting a PC to Your XSUSB Board....................................................5 Applying Power ............................................................................................8 Testing Your XSUSB Board ........................................................................8 Programming ..................................................................................................10 Using the XSTOOLs Utilities with the XSUSB Board...............................10 FPGA Bitstream Generation Options When Using the XSUSB..............10 FPGA Bitstream Generation Options When Using the Flash..................11 XSUSB Schematics........................................................................................12 XSUSB INTERFACE BOARD V1.0 USER MANUAL 2 1 Preliminaries Getting Help! Here are some places to get help if you encounter problems: If you can't get the XSUSB Board hardware to work, send an e-mail message describing your problem to [email protected] or submit a problem report at http://www.xess.com/help.php3. Sign-up for our email forum where you can post questions to other XS Board users. Take Notice!! The XSUSB Board works only with the XSA-50, XSA-100, XSA-200, XSA-3S1000 and XSB-300E Boards. It is not compatible with any of the XS40, XS95 or XSV Boards! The XSUSB Board gets its power through the USB cable. It does not require an external power supply! However, the XSUSB Board does not supply power to the XS Board it is attached to; you still need an external power supply for the XS Board. Even if you have experience with the XILINX software tools, please read this section on setting the FPGA bitstream generation options for the XSUSB Board. Packing List Here is what you should have received in your package: an XSUSB Board; a 6' USBA-to-USBB cable; an XSTOOLS CDROM containing the XSTOOLs software utilities and documentation for all XESS products. XSUSB INTERFACE BOARD V1.0 USER MANUAL 3 2 Installation Installing the XSTOOLS Utilities and Documentation XESS Corp. provides the XSTOOLS utilities for interfacing a PC to your XS Board through the parallel and USB ports. These utilities should be installed automatically when you insert the XSTOOLs CDROM into your CDROM drive. If not, then manually run the SETUP.EXE installation program on the CDROM. Setting the Jumpers on Your XSUSB Board There are four jumpers on the XSUSB Board and shunts should be set on them as shown below. A shunt should be on jumper JP2. There should not be any shunts on jumpers JP1, JP3 or JP4. XSUSB INTERFACE BOARD V1.0 USER MANUAL 4 Connecting the XSUSB Board to Your XSA or XSB Board Just push the male DB25 connector on the XSUSB Board into the female DB25 connector on your XSA or XSB Board as shown in Figure 1. The fit of the connectors will keep the XSUSB Board in place, but you can also use the mounting screws to prevent the boards from separating. Don’t worry if the metal shell on the XSUSB DB25 connector is loose. The shell will be held in place when the XSUSB and XS Board are connected. Note that the XSUSB Board works only with the XSA-50, XSA-100, XSA-200, XSA3S1000 and XSB-300E Boards. It is not compatible with any of the XS40, XS95 or XSV Boards! USB Cable USBB Port XSUSB Board XSA-3S1000 Board Mounting Screw Figure 1: Connection of the XSUSB Board to an XSA-3S1000 Board. Connecting a PC to Your XSUSB Board Attach the USBA plug of a USB 1.1 or USB 2.0 cable to a USB port on your PC. Then attach the USBB plug on the other end of the cable to the USBB port of the XSUSB Board. XSUSB INTERFACE BOARD V1.0 USER MANUAL 5 The PC will need to install a USB driver if this is the first time you have connected an XSUSB Board to this particular USB port. Just select the option and click on the indicated button shown in each of the following screenshots and the driver will be installed. XSUSB INTERFACE BOARD V1.0 USER MANUAL 6 The LED on the XSUSB Board will turn on once the driver has been installed and the USB port is activated. XSUSB INTERFACE BOARD V1.0 USER MANUAL 7 Applying Power The XSUSB Board gets its power through the USB cable. It does not require an external power supply. However, the XSUSB Board does not supply power to the XS Board it is attached to; you still need an external power supply for the XS Board. Testing Your XSUSB Board The easiest way to test your XSUSB Board is to try testing the XS Board it is attached to using the GUI-based GXSTEST utility as follows. You start GXSTEST by clicking on the icon placed on the desktop during the XSTOOLS installation. This brings up the window shown below. First, select the type of XS Board connected to the XSUSB Board in the Board Type pulldown list (in this case, the XSA-3S1000). XSUSB INTERFACE BOARD V1.0 USER MANUAL 8 Next, select the USB port that your XSUSB Board is connected to from the Port pulldown list. If you only have one XSUSB Board connected, then it will probably be USB0. (If no USB ports appear in the pulldown list, then either the XSUSB Board is not working or there was a problem installing the driver software.) Now click on the TEST button to start the testing procedure. GXSTEST will configure the FPGA to perform a test procedure on the XSA-3S1000 Board. The LED on the XSUSB Board will blink during the FPGA configuration and testing processes. Within thirty seconds you will see a O displayed on the LED digit if the test completes successfully. Otherwise an E will be displayed if the test fails. A status window will also appear on your PC screen informing you of the success or failure of the test. Regardless of the result of the test, your XSUSB Board is operating correctly if you have reached this point. XSUSB INTERFACE BOARD V1.0 USER MANUAL 9 3 Programming Using the XSTOOLs Utilities with the XSUSB Board The XSUSB Board does not significantly alter the procedures for downloading logic designs into the FPGA and CPLD of your XSA or XSB Board or for downloading/uploading data to/from the SDRAM and Flash devices on the board. The only change is that you must select the USB port instead of the parallel port in the Port pulldown list of the GUI-based XSTOOLs utilities. For the command-line-based XSTOOLs utilities, use the option –usb 0 to select the USB0 port. FPGA Bitstream Generation Options When Using the XSUSB You use the XILINX ISE software to generate the .BIT file that is downloaded to the FPGA through the XSUSB Board. Steps for doing this are given in the XILINX documentation, but there is one detail that is specific to using the XSUSB Board. The XSUSB Board loads the bitstream into the FPGA through its JTAG port. In order for your FPGA designs to startup correctly, you need to change the FPGA Start-Up Clock from CCLK to JTAG Clock. This is done by right-clicking on the Generate Programming File item in the Processes pane and selecting Properties... from the pop-up menu. XSUSB INTERFACE BOARD V1.0 USER MANUAL 10 Then select the Startup Options tab in the Process Properties window and change the FPGA Start-Up Clock to JTAG Clock. Then click on the OK button. After this option is set, you can generate your bitstream and download it to the FPGA through the XSUSB Board. FPGA Bitstream Generation Options When Using the Flash Once your design is working correctly, you might want to store its bitstream in the nonvolatile flash memory of your XSA or XSB Board so the FPGA will start to function as soon as power is applied. In this case, you will need to change the FPGA Start-Up Clock to the CCLK option and regenerate the bitstream (see the previous section for the steps to do this). If you leave the FPGA Start-Up Clock as the JTAG Clock, then your design will not startup correctly when it is transferred from the flash into the FPGA. Once the bitstream is generated with the CCLK as the startup clock, you will need to use the promgen utility to convert the .BIT file into a form that can be loaded into the flash on your XSA or XSB Board. Please see the manual for your XSA or XSB Board for the exact conversion procedure. XSUSB INTERFACE BOARD V1.0 USER MANUAL 11 A XSUSB Schematics The detailed schematic for the XSUSB Board is shown below. XSUSB INTERFACE BOARD V1.0 USER MANUAL 12