1
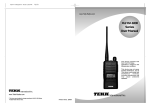
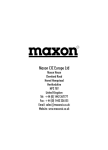
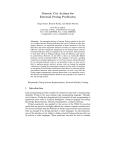
XU/XV-1000S/E Series User Manual
▶▶▶▶▶
This device complies with Part
15 of FCC Rules.
Operation is subject to the
following two conditions:
This device may not cause
harmful interference, and 2)
This device must accept any
interference received, including
interference that may cause
undesired operation.
www.Tekk-Radios.com
* This User manual subject to change according to XU/XV-1000S/E Series
Portable Radio without notice.
Printed in Korea. 200808
www.Tekk-Radios.com
www.Tekk-Radios.com
1. Precautions
Table of Contents
1. Precautions
2. Appearance of XU/XV-1000S/E Series Radio
3. Basic Operation of XU/XV-1000S/E Series Radio
4. Charging the Battery
5. Operating Instructions of XU/XV-1000 S/E Series Radio
1
2
3
4
5
Thank you for your purchase of the XU/XV-1000S/E Series Radio.
1. When using the Radio, please read the enclosed user guide in details.
2. The functions and specifications are subject to be changed without notice for
improvement of the Radio performance.
Don’t remove the antenna from the Radio or don’t transform the antenna or
don’t make any change on the antenna. The strong electronic wave to be
emitted from the Radio can have an effect on the performance of the Radio
and can cause the Radio to have a defect.
Don’t disassemble or reorganize the Radio. The disassembly or
reorganization will be causes of defect or malfunction and it will be impossible
to make repair afterward. Also, a punishment can be made by law.
Don’t use the other frequency except for the permitted frequency in order not
to be punished by law.
Don’t give an excessive shock to the Radio.
Don’t place the Radio where the direct sunlight and/or the high temperature
occurs.
If the Radio is placed for a long time in car in summer, the hot temperature
in the car may cause an explosion of battery.
Sharp substance and/or an excessive shock may cause damage to the
battery.
In case of the area that medical equipments are being used, please use the
Radio after discussion with the equipment maker or the related doctor.
Radio
Battery Pack
Adaptor
Please don’t use the Radio at the place where computer or other electric/
electronic devices are being used, because the strong electronic wave from
the Radio can have an effect on the equipments.
Charger
Antenna
Belt Clip
User Manual
Please keep the Radio away at least 1inch from the body.
If the outside surface of antenna gets stripped out, it can make a burn on
the skin.
If you contact a conductive metal to battery terminal, a heat can be made
and it may cause fire, explosion and burn. Especially, please be careful
when putting the battery in a pocket or a bag.
When using an earphone, please don’t listen to the sound at a high level.
The high sound may have a bad effect on your ear.
* Components could be changed by buyer request.
1
www.Tekk-Radios.com
3. Appearance of XU/XV-1000S/E Series Radio
1. On/Off/Volume Control
Turns the radio on and off and adjusts
audio volume level.
Antenna
3. Channel
control
1. On/Off/
Volume control
2. PTT Button
2. PTT Button(Push-To-Talk Button)
3. Basic Operation of XU/XV-1000S/E Series Radio
Please read this manual carefully before using XU/XV-1000S/E series Radio.
This manual contains important information about using Radio.
▶ 3.1 Installation and Removal of the Antenna
Radio transmission button. It is recommended to
talk 5~10cm away from the micro phone for the
best voice communication.
3. Channel Control
16 channels are selectable by rotary switch.
14. Belt Clip
4 Monitor Button(M)
8. Speaker
The monitor mode is enabled and disabled by
9. Mic Jack
5. Menu Button(P)
pressing the Monitor button (M) on the side.
Normal Mode : During pressing the Monitor
button(M) for about 2 seconds, it is possible to
check the receiving status.
Continuous Mode : During pressing the Monitor
button(M) for more than 2 seconds, the Radio
will make a “Beep” tone, which means the
monitor function is maintained and if you press
the Monitor button(M) again, the monitor
function will be released.
4. Monitor Button(M)
5. Menu Button(P)
Available to use for scan function.
6. Accessory Connector
The Accessory Connector is used when using an
external speaker microphone or doing PC
programming or making the Cloning or using as a
Repeater.
6. Accessory
Connector
13. Antenna Connector
1. On/Off/
Volume control
Battery Pack
7. RX/ TX LED
10. Emergency Button
(XU/XV-1000E Only)
2
When installation of the antenna, giving a strong pressure to the Radio or pulling the antenna with a
strong power from the Radio can make a damage on the antenna connector, which may cause the
Radio to have a critical problem.
▶ 3.2 Installation and Removal of the Battery
Installation of the
Battery
3.2.1 Installation of the battery
To install battery, slide up the battery towards the top of the
radio until battery latch is locked.
3.2.2 Removing the Battery
- Slide the battery latch located on the bottom of radio to
the open position as shown in figure 3-2.
- The battery is removed by pressing it against and sliding it
towards the bottom of the radio.
Removing the
Battery
7. RX /TX Led
This LED is a lamp indicating the current status of
the Radio and please refer to the below contents.
① RX : Green Lamp.
② TX : Red Lamp.
③ CTCSS, DCS Error : Green Blinks.
④ Low Battery: Red Blinks with “beep” sound.
11. Battery Locker
figure 3-1) Installation and Removal of the Antenna
8. Speaker : 1W
9. Mic : It is recommended to talk 5~10cm
away from the mic.
10. Emergency Button (XU/XV-1000E Only)
11. Battery Locker : This is for separation of
battery.
12. Battery
13. Antenna Connector
14. Belt Clip
figure 3-2) Installation and
Removal of the Battery
▶ 3.3 Installation and Removal of the Belt Clip
- To attach belt clip to radio, align belt clip rails with the
grooves in radio and slide the belt clip onto the mounting
rails until it latches into place.
- To remove belt clip from radio, push up on tab of belt clip
with flat bladed screwdriver and at the same time, slide
the belt clip towards the top of Radio(figure 3-3).
figure 3-3) Installation and Removal of
the Belt Clip
3
www.Tekk-Radios.com
4. Charging the Battery
5. Operating Instructions of XU/XV-1000S/E Series Radio
▶ 4.1 Safety Notes
Functions
1) The radio of XU/XV-1000S/E series receives power from high-performance Li-ion battery (XSB-2400).
XSB-2400 Battery is safe of high performance and highly reliable, and could be charged very fast.
XSB-2400 Battery has been designed suitably only for the charger of Tekk International Inc (DC-1000).
The charging of the enclosed Radio on the other maker’s charger will cause
damage to the battery and the Radio.
On/Off/Volume Control
2. Transmit (TX)
PTT Button
3. Receive (RX)
4. Channel change
2) Please charge the battery before using the radio for best performance and safety.
3) When you charge the battery that is installed in the Radio, please turn off the radio first to charge the
battery.
The continuous rapid discharge (for example, when making a short circuit on the ‘+, -’
terminals of battery by a metal substance) may make a fatal defect and the battery can be
exploded. Also, it can cause a fire.
4) Using the correct battery will improve the efficiency and safety.
▶ 4.2 The Time of Charging
LED Status
H: Red
L: Orange
Green
▶ 4.3 How to Charge
1) Plug the Adaptor for DC-1000 charger into the electricity power outlet.
2) When charging the Radio with the battery installed, please turn off the power of the Radio and place
the Radio on the charger (The charger has a slide slot.).
3) After completion of the charging, the green LED on the charger will light. However, please continue the
charging for 30 more minutes for the complete full charge.
status
During charging
When charging
After charging
Detecting error
LED Indication
Red LED lights
Green LED lights
Green LED lights
Red LED blinks
▶ 4.4 Charger (DC-1000)
The DC-1000 charger is designed to charge only the Li-ion battery enclosed in this Radio.
Specifications of DC-1000 Charger / Adaptor
• BATTERY
: XSB-2400
• QUICK CHARGING TIME : In 4 and half hours
Descriptions
“Beep” sound is heard.
Possible to set by PTT Button + Menu
Button(P)
In abnormal status, the Green LED blinks.
Place the Channel Knob on the position
where you want to locate.
Channel Switch
High: PTT Button+Menu Button(P)
5. Adjustment of
TX Output Power Low: PTT Button+Monitor Button(P)
6. Scan
Menu Button(P)
7. VOX
Setting by PC Programming
8.Compander
Setting by PC Programming
Both Normal Scan and Priority Scan are
available.
This is for transmitting voice without pressing
the PTT Button.
Original: PTT+On
Orange
Copy: Menu Button(P)+On
Green
9
C
.o
ln
n
ig
Low battery voltage will make the radio have less coverage and also make the performance worse.
Please charge the battery in case of following:
1) When you think performance of the radio becomes lower
2) When the red lamp on RX/ TX Led blinks (every 0.5 second) during transmission or reception
3) When “beep” sound is generated while the radio is in use.
4
Key & Setting
1. Power On/Off
Green: Good
In case of low Battery, the Red LED blinks
Orange: Sufficient and the Radio is turned off.
Red: Insufficient
10. Indication of
Battery Voltage
11. Stun
12. Scramble
This is for deleting noise.
After connecting the Cloning cable, start by
pressing the Monitor button(M) of original
Radio.
When succeeded, the Green LED lights and
when failed, the Red LED lights.
Menu Button(P)+Monitor Button(M)
Red, Green
Repeater base station can control the
operation of Radio from the location where
is far away from the base station.
This is for protection of your voice from
other people.
Monitor Button(P)
13. Monitor
Setting by PC Programming
14. BCL/BCLO
Setting by PC Programming
User can check whether the RX of current
channel is OK or not.
During normal RX, it is for blocking of TX
15. TOT
Setting by PC Programming
This is for control of transmission time.
16. 2 Tone
Setting by PC Programming
17. Lone Worker
Setting by PC Programming
18. Emergency
(XU/XV-1000E
Only)
Setting by PC Programming
Green
This is for transmission of emergency alarm
when no transmission during a period of time.
In case of emergency situation, if you press
the Emergency button in orange color for
more than 2 seconds, a siren sound for
emergency call will be heard through the
speaker built in the Radio or the Radio will
transmit the emergency signal to your party.
5